 Skip to main content
Programming a device driver for Linux requires a deep understanding of the operating system and strong development skills. To help you master this complex domain, Apriorit driver development experts created this tutorial.
We’ll show you how to write a device driver for Linux (5.15.0 version of the kernel). In doing so, we’ll discuss the kernel logging system, principles of working with kernel modules, character devices, the file_operations structure, and accessing user-level memory from the kernel. You’ll also get code for a simple Linux driver that you can augment with any functionality you need.
This article will be useful for development teams interested in Linux device driver programming.
Contents:
Getting started with the Linux kernel module
The Linux kernel is written in the C and Assembler programming languages. C implements the main part of the kernel, while Assembler implements architecture-dependent parts. That’s why we can use only these two languages for Linux device driver development. We cannot use C++, which is used for the Microsoft Windows kernel, because some parts of the Linux kernel source code (e.g. header files) may include keywords from C++ (for example, delete or new), while in Assembler we may encounter lexemes such as ‘ :: ’.
There are two ways of a Linux device driver programming:
- Compile the driver along with the kernel, which is monolithic in Linux.
- Implement the driver as a kernel module, in which case you won’t need to recompile the kernel.
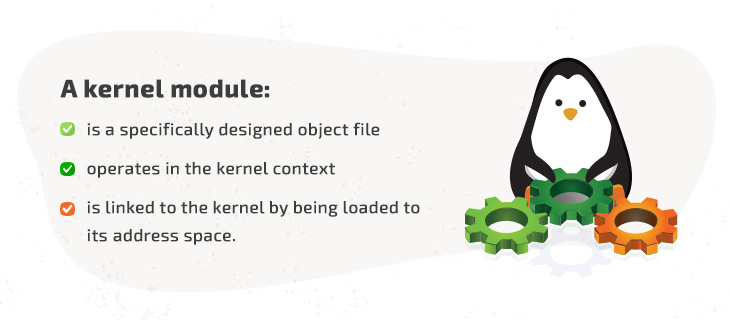
In this tutorial, we’ll develop a driver in the form of a kernel module. A module is a specifically designed object file. When working with modules, Linux links them to the kernel by loading them to the kernel address space.
Module code has to operate in the kernel context. This requires a developer to be very attentive. If a developer makes a mistake when implementing a user-level application, it will not cause problems outside the user application in most cases. But mistakes in the implementation of a kernel module will lead to system-level issues.
Luckily for us, the Linux kernel is resistant to non-critical errors in module code. When the kernel encounters such errors (for example, null pointer dereferencing), it displays the oops message — an indicator of insignificant malfunctions during Linux operation. After that, the malfunctioning module is unloaded, allowing the kernel and other modules to work as usual. In addition, you can analyze logs that precisely describe non-critical errors. Keep in mind that continuing driver execution after an oops message may lead to instability and kernel panic.
The kernel and its modules represent a single program module and use a single global namespace. In order to minimize the namespace, you must control what’s exported by the module. Exported global characters must have unique names and be cut to the bare minimum. A commonly used workaround is to simply use the name of the module that’s exporting the characters as the prefix for a global character name.
With this basic information in mind, let’s start writing Linux device drivers.
Does your next project need custom drivers?
Leverage Apriorit’s expertise in developing, testing, and securing dozens of quality Linux drivers for real and virtual devices.
Creating a kernel module
We’ll start by creating a simple prototype of a kernel module that can be loaded and unloaded. We can do that with the following code:
#include <linux/init.h>
#include <linux/module.h>

static int my_init(void)
{
    return  0;
}

static void my_exit(void)
{
    return;
}

module_init(my_init);
module_exit(my_exit);
The my_init function is the driver initialization entry point and is called during system startup (if the driver is statically compiled into the kernel) or when the module is inserted into the kernel. The my_exit function is the driver exit point. It’s called when unloading a module from the Linux kernel. This function has no effect if the driver is statically compiled into the kernel.
These functions are declared in the linux/module.h header file. The my_init and my_exit functions must have identical signatures such as these:
int init(void);
void exit(void);
Now our simple module is complete. Let’s teach it to log in to the kernel and interact with device files. These operations will be useful for Linux kernel driver development.
Registering a character device
Please note that in this article, we describe the most basic way to register a character device that works best when you need to create a device class from the kernel module. While using this method, you need to use the mknod /dev/simple-driver c 250 0 bash command after loading a module to create the needed file in the /dev folder and keep your code simple.
Device files are usually stored in the /dev folder. They facilitate interactions between the user space and the kernel code. To make the kernel receive anything, you can just write it to a device file to pass it to the module serving this file. Anything that’s read from a device file originates from the module serving it.
There are two groups of device files:
- Character files — Non-buffered files that allow you to read and write data character by character. We’ll focus on this type of file in this tutorial.
- Block files — Buffered files that allow you to read and write only whole blocks of data.
Linux systems have two ways of identifying device files:
- Major device numbers identify modules serving device files or groups of devices.
- Minor device numbers identify specific devices among a group of devices specified by a major device number.
We can define these numbers in the driver code, or they can be allocated dynamically. In case a number defined as a constant has already been used, the system will return an error. When a number is allocated dynamically, the function reserves that number to prevent other device files from using the same number.
To register a character device, we need to use the register_chrdev function:
int register_chrdev (unsigned int   major,
                     const char *   name,
                     const struct file_operations * fops);
Here, we specify the name and the major number of a device to register it. After that, the device and the file_operations structure will be linked. If we assign 0 to the major parameter, the function will allocate a major device number on its own. If the value returned is 0, this indicates success, while a negative number indicates an error. Both device numbers are specified in the 0–255 range.

The device name is a string value of the name parameter. This string can pass the name of a module if it registers a single device. We use this string to identify a device in the /sys/devices file. Device file operations such as read, write, and save are processed by the function pointers stored within the file_operations structure. These functions are implemented by the module, and the pointer to the module structure identifying this module is also stored within the file_operations structure (more about this structure in the next section).
Related project
Developing Drivers for Low Latency Virtual Reality Headsets
Explore how we collaborated with a device manufacturer to deliver a WHQL-certified custom driver that helps their device operate with 3–10 ms of latency and ~11 Gbps data transmission speed.

The file_operations structure
In the Linux 5.15.0 kernel, the file_operations structure looks like this:
struct file_operations {
	struct module *owner;
	loff_t (*llseek) (struct file *, loff_t, int);
	ssize_t (*read) (struct file *, char __user *, size_t, loff_t *);
	ssize_t (*write) (struct file *, const char __user *, size_t, loff_t *);
	ssize_t (*read_iter) (struct kiocb *, struct iov_iter *);
	ssize_t (*write_iter) (struct kiocb *, struct iov_iter *);
	int (*iopoll)(struct kiocb *kiocb, bool spin);
	int (*iterate) (struct file *, struct dir_context *);
	int (*iterate_shared) (struct file *, struct dir_context *);
	__poll_t (*poll) (struct file *, struct poll_table_struct *);
	long (*unlocked_ioctl) (struct file *, unsigned int, unsigned long);
	long (*compat_ioctl) (struct file *, unsigned int, unsigned long);
	int (*mmap) (struct file *, struct vm_area_struct *);
	unsigned long mmap_supported_flags;
	int (*open) (struct inode *, struct file *);
	int (*flush) (struct file *, fl_owner_t id);
	int (*release) (struct inode *, struct file *);
	int (*fsync) (struct file *, loff_t, loff_t, int datasync);
	int (*fasync) (int, struct file *, int);
	int (*lock) (struct file *, int, struct file_lock *);
	ssize_t (*sendpage) (struct file *, struct page *, int, size_t, loff_t *, int);
	unsigned long (*get_unmapped_area)(struct file *, unsigned long, unsigned long, unsigned long, unsigned long);
	int (*check_flags)(int);
	int (*flock) (struct file *, int, struct file_lock *);
	ssize_t (*splice_write)(struct pipe_inode_info *, struct file *, loff_t *, size_t, unsigned int);
	ssize_t (*splice_read)(struct file *, loff_t *, struct pipe_inode_info *, size_t, unsigned int);
	int (*setlease)(struct file *, long, struct file_lock **, void **);
	long (*fallocate)(struct file *file, int mode, loff_t offset,
			  loff_t len);
	void (*show_fdinfo)(struct seq_file *m, struct file *f);
#ifndef CONFIG_MMU
	unsigned (*mmap_capabilities)(struct file *);
#endif
	ssize_t (*copy_file_range)(struct file *, loff_t, struct file *,
			loff_t, size_t, unsigned int);
	loff_t (*remap_file_range)(struct file *file_in, loff_t pos_in,
				   struct file *file_out, loff_t pos_out,
				   loff_t len, unsigned int remap_flags);
	int (*fadvise)(struct file *, loff_t, loff_t, int);
} __randomize_layout;
If this structure contains functions that aren’t required for your driver, you can still use the device file without implementing them. A pointer to an unimplemented function can simply be set to 0. After that, the system will take care of implementing the function and make it behave normally. In our case, we’ll just implement the read function.
As we’re going to ensure the operation of only a single type of device with our Linux driver, our file_operations structure will be global and static. After it’s created, we’ll need to fill it statically like this:
#include <linux/fs.h>
static struct file_operations simple_driver_fops =
{
    .owner   = THIS_MODULE,
    .read    = device_file_read,
};
The declaration of the THIS_MODULE macro is contained in the linux/export.h header file. We’ll transform the macro into a pointer to the module structure of the required module. Later, we’ll write the body of the function with a prototype, but for now we have only the device_file_read pointer to it:
ssize_t device_file_read (struct file *, char *, size_t, loff_t *);The file_operations structure allows us to develop several functions that will register and revoke the registration of the device file. To register a device file, we use the following code:
static int device_file_major_number = 0;
static const char device_name[] = "Simple-driver";
int register_device(void)
{
    int result = 0;
    printk( KERN_NOTICE "Simple-driver: register_device() is called.n" );
    result = register_chrdev( 0, device_name, &simple_driver_fops );
    if( result < 0 )
    {
            printk( KERN_WARNING "Simple-driver:  can't register character device with error code = %in", result );
            return result;
    }
    device_file_major_number = result;
    printk( KERN_NOTICE "Simple-driver: registered character device with major number = %i and minor numbers 0...255n", device_file_major_number );
    return 0;
}
device_file_major_number is a global variable that contains the major device number. When the lifetime of the driver expires, this global variable will be used to revoke the registration of the device file.
In the code above, we’ve added the printk function that logs kernel messages. Pay attention to the KERN_NOTICE and KERN_WARNING prefixes in all listed printk format strings. NOTICE and WARNING indicate the priority level of a message. Levels range from insignificant (KERN_DEBUG) to critical (KERN_EMERG), alerting about kernel instability. This is the only difference between the printk function and the printf library function.
The printk function
The printk function forms a string, which we add to the circular buffer. From there the klog daemon reads it and sends it to the system log. Implementing the printk allows us to call this function from any point in the kernel. Use this function carefully, as it may cause overflow of the circular buffer, meaning the oldest message will not be logged.
Our next step is writing a function for unregistering the device file. If a device file is successfully registered, the value of the device_file_major_number will not be 0. This value allows us to revoke the registration of a file using the unregister_chrdev function, which we declare in the linux/fs.h file. The major device number is the first parameter of this function, followed by a string containing the device name. The register_chrdev and the unresister_chrdev functions have similar contents.
To unregister a device, we use the following code:
void unregister_device(void)
{
    printk( KERN_NOTICE "Simple-driver: unregister_device() is calledn" );
    if(device_file_major_number != 0)
    {
        unregister_chrdev(device_file_major_number, device_name);
    }
}
The next step in implementing functions for our module is allocating and using memory in user mode. Let’s see how it’s done.
Read also
How to Perform Comprehensive Linux Kernel Module Security Testing
Unveil every detail of testing a Linux kernel model. Learn how to incorporate this process into your driver development to ensure the security of your finished product.
Using memory allocated in user mode
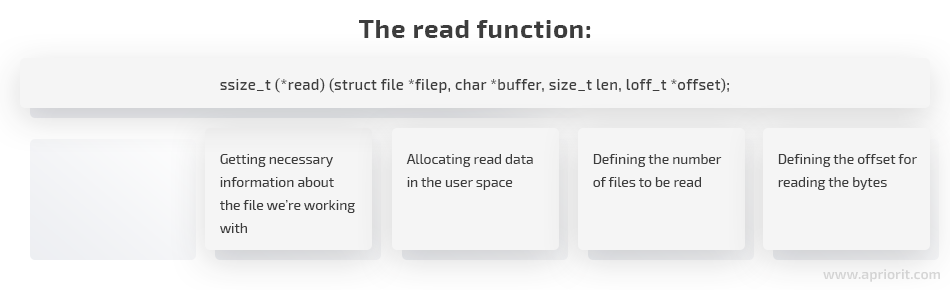
The read function we’re going to write will read characters from a device. The signature of this function must be appropriate for the function from the file_operations structure:
ssize_t (*read) (struct file *filep, char *buffer, size_t len, loff_t *offset);Let’s look at the filep parameter — the pointer to the file structure. This file structure allows us to get necessary information about the file we’re working with, data related to this file, and more. The data we’ve read is allocated in the user space at the address specified by the second parameter — buffer. The number of bytes to be read is defined in the len parameter, and we start reading bytes from a certain offset defined in the offset parameter. After executing the function, the number of bytes that have been successfully read must be returned. Then we must refresh the offset.
To work with information from the device file, the user allocates a special buffer in the user-mode address space. Then, the read function copies the information to this buffer. The address to which a pointer from the user space points and the address in the kernel address space may have different values. That’s why we cannot simply dereference the pointer.
When working with these pointers, we have a set of specific macros and functions we declare in the linux/uaccess.h file. The most suitable function in our case is copy_to_user. Its name speaks for itself: it copies specific data from the kernel buffer to the buffer allocated in the user space. It also verifies if a pointer is valid and if the buffer size is large enough. Here’s the code for the copy_to_user prototype:
long copy_to_user( void __user *to, const void * from, unsigned long n );First of all, this function must receive three parameters:
- A pointer to the buffer
- A pointer to the data source
- The number of bytes to be copied
If there are any errors in execution, the function will return a value other than 0. In case of successful execution, the value will be 0. The copy_to_user function contains the _user macro that documents the process. Also, this function allows us to find out if the code uses pointers from the address space correctly. This is done using Sparse, an analyzer for static code. To be sure that it works correctly, always mark the user address space pointers as _user.
Here’s the code for implementing the read function:
#include <linux/uaccess.h>
static const char    g_s_Hello_World_string[] = "Hello world from kernel mode!n";
static const ssize_t g_s_Hello_World_size = sizeof(g_s_Hello_World_string);
static ssize_t device_file_read(
                        struct file *file_ptr
                       , char __user *user_buffer
                       , size_t count
                       , loff_t *position)
{
    printk( KERN_NOTICE "Simple-driver: Device file is read at offset = %i, read bytes count = %un"
                , (int)*position
                , (unsigned int)count );
    /* If position is behind the end of a file we have nothing to read */
    if( *position >= g_s_Hello_World_size )
        return 0;
    /* If a user tries to read more than we have, read only as many bytes as we have */
    if( *position + count > g_s_Hello_World_size )
        count = g_s_Hello_World_size - *position;
    if( copy_to_user(user_buffer, g_s_Hello_World_string + *position, count) != 0 )
        return -EFAULT;
    /* Move reading position */
    *position += count;
    return count;
}
With this function, the code for our driver is ready. Now it’s time to build the kernel module and see if it works as expected.
Building the kernel module
In modern kernel versions, the makefile does most of the building for a developer. It starts the kernel build system and provides the kernel with information about the components required to build the module.
A module built from a single source file requires a single string in the makefile. After creating this file, you only need to initiate the kernel build system with the obj-m := source_file_name.o command. As you can see, here we’ve assigned the source file name to the module — the *.ko file.
If there are several source files, only two strings are required for the kernel build:
obj-m := module_name.o
module_name-objs := source_1.o source_2.o … source_n.o
To initialize the kernel build system and build the module, we need to use the make –C KERNEL_MODULE_BUILD_SYSTEM_FOLDER M=`pwd` modules command. To clean up the build folder, we use the make –C KERNEL_MODULES_BUILD_SYSTEM_FOLDER M=`pwd` clean command.
The module build system is commonly located in /lib/modules/`uname -r`/build. Now it’s time to prepare the module build system. To build our first module, execute the make modules_prepare command from the folder where the build system is located.
Finally, we’ll combine everything we’ve learned into one makefile:
TARGET_MODULE:=simple-module
# If we are running by kernel building system
ifneq ($(KERNELRELEASE),)
	$(TARGET_MODULE)-objs := main.o device_file.o
	obj-m := $(TARGET_MODULE).o
# If we running without kernel build system
else
	BUILDSYSTEM_DIR:=/lib/modules/$(shell uname -r)/build
	PWD:=$(shell pwd)
all :
# run kernel build system to make module
	$(MAKE) -C $(BUILDSYSTEM_DIR) M=$(PWD) modules
clean:
# run kernel build system to cleanup in current directory
	$(MAKE) -C $(BUILDSYSTEM_DIR) M=$(PWD) clean
load:
	insmod ./$(TARGET_MODULE).ko
unload:
	rmmod ./$(TARGET_MODULE).ko
endif
The load target loads the build module and the unload target deletes it from the kernel.
In our tutorial for device driver development in Linux, we’ve used code from main.c and device_file.c to compile a driver. The resulting driver is named simple-module.ko. Let’s see how to use it.
Related project
Developing a Custom Driver Solution for Blocking USB Devices
Explore a real-life case of delivering a custom driver for blocking USB devices that helped our client launch their device management product and gain a competitive advantage.
Loading and using the module
To load the module, we have to execute the make load command from the source file folder. After this, the name of the driver is added to the /proc/modules file, while the device that the module registers is added to the /proc/devices file. The added records look like this:
Character devices:
  1 mem
  4 tty
  4 ttyS
…
250 Simple-driver
…
The first three records contain the name of the added device and the major device number with which it’s associated. The minor number range (0–255) allows device files to be created in the /dev virtual file system.
Then we need to create the special character file for our major number with the mknod /dev/simple-driver c 250 0 command.
#> mknod /dev/simple-driver c 250 0After we’ve created the device file, we need to perform the final verification to make sure that what we’ve done works as expected. To verify, we can use the cat command to display the device file contents:
$> cat /dev/simple-driver
Hello world from kernel mode!
If we see the contents of our driver, it works correctly!
Creating a device file directly from the module
To use the mknod command, we need to load the kernel module (which may be done automatically) and work with the command line from the user space. However, there’s a way to do everything we need inside the kernel module.To create a device file from the module, we need to use the class_create macros:
#define class_create(owner, name)          \
({                                     	   \
    static struct lock_class_key __key;    \
    __class_create(owner, name, &__key);   \
})
Calling class_create macros creates the linux device class — a high-level view of the Linux Device Model, which abstracts implementation details.
We also need the device_create function:
device_create(struct class *cls, struct device *parent, dev_t devt, void *drvdata, const char *fmt, ...);Calling the device_create function creates a Linux device and adds it to the cls class. This function accepts a 32 bit device number as the third parameter. This device number may be combined from the device major number and device minor number with MKDEV macros:
#define MKDEV(ma,mi) (((ma) << MINORBITS) | (mi))To integrate the creation of a device file to our module, we need to complete the register_device function:
int register_device(void)
{
    int result = 0;
    printk( KERN_NOTICE "Simple-driver: register_device() is called.\n" );
    result = register_chrdev( 0, device_name, &simple_driver_fops );
    if( result < 0 )
    {
        printk( KERN_WARNING "Simple-driver:  can\'t register character device with errorcode = %i\n", result );
        return result;
    }
    device_file_major_number = result;
    printk( KERN_NOTICE "Simple-driver: registered character device with major number = %i and minor numbers 0...255\n", device_file_major_number );

    device_class = class_create( THIS_MODULE, device_name );
    if( IS_ERR( device_class ) )
    {
        printk( KERN_WARNING "Simple-driver:  can\'t create device class with errorcode = %i\n", PTR_ERR( device_class ) );
        unregister_chrdev( device_file_major_number, device_name );
        return PTR_ERR( device_class );
    }
    printk( KERN_NOTICE "Simple-driver: Device class created\n" );

    device_number = MKDEV( device_file_major_number, 0 );
    device_struct = device_create( device_class, NULL, device_number, NULL, device_name );
    if ( IS_ERR(device_struct ) )
    {
        printk( KERN_WARNING "can\'t create device with errorcode = %i\n", PTR_ERR( device_struct ) );
        class_destroy( device_class );
        unregister_chrdev( device_file_major_number, device_name );
        return PTR_ERR( device_struct );
    }
    printk( KERN_NOTICE "Simple-driver: Device created\n" );

    return 0;
}
Also, we have to remember about the destruction of the device file in the unregister_device function. To destroy a device file, we need to call the device_destroy and class_destroy functions:
void unregister_device(void)
{
    printk( KERN_NOTICE "Simple-driver: unregister_device() is called\n" );

    if( !IS_ERR( device_class ) )
    {
        device_destroy( device_class, device_number );
    }
    if( !IS_ERR( device_class ) && !IS_ERR( device_struct ) )
    {
        class_destroy( device_class );
    }
    if( device_file_major_number != 0 )
    {
        unregister_chrdev( device_file_major_number, device_name );
    }
}
As a result, a device file will be created right after the loading of our module to the kernel.
Conclusion
In this tutorial, we’ve shown you how to write a Linux driver. You can find the full source code of this driver in the Apriorit GitHub repository. If you need a more complex device driver, you may use this tutorial as a basis for embedded Linux driver development and add more functions and context to it.
At Apriorit, we’ve made Linux kernel and driver development our speciality. Our developers have successfully delivered hundreds of complex drivers for Linux, Unix, macOS, and Windows.
Need help with custom driver development?
Reach out to Apriorit to make your project benefit from our rare skills and knowledge.
Resources
- Linux Device Drivers, 3rd Edition by Jonathan Corbet, Alessandro Rubini, and Greg Kroah-Hartman
- The Linux Kernel Module Programming Guide by Peter Jay Salzman, and Ori Pomeranz
- Linux Cross Reference
- Our device driver source code (GitHub)


