 Skip to main content

We describe a lightweight C++ RPC implementation in this article. The RPC is intended to fulfill the pretty specific purpose to call driver functions from user mode code. It’s really lightweight and it doesn’t have any advanced features, which many general-purpose RPC implementations have. However, the RPC library (which we intricately named RpcLib) turned out to be very helpful.
Contents:
Introduction
This is quite a common task to control a kernel-mode driver from a user-mode application or service. But anyone who wrote drivers knows that it’s impossible to simply execute some piece of driver code directly from user mode. To make sending control commands to a driver possible, the operating system provides a mechanism of IO control codes (IOCTL’s). The library described in this article uses IOCTL as underlying transport.
Why RPC?
“Aren’t you, guys, complicating things ?” – the reader may ask, – “Why DeviceIoControl isn’t good enough for you?”. At first look, RPC really may seem an overcomplicated approach. But you can have certain difficulties using naked DeviceIoControl and IOCTL’s.
The conventional way to send control commands to a driver is to declare an IOCTL for each command. You can look over the Driver to Hide Processes and Files article by Ivan Romanenko and Sergey Popenko or the How to develop a virtual disk for Windows article by Gena Mairanichenko. These articles are the examples of this approach.
The problem is that a real-world driver can have dozens of control codes. It means that the dispatch routine that processes the IOCTLs can be so long that you can get lost there.
Another thing is data transfer. If you need to send some complex data between a driver and an application, packing it into a buffer and unpacking it back can be a kind of difficult and annoying task. RPC has a serialization mechanism that does the dirty work for you.
So, the RPC actually makes complicated things a bit less complicated.
Why C++ in driver?
RpcLib was designed to be used in the C++ code and it heavily relies on the C++ features such as templates and exceptions. It currently doesn’t support the drivers written in plain C (because we’ve never actually needed it). Using C++ in the kernel-mode drivers has its pros and cons, but they are not the subject of this article.
To make it possible to write the kernel-mode drivers in C++ we used the modified versions of CppLib and STLPort.
Client part
Using RpcLib is really simple. Let’s see how it looks from the user mode. When you need to call an RPC function from the kernel, you create the rpc::RpcCall object on the user-mode side. Then you initialize it with the name of the object registered on the server and with the name of the method that should be called.
rpc::RpcCall cl("Sample", "TranslateVirtualAddress");
    cl.Pack(virtualAddress);
    cl.Call(transport_);
cl.Unpack(&physicalAddress);Then you pass the input arguments, execute the call and get output arguments. It is pretty similar to the way of how a normal function call happens.
The rpc::RpcCall class incapsulates the RPC call. Here is how it looks:
class RpcCall
{
public:
    RpcCall(const std::string& objName, const std::string& fncName, size_t bufferSize = 16*1024);
    {
        rpc::Archive sourceArchive(&data_[0], data_.size());
        rpc::Pack(sourceArchive, objName);
        rpc::Pack(sourceArchive, fncName);
        curPackSize_ = sourceArchive.GetUsedSize();
    }
    template <class P>
    void Pack(const P& p)
    {
        rpc::Archive sourceArchive(&data_[0], data_.size(), curPackSize_, 0);
        rpc::Pack(sourceArchive, p);
        curPackSize_ = sourceArchive.GetUsedSize();
    }

    template <class senderType>
    void Call(senderType* sender)
    {
        sender->Send(&data_[0], curPackSize_, data_.size(), &answerSize_);
    }
    template <class P>
    void Unpack(P* p)
    {
        rpc::Archive sourceArchive(&data_[0], answerSize_, answerSize_, curUnpackSize_);
        rpc::Unpack(sourceArchive, p);
        curUnpackSize_ = sourceArchive.GetCurRange();
    }
};It has a buffer of the specified size (16Kb by default) for the input and output parameters. The rpc::RpcCall object serializes the RPC object name and the function name and the input parameters into this buffer (serialization is described in the Serialization section). The Call method sends the data from the buffer via the transport given by caller. After the call execution, the buffer contains output data to be deserialized.
Transport
The purpose of transport is to send the RPC call input data to the server and return output data. Normally, to send data from a user-mode application to a driver, rpc::IoctlTransport is used. It’s simply a wrapper over DeviceIoControl.
template <unsigned int RPC_IOCTL>
class IoctlTransport
{
public:
    IoctlTransport(HANDLE device)
        : device_(device)
    {}
    void Send(char* buf, size_t inBufSize, size_t maxBufSize, size_t* BytesCount)
    {
        if (!DeviceIoControl(
            device_,
            RPC_IOCTL,
            (void*)buf,
            (DWORD)inBufSize,
            (void*)buf,
            (DWORD)maxBufSize,
            (DWORD*)BytesCount,
            NULL)
            )
        {
            throw std::runtime_error("Device IO control failed");
        }
    }
private:
    HANDLE device_;
};Server part
Let’s look now, how to write the code to process calls from the user mode. Here is an example of the typical RPC object with one RPC method:
class Sample: public rpc::RpcSkelBase
{
public:
    Sample(rpc::IRpcServer* rpcServer)
    {
        RPC_FUNCTION(Sample, TranslateVirtualAddress);
        rpcServer->RegisterObject("Sample", this);
    }
    void TranslateVirtualAddress(rpc::Archive& inBuf, rpc::Archive& outBuf)
    {
        // ...
    }
};Every RPC function is an object method that takes two arguments: the input buffer and the output buffer. Each buffer is represented by an object of the rpc::Archive class. Usually, you need to deserialize arguments from the input archive with the rpc::Unpack function. After the work is completed, you can serialize the result into the output archive with the rpc::Pack function (serialization is described below). If there is an error, the method should throw an exception. It will be cought by the library, serialzied to the user mode and rethrown there. So, the caller will know that something has gone wrong.
To make an RPC function accessible, you need to register it with the RPC_FUNCTION macro in the constructor.
Also, you need to register the object itself on the RPC server. It’s an object that dispatches calls between the RPC object. In the code above, the object is being registered in the constructor, but actually, you can do it wherever you want.
To dispatch the RPC calls, you need to write something like this in the function where you process your IOCTL requests:
g_RpcServer->process(buf, inSize, outSize, &outSize);That’s how to use the library from the kernel mode. As you can see, everything is quite simple. Now, let’s take a look inside the server part of the library.
RPC objects
All RPC objects must implement the rpc::IRpcSkel interface:
struct IRpcSkel
{
virtual ~IRpcSkel(){ }
virtual void Call(const std::string& fncName, rpc::Archive& inBuf, rpc::Archive& outBuf) = 0;
};This interface has the method call, which gets the function name (as a string) and the archives for the input and output parameters. It must use the function name to dispatch the call to the right function. It’s a routine task, so we wrote the rpc::RpcSkelBase class to do this. It is implemented as follows:
class RpcSkelBase : public rpc::IRpcSkel
{
    typedef boost::function<void(rpc::Archive&, rpc::Archive&)> RpcImplMethodType;
    typedef std::map<std::string, RpcImplMethodType> RpcMethodMap;
public:
    void Call(const std::string& fncName, rpc::Archive& inBuf, rpc::Archive& outBuf)
    {
        RpcMethodMap::iterator it = rpcMethods_.find(fncName);
        RpcImplMethodType pMethod = it->second;
        pMethod(inBuf, outBuf);
    }
    void RegisterRpcFunction(const std::string& funcName, RpcImplMethodType pFunc)
    {
        if (rpcMethods_.find(funcName) != rpcMethods_.end())
            throw std::runtime_error(std::string(__FUNCTION__) + " - method " + funcName + " already registered");
        rpcMethods_.insert(std::make_pair(funcName, pFunc));
    }
private:
    RpcMethodMap rpcMethods_;
};All the user has to do is to inherit their object from rpc::RpcSkelBase and register the RPC function using the RPC_FUNCTION macro you’ve seen above.
RPC Server
As we mentioned, the RPC server is the object that keeps the list of the RPC objects and dispatches calls between them. It implements the rpc::IRpcServer interface. It works as follows:
struct IRpcServer
{
    virtual ~IRpcServer(){}
    virtual void RegisterObject(const std::string& objName, IRpcSkel* pObject) = 0;
    virtual void Process(char* buf, size_t inBufSize, size_t maxBufSize, size_t * outBufSize) = 0;
};There is a default implementation of this interface in RpcLib.
class RpcServer: public RpcServerImpl
{
public:
    void RegisterObject(const std::string& objName, IRpcSkel* pObject)
    {
        if (!objects_.insert(std::make_pair(objName, pObject)).second)
        {
            throw std::runtime_error(std::string(__FUNCTION__) + " - object " + objName + " already register.");
        }
    }
    rpc::IRpcSkel* FindObject(const std::string& objName)
    {
        RpcObjectMap::iterator i = objects_.find(objName);
        if(i == objects_.end())
            throw std::runtime_error(std::string(__FUNCTION__) + " - object " + objName + " not registered");
        return i->second;
    }
    void Process(char* buf, size_t inBufSize, size_t maxBufSize, size_t* outBufSize)
    {
        Archive input(buf, inBufSize, inBufSize, 0);
        Archive output(buf, maxBufSize);
        std::string objName, fncName;
        rpc::Unpack(input, &objName);
        rpc::Unpack(input, &fncName);
        FindObject(objName)->Call(fncName, input, output);
        *outBufSize = output.GetUsedSize();
    }
private:
    typedef std::map<std::string, IRpcSkel*> RpcObjectMap;
    RpcObjectMap objects_;
};rpc::RpcServer has std::map of the RPC objects. You can register an object simply adding the object to the map. Method process is a little bit more interesting. Client sends to the server some data and expects it to return some result. As you’ve seen in the rpc::RpcCall description, the two first pieces of data are always object name and function name; then there are the input arguments. The default implementation of the RPC server uses a single buffer for the input and output data.
Serialization
To transfer the data between client and server we have to store them in a buffer at one side and extract them from the buffer at other side. This is what serialization does. We’ve been avoiding its description, but now it’s time to fill the gap.
There are several solutions for the data serialization in C++ (like Boost.Serialization or Google Protocol Buffers), but none of them can be compiled as a kernel-mode library out of the box. So, it turned out to be easier to write our own serialization for RpcLib, then to port any existing solution into the kernel mode. The serialization is quite simple, but it does the job.
It’s easy to use it. The serialization of std::string looks as follows:
rpc::Archive archive(buffer, size);
    std::string inputArg;
rpc::Pack(archive, inputArg);And here is deserialization:
rpc::Archive archive(buffer, size);
    std::string outString;
rpc::Unpack(archive, & outString);The first parameter of both rpc::Pack and rpc::Unpack is an object of the rpc::Archive class, which is simply a wrapper over a memory buffer.
The serialization can handle standard C++ types (like bools, integers, chars), some STL containers (vector, string, list, and map), and standard exceptions.
Now let’s take a look under the hood. The implementation of rpc::Pack and rpc::Unpack is as follows:
template<class ArchiveType, class ObjectType>
    void Pack(ArchiveType & archive, const ObjectType& object)
    {
        serialize_traits<ObjectType>::serialize(archive, object);
    }
    template<class ArchiveType, class ObjectType>
    void Unpack(ArchiveType & archive, ObjectType* pObject)
    {
        serialize_traits<ObjectType>::deserialize(archive, pObject);
}They are template functions that use the serialize_traits template class, parameterized with type, which should be serialized.
template<class Type>
    struct serialize_traits
    {
};The only thing you need to implement serialization for some type is to declare the serialize_traits specialization for this type and implement the static methods serialize and deserialize there.
struct serialize_traits<MyType>
    {
        template<class A>
        static void serialize(A& archive, const MyType& object)
        {
            // implementation ...
        }
        template<class A>
        static void deserialize(A& archive, MyType* pObject)
        {
            // implementation ...
        }
};Serialization for some commonly used types is already implemented in the library.
Exception Processing
One of the goals of the RpcLib creating was the exception support. If a server-side object throws an exception it must be serialized and returned back to the client. Client part of RpcLib must deserialize and rethrow it. Also, as far as possible, the exception should not be sliced, i.e. exception of the exactly same type should be rethrown to the client side.
The simplest and the most obvious way to do this is to select a set of exception types, which the library is going to support, and directly implement the catch for each type on the server and the throw for the each type on the client. But this approach isn’t flexible enough: to support one more exception you have to modify the library code.
To achieve the goal with the descent level of flexibility, we decided to use type lists, which are described in the Modern C++ Design book by Andrey Alexandrescu. RpcLib declares a type list of several default exceptions:
typedef
        TL::MakeTypelist
        <
        std::exception
        , std::bad_alloc
        , std::bad_cast
        , std::bad_exception
        , std::bad_typeid
        , std::runtime_error
        , std::range_error
        , std::overflow_error
        , std::underflow_error
        , std::logic_error
        , std::domain_error
        , std::invalid_argument
        , std::length_error
        , std::out_of_range
        >::Result
DefaultExceptions; Exception type list is a template parameter for rpc::RpcCall and rpc::RpcServer. To add the support for your own exception processing, you have to declare a type list that contains the type of your exception, for instance, appending this exception type to rpc::DefaultExceptions::
typedef rpc::TL::Append<rpc::DefaultExceptions, CustomException>::Result MyExceptions;
If CustomException is serializable (i.e. serialzie_traits<CustomException> exists), you can use this type list as the template parameter for rpc::RpcCall and rpc::RpcServer.
The rpc::ExceptionPacker class is used to process exceptions.It works as follows:
template <class ExTypeList>
    struct ExceptionPacker
    {
        template<class ArchiveType>
        inline static void UnpackAndThrow(ArchiveType& archive)
        {
            typedef typename TL::DerivedToFront<ExTypeList>::Result ExTypeList_Ordered;
            unsigned int x;
            rpc::Unpack(archive, &x);
            UnpackAndThrowImpl<ExTypeList_Ordered, TL::Length<ExTypeList_Ordered>::value-1 >::Do(archive, x);
        }
        template<class ArchiveType ,class Command>
        inline static void Dispatch(ArchiveType& archive, Command& command)
        {
            typedef typename TL::DerivedToFront<ExTypeList>::Result ExTypeList_Ordered;
            DispatchImpl<ExTypeList_Ordered, TL::Length<ExTypeList_Ordered>::value - 1 >::Do(archive, command);
        }
};DispatchImpl is a template class that catches exceptions of each type specified in the type list:
template<class ExTypeList, unsigned int inx>
struct DispatchImpl
{
    template<class ArchiveType, class Command>
    inline static void Do(ArchiveType& archive, Command& command)
    {
        try
        {
            DispatchImpl<ExTypeList, inx - 1>::Do(archive, command);
        }
        catch (const typename TL::TypeAt<ExTypeList, inx>::Result &ex)
        {
            archive.UnTail(archive.GetUsedSize());
            rpc::Pack(archive, true); // exception flag
            rpc::Pack(archive, inx);
            rpc::Pack(archive, ex);
        }
    }
};
template<class ExTypeList>
struct DispatchImpl<ExTypeList, -1>
{
    template<class ArchiveType, class Command>
    inline static void Do(ArchiveType&, Command& command)
    {
        return command();
    }
};The purpose of UnpackAndThrow, which is also a template class, obviously is deserialize the exception of the correct type and throw it to the client side:
template<class ExTypeList, unsigned int inx>
struct UnpackAndThrowImpl
{
    template<class ArchiveType>
    inline static void Do(ArchiveType& archive, unsigned int index)
    {
        if (index == inx)
        {
            typename rpc::TL::TypeAt<ExTypeList, inx>::Result exd("");
            rpc::Unpack(archive, &exd);
            throw exd;
        }
        UnpackAndThrowImpl<ExTypeList, inx - 1>::Do(archive, index);
    }
};
template<class ExTypeList>
struct UnpackAndThrowImpl<ExTypeList, -1>
{
    template<class ArchiveType>
    inline static void Do(ArchiveType&, unsigned int)
    {
        return;
    }
};Executing calls
Let’s summarize how the RPC call is executed. Here is the complete diagram of what happens :
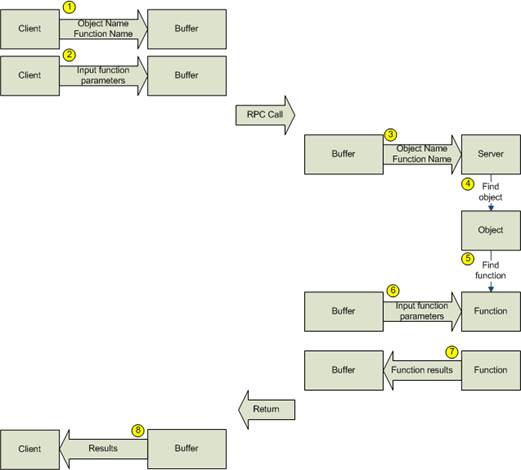
1. RpcCall serializes the RPC object name and the RPC function name
2. RpcCall serializes the function input parameters
3. RpcServer deserializes the object and function names
4. RpcServer finds the object in the map of the registered RPC objects and executes the Call method
5. The RPC object finds the function in the map of the registered RPC functions and calls it
6. The function gets the input arguments from the buffer
7. The function puts the output arguments to the buffer
8. RpcCall deserializes the output arguments from the buffer
Demonstration Example
We’ve created a small example to demonstrate how the RPC works, .To make it a little more interesting than a routine “hello world”, we implemented the obtaining a physical address corresponding to a virtual memory. So, there are two parts: application and driver.
The application can have one of such command line parameters:
--install – registers the driver in the OS
--uninstall – unregisters the driver
If called without parameters, the application interacts with the driver and displays physical addresses for a local variable, a global variable, ntdll.dll and kernel32.dll.
class SampleCall
{
public:
    SampleCall();
    LONGLONG VirtualToPhysicalAddr(const void* ptr);
private:
    sc_utils::DriverStarter m_starter;
    sc_utils::HandleGuard m_driver;
    rpc::IoctlTransport<RPC_CALL_IOCTL> m_transport;
};
SampleCall::SampleCall()
    : m_starter(L"Sample")
    , m_driver(sc_utils::OpenDriverAsFile(L"\.Sample"))
    , m_transport(m_driver.get())
{
}
LONGLONG SampleCall::VirtualToPhysicalAddr(const void* ptr)
{
    __int64 physicalAddress = 0;
    rpc::RpcCall<Exceptions> cl("Sample", "TranslateVirtualAddress");

    cl.Pack(ptr);
    cl.Call(&m_transport);
    cl.Unpack(&physicalAddress);
    return physicalAddress;
}
void PrintPhysicalAddresses()
{
    std::cout << std::hex << "source: " << "tt" << "virtual  " << "t" << "physical  " << std::endl << std::endl;
    SampleCall sample;

    LONGLONG physicalAddress = sample.VirtualToPhysicalAddr(&g_tempForAddress);
    std::cout << std::hex << "global variable:" << "t" << &g_tempForAddress << "t" << std::setfill ('0') << std::setw (16) << std::uppercase << physicalAddress << std::endl;
    int tempForAddress;
    physicalAddress = sample.VirtualToPhysicalAddr(&tempForAddress);
    std::cout << std::hex << "stack variable: " << "t" << &tempForAddress << "t" << std::setfill ('0') << std::setw (16) << std::uppercase << physicalAddress << std::endl;
    physicalAddress = sample.VirtualToPhysicalAddr(GetModuleHandleA("ntdll.dll"));
    std::cout << std::hex << "ntdll.dll:" << "tt" << GetModuleHandleA("ntdll.dll") << "t" << std::setfill ('0') << std::setw (16) << std::uppercase << physicalAddress << std::endl;
    physicalAddress = sample.VirtualToPhysicalAddr(GetModuleHandleA("kernel32.dll"));
    std::cout << std::hex << "kernel32.dll:" << "tt" << GetModuleHandleA("kernel32.dll") << "t" << std::setfill ('0') << std::setw (16) << std::uppercase << physicalAddress << std::endl;
}The driver processes calls from the application and uses MmGetPhysicalAddress to return the result to the client.
class Sample: public rpc::RpcSkelBase
{
public:
    Sample(rpc::IRpcServer* rpcServer);
    void TranslateVirtualAddress(rpc::Archive& inBuf, rpc::Archive& outBuf);
};
Sample::Sample(rpc::IRpcServer* rpcServer)
{
    RPC_FUNCTION(Sample, TranslateVirtualAddress);
    rpcServer->registerObject("Sample", this);
}
void Sample::TranslateVirtualAddress(rpc::Archive& inBuf, rpc::Archive& outBuf)
{
    void* virtualAddress;
    rpc::Unpack(inBuf, &virtualAddress);
    PHYSICAL_ADDRESS physicalAddress = MmGetPhysicalAddress(virtualAddress);

    rpc::Pack(outBuf, physicalAddress.QuadPart);
}
NTSTATUS DrvDeviceIoControl(PDEVICE_OBJECT DeviceObject, PIRP Irp)
{
    PIO_STACK_LOCATION irpStack = IoGetCurrentIrpStackLocation(Irp);
    ULONG code = irpStack->Parameters.DeviceIoControl.IoControlCode;

    if (code == RPC_CALL_IOCTL)
    {
        size_t inBufSize = irpStack->Parameters.DeviceIoControl.InputBufferLength;
        size_t outBufSize = irpStack->Parameters.DeviceIoControl.OutputBufferLength;
        size_t outSizeRes = 0;
        NTSTATUS status = RpcProcess((char*)Irp->AssociatedIrp.SystemBuffer,
            inBufSize, outBufSize, &outSizeRes);
        Irp->IoStatus.Information = outSizeRes;
        IoCompleteRequest(Irp, IO_NO_INCREMENT);
        return status;
    }
    else
    {
        NTSTATUS status = STATUS_INVALID_DEVICE_REQUEST;
        Irp->IoStatus.Status = status;
        IoCompleteRequest(Irp, IO_NO_INCREMENT);
        return status;
    }
}
NTSTATUS RpcProcess(char* buf, size_t inSize, size_t outSize, size_t* written)
{
    try
    {
        g_RpcServer->process(buf, inSize, outSize, &outSize);
        *written = outSize;
        return STATUS_SUCCESS;
    }
    catch(const std::exception& ex)
    {
        KdPrint((__FUNCTION__" [RPC CALL] %sn", ex.what()));
        return STATUS_UNSUCCESSFUL;
    }
}Project Structure
.bin – folder with binary files
.obj – folder with object files
.src – folder with source files
|
|-> .Application – User-mode application
|-> .Driver – Kernel-mode driver
|-> .DrvCppLib – Kernel Library to develop driver in C++.
|-> .DrvStlPort – Directory with STLPort modified for utilizing in windows drivers.
|-> .RpcLib – RPC library for calling a driver from user mode (both user and kernel mode parts)
|-> .RpcLibTest – Unit tests for RpcLib.
Build Instructions
1. Install Windows Driver Kit. You can download it from the following link: http://msdn.microsoft.com/en-us/windows/hardware/gg487428.aspx
2. Set the global environment variable “BASEDIR” to the path of installed DDK:
Computer -> Properties -> Advanced -> Environment variables ->System Variables -> New
Like this: BASEDIR -> c:winddk7600.16385.1
3. Download and install boost (tested with 1.44 version). You can download it from the link:
http://www.boost.org/users/download/
4. Set the global environment variable “BOOST_ROOT” to the path of installed boost. (You will have to restart your computer after this)
5. Use Visual Studio 2008 to build the solution.
Conclusion
The library described in this article is an RPC implementation. It helps you to control a kernel-mode driver from a user-mode service or application by simplifying some routine tasks. The library is quite simple and adjusted for a very specific task, but it turned out to be helpful for this task. However, there are some limitations. The library doesn’t support any kind of interface description language (IDL) and the serialization supports quite small number of types. Also, you cannot use the library in the pure C drivers, which also may be considered as a disadvantage.
Bibliography
1. Toby Opferman. Driver Development Part 2: Introduction to Implementing IOCTLs
2. Andrei Alexandrescu. Modern C++ Design: Generic Programming and Design Patterns Applied
3. David Vandevoorde, Nicolai M. Josuttis. C++ Templates: The Complete Guide
Have a question?
Ask our expert!
Program Manager


