 Skip to main content

Automating testing lets you save resources by automatically checking the functioning of most product components. However, the functioning of each particular function can’t ensure the successful execution of all business scenarios.
After adding new functionality to one of our client’s software products, we had to revise our existing acceptance tests as they were too reliant on previous functionality. In search of an efficient solution, we turned our attention to a new approach provided by behavior-driven development (BDD). This methodology initially builds software development processes based on business requirements and scenarios. To simplify our testing logic and improve the quality of our software development, we decided to implement BDD tools for acceptance testing on one of our recent projects.
In this article, we’ll share our experience of test automation using the Gauge framework and provide a brief overview of its application.
This article will be useful for QA specialists who want to improve their software testing processes.
Contents:
Our initial approach to automated acceptance testing
After developing a new product or adding new functionality, software development teams usually conduct functional testing. Functional testing of complex systems is a complex task, within which acceptance testing is the final step. Acceptance testing aims to confirm that all business requirements are met by the product and that it’s ready to satisfy customers’ needs.
Though this type of testing is usually performed right before a product is delivered to the client, internal acceptance testing can be done at intermediate stages of product development.
When working on one of our projects, we used automated acceptance tests created by our developers specifically for the needs of the product. Our developers started acceptance testing after building a new version of the product and discovered the most critical and blocking defects. As a result, testers got a fixed version of the product with fewer bugs.
Our approach to acceptance testing provided good results – until the product began to grow. After adding new functionality, we had to create new acceptance tests and rework the existing ones. We significantly reworked our existing tests several times because they were too dependent on the product functionality.
Moreover, since our developers initially assumed that they would be the only ones working with the acceptance test results, the data we received in the end was difficult to understand for our testers and managers.
All in all, the necessity to constantly maintain our tests and the complexity of the test results forced us to look for a third-party solution.
In search of alternatives
When searching for the most suitable test automation framework, we took into account our top requirements:
- Allowing testers as well as managers and clients to easily describe automated test scenarios
- Simplifying automated test support when a product grows
- Getting easily understandable reports of test progress and results
After a short investigation, we found that the first requirement (allowing all stakeholders to easily describe test scenarios) could be met with the behavior-driven development methodology. So we decided to consider this approach and choose a BDD tool.
BDD is a software development process that’s based on combining business interests with technical insights. BDD emerged from test-driven development (TDD) and also uses tests. The tests are created before product development and their successful completion is based on compliance with business requirements. This approach allows you to write tests in natural language, so our first requirement could be satisfied with any BDD tool. After analyzing several ones, we were drawn to a free open-source project called the Gauge framework, as it offers a range of useful features that make acceptance testing much easier:
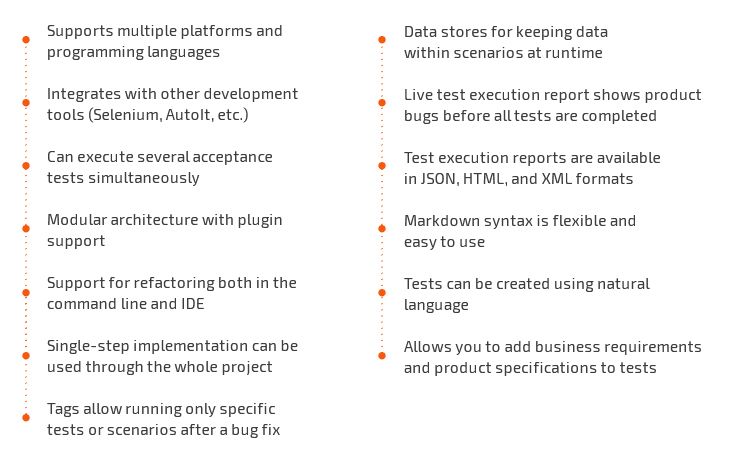
The most popular BDD instruments like Behave and Cucumber use Gherkin syntax, with the main clauses being Given-When-Then. These clauses pose certain limitations for describing test cases. Fortunately, Gauge allows you to write tests almost without syntax limitations. So creating tests in Gauge doesn’t require special knowledge.
We also discovered that Gauge has all the functionality to meet our other requirements. To simplify test support, this framework can quickly introduce changes to tests with the same steps. Possible bugs in Gauge are fixed by its developers, so Gauge integration makes our tests easy not only to develop but also to support.
Finally, Gauge allows us to create test progress reports in HTML, so test results are easy for anyone to understand. Additionally, we can get a report with a list of all existing tests that we can filter and search through.
Installing Gauge
Currently, automated testing with Gauge can be performed using programming languages including Java, C#, Ruby, JavaScript, Golang, and Python. Gauge supports Windows, Linux, and macOS.
For our project, we decided to run automated tests written in Python for Windows. Gauge is a console-based application, so it has no graphical user interface.
The framework installer can be downloaded from the official website.
You can also use a packet manager, for instance, Chocolatey for Windows.
choco install gaugeWhile Gauge has a module structure, the minimum set of plugins can be installed for the desired programming language just a few commands. The gauge-python plugin and the getgauge module for Python can be installed with the following two commands:
gauge install pythonpip install getgaugeNow, a new template can be created for a project. To do this, we initialize a new project in the language of our choice in an empty directory.
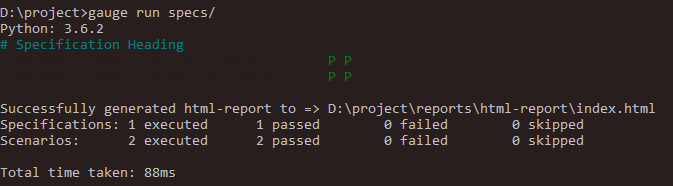
gauge init pythonAfter the template for the Gauge project is created, we can monitor test performance. The project includes a sample specification written in Python, the language we’ve selected. If everything has installed successfully, we can run the tests with this command:
gauge run D:projectspecsA plugin for HTML reports will be installed automatically before the project starts. There are also plugins for getting reports in JSON and XML formats that can be installed manually.
For storing testing objects (for instance, DLLs), we’ll create an Artifacts folder in the new project.
Main components of Gauge tests
Automated Gauge tests include three main components:
- A specification represents a business test case that usually describes a particular software feature. Each specification includes at least one scenario.
- A scenario is a single flow in a specification. Each scenario consists of one or more steps.
- Steps are executable components of specifications.
Implementing scenarios in Gauge
Gauge uses Markdown as the markup language for writing scenarios. Thanks to UTF-8 support, scenarios can be written in any natural language. We used English for our project.
Gauge doesn’t apply the Given-When-Then approach to writing acceptance tests, so all steps have equal ranking. Steps can be divided into logical groups with the use of markers. It’s possible to combine scenarios with any common feature in a single file, called a specification. The size of scenarios and specifications is unlimited.
However, specifications can only be parsed if:
- the specification name is written as the first-level header;
- the name of each scenario is written as the second-level header;
- scenario steps are written as markdown unordered list items (bulleted points);
- variables are written in quotes.
For example:
# Specification Heading

## Vowel counts in single word

* The word "gauge" has "3" vowels.This is the minimum set of components for getting an executable scenario. However, you can also use other components to expand the test capabilities:
- Tags are written after the prefix Tags: under the specification or scenario heading.
- Context steps are executed before any scenario in a specification. They are written before the heading of the first scenario.
- Teardown steps are executed after every scenario in a specification. They are written at the end of a specification after three or more consecutive underscores.
- Concepts unite the most commonly used logical groups of steps into a single unit, which is defined in a separate file. Concepts and headers are used in a specification just like other steps.
- Data and variable values can be written as strings or in a table within scenarios. They also can be taken from a text or csv file.
- Comments are any line that isn’t marked as a step or other element. Comments are not executed when implementing a scenario.
Here’s a Gauge test example using tags, context steps, and teardown steps:
This is a specification heading:

# Delete project

This is a list of specification tags:

Tags: delete, valid

These are context steps:

* Sign up for user "mike"
* Log in as "mike"

This is a scenario heading:

## Delete single project

This is a list of scenario tags:

Tags: delete, single

These are scenario steps:

* Delete the "example" project
* Ensure "example" project has been deleted

This is a description of the next scenario:

## Delete multiple projects

Tags: delete, multiple

* Delete all the projects in the list
* Ensure the project list is empty

____________________
These are the teardown steps:

* Logout user "mike"
* Delete user "mike"You may notice that these two scenarios don’t have matching steps. In practice, it’s best to avoid using different step definitions for similar actions. This simplifies scenario support and minimizes the risk of duplicating the same steps.
In this case, steps can represent concepts that contain sets of other steps. Concepts created from the implemented steps are executed immediately.
Here’s an example of a file with concept descriptions:
This is a concept heading:

# Delete the <project_name> project

These are concept steps:

* Find the following projects: <project_name>
* Check that the user has admin rights in found projects
* Delete all found projects

This is a description of the next concept:

# Delete all the projects in the list

* Find the following projects: “all”
* Check that the user has admin rights in found projects
* Delete all found projectsScenarios with more abstract steps can be useful for all stakeholders, who can also edit them. Detailed steps in concepts that are hidden from scenarios will be available only for testers and developers.
You can find more information about how to create specifications in the Gauge tutorial.
Implementing steps in Gauge
For our project, we wrote our steps in Python. A simple step implementation looks like this:
from getgauge.python import step

@step("The word <word> has <number> vowels.")
def assert_no_of_vowels_in(word, number):
assert str(number) == str(number_of_vowels(word))The @step decorator accepts the line with a step sample. After this, the actual implementation of this step is provided.
A step that has already been implemented can be added to any other project scenarios.
For a better experience, there are plugins that support several IDEs (Visual Studio, IntelliJ IDEA, Visual Studio Code).
Gauge tests and reports
For test execution, Gauge offers to use the path to either a specs directory, any subdirectory, a particular specification, or a scenario. In each of these cases, it’s possible to specify several paths.
gauge run specssome_specsgauge run specssome_specsauthentication.specgauge run specssome_specshello.spec specsanother_specsworld.specA single scenario for a specification can be executed by specifying the line number in the span of that scenario in the specification.
gauge run specssome_specauthentication.spec:28You can also use scenario and specification tags to execute certain groups of tests. For example, you can include or exclude scenarios with specific tags. Complex combinations of tags are also supported in Gauge.
Here’s an example of a command that executes only scripts with certain tags:
gauge run --tags “tag1, tag2” D:\project\specsWith this command, all scripts will be executed except those containing the specified tag:
gauge run --tags “!tag1” D:\project\specsAfter running the Gauge project, the console displays the name of the currently executing specification.
There’s a separate line for each scenario, and each step passed is marked with the corresponding letter: P (passed) or F (failed). For failed steps, Gauge provides error names.
Before test execution, Gauge checks the steps and their implementation. If there are issues such as absence or duplication of any step, the corresponding error will be displayed.
After finishing all tests, Gauge creates a report in the Report folder. Here’s a sample HTML report:
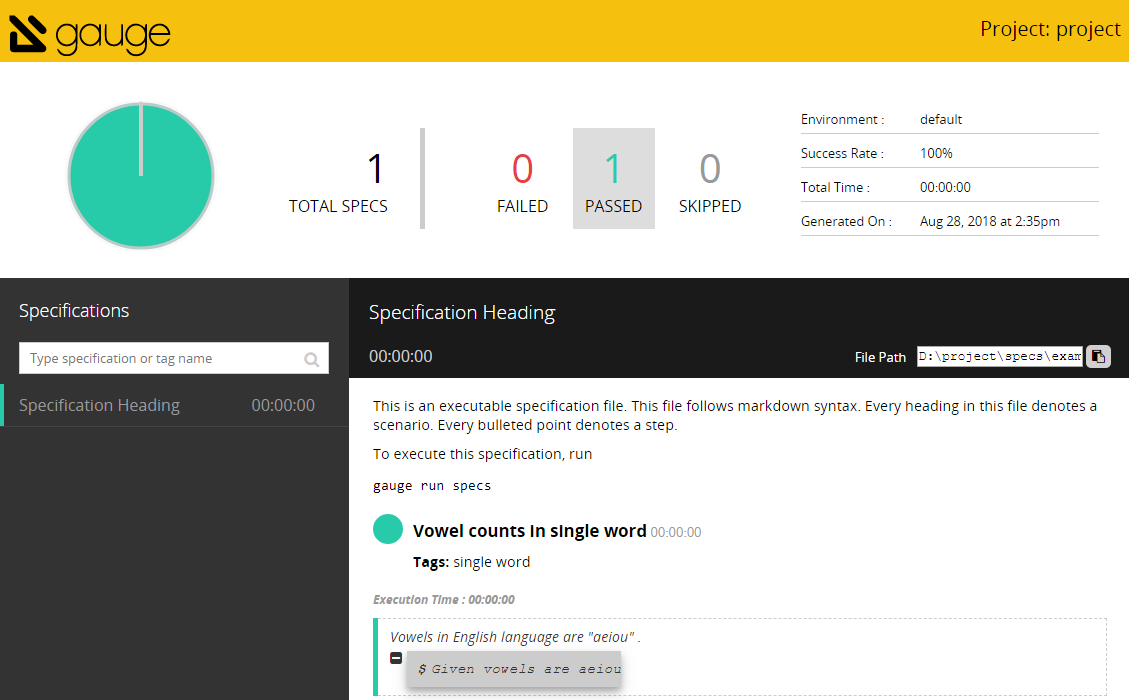
The report provides statistics on completed tests and detailed information on failed steps. If necessary, a screenshot made at the moment of failure can be attached to each failed step.
Our experience using Gauge
Using Gauge, our acceptance tests have become more transparent and require less maintenance. Now, automated acceptance tests can be written by our testers and not only by our developers, as was the case with our previous approach. Test results are easy to understand and are regularly reviewed by both testers and developers. And managers can also get the results of automated tests when necessary.
If our automated acceptance tests find any serious defects in the release version of a product, the framework automatically notifies the client about it. The results of full tests are automatically recorded in TestRail.
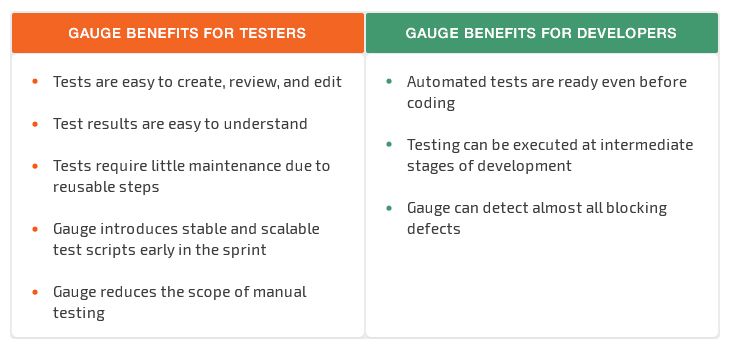
The Gauge framework offers additional benefits for both testers and developers:
However, we also encountered some pitfalls when we used Gauge for test automation:
- Occasional unstable test performance and compatibility issues
- Bugs aren’t fixed immediately
- Detailed scenarios increase test execution time
When working with the Gauge framework, we noticed that test performance may be unstable. An update of one of the plugins or to the Python interpreter sometimes leads to compatibility issues. Unfortunately, the framework developers don’t always fix these issues quickly, so our specialists have to make additional efforts to cope with them.
We also faced difficulties because of our style of writing scenarios. Even though Gauge doesn’t have syntax limitations compared to other frameworks, our scenarios appeared to be too specific. This isn’t an issue for a small product, but as it grows, it becomes difficult to work with a great number of detailed steps. More importantly, while giving us little to no benefit, such detailed tests significantly increase execution time.
Careful planning of acceptance testing processes might help avoid some of these difficulties when using the Gauge framework. Particularly, you need to take into account the possible growth of your product and develop a suitable and succinct architecture for test scenarios and their implementation.
Dealing with the bugs of the Gauge framework is a bigger challenge. But since the framework has just recently come out of beta, these issues are quite understandable. We can only hope that the framework will continue to be developed and its bugs fixed.
Conclusion
Using the Gauge framework for automated acceptance testing, we successfully achieved transparency in our tests and test results. Now, our automated test scenarios can contain detailed business requirements and product specifications. They’re easy to review and edit and can be understood not only by our developers but also by our testers and managers. Thanks to automated Gauge tests, we can spend less time and effort on manual testing without reducing product quality.
Gauge has allowed our developers to detect and fix almost all blocking defects. Though our testers still have to deal with critical defects, their number is much fewer than in projects where automated Gauge tests aren’t applied.
After this experience using the Gauge framework, we’re planning to continue implementing the behavior-driven development approach in our upcoming projects.
Apriorit has a team of QA specialists whose expertise is confirmed with ISTQB certification. Contact us if you need to ensure the quality of your software.
Have a question?
Ask our expert!
VP of Engineering


