



Key takeaways:
- Automated GUI testing is essential for validating real user workflows without the time and maintenance costs of manual checks.
- Pywinauto is a set of libraries that is widely used for automating Windows GUI testing with Python.
- Pywinauto covers a huge number of Windows GUI technologies and provides easy access to graphical elements of tested applications.
- Scaling GUI test automation is challenging, mostly due to specifics of the Windows UI such as unstable and dynamic element identifiers.
- For proper test distribution, QA teams should rely on unit and API tests for fast, cost-effective defect detection while using GUI tests as a focused final validation layer.
When automating Windows GUI testing, desktop UI tests are often harder to stabilize than API or unit tests.
For QA leads, the challenge is not only to choose a tool that can interact with the interface but also to build automation that remains stable, maintainable, and worth the investment.
In this article, we:
✓ Discuss how to automate desktop application GUI testing using Python and Pywinauto.
✓ Show a practical example of how to use Pywinauto for testing the Notepad application.
✓ Share Apriorit’s experience automating Windows GUI testing, from common challenges to tips for strengthening the QA strategy.
This article will be helpful for QA leads evaluating or introducing Windows GUI automation, test architects, and technical managers responsible for legacy Windows products.
Contents:
- Why use Python tools for GUI test automation?
- Why choose Pywinauto to automate desktop UI tests?
- GUI test automation with Pywinauto in 6 steps
- 1. Install Pywinauto
- 2. Run the application under test
- 3. Define the Windows specification
- 4. Find controls
- 5. Perform user action on the control element
- 6. Check the Windows GUI test automation results
- Common challenges when automating Windows GUI tests
- Optimizing Windows GUI test coverage with the test pyramid
- Enhance your QA strategy and efforts with Apriorit
Why use Python tools for GUI test automation?
Graphical user interface (GUI) testing lets your team view your application from the user’s perspective, ensuring the application’s visual elements and interactive workflows function correctly and as intended.
However, in complex projects, GUI testing can take too much time and effort, potentially delaying product launch. To make automation more accessible and maintainable, many QA teams rely on Python because of its readable syntax, mature testing ecosystem, and broad tooling support.
QA teams choose Python for GUI test automation for several reasons:
- Faster time to market, as Python has a low threshold for entry and concise syntax. These qualities allow QA engineers to write tests faster than in Java or C#, allowing businesses to get feedback more quickly after release.
- Rich ecosystem and integration capabilities, given that Python integrates easily with CI/CD pipelines (Jenkins, GitHub Actions, GitLab) as well as with test management and data analytics systems (Allure, BI systems).
- Multi-level abilities with QA engineers being able to combine UI, API, database, and data validation checks in one stack.
- Staff availability, since the market for Python engineers (QA automation, DevOps, developers, etc.) is one of the largest.
However, choosing Python as the automation language is only the first step.
GUI testing tools differ significantly in how they locate elements, handle Windows technologies, integrate with existing test stacks, and scale across complex projects.
To help your team choose the right option for your project, let’s compare several popular tools for automated GUI testing.
Table 1. Python-powered tools for automated GUI testing
| Tool | Pros | Cons | Best fit for |
|---|---|---|---|
| Pywinauto (open-source, BSD) | – Pure Python – Readable syntax – Two back ends: Win32 and UIA – Covers both legacy and modern applications – Active support on GitHub | – Windows only – Doesn’t support Tkinter, Java AWT, GTK+ – Takes time to learn the structure of elements | – QA teams with Python expertise – Projects on native Windows (Win32/ WinForms /WPF) – Balancing flexibility and zero license costs |
| PyAutoGUI (open-source) | – Simple to use – Cross-platform: Windows, macOS, Linux | – Works mainly through coordinates, image recognition – Fragile when changing resolution or theme – No access to element properties for meaningful assertions | – Simple scripts for routine actions or UI without accessibility tree (games, canvas) |
| FlaUI (open-source) | – Modern, strongly typed .NET library – Deep integration with UIA | – Requires C# or .NET stack – Separate codebase from Python tests | – Products on .NET (WPF, WinForms) – Teams already working in the C# ecosystem |
| TestComplete (paid) | – Wide coverage: desktop, web, and mobile – Action recording – Stable element recognition engine | – Cost increases with team size – Less flexibility for clean code | – Enterprise team wanting a single out-of-the-box tool with official support instead of building from open-source libraries |
| Ranorex Studio (paid) | – Hybrid of codeless writing + code in C# and VB.NET – Proprietary RanoreXPath locator system Covers Win32, WPF, Java SWT, Office, Citrix Ready-made integrations with Jira, Jenkins, Azure DevOps – Parallel execution | – Expensive license – Entry threshold can be high – Support is only in English | – Products combining several technologies: legacy, modern UI, and Office plugins – Teams looking for a single tool with vendor support |
| Winium (open-source) | – WebDriver-like approach – Familiar to Selenium teams | – Not actively supported in recent years | – Teams that are already working with Selenium or WebDriver patterns, want to extend them to desktop, and understand the risks of a tool without active support |
| AutoIt (freeware) or AutoHotkey (open-source) | – Lightweight – No configuration required – Handles system dialogs and installers well | – Not a full-fledged testing framework – Doesn’t scale well for a large regression set | – Auxiliary scripts (installation, system dialogs) next to the main framework, not as the main QA tool |
| SikuliX or Airtest (both open-source) | – Work where there is no element tree available | – Very sensitive to color, font, and size changes – Most fragile approach of all | – Suitable for Citrix, remote desktops, canvas, and game UIs, and for projects where object-based tools don’t see elements |
In the practical example later in this article, we provide a detailed overview of Pywinauto Windows GUI automation with Python. We may cover the rest of the tools in future publications on the Apriorit blog.
Ready to accelerate software testing without compromising quality?
Get in touch with Apriorit and entrust comprehensive software testing to experienced professionals.
Why choose Pywinauto to automate desktop UI tests?
Pywinauto is a set of Python libraries for automating the Microsoft Windows GUI. It lets engineers work with windows, dialogs, and various controls. This tool is commonly used for GUI testing and desktop automation on Windows, with support for back ends such as Win32 and Microsoft UI Automation.
In our experience, Pywinauto Windows GUI automation is a fitting choice for QA teams that care about working with:
- Pure Python. Integrates smoothly with existing pytest and CI workflows without external executable wrappers.
- Two back ends. Supports both Win32 and UIA, helping teams automate legacy and modern Windows applications in one project.
- Readable syntax. Uses Pythonic element access, making test code easier for QA engineers and developers to review and maintain.
- Open-source. Reduces licensing costs and vendor lock-in risks.
- More stable than image-based tools. Works with element properties instead of screenshots or coordinates, improving resilience to resolution, theme, and localization changes.
Still, Pywinauto is not a universal option for every desktop project. It is designed specifically for Windows GUI automation and may not work well with applications built on unsupported frameworks like Java AWT and GTK+, where a different tool may be required.
GUI test automation with Pywinauto in 6 steps
There are six main steps to writing a GUI test with Pywinauto:
- Install Pywinauto.
- Run an application or access a running application.
- Define the main application window.
- Find the necessary control element: button, text field, drop-down list, etc.
- Perform any user action on the control element: click on the button, enter text, etc.
- Check the results.
To show you how to automate Windows GUI application testing using Python and Pywinauto, we’ll use the Notepad application. For this example, we used Win11. Depending on your Windows version, UI elements and control identifiers may differ.
Here are the main steps of editing and saving a Notepad file:
- Open a text file in Notepad.
- Enter text and apply formatting to it. For example: Comic Sans, bold, size 18.
- Save the file in PDF format with the following settings: landscape orientation, A3 paper size.
- Check if the PDF file has been saved.
Now, let’s move to a Pywinauto tutorial for executing this test.
1. Install Pywinauto
To install the Pywinauto package, run a standard pip command:
pip install pywinautoNote that installing the 64-bit version requires running the 64-bit Python interpreter:
C:pathtopython_64bit.exe -m pip install pywinautoPywinauto supports the following Windows GUI technologies:
- Win32 controls through the Win32 API: MFC, VB6, VCL
- MS UI Automation: WinForms, WPF, Qt5, browsers, store apps
However, Pywinauto doesn’t support Tkinter, Java AWT/Swing, or GTK+.
GUI tests take the form of Python scripts that consist of Pywinauto library methods, which emulate user actions like mouse clicks/movements and key presses.
These Python GUI automation testing libraries provide an important benefit of accessing the GUI control elements with the help of attributes.
For example, below, we access the Save button that’s located in the Save As dialog window and call the click method:
app.SaveAs.Save.click()2. Run the application under test
To call the main Notepad window and its control elements, run the application and create a new text file in it.
Here’s how to initialize the Notepad file:
import time  # Import time for sleep delays
from random import random  # Import random for unique filenames
from pywinauto import Application, Desktop  # Import core pywinauto modules

# --- Notepad Setup ---
app = Application(backend="uia").start('notepad.exe')  # Start Notepad using UI Automation backend
time.sleep(2) # Wait for the application to loadBy default, Pywinauto looks for an open dialog window and control elements during a certain period of time (approximately 5 seconds) and repeats the search if it fails. But in the example below, Pywinauto runs notepad.exe as a separate process and opens a new file with a 10-second timeout and 10 retries. This makes the testing process a bit smoother because Pywinauto allows for a delay in the test application’s displaying of windows and GUI elements.
There are also several alternative ways of accessing an application that’s already running. For example, you can specify the process ID (PID), path to the executable, or regular expression for window name identification, as shown below:
# Connect to an already running process:
# By PID
app = Application(backend="uia").connect(process=1234)

# By path to executable
app = Application(backend="uia").connect(path=r"C:\Windows\System32\Notepad.exe")

# By regular expression
app = Application(backend="uia").connect(title_re=".*Notepad*")You can specify the name of a window or control element using a regular expression or a name written without spaces or other breaking symbols. Pywinauto will automatically search for the element that most closely matches the name among all opened windows.
Read also
How to Use Python for Automation Testing: Building a QA Framework from Scratch
Enhance your QA strategy with Python automation to reduce manual effort and improve test coverage. Explore actionable techniques that help your team deliver more reliable software faster.
3. Define the Windows specification
To access control elements, make sure to let Pywinauto define the application window with those elements. In this example, let’s choose the Notepad window.
Window specification is an object that describes either an application window or a control element. In this scenario, you can specify the window in the following way:
main_dlg = Desktop(backend="uia").window(class_name="Notepad")  # Locate the main Notepad window
main_dlg.wait('visible', timeout=10)
main_dlg.set_focus()  # Bring the Notepad window to the foreground

# Type text
text_field = main_dlg.child_window(control_type="Document")  # Find the text editing area
text_field.click_input() # Click into the text field to set focusAlternatively, you can describe the window with a regular expression of the title, or specify a particular name:
main_dlg = app.window(title='Untitled - Notepad')4. Find controls
Pywinauto supports the most common GUI control elements, including:
- Button
- CheckBox
- RadioButton
- GroupBox
- ComboBox
- Edit
- Header
- ListBox
- ListView
- PopupMenu
- Static
- StatusBar
- TabControl
- Toolbar
- ToolTips
- TreeView
- UpDown
To display all available control elements for a specified window, call the print_control_identifiers method:
# Print all controls on the dialog
main_dlg.print_control_identifiers()This method allows you to see which control elements Pywinauto has access to and which of those controls need further desktop automation using Python.
Note: The method described above is not the only way to get an element’s locators. You can also use the following object inspection tools for this task:
- Visual Studio Spy++ is part of Microsoft Visual Studio distribution (even Express or Community), is accessible through the Start menu, and uses the Win32 API. An altenative for this tool is AutoIt Window Info.
- Inspect.exe is part of the Windows SDK. You can switch Inspect.exe into UIA mode using MS UI Automation. If it can show more controls and their properties than Spy++, the UI Automation (UIA) back end is probably the better choice.
- Accessibility Insights is a free tool from Microsoft designed for inspecting and testing UI accessibility. It uses UIA and provides a clear view of the element tree, properties, and patterns.
- Swapy is an open-source tool that allows you to locate control elements and create simple scripts for them. Swapy is in archive now, but it still works.
5. Perform a user action on the control element
You can call a control as an attribute of the window where the control is placed. You can perform a user action on an element by calling a method.
In this case, after running notepad.exe, enter any text and apply formatting to it.
Enter text in the open document:
text_field.type_keys("Hello pywinauto! It’s a sample text^A", with_spaces=True, pause=0.01) # Type text and Select All (^A)As a result, you’ll get entered text and indentation (due to the ^A command):

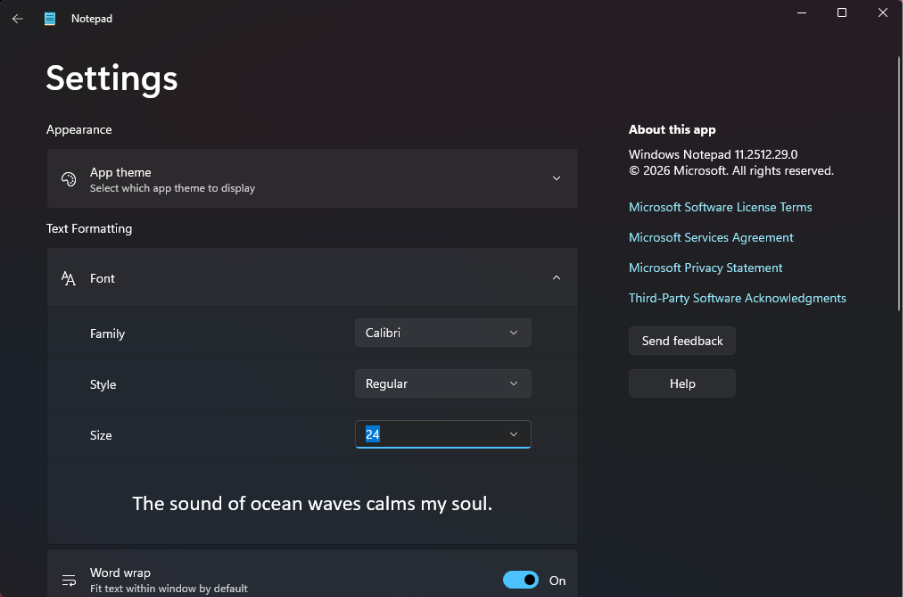
Now, open the Font dialog window and edit the text font:
# Change Font
main_dlg.child_window(title="Edit").click_input()  # Click the 'Edit' menu/button
main_dlg.PopupHost.Font.click_input(double=True)  # Double-click the 'Font' option in the pop-up

main_dlg.FamilyComboBox.select('Calibri')  # Select 'Calibri' from the font family dropdown
main_dlg.StyleComboBox.select('Regular')  # Select 'Regular' from the font style dropdown
main_dlg.SizeComboBox.select('24')  # Select '24' from the font size dropdown
main_dlg.BackButton.click_input() # Click the back button to return to the main editorIn screenshot 2, you can see that the following controls were accessed: the main window menu, the ComboBox, and the button:
Next, save the file in PDF format with landscape orientation and A3 paper size. To do so, select a virtual printer through the Notepad menu:
# --- Print Dialog ---
main_dlg.File.click_input()  # Click the 'File' menu
main_dlg.PopupHost.Print.click_input(double=True)  # Double-click 'Print' in the pop-up menu
time.sleep(1)  # Wait for the system print dialog to appear

app_print = Application(backend="uia").connect(title_re=".*Print.*")  # Connect to the print dialog process

print_dlg = app_print.window(title_re=".*Print.*")  # Access the print dialog window
print_dlg.wait('visible', timeout=10)

# Select Printer
printer_combo = print_dlg.child_window(auto_id="printerSelector", control_type="ComboBox")  # Find the printer selection dropdown
printer_combo.expand()  # Open the printer dropdown list
time.sleep(1)  # Wait for the list of printers to populate
print_dlg.child_window(title="Microsoft Print to PDF", control_type="ListItem", found_index=0).click_input()  # Click the PDF printer item

# Open More Settings
print_dlg.child_window(auto_id="moreOptionsButton", control_type="Hyperlink").click_input() # Click 'More settings' linkThen specify the document settings: landscape orientation, A3 paper size:
# --- Printing Preferences (Win32) ---
app_prefs = Application(backend="win32").connect(title='Printing Preferences', timeout=10)  # Connect to the preferences dialog (Win32 back end)
prefs_dlg = app_prefs.Dialog  # Access the preferences dialog window

time.sleep(2)  # Wait for the dialog to be fully ready
prefs_dlg.ComboBox.select("Landscape")  # Select 'Landscape' orientation from the first ComboBox
button = prefs_dlg.Button2  # Reference the 'Advanced' button by its shorthand name
button.ClickInput()  # Click the 'Advanced' button

# Advanced Settings
paper_size = prefs_dlg['2', 'ComboBox']  # Locate the second ComboBox (Paper Size) in the advanced window
paper_size.select('A3')  # Select 'A3' from the paper size list
prefs_dlg.Ok.click_input()  # Click 'OK' in the Advanced settings dialog

# Confirm Preferences
prefs_dlg.OKButton.click_input()  # Click 'OK' in the Printing Preferences dialog
print_dlg.Print.click_input()  # Click the final 'Print' button in the main print dialog

# Save the file
save_dlg = Application().connect(title='Save Print Output As', timeout=10)  # Connect to the 'Save As' file dialog
file_path = f'D:\\File\\txt_to_pdf{random()}.pdf'  # Generate a random file path for the PDF
save_dlg.SavePrintOutputAs.type_keys("%N")  # Use Alt+N shortcut to focus the 'File name' field

save_dlg.SavePrintOutputAs.type_keys(file_path)  # Type the generated file path into the field
save_dlg.SavePrintOutputAs.Save.click()  # Click the 'Save' button to finish printing to PDF

# Clear the text and close Notepad
main_dlg.Document.type_keys('{DELETE}')  # Delete the selected text in Notepad
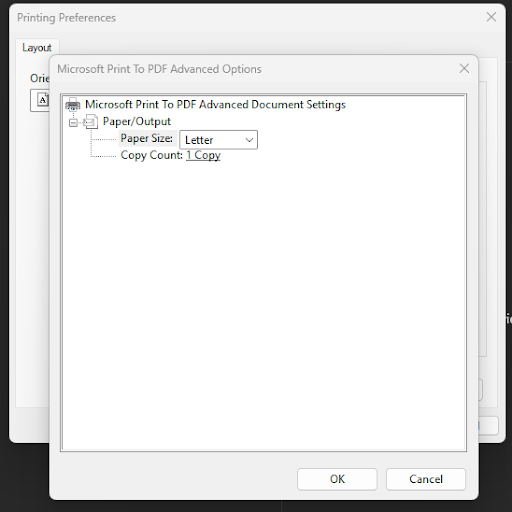
main_dlg.close() # Close the Notepad applicationExecuting the script makes the following dialog windows open sequentially:
- PrintingPreference
- Microsoft Print to PDF Advanced Options
There’s one peculiarity about the way Notepad runs processes and opens dialog windows. Say you start Notepad in the 64-bit version of Windows with the help of the 32-bit Python interpreter and Pywinauto. In this case, notepad.exe runs as WoW64, or a 32-bit process, while the Print dialog window is hosted by a separate 64-bit process called splwow64.exe. This means that you can’t call the Print process from notepad.exe, but you can access it via a separate invocation by the process name or its PID.
However, you can call the dialog window from notepad.exe if you’re working on 32-bit Windows or run notepad.exe on 64-bit Windows through the 64-bit Python interpreter.
This peculiarity also relates to other applications where dialog windows are implemented in a similar way.
Finally, save the document and close Notepad:
# Save the file
save_dlg = Application().connect(title='Save Print Output As', timeout=10)  # Connect to the 'Save As' file dialog
file_path = f'D:\\File\\txt_to_pdf{random()}.pdf'  # Generate a random file path for the PDF
save_dlg.SavePrintOutputAs.type_keys("%N")  # Use Alt+N shortcut to focus the 'File name' field

save_dlg.SavePrintOutputAs.type_keys(file_path)  # Type the generated file path into the field
save_dlg.SavePrintOutputAs.Save.click()  # Click the 'Save' button to finish printing to PDF

# Clear the text and close Notepad
main_dlg.Document.type_keys('{DELETE}')  # Delete the selected text in Notepad
main_dlg.close() # Close the Notepad applicationWaiting for long-running operations
When conducting automated GUI testing, you often have to wait for certain events to complete, such as file loading, window rendering, and switching between windows.
In these cases, Pywinauto can wait for an event, or you can set a timeout:
# Open a large file
app.OpenDialog.click()
# Wait for the dialog to become invisible
app.Open.wait_not('visible')
# Wait for up to 10 seconds until Report.txt is loaded
app.window(title='Report.txt - Notepad').wait('ready', timeout=10)6. Check the Windows GUI test automation results
You can also automate checking of the GUI test results depending on what you’re testing. In this example, you can check the existence of the PDF file on the disk with standard Python methods: for instance, by calling os.path.exists.
In our Pywinauto examples, validating that the PDF file was successfully created is enough to confirm that the automated workflow completed as expected. In real-world projects, QA teams typically combine UI assertions with file validation, database checks, log analysis, or API verification to ensure the application behaves correctly across all layers.
As this Notepad example demonstrates, Pywinauto can automate complete user workflows in Windows applications, from interacting with controls to validating the final result.
Pywinauto can be an effective addition to a broader test automation strategy, helping QA teams validate end-to-end user workflows in Windows applications. However, selecting the right automation approach requires balancing coverage, stability, maintenance costs, and the specifics of your technology stack. In the next section, we look at the most common challenges teams face when automating Windows GUI tests.
Related project
Supporting and Improving Legacy Data Management Software
Discover how we enhanced legacy data management systems to improve reliability and performance while reducing maintenance challenges. See how your business can benefit from modernizing outdated solutions.

Common challenges when automating Windows GUI tests
Regardless of the tool chosen, desktop GUI automation is traditionally considered one of the most challenging areas of test automation. Our practice shows that the biggest challenges are not so much related to a specific library but rather to the specifics of the Windows UI:
1. Unstable and dynamic element identifiers. Element identifiers can change between releases, and some elements have no stable unique attributes at all. Tests start to break after cosmetic UI changes, even if the business functionality remains the same. As a result, your QA team may spend time fixing tests instead of covering new functionality.
2. Custom controls and third-party UI libraries. Many enterprise applications use custom UI components or libraries like DevExpress and Telerik. These controls may not appear correctly through Win32 or UI Automation, so tools like Pywinauto can sometimes see the entire interface as one window without access to internal buttons. This forces engineers to rely on workarounds, such as coordinate-based clicks or OCR, instead of automating real business scenarios directly, which increases both the cost and duration of test automation.
3. Timing and synchronization issues. Desktop applications often open windows asynchronously, perform long-running operations, or depend on external services. The most common cause of flaky tests is trying to interact with an element before it is fully ready to work. So, the project team needs to come up with a good wait strategy.
4. Dependency on the runtime environment. GUI tests are more sensitive to environment settings than API or unit tests. Screen resolution, DPI scaling, access rights, locked sessions, system pop-ups, OS settings, and remote connections can all affect stability. As a result, a test that works locally may fail on a CI agent, creating false errors and reducing trust in automation results.
5. Difficulties of scaling and parallelization. Unlike web tests that can run in parallel in headless environments, desktop GUI tests need an active GUI session. Multiple tests usually can’t share the same screen because they compete for mouse and keyboard focus. This slows feedback and often requires separate virtual machines, increasing infrastructure costs.
6. Legacy systems and poor testability. Many companies still rely on internal Windows applications built 10–20 years ago without automated testing in mind. These systems often lack modern accessibility support and stable identifiers, such as AutomationID. As a result, QA teams may need developers to refactor parts of the product so automation can reliably recognize UI elements, increasing both the scope and cost of testing.
7. Test maintenance costs. Because the GUI layer changes more often than APIs, UI tests usually require more maintenance than API or unit tests. Teams should carefully assess the ROI of automation and avoid covering every scenario with GUI tests.
Read also
Windows Driver Testing Basics: Tools, Features, and Examples
Enhance your driver testing strategy and minimize critical errors in production. Learn how structured QA approaches help you deliver more reliable low-level software.
Optimizing Windows GUI test coverage with the test pyramid
The exact approach to solving GUI automation challenges depends on your application architecture, technology stack, and testing tools. However, there is one practice that consistently helps teams reduce flakiness, maintenance effort, and execution time: distributing test coverage across the test pyramid and using GUI tests only where they provide unique value.
GUI tests are the slowest and most expensive to maintain, so they should be used selectively based on the principle of the test pyramid: the higher the level (the closer to the UI), the fewer tests there should be, and the more precisely they should cover the test scenarios.
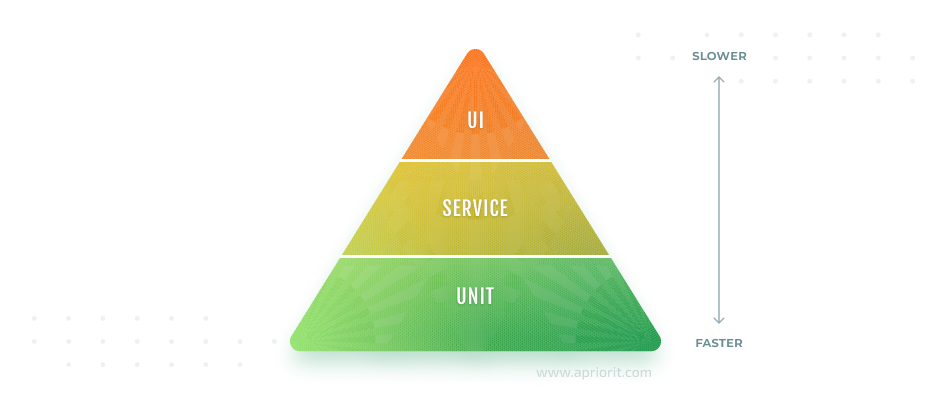
Use unit tests to cover low-level logic that doesn’t depend on the UI:
- Business logic, calculations, data validation, and individual functions or classes.
- Fast, stable checks that catch most logic regressions before changes reach the UI.
- Scenarios where a bug can be reproduced without opening the application window.
Use API or service-level tests for intermediate scenarios that don’t require UI validation:
- Business processes that span multiple components or services, such as request processing, data storage, database interactions, or integrations with external services.
- Faster, cheaper, and more stable checks that are not affected by GUI-specific factors like resolution, DPI, or window focus.
- Edge cases and negative scenarios, such as invalid data, limits, and backend errors, which are easier to reproduce through APIs than through UI clicks.
Use GUI automation for high-value scenarios that must be validated through the interface:
- Critical business processes whose failure could affect revenue or reputation, such as placing an order, signing a document, or generating a report.
- End-to-end user journeys that span multiple screens and require validation from the user’s perspective.
- A focused regression set covering the product’s most important features before release.
- Post-release smoke tests that confirm the application starts, main screens open, and key actions are available.
- Scenarios that can’t be tested below the UI, such as visual rendering, accessibility, native Windows dialogs, drag-and-drop, and hotkeys.
Avoid using GUI tests for scenarios that are better covered at lower levels:
- Duplicating checks already covered by unit or API tests, such as detailed form validation with many invalid input values.
- Exhaustively testing all input combinations through the UI, which is slow, costly to maintain, and better handled with lower-level data-driven tests.
Verifying minor visual details, such as colors or pixel placement. These checks belong to visual regression testing tools, not Pywinauto or similar frameworks.
The correct distribution of scenarios across the pyramid levels is not a matter of ‘savings on testing’ but a matter of ROI. Unit and API tests provide quick and cheap feedback on 80% of defects. And GUI tests remain a focused ‘last line’ that confirms that the entire product works through the user’s eyes, without trying to replace the rest of the testing levels.
Denys, Senior Automation Tester at Apriorit
Enhance your QA strategy and efforts with Apriorit
Apriorit has a professional team of dedicated quality assurance specialists whose qualifications are confirmed with ISTQB certification.
With 20+ years of experience in the software development and testing market, we assist business of different sizes and from different areas with services like:
- Driver testing and quality assurance
- Driver testing for WHQL certification
- LLM chatbot testing
- Software security audit
- Post‑quantum cryptography testing
- Risk assessment and penetration testing
- And more
Looking to deliver efficient and high-quality software?
Reach out to Apriorit for thorough Python application development and testing.
FAQ
What is Pywinauto?
Pywinauto is an open-source Python library for automating Windows graphical user interface (GUI) applications. It allows testers and developers to simulate user actions like clicking buttons, entering text, and interacting with UI controls programmatically.
What is the difference between win32 and UIA in Pywinauto?
The Win32 back end works with the older Win32 API and is best suited for traditional desktop applications. The UIA back end uses Microsoft UI Automation and supports modern applications like WPF and UWP, offering better access to complex or newer UI elements.
What are the limitations of testing with Pywinauto?
<p>Pywinauto has several limitations:</p>
<ul class=apriorit-list-markers-green>
<li>Works only on Windows</li>
<li>May struggle with custom or non-standard controls</li>
<li>Requires a stable UI structure (fragile when UI changes)</li>
</ul>