 Skip to main content

Even though 32-bit systems aren’t widely used these days, 32-bit applications haven’t lost their popularity. However, ensuring compatibility when running a 32-bit application on a 64-bit platform can be a challenge. This is where the WOW64 subsystem for Windows comes into play.
In one of our recent projects, we needed to secure a system from exploits that could bypass the WOW64 subsystem and call the native API directly. One way to tackle this challenge was by setting hooks in the 64-bit code from 32-bit mode.
In this article, we talk about the WOW64 subsystem, ways you can install 32-bit programs under WOW64, and how to switch between the 32-bit and 64-bit modes in Windows systems. We also describe how you can hook 64-bit code from WOW64 32-bit mode.
This article will be useful for C++ developers working on Windows software and for anyone who wants to understand the operation of WOW64 running 32-bit applications and learn about uncommon software protection techniques and methods.
Contents:
A few words about WOW64
What’s WOW64? WOW64, otherwise known as Windows on Windows, is a Windows subsystem that works in the user’s address space. Using this system, you can run 32-bit applications on 64-bit Windows systems. WOW64 consists of a set of DLL controls:
- wow64.dll
- wow64cpu.dll
- wow64win.dll
These DLLs control the 32-bit context and provide adapters for system services, thus allowing you to switch between 32-bit and 64-bit code. In other words, you can emulate 32-bit mode for 32-bit applications launched on 64-bit platforms.
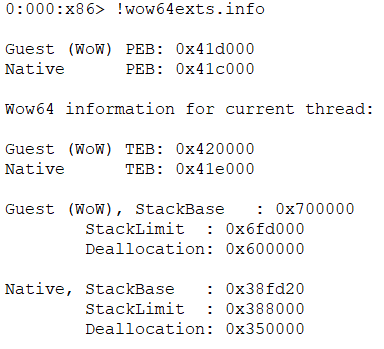
Each WOW64 stream contains the context, stack, and Thread Environment Block (TEB) / Process Environment Block (PEB) structures for both 32-bit and 64-bit modes.
This is what the architecture of the WOW64 subsystem looks like:
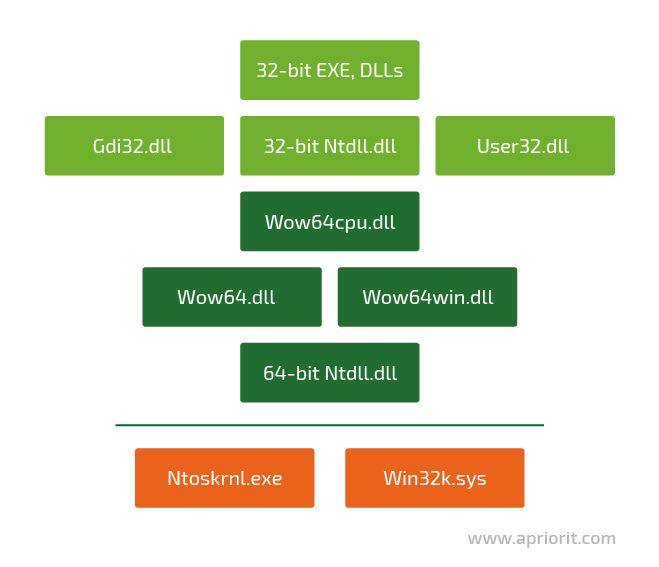
When a WOW64 process is launched, the system maps WOW64 DLLs and two Ntdll.dll files (a 32-bit and a 64-bit version) to its virtual address space. Wow64.dll loads the 32-bit version of the Ntdll.dll file and runs its initialization code, which loads all the needed 32-bit DLLs. Here’s the list of modules that are loaded into the WOW64 process memory:

During operation, the system loads the required modules from the WindowsSyswow64 folder. Most of these modules are unmodified copies of the 32-bit binary Windows files, except for several files that were changed specifically for interacting with the WOW64 subsystem.
But how can you run 32-bit code on a 64-bit platform? In the next section, we describe a method that can help you tackle this task — heaven’s gate.
Working with heaven’s gate
The term heaven’s gate usually refers to a technique used for running 32-bit code on a 64-bit platform. This technique grants you full access to the 64-bit address space, 64-bit registers, and 64-bit calls.
There are two ways for extracting the address of the heaven’s gate:
- From the 32-bit TEB structure at the 0xC0 offset
- Using the FS register — FS:[0хC0]
Note: On 32-bit Windows processors, the FS register contains the TEB address for the current thread. You can see the 32-bit TEB address in the first sScreenshot 1.
Here’s the address of the heaven’s gate:

It’s also noteworthy that depending on the type of Windows architecture, the CS register will contain different values:
- 64-bit (native) = 0x33
- 32-bit (WOW64) = 0x23
- 32-bit (native) = 0x1B
Now, using the WinDbg disassembler, let’s see how to call the native NtAllocateVirtualMemory function to transition from 32-bit mode to 64-bit mode (and vice versa):
- In the 32-bit Ntdll.dll, we call the Wow64SystemServiceCall instead of a system call:

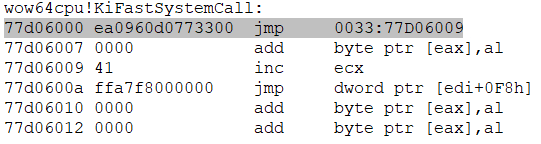
- Now we jump to the address of the so-called heaven’s gate using the address in the TEB structure (see one of the previous screenshots).

- To switch to 64-bit mode, we perform a far jump and change the 0x33 code segment (the number of the 64-bit code segment):
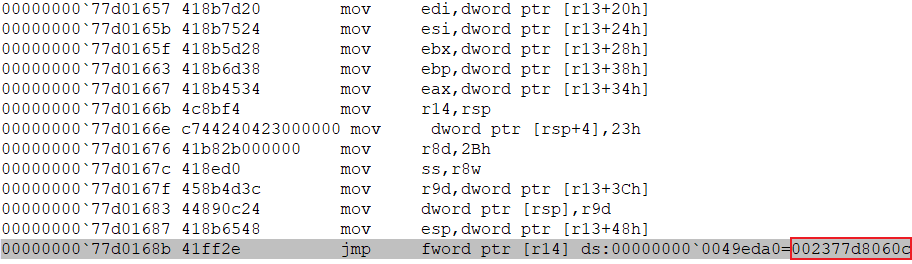
- Next, we jump to the function responsible for saving the 32-bit context and configuring the 64-bit context:

This function is called CpupReturnFromSimulatedCode:

- Then, after performing a number of other processes, WOW64 calls the NtAllocateVirtualMemory function with the 64-bit Ntdll.dll.

In the screenshot below, you can see the native 64-bit system call:

- After restoring the 32-bit context, stack, TEB, and return address, we can return to the 32-bit mode using the same far jump technique. This time, however, we need to use the 0x23 code segment (the number of the 32-bit WOW64 code segment):
As you can see, using the heaven’s gate technique, you can easily switch from the 32-bit compatibility mode to the 64-bit mode and back. However, this isn’t enough for hooking the 64-bit Ntdll.dll from the 32-bit WOW64 mode. In the next section, we describe the overall process of hooking WOW64 processes and the tools you’ll need for accomplishing this task.
Tools for setting 64-bit hooks
In order to set 64-bit hooks in 32-bit processes, you’ll need tools for:
- Setting hooks
- Working with x64 memory
- Handling hooks
Let’s see what tools you can use for each of these tasks.
1. Setting hooks
There are several nice open-source libraries that offer APIs for setting hooks, including Microsoft Detours and Mhook. Both these libraries do their job well, but only at the level of the current system architecture. They’re a great option for cases when you need to set hooks without changing the context or code segment of program execution. In other words, with the help of these libraries, you can only hook a WOW64 process in the 32-bit code used by it.
However, hooking a WOW64 process in its 64-bit code requires more effort. You’ll need to write or find a more flexible hooker that can offer you a wider range of capabilities. Some features to look for include the ability to specify not only the addresses of both the original and the handler functions but also the policy for allocating and freeing memory as well as reading and writing to it.
One of the hookers that match these criteria is part of the Diana Disassembler open-source library, written in C. Later in this article, we’ll implement a small wrapper library for this hooker so it will be easier to use in C++ code.
2. Working with x64 memory
A WOW64 process is a 32-bit entity that knows nothing about the memory that goes beyond the limits of a 32-bit address space (approximately 4GB). At the same time, the native 64-bit Ntdll.dll that we’re going to set hooks in exists outside this 32-bit address space. So how can you find the address of this native 64-bit Ntdll.dll and the addresses of the functions you’re going to hook? And how can you read and write in the memory of this Ntdll.dll?
One way to tackle these challenges is by using the wow64ext library. This library has special macros for changing the code segment. With the help of these macros, you can implement functions for obtaining the needed 64-bit addresses from the 32-bit mode and allocating the necessary memory.
We’ll use these functions for working with x64 memory:
DWORD64 GetModuleHandle64(wchar_t* lpModuleName);
DWORD64 GetProcAddress64(DWORD64 hModule, char* funcName);
DWORD64 VirtualAllocEx64(HANDLE hProcess, DWORD64 lpAddress, SIZE_T dwSize, DWORD flAllocationType, DWORD flProtect);
BOOL VirtualFreeEx64(HANDLE hProcess, DWORD64 lpAddress, SIZE_T dwSize, DWORD dwFreeType);
BOOL VirtualProtectEx64(HANDLE hProcess, DWORD64 lpAddress, SIZE_T dwSize, DWORD flNewProtect, DWORD* lpflOldProtect);
BOOL ReadProcessMemory64(HANDLE hProcess, DWORD64 lpBaseAddress, LPVOID lpBuffer, SIZE_T nSize, SIZE_T* lpNumberOfBytesRead);
BOOL WriteProcessMemory64(HANDLE hProcess, DWORD64 lpBaseAddress, LPVOID lpBuffer, SIZE_T nSize, SIZE_T* lpNumberOfBytesWritten);3. Hook handlers
The only thing left is to decide how we’re going to implement hook handlers. Our hook handler needs to be 64-bit code that either can do what we need it to do on its own or can pass control to a 32-bit handler.
Further in this article, we’ll try to implement both of these types of handlers in the form of a 64-bit shellcode. Particularly, we’ll use 64-bit calls to allocate the executable memory and put the assembler code where all the needed actions will be performed in this memory.
We already have the wow64ext library for memory allocation. As for writing the shellcode, we’ll use the AsmJit library, which allows for generating 64-bit assembler code during program execution.
In the next section, we provide a detailed example of implementing a 64-bit hook.
Practical example of setting 64-bit hooks
To successfully implement this example, we need two additional tools:
- Visual Studio (preferably VS 2015 or higher) with all toolkits for C++ development
- CMake for generating project files and compiling code
The following process consists of four phases:
- Creating the DianaHook wrapper library
- Installing 64-bit shellcode handlers
- Implementing WOW64 memory reader/writer
- Implementing the Hooker class
Below, we describe each of these phases in detail. Let’s start with the wrapper library.
1. Creating the DianaHook wrapper library
To make our work with the Diana Disassembler hooker a bit more comfortable, we’ll create a wrapper library for it called DianaHook. In this wrapper library, we implement the following features:
- The IMemoryReaderWriter interface with read/write methods. This interface enables our hooker to use the read/write functions that we need:
struct IMemoryReaderWriter
{
    virtual ~IMemoryReaderWriter() = default;
    virtual void read(uint64_t address, void* buffer, size_t bytesToRead, size_t& bytesRead, int flags) = 0;
    virtual void write(uint64_t address, void* buffer, size_t bytesToWrite, size_t& bytesWritten, int flags) = 0;
};- The MemoryStream class that will register handlers (such as Read, AnalyzeMoveTo, RandomRead, and RandomWrite) for reading/writing to/from 64-bit memory:
MemoryStream::MemoryStream(IMemoryReaderWriter& memoryReaderWriter, OPERAND_SIZE currentOffset, OPERAND_SIZE moduleSize)
    : m_memoryReaderWriter(memoryReaderWriter)
    , m_currentOffset(currentOffset)
    , m_moduleSize(moduleSize)
{
    DianaMovableReadStream_Init(&parent, Read, AnalyzeMoveTo, RandomRead);
    pRandomWrite = RandomWrite;
}- The MemoryProvider class for initializing the DianaHook_Allocator and DianaHook_TargetMemoryProvider objects of our classes:
MemoryProvider::MemoryProvider(IMemoryReaderWriter& memoryReaderWriter, DianaHook_Alloc_type hookAlloc, DianaHook_Free_type hookFree)
    : m_memoryStream(memoryReaderWriter, 0, ULLONG_MAX)
{
    DianaHook_Allocator_Init(&m_allocator, hookAlloc, hookFree);
    DianaHook_TargetMemoryProvider_Init(&m_impl, &m_memoryStream, &m_allocator);
}- The DianaHookPatcher class for initializing the hook and calling the main DianaHook_PatchStream function:
DianaHookPatcher::DianaHookPatcher(IMemoryReaderWriter& memoryReaderWriter, DianaHook_Alloc_type hookAlloc, DianaHook_Free_type hookFree)
        : m_memoryProvider(memoryReaderWriter, hookAlloc, hookFree)
{
    Diana_Init();
}

void DianaHookPatcher::addHook(int processorMode, OPERAND_SIZE addressToHook, OPERAND_SIZE hookFunction, DianaHook_CustomOptions* customOptions)
{
    DianaHook_PatchStream(m_memoryProvider.getTargetMemoryProvider(), processorMode, addressToHook, hookFunction, customOptions);
}Once all these features have been added to our DianaHook wrapper library, we can move to 64-bit shellcode handlers.
2. Installing 64-bit shellcode handlers
To show you two possible ways of installing shellcode handlers, we’ll set hooks in two 64-bit functions:
- NtReadVirtualMemory
- NtWriteVirtualMemory
1) One way you can install a 64-bit shellcode handler is by calling the required system call directly from the handler code, which is an easy option as this code is already in a 64-bit context.
Below, we provide the code for the first handler from our example. When the NtWriteVirtualMemory function is called, it writes the message “Hello from hooked 64-bit NtWriteVirtualMemory function” in the standard output stream (STDOUT):
const char* g_hookMessage = "Hello from hooked 64-bit NtWriteVirtualMemory function\n";
ULONG64 g_ioStatusBlock = 0;

void ShellCode64Generator::generate(X86Assembler& assembler, DWORD64 writeFileFuncAddr)
{
    // save stack pointer
    assembler.push(x86::rbp);
    assembler.mov(x86::rbp, x86::rsp);

    HANDLE handle = GetStdHandle(STD_OUTPUT_HANDLE);
    if (INVALID_HANDLE_VALUE == handle || !handle)
    {
        throw std::runtime_error("Cannot get stdout handle");
    }

    // prepare parameters to call ZwWriteFile
    assembler.mov(x86::rcx, reinterpret_cast<uint64_t>(handle));        // FileHandle
    assembler.mov(x86::rdx, 0);                                         // Event
    assembler.mov(x86::r8, 0);                                          // ApcRoutine
    assembler.mov(x86::r9, 0);                                          // ApcContext
    assembler.push(0);                                                  // Key
    assembler.push(0);                                                  // ByteOffset
    assembler.push(strlen(g_hookMessage));                              // Length
    assembler.push(reinterpret_cast<uint64_t>(g_hookMessage));          // Buffer
    assembler.push(reinterpret_cast<uint64_t>(&g_ioStatusBlock));       // IoStatusBlock

    // align stack
    assembler.push(0);
    assembler.push(0);
    assembler.push(0);
    assembler.push(0);

    assembler.call(writeFileFuncAddr);

    // restore stack pointer
    assembler.mov(x86::rsp, x86::rbp);
    assembler.pop(x86::rbp);

    assembler.ret();
}2) The second possible solution is to call the 32-bit handler from our 64-bit shellcode handler. To so, we need to:
- prepare the stack for calling the 32-bit code (parameters and return address)
- change the code segment to the one for 32-bit mode before calling the 32-bit handler
- restore the 64-bit code segment after the call
This method, however, has a limitation — it’s impossible to perform any system call-related actions from a 32-bit handler, as control will be recursively returned to the WOW64 subsystem. The thing is that before making any syscalls, the WOW64 subsystem saves certain context in 64-bit registers. And when a recursive call to the WOW64 subsystem is made, these registers will be overwritten and an ACCESS VIOLATION error will occur, at the very least.
Due to this limitation, we’ll simply increment the counter in our 32-bit handler and then display the value of this counter in the console. In this way, we can see how many times the NtReadVirtualMemory function was called.
Below is the code for the second 64-bit shellcode handler that calls the 32-bit handler:
DWORD g_counter = 0;
void __stdcall hookHandler32()
{
    ++g_counter;
}
void ShellCode64Generator::generate(X86Assembler& assembler, const HookHandler32* hookHandler32)
{
    // Label uses to adjust mode after returning from hookHandler32
    Label lBackFromAlert = assembler.newLabel();

    // prepare retaddress to return from hookHandler32
    assembler.sub(x86::esp, 0x04);
    assembler.lea(x86::eax, x86::ptr(lBackFromAlert));
    assembler.mov(x86::dword_ptr(x86::rsp), x86::eax);

    // specify x86 code segment
    const uint32_t x86CodeSegment = 0x23;
    assembler.mov(x86::rax, x86CodeSegment);

    // prepare hookHandler32 address for calling
    const uint32_t sizeToShift = 0x20;
    assembler.shl(x86::rax, sizeToShift);
    assembler.push(x86::rax);
    assembler.mov(x86::eax, x86::dword_ptr(reinterpret_cast<uint64_t>(hookHandler32)));
    assembler.mov(x86::dword_ptr(x86::rsp), x86::eax);

    // generate retf instruction to switch to x86
    assembler.db(OPCODE(0xCB));

    // begin of code after return from hookHandler32
    assembler.bind(lBackFromAlert);

    // switch back to x64 mode
    assembler.db(OPCODE(0x6A)); // push
    assembler.db(OPCODE(0x33)); // x64 code segment
    assembler.db(OPCODE(0xE8)); // call (current_addr + 5)
    assembler.db(OPCODE(0x00));
    assembler.db(OPCODE(0x00));
    assembler.db(OPCODE(0x00));
    assembler.db(OPCODE(0x00));
    assembler.db(OPCODE(0x83)); // add
    assembler.db(OPCODE(0x04)); // dword
    assembler.db(OPCODE(0x24)); // [esp]
    assembler.db(OPCODE(0x05)); // 0x05
    assembler.db(OPCODE(0xCB)); // retf

    assembler.ret();
}Finally, we can move to the implementation of the interface for setting the DianaHook memory read/write policy.
3. Implementing a WOW64 memory reader/writer
In order to set the read/write policy for DianaHook memory, we need to implement the IMemoryReaderWriter interface. Let’s start with setting a name for our class — Wow64MemoryReaderWriter — and implementing the interface methods:
void Wow64MemoryReaderWriter::read(uint64_t address, void* buffer, size_t bytesToRead, size_t& bytesRead, int flags)
{
    // ...
    BOOL result = ReadProcessMemory64(GetCurrentProcess(), address, buffer, bytesToRead, &read);
    // ...
}

void Wow64MemoryReaderWriter::write(uint64_t address, void* buffer, size_t bytesToWrite, size_t& bytesWritten, int flags)
{
    // ...
    BOOL result = WriteProcessMemory64(GetCurrentProcess(), address, buffer, bytesToWrite, &written);
    // ...
}4. Implementing the Hooker class
The final phase of our hooking process is implementing the Hooker class. This class will be responsible for preparing the context for hooks and setting them with DianaHook.
We start with the constructor that we use for getting the addresses of all the needed functions and generate the two 64-bit handlers described earlier:
Hooker::Hooker(const HookHandler32* hookHandler32)
    : m_dianaHook(m_wow64ReaderWriter, Hooker::hook_Alloc, Hooker::hook_Free)
{
    DWORD64 ntdllAddr = GetModuleHandle64(L"ntdll.dll");
    if (!ntdllAddr)
    {
        throw std::runtime_error("Can't get 64-bit ntdll address");
    }

    DWORD64 funcToCallAddr = getFunctionAddress64(ntdllAddr, "ZwWriteFile");

    m_hookContexts.push_back(generateHookContext(ntdllAddr, "NtReadVirtualMemory", hookHandler32));
    m_hookContexts.push_back(generateHookContext(ntdllAddr, "NtWriteVirtualMemory", funcToCallAddr));
}We also need to implement two handlers for allocating and freeing memory in DianaHook. These handlers will have the types DianaHook_Alloc_type and DianaHook_Free_type, respectively:
int Hooker::hook_Alloc(void* pThis, OPERAND_SIZE size, OPERAND_SIZE* pAddress, const OPERAND_SIZE* pHintAddress, int flags)
{
    // ...
    DWORD64 address = VirtualAllocEx64(GetCurrentProcess(), 0ull, static_cast<size_t>(size), MEM_COMMIT, PAGE_EXECUTE_READWRITE);
    // ...
}

void Hooker::hook_Free(void* pThis, const OPERAND_SIZE* pAddress)
{
    // ...
    VirtualFreeEx64(GetCurrentProcess(), *pAddress, 0, MEM_RELEASE);
}Now we implement the main applyHooks() method:
void Hooker::applyHooks()
{
    for (auto hookContext : m_hookContexts)
    {
        changeRWEProtection(hookContext.funcToHookAddr, true);
        m_dianaHook.addHook(DIANA_MODE64, hookContext.funcToHookAddr, static_cast<DI_UINT64>(reinterpret_cast<ULONG_PTR>(hookContext.hookHandler64)), nullptr)
        // ...
    }
}

void Hooker::changeRWEProtection(DWORD64 addr, bool needSetRWE)
{
    // ...
    result = VirtualProtectEx64(GetCurrentProcess(), addr, hookJmpSize, PAGE_EXECUTE_READWRITE, &m_oldProtect);
    // ...
}In this method, we’ll set our hooks.
The main() function and our results
To see the results of our work, we set hooks in the main() function and call WinApi functions for reading and writing process memory. In this way, we can check whether our hooks were applied and perform correctly:
int main()
{
    Hooker hooker(&g_hookHandler32);
    hooker.applyHooks();

    auto memoryAddr = VirtualAlloc(NULL, 0x1000, MEM_COMMIT, PAGE_READWRITE);

    // ...
    BOOL result = WriteProcessMemory(GetCurrentProcess(), memoryAddr, str, str_length, &lpNumberOfBytesWritten);

    // ...
    result = ReadProcessMemory(GetCurrentProcess(), memoryAddr, buffer, sizeof(buffer), &lpNumberOfBytesRead);

    // ...
    std::cout << "NtReadVirtualMemory hook was called - " << g_counter << " times" << std::endl;
}Here’s the result of our example:

As you can see, we successfully received the message “Hello from hooked 64-bit NtWriteVirtualMemory function,” and the counter displayed the correct number of calls to the NtReadVirtualMemory function.
Conclusion
While 32-bit applications are still widely used, 32-bit versions of Windows are less popular. This is why you might face the need to execute 32-bit code on a 64-bit platform.
The WOW64 subsystem can help you in accomplishing this task. Also, WOW64 can be used for hooking 64-bit processes from 32-bit mode.
At Apriorit, we have a team of dedicated C++ developers who will gladly assist you in implementing projects of any complexity. Our developers will make sure your solutions always perform at their best while remaining stable and secure. Feel free to get in touch with us and start discussing your ideas.
Have a question?
Ask our expert!
Program Manager


