 Skip to main content
Controlling and monitoring traffic is more complicated than you might think. The challenges begin with choosing your technique, as you may face some pitfalls or limitations depending on the Windows version you’re working with.
Controlling and monitoring network traffic can be done for various purposes: to detect viruses, block undesired traffic, limit access to network resources, shape traffic, avoid data leaks, and perform lots of other tasks. Choosing the right technique will help you achieve flawless traffic control.
In this article, we explore a few ways to monitor and modify network traffic on the Windows platform by applying user mode and driver approaches. We pay most attention to a driver technique using the Windows Filtering Platform (WFP) and show several examples of how to apply it.
This article will be a helpful starting point for developers choosing an appropriate technology for controlling and monitoring network traffic on Windows.
Contents:
- User mode techniques for controlling and monitoring network traffic
- SOCKS/HTTP proxy
- Layered Service Providers
- Hook & connect redirection
- Hooks for the entire Winsock API
- Driver techniques for controlling and monitoring network traffic
- Network Driver Interface Specification filter
- Windows Filtering Platform
- Using the Windows Filtering Platform for network monitoring
- Conclusion
User mode techniques for controlling and monitoring network traffic
There are two approaches to controlling and monitoring network traffic on Windows systems: doing so in user mode or using driver techniques. The difference is that the user mode approach doesn’t involve a driver.
Your choice of approach will depend on the version of Windows you’re working with — some methods only work on older versions of Windows, while others only work on recent versions — and on various limitations that we’ll discuss in detail.
In this section, we explore four ways of monitoring and controlling traffic in user mode. For each of them, we show an implementation scheme and a list of pros and cons.
| User mode techniques for controlling and monitoring network traffic | |
| SOCKS/HTTP proxy | Layered Service Providers |
| Hook and connect redirection | Hooks for the entire Winsock API |
Let’s start with the technique that includes working with a SOCKS/HTTP proxy.
Ready to take control of your system?
Reach out to explore how our driver development expertise can revolutionize your software and expand its abilities!
SOCKS/HTTP proxy
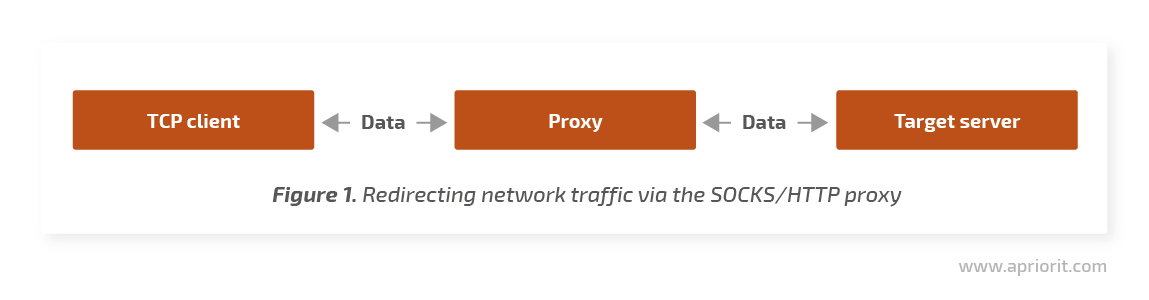
The main idea behind this method is to configure the system’s SOCKS or HTTP proxy in a way that applications connect to the network only through the proxy server. In this case, the proxy receives Transmission Control Protocol (TCP) connections from clients and establishes its own connections with remote servers. All traffic between TCP clients and target servers passes through the proxy.
Let’s briefly break down the pros and cons of this method.
Advantages:
- Easy to implement and maintain
- Can be implemented under a regular user account with no need for admin rights
Limitations:
- Applications can have their own proxy settings and ignore system settings
- System proxy settings need to be continuously monitored, as they can be changed by code or by a user
- It’s impossible to build a chain of proxies
- This method doesn’t work for server applications
Layered Service Providers
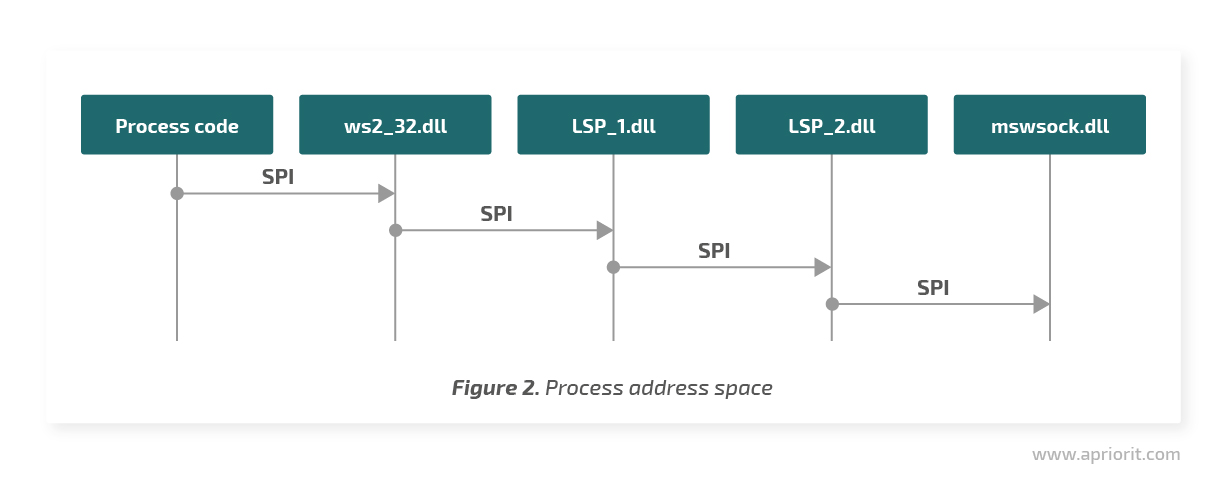
Layered Service Providers, or LSPs, allow you to replace Winsock 2 API calls with their handlers. LSP is a dynamic-link library (DLL) that Windows uploads into the address space of network applications. Winsock API calls are transferred in a chain order between providers through the Winsock Service Provider Interface.
This technique also has some benefits and downsides.
Advantages:
- Easy to implement
- Uses the well-documented Winsock 2 API
Limitations:
- This technology is deprecated. Starting from Windows 8 and Windows Server 2012, Microsoft advises using the Windows Filtering Platform.
- This method doesn’t work with Universal Windows Platform (UWP) apps, previously known as Metro-style apps.
- It can easily be turned off by the user.
Read also
User Mode and Kernel Mode in Cyber Security Technology Implementation
Detect attacks and manage data efficiently using our advanced system monitoring and management techniques. Discover which mode will be perfect for your specific cybersecurity solution.

Hook & connect redirection
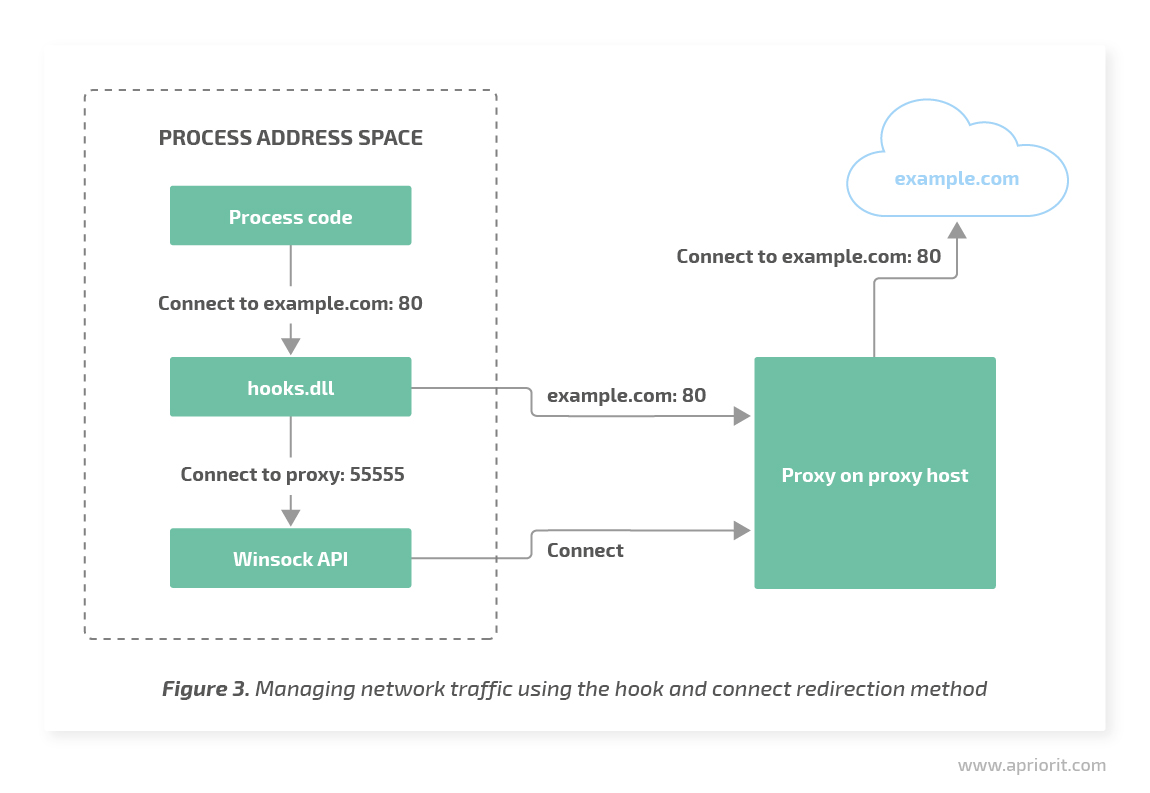
This method involves injecting our own DLL into the address space of a process and installing hooks on several Winsock API functions: connect, WSAConnect, and ConnectEx.
In the hook handlers, the DLL code replaces the target IP address and port with its own. If necessary, the DLL transfers information about the original content to the used proxy. As a result, an application connects not to the IP address and port delivered to the system function but to our proxy service. The proxy service can then connect to the designated server and transmit traffic between the client and the server.
Let’s explore the pros and cons of this technique.
Advantages:
- No need for a driver
- Depending on the method of DLL injection, hooks can be installed under a regular user account.
Limitations:
- Requires DLL injection into processes. There are lots of techniques to perform DLL injection, but in our experience, the best approach is APC injection. However, APC injection requires a driver, and a driver also brings some challenges such as allocating executable memory, which leads to issues with Device Guard and Microsoft certification. Moreover, DLL injection can lead to conflicts with antivirus software.
- If the proxy process is launched on the client’s computer, the redirect won’t work for applications that run in the AppContainer because connections to the local host are forbidden for them. These include UWP apps, Internet Explorer with Enhanced Protected Mode, Microsoft Edge, etc.
Hooks for the entire Winsock API
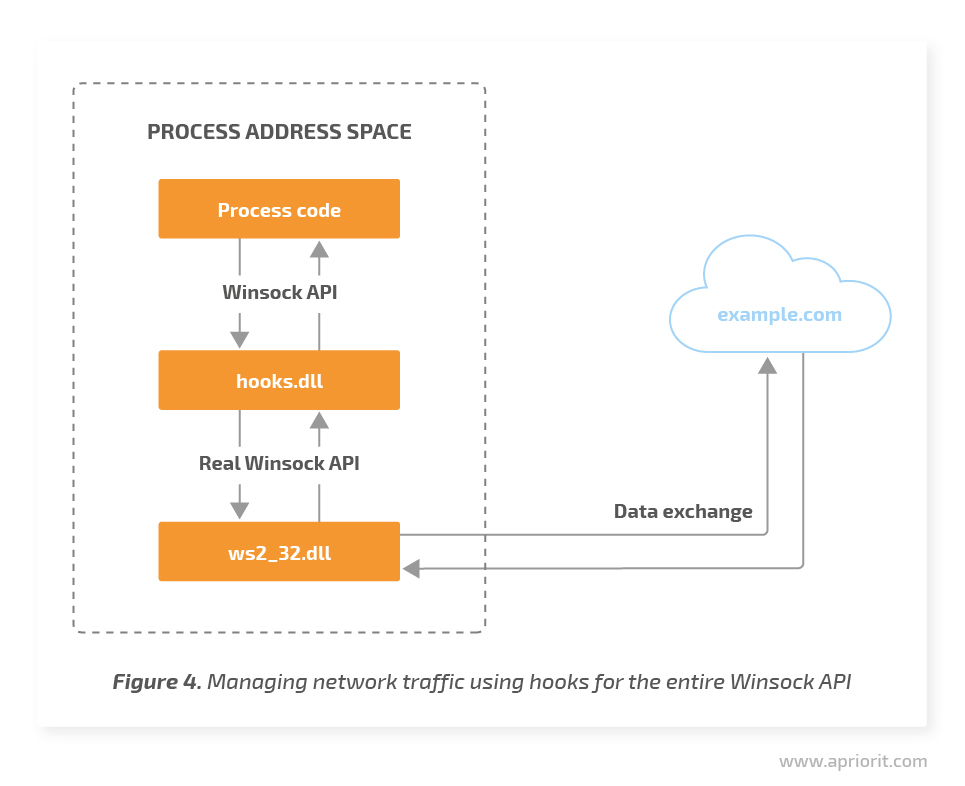
In addition to the previous method, this technique also requires injecting our own DLL into the address space of the target process.
However, this time we don’t change the connections target but perform all work inside the hooks. This allows us to bypass restrictions on connecting the local host for AppContainer processes. In this case, we need to set many more hooks and our own Winsock API implementation with the support of Asynchronous I/O (select, WSAAsyncSelect, WSAEventSelect, and WSAEnumNetworkEvents functions) and Overlapped I/O (the I/O Completion Port and Thread Pool API functions family).
This approach isn’t perfect either and has both benefits and flaws.
Advantages:
- No need for a driver
- Depending on the method of DLL injection, hooks can be installed using a standard user account
Limitations:
- Requires DLL injection into processes, which causes the same issues as in the previous method
- Hooks can conflict with third-party applications that use LSP or other techniques
- Difficult to implement and maintain
Related project
Developing Drivers for Low Latency Virtual Reality Headsets
Learn how the Apriorit team helped our client reduce time-to-market for their virtual reality headset through cutting-edge driver development and streamlined virtual and physical testing!
Driver techniques for controlling and monitoring network traffic
In this section, we explore two driver-based approaches to controlling and monitoring network traffic on Windows: the Network Driver Interface Specification filter and the Windows Filtering Platform.
| Driver-based techniques for controlling and monitoring network traffic | |
| Network Driver Interface Specification (NDIS) filter | Windows Filtering Platform (WFP) |
Network Driver Interface Specification filter
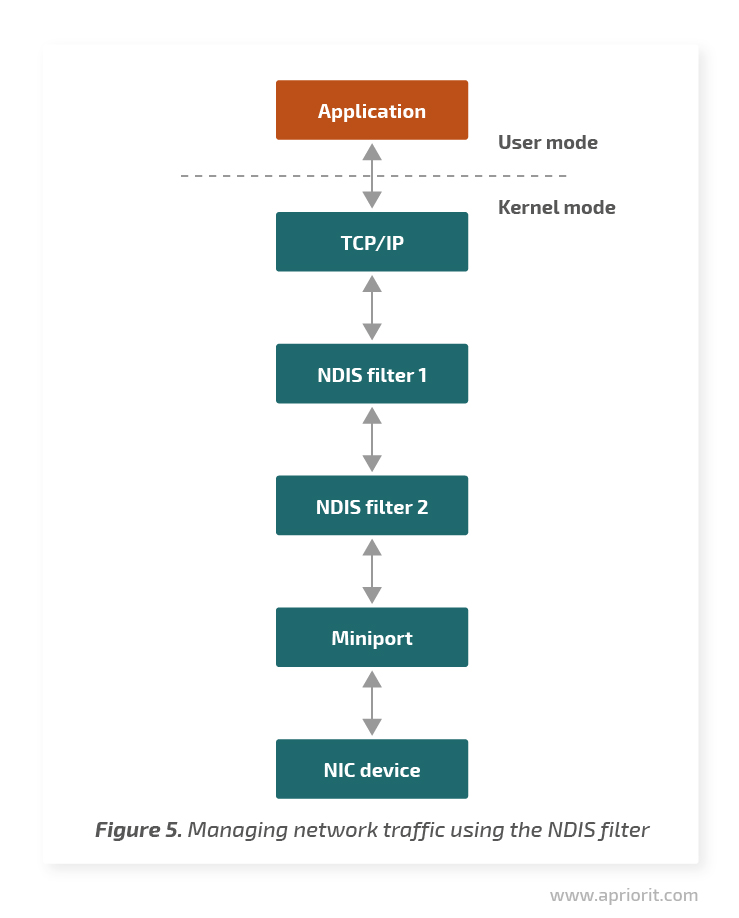
The Network Driver Interface Specification, or NDIS, is a network driver API that allows you to catch network traffic at the lowest possible level. NDIS provides interfaces for connections between driver protocols (for example, TCP/IP) and miniport drivers that control network cards.
A filter driver implemented between the protocol and miniport can filter traffic. Before NDIS 6.0 (Windows Vista and previous versions), a driver called NDIS intermediate filter had to maintain both protocol and miniport interfaces. Starting from NDIS 6.0, the driver is called NDIS filter and interacts only with NDIS.
Advantages:
- Allows for catching network traffic at the lowest possible level
Limitations:
- Non-obvious installation
- Absence of process context. At the NDIS filter level, we can’t sort data by processes, users, etc. You can check out an NDIS filter example on the Microsoft GitHub page.
Windows Filtering Platform
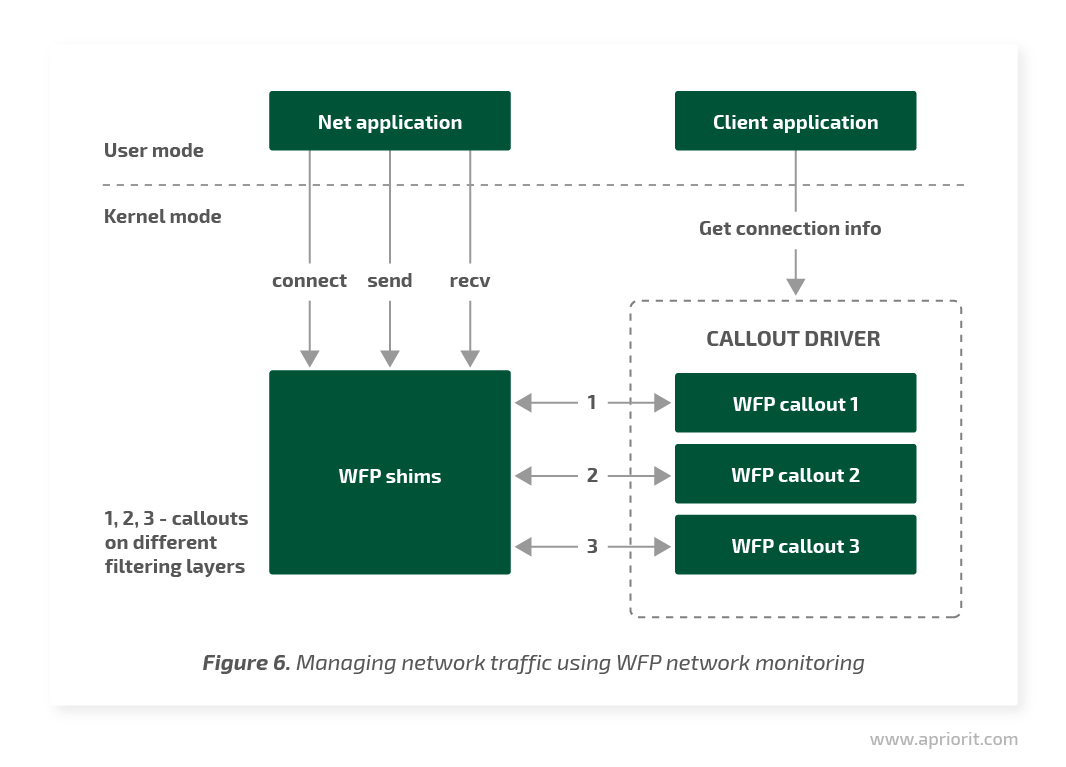
The Windows Filtering Platform, or WFP, is a Microsoft technology introduced in Windows Vista and Windows Server 2008 and designed to replace outdated techniques for traffic filtration. WFP has an understandable architecture and allows for monitoring and/or changing data at various levels of the Windows network stack. WFP consists of user mode and kernel mode APIs. However, lots of its functions can only be accessed from the kernel.
In user mode, we can create filters with various settings. For example, we can pass or block the traffic for a certain IP address and port through a certain protocol. In case deeper filtration is required — for example, packet content analysis — the corresponding logic can be implemented in a callout driver that registers one or more callouts at the required WFP layers.
Each callout can have the following functions:
- classifyFn — Called for data classification. Inside this function, a callout receives access to data related to the network event and can pass this event or block it.
- notifyFn — Called to notify a callout about related events (for example, when adding a filter)
- flowDeleteFn — Called during data thread termination so a callout can clean its data related to the thread
Let’s take a brief look at WFP pros and cons before analyzing examples.
Advantages:
- Different levels of filtration
- Lots of metadata like PID, process name, addresses, protocols, etc. is accessible at all levels
- Code simplicity
Limitations:
- Some features are only available on the most recent Windows versions
- Documentation isn’t descriptive enough and can contain mistakes
- Dependence on the Base Filter Engine service
- There still can be conflicts with third-party software
Now let’s take a look at several examples of how to use the Windows Filtering Platform.
Read also
3 Effective DLL Injection Techniques for Setting API Hooks
Start using API hooks to modify the behavior of Windows apps according to your needs. Explore three ways to set API hooks with our practical examples
Using the Windows Filtering Platform for network monitoring
Let’s assume we’re developing a product like netstat or TCPView. We need to provide users with information about TCP connections in the system: inbound and outbound IP addresses and ports as well as the number of bytes transferred through these connections.
To implement this method, we’ll register several of our callouts at different WFP layers. Windows will call them for processing events to set or abort TCP connections as well as to transfer data through the network. In the kernel, we’ll store the map of opened connections with information about the connection, process, number of transferred bytes, etc.
We’ll need callouts at the following WFP layers:
- FWPM_LAYER_ALE_FLOW_ESTABLISHED_V{4/6} — At this layer, we receive a notification about connection setup. In the classifyFn function, we gather information about a connection and add a node to the map.
- FWPM_LAYER_STREAM_V{4/6} — Here, we process the data that goes through the network stack. In the classifyFn function, we gather data about the direction and volume of a transmission and add this information to the map. In the flowDeleteFn function, we remove the connection from the map and the connection is closed.
The user mode product component will receive data from the driver and show it to the user.
WFP connect redirection
This time, statistics on connections and the amount of transferred data is not enough for us. Now we need deep packet inspection (DPI), which will help us to identify and filter application-layer protocols like HTTP.
Therefore, we can use callouts at the FWPM_LAYER_STREAM_V{4/6} layer. However, gathering and processing data in the kernel mode is way more complicated than in user mode. Especially if we want to implement a Transport Layer Security (TLS) man-in-the-middle attack (MITM), which is legal as it’s commonly used in antivirus software. In this case we need to gather, store, and send network packets for DPI, generate certificates for MITM, keep two connections, and arrange support for TLS.
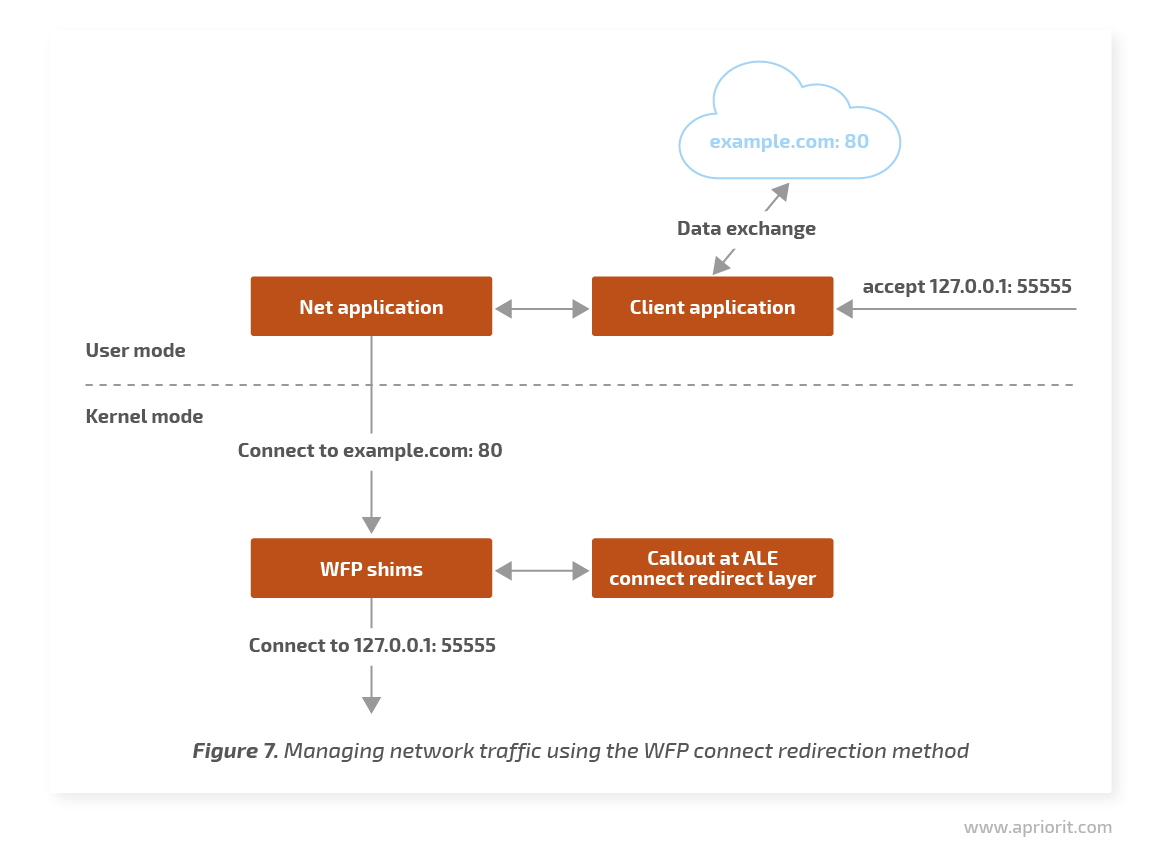
We’ll use WFP to redirect connections to our proxy service that’s working at the localhost. Instead of the designated server on the internet, our proxy service will receive connections from applications and will itself connect to the designated server. Thus, all data exchanged between a client and a server that passes through our proxy will be transparent for both the client and server.
For connect redirection, we’ll need a callout at the FWPM_LAYER_ALE_CONNECT_REDIRECT_V{4|6} layer. Before setting a connection, the system will call our classifyFn function that will help us change the target IP and ports to ours. When redirecting to the localhost, we’ll need to specify the ID of the process that will receive the redirected connection.
Connect redirection is available on Windows platforms starting from Windows 7, but it has some limitations. Let’s analyze them.
After receiving a redirected connection from the local client, the proxy service needs to establish a second connection with the server to which the connection was initially addressed. In Windows 7, there’s no native way to change the destination of the original connection from the callout driver to the proxy service. This is why we’ll need to find another approach to transfer this data. For example, a driver can keep a map of redirected connections with the outbound port in the form of a key and the proxy service will request this data after receiving a redirected connection.
In Windows 8, this issue is solved using a local redirect context. After the redirect, a callout can save random data in the WFP structures. The proxy service can receive this data using a simple WSAIoctl call to the socket, received from the accept function.
Another possible issue with Windows 7 is the presence of several redirects. For example, callout 1 will redirect the original connection to proxy service 1. Callout 2 will redirect the outbound connection from proxy service 1 to proxy service 2. And callout 1 will redirect the outbound connection from proxy service 2 again to proxy service 1. Thus, we’ll receive an infinite cycle of redirects. In the Microsoft sample driver, this issue is solved by counting the number of redirects for one connection. A callout just doesn’t redirect a connection if it was already redirected more than three times.
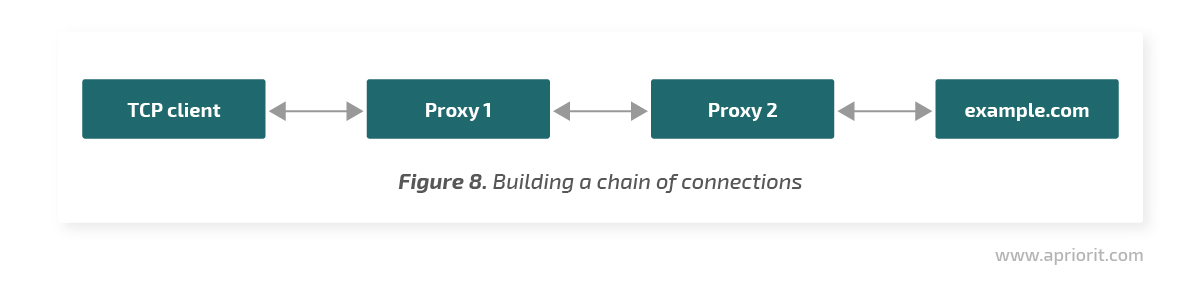
In Windows 8, a redirect record is added to the scheme. The proxy service receives a data buffer using the socket (received from the accept function) and connects it to the socket that will be used for the outbound connection. A callout, in turn, uses the classifyFn function to receive the connection redirect state from the system and pass the connection if it has already been redirected by the callout. This allows Windows to build chains of connections from the original client to the target server through several proxies.
An example of WFP connect redirection
As an example, let’s try to redirect connections using the Microsoft sample driver. First, we’ll set the WFPSampler using the instructions provided by Microsoft and deploy it on a test machine.
Unfortunately, there’s no listening proxy server attached to the Microsoft sample, although it’s mentioned in the documentation. Therefore, let’s take the Boost.Beast example as a server. Let’s build it, deploy it on the test machine, and create an index.html file with the following content:
<!DOCTYPE html>
<html>
<body>
<h1>Hello from local server</h1>
</body>
</html>Now let’s run the test server:
http_server_sync.exe 0.0.0.0 55555 .Then we’ll initiate connect redirection:
WFPSampler.exe -s PROXY -l FWPM_LAYER_ALE_CONNECT_REDIRECT_V4 -iprp 80 -ipp TCP -pra 127.0.0.1 -prp 55555 -plspid 2116 –vNow all outbound TCP connections addressed to port 80 will be redirected to 127.0.0.1:55555. The 2116 value from the command above is the ID for the http_server_sync.exe process.
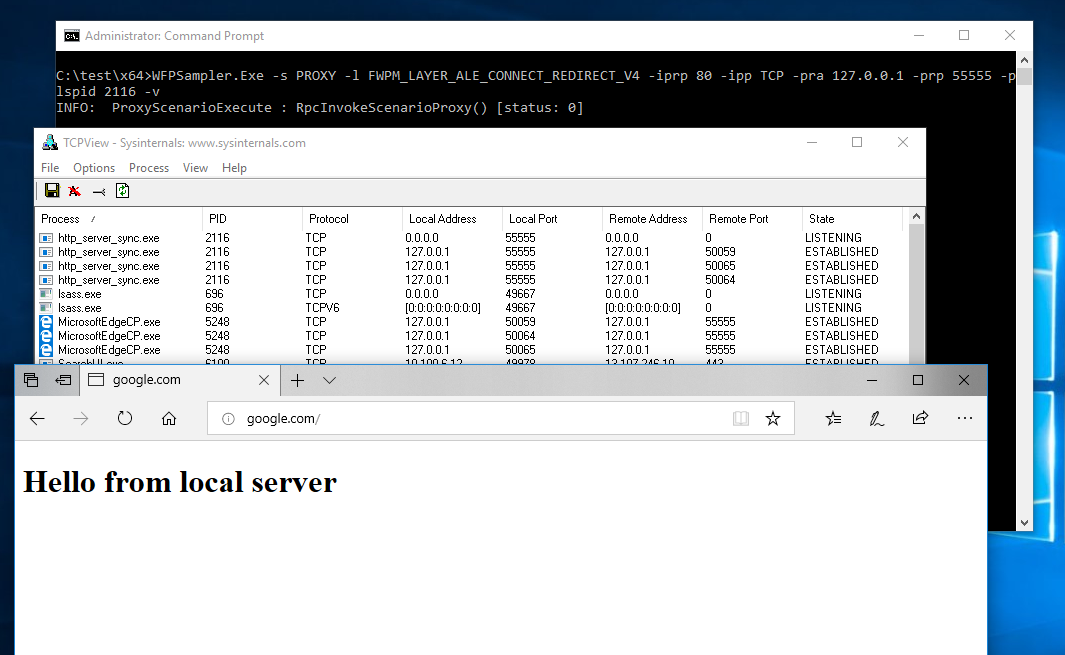
Figure 9. The result of connect redirection using the Microsoft sample driver
As you can see, the WFP connect redirection technique is quite easy to implement. However, you should keep in mind the limitations for various Windows versions described above.
Conclusion
There’s no one correct option for network monitoring that suits all software products and all Windows versions. However, among all the ways we explored above, the Windows Filtering Platform seems the most convenient. WFP significantly saves your time when building and maintaining a product.
Still, this technology has some flaws. Its documentation may contain gaps, and some features are available only in recent Windows versions. So you may need to choose an alternative approach in case you’re working with old versions of Windows like XP.
At Apriorit, we have a dedicated kernel and driver development team that’s ready to share their experience and develop a robust solution for your project.
Need a team of driver developers?
Let’s chat about how we can expand your product’s abilities using our niche expertise in driver and kernel development!
Have a question?
Ask our expert!
Program Manager


