 Skip to main content


As the amount of data rapidly increases, tools for image optimization become crucial for data storage and transfer. Currently, there are a variety of image compression and decompression techniques. But how can you ensure that your solution really meets all your customers’ needs?
In this article, we discuss approaches to image encoding and decoding and share our experience testing a client’s image compression application based on the Good, Fast Wavelet Codec (GFWX).
This article will be helpful for testers and developers who are working on image processing software based on similar open source projects and who would like some tips for better image encoding and decoding.
Contents:
Image compression and decompression
To begin, what’s image compression and decompression?
Image compression is the process of reducing the size of a digital image, typically to reduce the cost for storage or transmission. From a mathematical point of view, it’s the process of transforming a two-dimensional pixel array into an uncorrelated data set.
Image encoding is possible due to the presence of redundant information in an image. This redundant data includes information about pixels that are nearly identical to their neighbors. During compression, the number of nearly identical pixels can be reduced while maintaining the original resolution and keeping the quality close to that of the source image.
During the encoding process, the following kinds of redundancies can be removed:
- Coding redundancies, which occur when some pixel values are repeated
- Inter-pixel redundancies, including data for neighboring pixels with almost the same value
- Psychovisual redundancies, which occur when an image contains combinations of colors that the human eye can’t distinguish simultaneously
In contrast, image decompression is the process of decoding an image to reconstruct the source image from its compressed version. The choice of decoding algorithm is determined by the method used to encode the image. The process of image decoding is usually started automatically by a decoder when a file is opened or run.
Image compression and decompression have a great variety of applications, from sharing personal images to television broadcasting.
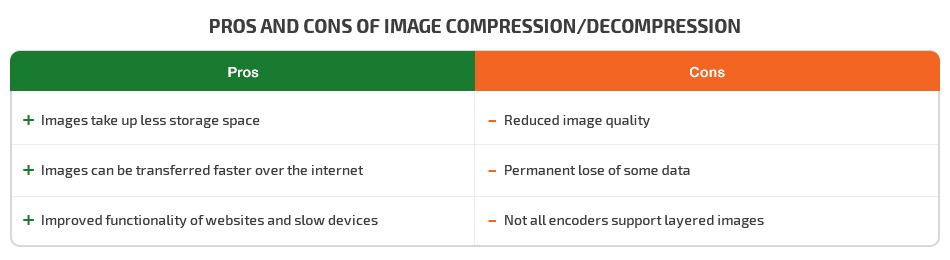
Let’s take a look at the main benefits and drawbacks of image compression and decompression:
Process of image compression
Image compression algorithms vary in how they work, but they all include the following stages:
- Transformation – Used to define and eliminate redundant information in the source image. In this step, the image is prepared to be processed by an image codec.
- Quantization – This process is applied to select relevant data and remove irrelevant data. In this step, some information can be lost, so it’s only applied if quality reduction is acceptable. During the inverse step, called dequantization, the goal is to minimize data loss over picture quality.
- Entropy encoding – This is when various image compression algorithms are applied to reduce the file size without losing information. During entropy encoding, image is compressed by replacing each fixed-length input symbol with the corresponding variable-length prefix codeword.
Image compression methods
Lossless and lossy compression are two types of image compression methods. We’ll explain the difference between them.
Lossless compression
Lossless image compression is achieved with a group of compression algorithms that reduce the size of an image without losing any information. Lossless compression methods are usually applied to high-value content where any deviations from the source are unallowable, such as satellite images, medical scans, technical drawings, icons, and text.
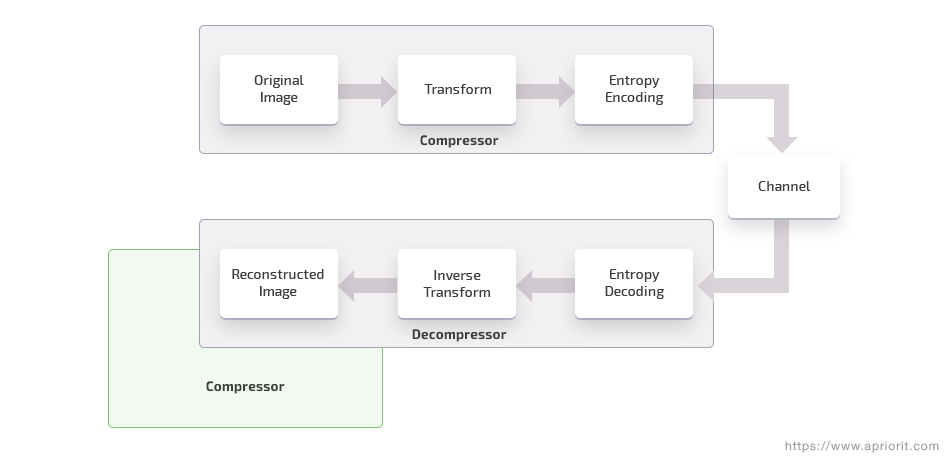
Lossless compression is usually performed with a two-step algorithm. First, the image is transformed to reduce the inter-pixel redundancies. Then coding redundancies are removed with an entropy encoder. Decompression of an image encoded with a lossless algorithm perfectly reconstructs the source image. The process of lossless compression and decompression looks like this:
Lossless image compression techniques include the following groups of algorithms:
- Run-length encoding, or RLE, reduces the number of repeated pixels in an image. The repeated pixels are substituted by a number indicating how many times a pixel of a certain color is repeated and the intensity of each pixel. This algorithm is commonly used for encoding grayscale images like fax machine messages. It’s used by default in such file formats as PCX and is one of the possible encoding techniques for BMP, TGA, and TIFF.
- Entropy encoding is the process of encoding a source image when each image block is assigned the smallest probable codeword. The length of each codeword is proportional to the negative logarithm of probability. The two most commonly used algorithms for entropy encoding are Huffman coding and arithmetic coding. The Huffman coding algorithm is based on assigning shorter codewords to more frequently used pixels, thus reducing the overall size of the image. During arithmetic coding, an image is encoded as a whole new symbol instead of separable symbols and is represented as a range defined by two numbers.
- Dictionary-based coding is performed using a pointer or index in the dictionary. This technique is only applicable to picture that generate a relatively small number of patterns or symbols quite frequently. The most common dictionary-based compression algorithms are Lempel-Ziv-77 (LZ77) and Lempel-Ziv-Welch (LZW), which are used in the GIF and TIFF file formats. DEFLATE is a compression method that combines the LZ77 algorithm with Huffman coding. It’s applied to PNG images as well as ZIP and GZIP image formats.
Lossy compression
Lossy image compression is accomplished by removing data from the source image in exchange for increased compression. It’s used for pictures where some data loss can be tolerated. This class of image compression methods exploits both code and inter-pixel redundancies as well as properties of psychovisual perception.
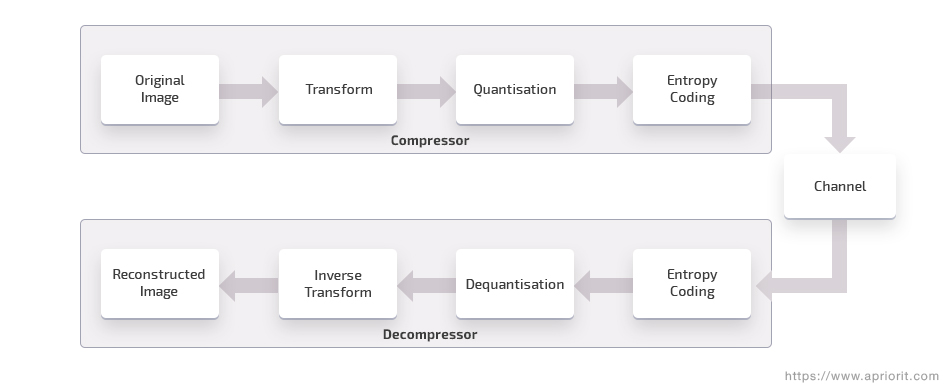
Decompression of a lossy encoded image retrieves data different from the source image. Image file formats that use lossy compression include JPEG, TIFF, MNG, and PGF. The process of lossy encoding and decoding looks like this:
Lossy image compression techniques include the following groups of algorithms:
- Predictive coding is based on eliminating inter-pixel redundancies, which allows for extracting and encoding only the new information in each pixel by using an identical predictor. This predictor generates the anticipated values of new pixels based on their previous inputs. Predictive coding includes such algorithms as differential pulse-code modulation (DPCM).
- Transform coding is performed by packing the image data into a small number of coefficients that are further quantized to take up less storage space. A fourier-related transform such as discrete cosine transform or wavelet transform is applied during this type of image encoding. During a discrete cosine transform, the picture data is converted into a sum of sinusoids of varying magnitudes and frequencies. Wavelet transform decomposes the signal into a range of wavelets, splitting the picture data into different frequency components and investigating them with a resolution matched to their scale. The most popular picture format using wavelet transform is JPEG 2000.
Now that you’re familiar with image encoding and decoding principles, let’s see how to test an image encoder in an image optimization solution.
Testing an image encoding application
During one of our projects, the Apriorit QA team tested a client’s application based on the Good, Fast Wavelet Codec, or GFWX. This application encodes source images in PNG, JPEG, BMP, and other formats into GFWX using lossy and lossless compression methods and then decodes them into the source format with minimum loss of data.
The GFWX codec was developed in 2016 by Graham Fyffe for optimizing large amounts of video data. The compression ratio of GFWX is similar to JPEG 2000, but its compression speed is several times faster. Among the other benefits of this codec, it can be used for both lossy and lossless image encoding and it provides innovative decompression with optional downsampling.
The main goal of our testing was to ensure that the application produced the decoded GFWX image with the same parameters as the source image. To achieve this goal, we covered the application features with the maximum number of meaningful tests.
During testing, we encoded images with different parameters into GFWX format and then decoded them with a compression/decompression binary. After that, we compared the source and decoded images with a special script. At the same time, we intersected the checks with each other. For example, we used a PNG and JPEG file with a size of 1 MB and a resolution of 512 x 512 pixels or two JPEG files with different sizes and resolutions.
Test data
For image encoding and decoding, we used a range of pictures in various formats, sizes, resolutions, and color models taken from the following resources:
- https://visibleearth.nasa.gov/view.php?id=73751
- https://testimages.org/
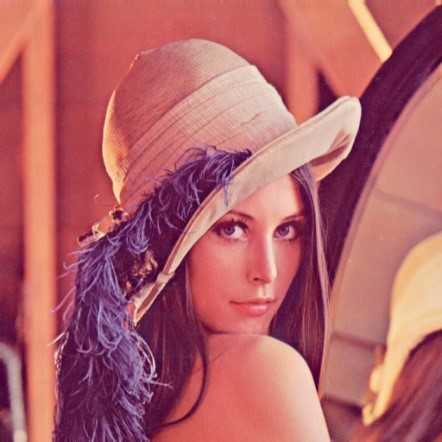
- https://en.wikipedia.org/wiki/Lenna
Below, you can see the parameters of the images we used for GFWX codec testing.
Formats:
- PNG
- JPEG
- BMP
- ICO
- GIF
Sizes:
- 4 MB
- 87 MB
- 245 MB
- 200 KB
Resolutions:
- 64 x 64 pixels
- 512 x 512 pixels
- 1000 x 1000 pixels
- 2160 x 2160 pixels
Color models:
This variety of pictures was used for covering the maximum amount of incoming data and ensuring that all images were converted properly.
Test environment
To get the maximum information about the performance of the tested application, we ran the tests on the following operating systems:
- Windows 10, x64 (Core i5-7400 3.00 GHz, 8 GB RAM)
- Ubuntu 18.04 (Core i5-7400 3.00 GHz, 8 GB RAM)
- macOS 10.14 (Core i5-7400 3.00 GHz, 8 GB RAM)
Further, we describe the issues we faced during the testing of each application feature and analyze the final results of testing.
Compressing images
The compression parameters we used are described below. You can apply all of these parameters together; however, we’ll describe the impact of each of them separately. This way you can better understand what changes a specific compression parameter can cause.
Selecting the block size
Before encoding, an image should be divided into square blocks to make it suitable for compression. Both the computational complexity and the final compression efficiency depend on the block size. Blocks are usually 8×8 pixels or 16×16 pixels.
After the transformation coefficients are calculated for each block, it’s necessary to quantize and encode them. During entropy coding, each block is encoded separately, and its size is recorded.
If the block size is too small, the image will be divided into too many blocks and the last blocks will contain little entropy. If the block size is too large, there will be few blocks but each of them will be encoded inefficiently, as it will include too much information. In both cases, there’s a risk that the encoded image may be even larger than the source image.
We faced problems when dealing with large images. First, the smaller the block size, the longer the image takes to process. Second, there’s a risk of getting the “Failed to write the whole buffer” because when we choose 1 as the block size, each pixel is written in a separate block.
In our case, we used the default block size of 7, but you can choose another size for your specific needs. However, we recommend using the default block size or higher to avoid errors. Also, there’s no need to compress the image to the minimum size, especially when you lack time.
Here you can see the results of block size testing:
 Source image

Block size 7
Applying the GFWX encoder
In the case of entropy encoding, which is implemented in GFWX by Golomb-Rice coding, certain coefficients are used to encode each block. GFWX uses three modes to select these coefficients:
- Turbo – The coefficients are always 0. This is the fastest mode, but the size of the compressed image is larger since each block is encoded without coefficients.
- Fast – Coefficients accumulate along the coding. This mode is a bit slower than Turbo, but the compression quality is much better.
- Contextual – Coefficients are calculated from several adjacent blocks. This is the slowest mode, but the size of a compressed image is close to that for JPEG 2000.
The recommended compression speed is Fast, but you can choose another speed if necessary. With a high compression speed, more image quality is lost. When the compression speed is low, the image quality is better.
Encoder testing results:
Source image

Fast encoder mode
Filtering
To encode an image in GFWX, pixel colors, which represent the frequency of a light wave, are transformed into wavelet function coefficients. These coefficients are easier to compress since they have higher collinearity than the frequency of the wave (i.e. the color). GFWX supports two types of wavelet filtering functions:
- Linear is a fast filtering function, but it depends only on a pair of pixels, which leads to less collinearity of the coefficients and increases the size of the compressed image.
- Cubic is a slow filtering function that depends on groups of three pixels. Due to this, the collinearity of the coefficients is much higher and the image is compressed more efficiently.
As we worked with different types of images, we discovered that linear filtering is better for lossless image encoding, while cubic filtering is preferable for lossy image encoding.
Let’s look at the filtering results:
Source image

Image after linear filtering
Changing the color model
In our testing, we changed monochrome and RGB images to the following color models:
- RGB, or red, green, and blue, combine to reflect the great variety of colors.
- BGR that is the same as RGB, but with red occupying the least significant area.
- BGRA differs from BGR as it includes an alpha channel used for partial transparency.
- RGBA differs from RGB as it also includes an alpha channel used for partial transparency.
We wanted to ensure that the change of the color model didn’t lead to changes in the image data or increased image compression time. To check this, we changed the colors from RGB to BGR:
Source image in RGB
Decoded image in BGR
Note that the order of color channels has been reversed: BGR instead of RGB. In many cases, there’s enough space for sequential line storage, so color lines can follow each other, creating one long line. This method can increase the time for image encoding, as all color lines are stored in one place.
Checking image quality
Unfortunately, there’s no universal criteria for verifying image quality. This is because the viewer’s reaction is unpredictable and depends on personal factors.
Image quality is evaluated based on personal criteria and reflects peculiarities of the compressed image. Depending on what information you want to discover from the image, different criteria can be used.
In our case, we used a specially written script that defined image quality within a range from 1 to 1024, where 1 defines the worst image quality with lots of data loss and 1024 represents a fully lossless image.
We used these criteria when working with high-quality images whose quality could be reduced after decoding. In the case of lossy compression, the time for the compression process will depend only on the desired image quality.
Let’s compare the picture quality results:
Source image

Compressed image 1024
Downsampling
Downsampling is used to specify the part of the blocks to be decoded.
It is useful for creating previews of images and load balancing when showing a stream of images.
However, downsampling reduces image quality automatically during decoding.
For example, 100% / (2 × downsampling) blocks are decoded.
That is, if downsampling = 2, then 25% of the blocks are decoded, which reduces the picture resolution by 2 × 2 = 4 times.
Problems during image compression and decompression
Issues with compression appeared when we were processing large images (more than 200 MB) with a resolution of 40 megapixels. The main problems related to the following:
- interruptions to the coding process because of buffer overflows
- long time for encoding
- lack of computing resources (Windows 10 configuration performed significantly slower than other operating systems under the test)
Like compression, decompression can be time-consuming and cause errors in transmission. In our case, sometimes not all blocks were decoded when decoding an image. This leads to a decrease in image resolution but significantly speeds up decompression.
During decompression, we experienced the following issues with the performance of the test application:
- It crashed if the image width/height/channels were much higher than the original.
- It hung if there were too many layers.
- It crashed when there was a large contrast in nearby pixels.
- It failed when we changed the block size for a very large image.
To solve these issues, we extended our computing capacities as well as the amount of memory.
Conclusion
As you can see, lossy and lossless compression are two different approaches to reducing the size of a digital image. You can use these techniques for saving money on image transfer and storage. In testing our client’s application, we verified that it significantly compresses images and produces output images without any data loss.
In the examples we’ve described, we tested the application features by compressing and decompressing different types of images. While there were different results for different file types, downsampling improved the overall size reduction. The results of our tests reveal that applying the default parameters doesn’t provide meaningful changes to image quality but allows for reducing the file size.
Need a team of experienced quality assurance specialists to help you test your solution for image encoding and decoding? Send us your request for proposal and we’ll get back to you.
Have a question?
Ask our expert!
VP of Engineering


