 Skip to main content

Key takeaways:
- Windows Hardware Quality Labs (WHQL) testing is a must for any driver development company that wants their devices to work smoothly with Windows.
- Without WHQL certification, users will receive a warning message about possible compatibility issues when installing a driver. Also, the driver will not be added to Microsoft Compatibility Center.
- To obtain WHQL certification, you need to conduct predefined testing and submit the results to Microsoft.
- Testing activities require specialized toolkits. You’ll also need a QA team that knows how to configure WHQL-compliant testing infrastructure and pass all the required tests.
Quality standards for device drivers vary greatly across markets, hardware types, and projects. To make sure a driver works well on Windows machines, Microsoft has established the Windows Hardware Certification Program, commonly known as WHQL testing.
The program includes tough requirements that development and quality assurance (QA) teams need to account for in their projects. In this article, we explain how to deploy WHQL infrastructure and the WHQL testing flow. This information will be useful for tech leaders who develop devices and drivers for Windows and are preparing for WHQL testing and certification.
Contents:
- What is WHQL testing and why do you need it?
- How to choose the Windows Hardware Lab Kit for your project?
- WHQL infrastructure deployment
- WHQL testing flow
- 1. Create a machine pool
- 2. Create a test project
- 3. Select a target
- 4. Select and run tests
- 5. Analyze the results
- Getting Microsoft Hardware Certification
- Build WHQL-compliant drivers with Apriorit
- Conclusion
What is WHQL certification and why do you need it?
Windows Hardware Quality Labs is a framework that allows you to test the reliability and compatibility of your device or driver with Windows. Successfully passing all tests allows you to obtain Microsoft Hardware Certification and opens the door to driver distribution through Windows Update and the Microsoft Update Catalog. Previously, Microsoft charged a fee for WHQL testing, but now the procedure is free.
During the WHQL testing procedure, you run a series of tests to verify the quality of your driver on third-party hardware or software. Then you submit the log files for Microsoft to review. If your Windows driver successfully passed all WHQL tests, Microsoft will send you a WHQL release signature file that you should add to the driver installation package. This signature confirms that your driver is compatible with Windows.
There are several key reasons to obtain Windows Hardware Certification:
- Getting a WHQL release signature provides you with a Certified for Windows logo (or something similar) to use on your product packaging and advertising, as well as a WHQL release signature verifying the source and legitimacy of your driver. Without Microsoft Hardware Certification, a user will see a warning message when installing your driver. This message says that Windows can’t verify the publisher of the software or that your software has not passed neсessary testing to verify compatibility with Windows.
- WHQL-certified drivers are included in Microsoft Compatibility Center, which provides the latest updates to the Windows operating system. This allows end users to download your driver automatically when they use a device for the first time.
- Your driver gets better test coverage with WHQL driver certification. This allows testers to find almost all driver defects and lets developers fix them before release. The testing process also helps test centers better support the driver device. Microsoft Hardware Certification proves that a driver has been tested thoroughly with Microsoft-approved QA standards.
- Microsoft Hardware Certification prevents driver tampering. This is great from a security perspective, but it also means that any driver updates will require your driver to pass WHQL testing again.
Having a WHQL certification is a must for any driver developed for Windows machines. And the first step of getting a signature is getting a testing kit relevant to your target operating systems.
How to choose the Windows Hardware Lab Kit for your project?
WHQL testing is performed with a special toolkit depending on the target operating system. There are three of them:
- Windows Hardware Lab Kit (Windows HLK)
- Windows Hardware Certification Kit (Windows HCK)
- Windows Logo Kit (Windows LK)
The table below shows which version of which kit should be used with a given operating system.

Once you have obtained the necessary toolkit, let’s build an infrastructure suitable for WHQL testing. If you’re only interested in the process of obtaining certification, feel free to skip the next two sections.
Want your driver WHQL certified?
Partner with Apriorit’s developers and QA experts to test and refine your driver so it passes Microsoft’s review smoothly.
WHQL infrastructure deployment
WHQL testing requires a specific test environment. Table 2 shows what components you should prepare to perform testing with Windows HLK for Windows clients.
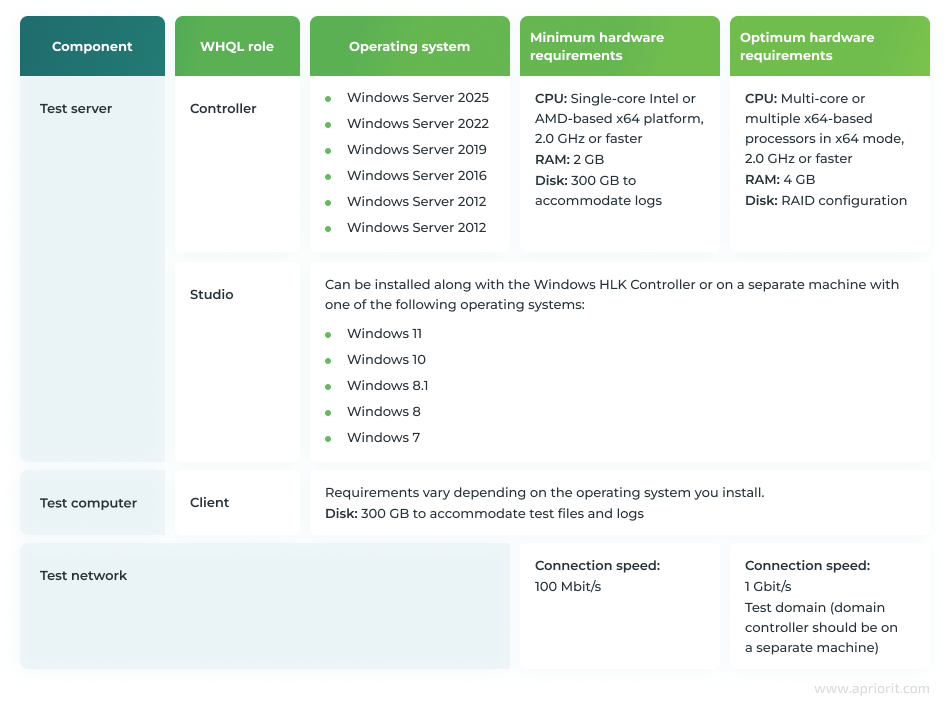
Installing Windows HLK Controller and Studio doesn’t take much effort. You just need to download and run the setup file of the kit corresponding to the target operating system. During installation, you need to allow a port to be opened. Otherwise, installation may fail. Installing HLK Controller and Studio took us approximately 45 minutes.
The Windows HLK Client takes just several minutes to install on the test computer using an installer file. If the test computer is not a member of the local network domain, the Guest account should be enabled on it. To begin installation, it’s first necessary to mount the test server’s shared folder – called HLKInstall – along with its subfolder named Client, as shown in Image 1.
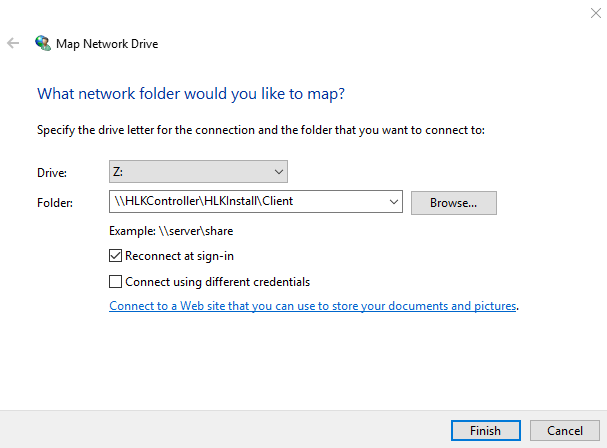
Image 1. Mounting the Windows HLK Controller’s shared folder on the test computer
From the mounted folder, it’s enough to run the Windows Command Setup.cmd (see Image 2). It will determine the computer’s processor architecture and launch the appropriate installer.

Image 2. Run Setup.cmd to start installing the Windows HLK Client
With the infrastructure ready, let’s move to WHQL testing. We’ll walk you through the five key steps and provide detailed examples.
WHQL testing flow
The WHQL testing process can be divided into five steps:
- Create a machine pool
- Create a test project
- Select a target
- Select and run tests
- Analyze the results
Let’s take a close look at each of these steps.
1. Create a machine pool
To perform testing, you’ll probably have to operate with a certain group of test computers. In Windows HLK, this group of computers is called a machine pool.All new clients are automatically placed into the default pool. However, this pool can’t be used for testing purposes. So, you have to create a new one.
To do this, launch HLK Studio on the test server and choose Configuration at the top of the page. Then, select $ (Root) and choose the Create Machine Pool option in the context menu. You can rename your pool as you want (see Image 3).
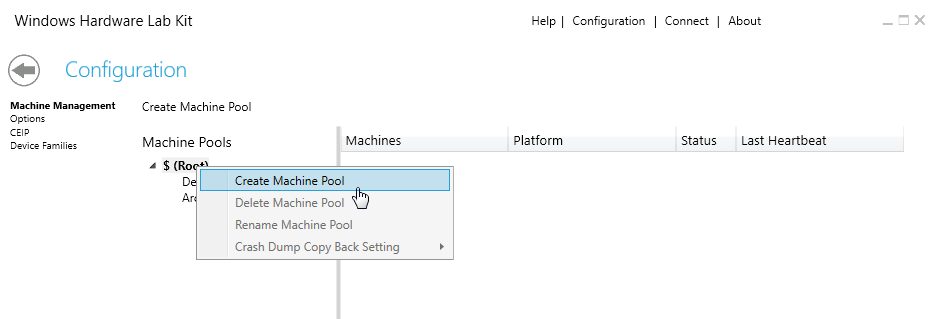
Image 3. Creating a machine pool
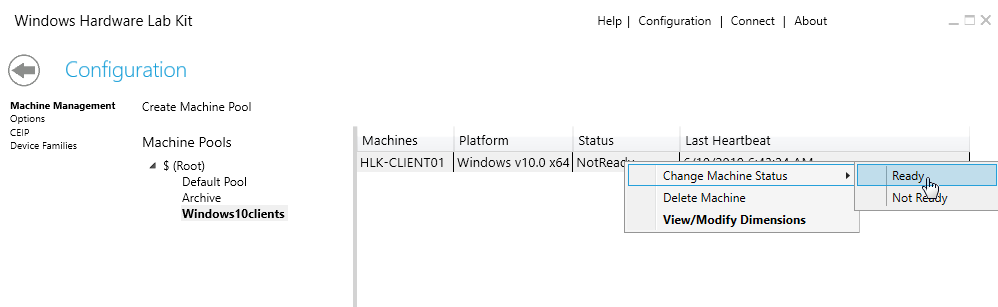
After the pool has been created, just drag and drop your client from the default pool into the new pool as shown in Image 4.
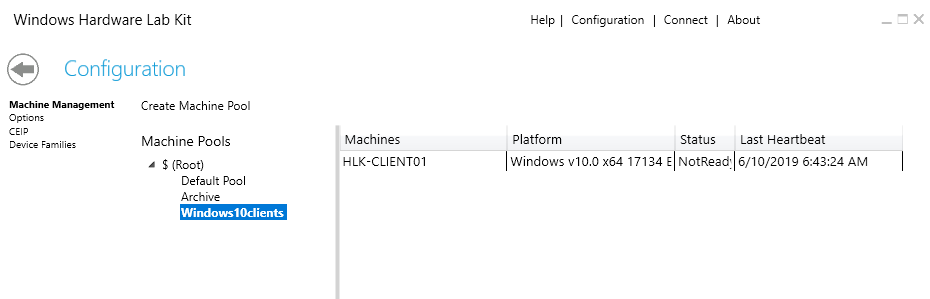
Now, switch the client to the Ready status in the context menu. This initializes the client on the test computer and gets it ready for testing. If you forget to switch the status, you won’t be able to proceed with testing the client.
2. Create a test project
A project defines what you want to test. To create one, choose Create project in Windows HLK Studio.
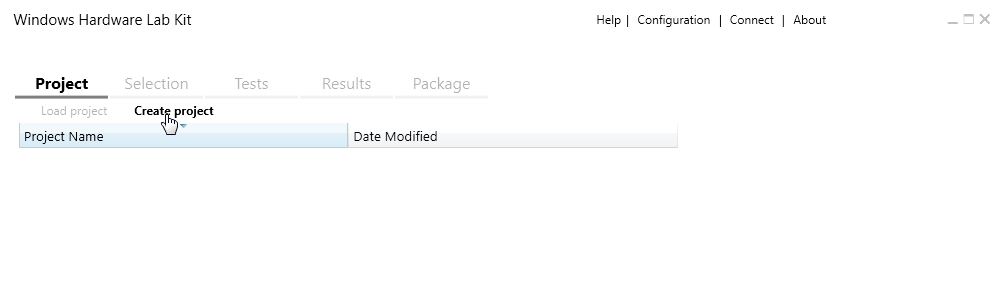
Image 6. Create a new project
Here, you can also enter a custom name for the project. If the project wasn’t loaded by default (in which case its name should appear under the Project tab), you can provide a custom name via the context menu.
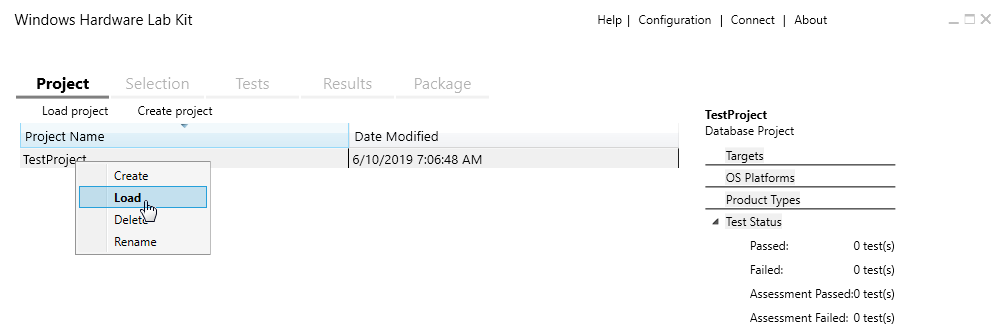
Image 7. Load the created test project via the context menu
3. Select a target
A target in Windows HLK is an individually testable feature that your device or driver implements. To select a target, choose the Selection tab under the name of your project and choose your pool of test computers.
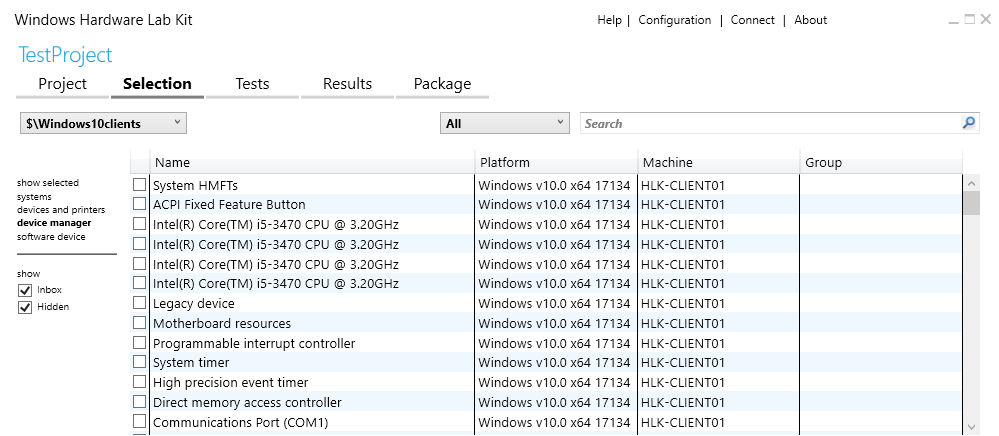
Image 8. Selecting a target for testing
As you can see in Image 8, targets can be filtered by the following options:
- show selected – displays only the selected targets
- systems – used to test a complete client
- device and printers – used to test an external device connected to a test system
- device manager (selected by default; has the most detailed view) – used to test a component of a test system
- software device – used to test filter drivers, firewalls, and antivirus software installed on the test system
It’s necessary to select all features of a specific product type for a device or driver to receive Microsoft Hardware Certification.
4. Select and run tests
The Tests tab in Windows HLK Studio shows the tests for the selected target. All tests are categorized by the test phase as shown in Image 9.
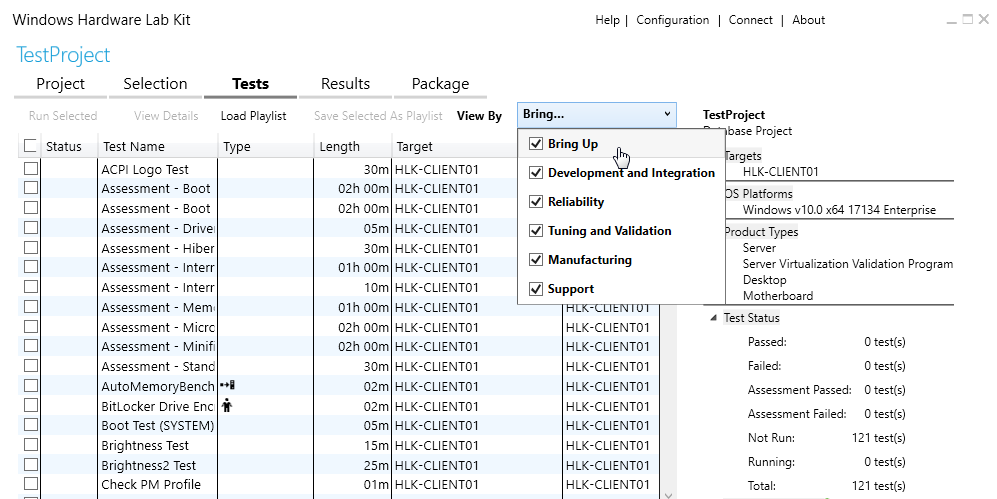
Image 9. Test categorization by test phase
Let’s look closer at each category of tests:
- Bring Up tests verify that the device works properly at launch. Examples of Bring Up tests include disabling and enabling devices with I/O before and after, sleep with I/O before and after, etc.
- Development and Integration tests include all tests needed to check the correct device implementation and integration with the system. Examples include removing the device, conducting compliance tests, and running the HyperVisor Code Integrity Readiness test.
- Reliability tests verify that the device will work in extreme conditions, such as when faced with thousands of create-open-close sequences or I/O operations during reboot and restart. Examples of reliability tests are fuzz open and close tests and reboot-restart with I/O during disk stress.
- Tuning and Validation tests include signature verification, INF file verification, and TDI filter verifications.
- Manufacturing tests can include such verifications as Secure Boot logo test, signed driver check, and battery validation.
- Support tests, such as the ApiValidator test, verify whether the device will be easy to maintain.
It doesn’t matter that different test phases might include the same test. For instance, the Sleep with I/O before and after test is suggested by HLK Studio in two phases – Development and Integration and Reliability. The difference is in the way the test is conducted. At the Development and Integration phase, the test lasts only about 5 minutes, whereas at the Reliability phase it runs for about 45 minutes. A detailed description of each test can be found on the HLK Test Reference page.
To select a specific test in HLK Studio, just check the box and choose Run Selected (Image 10).
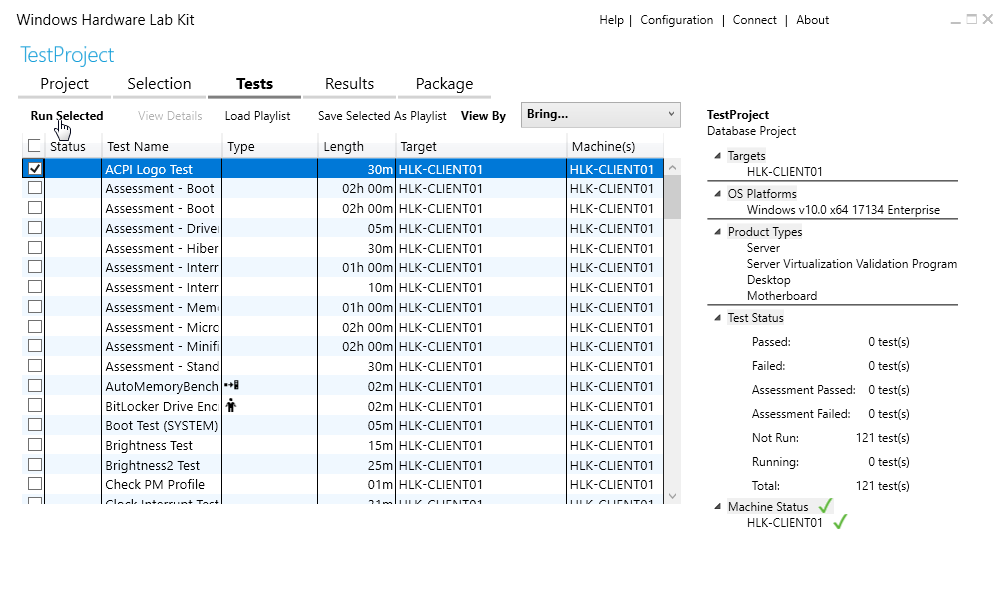
Image 10. Select and run tests
5. Analyze the results
Test results are displayed in the Results tab. After each test is completed, the status column is updated with the result: pass or fail.
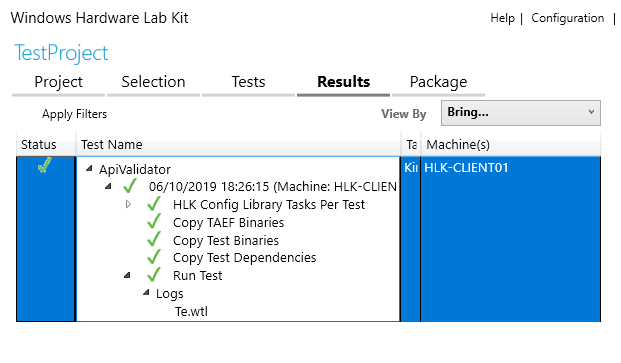
Image 11. Example of the ApiValidator test result
Log files contain details of all completed tests. A log file has the .wtl extension and can be opened with the Windows HLK Manager included in the kit.
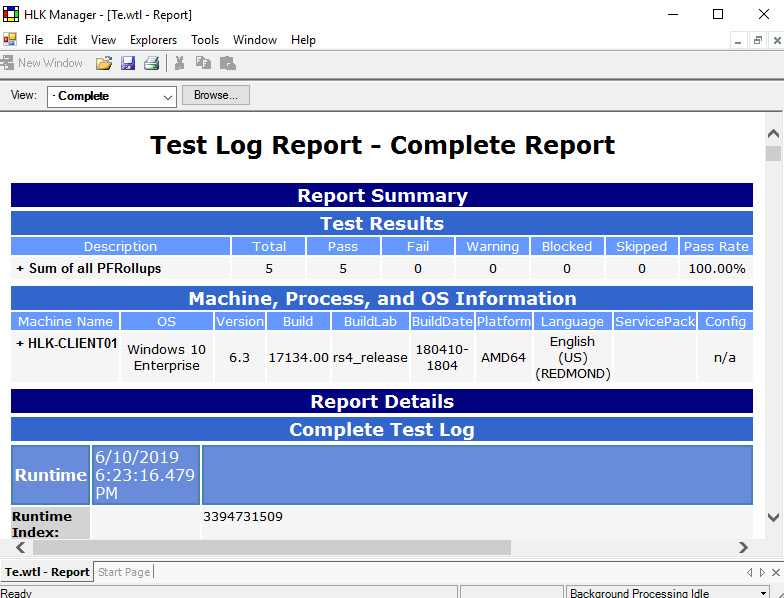
Image 12. Test log report in Windows HLK Manager
If a test has failed, you can find a description of the error in the report.
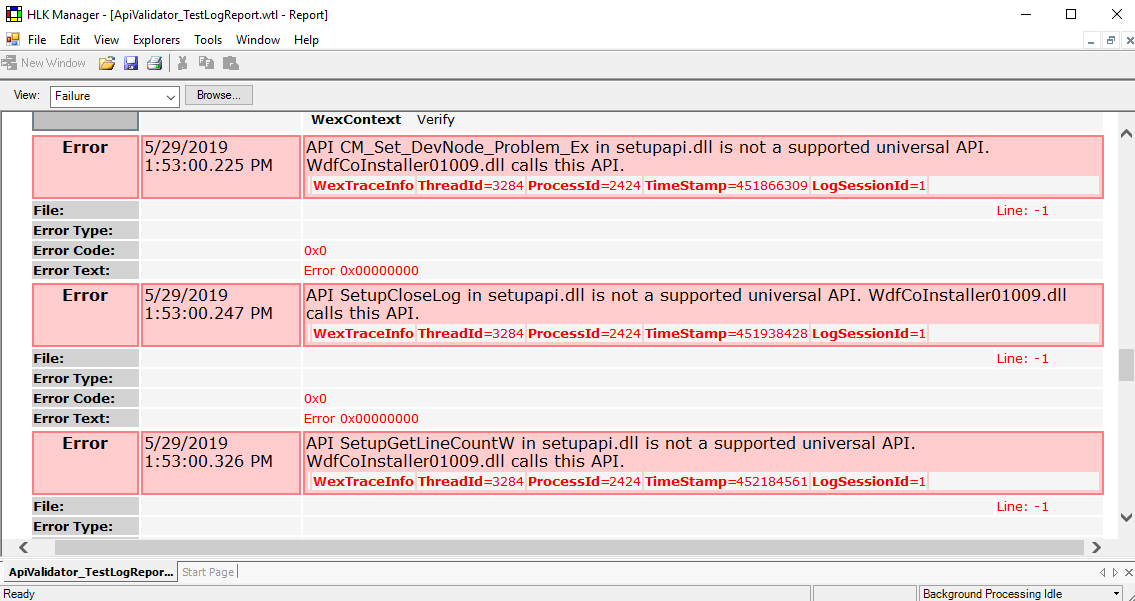
Image 13. Failed test log report in the Windows HLK Manager
After you eliminate the reason for test failure, you can run the test again.
Related project
Improving a Windows Audio Driver to Obtain a WHQL Release Signature
Discover the details of improving the audio driver for the Windows version of client’s AI-powered sound filtering application. Find out how Apriorit developers helped our client successfully obtain a WHQL certification.

Getting Microsoft Hardware Certification
If all tests for the selected target have been passed successfully, you can go to the Package tab of Windows HLK Studio and create a package that can be sent to Microsoft for certification.
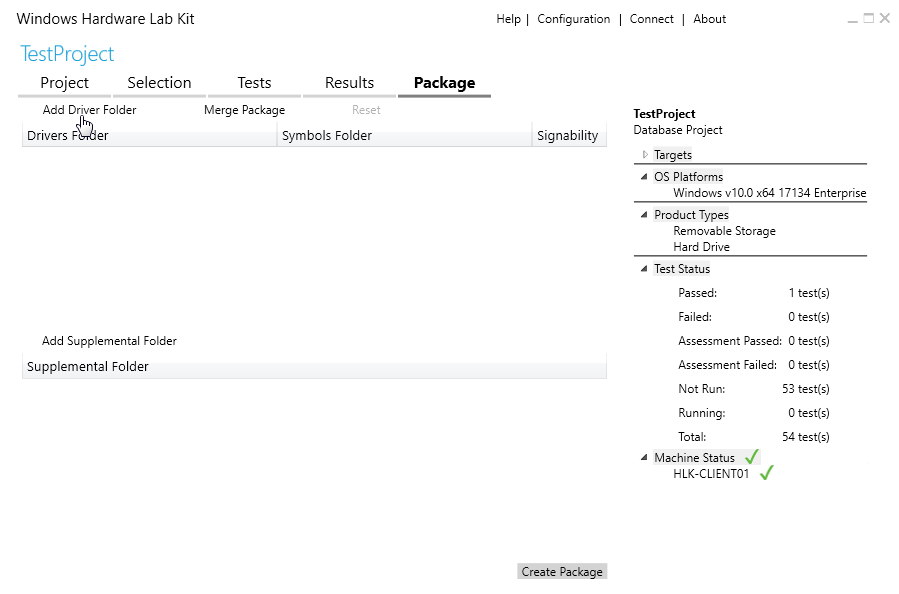
Image 14. The Package tab in Windows HLK Studio
You can add the driver, symbols (via the context menu of the added driver), and a supplemental folder (Readme files, error descriptions, etc.) to the package if needed.
Choose Create Package to generate the package. Here, the following signing options will be suggested:
- Do not sign
- Use the certificate store
- Use a certificate file
The form for submitting the package to Microsoft is available here (authorization with a Microsoft account is required).
Build WHQL-compliant drivers with Apriorit
The Apriorit team uses the Windows Hardware Lab Kit to get Microsoft Hardware Certification for drivers we develop and to ensure driver quality. Our #1 priority is helping our clients receive high-quality, secure drivers that empower their devices.
With over 20 years providing driver development and QA services, we have experience in building and testing drivers for drones, virtual reality hardware, audio systems, and other types of devices.
Here’s what we can offer clients who want their devices to work smoothly in Microsoft environments:
- Building a custom driver from scratch. If you have an idea for a driver, Apriorit will provide you with a balanced team of expert developers and QA specialists to design, implement, and certify your driver.
- Improving an existing device driver. If your existing driver doesn’t meet WHQL standards, Apriorit’s team will determine areas for improvement and write new code that passes WHQL testing.
- Conducting WHQL-compliant testing. Our QA teams know how to set up testing infrastructure for Windows Hardware Certification and test your driver correctly. We’ll cover this part of the project while your development team is busy coding.
Note: Apriorit can’t obtain a certificate and sign the driver for you, as it has to be done in the driver’s owner account in Microsoft. However, we can consult your team and guide them through the process.
Before submitting the driver for certification, the owner company must purchase an Extended Validation Code Signing Certificate from a trusted certificate authority. This certificate is necessary to sign the driver before submission to Microsoft. A third party can’t purchase this certificate, since doing so requires detailed verification of the driver owner’s identity. Besides obtaining the signing certificate, you need to register for the Microsoft Windows Hardware Developer Program yourself.
Once registered, we can assist with subsequent steps, including testing and preparing the driver for signing and submission for certification.
Conclusion
WHQL driver testing is an essential step for Windows driver development that allows your driver to be installed on Windows machines without hurdles. To conduct testing that satisfies Microsoft, you need to work with specific toolkits and design a test flow according to all of Microsoft’s requirements. Only drivers that pass this testing with a 100% success rate can be submitted for Microsoft’s review.
Apriorit’s kernel and driver development team and QA team will design, test, and implement a driver that suits your requirements and passes WHQL tests. Our experts have the knowledge and experience needed to guide you through each step — and even to help with processes that we can’t do for you.
Need help with driver development and testing?
Whether you already have a driver or only have an idea for one, Apriorit’s development and QA teams will help you prepare for WHQL testing. We’ll guide you through every step until your device is officially supported by Windows.
FAQ
Is there any benefit to doing Windows HLK tests?
<p>Yes, Windows HLK helps validate driver compatibility, stability, and reliability with Windows under different conditions. While not strictly required for certification, passing HLK ensures drivers meet Windows Hardware Compatibility Program standards and qualify for listing on the Windows Hardware Compatibility List.</p>
<p>Passing Windows HLK testing boosts customer confidence, as users trust that certified drivers will work smoothly with Windows. Without HLK, drivers can still be submitted for certification, but their stability isn’t guaranteed, and Windows may warn users about unverified compatibility during installation.</p>
What does WHQL mean for drivers?
<p>A driver package with a WHQL digital signature is eligible for distribution through Windows Update. The signature also signals to users and IT admins that the package has passed Microsoft’s compatibility checks and installs without security prompts.</p>
What’s the difference between WHQL and Windows HLK?
<p>WHQL is Microsoft’s certification program that verifies drivers meet Windows compatibility and reliability standards. Windows Hardware Lab Kit (HLK) is the testing framework used to validate drivers as part of that process.</p>
</p>In practice, HLK produces the test results that Microsoft reviews, and WHQL is the certification granted when those results meet requirements.</p>
How long does WHQL testing take?
<p>The duration of WHQL testing depends on the type of driver and the number of platforms it needs to support. Based on our experience, the WHQL testing typically takes about 2-4 days for a pre-tested, bug-free driver. It may take longer if your driver must be compatible with multiple versions of Windows and Windows Server.</p>
<p>The entire process, from pre-testing the driver to bug fixing, WHQL testing, post-testing improvements, secondary testing, and driver signing, typically takes several weeks.</p>
What happens if a driver doesn’t have a WHQL signature?
<p>If a driver is unsigned or incorrectly signed, Windows will not allow it to be installed by default, making the driver unusable. Installation is only possible if signature verification is manually disabled in the system, but this creates risks for both security and stability.</p>
Can you fix the issues my driver has before WHQL testing?
<p>Of course. If your driver is likely to fail, there’s no point in sending it to Microsoft.</p>
<p>Before submitting a driver for certification, we analyze its performance to identify potential issues that could lead to testing failures. We can then fix the detected bugs on our side, submit your driver to Microsoft, and guide you through the entire testing process.</p>
How do you prepare a driver for WHQL testing?
First, we assess your driver using tools such as Driver Verifier and identify critical flaws or risks that could cause testing failures. Then, we discuss our proposed actions with you and fix the detected issues. Once the driver passes our analysis without any failures, we submit it to Microsoft.
Do we have to sign our driver with an EV code signing certificate?
<p>Yes, the EV Code Signing Certificate is the one you need, but the package is usually signed after HLK passes and before submitting it to Microsoft. The process goes like this:</p>
<ul class=apriorit-list-markers-green>
<li>We run HLK tests</li>
<li>Build the final driver package (.sys, .inf, .cat files)</li>
<li>Sign the .cat file with an EV certificate</li>
<li>Submit the signed package and HLK results to Microsoft Partner Center</li>
<li>Microsoft re-signs it with their valid signature for production</li>
</ul>
Have a question?
Ask our expert!
Program Manager


