 Skip to main content

Long-term projects are like a mosaic: some parts of the code were written years ago, while others were written just a couple of months or even hours ago. Often, each of these parts was written by a different developer. And if your project has a strict coding standard and everyone in your team uses the same coding style and always documents every change they make — then you’re impossibly lucky!
More often, working with legacy code is like trying to make your way through a jungle. In this article, we tell you how to handle legacy code in order to optimize it and make it more understandable, compact, and secure. Our recommendations will be useful for simplifying the support of legacy code and improving the overall performance of legacy projects.
Contents:
- Auditing the project
- Organizing the parallel operation of two development teams
- Building a universal and cross-platform build system
- Unit testing integration
- Launching build in one click
- Preparatory refactoring
- Performing static and dynamic code analysis
- Decreasing project coupling
- Creating project documentation
- Discovered anti-patterns and final results
- Conclusion
What is legacy code? On the one hand, legacy code can be defined as code for an operating system, technology, or functionality that is no longer supported. Such code may also be added to a modern solution for the sake of supporting old features. On the other hand, you can see legacy code as any code inherited by your team from other sources (like from a client) or even from other development teams within your own company. This latter definition is the one we’re going to use in this article.
Projects that are in development for many years often face the problem of dealing with legacy code. Developers come and go, coding standards change, the developed product gets new functionalities and features, and so on. Countless changes are made to the source code on a daily basis. And without a proper strategy for handling and supporting the source code, you risk ending up with complete chaos instead of a logical, well-functioning structure.
In this article, we use a real example from our practice and illustrate the process of handling legacy code step by step.
Auditing the project
Recently, one of our customers asked our team to fix a number of issues in an ongoing networking project and ensure its further support. After investigating the project, we decided to run a preliminary audit and determine the full scope of problems that needed to be dealt with.
We identified five key drawbacks of this project:
- Code base structure. Initially, all source code of the project was stored in several private GitHub repositories. As a result, it wasn’t comfortable to work with the code: the structure of the project was difficult to understand and it was hard to find identical code fragments.
- Non-uniform builds. The main project has a number of sub-projects, each coming with its own set of build specifics. Some of these specifics were described in outdated text documents, which made it impossible to build a release configuration.
- Coding style. The project was supported by several programmers simultaneously. Emerging issues were resolved using the so-called “quick fix” method: each programmer opted for the fastest solution and applied it in their own manner. As a result, the project had no ultimate coding style and standards, making it even harder to handle the code.
- Manual support. Build and change workflows were supported manually. Programmers manually managed dependencies, including libraries and their versions, types of linking, and connections to C Run-Time Libraries (CRT). Many binary files, such as compiled Boost libraries, were added to a repository.
- No universal cross-platform build. The sources we got from our client showed that the project lacked a universal build for operating systems other than Windows. Meanwhile, the project was planned as a cross-platform solution. Furthermore, some of the components were supposed to work in *nix environments (according to the specifications of these components).
Regarding the last issue, we also noticed two additional difficulties:
Despite positioning the project as cross-platform, our client’s developers focused mainly on Visual Studio, which isn’t cross-platform at its core. Part of the components were developed using Visual Studio .vcxproj projects.
To debug the components designed to run on Linux, the developers on our client’s side used Microsoft Visual Studio in remote debug mode. But this increased the time before the actual start of debugging and made these components less convenient to use. Compilation was performed on a computer with another operating system, and all source files were copied to that system by the integrated development environment (IDE). When starting the debugging process, Microsoft Visual C++ (MSVC) recopied the required files to the remote system and then exchanged data with the GDB server using a socket.
After getting familiar with the project, we proposed a list of high-level steps and a detailed work plan, which was approved by the client. Let’s talk about the implementation of these steps in detail.
Determining the necessary improvements
After the preliminary audit, we recommended the following improvements:
- Organize the parallel work of two development teams (our own team and our client’s)
- Create a universal, cross-platform build system
- Integrate unit tests
- Add scripts for launching the build in one click
- Optimize the code
- Implement static and dynamic analysis
- Decrease the coupling of the project
- Unify the command-line parameters for all console utilities
- Document legacy code and create project documentation
All of these improvements were then implemented within the project. In the following sections, we describe in detail each stage of this process.
Read also:
Rust vs C++ Comparison
Organizing the parallel operation of two development teams
As we mentioned, our client already had a team of developers responsible for supporting this networking project. With our own team coming into the picture, we needed to build an algorithm for cooperation that would be convenient for both teams.
To combine all of the available source code, we decided to create an empty root repository and add the needed components as submodules.
Pros:
- These changes allowed us to have a minimal effect on our client’s workflow. Synchronization took place on our side after making all needed changes in the Master branch, which we executed as GitHub pull requests.
Cons:
- Changes made to the internal submodule need to be committed in the external root repository. But if a submodule is under active development (as opposed to being simply connected as a rarely updated third-party solution), the number of such commits will increase significantly. The chance of human error will also increase.
To minimize the disadvantages of this approach, we set clear rules for working with the repository on our side.
Our scheme for working with repositories
The standard Gitflow Workflow didn’t work well for ensuring efficient parallel operation of our two teams, so we modified it a bit. Below, you can see the scheme used by our client and the scheme of our Gitflow-based approach adapted to the needs of this project.
Figure 1. The process of working with repositories
Our general principle of working with branches was similar to the Gitflow Workflow:
- The client’s Master branch was considered stable.
- On our side, we created a Develop branch where we tested all changes before merging our code with the client’s Master branch.
- Feature branches were based on the current Develop branches and created using Jira task identifiers in the root repository and inside the affected submodule repositories.
Git submodules are usually used for established components. However, this approach allowed us to preserve the client’s development processes for a while before gradually transferring them to our new model. As a result, we were able to build both individual projects on the client’s side and generate CMake files for the integrated solution on our side.
Building a universal and cross-platform build system
Our client’s project was supposed to be cross-platform, but it only had a build system for Windows. So to make it truly cross-platform, we needed to create a universal build system that would also support macOS and Linux.
Compiling with CMake
We decided to use CMake, an open-source toolset for software compilation, to create such a system.
Key benefits of CMake:
- CMake is one of the most popular software build systems and is nearly the gold standard for the industry.
- The tool can be launched with the CMake GUI as well as through the command line.
- Its basic functionality can be extended with multiple modules.
- It has CTest and CPack components for unifying the launch of tests and build packages/installers.
- It’s well documented.
When evaluating the project, it became clear that dependency management of this project was not implemented effectively:
- The repository contained precompiled binaries of libraries and executables.
- Some dependencies were expected in specific places within the file system, and it was obvious that they were explicitly added to the Visual Studio project properties.
- We had to copy the Boost libraries (and some other libraries) to the expected locations for different types of builds (Release or Debug).
- There were link conflicts that caused confusion between dynamic and static versions of libraries.
To address these problems, we added the root repository and nested submodule repositories to CMake. Some of the projects already contained CMakeLists.txt files, but these files were not always up to date. In addition, existing code didn’t fit the Modern CMake style and were not suitable for integration. Also, there were unused source code files and peculiar tests in the project folders.
In the end, we deleted the excess files, reworked the tests in Google Test manner, and integrated them into the build.
Creating a unified dependency management system
We decided to also build a unified dependency management system that would integrate with CMake. Our main options here were:
- CMake ExternalProject
- VCPKG
- Сonan
After analyzing the existing project dependencies, we decided to exclude ExternalProject. This module was launching during the build phase and not during the generation phase. Plus, it required us to explicitly configure trivial aspects.
VCPKG was originally used to test the ability to create a build and the availability of the required packages. However, we decided to look for a better solution.
Eventually, we chose Сonan. This package manager allows for configuring packages with the help of Python scripts and text files. In our case, we used the configuration with text files. Standard packages were suitable for the project and there was no need for additional configuration steps or special build parameters.
Here are the key benefits and drawbacks of using Conan for our project.
Pros:
- A simple declarative description of dependencies via conanfile.txt
- Easy to add new common libraries to the project
- Can be integrated with CMake
- High-level configuration of dependencies is available (for example, versioning and build options)
Cons:
- Requires Python and the Pip package
- The main repository doesn’t contain all needed dependencies. For some, we had to use an additional public repository.
Next, let’s discuss another benefit provided by the use of CMake — the possibility to detach our project from MSVC.
Detaching the project from MSVC
Using CMake made it possible to eliminate tight binding of the build to MSVC. In particular, we removed the options unique to MSVC, such as #pragma lib and declspec. We also removed hard-coded versions and configurations of libraries as well as the paths to them.
Here’s what benefits this brought to our project:
- It became possible to build, operate, and debug in other IDEs and operating systems. In particular, we were able to use QTCreator (+ GCC) alongside MSVC.
- We didn’t need to use additional solutions based on Cygwin and MinGW for compiling the build for other platforms.
- It became possible to debug the build with native solutions instead of debugging it remotely with Visual Studio.
Thanks to transferring the project to CMake, using Conan for dependency management, and removing non-portable Visual Studio options, we now can make a fully cross-platform build using MSVC and GCC in a clean environment. Also, there’s no more need to manually copy dependencies, and the human factor related to choosing the required library versions has also been eliminated. As a result, building of the project was significantly accelerated and simplified.
Unit testing integration
As we mentioned earlier, we found some source files for our client’s tests during our preliminary audit. Unfortunately, these files were simply stored in the repository and weren’t integrated in the build workflow. Separate .vcxproj files were simply left in the source tree and were never executed.
To tackle this issue, we adapted the existing tests and added new ones. Shortly after integrating unit testing for legacy code, we saw the first positive results: launching tests on a regular basis helped us find unobvious errors associated with the object lifetime during asynchronous calls.
Launching a build in one click
The next logical step was to create scripts for launching the build in one click. For Windows, we wrote a simple launch script for a real environment. For Linux, we configured a Docker image based on the latest LTS version of Ubuntu (18.04) for a clean build regardless of the environment.
Since the process of launching the build was simplified and our client has their own continuous integration infrastructure based on Atlassian Bamboo, we configured plans for automatic rebuilding after changing the source code. We also added nightly builds, which, alongside the subsequent test integration, allowed us to increase the security of our code.
Let’s look at the main advantages and disadvantages of implementing continuous integration.
Pros:
- Fixing any possible flaws at an early stage is usually cheaper and easier.
- Assigned employees can receive notifications about a successful build or any problems discovered after each launch.
- There are sufficiently stable versions of the system at any given time for demonstration, presentation, and testing.
Cons:
- Additional resources are needed to keep the infrastructure (build scripts, unit tests) up to date.
Now let’s move to the next challenging set of project improvements — code optimization.
Preparatory refactoring
One of the biggest challenges of handling bad legacy code is optimizing it. At this point, we had three major tasks:
- Reduce the size of the code base
- Unify the coding style for the source code
- Bring the code in line with the new C++ style and update it
Let’s see how we dealt with each of these tasks.
Reducing the size of the code base
During our preliminary audit, we saw that there was a common subproject in the initial hierarchy of our target project. The problem was that this subproject had practical functions, some of which were not written in accordance with C++11 and newer coding standards.
When refactoring legacy code, we eventually got rid of this rudiment by replacing it with new analogues from the standard library. After that, we reviewed a number of tools for finding code duplicates and decided to use jscpd.
Based on the results of using this utility as well as manual reviews, we detected and removed all common, similar, and duplicate code fragments. The code that was left was merged into a new common project library.
There were also parts of the project where we found third-party libraries’ source files with minimal differences between these files. For example, we found the library for working with JSON data in two projects and added it to the dependencies loaded with Conan. We discovered similar code fragments among self-written wrappers for the cURL library, which we replaced with the cURLpp library found in Conan repositories.
In the end, we got promising results:
- The percentage of unused code was minimized.
- Shared libraries became more compact.
- Updating all third-party libraries used in the project became much easier.
Our next step was to bring all source code in line with a single coding style.
Bringing the source code in line with a single style
At the moment of our audit, all source code in the project didn’t have a common style.
To standardize the code, we processed the project with the Clang-Format toolset. We tried to configure the new style as close as possible to the coding standard agreed by our client. Also, we used a beautifier script to add one-click launch integration.
The unified code format increased readability and helped us find more identical fragments, which we generalized during refactoring. We also discovered places in the project where there was no order in class descriptions: public and private methods and class members were all mixed. During refactoring, we also brought these classes in line with the common standard.
Bringing the code up to new standards
Since the project was in development for a while, different parts of the code were written in accordance with different coding standards. We decided to build the project using the C++14 standard.
However, as coding standards were still evolving from C++11 to C++14, many components previously present only in the Boost library appeared in the standard library (std lib). So we decided to minimize the dependence on Boost and use std analogues of Boost components wherever possible. For instance, we replaced boost :: thread with std :: thread.
Among all the major components of the Boost library, we decided to keep only Boost.ASIO. Since a significant part of the code was written before the implementation of the C++11 standard, callbacks to ASIO objects were written using boost :: bind and boost :: placeholders functions. During refactoring, we replaced these fragments with modern lambda expressions, which increased readability.
Now there was no risk of confusing some parameters and no need to guess the name and purpose of parameters that were previously named _1 and _2. As an additional advantage of using Conan, we could quickly update the version of the Boost library by editing the conanfile.txt configuration file.
Performing static and dynamic code analysis
After code standardization and optimization, it was time to perform static and dynamic analysis of the code. In this way, we could locate previously undetected flaws and logical errors.
Static analysis
First, we set the treat warnings as error option, a compiler option. When enabled, this option causes the compiler to abort the build compilation instead of completing it with a diagnostic message. Thanks to the use of CMake, we were able to implement this option in a consistent manner across the whole project.
With the help of this option, we quickly located and eliminated all fragments that seemed suspicious to the compiler. Also, we decided to use a newer version of the compiler: GCC-8. It has a more pedantic set of warnings that were skipped by the GCC-5 compiler from the standard Ubuntu 16 distribution.
After eliminating all compiler warnings, we conducted static code analysis with the Clang-Tidy tool. It provided us with an additional stream of warnings, revealing different errors hidden in formally correct code fragments.
Now, thanks to Clang, we’re one step closer to compilation (in the context of potential porting to macOS).
Dynamic analysis
Some of the problems our client came to us with looked memory-related. Therefore, we launched the project under the valgrind analyzer (for the Linux version), Visual Studio, and the umdh utility (for the Windows version). As a result, we identified and fixed additional problems.
Separate components were launched under callgrind and Visual Studio profiler. It helped us detect additional bottlenecks, which were our next candidates for optimization. After dynamic analysis, we took a number of steps towards improving the security of the code:
- Replaced manual memory management with automatic memory management (smart pointers/lock guards) in accordance with the RAII concept
- Made functions constant where possible
- Minimized the need for copying by transferring resources through forwarding
- For C-like libraries (e.g. cURL), we added a C ++ wrapper where possible
These changes allowed us to improve the security and performance of the project.
Decreasing project coupling
As we were writing tests and refactoring the code by combining its common parts, it became possible to make the project more modular. As a result, the build was accelerated and assembling new tests became much easier.
Such changes have also reduced the overall coupling of the project. Now, making changes (including architectural ones) to a separate component is easier and safer.
Also, we discovered that class implementations were often placed in the header files, harming both readability and compilation speed. During refactoring, such places were divided into header files and class implementations.
Removing unnecessary components and libraries
For logging, the project used a part of the shared library that was basically a variation of a Boost.Log library wrapper. This shared library required additional components for working with time representation (such as Boost.Gregorian) and included additional functionality with custom exception descriptions and macros for indicating the place where a message occurred.
We replaced this Boost log-based component with the plog library. The key advantages of plog are:
- Increased performance
- Standardized detailed output
- Simple configuration
Next, we moved to unifying the parameters of the command line for all used console utilities.
Unifying command-line parameters for console utilities
As the code changes were checked within development testing, we made some changes to the way binary files were launched. Previously, many important and frequently changed settings such as port configuration and logging options were implemented in the form of #ifdef preprocessor directives. So to fully check all settings, the project had to be rebuilt several times in different configurations.
To simplify the process, we added an on-the-fly configuration capability for these frequently changed options. Also, wherever possible, we set the same arguments for configuring the project thought the command line or configuration files. As a result, working with the project became much easier while all potential configuration mistakes were eliminated.
Finally, we moved to the last major step of handling the legacy code — creating unified, up-to-date project documentation.
Creating project documentation
Well-written, complete documentation makes it much easier to understand legacy code. At this stage, we focused on solving two major tasks:
- Documenting the legacy code and creating project documentation
- Creating guidelines for building, setting up, and launching the project
Here’s how we handled these tasks.
Documenting the source code
Using Doxygen-style comments, we documented all of the core structures, enumerations, interfaces, and classes. As a result, information can be quickly found with the help of generated HTML files without any need to access the real code.
We added the code documentation creation stage as an optional custom target in CMake. In conjunction with the warning-as-error settings, this helps developers supporting the project to remember to update the documentation when changing interfaces.
Since the package for Doxygen was found inside the Conan public repository, its executable files were added to the list of dependencies to ensure an independent build in any environment.
Creating guidelines for the project build, setup, and launch
The lack of up-to-date information and the presence of unobvious aspects in the build and launch processes that we faced at the beginning of this project were challenging. This is why we decided to add detailed, step-by-step how-to instructions describing all actions for building and launching the project on different systems.
These guidelines came in handy when we demonstrated the next set of innovations to the client. During a remote session, we opened these guidelines, and by implementing them step by step, we managed to deal with the difficulties that occurred when building a new version of the project.
Discovered anti-patterns and final results
While working on this networking project, we encountered a number of malpractices:
- Copying binary files to different places.
- Making changes to third-party libraries without proper connections (for example, forking the project and connecting it as a submodule) by copying to subprojects and making changes there. In particular, this project had two almost completely matching versions of one library and three versions of another.
- Using self-written or third-party libraries for functionalities that are implemented in the standard library.
- Copying parts that are common for several projects (like declaring structures or operations) inside each of them instead of moving these parts to a common location.
- Having a large number of “dead” commented code. In any case, the whole code history is stored in the version control system, so there’s no point in keeping unused code.
- Keeping several class declarations and implementations of their methods in one file. This one may be a bit subjective, but it becomes really difficult to navigate through such files when working with large classes.
- Insignificant descriptions of commits (random character sets, common words like “synchronization”).
When we were done optimizing the legacy code, we saw some promising statistics.
Using the CLOC utility, we examined if the project volume had changed.
In the image below, you can see the results we got (old values->new values).
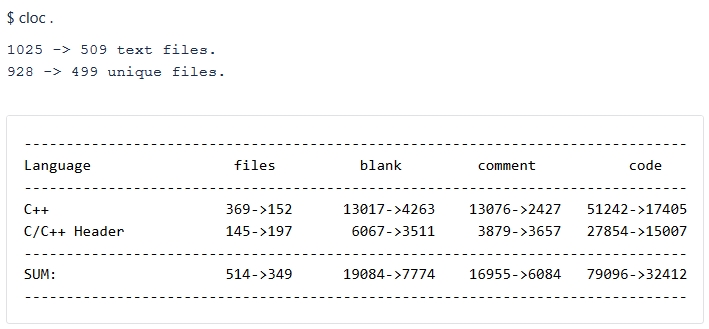
As you can see, we reduced the code volume of this project by almost 2.5 times!
Conclusion
Handling and supporting legacy code is a task that many developers face when working on legacy projects. If there’s no clear and complete documentation and the code isn’t created according to a single standard, using the legacy code and finding and fixing the flaws hidden in it becomes a real challenge.
However, this challenge can be solved if you build the right strategy. In this article, we used a real-life example from our practice to show you that getting rid of the chaos in your project code is possible. In addition, the approach we used helped us achieve two critical goals:
- Ease further support and development of the project
- Improve the security of the code and overall performance
At Apriorit, we have a team of talented and experienced developers whom you can trust to improve your legacy code without any effort from your side. Get in touch with us to enhance the productivity of your ongoing projects.
Have a question?
Ask our expert!
VP of Engineering


