 Skip to main content

Maintaining consistently high development standards is extremely important for any software. It helps to make your code readable, reliable, and secure. Periodic quality checks also save you a lot of time on code maintenance and help you find and fix code issues at early development stages.
One way to experience these benefits is by integrating a code quality analyzer into your continuous integration and continuous delivery (CI/CD) system. In this article, we show you how to create containers with SonarQube and add them to CircleCI in order to analyze the quality of a Java project.
This article will be useful for developers and project leaders looking for a quick and simple way to add code quality analysis to their projects.
Contents:
- Choosing tools for analyzing code quality
- SonarQube overview
- Docker overview
- CircleCI overview
- Creating containers with SonarQube
- Configuring the SonarScanner plugin for Maven
- Preparing Dockerfile and docker-compose.yml
- Launching SonarQube Server and SonarScanner containers
- Accessing scanning results
- Integrating SonarQube into CircleCI
- Conclusion
Choosing tools for analyzing code quality
High-quality code makes software easy to test, deploy, and maintain. While the definition of quality is unique for each development project, it usually includes:
- Maintaining consistent code styling and names for classes, methods, and variables
- Creating detailed documentation for code elements
- Eliminating insecure and unreliable coding practices
- Ensuring a high level of code coverage
To ensure the high quality of your code, you need to implement a proper code quality analysis procedure. Doing it manually takes a lot of time and can’t always guarantee correct results because developers that conduct code analysis are prone to human error. Instead, you can use an automated analyzer.
In one of our recent Java projects, we decided to use SonarQube to check code quality. To regularly conduct code checks, we needed to integrate this tool into CircleCI, the project’s CI/CD system. It continuously merges several copies of project code into the main branch and delivers the code from the main branch to users.
We decided to integrate SonarQube in the form of containers. Containerization is the technology that allows you to create an image for an application and its dependencies. You can run this image in the form of containers — secure environments isolated from the host operating system.
We’ll show you how we did it later in the article. First, let’s take a look at the tools we used.
Looking for ways to conveniently check your code quality at every step of development?
Reach out to start building a continuous development and QA pipeline to start testing early in your cycle.
SonarQube overview
SonarQube is an open-source code quality analyzer that uses static analysis methods to analyze code, assess its reliability, security, and maintainability, and generate reports. This multi-language tool with numerous plugins is easy to integrate into the CI/CD system to analyze code quality during each build.
SonarQube consists of two key parts:
- SonarScanner for scanning source code
- SonarQube server for accountability and reporting. One SonarQube server can support several SonarScanners, which allows you to centralize code quality reporting.
We decided to use SonarQube in our project because it helps to detect various types of issues:
- Bugs and errors in the code
- Code vulnerabilities
- Deviations from code style standards
After analyzing the code, SonarQube generates a report with numerous metrics like code project reliability and security, duplications and complexity, detected issues, and code coverage.
Docker overview
We decided to run SonarQube in a container using Docker — one of the most popular platforms for creating and managing containers. Docker allows us to:
- Launch and manage an application isolated from the host operating system and infrastructure
- Simplify software development, testing, and deployment
- Save time on configuring the application launch environment
- Deploy several containers simultaneously
Docker makes software installation and deployment much easier because you can simply create a container instead of configuring the environment and installing packets and web servers. Also, we can use Docker Hub — a hub library that contains applications from Nginx, MySQL, Apache, GitLab, Redmine, Elasticsearch, Jenkins, and other development companies.
CircleCI overview
CircleCI is one of the most common CI/CD systems that you can use to automate your application’s development, testing, builds, and deployment. To implement CircleCI in your project, you need to add your repositories to a CircleCI account. Then, you can build applications inside containers of virtual machines and get build results via email and Slack.
We decided to use this CI/CD system for several reasons:
- Availability of a cloud-based version with a web interface
- Small and easy-to-read YAML configuration files
- Possibility to build several projects simultaneously
- Support for GitHub, Bitbucket, AWS, Azure, Heroku, Docker, Slack, and other useful tools
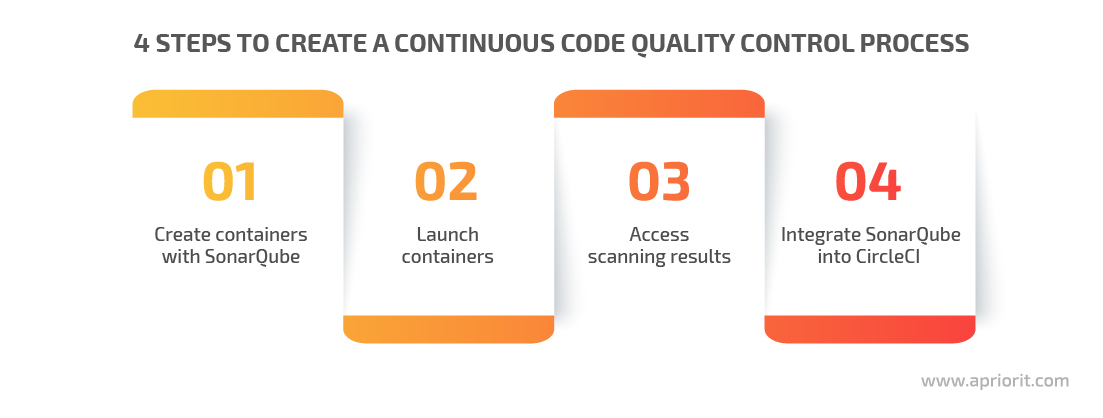
Running SonarQube containers and integrating them into our CircleCI pipeline allowed us to implement a continuous code quality control process in our project. We were able to use SonarQube to analyze Java project quality by following these steps:
First, let’s take a closer look at how to use SonarQube with Docker.
Read also
Using Docker When Developing a Web Service: What Do You Need To Consider?
Master Docker integration with Django and gain a deeper understanding of Docker’s role in development through our in-depth article. Apriorit experts share best practices, recommended tools, and common pitfalls for improving your CI and CD processes.

Creating containers with SonarQube
Before we start analyzing code quality, we need to set up a SonarQube environment using Docker. To do that, we need:
- Ubuntu with SSH access and an internet connection
- GitHub repository with our application’s Java code
The first thing we need to do is install Docker and Docker Compose. Since we use the Ubuntu machine, we need to install these tools using the following commands:
sudo apt-get update
sudo apt install docker.io
sudo apt install docker-composeNote that the commands are different for various Linux versions. You can check other installation commands on Docker’s Supported Platforms page.
Second, we need to copy our application’s code from the GitHub repository to our local machine. To do that, we need to go to the /opt directory using the cd /opt/ command and execute git clone https://github.com/mesche/maven-multi-project-example.git to copy the code.
Now we can start building our project.
Configuring the SonarScanner plugin for Maven
To build our project, we’ll use Maven — a tool for Java project build automation. SonarQube has an official plugin for Maven and instructions on how to configure code analysis for Maven projects. We can add this plugin to our project in two simple steps.
First, we need to find the pom.xml file. In our project, it’s located in the /opt/maven-multi-project-example/MavenReactor folder.
Second, we add the SonarScanner plugin to the Plugins section of the pom.xml file:
<build>
 <plugins>
 <plugin>
 <groupId>org.sonarsource.scanner.maven</groupId>
 <artifactId>sonar-maven-plugin</artifactId>
 <version>3.7.0.1746</version>
</plugin>
 </plugins>
</build>This file will help us create containers with SonarQube. Save pom.xml with these changes and the plugin will be ready to use.
Preparing Dockerfile and docker-compose.yml
We need to create a Dockerfile that will describe SonarScanner’s work in the same folder that stores the pom.xml file. Here are the contents of this Docker file:
FROM maven:3.6.3-openjdk-8
COPY . /dist
RUN cd /dist && mvn clean install
WORKDIR /dist/
CMD sleep 150 && mvn sonar:sonar
-Dsonar.host.url=http://sonar-server:9000
-Dsonar.language=java -Dsonar.login=admin
-Dsonar.password=admin -Dsonar. projectKey=sonarbackend Note that we use the mvn clean install and mvn sonar:sonar commands to launch the SonarScanner container. According to this Dockerfile, Docker will do the following when launching the SonarScanner container:
- Launch the SonarScanner container from the maven:3.6.3-openjdk-8 Docker image.
- Copy the code from the local /opt folder to the /dist folder in the SonarScanner container.
- Build the project by executing the
mvn clean installcommand in the /dist folder. - Pause Maven for 150 seconds, then launch SonarScanner with the required parameters. We need the pause to let the SonarQube server from another container launch and initialize.
- After launching the SonarScanner container, Maven builds the Java application, scans it, connects to the SonarQube server, and sends scan results to the server.
We use the following parameters to launch SonarScanner:
-Dsonar.host.url=http://sonar-server:9000— The URL is required to connect with the SonarQube server. Since we use Docker Compose, we only need to state the name of the SonarQube server container and its port.-Dsonar.language=java— This parameter indicates the language of our project.-Dsonar.projectKey=sonarbackend— This parameter defines the project key — a unique identifier for each SonarQube project.-Dsonar.login=admin— Here we provide a default username to connect to the SonarQube server.-Dsonar.password=admin— Provide a default password to connect to the SonarQube server.
Note that you can use an authorized user’s token instead of a login and password in the last two parameters. Also, these are default credentials for the SonarQube server that you’ll need to change in your project.
Now, we need to create a docker-compose.yml file. This file needs to be placed in the same folder as the pom.xml file. In our project, it’s the /opt/maven-multi-project-example/MavenReactor/ folder. We need docker-compose.yml to run SonarQube in Docker. Here’s what it looks like in the file’s contents:
version: '3.1'
services:
sonar-server:
image: sonarqube:8.9.1-community
ports:
- 9000:9000

sonar-scanner:
image: maven:3.6.3-openjdk-8
build:
context: .
dockerfile: Dockerfile
depends_on:
- sonar-serverNext, we need to launch the sonar-server container from the SonarQube 8.9.1 image and open port 9000 for this container. By default, the SonarQube server uses this port for communication.
Note that the server uses a built-in database that doesn’t support scaling and updating to newer versions of SonarQube. Also, you can’t access code quality check reports after you stop the container with the SonarQube server. That’s why you should set up a SonarQube server with Docker only when you need to quickly integrate SonarQube to your CI/CD system and need to be able to stop the Java project build if the code doesn’t pass the quality check.
If you need to save the results of code quality analysis, it’s best to install a SonarQube server on a real or virtual machine that has an external IP address. Then, you can connect the sonar-scanner container to this server instead of the sonar-server container.
Related project
Developing a Custom Secrets Management Desktop Application for Secure Password Sharing and Storage
Our team developed a secrets management tool for a US-based company, leading to a 30% boost in their security score. With new tools for efficient access and password management, our client can now be sure of the security of their data.

Launching SonarQube Server and SonarScanner containers
To start launching these containers, let’s go to the /opt/maven-multi-project-example/MavenReactor/ folder and execute the cd /opt/maven-multi-project-example/MavenReactor/ command.
Then, we need to execute the docker-compose -f docker-compose.yml build command that should read our docker-compose.yml file and build sonar-server and sonar-scanner images. Here’s the output of this command:
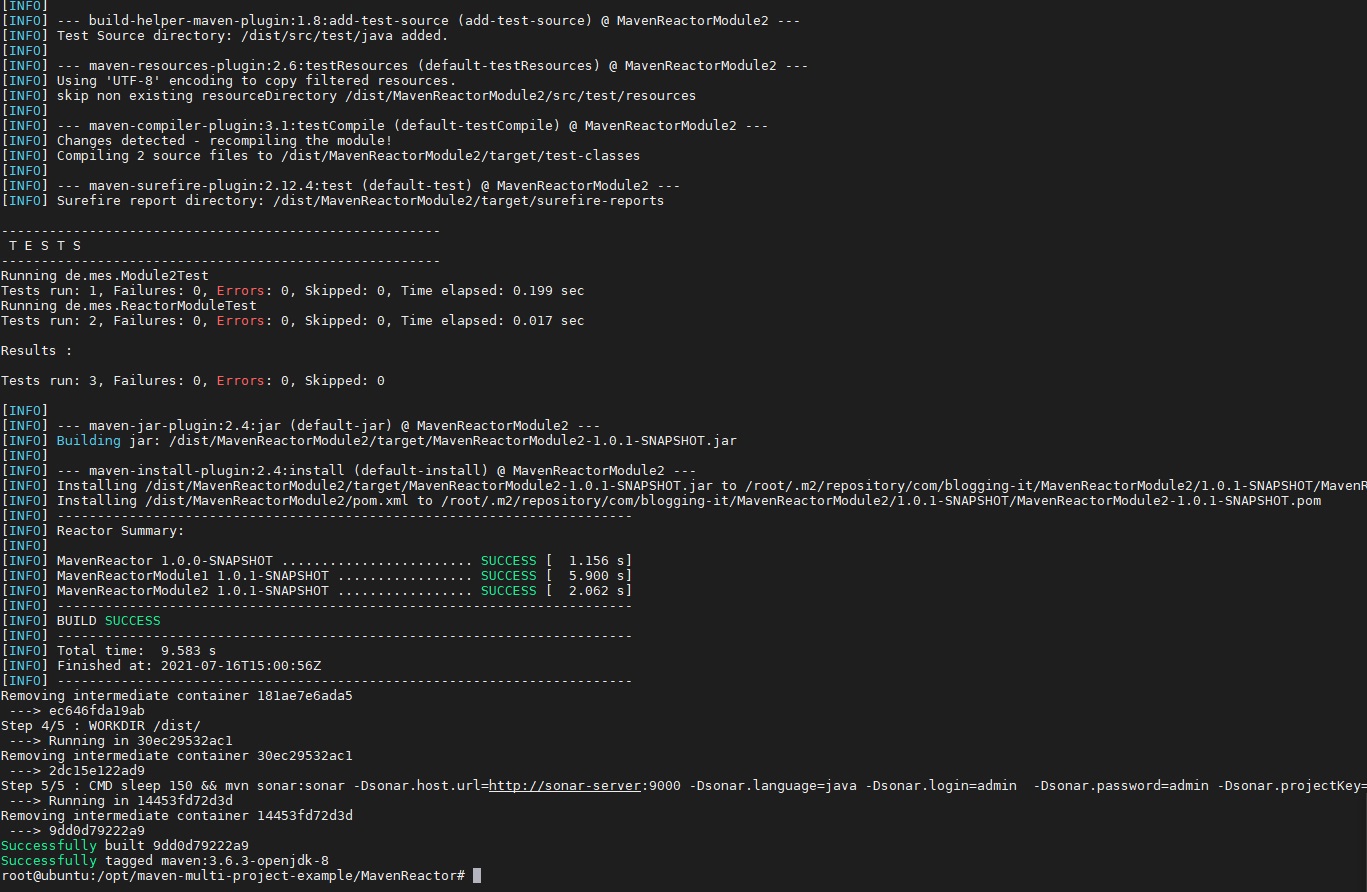
Figure 1. Building sonar-server and sonar-scanner containers
Next, we need to execute the docker-compose -f docker-compose.yml up command. It will launch images of our containers. This command will return the following:
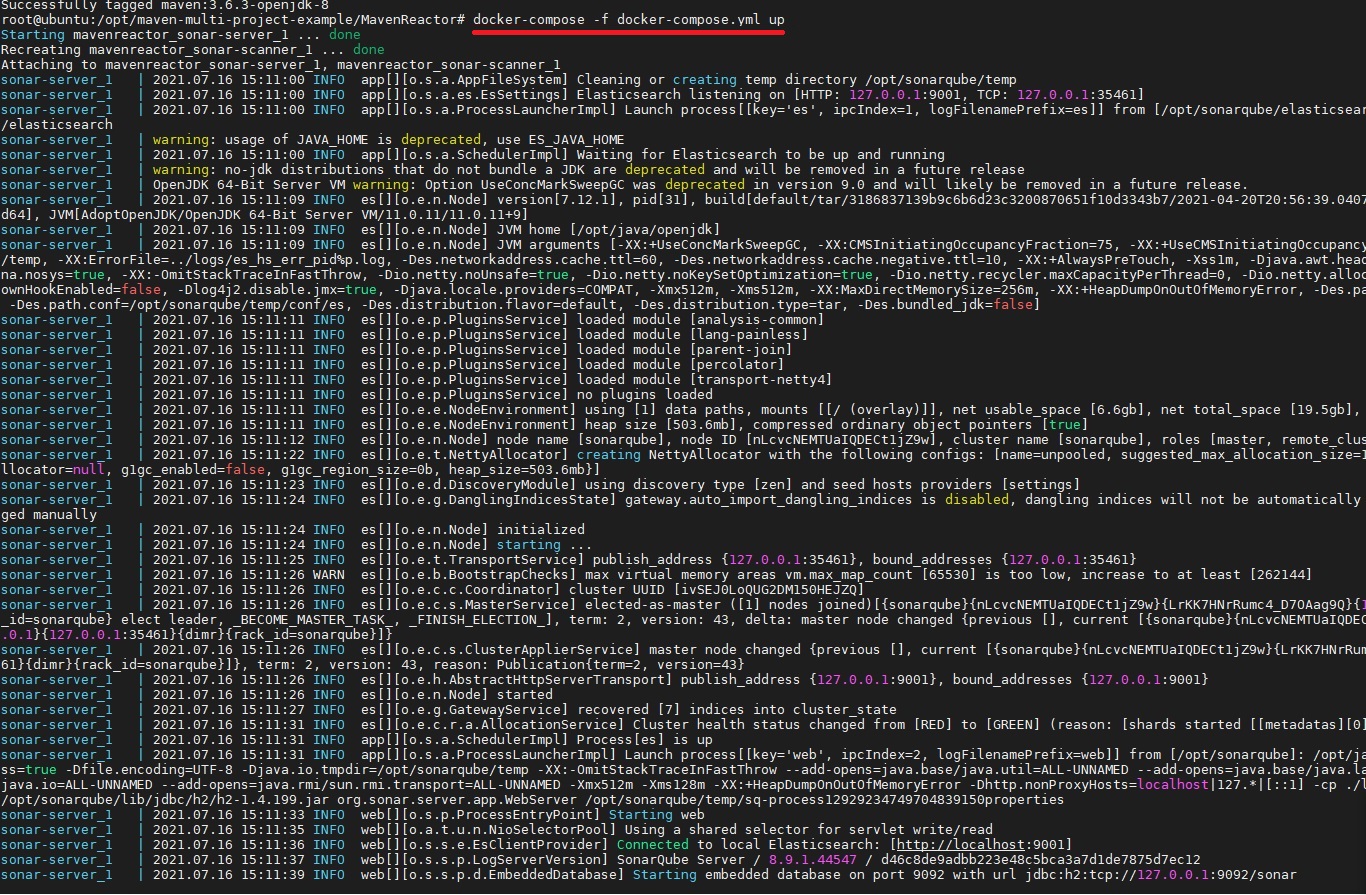
Figure 2. Launching sonar-server and sonar-scanner containers
According to the contents of our Dockerfile, when running the SonarQube server with Docker, Maven builds a Java application, scans its code with SonarScanner, and sends scanning results to the server.
Accessing scanning results
When the code quality check is over, we can analyze SonarQube reports and possible issues with our code. There are two ways to obtain the results of SonarScanner’s work:
- Get code analysis data via the SonarQube Server web interface
- Get analysis data with an API request to SonarQube Server
Let’s see how to use both methods.
1. To view the results in the SonarQube Server web interface, we need to access the IP address of our Ubuntu machine via a browser. In our project, the address is http://10.10.13.11:9000. After providing the credentials, we need to choose our project. Here’s the data we’re looking for:
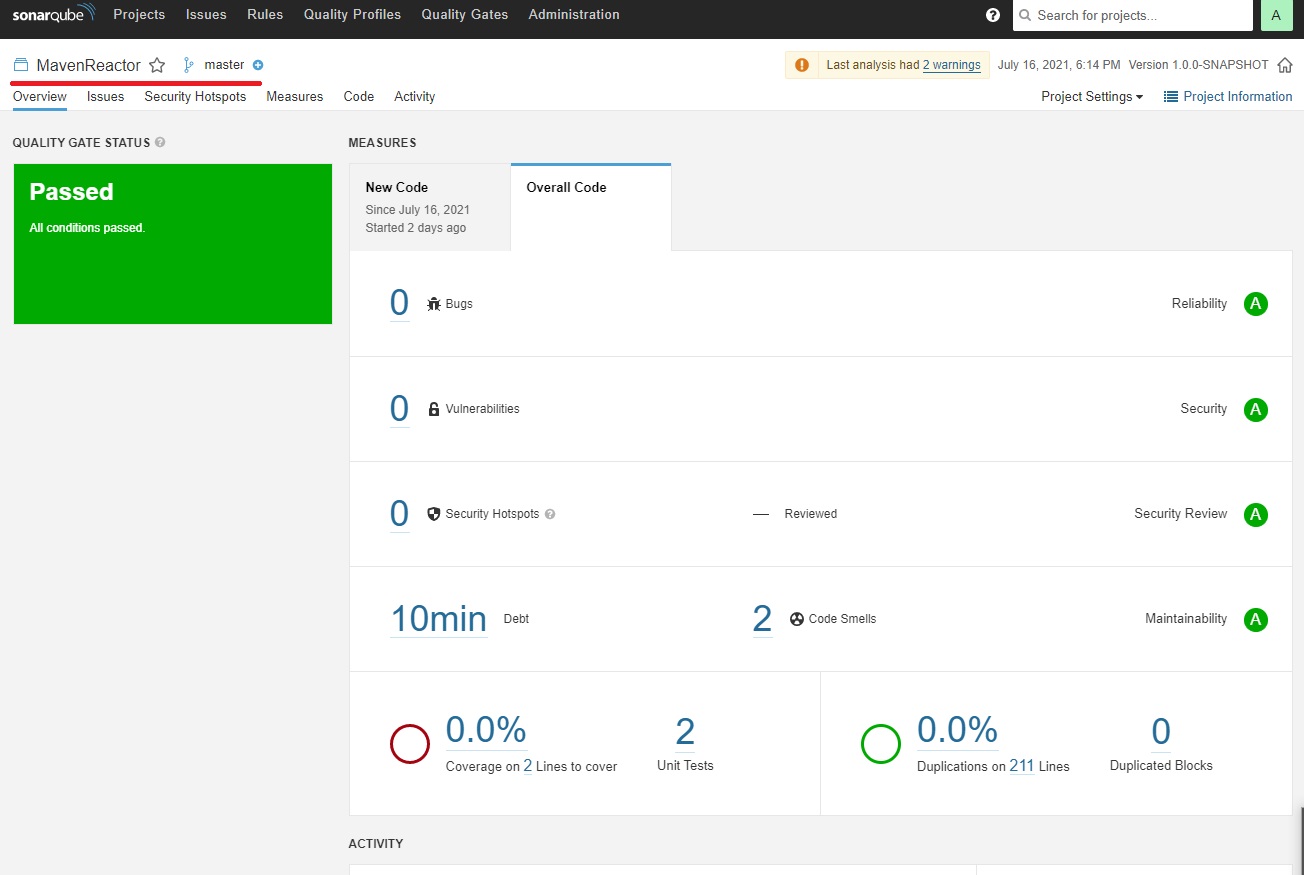
Figure 3. Results of a code quality scan
2. To get analysis status with an API request, we need to execute the GET api/qualitygates/project_status request using cURL. You can learn more about this and similar requests in the SonarQube documentation.
Note: Here we use Sonar way, the default quality gate. You can also configure your own quality gate when running a SonarQube server, or you can send a quality gate API request.
Then, we execute the curl -s -u admin:admin http://localhost:9000/api/qualitygates/project_status?projectKey=sonarbackend command to get scanning results. If you want to execute this command from a remote endpoint instead of a local Linux-based machine, you need to change localhost to the IP address of the endpoint that runs the sonar-server and sonar-scanner containers.
We get the following response to this command:
{"projectStatus":{"status":"OK","conditions":[{"status":"OK","metricKey":" new_reliability_rating","comparator":"GT","periodIndex":1,"
errorThreshold":"1","actualValue":"1"},{"status":"OK","metricKey":" new_security_rating","comparator":"GT","periodIndex":1,"errorThreshold":" 1","actualValue":"1"},{"status":"OK","metricKey":"
new_maintainability_rating","comparator":"GT","periodIndex":1," errorThreshold":"1","actualValue":"1"}],"periods":[{"index":1,"mode":" PREVIOUS_VERSION","date":"2021-07-16T14:41:07+0000"}]The projectStatus":"status":"OK" line shows scanning results. Depending on the result of the scanning, you can get OK, WARN, ERROR, or NONE values on this line.
Read also
5 Best Automation Testing Tools for Software Engineering: Which to Choose for Your Project?
Read on to understand the impact of automated testing tools on your software projects and start planning automation pipelines. In this article, we discuss the top five QA tools we use at Apriorit, show use cases for each of them, and show how to use these tools to streamline our testing efforts.
Integrating SonarQube into CircleCI
To integrate SonarQube into CircleCI using Docker, we need to do the following:
- Add Dockerfile and docker-compose.yml to the GitHub repo with our application’s Java code
- Add the SonarScanner plugin to pom.xml
- Add the sonar_run.sh script to the same GitHub repo
- Add the sonar_run.sh script execution to CircleCI’s config.yml file
The code from CircleCI’s config.yml for executing the sonar_run.sh script will look like this:
name: "Scanning by the Sonar Tool"
command: |
echo "Running  the scanning ..."   if [[ $CIRCLE_TAG =~ ^prod|preprod$ ]]; then
bash sonar_run.sh; fi;This script performs several actions:
- Builds and initializes the sonar-server and sonar-scanner containers using docker-compose.yml.
- Waits for sonar-scanner to build and scan the application code and send the results to sonar-server.
- Executes the
GET api/qualitygates/project_statusAPI request on sonar-server. - Parses the response to this request. If the response is “OK,” the script stops the sonar-server and sonar-scanner containers and continues to build the application. If the API returns any other response, the script fails to build the application and keeps the containers running.
Here are the contents of our sonar_run.sh script:
#!/bin/bash
docker-compose -f docker-compose-sonar.yml build
docker-compose -f docker-compose-sonar.yml up -d
sudo apt-get install jq -y
PROJECTKEY="sonarbackend"
Check=`curl -s -u admin:admin http://localhost:9000/api/qualitygates /project_status?projectKey=$PROJECTKEY | jq '.projectStatus.status' | tr - d '"'`
max_retry=30
counter=0
until [ "$Check" == "OK" ] || [ "$Check" = "ERROR" ] || [ "$Check" ==  "WARN" ];
 do
 sleep 20

 [[ counter -eq $max_retry ]] && echo "Failed! Check you sonnar-server  container" && exit 1
 echo "Retrying. Try #$counter"
 ((counter++))

Check=`curl -s -u admin:admin http://localhost:9000/api/qualitygates /project_status?projectKey=$PROJECTKEY | jq '.projectStatus.status' | tr - d '"'`
done
QGSTATUS=`curl -s -u admin:admin http://localhost:9000/api/qualitygates /project_status?projectKey=$PROJECTKEY | jq '.projectStatus.status' | tr - d '"'`
if [ "$QGSTATUS" = "OK" ]
then
echo "Status is OK"
echo "Stopping and removing docker images ...."
docker-compose -f docker-compose-sonar.yml down --rmi all
echo "Sonar scanning has successfully ended with the status 'OK'"
elif [ "$QGSTATUS" = "WARN" ]
then
echo "Status is WARN. Check out the quality of the products at  http://localhost:9000"
exit 1 # terminate and indicate error
elif [ "$QGSTATUS" = "ERROR" ]
then
echo "Status is ERROR. Check out the quality of the products at  http://localhost:9000"
exit 1 # terminate and indicate error
fi,Here’s what a successful SonarQube scan and application build looks like in CircleCI:
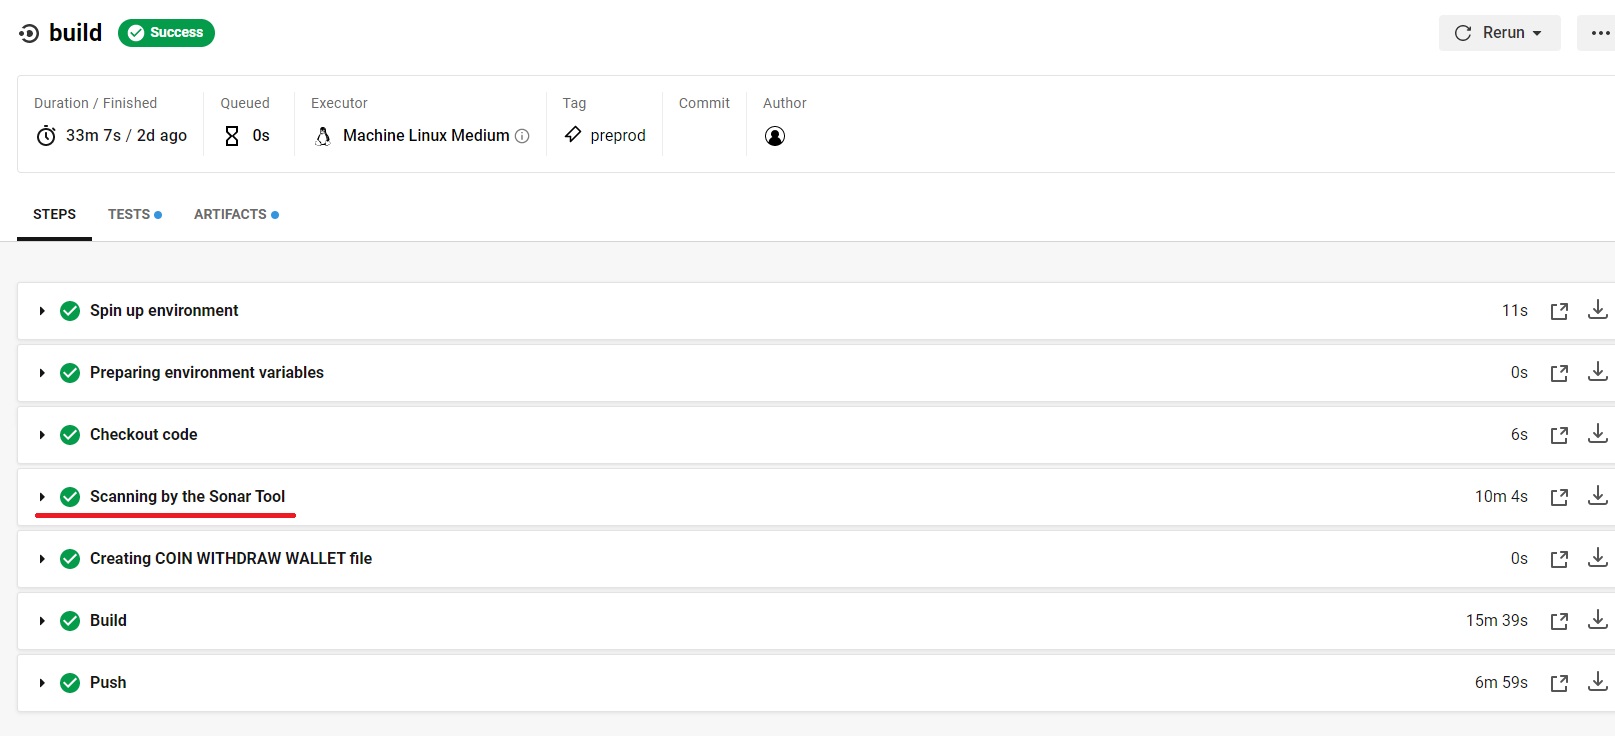
Figure 4. Successful SonarQube scan and application build
If we get this result, it means our containers with SonarQube scanned the application, didn’t find critical bugs, vulnerabilities, or issues with code quality, and sent this result to CircleCI.
Note that this method of SonarQube integration is suitable only for CircleCI. If you use another CI/CD system on your project, you may need to apply another method of integration.
Conclusion
Automated code quality analysis helps you quickly discover issues with your code, ensure consistent styling, and save time on code maintenance. For our quality assurance experts, using such tools is a must in any project.
In this article, we described how to measure code quality with SonarQube based on the example of one of our projects. Depending on the infrastructure, CI/CD system, and languages you use in your project, you may need to use a different approach to integrating code quality control.
Release software that customers can trust!
Let Apriorit QA experts thoroughly test your application and provide advice on quality improvements.
Have a question?
Ask our expert!
VP of Engineering


