 Skip to main content

Audio and video conferencing software is getting more popular, and new applications of this type keep entering the market. Thus, it’s essential to ensure your end users are pleased with your solution and don’t have reasons to choose a competitor’s software over yours.
The key is to make sure your development and quality assurance teams focus on ensuring flawless sound. Your target audience probably uses Zoom-like solutions for calling friends and family, attending educational events, and holding work meetings, so it’s crucial for them to be able to clearly hear what others are saying. If you don’t pay enough attention to detecting and fixing issues related to audio quality, you risk ending up with unsatisfied end users and an uncompetitive product.
In this article, we discuss common VoIP quality issues to expect when working on a solution that enables audio and/or video calling functionality. We also share our experience of what tests to perform and what tools to use when measuring sound quality.
Contents:
VoIP as the basis of audio conferencing solutions
If you want your product to allow end users to make calls and host audio conferences and video meetings, you need to implement Voice over Internet Protocol (VoIP) technology. VoIP lets users make voice calls over the internet, providing benefits over conventional phone calls including cost savings, greater flexibility, and advanced features.
VoIP stands behind many popular communication solutions including Skype, WhatsApp, and FaceTime. Businesses also use it to create their own custom solutions. According to Statista, the global video conferencing market is expected to increase up to $19.1 billion by 2027. And Market Data Forecast predicts that the audio conferencing service market can reach $32.4 billion by the end of 2026.
For your product to survive in the competitive market of audio and video conferencing solutions, you need to make sure it provides flawless audio quality. Let’s start with a brief explanation of how VoIP technology works before we move to common audio issues and testing.
During an audio or video conferencing session, VoIP transmits audio signals over the internet rather than over the cellular network. The VoIP call quality is heavily dependent on the internet connection speed.
When working on VoIP-based software, you must consider four crucial factors:
- Bandwidth — This is the difference between the upper and lower frequencies in a continuous band of frequencies. If there are any bandwidth-related issues, audio might sound muffled or distorted.
- Sample rate — This is the number of digital samples taken per second when recording the original sound. The higher the sample rate, which is typically expressed in kHz, the better the sound quality. For standard telephony, the sample rate is usually 8 kHz or 16 kHz, while for streaming audio, it’s typically 44.1 kHz.
- Bitrate — This is the amount of data contained in a digital audio file, measured in kilobits per second (kbps). A higher bitrate is often an indicator of better audio quality.
- Audio codecs — These are algorithms that compress and decompress digital audio.
Signals that occupy a narrow range of frequencies or that have a small fractional bandwidth are called narrowband. Wide-bandwidth data transmission that transports multiple signals over a wide range of frequencies is called broadband. Here’s how narrowband and broadband differ:
- To maximize efficiency, narrowband signals rely on the adaptive multirate (AMR) speech codec. AMR compresses and transmits a live stream using a limited range of audio frequencies: 200 Hz to 3.4 kHz. If the sound quality is compromised, it’s usually due to low bandwidth causing the AMR codec to switch to a lower bitrate.
- Broadband audio offers superior quality with a high-definition format tailored specifically for VoIP. It uses adaptive multi-rate wideband (AMR-WB) speech codecs that cover a wider frequency range: 50 Hz to 7 kHz. AMR-WB allows for better audio reception and for capturing higher and lower sounds to provide richer and more reliable sound quality.
With this information in mind, let’s move to exploring the issues to expect when attempting to ensure high quality in VoIP-based solutions.
6 common audio quality issues in VoIP-based solutions
Audio quality has a significant impact on how information is perceived and assimilated. If sound delays or errors occur, end users can be unsatisfied with your product. To understand how to improve your VoIP call quality, you first need to know what problems to expect.
Let’s explore several potential issues that can affect audio quality and make it difficult for users to understand each other:
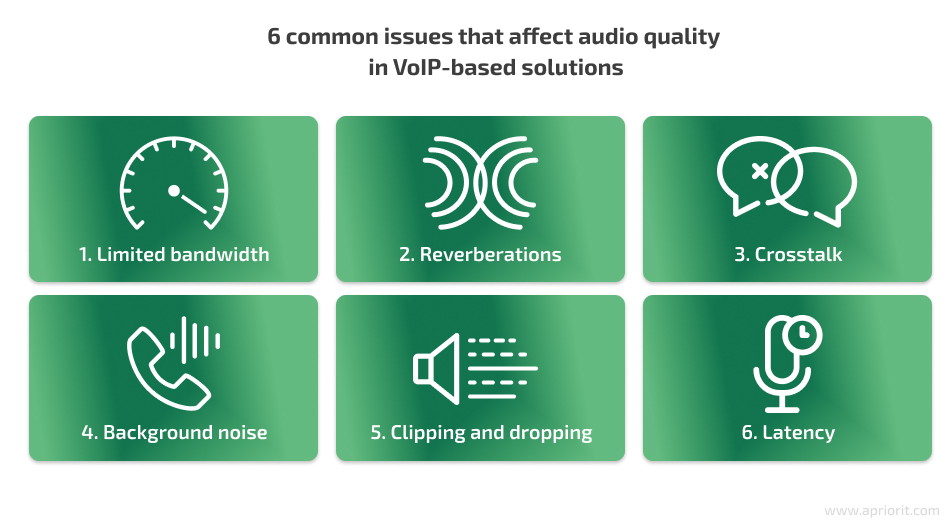
1. Limited bandwidth can lead to a decline in overall audio quality. If the available bandwidth is limited, audio quality can suffer due to compression, data loss, or delays.
This can make it difficult for participants to hear each other, especially if they have different accents or speak quickly. The negative impact is especially severe in remote meetings, where participants may rely entirely on audio cues to understand each other.
2. Reverberations occur when sound waves bounce off hard surfaces, such as walls or ceilings, creating a lingering echo. They can make audio sound harsh or unnatural.
3. Crosstalk occurs when multiple participants speak at once, creating overlapping audio signals that can be difficult to separate.
4. Background noise should be minimized, as it can make it difficult to hear what participants are saying, leading to miscommunication or misunderstandings.
The volume of background noise also affects how well it is picked up by the microphone. A microphone may not pick up faint sounds, such as quiet speech or distant noises. But if the hum of a fan or the sound of traffic outside is quite loud, the microphone will pick up unwanted background noise. It’s vital to consider microphone testing in ensuring the proper audio quality of your solution, because it will help you see how different types of microphones work with your software.
5. Clipping and dropping. Clipping occurs when a word is cut off, while dropping occurs when an entire word is missing, changing the meaning of what was said.
These issues can be caused by dropped packets, which can occur due to:
- Bandwidth limitations
- Misconfigured interfaces
- Microburst link floods
- Underpowered network equipment
- Cabling faults
- Out-of-order packets
If users report clipping at the start or end of words, the reason could be the Voice Activity Detection (VAD) in the VoIP hardware. This can be fixed by adjusting sound level settings or disabling VAD / silence suppression until the issue is resolved.
6. Latency in digital audio refers to the delay that occurs when an analog signal is converted to digital form and then outputted from computer memory. Below, we explain in detail how to test and minimize latency.
With that in mind, let’s move on to the active part of ensuring decent sound quality in your VoIP-based solution and discuss where to start.
Ensuring proper sound quality: where to start?
The first thing to do to evaluate your solution’s sound quality is to analyze the sound spectrum.
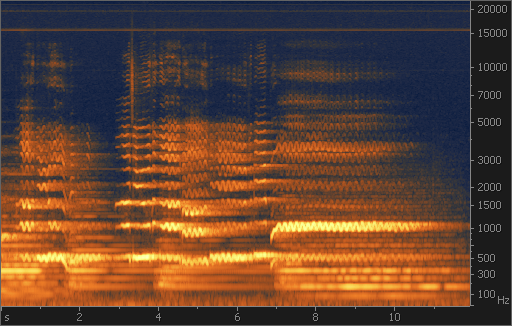
A sound spectrum is a representation of sound that displays the different frequencies present. To perform sound spectrum analysis, you need to use a spectrum analyzer ー a tool that breaks down a signal into individual frequencies and shows the level of each frequency in a graph.
A spectrum analyzer can help you detect unwanted sounds, such as wind and DC offset, by showing a visual representation of sound frequencies. Such defects are difficult to identify just by listening to a recording. A visual representation of how the spectrum of frequencies changes over time is called a spectrogram.
By analyzing sound with a spectrum analyzer, you can:
- Identify the properties of the sound, like its frequency and whether there are any additional frequencies that don’t relate to your sound
- Identify and remove unwanted sounds in music production
- Study the phonetics of speech
- Find hard-to-hear defects like high-pitched sounds (15 kHz in the example below) which may not be noticeable to the human ear
Spectrum analyzers differ in the methods they use to obtain the spectrum of a signal. The most common types are:
- Swept-tuned analyzer, also called a sweep or swept spectrum analyzer — works like a radio receiver with a display indicating the output level
- FFT analyzer — computes a time sequence of periodograms using the fast Fourier transform (FFT) algorithm
Once you’re done with spectrum analysis, it’s time for tests.
Tests and tools for measuring sound quality
From our experience, performing these four crucial tests will help you measure the sound quality of your VoIP-based solution:
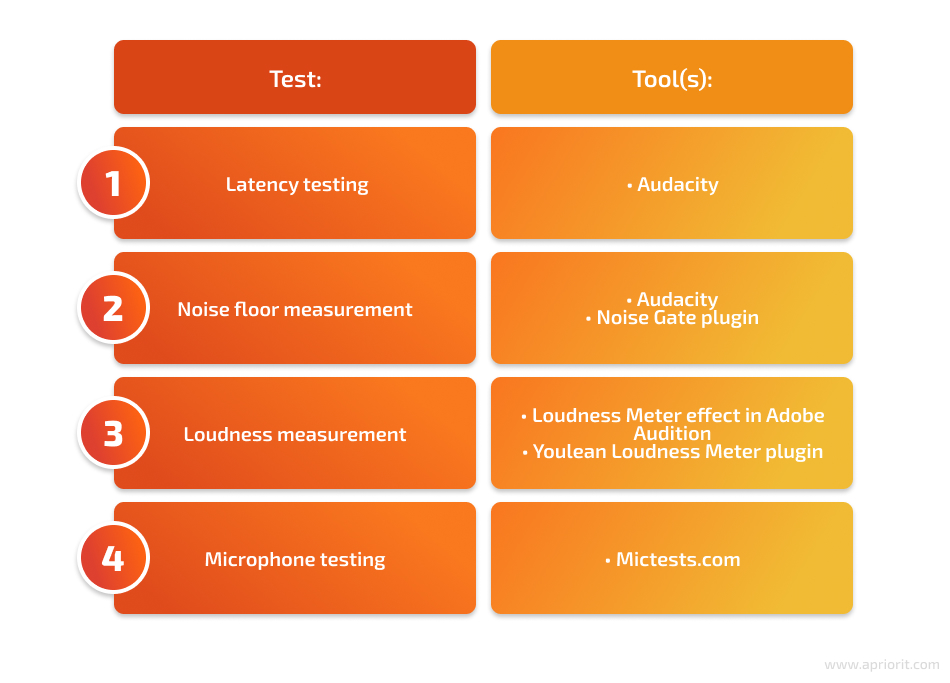
- A latency test measures the delay between the time a signal is sent and received. The lower the latency, the better the VoIP call quality. Based on latency test results, you can conclude whether a network setup is suitable for real-time VoIP communication.
- The noise floor (room tone) helps to establish the level of background noise in a VoIP call. A lower noise floor indicates less background noise, which can result in a clearer call. You can use noise reduction tools like noise suppression and echo cancellation to minimize unwanted background noise in the call.
- Loudness is a measure of the volume of the VoIP call. It’s important to ensure that the call volume is not too low or too high. Measuring loudness can help to make sure the call volume is at an appropriate level for the intended use.
- Microphone testing can help you determine the quality of a microphone being used for VoIP communications and check how different types of microphones work with your solution. Most tools for mic testing offer a variety of tests to assess the microphone’s performance in different scenarios, including noise reduction, frequency response, and sensitivity.
Now, let’s explore each test in detail.
1. Latency testing
Latency testing is one of the key tests your team should conduct to achieve a quality product. Before showing you how to test it, let’s dive into some details.
To be able to thoughtfully test latency and minimize delays in your solution, you first need to understand what causes them. Here are the factors that most influence latency:
- The data input buffer size is the main cause of delays and depends on the processor’s capabilities
- The analog-to-digital conversion (ADC) and digital-to-analog conversion (DAC) stages add a minor delay ー 0.5ms combined (0.25ms each) on average
- The data transfer protocol usually introduces a negligible delay
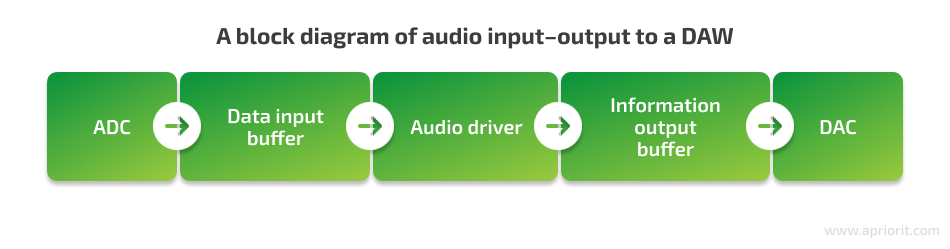
An efficient audio driver is what helps you minimize latency. Let’s explore its place in audio input–output to a digital workstation (DAW), where the DAC stage converts the digital signal back to analog form:
The sample rate determines the number of samples per second. The higher the sample rate, the more samples will represent the original analog waveform. Since time remains constant, with a higher sample rate, each individual sample represents a shorter amount of time compared to a lower sample rate.
Sample rate, buffer size, and latency are all interconnected. By adjusting the buffer size, which is measured in samples, you can change the resulting latency. A larger buffer size results in higher latency. The sample rate, on the other hand, determines the number of samples taken per second. A higher sample rate means each individual sample is shorter, resulting in less latency.
To calculate the total latency of a system, you can use the following formula:
(Buffer size / sample rate) × 2
However, it’s important to take into account fixed delays, such as analog-to-digital and digital-to-analog conversion and audio driver delays.
Here are two practical examples to help illustrate the relationship between sample rate, buffer size, and latency:
1. Let’s say you’re recording audio using a DAW:
- If you set the buffer size to 256 samples and the sample rate to 44.1 kHz, the total latency of the system would be (256 / 44100) × 2 = 0.0116 seconds, or 11.6 milliseconds.
- If you increase the buffer size to 512 samples, the total latency will increase to 23.2 milliseconds.
- If you increase the sample rate to 88.2 kHz while keeping the buffer size at 256 samples, the total latency will decrease to 5.8 milliseconds.
2. In the context of video conferencing, the buffer size and sample rate can affect the delay between audio and video. Let’s explore a few examples:
- If you’re using a video conferencing app with a buffer size of 256 samples and a sample rate of 48 kHz, you may notice that the audio and video are slightly out of sync.
- If you increase the buffer size to 512 samples and decrease the sample rate to 44.1 kHz, the delay may be even more noticeable.
- To reduce the delay, you can try increasing the sample rate while keeping the buffer size small or using a dedicated low-latency audio interface.
How can you test latency?
To show you an example of latency testing, we’ll use the open-source cross-platform Audacity software.
Before we start testing latency, let’s briefly discuss possible devices:
- An external microphone. To record overdubs, set up the microphone in front of a speaker or headphones and turn Software Playthrough off.
- A laptop’s onboard microphone. To record overdubs, simply use the onboard microphone and speakers.
- A desktop computer. In this case, you’ll need to connect the line input and output ports with a loopback cable. The type of cable required will depend on the way you’re connecting your recording equipment to the computer. If you’re connecting your recording equipment to the line input and line output jacks on your computer, you’ll need a cable with a stereo mini plug at each end.
- If you’re using a USB audio interface device for input and/or output, plug the loopback cable into the appropriate jacks in the USB interface. Depending on your interface, you may need a specific type of loopback cable.
Note that using some USB microphones might not be the best way to record overdubs. The problem with some of these microphones is that the only way you can hear yourself in your headphones is by turning Software Playthrough on. Software Playthrough introduces its own delay that you will hear in your headphones. For example, in our project, using a USB microphone added 65 milliseconds of delay.
Now, let’s discuss Audacity settings for latency testing.
Recording preferences
1. In the top menu bar, choose on Edit and > Preferences.
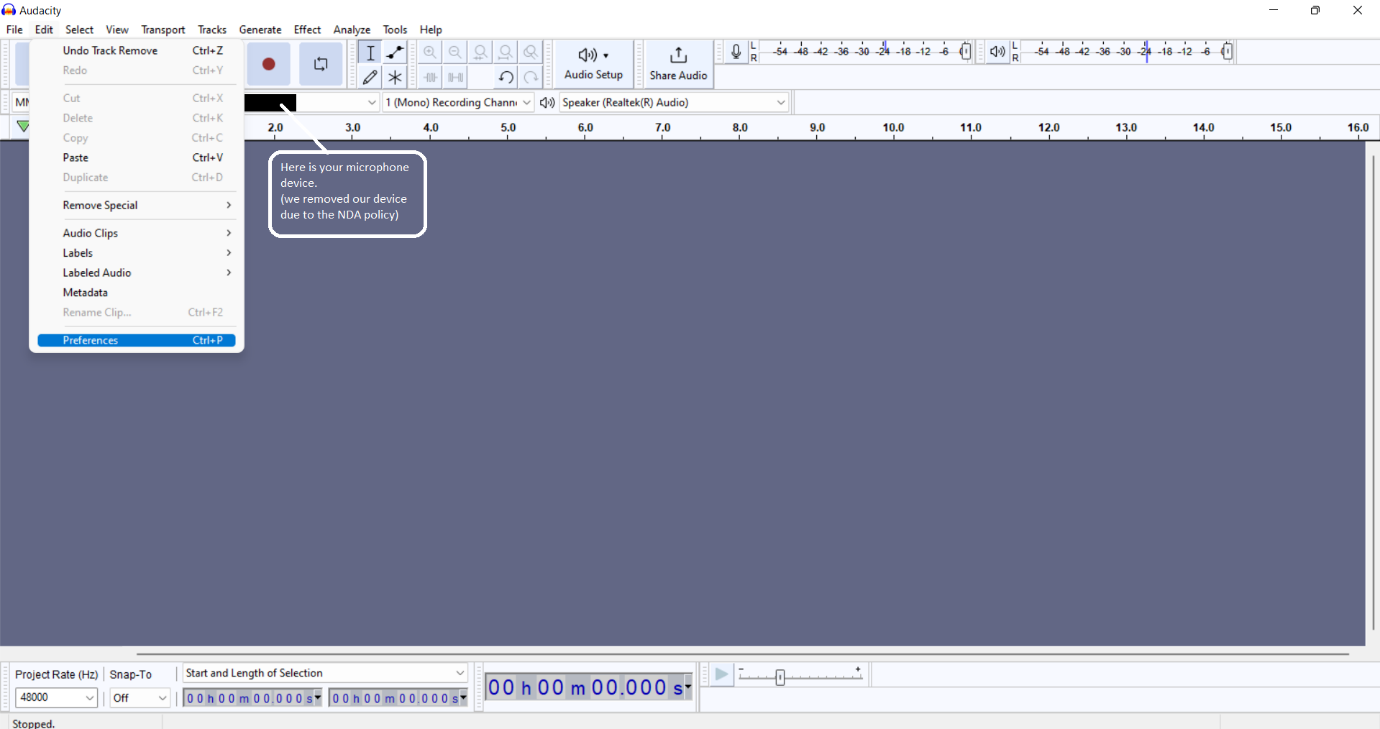
2. In the Recording tab, check the box for Play other tracks while recording (overdub) as shown in the screenshot below:
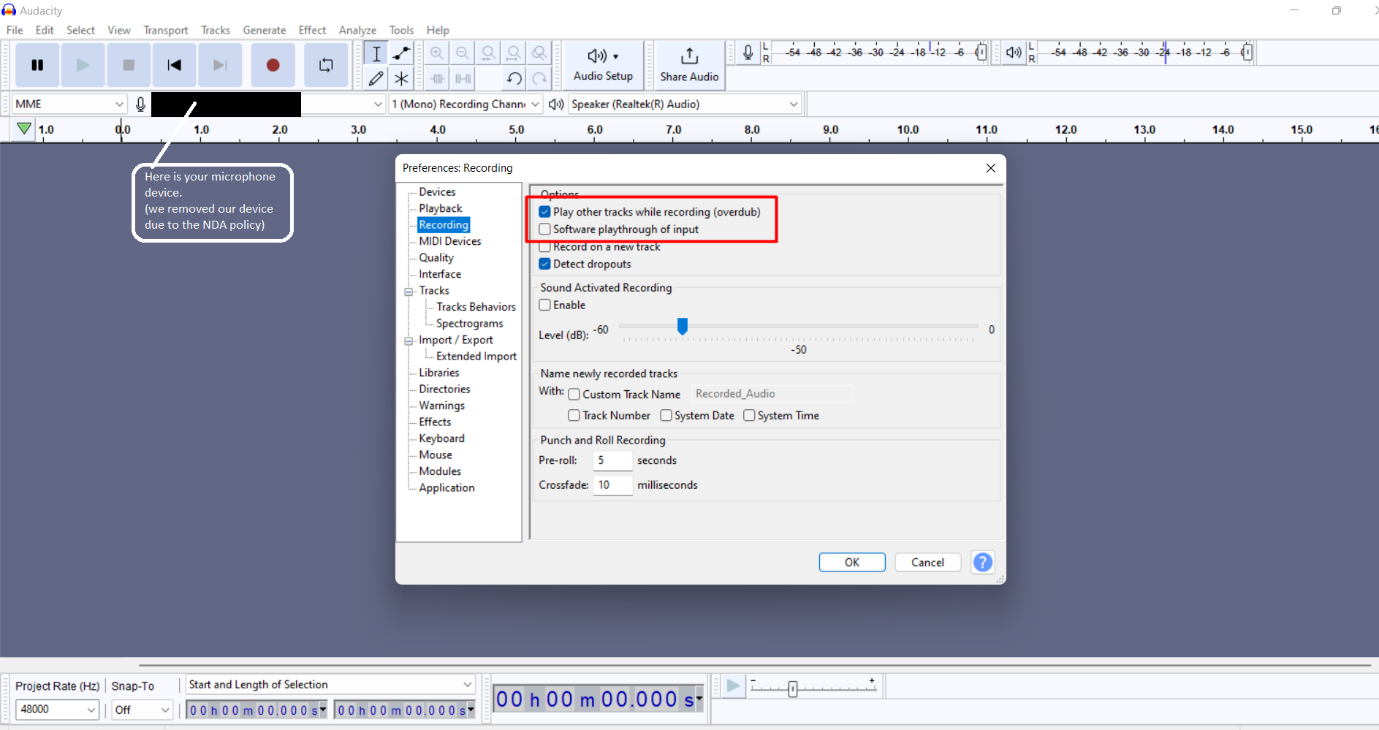
With Audacity’s default settings, the Record button will append a recording onto your existing track. To record to a new track for multitrack overdubbing, you’ll need to press Shift and select Record New track, or use the shortcut Shift + R. You can change the default keyboard shortcut in Recording Preferences by checking Record on a new track.
Device preferences
1. In the Sampling section of the Quality tab, we set the default settings for our app (you can select other values if your app requires):
- Default Sample Format — 16-bit
- Default Sample Rate — 48000 Hz

2. In the Latency section of the Devices tab, set the following:
- Latency compensation to 0 so that you get an absolute reading
- Leave the Buffer length value at its default value
Then click OK.
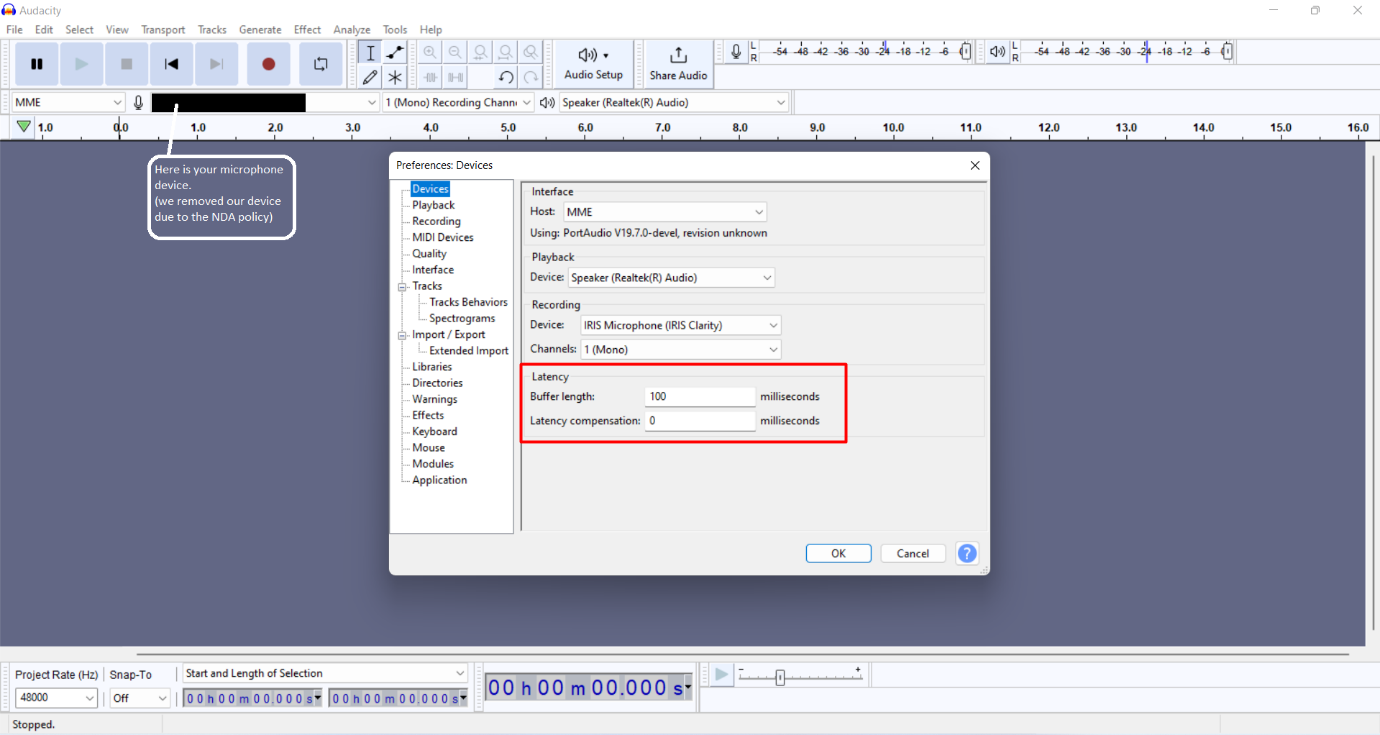
The Buffer length value will affect latency, but the effect can vary between systems. 100 milliseconds is a safe value that won’t put too much load on your CPU. Too low of a value may put too much load on the CPU, causing dropouts in the recording. If you’re feeling adventurous, you can repeat this test with different values for buffer length. But in the end, you should settle on values for both buffer length and latency compensation and leave them be.
3. We recommend you go to the View page and enable the Device Toolbar:
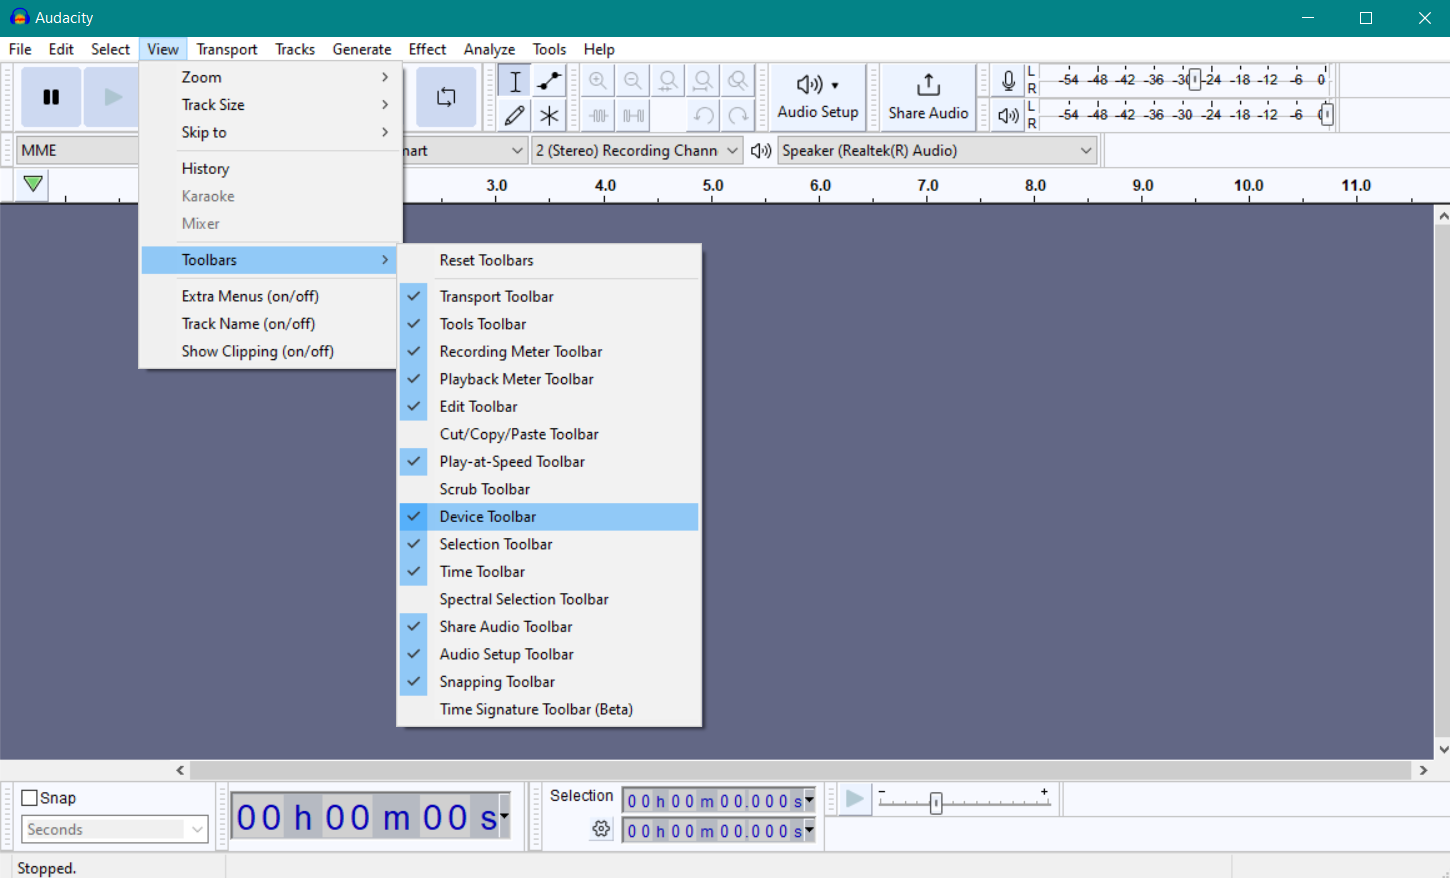
If you change the recording, playback, devices, real audio host, or audio host in the Device Toolbar, you’ll need to run this test again. Each Audacity test is only representative for the specific inputs, outputs, and hosts used during the test.
Selection Toolbar
1. In the Selection Toolbar, make sure that Snap-To is set to Off. Above the second and third group of numbers, make sure that Start and Length of Selection is selected.
2. Click on one of the downward-pointing arrows in the digit’s boxes to the right of Snap-To and select hh:mm:ss + milliseconds.
Performing the latency test
As we’re using a standalone microphone to record overdubs in our example, we’ll start with setting up the microphone in front of a speaker or headphones and turning Software Playthrough off. We’ll use the Realtek (R) Audio laptop speakers and a USB microphone (USB Audio Device).
Note: Turn off unnecessary applications before starting the test so that your machine can allocate most resources to playing and recording audio.
Here’s how to test latency without an application or a driver:
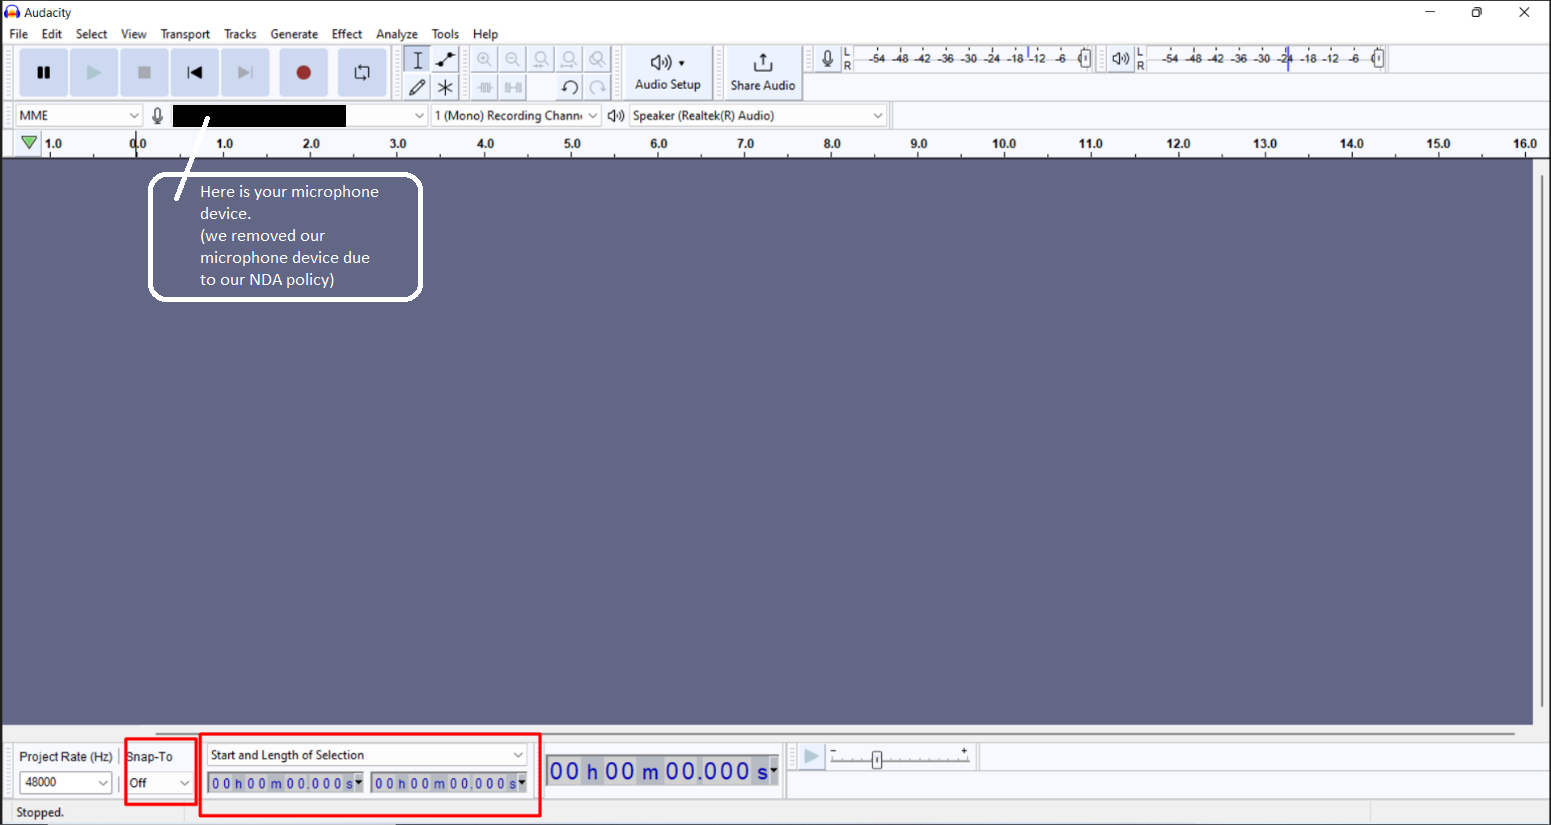
- Set up the devices in the Device toolbar.
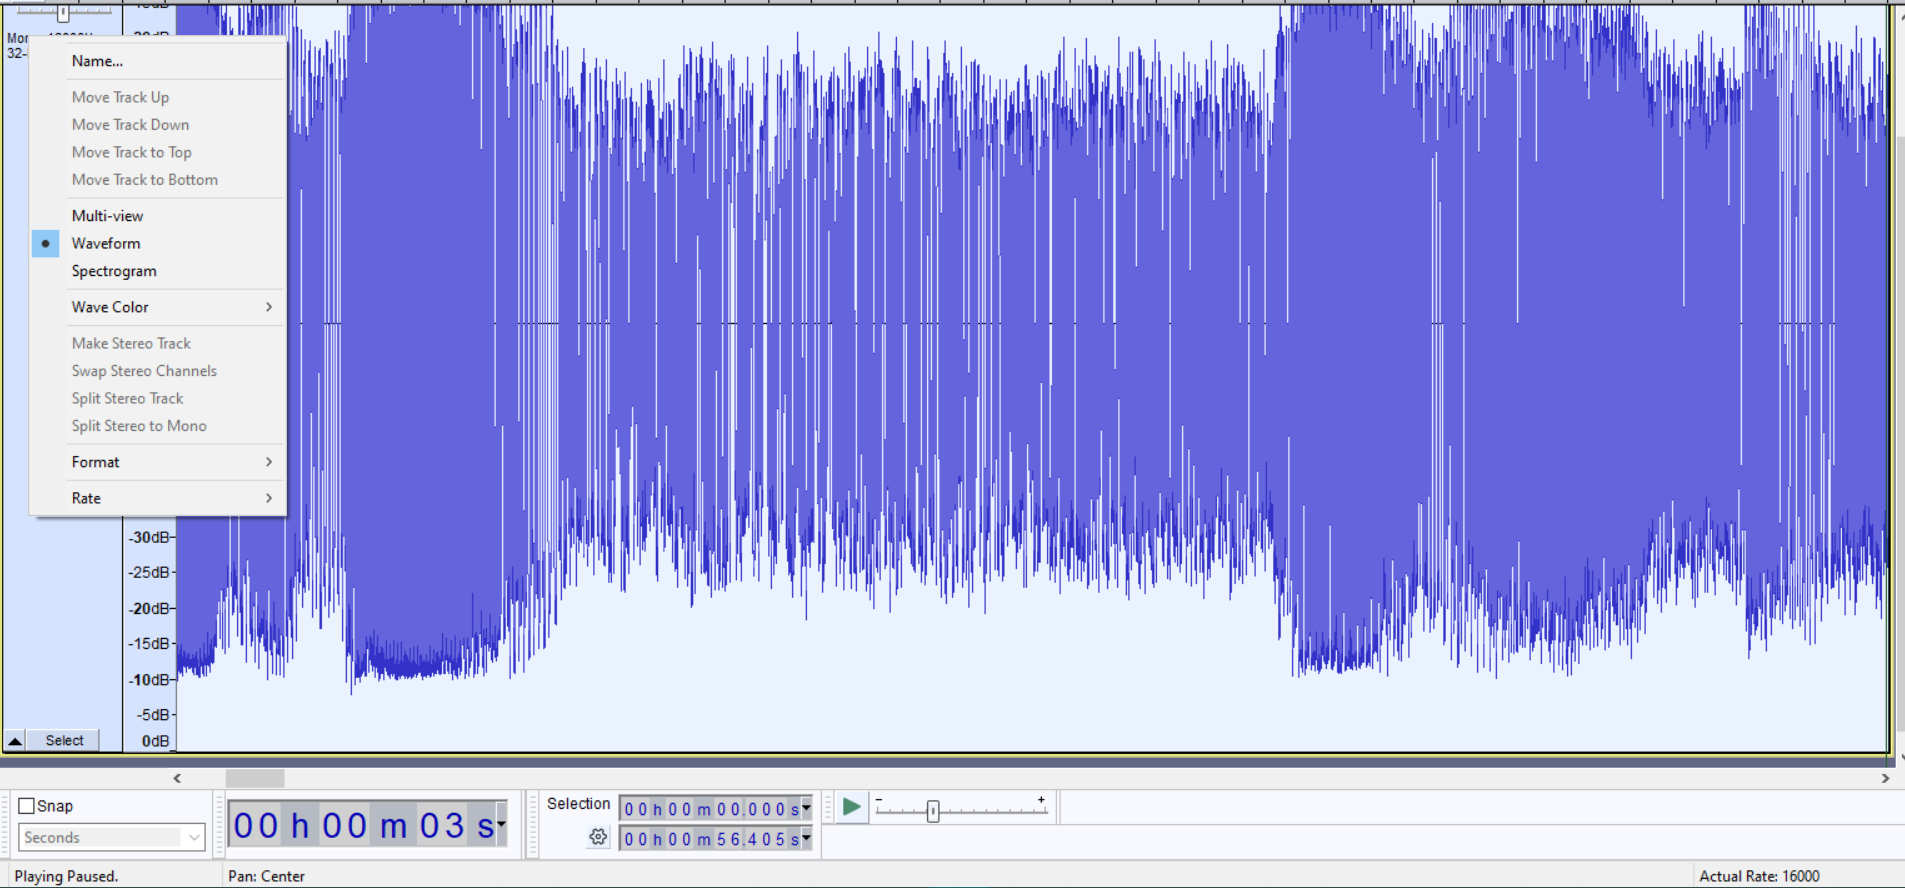
- Click the Record new track button in the Transport Toolbar and record your voice.
- Press Shift and click Record new track in the Transport Toolbar. Then, the recorded voice will be played back and recorded to a new track. The top track (Audio 1) is the original recording, and the bottom track (Audio2) is the looped-back recording. Note the delay.
- Zoom in so you can see the sound spikes on the top track and its delayed version on the bottom track.
- Using the Selection Tool, drag a selection from the start of the voice in Audio 1 and ending at the start of the delayed voice in Audio 2. To check the results, click the Mute button on Audio 1 and play Audio 2 to hear where the sound begins.
The selections go from the original voice to the delayed version in the bottom recording.
You can now find out the latency directly from the second panel of numbers:
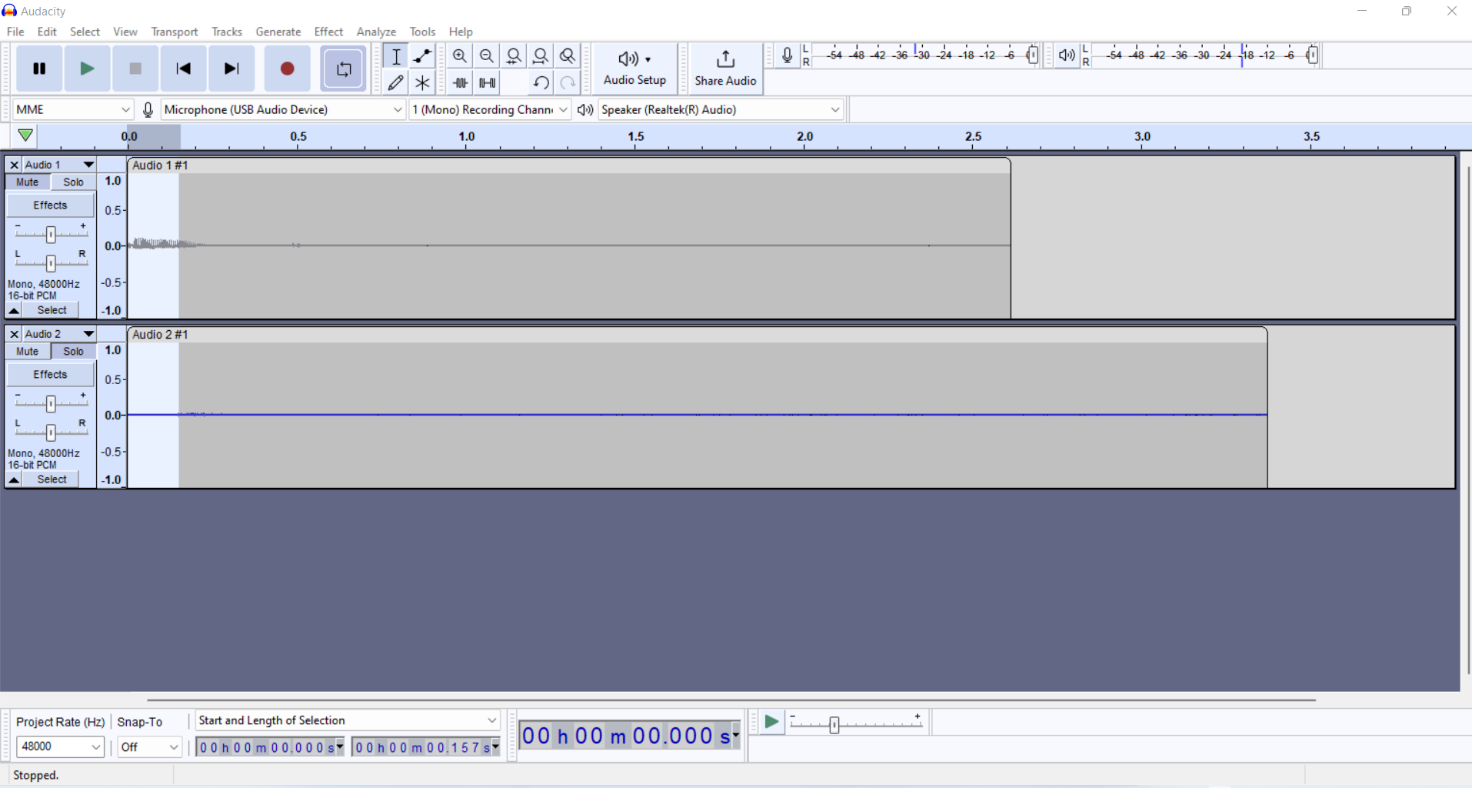
Without using our application, we can see that we have 157 milliseconds of latency.
Here’s how to test latency with an application or driver:
1. For our app, we set the devices to USB Audio Device as the microphone and Realtek (R) Audio for the speakers. Also, we set the toggles that enable a neural network on the microphone and speakers: microphone On, speaker Off.
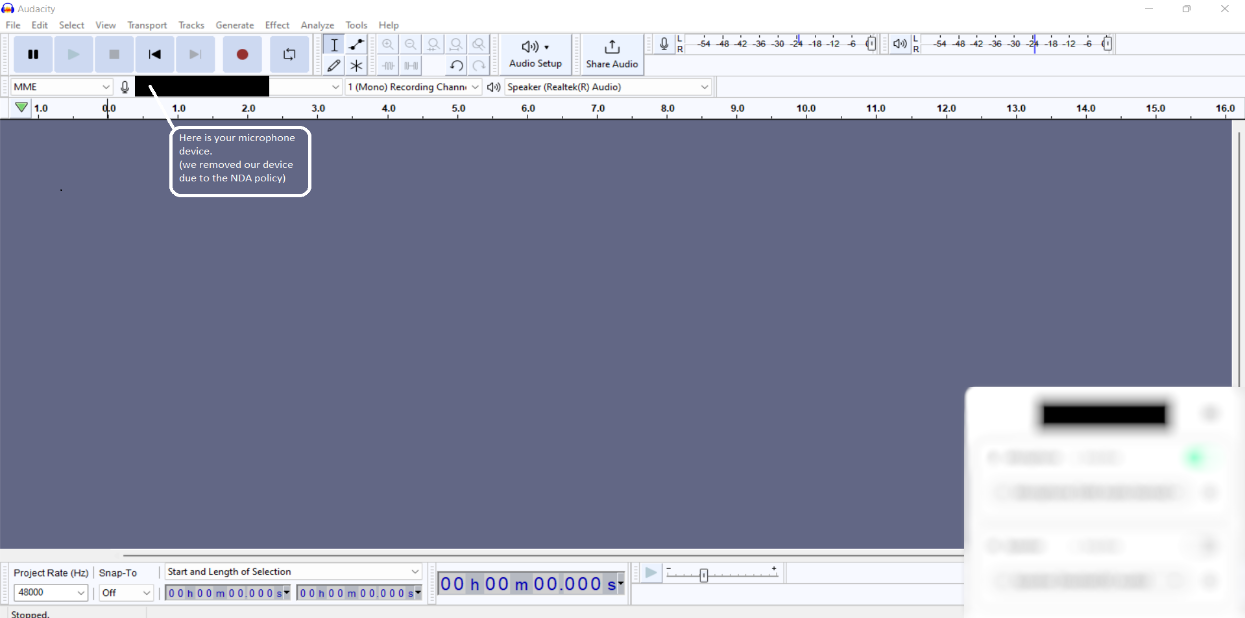
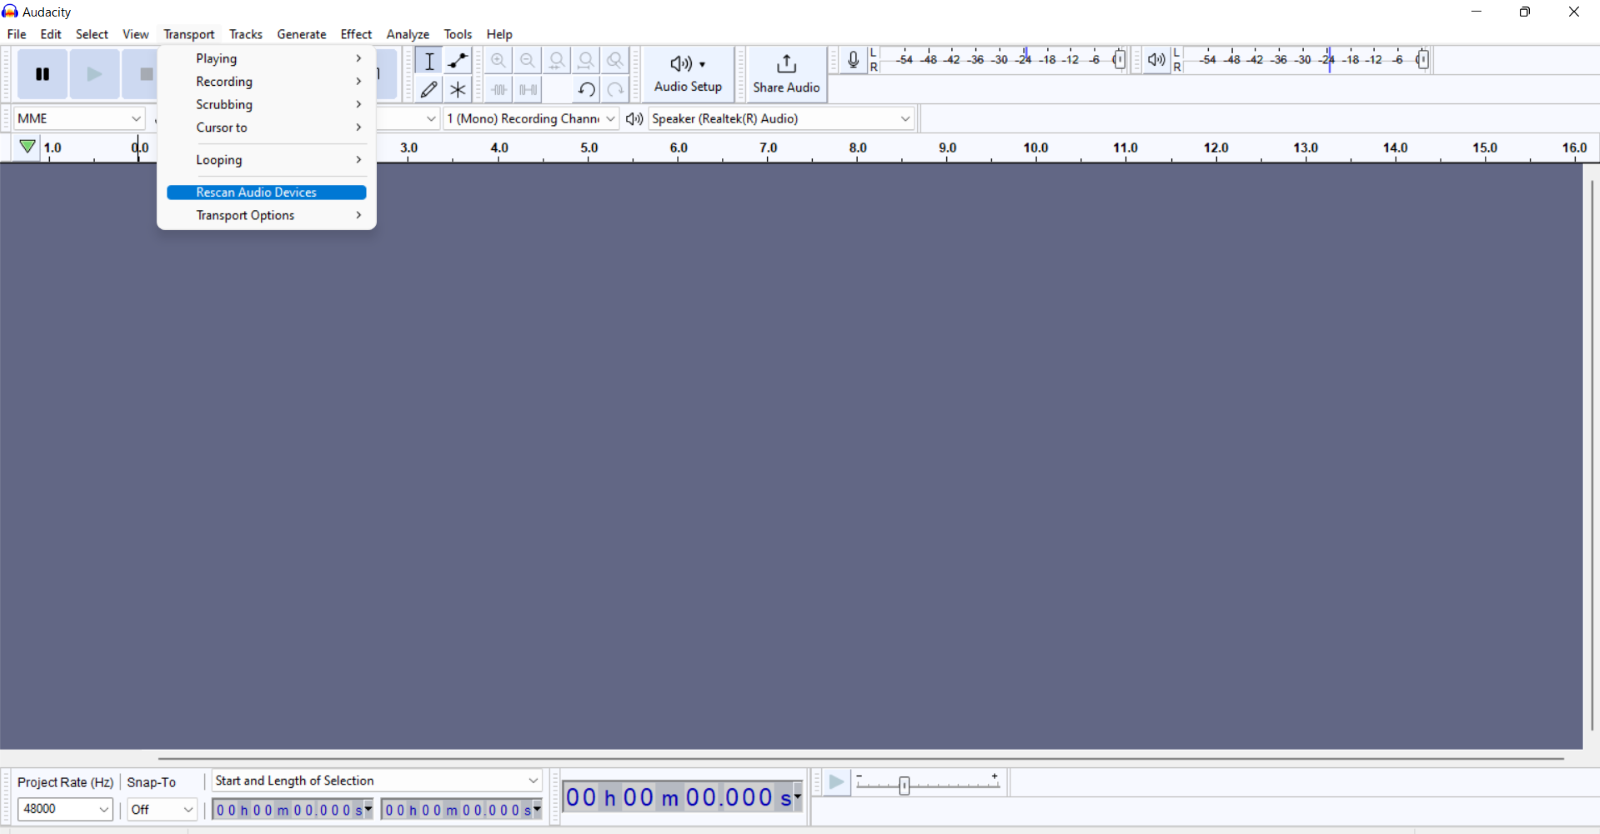
2. Click Transport and choose Rescan Audio Devices to detect your device:
3. Set up the devices in the Device toolbar (Microphone – your application or driver device, speaker — Realtek (R) Audio). Note: For measuring latency with the neural network enabled, we continue using the default speakers.
4. Repeat steps 2–5 from the previous test.
Here are the results:

When using our driver, we have 406 milliseconds of latency with the neural network enabled. Please note that in these examples, we only explored two configurations. In real life, you need to test all possible configurations to detect latency.
2. Noise floor measurement
The noise floor refers to the level of noise in an electrical circuit or component. It can take the form of a hum, hiss, rumble, or other low-level sounds. To measure it, you can use the Noise Gate plugin, which is preinstalled in Audacity.
First, you need to configure the plugin. Noise Gate in Audacity has three main settings:
- Level reduction is best to set between -10dB and -20dB, as you want to leave some of the room sound for a more natural feel.
- Gate threshold should be set 3dB to 5dB above the noise floor.
- Attack/Decay, in our experience, is best to set around 80ms, as going any lower starts to cut the end of sentences. If you notice choppiness at the end of sentences, try increasing this parameter’s value.
An important note on how Noise Gate works: If input audio is below the threshold, the plugin closes and reduces the audio volume by an amount you specify in level reduction. If input audio is above the threshold, the plugin stays open and does nothing.
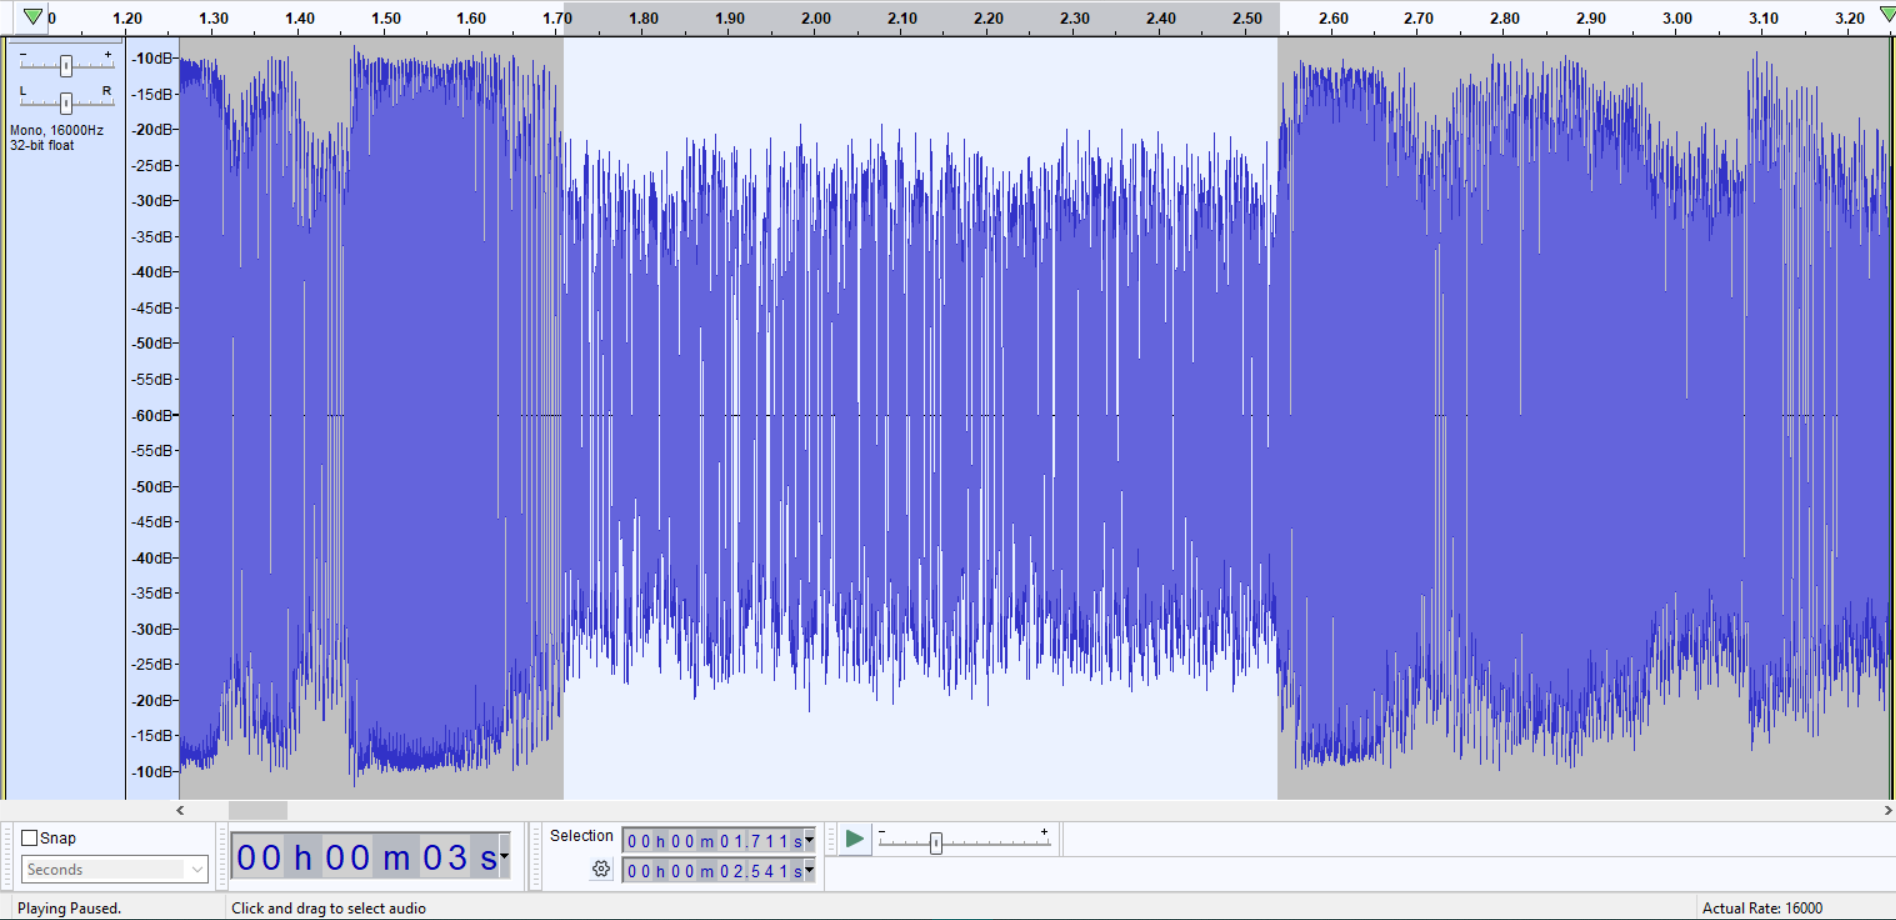
Then, you can start measuring the noise floor using Audacity:
- Open the recording in Audacity (if you’ve already recorded it), or make a new recording.
- On the far left-hand side of the recorded track, click the down arrow.
- Click the Waveform view (it may already be selected):
4. Right-click the left scale (0.1 and so on) and choose Logarithmic (dB):
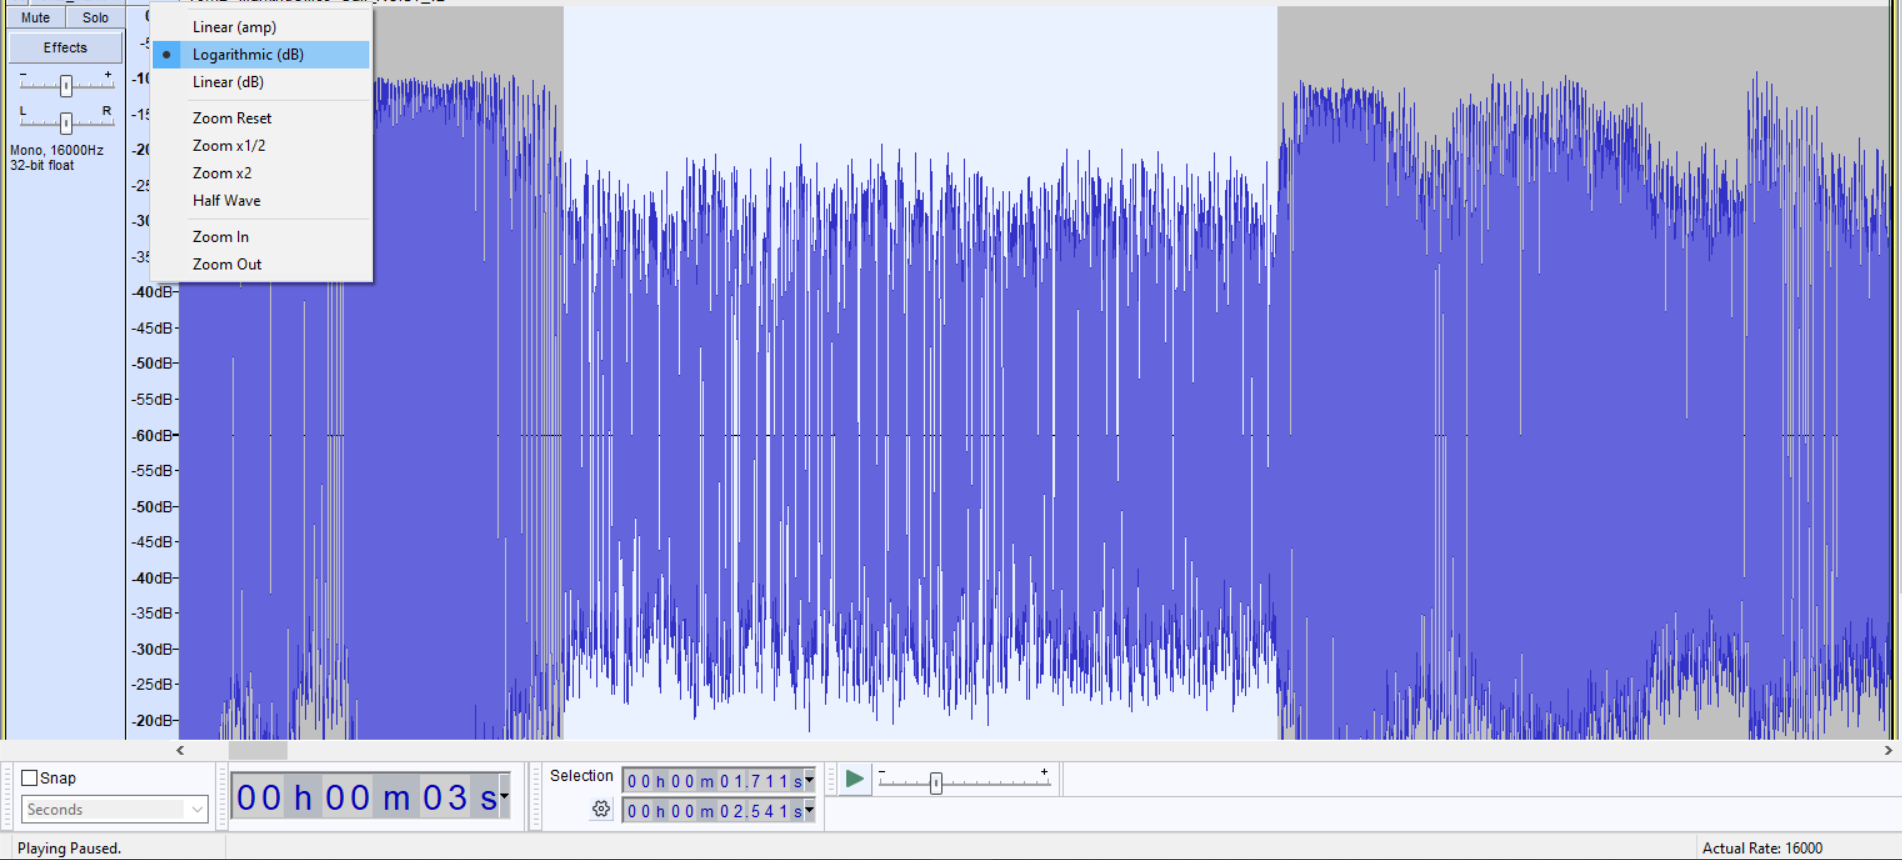
5. Zoom in on the recording (by pressing Ctrl + 1) to make the track’s size larger.
6. Play the recording until you hear a breath or a section without voice. When you hear it, make a note of approximately the noise level where it begins. In the screenshot below, you can see that its loudest level is -20 dB.
3. Loudness measurement
We’ll show how to measure loudness using two different tools:
- Loudness Meter effect in Adobe Audition
- Youlean Loudness Meter plugin in Audacity
1. Measuring loudness using the Loudness Meter effect in Adobe Audition
Adobe Audition is professional audio editing software for recording, mixing, and mastering audio files for a variety of applications.
It has a built-in Loudness Meter tool. Here’s how to start working with it:
- Open the Effects Set tab on the left side of the user interface.
- Click the small triangle to open the drop-down menu and select Special > Volume Meter, and the effect will be applied automatically.
- To save your settings for future use, select Effects > Special > Loudness Meter > Effect, then check the Loudness Meter dialog box, adjust the settings (see the next step), and click Apply.
- To manually change the measurement levels in the Loudness Meter, right-click or double-click it to open the Fx Track Editor – Loudness Meter dialog box and click Settings. If editing levels manually is inconvenient, you can use a settings template based on commonly used standards or default settings.
- In the Settings tab, you’ll see the default Loudness settings that are good to go.
- To switch to the channel map editor, click the icon in the upper left corner of the Fx Track Editor and check the Loudness Meter box.
Once all preparation steps are done, let’s move to measuring track loudness:
- Right-click (in Windows) or hold Ctrl and click (in macOS) on the Loudness Meter effect and choose Edit Selected Effect from the drop-down menu.
- Press the spacebar or the Play button on the program monitor to play. During playback, the loudness meter monitors the loudness of all playback channels and displays the results as a range of blue, green, and yellow values.
- As a result, you get an accurate loudness measurement and can use it as the basis for deciding how to change the loudness levels.
2. Applying the Youlean Loudness Meter plugin to measure track loudness in Audacity
This is a free loudness meter plugin that can be used in many popular DAWs. Here’s a step-by-step guide on how to use the Youlean Loudness Meter with Audacity:
- Download and install the Youlean Loudness Meter plugin from the Youlean website.
- Open Audacity and import your audio file.
- Go to the Effects menu and select Add/Remove Plug-ins.
- Click Add and select the Youlean Loudness Meter plugin from the location where you installed it.
- Close the Add/Remove Plug-ins window and select the portion of your audio you want to measure.
- Go to the Effect menu and select Youlean Loudness Meter.
- In the Youlean Loudness Meter window, select the appropriate Loudness Standard for your region (e.g., EBU R128 for Europe, ATSC A/85 for North America).
- Click Analyze to measure the loudness of your audio.
The Youlean Loudness Meter will display the loudness measurements for your selected portion of audio. You can adjust the playback level of your audio and re-run the analysis to see the effect on the loudness measurement.
You can also use the Youlean Loudness Meter to measure the overall loudness of your entire audio file. To do this, select the entire audio file and run the analysis as described above.
4. Microphone testing
Testing microphones is essential for delivering a high-quality audio conferencing solution. You should check how different types of microphones work with your product to ensure wide compatibility for end users. When detecting VoIP call quality issues during such tests, you should investigate the reasons behind them and introduce fixes to improve your product’s compatibility with customer devices.
Let’s discuss how to test a microphone using Mictests.com. This online test is a useful tool for testing a microphone, finding out technical information about it, and checking whether it works correctly.
How can you check a microphone on mictests.com?
1. Select the desired microphone.
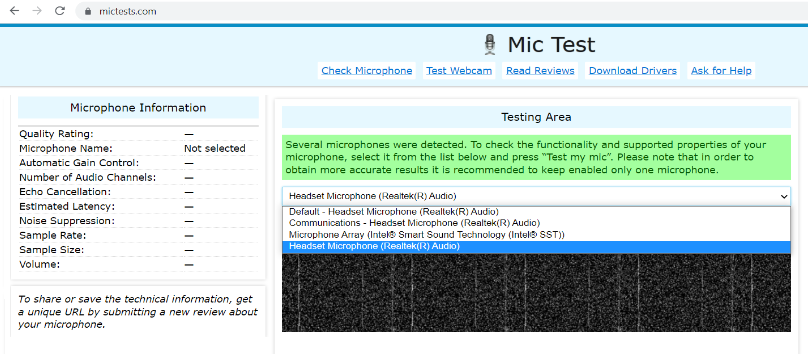
2. Click Check my microphone.
3. Grant access to your microphone.
4. Say something or make some noise.
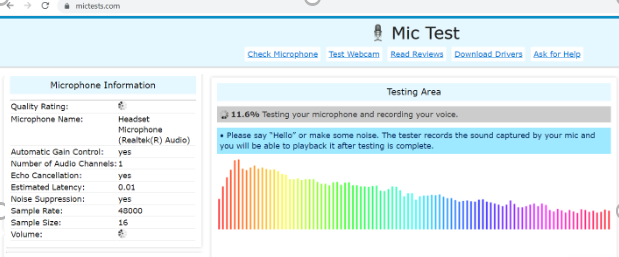
5. After a few seconds, you’ll see the results on the left side of your screen or in the Microphone Information block.
Apart from the tests mentioned in this section, you also should check:
- Total harmonic distortion (THD), which measures harmonic distortion in a signal. In audio systems, lower distortion means that components in a microphone or other equipment more accurately reproduce audio. The cause of harmonic distortion might be that the output signal has components that are not present in the input signal.
- Audio power is the electrical power transferred from an audio amplifier to a loudspeaker, measured in watts.
- Frequency response describes the range of frequencies and audio tones a piece of equipment can produce.
- Signal-to-noise ratio measures the quality of sound compared to background noise.
Performing all key tests will help you better evaluate the sound quality provided by your VoIP-based solution, identify issues, and fix them before delivering your product to end users.
Conclusion
Building Skype-like applications is challenging. With so many products on the market, you need to ensure top-notch quality of each and every functionality to make your solution stand out. And thoroughly testing sound quality is one of the essentials.
Conducting measurements described in this article can help you assess the quality of VoIP calls and identify issues that can compromise them. Using these tests, you can detect and fix issues and achieve better audio quality in VoIP calls, resulting in clearer communication and a better user experience.
However, working on a real-life product requires much more knowledge, skills, and work than we’ve mentioned in this article. At Apriorit, we have experienced teams of software developers and quality assurance specialists who will gladly assist you with delivering competitive Zoom-like software.
Contact us to start working on your VoIP-based application!
Have a question?
Ask our expert!
VP of Engineering


