 Skip to main content

The backend is a critical component of any Android mobile application, as it houses essential elements such as data storage for Android app, databases, and authentication. It serves as the backbone of the application, facilitating seamless communication and providing necessary functionality. In order for your application to use its backend to the fullest, it’s important to establish seamless communication between the frontend and backend. This communication can be achieved with the help of dedicated communication platforms.
In this article, we take a look at our experience using three different platforms for Android backend communication: Azure IoT Hub, Ably, and Firebase Cloud Messaging. Learning from our experience, you’ll be able to pick the right platform to improve your application’s functionality and enhance the user experience.
This article will be helpful for mobile development teams working on Android applications and looking for ways to improve backend to frontend communication.
Contents:
Understanding app-backend communication
Backend development is very important in the app development process, as the backend handles the app’s underlying logic, data storage, and communication between the app and servers. It’s also responsible for the smooth functioning of the app together with the frontend, scalability, and efficient data management. These benefits can be achieved with the help of communication protocols. A communication protocol is a set of rules that define the type of delivered information and the format of its delivery between two or more components of a communication system.
In the context of Android app development, communication protocols allow your app to interact with backend infrastructure such as servers, databases, and APIs. Communication protocols handle various aspects of data transfer, including:
- Establishing connections
- Data encoding and decoding
- Data integrity and security
- Error recovery
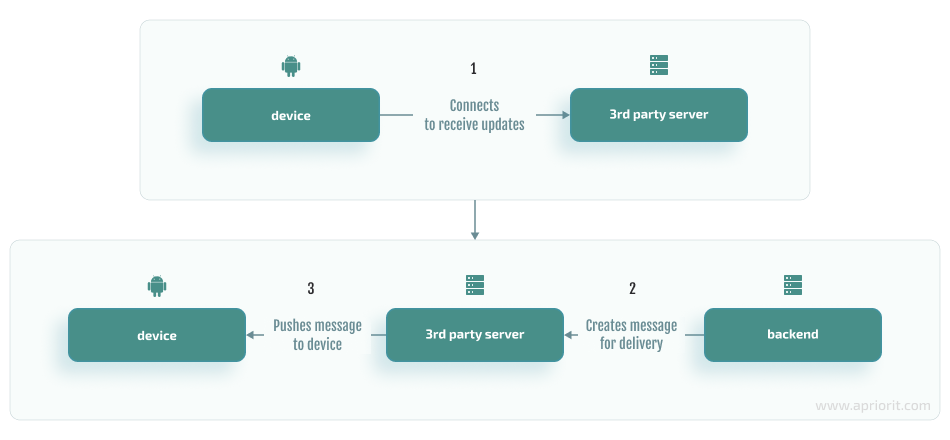
To help Android apps communicate with the backend system, a device needs to first initiate a connection to a communication platform. Only after this connection is established can the backend deliver messages to the device. The role of a third-party platform is to manage and maintain all connections to devices. As a result, the backend simply needs to receive the message, specify the device or channel for message delivery, and let the platform handle the rest.
Communication between server-side components can be achieved with the help of different message types. The choice of message type depends on the system’s specific requirements and architectural design. Here are some of the message categories that define how the backend and frontend of the mobile app communicate:
- User-system interactions
- Server-to-server communication
- IoT device communication
- Event-based messaging
- Publish/subscribe (Pub/Sub) messaging
For instance, when a platform guarantees message delivery, here is what happens: Since the platform manages the connections, it can determine whether a device is online or offline. If a device is offline, the platform can postpone message delivery until the device comes online, guaranteeing that the message is successfully pushed to the device.
There are two possible message delivery approaches that platforms can use:
- Asynchronous
- Synchronous
The asynchronous delivery approach will fit when the backend does not need to know the result of handling the pushed message on the device side at all, or at least doesn’t need to know it immediately. Once the device receives the message, it can optionally notify the backend. When you use libraries with asynchronous message delivery, the overall framework usually follows this structure:
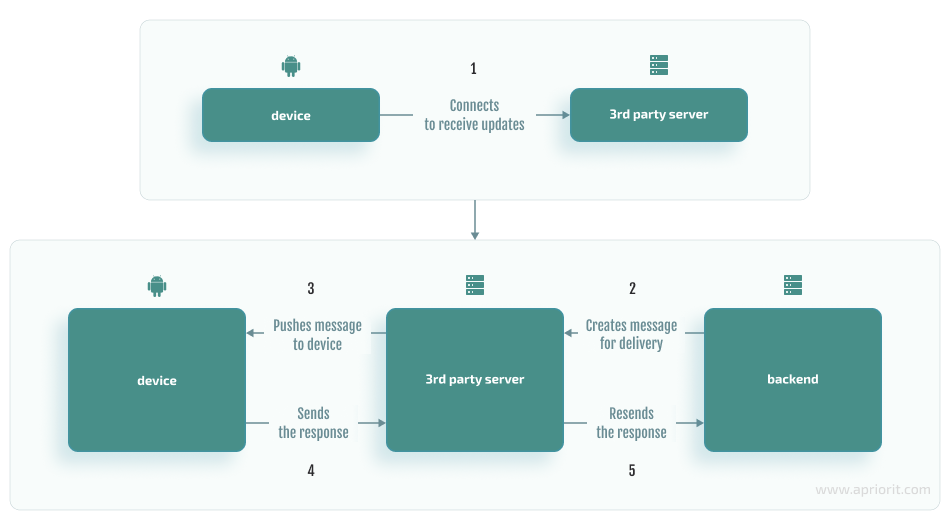
The synchronous delivery approach is used when backend behavior depends on the result of handling the message on the device, and the result is retrieved once the message is sent from the backend. The backend will immediately know if the device is unavailable and cannot receive the message. After this, the backend can notify the user or resend the message if it wasn’t successfully processed. In case of synchronous delivery, where the library not only pushes the message to the device but also retrieves the result, the scheme will look like this:
Recently, Apriorit developers were hired for a project where we needed to develop network traffic filtering functionality for a web solution. The main purpose of the project is to regulate access to other apps on the device and to regulate the content that users see on the internet. We used three different platforms in the course of working on this project — Ably, Azure IoT Hub, and Firebase Cloud Messaging — to implement communication between the app and the backend.
All three of these platforms share some similarities that were useful to our project: for example, cross-platform support and integration with Client for URLs (cURL). However, as they offer different sets of features and have different capabilities, we shifted platforms as the project grew.
In the next sections, we explore each of these platforms and the reasons for choosing them, overview their unique features, and show how to integrate them into your Android project in practice.
Achieving seamless and reliable messaging with Ably
For our project, Apriorit experts first tried to use Ably — a cloud-based messaging platform that provides a scalable and reliable infrastructure for real-time communication and data streaming. It offers many communication protocols including WebSocket, MQTT, and Server-Sent Events, which allow for efficient and low-latency messaging between clients and servers.
Ably works by using messages and channels:
- Messages contain the information that you want to deliver to a device
- Channels are used for message distribution
Here is how it works: The client attaches to a channel and subscribes to a message. When the message is pushed to the channel, Ably broadcasts it to all of the channel’s subscribers.
To be able to test the solution, you need to create an account on the Ably website to retrieve the API key that will be needed later for interacting with Ably’s services.
Ably provides many features that turn it into a versatile messaging platform for real-time communication. Here are some of them:
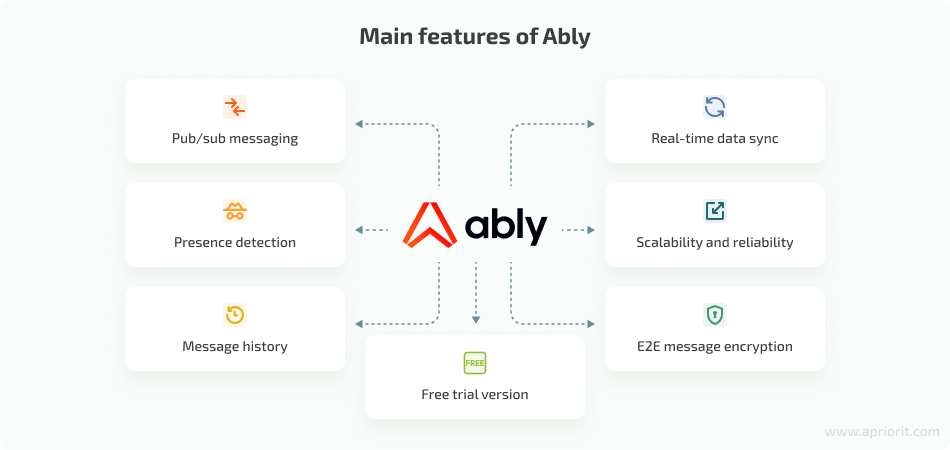
- Pub/sub messaging. Ably follows a publish–subscribe model, allowing clients to publish messages to specific channels and subscribe to receive messages from those channels. This way, you can efficiently distribute messages across multiple clients.
- Presence detection. You can detect if users or devices are present within a channel in real time and improve the user experience by providing targeted communication, showing online/offline statuses, and creating collaborative applications.
- Message history. Ably saves all message history, making sure that clients can still receive missed messages after re-establishing a connection.
- Real-time data sync. All clients and devices can synchronize their data in real time, which guarantees instant updates and consistency of data across all connected devices.
- Scalability and reliability. Ably’s infrastructure is designed for high scalability and reliability, allowing applications to handle a large number of concurrent connections and messages. It provides automatic scaling and load balancing to ensure smooth operations even during periods of high traffic.
- E2E message encryption. In terms of security, Ably offers end-to-end encryption, preserving data confidentiality and integrity. This platform also offers security measures to protect against unauthorized access.
- Free trial version. Apart from the paid plan with full capabilities, Ably also has a free trial version with some limitations, such as a limit on the number of sent messages and channels that can be subscribed to. Still, the trial version will be enough to test this solution and see if it fits your needs.
One of the possible disadvantages of Ably is that by default, if a device remains disconnected for more than two minutes, messages won’t be sent to it. You can enable the history option to recheck if there were new messages on a channel once a device is back online. However, this will increase the number of used messages, which might be a problem if you plan on using the free version.
Ably can be a great option for reliably delivering messages across different platforms and devices while also offering broad device support. Ably offers real-time messaging through its API and supports such communication protocols as MQTT, WebSockets, and Server Sent Events.
How to implement Ably into your Android app
Now we will proceed to platform implementation. Ably can be easily integrated into an Android project by adding ably.io as a dependency to the project’s Gradle file.
...


dependencies {
    implementation "io.ably:ably-android:$latest_version"
}Now you need to initialize the Ably main class to be able to create subscribers and retrieve messages. For that, you need to have the API key, which can be retrieved from your created account, and the channel name. All messages are distributed via channels, so in order to retrieve them, we will need to connect to a specific channel.
The initialization will look like this:
fun init(apiKey: String, channelName: String): Channel? {
        try {
            // initialization of ably and connecting to the channel
           AblyRealtime(apiKey).channels?.get(channelName)

        } catch (e: AblyException) {
           // handle a failed connection
            null
        }
}At this point, you need to retrieve some information from the channel. Channels work with a subscription mechanism, so in order to retrieve information you need:
- Some event to subscribe to
- A listener that will handle the event payload
Create a message listener by extending the Channel.MessageListener class. The listener will handle the payload of the subscribed event:
class MessageListener : Channel.MessageListener {
    override fun onMessage(message: Message?) {
        val messageData = message?.data as String
        Timber.d("Message is $messageData")
        //proceed with handling the data
        ...
    }
}Now that we have our listener, we can subscribe to events by attaching the listener to a specific event name:
//we will need this listener later, so it is best that we create its instance once
private val listener = MessageListener()

fun subscribeListener(channel: Channel) {
    channel.subscribe("new_event", listener)
}Along with subscribing to events, you can also unsubscribe from them. If you no longer want to handle a specific event, unsubscribe using the event name and the corresponding listener:
fun unsubscribeListener() {
    //using the same instance of the listener that we used when subscribing
    channel.unsubscribe("new_event", listener)
}Now you can push some information to a device. As mentioned earlier, you can perform testing with a simple cURL invocation like this:
curl https://rest.ably.io/channels/[Channel name]/publish --user "[Ably API key]" --data 'name=[Event name]&&data=[Message]'Next, let’s take a look at Azure IoT hub.
Improving IoT connectivity with Azure IoT Hub
As our backend used more and more Azure services, our team switched from Ably to Azure IoT Hub. Azure IoT Hub is specifically designed for building and managing Internet of Things (IoT) applications and devices. It serves as a cloud gateway that allows for bidirectional communication between IoT devices and the cloud. However, it can also be used for managing communication between a backend and non-IoT devices, as is the case in our project. Azure IoT Hub supports these protocols:
- AMQPS
- AMQPS_WS
- HTTPS
- MQTT
- MQTT_WS
Which protocol to use depends on the result you want to achieve. For example, the MQTT and HTTPS protocols are often used instead of AMQP libraries when the target device has limited resources. Also, MQTT and AMQP are binary protocols, so they create more compact payloads compared to HTTPS.
Similar to Ably, Azure IoT Hub offers a free plan to test it out and see if it will work for your application. You can test out its main features:
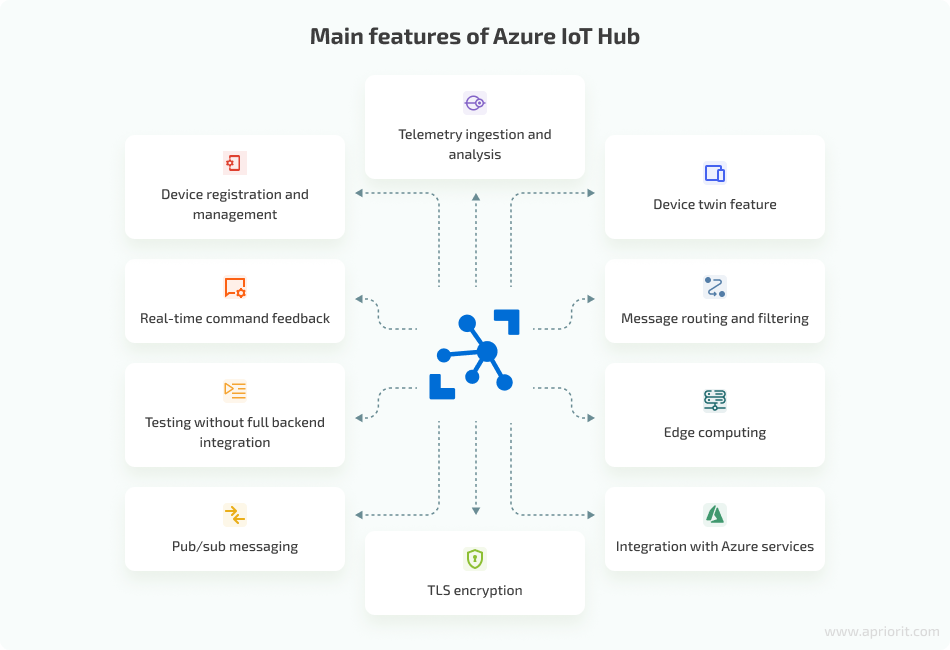
- Device registration and management. You can easily register and onboard devices to the IoT Hub, assign unique identities, and manage their lifecycle.
- Telemetry ingestion and analysis. You can set your devices to send telemetry data to the cloud for further analysis and processing. This way, you will have reliable and secure bidirectional communication channels for device-to-cloud and cloud-to-device messaging. In cases when there are no connection drops, messages are delivered fast, guaranteeing timely communication with IoT devices.
- Device twin feature. With this feature, you can create a digital twin of each IoT device connected to the hub. Device twins store device metadata, configuration data, and reported properties.
- Message routing and filtering. Flexible message routing options allow you to define rules for routing messages to different endpoints.
- Edge computing. With the help of Azure IoT Edge, you can deploy and manage cloud services directly on IoT devices, run custom code, and apply machine learning models at the edge.
- Integration with Azure services. You can seamlessly integrate other Azure services if needed, including Azure Functions, Azure Stream Analytics, Azure Logic Apps, and Azure Machine Learning. Together, these tools allow you to maximize your Android app’s productivity.
- Real-time command feedback. The backend instantly knows if a command was successfully handled by the application, thus improving control.
- Testing without full backend integration. You can use the user interface provided by Azure IoT Hub directly from your account to register devices and push information, or to use cURLs.
- Pub/sub messaging. Similar to Ably, Azure IoT Hub supports the publish–subscribe pattern for exchanging messages between devices and cloud applications.
- Transport Layer Security (TLS) encryption. Azure IoT Hub uses TLS to encrypt data in transit, protecting it from unauthorized access.
One of the main disadvantages of this platform is that IoT devices connected to Azure IoT Hub can’t selectively choose which information to handle, so there is a lack of device-side control. You might need to additionally handle information on the backend, or you can push all messages. In this case, pushing all messages to devices can result in increased traffic. There is also message counting based on the amount of data sent instead of invocations of data pushing. For example, a single 16KB message will be calculated as four messages. You need to consider this disadvantage because the paid plan depends on the number of sent messages.
Azure IoT Hub is your choice if you prioritize guaranteed message delivery and have strict payload requirements. Because of its bidirectional communication and useful device management features, you can use Azure IoT Hub for creating scalable and secure solutions even when your app doesn’t communicate with IoT devices. If your project has other priorities, read our article on the best MBaaS tools to choose one that fits your needs.
How to integrate Azure IoT Hub into your Android app
Now, let’s take a look at how you can integrate Azure IoT Hub into your Android app that is not a part of the Internet of Things. Similar to Ably, you need to add the Azure IoT Hub dependency to your project’s Gradle file:
...

dependencies {
    implementation ("com.microsoft.azure.sdk.iot:iot-device-client:$latest_version"){
        exclude module: 'slf4j-api'
        exclude module: 'log4j-slf4j-impl'
    }
}Now you can initiate a connection with the Azure client by providing the connection string from your Azure IoT Hub account and the type of protocol you will use. For our project, we decided to use the MQTT protocol. The initialization looks like this:
fun init(connectionString: String, protocol: IotHubClientProtocol) =
    try {
        deviceClient = DeviceClient(connectionString, IotHubClientProtocol.MQTT)
        azureIotConnectionMonitor.registerClient(deviceClient)
        deviceClient?.open(false)
    } catch (e: IOException) {
          null
}For our application, we used the direct methods for retrieving information from the backend. Direct methods in IoT apps are preferable when there is a need for immediate and synchronous communication with the backend of the Android app. Some alternatives to the direct method include device-to-cloud messaging, cloud-to-device messaging, and device twinning. These alternatives are more appropriate for asynchronous operations and event-driven architectures.
When using the direct method, you need to create a callback that handles the payload:
class AzureIotMethodCallback : MethodCallback {

 override fun onMethodInvoked(
        //methodName - could be used to identify what information was sent
        methodName: String?,
        methodData: DirectMethodPayload?,
        context: Any?
    ): DirectMethodResponse {
        //retrieving the payload of the message
        val data = methodData?.payloadAsJsonString
        //handle the payload

        ...

       return DeviceMethodData(
        //could be used to identify if the command was handled successfully
        status,
        //could be used to supply details on failure
        messageResponse
        )
    }
}Now, to be able to use this callback and receive direct method invocations, you need to register the callback:
fun setDeviceMethodCallback(deviceClient: DeviceClient) = try {
        deviceClient.subscribeToMethodsAsync(
            AzureIotMethodCallback(),
            context.applicationContext,
            deviceMethodStatusCallback = SubscriptionAcknowledgedCallback { responseStatus, _ ->
                //IoT Hub responded to device method operation with status $responseStatus
            },
            null
        )
    } catch (e: IOException) {
       // handle failure of the subscription
}Note: You can’t unregister from retrieving information once the subscription is set. You can only close the entire connection and reopen it again without subscribing for the callback.
Here is how you close the connection:
fun close(deviceClient: DeviceClient) = try {
        deviceClient?.close()
    } catch (e: IOException) {
       // handle failure of the subscription
}With that, you can try to send some information to the device via the Azure IoT Hub account. Alternatively, you can use cURL to invoke the direct method by generating a token with the Azure CLI extension. Don’t forget to specify the length of time for the token to be active when making a request. Also, include your Azure IoT Hub account name that was used when the account was created:
az iot hub generate-sas-token -n [iothubName] --du [duration]With that, you can invoke a request and push data to the devices:
curl -X POST https://[iothubName].azure-devices.net/twins/[deviceId]/methods?api-version=[version] -H 'Authorization: SharedAccessSignature sr=[generated token]' -H 'Content-Type: application/json' -d '{ "methodName": "[your method name]", "responseTimeoutInSeconds": 200, "payload": [your payload]'By following these steps, you can establish a connection to Azure IoT Hub, handle direct method invocations, and effectively interact with your IoT devices. Now, let’s take a look at our experience using Firebase.
Simplifying messaging and push notifications with Firebase Cloud Messaging
As the amount of transmitted data grew, we needed to look for another platform for backend communication for Android app. We switched to Firebase to accommodate this growth. Firebase Cloud Messaging (FCM) is a cross-platform messaging solution provided by Google as part of the Firebase product suite. FCM supports several communication protocols, including HTTP, XMPP, and WebSocket. You can choose the protocol that is relevant to your application’s needs depending on factors like real-time messaging, resource availability, and required scalability. Firebase Cloud Messaging makes it easier to send targeted messages to specific devices.
Here are some of the key features of FCM:

- Targeted messaging. With FCM, you can be sure that the right users receive the right messages at the right time, as it can send targeted messages to specific devices, channels, or user segments.
- Push notifications. FCM allows you to send push notifications and messages to users’ devices. This way, you can effectively engage and re-engage with your app users.
- Message customization. You can send different types of messages, such as notifications and data messages, and set messages to a higher priority to increase the speed of their delivery. Note that FCM’s analysis of device activity can override this setting depending on network conditions and battery or device optimization settings, potentially delaying notifications and delivery.
- HTTPS protocol. FCM uses the HTTPS protocol to create a secure connection between the sending server and the FCM server. Namely, TLS is used for data encryption to prevent tampering and unauthorized access to messages during transit.
- Free usage. FCM is completely free, unlike the other two libraries on this list. However, you can’t use Firebase if your end devices don’t have Google Play Services installed.
Similar to Azure IoT Hub, Firebase has a UI that allows you to push notifications to test app functionality without backend integration. To use this feature, you need to create an account and register your application in Firebase.
Firebase used to send notifications with cURL commands, but it has eliminated this capability after transitioning to the OAuth 2.0 authorization protocol. It’s still possible to get a temporary token using Google’s OAuth 2.0 Playground, but it will only last one hour. So it’s more convenient to rely on the Firebase UI for testing purposes.
The Firebase Cloud Messaging platform will be a good fit for your project when you need to handle a large number of devices and messages, and for apps with a broad user base. It allows for device-side data filtering and has a user-friendly interface. This platform prioritizes simplicity, scalability, and real-time communication for your app-backend interactions.
How to integrate Firebase Cloud Messaging into your Android app
To begin integrating FCM into your Android application, you need to add an FCM dependency to your project’s Gradle file:
...

dependencies {
    implementation "com.google.firebase:firebase-messaging:$latest_version"
}You will need to add the google-services.json file to the app directory of your Android project to connect your Firebase account with the app. You can find the json file in your Firebase account. After you download it and add it to the project, you can continue with the implementation itself.
To retrieve messages, you need to create a Service that extends FirebaseMessagingService:
class FirebaseService : FirebaseMessagingService() {
    override fun onMessageReceived(remoteMessage: RemoteMessage) {
        val data: String = remoteMessage.data[“name_of_the_data”]
        //handling retrieved information
    }

    override fun onNewToken(token: String) {
        //handling token retrieval and sending information to the backend
    }
}Next, add the service to the manifest file:
...
<service
    android:name=".remotecontrol.connection.firebase.FirebaseService"
    android:exported="false">
        <intent-filter>
            <action android:name="com.google.firebase.MESSAGING_EVENT" />
        </intent-filter>
</service>Now that you have a service that can retrieve the information, you need to get the token for message delivery. This token will be used by the backend to send the information to the app:
fun connect() {
       FirebaseMessaging
           .getInstance()
           .token
           .addOnCompleteListener { task ->
               if (!task.isSuccessful) {
                   //Failed to retrieve token
               } else {
                   //handling retrieval of token and sending of information to the backend
                   task.result
               }
           }
}This way, the device can retrieve any information from the backend. If you want to filter the information received by the device, subscribe to specific topics using this method:
fun subscribeToTopic() {
       Firebase.messaging
           .subscribeToTopic("topic")
           .addOnCompleteListener { task ->
               var msg = "Subscribed"
               if (!task.isSuccessful) {
                   //handle case when subscription fails
               }
           }
}This allows the device to receive only relevant messages and filter out unwanted information. Your device will handle information pushed via topics in the same way it handles it when pushed via the general channel.
Conclusion
The backend is a critical component of app development, as it plays an important role in an application’s overall functionality and success. Exploring different libraries and platforms for app-backend communication is crucial for Android developers who are looking for seamless connectivity and enhanced application functionality. Azure IoT Hub is great when you have strict payload requirements, Ably offers broad device support, and Firebase Cloud Messaging can handle a large number of devices and messages. However, choosing the right platform according to your project’s unique needs can be a challenging task.
Are you looking to develop a reliable, secure, and efficient backend for your app? Delegate this decision to the Apriorit team of mobile app developers. Our experts will gladly assist you with both backend and frontend development and any other roadblocks during your Android application development process.
Contact us so we can help you find the best development approach for your mobile solution!


