 Skip to main content


While working on one of our projects, Apriorit experts had to dive into the depths of Kubernetes and learn how to create a new component of it. Our developers acquired a deep understanding of its infrastructure and the logic behind various components. The architecture of Kubernetes allows you to combine hardware from various vendors and different cloud platforms in a single application.
Building a project with Kubernetes has several hidden challenges. Today, we’ll talk about key Kubernetes components and take a look inside the framework. This article will be useful for developers who are planning to use Kubernetes for developing web applications.
Contents:
What is Kubernetes?
Kubernetes is a container orchestration framework for automated software deployment, management, and scaling. It was originally created by Google as an internal project back in 2014. Now, Kubernetes is an open-source project maintained by the Cloud Native Computing Foundation and distributed under the Apache 2.0 license.
The framework allows for managing containers on separate machines, thus ensuring that a system maintains the desired state, which is specified with YAML declarations. All a system developer needs to do is create a precise system declaration and a Kubernetes cluster will always seek to maintain the declared state.
Benefits of using Kubernetes
This containerization platform is evolving rapidly. Let’s consider the key advantages of Kubernetes:
- It’s comfortable to use. To make your website maintain itself as long as the Kubernetes cluster is operational, you only need to:
- declare a website that includes a container with a server application, database, and file storage
- apply this website declaration to a Kubernetes system
- The hardware itself (nodes, databases, file storage systems) may be located anywhere. Thus, it’s possible to cut costs by renting various hardware parts from different vendors and then combining hardware in a Kubernetes cluster.
- It’s an open-source project, so you can use it for free and even contribute to it. All the source code is available on GitHub, and most of it is written in Go. You can create a standalone part of Kubernetes and share it with the community.
Both AWS and Kubernetes are tools for creating cloud applications, butas a framework, Kubernetes outperforms AWS. In fact, you can use Kubernetes as a program shell to tie together computing resources from different providers for any services.
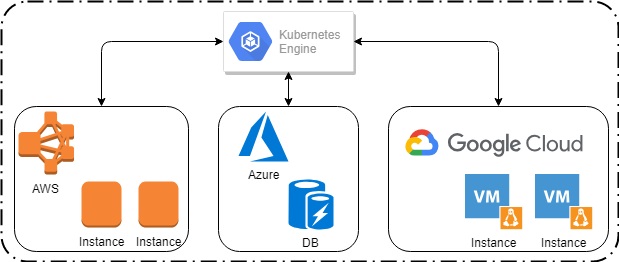
Kubernetes may be used as a programm shell
Kubernetes documentation and community
Kubernetes is a relatively new and fast developing framework. Although it’s exciting to watch how it grows, its constant changes make it harder to learn.
The official documentation is automatically generated from the source code, and the tool documentation is basically a set of supported commands. Unofficial documentation, in turn, is often too abstract or devoted to a particular technical issue.
Each Kubernetes resource must have a version specified in its definition:
apiVersion: v1Note that this isn’t a Kubernetes version but a version of the resource definition. At the time of writing, the latest Kubernetes version is 1.14, but it contains a lot of unfinished components with versions v1beta1 or even v1alpha1. As a result, installing certain components and ensuring their compatibility with different versions of Kubernetes may be an issue. Fortunately, members of the Kubernetes community have developed workarounds to fix some of these issues.
This makes Kubernetes a good choice for multicloud solutions. Let’s review its key principles and components.
Working with Kubernetes
There are four main stages of working with Kubernetes:
- Creating a Kubernetes cluster
- Declaring an infrastructure
- Applying the infrastructure
- Administering the cluster
A cluster is a set of nodes that hosts your environment. There are two types of nodes: the Master and workers. The Master node runs all management functionality for the cluster. Worker nodes run working containers, which include parts of your web service. If you have at least one worker node, the environment can be called a cluster. A new cluster node is configured with kubeadm. This tool turns a machine into a Master or worker node.
You can create a node with both Master and worker roles simultaneously. This can be achieved by assigning a main node with rights to run working containers. Such a small infrastructure is useful for development and testing. But it’s never deployed to production.

A Pod is a set of containers run on the same node. One Pod consists of one or several containers that are tightly coupled.
An infrastructure declaration is written in one or several YAML files. It describes how your cluster should look to work properly:
- Number of containers
- Container execution roles
- Container configuration maps
- Credentials for accessing databases and file storages
- And more
Let’s take a look at the Kubernetes-dashboard environment description as an example of a support container for managing a cluster with a user-friendly web interface that shows cluster statistics. The description declares:
- Secret – a location of cluster sensitive data
- ServiceAccount – an account for running a service with a dashboard
- Role – a list of actions the dashboard is allowed to perform
- Deployment – an entity that controls Pod status and availability
- Service – an entry point to a container
Applying infrastructure to a cluster is an administrator’s task. It’s usually executed with kubectl. This utility is installed on the Master node alongside other Kubernetes components. It’s the facade for a REST API server running in one of the Master node containers.
Generally, installing a well-configured environment is a simple task. You can do it with the following command:
kubectl create -f infrastructure.yamlAn environment description file may be stored outside the network. Here’s how you can install a dashboard for your cluster:
kubectl create -f https://raw.githubusercontent.com/kubernetes/dashboard/v1.10.1/src/deploy/recommended/kubernetes-dashboard.yamlKubeadm and kubectl are also used for cluster administration. Kubeadm can be used to change, add, and delete nodes. Kubectl is required for managing node contents: changing, adding, and deleting containers (or Pods) and their logical components. It’s important to remember that kubectl separates the administrator from the hardware. With kubectl, an administrator works with the container environment, not with the hardware it’s deployed on.
You can find an extensive introduction to the Kubernetes framework with use cases in the project’s official documentation.
Key Kubernetes components
As we’ve mentioned, each Kubernetes cluster contains Master and worker nodes. Both have their own component packages. Kubeadm helps to configure a specific set of components for an object node. A daemon agent, kubelet, controls all the components on each node and logs its work.
To form a cluster, you need to install Kubernetes components to the Master node using kubeadm. This tool:
- creates RSA keys and certificates for the cluster
- downloads all necessary containers from repositories
- configures kubelet to monitor the Master node containers and reset them if necessary.
The main master node program components are the API server and the etcd database. They’re both launched in containers, use WebSockets to communicate with each other, and are logical parts of a Kubernetes cluster.
The API server and etcd database are Pods, but they aren’t displayed in the Pod list. They’re listed in the kube-system namespace by default. In order to see them, execute this command:
kubectl get pods -n kube-systemThese are static Pods with YAML definition files stored in the kubelet daemon. If a container crashes, kubelet restarts it immediately.
When the Master node is configured, a security token is generated. You’ll need this token to authenticate a machine (node) when integrating it into a cluster of worker nodes. When you set up a worker node with kubeadm, it also runs kubelet. In this case, kubelet controls the condition of worker nodes instead of controlling the condition of static Pods.
You can manage the cluster using the API server’s REST API. You can send commands to the API server using kubectl. Kubectl transforms your command into a request string and a POST request in the format of a JSON document with the requested resource. Then it sends the request to the API server and outputs the result.
The workflow of the API server and other cluster components is more complex. In the next section, we explain some basics of these complex processes.
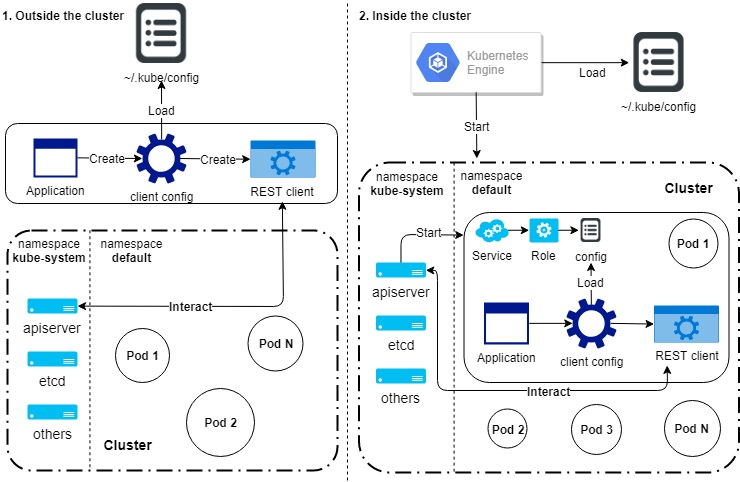
API server and kubeconfig
The API server is the heart of a cluster. Its IP address is specified in the Master node configuration file (/etc/kubernetes/admin.conf). Usually, this document is copied to ~/.kube/config and named kubeconfig. This file also contains certificate authority and a list of users with access to this configuration. A cluster administrator profile is created by default and called cluster-admin. Kubeadm also creates a kubernetes-admin user with the following parameters:
...
users:
- name: kubernetes-admin
  user:
    client-certificate-data: <cert-base64>
    client-key-data: <key-base64>
...Using the kubeconfig file, an application can execute commands as an administrator. That’s why administrative applications (for example, kubectl), which are required for the cluster to work but are stored outside it, use data from the kubeconfig file for authenticating on the API server.
If an application that manages a cluster is stored inside it, access to cluster resources must be configured with specific roles. Using an administrator role, a Pod can launch itself with predefined environment variables and mounted configuration files. These files allow a Pod to execute commands to create/delete a certain type of resource, request a certificate, etc.
The clientcmd package provides access to authentication data on the API server. Using this package, you can create a client configuration structure. Then, using this structure and the rest package, you can create a REST client object for the API server. Once a client object is created, you can use it to manage the cluster from your application.
The figure below illustrates how an application loads the configuration.
Adding third-party applications
The ability to include third-party applications using links to GitHub or any other repository is a unique feature of Go.
For example, in order to create a Pod object in your application code, you can include its description from the k8s.io repository:
import "k8s.io/api/core/v1"
Then, you can add this piece of code:
pod := v1.Pod {
    // Your definition here
}You can add any public repository packages (or private ones, if you have access to them) to your Kubernetes environment. As a result, you can build your application from the packages of different external projects. In order to manage external dependencies (by downloading packages ), you can use the Dep utility.
etcd database
Etcd is a speed optimized database that stores information in key-value pairs. The Master node uses an instance of this database to store all sorts of data, from Pod configurations to logs. Etcd has a protected network interface. The database has a relatively simple architecture that ensures fast and reliable performance. Etcd is of the most important components of a Kubernetes cluster.
Our experience with Kubernetes
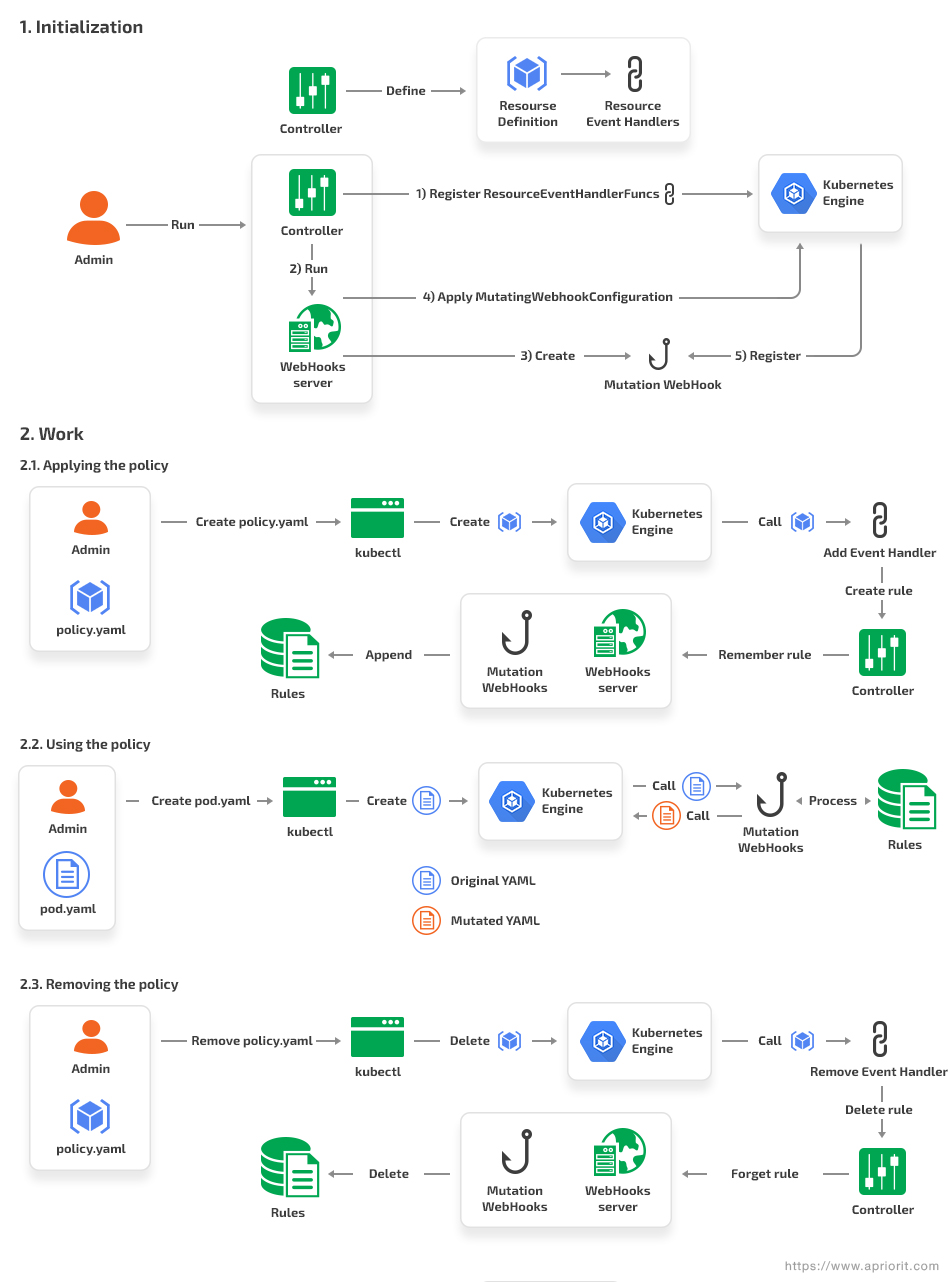
While working on our Kubernetes project, our Apriorit development team created a controller to monitor custom resources. In Kubernetes, such resources are called policies. Policy controllers are called to ensure a cluster works correctly. Let’s see what roles they play.
Kubernetes controllers
Controllers are in charge of maintaining the desired state of the cluster. They monitor all changes in cluster resources of its own type and constantly compare the observed state with the desired one. Controllers are resource implementations.
Standard controllers don’t necessarily comply with basic entities. Some of them may manage only part of a entity described in cluster configuration. For example, the ReplicaSet field in the Deployment dictates how many Pods with certain resources a cluster should contain, and the specific fields of container definition specifies which disks should be mounted on a container. A dedicated Replication Controller oversees the number of Pods in a cluster. A Volume Controller is in charge of allocating volumes for containers.
Kubernetes version 1.9 and higher allows an administrator to create their own resources and controllers. You can use a new resource if:
- it’s registered in a cluster
- you run a controller to monitor the new resource’s state.
A controller may use any k8s packages and obtain any rights. Such flexibility allows you to create a controller for any purpose. For example, there’s a controller that reports Pod changes to Slack.
Kubernetes policies
A policy determines the final form of the resource created in a cluster. At the time of writing, the current version of Kubernetes supports only the implementation of mutation policies. According to this policy, an administrator or an application creates a resource, and controller adjusts it to the policy. The next step will be implementing a validation policy to avoid creating resources that violate validation policies.
Creating a resource in Kubernetes takes time. There are several stages typing a command to kubectl and writing a new resource to etcd. The process includes the mutation and validation stage. At this stage, a resource definition is transmitted to a registered webhook for processing and/or verification. A webhook uses POST requests in a JSON document. This file must contain a full resource description, including object and request metadata.
The process of resource verification with webhooks is called Dynamic Admission Control. The policy controller we created for our project uses this process to identify and change new resources at the stage in which it’s created.
Conclusion
Building a project with Kubernetes makes the development process faster, more scalable, and more flexible. Once the system is configured, it manages itself automatically and heals itself if some part crashes.
Configuring a network requires basic Docker knowledge and a deep understanding of the Kubernetes infrastructure. Kubernetes uses a set of CLIs and APIs to execute commands. In this article, we discussed creating a cluster, writing infrastructure and environment descriptions, and working with the API server and etcd database.
Have an ambitious Kubernetes project in mind? Feel free to contact Apriorit Cloud Software Development experts to start working on it!
Have a question?
Ask our expert!
VP of Innovation and Technology, Canada Branch Director


