 Skip to main content

As Bill Gates reportedly said, “If your business isn’t on the internet, then your business will be out of business.” We would add: If your website isn’t fast enough, then you aren’t on the internet.
Creating a website is not complex. Optimizing it to load fast all around the world is a much more significant issue. In this article, we share a comprehensive tutorial on how to create a cloud environment for a website using Amazon Web Services (AWS) and optimize access to the site from different locations. We also describe core AWS tools for deploying a web service globally.
We’re going to do everything with the AWS Command Line Interface (CLI) so you can understand the AWS structure better. However, you can also use the AWS web interface in parallel so you can see how your actions in the AWS CLI affect the state of the environment that you create.
Contents:
Why move to the cloud?
While it’s not always cheaper to rent a server than to maintain one, the main advantage of moving your website to the cloud is that you can use any server around the world. This is important for organizations targeting an international market. When you move your website to the cloud, it’s much easier to comply with local requirements and ensure data security. Besides, it also spares your IT department from server maintenance.
On the other hand, if you run a local website with a small amount of traffic, maintaining your own server may be more cost-effective.
Pricing
The cost of computing resources differs from one provider to another. So we recommend estimating the costs of moving your website to a specific cloud and the costs of maintaining your existing service.
In our case, we’ll move a website to the AWS cloud using the AWS Fargate task launcher and the Amazon Route 53 DNS service. Fargate uses the AWS Elastic Compute Cloud (EC2) service, which provides virtual machines (VMs) on demand. These are paid services with free trial access.
We’ve calculated the majority of our expenses for this tutorial:
- EC2 instances (virtual machines) in Oregon and Frankfurt: $0.30
- Public hosted zone for domain: $0.50
- Buying a .com domain name: $12 (You don’t need to pay this if you already have a domain. Note that you can complete this tutorial without creating your own domain.)
- Route 53 Traffic Flow: $1.61 (includes using the service for 1 day; the monthly fee is $50)
The remaining costs were less than 1 cent, so we didn’t include them in this list.
Find out more about pricing for AWS tools: FARGATE, EC2, Route53.

We’ll mark any action you’ll be billed for with this dollar sign. Usually, the prices are quite small, but our duty is to warn you about possible expenses. Commands that remove your environment from the cloud are provided at the end of this tutorial. Don’t skip them or you’ll be charged for the resources used.
Getting down to basics
Let’s suppose that our_site.com is deployed on our company’s internal server, located in the United States. Recently, we’ve started working with European clients, so website access speed in Europe has become critical. The most appropriate choice is to deploy our existing site in the cloud: This will allow us to flexibly manage the availability of our service throughout the world.
We’re going to create the infrastructure displayed in this picture:
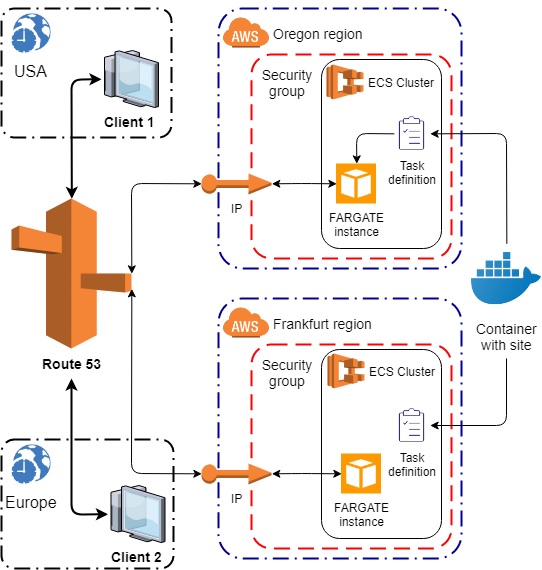
Infrastructure of our project

Our environment will consist of virtual machines (Fargate instances) that will be configured by Task Definitions. A Task Definition uses a containerized site that’s shared between regions. Each Fargate instance has a network interface with private and public IP addresses. This interface is expanded through the security group, which acts as a firewall and allows traffic to pass from and to Fargate instances through a certain port. Route53 manages the traffic for each client according to their geolocation.
Let’s review the basic services used in this tutorial.

Container with the website. The site we’re about to deploy in the cloud should be containerized, i.e. wrapped in a Docker container. We need to do this in order to distribute identical copies of the site across several regions.

AWS ECS. We’ll use AWS Elastic Container Service (ECS) to run the containers. AWS also provides EC2 service for running virtual machines in the cloud. On these machines, you can deploy ready-made system images, your own system images, and containers. The ECS service works side by side with EC2 and abstracts the launch of containers from the launch of machines

Amazon Fargate. Generally, a container with a site (or any other web service) can be launched in ECS as an EC2 or Fargate service. EC2 services are known for their in-depth resource management. Fargate services are designed to simplify the launch of containers. In this tutorial, we use a Fargate service to automate the process of building virtual machines and network interfaces.

Task Definition. Every container launch starts a new task. Several containers can be used in one task, but we’ll only run one container in one task. The task description is an ECS object of the Task Definition type. Using Task Definition, you can define the container launch parameters and the necessary resources, then use these rules to launch containers within a region.

Server region. It’s important that all the described entities are configured and work within one region. To run them in a different region, we need to create these entities again. Fortunately, entities in AWS are described with the help of JSON or YAML documents. These documents can be generated once and then reused as parameters for CLI commands.

Amazon Route53. After our environment is formed in both regions, we’ll be able to reach our ultimate goal using the Amazon Route53 service. This service operates with hosting zones, which can be private and public. Public hosting zones must be associated with a domain name that enables service access from any region. If you don’t want to buy a domain name, it’s enough to familiarize yourself with the procedure in theory and apply the described approach later.
Getting started with AWS
First of all, you need to log in to AWS. If you aren’t registered in AWS, you’ll have to go through the registration procedure, which requires personal information and a credit card.
After registering, you’ll receive root credentials for accessing AWS using software tools: AWS Access Key ID and AWS Secret Access Key. AWS recommends not using the credentials of the root user directly. It’s safer to create an identity and access management (IAM) user profile, configure AWS access settings, and use the IAM credentials to work with the CLI. You can learn more about this process in the AWS guide.
After creating a new user, you can find new access keys in the My Security Credentials tab in the web console:
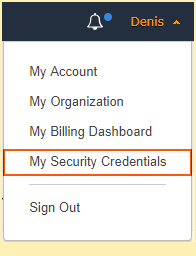
My Security Credentials tab
Installing and configuring AWS CLI
The process of installing the AWS CLI is described in the AWS user guide. After you install the CLI and verify it with the --version command, set up the credentials of your account and the default region with the following command:
aws configure
AWS Access Key ID []: ****************YH3Q
AWS Secret Access Key []: ****************whMu
Default region name []: eu-central-1
Default output format []: jsonPay attention to the region name. Since we’re launching our server in Frankfurt, the name we need is eu-central-1.
The Default output format parameter defines the format in which the operation results will be displayed. The default format (and the most suitable format for this tutorial) is JSON.
Now we’re ready to start creating the environment. From now on, we’ll exclusively use the CLI to communicate with AWS. You can use the web console to see how actions in the CLI affect your environment.
We’ll create servers in Frankfurt, Germany, and Oregon, USA, and then we’ll set up routing to these servers based on the geographical location of a client. Let’s begin!
Part 1. Launching the server in Frankfurt
The functionality unit of our cloud service is a website. The site contains the server program, site files (pages, scripts, templates), and all the necessary tools for its management. All the components must be containerized so we can put the site into the cloud. Launching a container with a site is called a task. The description of this task should be written to a file and placed in the cloud.
A regular website may use changeable persistent data on the disk and communicate with a database, so the container may have some requirements for available storage and ports. In our example, we use the simplest container with the simplest settings possible.
Creating a Task Definition
Here’s a definition of our task:
{
    "family": "TestTask",
    "networkMode": "awsvpc" ,
    "memory": "512",
    "cpu": "256",
    "executionRoleArn": "arn:aws:iam::999472750599:role/ecsTaskExecutionRole",
    "taskRoleArn": "arn:aws:iam::999472750599:role/ecsTaskExecutionRole",
    "requiresCompatibilities": [
        "EC2",
        "FARGATE"
    ],
    "containerDefinitions": [
        {
            "name": "httpd",
            "image": "httpd:2.4",
            "essential": true,
            "portMappings": [
                {
                    "containerPort": 80,
                    "protocol": "tcp"
                }
            ],
            "entryPoint": [
                "sh",
                "-c"
            ],
            "command": [
                "/bin/sh -c "echo '<html> <head> <title>Welcome from Europe</title> <style>body {margin-top: 40px; background-color: #333;} </style> </head><body> <div style=color:white;text-align:center> <h1>Your server is running in Frankfurt</h1> <h2>Congratulations!</h2> </div></body></html>' >  /usr/local/apache2/htdocs/index.html && httpd-foreground""
            ]
        }
    ]
}family defines the name of the task launched by this definition.
networkMode defines how the task will interact with the world. The awsvpc mode gives the task the same networking properties used in the EC2 instance. We use this mode to simplify environment setup.
memory and cpu determine the resources needed to start and run a task. Memory is set in megabytes, and the CPU is set in parts of the virtual CPU (vCPU). One vCPU contains 1024 parts; therefore, in the description provided, the value 256 means that the task will use 1/4 of the vCPU.
executionRoleArn and taskRoleArn are IAM users your task will be performed with. Just as you set the credentials for working with the CLI, the task requires similar credentials for its work in order to determine its area of responsibility. In this example, we use the default task launching. To find your default task role, run the following command:
> aws iam list-roles
You’ll see a list containing a role with the name ecsTaskExecutionRole:
{
    "Path": "/",
    "RoleName": "ecsTaskExecutionRole",
    "RoleId": "AROAIE6HVPNSCZNBTMJJS",
    "Arn": "arn:aws:iam::888472799505:role/ecsTaskExecutionRole",
    "CreateDate": "2018-10-17T12:40:21Z",
    "AssumeRolePolicyDocument": {
        "Version": "2008-10-17",
        "Statement": [
            {
                "Sid": "",
                "Effect": "Allow",
                "Principal": {
                    "Service": "ecs-tasks.amazonaws.com"
                },
                "Action": "sts:AssumeRole"
            }
        ]
    },
    "MaxSessionDuration": 3600
}Use the Arn value of this role in your Task Definition.

In this tutorial, the most important identifiers and paths will be marked green in text. Most of these strings must be obtained by you, i.e. they can’t be copied and pasted from the tutorial text.
requiresCompatibilities defines in which AWS services this Task Definition can be used.
containerDefinitions describes containers that should be launched as part of this task. We have only one container: the https server.
portMappings defines port 80, which will be used by the container to communicate via the TCP protocol. Next, with entryPoint, we define a program that will be launched in the container with the command parameters. Our starting command changes the contents of the index page that our server will show when connecting to it.
The goal of our task is to start a server that will display a specific page. This page will display the message “Your server is running in Frankfurt” so we know where the server is located.
Registering a Task Definition
Now let’s register this Task Definition in our environment. Save the document to a .json file on the disk, for example, D:AWSTaskDefinition-Frankfurt.json. To do that, run the CLI command with the created file as a parameter:
> aws ecs register-task-definition --cli-input-json “file://D:AWSTaskDefinition-Frankfurt.json”
Note the command argument --cli-input-json and the format of its parameter: In the CLI, you can specify input parameters written to a file. You can specify both local files and network resources.
The output should look like this:
{
    "taskDefinition": {
        "taskDefinitionArn": "arn:aws:ecs:eu-central-1:999472750599:task-definition/TestTask:7",
        "containerDefinitions": [
            {
                "name": "httpd",
                "image": "httpd:2.4",
                "cpu": 0,
                "portMappings": [
                    {
                        "containerPort": 80,
                        "hostPort": 80,
                        "protocol": "tcp"
                    }
                ],
                "essential": true,
                "entryPoint": [
                    "sh",
                    "-c"
                ],
                "command": [
                    "/bin/sh -c "echo '<html> <head> <title>Welcome from Europe</title> <style>body {margin-top: 40px; background-color: #333;} </style> </head><body> <div style=color:white;text-align:center> <h1>Your server is running in Frankfurt</h1> <h2>Congratulations!</h2> </div></body></html>' >  /usr/local/apache2/htdocs/index.html && httpd-foreground""
                ],
                "environment": [ ],
                "mountPoints": [ ],
                "volumesFrom": [ ]
            }
        ],
        "family": "TestTask",
        "taskRoleArn": "arn:aws:iam::999472750599:role/ecsTaskExecutionRole",
        "executionRoleArn": "arn:aws:iam::999472750599:role/ecsTaskExecutionRole",
        "networkMode": "awsvpc",
        "revision": 7,
        "volumes": [ ],
        "status": "ACTIVE",
        "requiresAttributes": [
            {
                "name": "com.amazonaws.ecs.capability.docker-remote-api.1.18"
            },
            {
                "name": "ecs.capability.task-eni"
            },
            {
                "name": "com.amazonaws.ecs.capability.task-iam-role"
            }
        ],
        "placementConstraints": [ ],
        "compatibilities": [
            "EC2",
            "FARGATE"
        ],
        "requiresCompatibilities": [
            "EC2",
            "FARGATE"
        ],
        "cpu": "256",
        "memory": "512"
    }
}Preparing a task to start
The task is launched by the aws ecs run-task command, which has a single mandatory parameter according to its specification: –-task-definition. But when you try to execute this command, you’ll see errors indicating that the cluster and the network interface aren’t specified. Let’s see what we need to do to run the task.
ECS Cluster
Each task is launched on a virtual machine. The working machines are logically combined into clusters. Our task has the Fargate launch type, which doesn’t require an explicit choice of virtual machine. In our case, the cluster is a scope for tasks running on the existing machines we don’t control. When starting EC2 instances (i.e. explicitly defined virtual machines), machines appear in a cluster along with the tasks that are running on them.
Now, we need to create a cluster to place new tasks there. The command is simple:
> aws ecs create-cluster --cluster-name TestCluster
{
    "cluster": {
        "clusterArn": "arn:aws:ecs:eu-central-1:999472750599:cluster/TestCluster",
        "clusterName": "TestCluster",
        "status": "ACTIVE",
        "registeredContainerInstancesCount": 0,
        "runningTasksCount": 0,
        "pendingTasksCount": 0,
        "activeServicesCount": 0,
        "statistics": [ ],
        "tags": [ ]
    }
}Virtual private cloud and subnet
At this point, we start using subnets. You can learn more about virtual private clouds (VPCs) and subnets in the official AWS documentation. Briefly, a VPC is a private network, and subnets are parts of it. Some tasks can be performed in an isolated environment within a private subnet; other tasks can have access to the world from a subnet that has a public IP. That is, if we consider a cluster as a container of computing power for tasks, then the subnet should be considered a container of network interfaces for these tasks.
Each availability zone (datacenter within a region) has a default subnet for your account. To see all the subnets in the current region, run the following command:
> aws ec2 describe-subnets
{
    "Subnets": [
        {
            "AvailabilityZone": "eu-central-1a",
            "AvailabilityZoneId": "euc1-az2",
            "AvailableIpAddressCount": 4091,
            "CidrBlock": "172.31.16.0/20",
            "DefaultForAz": true,
            "MapPublicIpOnLaunch": true,
            "State": "available",
            "SubnetId": "subnet-3efcee55",
            "VpcId": "vpc-3e507a55",
            "OwnerId": "999472750599",
            "AssignIpv6AddressOnCreation": false,
            "Ipv6CidrBlockAssociationSet": [ ],
            "SubnetArn": "arn:aws:ec2:eu-central-1:999472750599:subnet/subnet-3efcee55"
        },
        {
            "AvailabilityZone": "eu-central-1b",
            "AvailabilityZoneId": "euc1-az3",
            "AvailableIpAddressCount": 4090,
            "CidrBlock": "172.31.32.0/20",
            "DefaultForAz": true,
            "MapPublicIpOnLaunch": true,
            "State": "available",
            "SubnetId": "subnet-74eca509",
            "VpcId": "vpc-3e507a55",
            "OwnerId": "999472750599",
            "AssignIpv6AddressOnCreation": false,
            "Ipv6CidrBlockAssociationSet": [ ],
            "SubnetArn": "arn:aws:ec2:eu-central-1:999472750599:subnet/subnet-74eca509"
        },
        {
            "AvailabilityZone": "eu-central-1c",
            "AvailabilityZoneId": "euc1-az1",
            "AvailableIpAddressCount": 4091,
            "CidrBlock": "172.31.0.0/20",
            "DefaultForAz": true,
            "MapPublicIpOnLaunch": true,
            "State": "available",
            "SubnetId": "subnet-46dc800b",
            "VpcId": "vpc-3e507a55",
            "OwnerId": "999472750599",
            "AssignIpv6AddressOnCreation": false,
            "Ipv6CidrBlockAssociationSet": [ ],
            "SubnetArn": "arn:aws:ec2:eu-central-1:999472750599:subnet/subnet-46dc800b"
        }
    ]
}Later, we’ll run the task in one of the listed subnets.
Security group
A security group is a firewall for your task or VM instance. It contains rules for inbound and outbound traffic. Each VPC has a default security group, which allows all inbound and outbound traffic for IPv4 and IPv6. You can list all of the available security groups with this command:
> aws ec2 describe-security-groups
{
    "SecurityGroups": [
        {
            "Description": "default VPC security group",
            "GroupName": "default",
            "IpPermissions": [
                {
                    "IpProtocol": "-1",
                    "IpRanges": [ ],
                    "Ipv6Ranges": [ ],
                    "PrefixListIds": [ ],
                    "UserIdGroupPairs": [
                        {
                            "GroupId": "sg-79855716",
                            "UserId": "999472750599"
                        }
                    ]
                }
            ],
            "OwnerId": "999472750599",
            "GroupId": "sg-79855716",
            "IpPermissionsEgress": [
                {
                    "IpProtocol": "-1",
                    "IpRanges": [
                        {
                            "CidrIp": "0.0.0.0/0"
                        }
                    ],
                    "Ipv6Ranges": [ ],
                    "PrefixListIds": [ ],
                    "UserIdGroupPairs": [ ]
                }
            ],
            "VpcId": "vpc-3e507a55"
        }
    ]
}Our container should work with traffic going both ways through port 80 (the default HTTP port), so we should create corresponding rules for its security group. We’ll create a new security group in the default VPC. We won’t change this VPC’s default security group because it may be useful to us later when working with this AWS account to launch test containers.
So we’re going to create a new security group. First of all, let’s find out the ID of our default VPC. We can see its ID in the output of the previous command or we can list all our VPCs and get the corresponding ID from the list:
> aws ec2 describe-vpcs
{
    "Vpcs": [
        {
            "CidrBlock": "172.31.0.0/16",
            "DhcpOptionsId": "dopt-043c166f",
            "State": "available",
            "VpcId": "vpc-3e507a55",
            "OwnerId": "999472750599",
            "InstanceTenancy": "default",
            "CidrBlockAssociationSet": [
                {
                    "AssociationId": "vpc-cidr-assoc-2d2d1745",
                    "CidrBlock": "172.31.0.0/16",
                    "CidrBlockState": {
                        "State": "associated"
                    }
                }
            ],
            "IsDefault": true
        }
    ]
}VpcId is the parameter that we need, and now we can create a new security group in this VPC:
> aws ec2 create-security-group --description "TestTasks security group" --group-name "TestSecurityGroup" --vpc-id "vpc-3e507a55"
{
    "GroupId": "sg-0aa7181ac7adc3afe"
}Now let’s configure inbound rules:
> aws ec2 authorize-security-group-ingress --group-name TestSecurityGroup --protocol tcp --port 80 --cidr 0.0.0.0/0
This command doesn’t generate any output. So in order to check the changes, we should list our security groups again:
> aws ec2 describe-security-groups
{
    "SecurityGroups": [
        {
            "Description": "TestTasks security group",
            "GroupName": "TestSecurityGroup",
            "IpPermissions": [
                {
                    "FromPort": 80,
                    "IpProtocol": "tcp",
                    "IpRanges": [
                        {
                            "CidrIp": "0.0.0.0/0"
                        }
                    ],
                    "Ipv6Ranges": [ ],
                    "PrefixListIds": [ ],
                    "ToPort": 80,
                    "UserIdGroupPairs": [ ]
                }
            ],
            "OwnerId": "999472750599",
            "GroupId": "sg-0aa7181ac7adc3afe",
            "IpPermissionsEgress": [
                {
                    "IpProtocol": "-1",
                    "IpRanges": [
                        {
                            "CidrIp": "0.0.0.0/0"
                        }
                    ],
                    "Ipv6Ranges": [ ],
                    "PrefixListIds": [ ],
                    "UserIdGroupPairs": [ ]
                }
            ],
            "VpcId": "vpc-3e507a55"
        },
        {
            "Description": "default VPC security group",
            "GroupName": "default",
            "IpPermissions": [
                {
                    "IpProtocol": "-1",
                    "IpRanges": [ ],
                    "Ipv6Ranges": [ ],
                    "PrefixListIds": [ ],
                    "UserIdGroupPairs": [
                        {
                            "GroupId": "sg-79855716",
                            "UserId": "999472750599"
                        }
                    ]
                }
            ],
            "OwnerId": "999472750599",
            "GroupId": "sg-79855716",
            "IpPermissionsEgress": [
                {
                    "IpProtocol": "-1",
                    "IpRanges": [
                        {
                            "CidrIp": "0.0.0.0/0"
                        }
                    ],
                    "Ipv6Ranges": [ ],
                    "PrefixListIds": [ ],
                    "UserIdGroupPairs": [ ]
                }
            ],
            "VpcId": "vpc-3e507a55"
        }
    ]
}As you can see, TestSecurityGroup appears in the list, and its inbound rules are described in IpPermissions.
Network configuration file
Let’s save all collected parts of our network interface to D:AWSTaskNetworkConfiguration-Frankfurt.json:
{
    "awsvpcConfiguration":
    {
        "subnets": [ "subnet-3efcee55" ],
        "securityGroups": [ "sg-0aa7181ac7adc3afe" ],
        "assignPublicIp": "ENABLED"
    }
}This file describes the AwsVpcConfiguration.
assignPublicIp makes this task accessible to the outside world by public IP.
Starting the task
The running task consumes computing resources, so you’ll be charged for the resources used at the end of the month. According to AWS Fargate pricing, the described task will cost about $0.012 per hour. You can stop the task using the corresponding CLI command described in the next section, Stopping the task, or by using the Amazon web console:
Choose Region –> Services –> ECS –> Clusters –> TestCluster –> Tasks tab –> Choose task and click Stop or Stop All if there is only your task in the list.
We have a cluster for the task and the definition of its network interface. Now we can start the task using the following command:
> aws ecs run-task --task-definition TestTask --cluster TestCluster --launch-type FARGATE --network-configuration file://D:AWSTaskNetworkConfiguration-Frankfurt.json
Here’s the output:
{
    "tasks": [
        {
            "taskArn": "arn:aws:ecs:eu-central-1:999472750599:task/0c180e73-b10d-42f5-9e35-f1175c97d4dc",
            "clusterArn": "arn:aws:ecs:eu-central-1:999472750599:cluster/TestCluster",
            "taskDefinitionArn": "arn:aws:ecs:eu-central-1:999472750599:task-definition/TestTask:7",
            "overrides": {
                "containerOverrides": [
                    {
                        "name": "httpd"
                    }
                ]
            },
            "lastStatus": "PROVISIONING",
            "desiredStatus": "RUNNING",
            "cpu": "256",
            "memory": "512",
            "containers": [
                {
                    "containerArn": "arn:aws:ecs:eu-central-1:999472750599:container/498832ce-96c3-4c29-a199-2f069953202a",
                    "taskArn": "arn:aws:ecs:eu-central-1:999472750599:task/0c180e73-b10d-42f5-9e35-f1175c97d4dc",
                    "name": "httpd",
                    "lastStatus": "PENDING",
                    "networkInterfaces": [ ]
                }
            ],
            "version": 1,
            "createdAt": 1547048841.699,
            "group": "family:TestTask",
            "launchType": "FARGATE",
            "platformVersion": "1.3.0",
            "attachments": [
                {
                    "id": "6bad1862-0295-4bf1-a629-3e0333ca6322",
                    "type": "ElasticNetworkInterface",
                    "status": "PRECREATED",
                    "details": [
                        {
                            "name": "subnetId",
                            "value": "subnet-3efcee55"
                        }
                    ]
                }
            ],
            "tags": [ ]
        }
    ],
    "failures": [ ]
}lastStatus shows the last reported status of the task, which can be considered relevant. Wait while the task is started, which can take about 30 seconds. Then run the following command to get information about running tasks:
> aws ecs describe-tasks --cluster arn:aws:ecs:eu-central-1:999472750599:cluster/TestCluster --tasks arn:aws:ecs:eu-central-1:999472750599:task/39604935-8c9a-4903-aa40-cf260581d802
Use the clusterArn and taskArn properties of the task from the previous output to fill the parameters of this command. The result should look like this:
{
    "tasks": [
        {
            "taskArn": "arn:aws:ecs:eu-central-1:999472750599:task/39604935-8c9a-4903-aa40-cf260581d802",
            "clusterArn": "arn:aws:ecs:eu-central-1:999472750599:cluster/TestCluster",
            "taskDefinitionArn": "arn:aws:ecs:eu-central-1:999472750599:task-definition/TestTask:7",
            "overrides": {
                "containerOverrides": [
                    {
                        "name": "httpd"
                    }
                ]
            },
            "lastStatus": "RUNNING",
            "desiredStatus": "RUNNING",
            "cpu": "256",
            "memory": "512",
            "containers": [
                {
                    "containerArn": "arn:aws:ecs:eu-central-1:999472750599:container/daf847b1-bac6-41ed-8c5d-83360242c058",
                    "taskArn": "arn:aws:ecs:eu-central-1:999472750599:task/39604935-8c9a-4903-aa40-cf260581d802",
                    "name": "httpd",
                    "lastStatus": "RUNNING",
                    "networkBindings": [ ],
                    "networkInterfaces": [
                        {
                            "attachmentId": "c477f0df-23b6-49cd-88d8-ab1899b06059",
                            "privateIpv4Address": "172.31.25.169"
                        }
                    ],
                    "healthStatus": "UNKNOWN"
                }
            ],
            "version": 3,
            "connectivity": "CONNECTED",
            "connectivityAt": 1547724644.683,
            "pullStartedAt": 1547724655.792,
            "pullStoppedAt": 1547724668.792,
            "createdAt": 1547724639.807,
            "startedAt": 1547724669.792,
            "group": "family:TestTask",
            "launchType": "FARGATE",
            "platformVersion": "1.3.0",
            "attachments": [
                {
                    "id": "c477f0df-23b6-49cd-88d8-ab1899b06059",
                    "type": "ElasticNetworkInterface",
                    "status": "ATTACHED",
                    "details": [
                        {
                            "name": "subnetId",
                            "value": "subnet-3efcee55"
                        },
                        {
                            "name": "networkInterfaceId",
                            "value": "eni-b96677ee"
                        },
                        {
                            "name": "macAddress",
                            "value": "02:b7:de:f4:2a:40"
                        },
                        {
                            "name": "privateIPv4Address",
                            "value": "172.31.25.169"
                        }
                    ]
                }
            ],
            "healthStatus": "UNKNOWN",
            "tags": [ ]
        }
    ],
    "failures": [ ]
}You can see that lastStatus of the task is now RUNNING. If lastStatus is PENDING, you should wait a bit more and run the describe-tasks command again.
If the task is started, our mini server should be accessible now by its public IP, which was assigned according to the task network configuration. But look at the output of the previous CLI command: there’s no such thing as public IP. We should look for it in the network Interface properties. The network interface was created automatically for our Fargate task using the given network configuration. Run the following command to list all network interfaces in the region:
> aws ec2 describe-network-interfaces
{
    "NetworkInterfaces": [
        {
            "Association": {
                "IpOwnerId": "amazon",
                "PublicDnsName": "ec2-54-93-205-147.eu-central-1.compute.amazonaws.com",
                "PublicIp": "54.93.205.147"
            },
            "Attachment": {
                "AttachTime": "2019-01-09T11:30:43.000Z",
                "AttachmentId": "eni-attach-02a79f62adcc2ea3f",
                "DeleteOnTermination": false,
                "DeviceIndex": 1,
                "InstanceOwnerId": "326244987664",
                "Status": "attached"
            },
            "AvailabilityZone": "eu-central-1a",
            "Description": "arn:aws:ecs:eu-central-1:999472750599:attachment/c477f0df-23b6-49cd-88d8-ab1899b06059",
            "Groups": [
                {
                    "GroupName": "TestSecurityGroup",
                    "GroupId": "sg-0aa7181ac7adc3afe"
                }
            ],
            "InterfaceType": "interface",
            "Ipv6Addresses": [ ],
            "MacAddress": "02:b7:de:f4:2a:40",
            "NetworkInterfaceId": "eni-b96677ee",
            "OwnerId": "999472750599",
            "PrivateDnsName": "ip-172-31-25-169.eu-central-1.compute.internal",
            "PrivateIpAddress": "172.31.25.169",
            "PrivateIpAddresses": [
                {
                    "Association": {
                        "IpOwnerId": "amazon",
                        "PublicDnsName": "ec2-54-93-205-147.eu-central-1.compute.amazonaws.com",
                        "PublicIp": "54.93.205.147"
                    },
                    "Primary": true,
                    "PrivateDnsName": "ip-172-31-25-169.eu-central-1.compute.internal",
                    "PrivateIpAddress": "172.31.25.169"
                }
            ],
            "RequesterId": "628676013162",
            "RequesterManaged": true,
            "SourceDestCheck": true,
            "Status": "in-use",
            "SubnetId": "subnet-3efcee55",
            "TagSet": [ ],
            "VpcId": "vpc-3e507a55"
        }
    ]
}Search for the PublicIp property (54.93.205.147 in our case), copy the value to the clipboard, and paste it to the address line of your web browser.
You should see a page with this message:

Stopping the task
The running task consumes computing power, which costs money. While you were looking for the public IP of this task, it may have already cost you half a cent! To prevent the cost from growing, we’d better stop the task until we need it again:
> aws ecs stop-task --cluster arn:aws:ecs:eu-central-1:999472750599:cluster/TestCluster --task arn:aws:ecs:eu-central-1:999472750599:task/39604935-8c9a-4903-aa40-cf260581d802
{
    "task": {
        "taskArn": "arn:aws:ecs:eu-central-1:999472750599:task/39604935-8c9a-4903-aa40-cf260581d802",
        "clusterArn": "arn:aws:ecs:eu-central-1:999472750599:cluster/TestCluster",
        "taskDefinitionArn": "arn:aws:ecs:eu-central-1:999472750599:task-definition/TestTask:7",
        "overrides": {
            "containerOverrides": [
                {
                    "name": "httpd"
                }
            ]
        },
        "lastStatus": "RUNNING",
        "desiredStatus": "STOPPED",
        "cpu": "256",
        "memory": "512",
        "containers": [
            {
                "containerArn": "arn:aws:ecs:eu-central-1:999472750599:container/daf847b1-bac6-41ed-8c5d-83360242c058",
                "taskArn": "arn:aws:ecs:eu-central-1:999472750599:task/39604935-8c9a-4903-aa40-cf260581d802",
                "name": "httpd",
                "lastStatus": "RUNNING",
                "networkBindings": [ ],
                "networkInterfaces": [
                    {
                        "attachmentId": "c477f0df-23b6-49cd-88d8-ab1899b06059",
                        "privateIpv4Address": "172.31.25.169"
                    }
                ]
            }
        ],
        "version": 4,
        "stoppedReason": "Task stopped by user",
        "stopCode": "UserInitiated",
        "connectivity": "CONNECTED",
        "connectivityAt": 1547724644.683,
        "pullStartedAt": 1547724655.792,
        "pullStoppedAt": 1547724668.792,
        "createdAt": 1547724639.807,
        "startedAt": 1547724669.792,
        "stoppingAt": 1547731456.962,
        "group": "family:TestTask",
        "launchType": "FARGATE",
        "platformVersion": "1.3.0",
        "attachments": [
            {
                "id": "c477f0df-23b6-49cd-88d8-ab1899b06059",
                "type": "ElasticNetworkInterface",
                "status": "ATTACHED",
                "details": [
                    {
                        "name": "subnetId",
                        "value": "subnet-3efcee55"
                    },
                    {
                        "name": "networkInterfaceId",
                        "value": "eni-b96677ee"
                    },
                    {
                        "name": "macAddress",
                        "value": "02:b7:de:f4:2a:40"
                    },
                    {
                        "name": "privateIPv4Address",
                        "value": "172.31.25.169"
                    }
                ]
            }
        ],
        "tags": [ ]
    }
}Now we see that lastStatus equals desiredStatus and has the value STOPPED. This means that our task has really stopped now. Try to refresh the congratulations page in your browser: the address should be unavailable.
Notice that we stopped the task but did not delete the components surrounding it. This is because in AWS you pay for the work and not for the presence of any objects in the cloud related to your account. That is, we can leave the Task Definition, an empty Cluster, and a Security Group in the cloud; they won’t cost anything.
Part 2. Launching the server in Oregon
We already have a base for launching a website in Europe, so it’s easier for us to set up a similar website in the USA. We chose the Oregon region for this purpose, which has the designation of us-west-2. Let’s switch to this region:
> aws configure
AWS Access Key ID [****************YH3Q]:
AWS Secret Access Key [****************whMu]:
Default region name [eu-central-1]: us-west-2
Default output format [json]:We need to change only the region name, leaving the Key ID, Access Key, and output format unchanged.
For a server in this region, we’ll use the same httpd, but with different launch settings in order to display another web page when accessing the server. The task role is accessible through the region, so we’ll use the same ARN role as for the task definition for the Frankfurt server.
Here is the Task Definition for the Oregon server (executionRoleArn and taskRoleArn should be taken from part 1):
{
"family": "TestTask",
"networkMode": "awsvpc",
"memory": "512",
"cpu": "256",
"executionRoleArn": "arn:aws:iam::999472750599:role/ecsTaskExecutionRole",
"taskRoleArn": "arn:aws:iam::999472750599:role/ecsTaskExecutionRole",
"requiresCompatibilities": [
"EC2",
"FARGATE"
],
"containerDefinitions": [
{
"name": "httpd",
"image": "httpd:2.4",
"essential": true,
"portMappings": [
{
"containerPort": 80,
"protocol": "tcp"
}
],
"entryPoint": [
"sh",
"-c"
],
"command": [
"/bin/sh -c "echo '
<title>Welcome from America</title>
<div style="color: white; text-align: center;">
<h1>Your server is running in Oregon</h1>
<h2>Congratulations!</h2>
</div>
' > /usr/local/apache2/htdocs/index.html && httpd-foreground""
]
}
]
}Save it to D:AWSTaskDefinition-Oregon.json and run the registration command:
> aws ecs register-task-definition --cli-input-json “file://D:AWSTaskDefinition-Oregon.json”
{
"taskDefinition": {
"taskDefinitionArn": "arn:aws:ecs:us-west-2:999472750599:task-definition/TestTask:1",
"containerDefinitions": [
{
"name": "httpd",
"image": "httpd:2.4",
"cpu": 0,
"portMappings": [
{
"containerPort": 80,
"hostPort": 80,
"protocol": "tcp"
}
],
"essential": true,
"entryPoint": [
"sh",
"-c"
],
"command": [
"/bin/sh -c "echo '
<title>Welcome from America</title>
<div style="color: white; text-align: center;">
<h1>Your server is running in Oregon</h1>
<h2>Congratulations!</h2>
<div>
' > /usr/local/apache2/htdocs/index.html && httpd-foreground""
],
"environment": [ ],
"mountPoints": [ ],
"volumesFrom": [ ]
}
],
"family": "TestTask",
"taskRoleArn": "arn:aws:iam::999472750599:role/ecsTaskExecutionRole",
"executionRoleArn": "arn:aws:iam::999472750599:role/ecsTaskExecutionRole",
"networkMode": "awsvpc",
"revision": 1,
"volumes": [ ],
"status": "ACTIVE",
"requiresAttributes": [
{
"name": "com.amazonaws.ecs.capability.docker-remote-api.1.18"
},
{
"name": "ecs.capability.task-eni"
},
{
"name": "com.amazonaws.ecs.capability.task-iam-role"
}
],
"placementConstraints": [ ],
"compatibilities": [
"EC2",
"FARGATE"
],
"requiresCompatibilities": [
"EC2",
"FARGATE"
],
"cpu": "256",
"memory": "512"
}
}The remaining steps for setting up the environment will be the same as in the previous example but this time, we have different resource identifiers (ARNs).
1. Get the VpcId of the default VPC:
> aws ec2 describe-vpcs
{
"Vpcs": [
{
"CidrBlock": "172.31.0.0/16",
"DhcpOptionsId": "dopt-3e62a546",
"State": "available",
"VpcId": "vpc-4f5c9237",
"OwnerId": "999472750599",
"InstanceTenancy": "default",
"CidrBlockAssociationSet": [
{
"AssociationId": "vpc-cidr-assoc-f3234799",
"CidrBlock": "172.31.0.0/16",
"CidrBlockState": {
"State": "associated"
}
}
],
"IsDefault": true
}
]
}2. Create a new security group in this VPC:
> aws ec2 create-security-group --description "TestTasks security group" --group-name "TestSecurityGroup" --vpc-id "vpc-4f5c9237"
{
"GroupId": "sg-02b35951c0dae62d0"
}3. Then set ingress rules for this group:
> aws ec2 authorize-security-group-ingress --group-name TestSecurityGroup --protocol tcp --port 80 --cidr 0.0.0.0/0
4. And create a new cluster:
> aws ecs create-cluster --cluster-name TestCluster
{
"cluster": {
"clusterArn": "arn:aws:ecs:us-west-2:999472750599:cluster/TestCluster",
"clusterName": "TestCluster",
"status": "ACTIVE",
"registeredContainerInstancesCount": 0,
"runningTasksCount": 0,
"pendingTasksCount": 0,
"activeServicesCount": 0,
"statistics": [ ],
"tags": [ ]
}
}5. Get any SubnetId from the list (we used the first one):
> aws ec2 describe-subnets
{
"Subnets": [
{
"AvailabilityZone": "us-west-2a",
"AvailabilityZoneId": "usw2-az1",
"AvailableIpAddressCount": 4091,
"CidrBlock": "172.31.16.0/20",
"DefaultForAz": true,
"MapPublicIpOnLaunch": true,
"State": "available",
"SubnetId": "subnet-f297cc8b",
"VpcId": "vpc-4f5c9237",
"OwnerId": "999472750599",
"AssignIpv6AddressOnCreation": false,
"Ipv6CidrBlockAssociationSet": [ ],
"SubnetArn": "arn:aws:ec2:us-west-2:999472750599:subnet/subnet-f297cc8b"
},
{
"AvailabilityZone": "us-west-2b",
"AvailabilityZoneId": "usw2-az2",
"AvailableIpAddressCount": 4091,
"CidrBlock": "172.31.32.0/20",
"DefaultForAz": true,
"MapPublicIpOnLaunch": true,
"State": "available",
"SubnetId": "subnet-cf1d5984",
"VpcId": "vpc-4f5c9237",
"OwnerId": "999472750599",
"AssignIpv6AddressOnCreation": false,
"Ipv6CidrBlockAssociationSet": [ ],
"SubnetArn": "arn:aws:ec2:us-west-2:999472750599:subnet/subnet-cf1d5984"
},
{
"AvailabilityZone": "us-west-2c",
"AvailabilityZoneId": "usw2-az3",
"AvailableIpAddressCount": 4091,
"CidrBlock": "172.31.0.0/20",
"DefaultForAz": true,
"MapPublicIpOnLaunch": true,
"State": "available",
"SubnetId": "subnet-fbbe94a1",
"VpcId": "vpc-4f5c9237",
"OwnerId": "999472750599",
"AssignIpv6AddressOnCreation": false,
"Ipv6CidrBlockAssociationSet": [ ],
"SubnetArn": "arn:aws:ec2:us-west-2:999472750599:subnet/subnet-fbbe94a1"
}
]
}6. Create a document with network configuration using GroupId from step 2 and SubnetId from step 5:
{
"awsvpcConfiguration":
{
"subnets": [ "subnet-f297cc8b" ],
"securityGroups": [ "sg-02b35951c0dae62d0" ],
"assignPublicIp": "ENABLED"
}
}Save this document as D:AWSTaskNetworkConfiguration-Oregon.json.
Testing the server
Let’s start testing the newly created server.
Note that while the task is running, it consumes about $0.012 per hour.
> aws ecs run-task --task-definition TestTask --cluster TestCluster --launch-type FARGATE --network-configuration "file://D:AWSTaskNetworkConfiguration-Oregon.json"
{
"tasks": [
{
"taskArn": "arn:aws:ecs:us-west-2:999472750599:task/53d54bca-31de-a47e 78-97e5-7fc52a546407",
"clusterArn": "arn:aws:ecs:us-west-2:999472750599:cluster/TestCluster",
"taskDefinitionArn": "arn:aws:ecs:us-west-2:999472750599:task-definition/TestTask:1",
"overrides": {
"containerOverrides": [
{
"name": "httpd"
}
]
},
"lastStatus": "PROVISIONING",
"desiredStatus": "RUNNING",
"cpu": "256",
"memory": "512",
"containers": [
{
"containerArn": "arn:aws:ecs:us-west-2:999472750599:container/a5591a75-14e5-42e0-9856-221490cfb8e4",
"taskArn": " arn:aws:ecs:us-west-2:999472750599:task/53d54bca-31de-a47e 78-97e5-7fc52a546407",
"name": "httpd",
"lastStatus": "PENDING",
"networkInterfaces": [ ]
}
],
"version": 1,
"createdAt": 1547048805.064,
"group": "family:TestTask",
"launchType": "FARGATE",
"platformVersion": "1.3.0",
"attachments": [
{
"id": "a891b695-6777-4c86-b4a5-b3a2956286fc",
"type": "ElasticNetworkInterface",
"status": "PRECREATED",
"details": [
{
"name": "subnetId",
"value": "subnet-f297cc8b"
}
]
}
],
"tags": [ ]
}
],
"failures": [ ]
}List network interfaces to get the PublicIP of this task:
> aws ec2 describe-network-interfaces
{
"NetworkInterfaces": [
{
"Association": {
"IpOwnerId": "amazon",
"PublicDnsName": "ec2-34-205-28-158.us-west-2.compute.amazonaws.com",
"PublicIp": "34.205.28.158"
},
"Attachment": {
"AttachTime": "2019-01-09T15:46:48.000Z",
"AttachmentId": "eni-attach-0becbb72cb6b41bd8",
"DeleteOnTermination": false,
"DeviceIndex": 1,
"InstanceOwnerId": "689245101779",
"Status": "attached"
},
"AvailabilityZone": "us-west-2a",
"Description": "arn:aws:ecs:us-west-2:999472750599:attachment/a891b695-6777-4c86-b4a5-b3a2956286fc",
"Groups": [
{
"GroupName": "TestSecurityGroup",
"GroupId": "sg-02b35951c0dae62d0"
}
],
"InterfaceType": "interface",
"Ipv6Addresses": [ ],
"MacAddress": "02:6d:7a:58:48:80",
"NetworkInterfaceId": "eni-0b828ae6",
"OwnerId": "999472750599",
"PrivateDnsName": "ip-172-31-17-87.us-west-2.compute.internal",
"PrivateIpAddress": "172.31.17.87",
"PrivateIpAddresses": [
{
"Association": {
"IpOwnerId": "amazon",
"PublicDnsName": "ec2-34-205-28-158.us-west-2.compute.amazonaws.com",
"PublicIp": "34.205.28.158"
},
"Primary": true,
"PrivateDnsName": "ip-172-31-17-87.us-west-2.compute.internal",
"PrivateIpAddress": "172.31.17.87"
}
],
"RequesterId": "578734482556",
"RequesterManaged": true,
"SourceDestCheck": true,
"Status": "in-use",
"SubnetId": "subnet-f297cc8b",
"TagSet": [ ],
"VpcId": "vpc-4f5c9237"
}
]
}Copy and paste this IP to your browser (34.205.28.158 in my case) and you should see this page:

Stop the server so that it doesn’t consume any more money. You can use the CLI command described in the Stopping the task section above or use the Amazon web console: Go to Region –> Services –> ECS –> Clusters –> TestCluster –> Tasks tab –> Choose task and click Stop or Stop All (if there’s only your task in the list).
Part 3. Using Route 53 to create a traffic policy
By this point, we’ve prepared the environment for servers in Frankfurt and Oregon. The next part of our tutorial includes using Route 53. If you don’t have a registered domain, you can buy one using Route 53:
In the Route 53 console, go to Registered domains –> Register Domain.
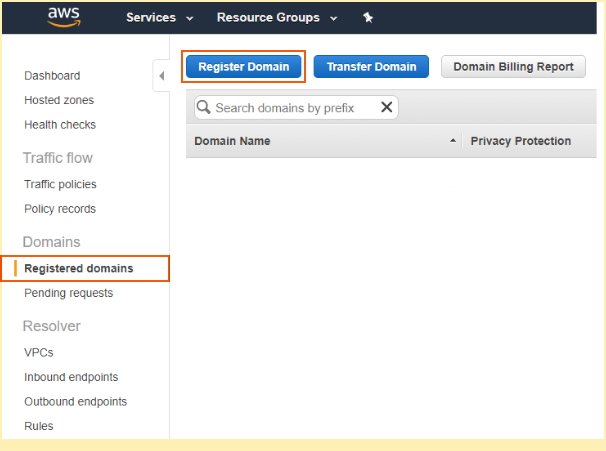
Registering Domain
If you already have a domain, you can link it to Route 53 using these instructions: Making Amazon Route 53 the DNS Service for an Existing Domain.
If you aren’t going to buy a domain and you don’t want to link an existing domain to Route 53 for this tutorial, you still can get the theoretical knowledge. In this case, make sure you’ve stopped the tasks on the Oregon and Frankfurt servers.
Creating a traffic policy
A traffic policy is a set of rules for routing traffic to the necessary parts of your AWS services. You can easily create such a policy with the very convenient graphics tool in Route 53. The traffic policy for our goal looks like this:
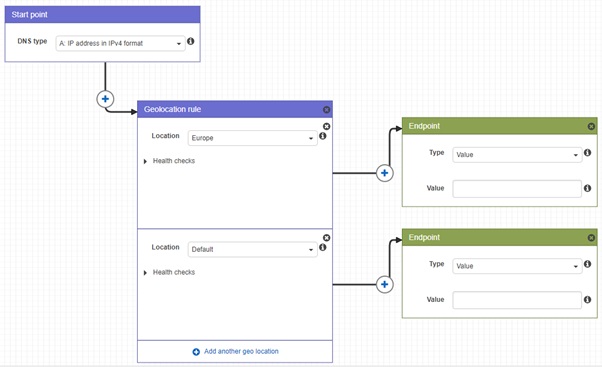
Traffic policy
The values of endpoints must contain the valid IP addresses of running servers. At the moment, we don’t have servers running, so we left these fields empty.
The traffic policy is described by the document with specific syntax. Since we’ve agreed to do everything only with the CLI, let’s forget about the web UI for a moment and create the traffic policy document:
{
"AWSPolicyFormatVersion": "2015-10-01",
"RecordType": "A",
"Endpoints": {
"endpoint-Frankfurt": {
"Type": "value",
"Value": ""
},
"endpoint-Oregon": {
"Type": "value",
"Value": ""
}
},
"Rules": {
"rule-Geolocation": {
"RuleType": "geo",
"Locations": [
{
"Continent": "EU",
"EndpointReference": "endpoint-Frankfurt",
"IsDefault": false,
"EvaluateTargetHealth": true
},
{
"Country": "*",
"EndpointReference": "endpoint-Oregon",
"IsDefault": true,
"EvaluateTargetHealth": true
}
]
}
},
"StartRule": "rule- -Geolocation"
}This document contains endpoints and rules. The rules define the conditions under which a connection will be established between a client and a specific endpoint. You can see that we have two endpoints called endpoint-Frankfurt and endpoint-Oregon without actual values: We’ll set the IP addresses for these endpoints later. Also, we have a single rule with two Locations:
- The first rule defines that connections from the Europe (EU) region are routed to endpoint-Frankfurt.
- The second rule defines that connections from any country (*) are routed to the endpoint-Oregon, which is the default location of our service.
This single rule is set as the start rule at the end of the document.
Running the servers again
When the task is launched, it spends money. You can see how to stop tasks at the end of part 3 of this article.
Let’s start from the current region, Oregon. If you’ve switched to another region, switch to us-west-2 using the aws configure command. The environment in this region was prepared in part 2, so we can just run the task:
> aws ecs run-task --task-definition TestTask --cluster TestCluster --launch-type FARGATE --network-configuration "file://D:AWSTaskNetworkConfiguration-Oregon.json"
{
"tasks": [
{
"taskArn": "arn:aws:ecs:us-west-2:999472750599:task/53d54bca-de31-47a8-97e5-56472a5fc407",
"clusterArn": "arn:aws:ecs:us-west-2:999472750599:cluster/TestCluster",
"taskDefinitionArn": "arn:aws:ecs:us-west-2:999472750599:task-definition/TestTask:1",
"overrides": {
"containerOverrides": [
{
"name": "httpd"
}
]
},
"lastStatus": "PROVISIONING",
"desiredStatus": "RUNNING",
"cpu": "256",
"memory": "512",
"containers": [
{
"containerArn": "arn:aws:ecs:us-west-2:999472750599:container/a5591a75-14e5-42e0-9856-221490cfb8e4",
"taskArn": "arn:aws:ecs:us-west-2:999472750599:task/53d54bca-de31-47a8-97e5-56472a5fc407",
"name": "httpd",
"lastStatus": "PENDING",
"networkInterfaces": [ ]
}
],
"version": 1,
"createdAt": 1547048805.064,
"group": "family:TestTask",
"launchType": "FARGATE",
"platformVersion": "1.3.0",
"attachments": [
{
"id": "a891b695-6777-4c86-b4a5-b3a2956286fc",
"type": "ElasticNetworkInterface",
"status": "PRECREATED",
"details": [
{
"name": "subnetId",
"value": "subnet-f297cc8b"
}
]
}
],
"tags": [ ]
}
],
"failures": [ ]
}Get the public IP of this task:
> aws ec2 describe-network-interfaces
{
"NetworkInterfaces": [
{
"Association": {
"IpOwnerId": "amazon",
"PublicDnsName": "ec2-34-217-47-221.us-west-2.compute.amazonaws.com",
"PublicIp": "34.217.47.221"
},
"Attachment": {
"AttachTime": "2019-01-09T15:46:48.000Z",
"AttachmentId": "eni-attach-0becbb72cb6b41bd8",
"DeleteOnTermination": false,
"DeviceIndex": 1,
"InstanceOwnerId": "689245101779",
"Status": "attached"
},
"AvailabilityZone": "us-west-2a",
"Description": "arn:aws:ecs:us-west-2:999472750599:attachment/a891b695-6777-4c86-b4a5-b3a2956286fc",
"Groups": [
{
"GroupName": "TestSecurityGroup",
"GroupId": "sg-02b35951c0dae62d0"
}
],
"InterfaceType": "interface",
"Ipv6Addresses": [ ],
"MacAddress": "02:6d:7a:58:48:80",
"NetworkInterfaceId": "eni-0b828ae6",
"OwnerId": "999472750599",
"PrivateDnsName": "ip-172-31-17-87.us-west-2.compute.internal",
"PrivateIpAddress": "172.31.17.87",
"PrivateIpAddresses": [
{
"Association": {
"IpOwnerId": "amazon",
"PublicDnsName": "ec2-34-217-47-221.us-west-2.compute.amazonaws.com",
"PublicIp": "34.217.47.221"
},
"Primary": true,
"PrivateDnsName": "ip-172-31-17-87.us-west-2.compute.internal",
"PrivateIpAddress": "172.31.17.87"
}
],
"RequesterId": "578734482556",
"RequesterManaged": true,
"SourceDestCheck": true,
"Status": "in-use",
"SubnetId": "subnet-f297cc8b",
"TagSet": [ ],
"VpcId": "vpc-4f5c9237"
}
]
}Search for the “PublicIp” (34.217.47.221 in my case) – this is the entry point of the server in Oregon. Now let’s switch to Frankfurt (eu-central-1):
> aws configure
AWS Access Key ID [****************YH3Q]:
AWS Secret Access Key [****************whMu]:
Default region name [us-west-2]: eu-central-1
Default output format [json]:And launch another server there:
> aws ecs run-task --task-definition TestTask --cluster TestCluster --launch-type FARGATE --network-configuration file://D:AWSTaskNetworkConfiguration-Frankfurt.json
{
"tasks": [
{
"taskArn": "arn:aws:ecs:eu-central-1:999472750599:task/c8669a1c-43e5-4ac1-b1b0-08e19780fc5c",
"clusterArn": "arn:aws:ecs:eu-central-1:999472750599:cluster/TestCluster",
"taskDefinitionArn": "arn:aws:ecs:eu-central-1:999472750599:task-definition/TestTask:7",
"overrides": {
"containerOverrides": [
{
"name": "httpd"
}
]
},
"lastStatus": "PROVISIONING",
"desiredStatus": "RUNNING",
"cpu": "256",
"memory": "512",
"containers": [
{
"containerArn": "arn:aws:ecs:eu-central-1:999472750599:container/56d9fb52-dfaf-449f-8f50-d5e8d001e05c",
"taskArn": "arn:aws:ecs:eu-central-1:999472750599:task/c8669a1c-43e5-4ac1-b1b0-08e19780fc5c",
"name": "httpd",
"lastStatus": "PENDING",
"networkInterfaces": [ ]
}
],
"version": 1,
"createdAt": 1547052293.144,
"group": "family:TestTask",
"launchType": "FARGATE",
"platformVersion": "1.3.0",
"attachments": [
{
"id": "012f6966-0887-4b80-99c4-4074055d2af9",
"type": "ElasticNetworkInterface",
"status": "PRECREATED",
"details": [
{
"name": "subnetId",
"value": "subnet-3efcee55"
}
]
}
],
"tags": [ ]
}
],
"failures": [ ]
}Let’s get the public IP of the launched task from the network interfaces:
> aws ec2 describe-network-interfaces
{
"NetworkInterfaces": [
{
"Association": {
"IpOwnerId": "amazon",
"PublicDnsName": "ec2-18-185-113-68.eu-central-1.compute.amazonaws.com",
"PublicIp": "18.185.113.68"
},
"Attachment": {
"AttachTime": "2019-01-09T16:44:57.000Z",
"AttachmentId": "eni-attach-0ed1c2930f1608841",
"DeleteOnTermination": false,
"DeviceIndex": 1,
"InstanceOwnerId": "781441340475",
"Status": "attached"
},
"AvailabilityZone": "eu-central-1a",
"Description": "arn:aws:ecs:eu-central-1:999472750599:attachment/012f6966-0887-4b80-99c4-4074055d2af9",
"Groups": [
{
"GroupName": "TestSecurityGroup",
"GroupId": "sg-0aa7181ac7adc3afe"
}
],
"InterfaceType": "interface",
"Ipv6Addresses": [ ],
"MacAddress": "02:9d:78:9a:44:88",
"NetworkInterfaceId": "eni-06415451",
"OwnerId": "999472750599",
"PrivateDnsName": "ip-172-31-17-192.eu-central-1.compute.internal",
"PrivateIpAddress": "172.31.17.192",
"PrivateIpAddresses": [
{
"Association": {
"IpOwnerId": "amazon",
"PublicDnsName": "ec2-18-185-113-68.eu-central-1.compute.amazonaws.com",
"PublicIp": "18.185.113.68"
},
"Primary": true,
"PrivateDnsName": "ip-172-31-17-192.eu-central-1.compute.internal",
"PrivateIpAddress": "172.31.17.192"
}
],
"RequesterId": "628676013162",
"RequesterManaged": true,
"SourceDestCheck": true,
"Status": "in-use",
"SubnetId": "subnet-3efcee55",
"TagSet": [ ],
"VpcId": "vpc-3e507a55"
}
]
}“PublicIp” is the entry point of the server in Frankfurt.
Check public IPs of both servers by inserting them into the address bar of your web browser. You should see simple pages from Oregon and Frankfurt:
Applying the traffic policy
By now, we have two running servers and we know their IPs. Let’s return to our incomplete traffic policy template and add the IPs of these servers to it:
{
"AWSPolicyFormatVersion": "2015-10-01",
"RecordType": "A",
"Endpoints": {
"endpoint-Frankfurt": {
"Type": "value",
"Value": "18.185.113.68"
},
"endpoint-Oregon": {
"Type": "value",
"Value": "34.217.47.221"
}
},
"Rules": {
"rule-Geolocation": {
"RuleType": "geo",
"Locations": [
{
"Continent": "EU",
"EndpointReference": "endpoint-Frankfurt",
"IsDefault": false,
"EvaluateTargetHealth": true
},
{
"Country": "*",
"EndpointReference": "endpoint-Oregon",
"IsDefault": true,
"EvaluateTargetHealth": true
}
]
}
},
"StartRule": "rule-Geolocation"
}In your document, you should have your own values of IPs. Save this document to D:AWSTestTrafficPolicyDocument.json. Register this policy in Route 53:
> aws route53 create-traffic-policy --name TestTrafficPolicy --document "file://D:AWSTestTrafficPolicyDocument.json"
{
"Location": "https://route53.amazonaws.com/2013-04-01/trafficpolicy/0de7e28a-6e86-447d-8d8d-ecc12a412e04/1",
"TrafficPolicy": {
"Id": "0de7e28a-6e86-447d-8d8d-ecc12a412e04",
"Version": 1,
"Name": "TestTrafficPolicy",
"Type": "A",
"Document": "{n "AWSPolicyFormatVersion":"2015-10-01",n "RecordType":"A",n "Endpoints":n {n "endpoint-Frankfurt":n {n "Type":"value",n "Value":"18.185.113.68"n },n "endpoint-Oregon":n {n "Type":"value",n "Value":"34.217.47.221"n }n },n "Rules":n {n "rule-Geolocation":n {n "RuleType":"geo",n "Locations":n [n {n "Continent":"EU",n "EndpointReference":"endpoint-Frankfurt",n "IsDefault":false,n "EvaluateTargetHealth":truen },n {n "Country":"*",n "EndpointReference":"endpoint-Oregon",n "IsDefault":true,n "EvaluateTargetHealth":truen }n ]n }n },n "StartRule":"rule-Geolocation"n}"
}
}The traffic policy has its Id and version: You see that our traffic policy is created with version 1. When you update the policy via the create-traffic-policy-version command, this value is incremented. Registration is free, but…
Applying a policy costs $50 per month. The pricing documentation states you don’t have to pay for a whole month – you’ll be charged only for the days you use the policy. Supposedly, we’ll pay $1.61 at the end of the month for one day of using this service: We experimented with Route 53 in January, which has 31 days.
The traffic policy is bounded to a specific domain name or subdomain. The Route 53 service begins to distribute traffic in accordance with this policy using the rules on the DNS servers. Supposing we already have the domain our_site.com in AWS and a Hosted Zone for it (AWS creates a public Hosted Zone for a registered domain automatically), we can list all the Hosted Zones registered with our account:
> aws route53 list-hosted-zones
{
"HostedZones": [
{
"Id": "/hostedzone/Z29J8UDNOOWFQB",
"Name": "local.",
"CallerReference": "ej3n2gt4dndgyrj35v75jafhxkmxknm4-jo7jxvyf",
"Config": {
"Comment": "Created by Route 53 Auto Naming",
"PrivateZone": true
},
"ResourceRecordSetCount": 2,
"LinkedService": {
"ServicePrincipal": "servicediscovery.amazonaws.com",
"Description": "arn:aws:servicediscovery:eu-central-1:999472750599:namespace/ns-bnqcz724u6p6oydd"
}
},
{
"Id": "/hostedzone/Z3LYYOJAWKGNWJ",
"Name": "our_site.com.",
"CallerReference": "RISWorkflow-RD:cf8bfa32-9ed7-46c0-bac6-dfff86375a41",
"Config": {
"Comment": "HostedZone created by Route53 Registrar",
"PrivateZone": false
},
"ResourceRecordSetCount": 2
}
]
}The traffic policy is bounded to a specific domain name or subdomain. The Route 53 service begins to distribute traffic in accordance with this policy using the rules on the DNS servers. Supposing we already have the domain our_site.com in AWS and a Hosted Zone for it (AWS creates a public Hosted Zone for a registered domain automatically), we can list all the Hosted Zones registered with our account:
As you can see, we have two zones: public and private. We’re interested only in the public zone, as it represents our domain – in our case, the public zone has the Id “/hostedzone/Z3LYYOJAWKGNWJ”. Now we can apply our traffic policy to the specific Hosted Zone:
> aws route53 create-traffic-policy-instance --hosted-zone-id "/hostedzone/Z3LYYOJAWKGNWJ" --name our_site.com --ttl 60 --traffic-policy-id "0de7e28a-6e86-447d-8d8d-ecc12a412e04" --traffic-policy-version 1.
{
"Location": "https://route53.amazonaws.com/2013-04-01/trafficpolicyinstance/64678dec-33da-4ce1-bffb-78c9d8ff2b91",
"TrafficPolicyInstance": {
"Id": "64678dec-33da-4ce1-bffb-78c9d8ff2b91",
"HostedZoneId": "Z2LYYOJAWKGNWJ",
"Name": "our_site.com.",
"TTL": 60,
"State": "Creating",
"TrafficPolicyId": "0de7e28a-6e86-447d-8d8d-ecc12a412e04",
"TrafficPolicyVersion": 1,
"TrafficPolicyType": "A"
}
}The traffic policy instance has its own ID. In our case, it’s “64678dec-33da-4ce1-bffb-78c9d8ff2b91”. You’ll use it when you clean your environment. Applying the policy will take about a minute. After that, you can check access to your site through the domain name. Type our_site.com in your browser and you should see a different page of the site depending on where you are at the moment and what proxy server you’re using. For example, a European user without a proxy will see the page from the server located in Frankfurt:
A user located in the USA or in any other non-European country will see another page from the server located in Oregon:
To test your service from different countries, you can use free proxies with port 80. You can pick any service in the list of free proxies in different regions. To configure a Windows proxy, go to Internet Properties –> LAN settings:
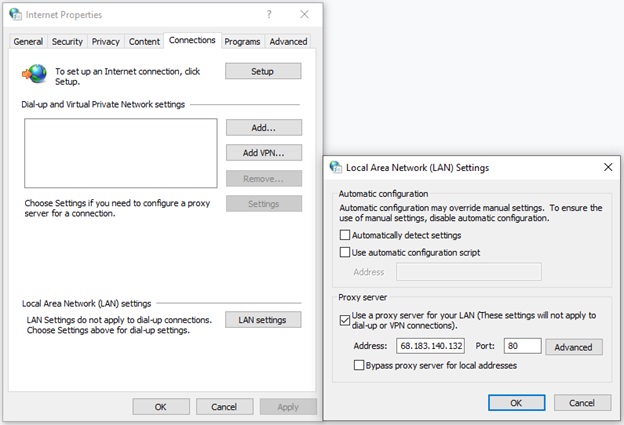
Configuring a Windows proxy
Stopping the service
This part is important, so don’t skip it! You should stop all the processes in the cloud that spend money.
Delete the instance of the traffic policy:
> delete-traffic-policy-instance --id "64678dec-33da-4ce1-bffb-78c9d8ff2b91"
Stop the task in the current region (Frankfurt):
> aws ecs stop-task --cluster arn:aws:ecs:eu-central-1:999472750599:cluster/TestCluster --task arn:aws:ecs:eu-central-1:999472750599:task/c8669a1c-43e5-4ac1-b1b0-08e19780fc5c
Switch to another region (Oregon):
> aws configure
AWS Access Key ID [****************YH3Q]:
AWS Secret Access Key [****************whMu]:
Default region name [eu-central-1]: us-west-2
Default output format [json]:Stop the task in this region:
> aws ecs stop-task --cluster arn:aws:ecs:us-west-2:999472750599:cluster/TestCluster --task arn:aws:ecs:us-west-2:999472750599:task/53d54bca-de31-47a8-97e5-56472a5fc407
You can make sure that the service is no longer working by typing the domain name and IP of individual servers in the address bar of your browser:
- our_site.com
- 18.185.113.68
- 34.217.47.221
Conclusion
Deploying a website on a cloud server instead of your own server in your basement has a few advantages:
- Your website will load fast in any part of the world
- You can quickly deploy your site on any other server worldwide
- You can respond quickly to changing load by increasing or decreasing capacity
In this article, we’ve described a step-by-step procedure for forming a cloud environment for a website with AWS tools. To do this, you’ll need AWS services: AWS Fargate, Amazon Route 53, and AWS EC2. Every command in the tutorial is executed through the AWS CLI to give you a better understanding of how AWS works.
Have a question?
Ask our expert!
VP of Innovation and Technology, Canada Branch Director


