 Skip to main content

Every week, we get news about a massive new data breach or leak of personal information. It makes cybersecurity a top priority for any IT project. Hackers constantly come up with new patterns and tools for attacks. Therefore, it’s important to keep an eye on new threat protection tools.
One way you can secure your network is by setting up a honeypot. In this article, we’ll show you how to create, configure, and deploy a decoy inside a Kubernetes cluster.
We’re continuing to share our experience working with Kubernetes, an open-source framework for deploying, scaling, and managing containerized applications. Our previous article was devoted to the infrastructure and key components of Kubernetes.
Contents:
What is a honeypot?
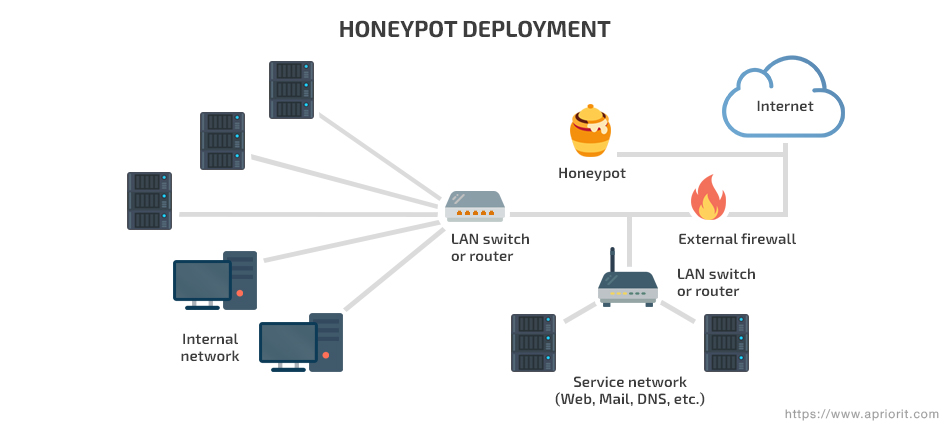
A honeypot is a well-known cybersecurity mechanism for detecting and countering hacker attacks. It’s a decoy placed inside your network, disguising itself as a sensitive asset or network vulnerability. When an attacker tries to access this fake confidential data, the honeypot notifies about the attempt. A honeypot also collects and analyzes data on hacking attempts.
There are two types of honeypot configurations:
- Production honeypots are used mostly by companies. They improve the security of a corporate system, protecting only the data that hackers are most likely to access. Production honeypots are easier to deploy and maintain, as they serve mostly to distract an attacker’s attention.
- Research honeypots are used by cybersecurity researchers, governments, and military organizations. The goal of a research honeypot is not to stop hackers but to study new threats and attack patterns.
We can also classify honeypots as:
- Low-interaction honeypots, which replicate only the most commonly attacked services.
- High-interaction honeypots, which replicate all system services.
- Pure honeypots, which are full-scale copies of a production system with an emphasis on logging. They don’t contain any sensitive data.
Read also:
Honeypots as a Method of Malware Detection
Before deploying a honeypot, let’s review the Kubernetes elements we need to use during this tutorial.
Basic Kubernetes elements
Kubernetes is an open-source orchestration framework for automated deployment, scaling, and management. We took a close look at its architecture and capabilities in our previous article. It has a vast set of built-in tools. In this tutorial, we’ll only use four components:
- Pod – A basic Kubernetes unit that models a host for containers it stores and creates an environment the containers run in
- Cluster – A set of nodes running a containerized application
- ReplicaSet – A replica controller called to ensure that the required number of containers are running at any given moment. A ReplicaSet is defined with several fields containing information on the type and number of Pods this controller should maintain along with a template for creating new Pods.
- Deployment – A controller in charge of declarative updates to Pods and ReplicaSets. a Deployment controller needs a description of the desired state in order to maintain these two entities.
Read also:
Investigating Kubernetes from Inside
Despite its extensive functionality, Kubernetes is quite simple to work with. It allows you to operate high-level entities (for instance, Deployment and StatefulSets) without interacting with Pods directly.
Kubernetes clusters are managed with Dashboard or an embedded command-line tool called kubectl. In this article, we use kubectl to deploy a honeypot system in a Kubernetes cluster and collect data on the current state of the infrastructure.
Deploying a honeypot in Kubernetes step-by-step
After studying the basics of honeypots and Kubernetes, we can go ahead and create a honeypot system inside a Kubernetes cluster.
Defining the protected perimeter
Let’s begin to set up a honeypot by defining what resources we want to protect. The Kubernetes documentation contains an example of a WordPress and MySQL deployment. We can use applications and the Deployment file from this example. Let’s suppose our Kubernetes network contains sensitive data that we want to protect.
Creating a MySQL honeypot
We need to choose the way to protect our sensitive data. The best way to do it is to create a MySQL service decoy.
In order to do that, we need to use a MySQL honeypot. In our tutorial, we’ll use this low-interaction honeypot example, although you’re free to use any other template you like.
Before we start, we have to ensure the example honeypot is working properly. Let’s download the repository:
> git clone https://github.com/skyformat99/mysql-honeypotd ./honeypot
Then, we need to create dependencies as described in the Kubernetes documentation:
> apt-get install libev-dev
After that, let’s compile the project:
> make
If kubectl doesn’t inform us of any errors, we can launch the project:
> ./mysql-honypotd -s 5.6 -n mysql-replica
After this command, the MySQL honeypot is up and running. Now we need to connect to it with the following command:
> mysql -root -h [host-IP]
ERROR 1045 (28000): Access denied for user ‘user’@’ip’
The honeypot answered our request, which means it’s ready to work. Let’s check its log:
mysql-replica: New connection from IP:PORT to host-IP
mysql-replica: Access denied for user ‘user’ from IP:PORT to host-IP:3306
mysql-replica: Closing connection for IP:PORT
This record means our honeypot is working properly. The next step is adding the honeypot to the Kubernetes cluster.
Read also:
Convert Website to PWA: How to Turn a WordPress Website into a Progressive Web Application
Creating a honeypot Docker image
Before starting our honeypot inside the Kubernetes cluster, we need to create a Docker image. We’ll need it later for launching a Pod.
A Docker image can be created in four simple steps:
- Choose a basic container (in our example, we’ll use Ubuntu 14.04).
- Set up a working directory and copy the honeypot to it.
- Create dependencies.
- Set an entry point.
All of these steps need to be recorded in a Docker file:
FROM ubuntu:14.04

WORKDIR /tmp/honeymsql
COPY . ./

RUN apt-get update
RUN apt-get install libev-dev

ENTRYPOINT [“./mysql-honypotd”]
Now we need to create a Docker image:
> docker build -f ./Dockerfile -t mysql-honeypot:1 .
When the building process is finished, our local Docker image is ready to use. In order to create a Pod out of it, we have to upload this Docker image to a Docker Hub:
> docker push dockerID/repositoryName
At this point, we’ve created a MySQL honeypot inside a Pod.
Adding the honeypot to Kubernetes
The desired state of our Pod is maintained by the Deployment object we discussed earlier. To start the Deployment, we need to create a YAML file. Based on it, Deployment controls the condition of the Pod automatically. We can run several honeypots using ReplicaSets if there’s a need for it.
For writing a YAML document, feel free to use the Kubernetes documentation. The declaration for our project looks like this:
apiVersion: extensions/v1beta1
kind: Deployment
metadata:
  name: mysql-replica
spec:
  replicas: 1
  template:
 	metadata:
     labels:
	 app: mysql-replica
 	spec:
     containers:
     - name: mysql-replica
	 image: dockerID/repo:tag
	 imagePullPolicy: Always
	 args: ["-s 5.6"]
	 securityContext:
privileged: trueLet’s pay attention to two strings from this declaration:
image: dockerID/repo:tag
This line refers to the Docker image we created earlier in order to build a Pod. Note that if you use a private repository, you’ll need to create an additional Secrets object that will store an access token to the image.
args: ["-s 5.6"]
This line defines the parameters of the application we started. We could have defined them at the entry point while creating the Docker image. But this method doesn’t allow for changing the parameters without rebuilding the image.
The ability to declare parameters while creating a Pod makes the process of setting up an application much more flexible.
Let’s save our file and create a Deployment resource:
> kubectl create -f honeypot-deployment.yaml
Now we need to check our Pod’s condition:
> kubectl get pods
mysql-replica-5895cb77dd-9ltrr 1/1 Running 0 2m
The following command allows us to find out if the honeypot is working as expected:
> mysql -root -h [POD-IP]
ERROR 1045 (28000): Access denied for user ‘user’@’ip’

  {/code}
Finally, let’s take a look at the honeypot log:
> kubectl logs mysql-replica-5895cb77dd-9ltrr
mysql-honeypotd[1]: New connection from IP:PORT to [POD-IP]:3306
mysql-honeypotd[1]: Access denied for user 'user from IP:PORT to POD-IP:3306
mysql-honeypotd[1]: Closing connection for IP:PORT
Mission accomplished! We’ve created, configured, and deployed a low-interaction honeypot inside a Kubernetes cluster.
Conclusion
In this tutorial, we described the process of deploying honeypots in your Kubernetes network. Such traps study hacking attempts and take trespassers’ attention away from your sensitive data. You can add honeypots to your Kubernetes infrastructure in four steps, using only a basic knowledge of this framework and Docker containers.
The MySQL decoy we’ve created is a great example of honeypot technology. However, honeypots aren’t effective against zero-day attacks. If an attacker detects a honeypot, they’ll avoid it, and you won’t be alarmed about a violation. So a honeypot can be an additional cybersecurity tool, but you can’t rely on it fully.
At Apriorit, we have vast experience developing and testing cybersecurity projects. Contact our team of experts to discuss the features of your project!
Have a question?
Ask our expert!
VP of Innovation and Technology, Canada Branch Director


