 Skip to main content

Fuzzing has proven to be a useful technique for discovering bugs in software. Nowadays, integrating fuzzing into your product’s development lifecycle is essential for catching bugs that can’t be caught by classic quality assurance (QA) techniques like code review, source code annotations, and unit testing.
In this article, we show you how to find vulnerabilities in Windows closed source software using coverage guided fuzzing. We leverage WinAFL and consider ACDSee Photo Studio Standard 2019 as an example.
This article will be useful for QA specialists as well as reverse engineers and developers who want to improve the quality of their testing.
Contents:
The theory of fuzzing
First of all, what is fuzz testing? Wikipedia defines it this way:
Fuzzing or fuzz testing is an automated software testing technique that involves providing invalid, unexpected, or random data as inputs to a computer program. The program is then monitored for exceptions such as crashes, failing built-in code assertions, or potential memory leaks.
This type of testing is very simple and extremely useful, as it avoids preconceptions about how the system should behave. Besides, fuzz-based testing can be the only opportunity to discover vulnerabilities in software with totally closed source code.
There are three types of fuzzing, depending on how aware you are of the structure of the test program: whitebox, greybox, and blackbox fuzzing.
For the purpose of this article, we’ve used greybox fuzzing, which is also known as coverage-guided. This type of fuzzing uses software instrumentation to trace the code coverage achieved by each input fed to a fuzz target. Coverage-guided fuzzing is applied to a deterministic and self-contained target that can execute dozens or more times per second (for instance, an image format parser).
Fuzzing is performed with the help of software for reverse engineering, also known as “fuzzers.” American fuzzy lop, or AFL fuzzer, is one of the most effective tools for coverage-guided generic fuzzing. This fuzz testing tool is effective at finding real bugs, as it uses compile-time and generic algorithms to automatically discover test cases.
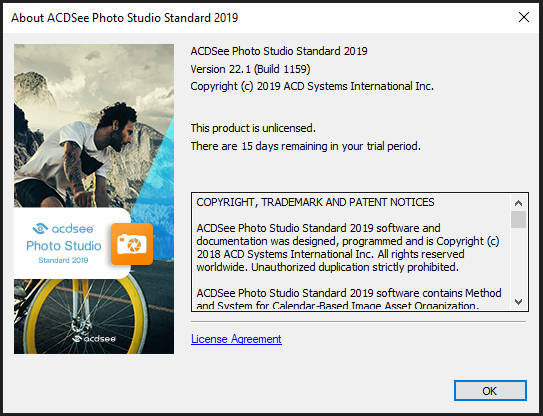
In our case, we performed coverage-guided fuzzing for ACDSee Photo Studio Standard 2019. ACDSee is an image editing solution created by ACD Systems International Inc. for the Windows, macOS, and iOS platforms. For our example, we used a 64-bit ACDSee Photo Studio binary with version number 22.1.0.1159.
In particular, we were interested in the viewing feature of this app. We assumed the app should implement image parsing functionality itself, which we intended to fuzz.
When testing ACDSee, our main goal was to generate many images and open them via the image viewer. Let’s assume we can create many samples by placing random data into the internal structure of the image file. Opening them one by one would be inefficient, because we don’t have any information about the app’s behavior, that is the coverage of the target app. If we could get the app’s coverage, we could create a more intelligent mutator. Hence, we could increase the overall efficiency of fuzzing.
This is where AFL comes in handy. It implements a mutation of the input data based on the coverage of the application under test. To get the coverage, AFL instruments the binary at compile time. In our case, we don’t have the app source code. But thankfully, there’s an excellent branch of AFL called WinAFL. This fuzz testing software relies on coverage gathered by DynamoRIO, which we used in this case. WinAFL also supports other methods of instrumentation, such as IntelPT and Syzygy.
The target process here is ACDSeeStandard2019.exe, which accepts an array of bytes and does something interesting with them using the API under test.
Let’s take a look at the general fuzzing process:

Now the whole idea should be clear, so we can start to search for an entry point for fuzzing (i.e. create a harness, the program for triggering the functionality we want to fuzz).
Ready to boost your software cybersecurity?
Gain a competitive advantage by enhancing your product’s protection. Rely on Apriorit experts to achieve better security, compatibility, and performance.
Reversing and searching for an attack surface
WinAFL already has a mutator and coverage analyzer, so all we have to do is apply them properly to ACDSee Photo Studio. Let’s look under the hood of the test app and see what we can do. What we’re looking for is the code that actually parses the input file.
As a reverse engineer, you can use any approach you like and are familiar with. Here are some possible options:
- Conduct static analysis with tools like IDA Pro, Ghidra, and radare2
- Debug the code with WinDBG or x64dbg (Setting up breakpoints and analyzing the parameters of functions at runtime is quite helpful.)
- Use auxiliary tools like API monitors, process monitors, and coverage tools
For instance, you can start analyzing a stack call using ProcMon when the file’s read. Just add a filter for the input file and open it in the viewer.
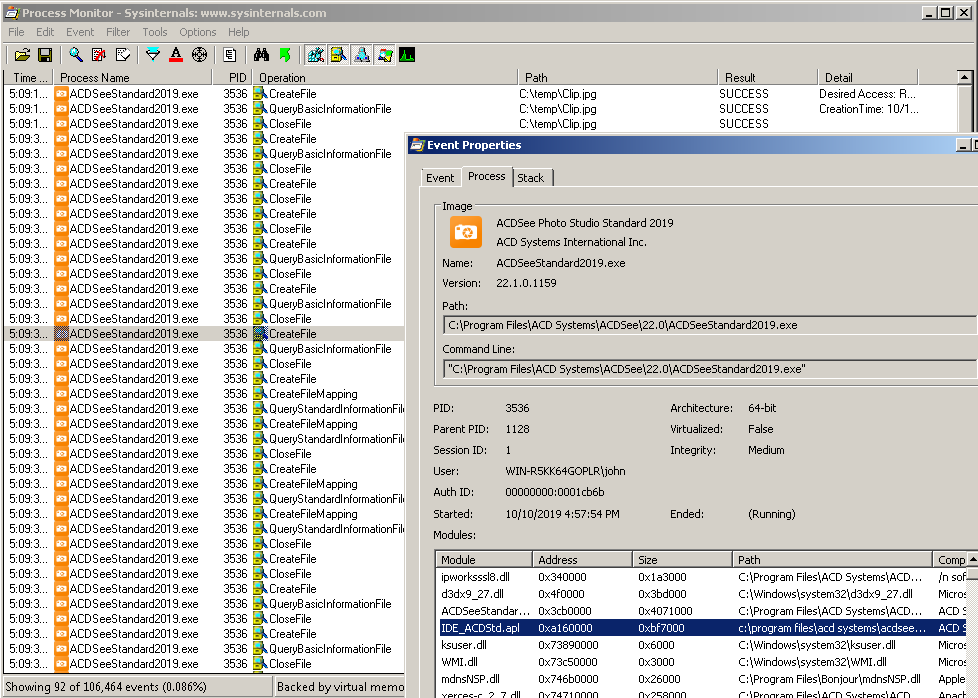
Notice that weird module called IDE_ACDStd.apl. It actually exists in the Plugins folder and it’s just a regular .dll executable with interesting exports:
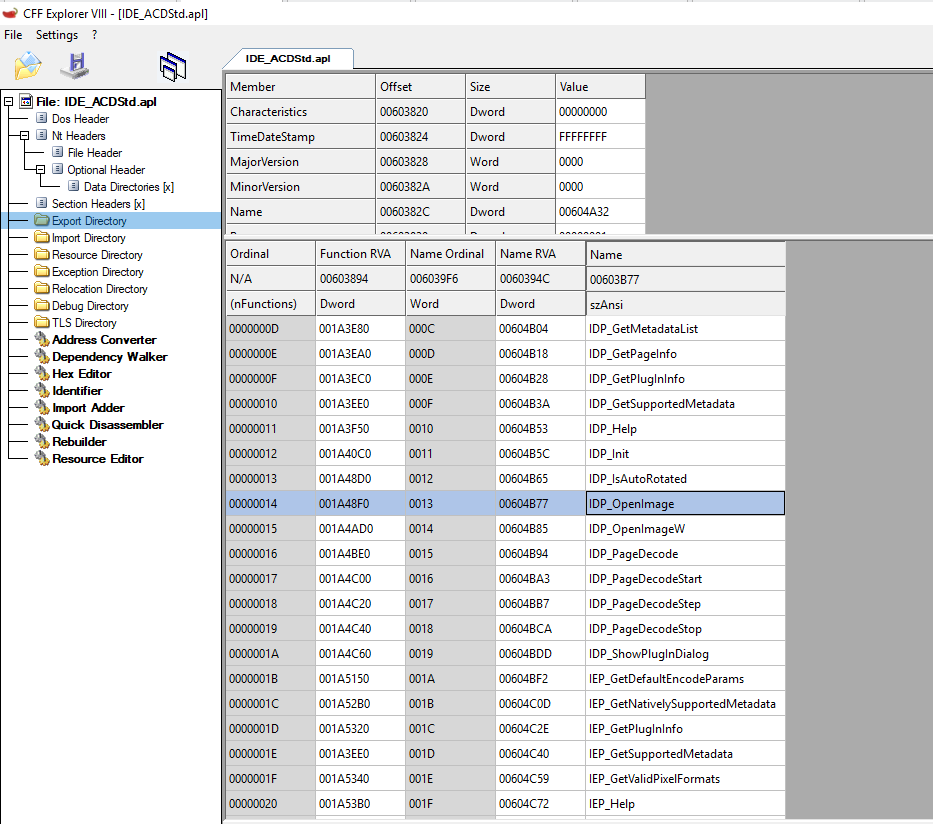
Indeed, ACDSeeStandard2019.exe leverages some plugin system, and it seems that IDE_ACDStd.apl is just a regular plugin responsible for handling most popular image formats. Actually, we can even find a manual for it!
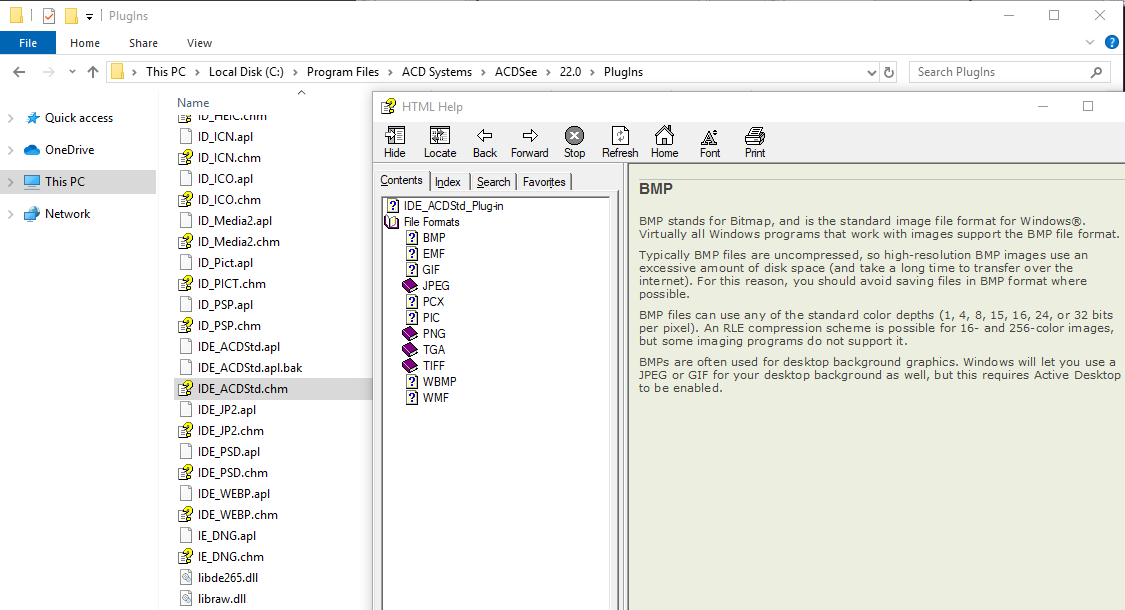
Of course, it’s not an SDK manual. But at least it describes what this plugin is capable of. Having an SDK for plugins should mean we can easily write a harness for fuzzing; but unfortunately, that’s not the case.
Read also
How to Reverse Engineer Software (Windows) the Right Way
Unlock the secrets of Windows software with Apriorit’s detailed guide on ethical and efficient reverse engineering. Our specialists show how to analyze product security, recover lost documentation, and build new solutions from legacy software.

Writing the harness
The harness should be able to properly load, process, and close the image using exports of the IDE_ACDStd.apl module. The harness should define an entry point for the fuzzer, this function will be called during each iteration of the fuzzer. In other words, when WinAFL generates a new input, it leverages the harness to check if that input generates new coverage of the target binary.
Let’s analyze which exported functions of IDE_ACDStd.apl get executed when the image is opened. We’ve defined that by leveraging IDAPython’s breakpoints:
import idautils
condition = """
print("In BP: %s")
return False
"""
def bp_mark_exports():
  for exp_i, exp_ord, exp_ea, exp_name in idautils.Entries():
    address = get_name_ea(0, exp_name)
    print("[+] Set BP: 0x%x, %s" % (address, exp_name))
    add_bpt(address, 0, BPT_SOFT)
    enable_bpt(address, True)
    SetBptCnd(address, condition % exp_name)
bp_mark_exports()We can clearly see this pattern:
...
In BP: IDP_OpenImageW
In BP: IDP_GetImageInfo
In BP: IDP_GetImageInfo
In BP: IDP_GetPageInfo
In BP: IDP_PageDecodeStart
In BP: IDP_PageDecodeStep
In BP: IDP_PageDecodeStep
In BP: IDP_PageDecodeStep
...
In BP: IDP_PageDecodeStep
In BP: IDP_IsAutoRotated
In BP: IDP_IsAutoRotated
In BP: IDP_PageDecodeStop
In BP: IDP_CloseImage
...We can determine the following:
- The image is opened with
IDP_OpenImageW. - We can see
IDP_PageDecodeStartat some point. - We’ve got a lot of
IDP_PageDecodeStepcalls, which is where the heavy work is done. - In the end, we can see
IDP_PageDecodeStopandIDP_CloseImage.
The sequence is clear, but there are still at least two issues preventing us from writing the harness.
The first issue is that we can see this check in every function:
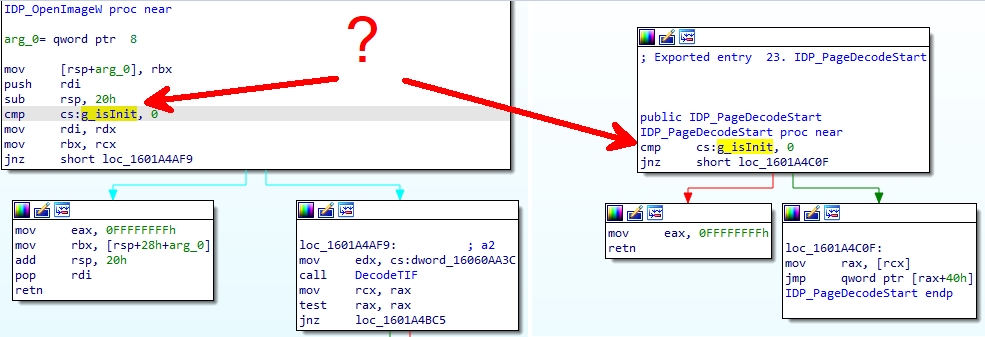
We’ve named that global variable as g_isInit because if it’s not set, then the code doesn’t work. Using cross-references, we can see that the global variable is set to 1 only once in IDP_Init. When IDP_Init is called, some random-looking data is passed to it as a parameter. IDP_Init checks that data using hashing and sets g_isInit to 1 if the data is valid. It’s trivial to overcome that check and force the successful loading of the .dll.
The second issue is that we don’t know the parameters for all the functions we’re interested in. So we need to reverse all of them. Here’s a snippet of what we should get in the end:
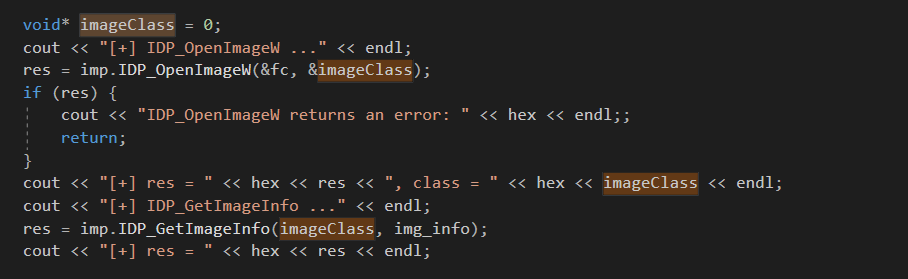
imageClass is an instance of the image that we should use as a parameter for subsequent calls, and we should close it with the IDP_CloseImage function in the end. fc is the input structure that we have to fill in:
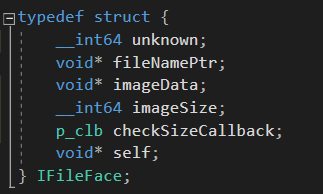
Crucial fields:
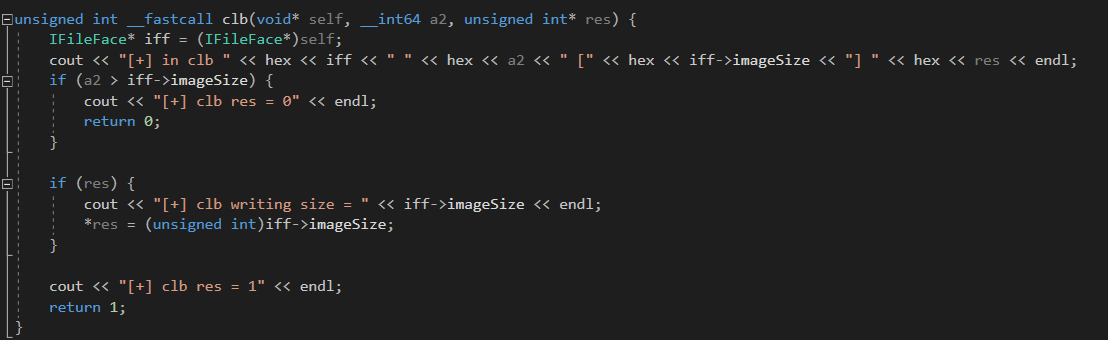
imageData– points to the raw data of the fileimageSize– the file’s sizecheckSizeCallback– a callback function that’s called when the plugin’s code needs to check the image size. Instead of directly checking the size using theimageSizemember of this struct, the plugin’s code will call this callback and pass the checked value to it as a parameter.self– should point to the start of this structure
We won’t provide the full sources of the harness in order not to cause any damage to the product’s vendor, but if you’ve read up to this point carefully, you should understand how it works.
The harness only performs the following five operations:
- Loads the
IDE_ACDStd.apllibrary and calls IDP_Init. - Reads the image data from the fuzzer using the command-line path to the file.
- Calls
IDP_OpenImageWandIDP_PageDecodeStartto initialize the iteration. - Calls
IDP_PageDecodeStepmultiple times until it returns an error. - Calls
IDP_PageDecodeStopandIDP_CloseImageto free resources.
Note: Unlike with the classic AFL, when you have access to the source code, writing a harness for closed source binaries might be difficult or even impossible by design. In this particular case, we spent several days on reversing and writing the harness.
Read also
9 Best Reverse Engineering Tools for 2024 [Updated]
Discover the top reverse engineering tools, recommended by Apriorit’s professional reversing team. We also share some practical examples of effectively using these tools to enhance software security and maintain legacy code.

Fuzzing itself
Finally, we’re moving to the most interesting part of our journey – the fuzzing itself. Usually, at this point we need to gather an input corpus, minimize it, and use it as a “seed” for the mutator. You can start with AFL’s demo test cases. But it turns out some of those test cases leads to the crash already.
So for educational purposes, let’s try a less efficient but more interesting approach. What if we don’t provide any input corpus? Strictly speaking, you can’t do that because WinAFL won’t run with an empty input folder. However, we can provide some fictitious input file – for example, a file containing “123” – and wait for the mutator to generate files for us that trigger some coverage in the target file. Eventually, these new files should look like images.
The command line to kick off the fuzzer looks like this:
afl-fuzz.exe -D z:\s\tools\dr70\bin64\ -i in_none -o out_none -timeout 15000+ -- -target_module harness.exe -target_method parseFile -coverage_module IDE_ACDStd.apl -- z:\s\acdsee\harness.exe "C:\Program Files\ACD Systems\ACDSee\22.0\PlugIns\IDE_ACDStd.apl" @@We used the basic block type of instrumentation instead of edge, because this term is not so important in our particular case.
Also, you might want to enable the page heap:

We found some crashes after ~10 to 20 minutes of multithreaded fuzzing! The reason for these crashes were TGA files:
file id_000004_00
id_000004_00: Targa image data - Map 8224 x 8224 x 32 +65280 +6104 - top " b \005 "We ran three fuzzing sessions on a laptop running eight threads. You can use winafl-plot.py to generate informative reports. Here is what a fuzzing report looks like:
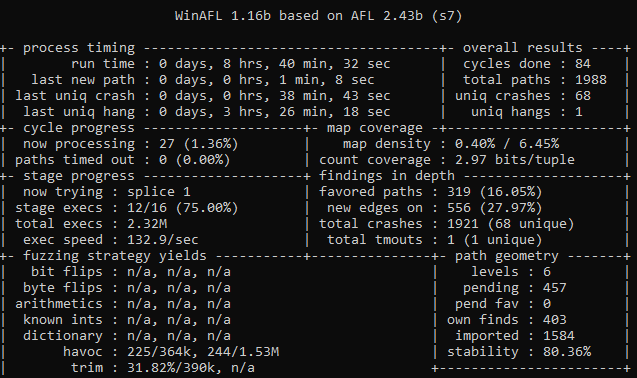
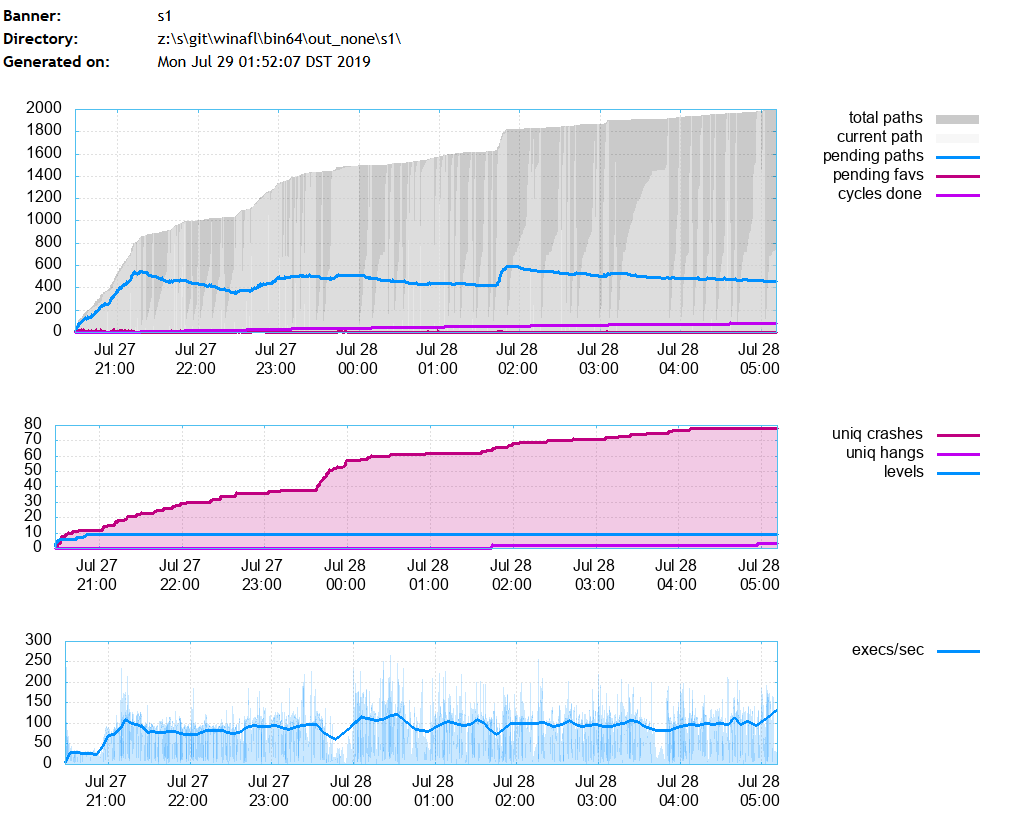
The most interesting metrics here are:
- total paths – the number of unique coverage paths detected by DynamoRIO’s tools
- unique crashes – the number of unique crashes (Uniqueness is determined based on the coverage; one logical bug can be reached via multiple coverage paths.)
- execs/sec – the number of iterations per second
We gathered 1,812 unique test cases from WinAFL and sorted them based on the output of the Linux file tool:
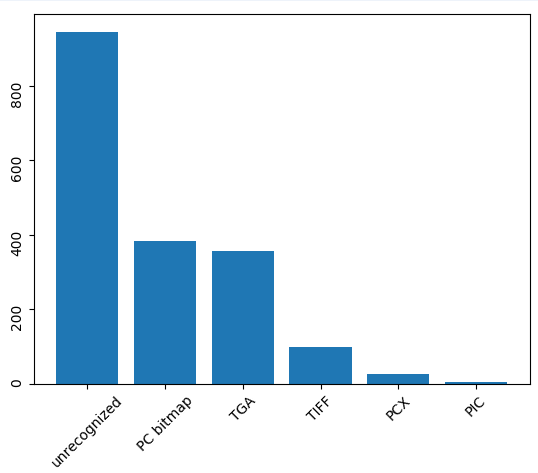
total: 1812
unrecognized: 944
PC bitmap: 383
TGA: 355
TIFF: 99
PCX: 25
PIC: 6Looking at those crashes manually isn’t feasible. You might use tools like !exploitable or BugId to triage them. With !exploitable, we conducted 1,812 test cases and formed them in 84 reports, 27 of which were marked as “EXPLOITABLE.”
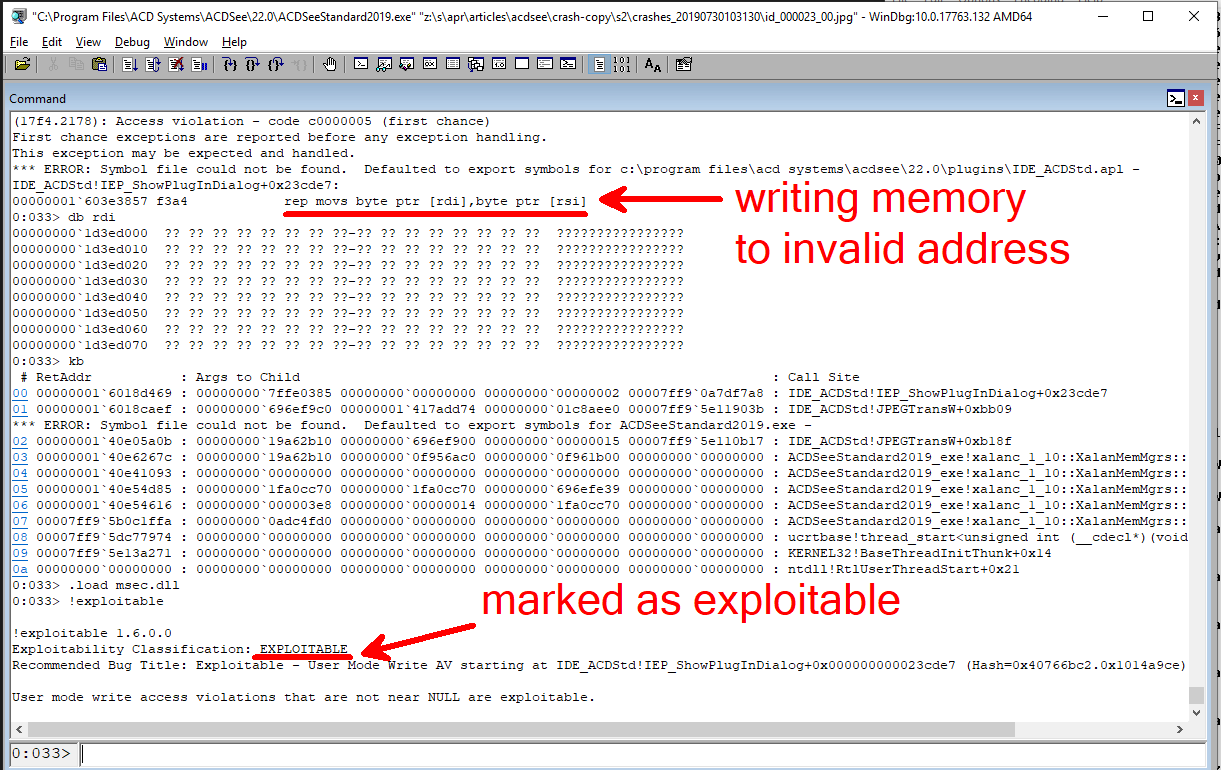
One of the bugs we found was CVE-2019-15293; there is a User Mode Write AV starting at IDE_ACDStd!IEP_ShowPlugInDialog+0x000000000023d060. Exploiting this vulnerability leads to unauthorized disclosure of information, modification of information, and disruption of service. The full code of this bug can be found here.
Related project
Improving a Windows Audio Driver to Obtain a WHQL Release Signature
Explore our client’s success story of enhancing their Windows audio driver and getting Microsoft WHQL certification. Find out how Apriorit assisted in ensuring seamless user experience across both macOS and Windows platforms.

Conclusion
Unfortunately, not all bugs can be discovered with traditional testing methods, so third-party Windows applications still contain bugs that make them easy targets for cybercriminals. However, using fuzzing in security testing of your software will allow you to significantly improve the quality of your solutions. As you can see, fuzzing allowed us to discover 27 vulnerabilities in ACDSee Photo Studio 2019, some of which were assigned a CVE number by the MITRE Corporation.
Apriorit has a team of reverse engineers who can conduct fuzzing for software security testing and apply other reverse engineering techniques. Feel free to contact us using the form below.
Uncover hidden vulnerabilities and prevent attacks!
Gain deep insights into your software and elevate its protection. Entrust your cybersecurity challenges to Apriorit’s reverse engineering and security specialists.
Have a question?
Ask our expert!
Program Manager


