 Skip to main content

The microservices architecture has been successfully applied in numerous projects to provide fast deployment, self-contained services, and system integrity. At Apriorit, we work with various microservices implementations. In this guide, we show you how to speed up the connection of gRPC-based microservices to a GraphQL client using code generation tools.
We used this software architecture approach for one of our projects. Our task in this guide will be to create a simple e-library with two services to show you how to combine gRPC-based microservices with GraphQL:
- A service for creating and deleting books
- A service that works with users and associates a book’s ID with a specific user once they take out the book (a user becomes a handler)
Both services are built on the gRPC protocol and use the same database. However, they don’t directly interact with each other; they’re connected indirectly through the GraphQL layer.
In this article, we explore how to quickly connect gRPC microservices to GraphQL. We also show you how to develop two simple services using proto3 syntax (a protocol buffer for creating proto files). Then we use those proto files to create the GraphQL layer that serves as the client side of our services.
This tutorial will be useful for anyone who’s interested in working with microservices and wants to learn about options for their implementation and how to use code generation tools to speed up development.
Contents:
Project scope and technologies
In this section, we explain what technologies we used for our project and why.
To create a simple e-library, you’ll need the following technology stack:
| Operating system | Linux/macOS (we used Ubuntu 20.04 LTS) |
| Integrated development environment (IDE) | Visual Studio Code |
| Language | Golang |
| Technologies | microservices, gRPC, GraphQL, ArangoDB, Docker |
| Code generators | Prototool 1.8.0 + protoc 3.8.0, gqlgen 0.11.3 |
| Repository | https://github.com/apriorit/Microservices-GRPC-GraphQL |
To start working with our project and explore its results, you first need to make a local copy of the repository. Create a git clone of our repository into your folder and place it in $GOPATH/src/tutorial. For convenient project analysis and testing, you should also install Golang and VsCode with plugins for Golang.
As we stated, we’ll use code generators, so let’s start by explaining why we need them.
Why should you generate code and how can you do it?
Code generation takes the routine work of creating typical code off a developer’s shoulders. With code generation, developers can spend more time on business logic instead of working on low-level API implementation logic .
Let’s consider the following abstract code generation scheme:
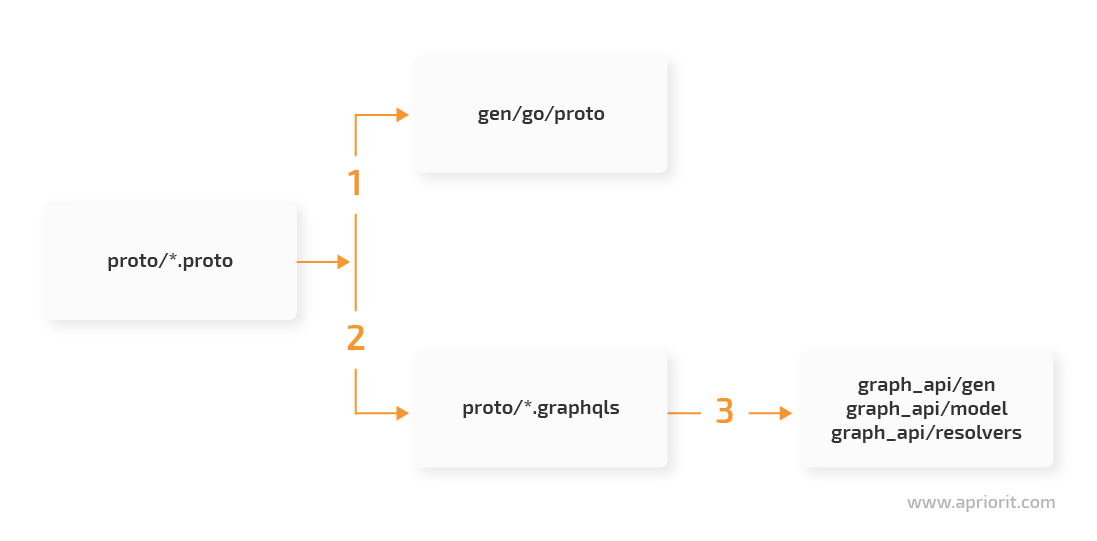
According to our scheme, we generate microservice structures and interfaces from proto files (1). Then we generate schemas for GraphQL from proto files (2). The next step is to generate models for GraphQL and code for a GraphQL service (3).
In this way, we receive a large part of the code that we’ll later complement with the missing logic.
Before you start investigating our repository, allow us to explain our choice of core technologies:
- Microservices
- Protocol buffer
- GraphQL
In this article, we only briefly describe how to work with the technologies mentioned above, since our goal is to form a general understanding of the practical use of these technologies.
What are the benefits of microservices?
A microservice architecture is composed of relatively small and self-contained applications that are parts of a single system. This architecture allows for fast development and deployment since each module is built, tested, and deployed independently, increasing agility.
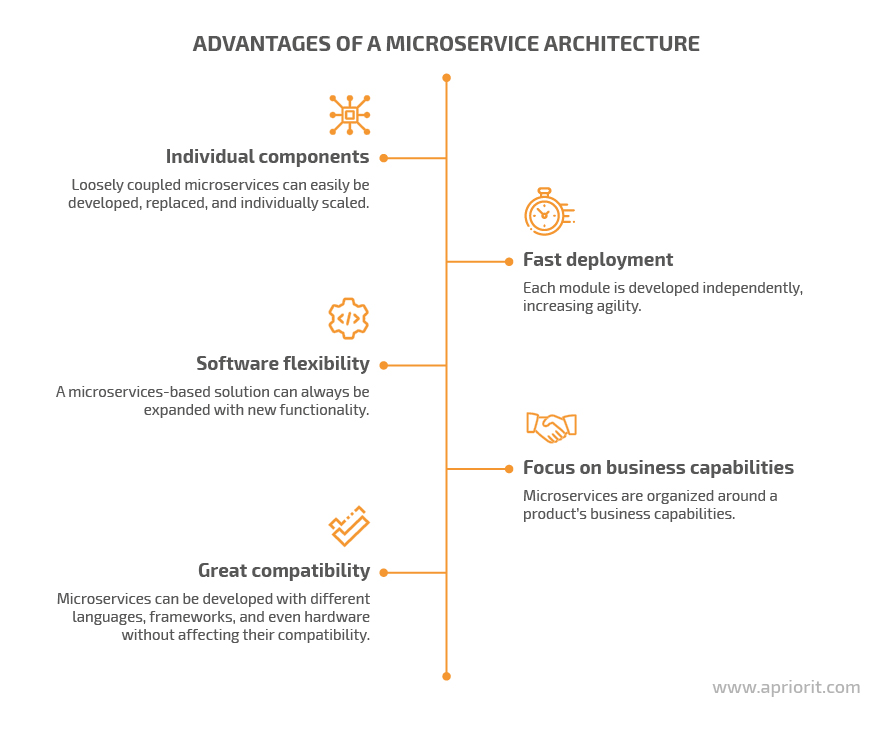
Each microservice solves a specific task and includes an API for interacting with it. Microservices can communicate with each other or can be fully independent.
Protocol buffer
Proto3 (protocol buffer) is a structured data serialization method that initially allows for describing data structures in the form of messages. It also allows for describing a set of operations on this data in the request/response format and for compiling data into an interface. Along with an interface, it produces code for serialization and deserialization.
Proto3 is easier to use than other text data formats like XML because it represents data in a way similar to usual data structures instead of as a set of tags. Also, when using a protocol buffer, data requires less storage space thanks to the encoding algorithm and is processed quite fast because the serialized data is represented in a binary format.
GraphQL
GraphQL is a RESTFul API alternative that allows for separating the description of certain resources from the methods of their receipt. Unlike REST requests, GraphQL requests allow you to receive several resources during one API call and to call only for the resource fields you need. In this way, GraphQL offers flexibility that REST can’t offer, since REST associates each resource with a certain URL (or so-called endpoint) and connects the method of receiving a resource with its representation.
Based on our project, we can explore two examples of REST requests:
- The first requests a holder by an ID from the server.
GET /holders/{id}
{
   "id": "4041",
   "firstName": "Silvia",
   "lastName": "McClintock",
   "email": "<span id="cloak014e8e76c3c7251d0d96f71667ac46ac"><a href="mailto:SilviaAMcClintock@dayrep.com">[email protected]</a></span><script type="text/javascript">
        document.getElementById('cloak014e8e76c3c7251d0d96f71667ac46ac').innerHTML = '';
        var prefix = 'ma' + 'il' + 'to';
        var path = 'hr' + 'ef' + '=';
        var addy014e8e76c3c7251d0d96f71667ac46ac = 'SilviaAMcClintock' + '@';
        addy014e8e76c3c7251d0d96f71667ac46ac = addy014e8e76c3c7251d0d96f71667ac46ac + 'dayrep' + '.' + 'com';
        var addy_text014e8e76c3c7251d0d96f71667ac46ac = 'SilviaAMcClintock' + '@' + 'dayrep' + '.' + 'com';document.getElementById('cloak014e8e76c3c7251d0d96f71667ac46ac').innerHTML += '<a ' + path + '\'' + prefix + ':' + addy014e8e76c3c7251d0d96f71667ac46ac + '\'>'+addy_text014e8e76c3c7251d0d96f71667ac46ac+'<\/a>';
    </script>",
   "phone": "916-335-5759"
}- The second requests to create a holder:
POST /holders
Body:
{
   "firstName": "Silvia",
   "lastName": "McClintock",
   "email": "<span id="cloakafcc47748228e7301631b5c57025f7c2"><a href="mailto:SilviaAMcClintock@dayrep.com">[email protected]</a></span><script type="text/javascript">
        document.getElementById('cloakafcc47748228e7301631b5c57025f7c2').innerHTML = '';
        var prefix = 'ma' + 'il' + 'to';
        var path = 'hr' + 'ef' + '=';
        var addyafcc47748228e7301631b5c57025f7c2 = 'SilviaAMcClintock' + '@';
        addyafcc47748228e7301631b5c57025f7c2 = addyafcc47748228e7301631b5c57025f7c2 + 'dayrep' + '.' + 'com';
        var addy_textafcc47748228e7301631b5c57025f7c2 = 'SilviaAMcClintock' + '@' + 'dayrep' + '.' + 'com';document.getElementById('cloakafcc47748228e7301631b5c57025f7c2').innerHTML += '<a ' + path + '\'' + prefix + ':' + addyafcc47748228e7301631b5c57025f7c2 + '\'>'+addy_textafcc47748228e7301631b5c57025f7c2+'<\/a>';
    </script>",
   "phone": "916-335-5759"
}
In these examples, the developer chooses the format in which the client will receive the resource.
In the case of GraphQL, clients themselves decide which parts of a resource they will receive. This is possible because GraphQL works with schemes that are used to determine available resources through APIs and operations that can be applied to these resources as well as to establish connections between resources.
# Determining a type. Holder is connected to the Book type with heldBooks field

type Holder {
    id: String! # the "!" sign makes the field obligatory
    firstName: String!
    lastName: String!
    phone: String!
    email: String!
    heldBooks: [Book!]!  # square brackets "[]" stand for an array
}

# Read request
type Query {
  holders(id: String): [Holder!]
}

# Change request
type Mutation {
  createHolder(inputData: HolderInput!): Holder
}In GraphQL, resources are read using a query that specifies which parts of a resource are required. Let’s explore how requests look on the client’s side.
A GraphQL query requests a holder by ID from the server:
query {
  holders {
    id
    firstName
    lastName
    email
    phone
    heldBooks {
      id
      title
      author
      isbn
    }
  }
}The query response looks like this:
{
  "data": {
    "holders": [
      {
        "id": "4041",
        "firstName": "Silvia",
        "lastName": "McClintock",
        "email": "<span id="cloak165fef64adbb4877c6b3769440372187"><a href="mailto:[email protected]">[email protected]</a></span><script type="text/javascript">
        document.getElementById('cloak165fef64adbb4877c6b3769440372187').innerHTML = '';
        var prefix = 'ma' + 'il' + 'to';
        var path = 'hr' + 'ef' + '=';
        var addy165fef64adbb4877c6b3769440372187 = 'SilviaAMcClintock' + '@';
        addy165fef64adbb4877c6b3769440372187 = addy165fef64adbb4877c6b3769440372187 + 'dayrep' + '.' + 'com';
        var addy_text165fef64adbb4877c6b3769440372187 = 'SilviaAMcClintock' + '@' + 'dayrep' + '.' + 'com';document.getElementById('cloak165fef64adbb4877c6b3769440372187').innerHTML += '<a ' + path + '\'' + prefix + ':' + addy165fef64adbb4877c6b3769440372187 + '\'>'+addy_text165fef64adbb4877c6b3769440372187+'<\/a>';
    </script>",
        "phone": "916-335-5759",
        "heldBooks": [
          {
            "id": "4130",
            "title": "Building microservices",
            "author": "Sam Newman",
            "isbn": "978-1491950357"
          }
        ]
      }
    ]
  }
}
In GraphQL, we get all the information about related resources with one request. In REST, we would have to use several requests:
- GET /holders/{id} to receive a user along with the book IDs mentioned above
- Execute n requests of GET /books/{id} to receive a description of all books associated with a certain user
Resource changes in GraphQL are performed with mutations and allow us to exclude unnecessary fields from the results:
mutation {
  createHolder(inputData: {firstName: "Silvia", lastName: "McClintock", phone: "916-335-5759", email: "<span id="cloak3a2061ab6e3e7b6ff42d546a07947e10"><a href="mailto:SilviaAMcClintock@dayrep.com">[email protected]</a></span><script type="text/javascript">
        document.getElementById('cloak3a2061ab6e3e7b6ff42d546a07947e10').innerHTML = '';
        var prefix = 'ma' + 'il' + 'to';
        var path = 'hr' + 'ef' + '=';
        var addy3a2061ab6e3e7b6ff42d546a07947e10 = 'SilviaAMcClintock' + '@';
        addy3a2061ab6e3e7b6ff42d546a07947e10 = addy3a2061ab6e3e7b6ff42d546a07947e10 + 'dayrep' + '.' + 'com';
        var addy_text3a2061ab6e3e7b6ff42d546a07947e10 = 'SilviaAMcClintock' + '@' + 'dayrep' + '.' + 'com';document.getElementById('cloak3a2061ab6e3e7b6ff42d546a07947e10').innerHTML += '<a ' + path + '\'' + prefix + ':' + addy3a2061ab6e3e7b6ff42d546a07947e10 + '\'>'+addy_text3a2061ab6e3e7b6ff42d546a07947e10+'<\/a>';
    </script>"}) {
    id
    firstName
    lastName
    email
    phone
  }
}
As a result, we receive only part of the resource description:
{
  "data": {
    "createHolder":
      {
        "id": "4041",
        "firstName": "Silvia",
        "lastName": "McClintock",
        "email": "<span id="cloak23ee008a99011aa184f2ba052118d5e3"><a href="mailto:[email protected]">[email protected]</a></span><script type="text/javascript">
        document.getElementById('cloak23ee008a99011aa184f2ba052118d5e3').innerHTML = '';
        var prefix = 'ma' + 'il' + 'to';
        var path = 'hr' + 'ef' + '=';
        var addy23ee008a99011aa184f2ba052118d5e3 = 'SilviaAMcClintock' + '@';
        addy23ee008a99011aa184f2ba052118d5e3 = addy23ee008a99011aa184f2ba052118d5e3 + 'dayrep' + '.' + 'com';
        var addy_text23ee008a99011aa184f2ba052118d5e3 = 'SilviaAMcClintock' + '@' + 'dayrep' + '.' + 'com';document.getElementById('cloak23ee008a99011aa184f2ba052118d5e3').innerHTML += '<a ' + path + '\'' + prefix + ':' + addy23ee008a99011aa184f2ba052118d5e3 + '\'>'+addy_text23ee008a99011aa184f2ba052118d5e3+'<\/a>';
    </script>",
        "phone": "916-335-5759",
      }
  }
}
With GraphQL, we also have a hard-coded data model. However, there’s flexibility, as clients can choose what to include and what to exclude in the results. Another thing we should mention is that GraphQL isn’t a completely standalone technology, since a GraphQL request looks just like a REST request on the client side.
When we use GraphQL for working with data, the client still needs to send an HTTP request:
POST /graphql?query={ holders { id, email } }On the client side, each time a holder is requested from the server, an HTTP request for a specific address is formed. A GraphQL handler, located on the server, processes the content after “query.”
However, in REST, each resource has a separate endpoint in the form of a linear list. Meanwhile, in GraphQL, it can be enough to use only one endpoint followed by schemas that replace a linear list of resource addresses.
You can use an online playground to create several requests by yourself if you’d like to explore how GraphQL requests work.
Building our services
Now that we’ve introduced the main technologies used in this project, let’s move on to creating our microservices. We do this in five steps:
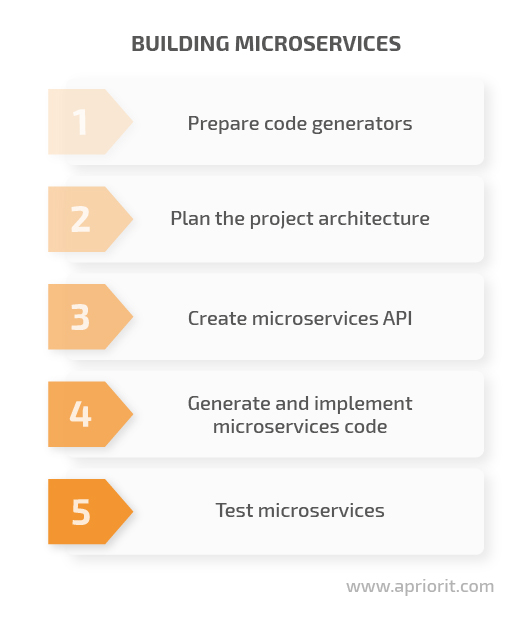
Prepare code generators
The first thing to do is to prepare the basis for generating code from proto files:
1. Install Prototool
There are several ways to install Prototool. We need to install it using a binary file, so let’s download it using the following terminal command (we used Prototool version 1.8.0):
curl -sSL
https://github.com/uber/prototool/releases/download/v1.8.0/prototool-$(uname -s)-$(uname -m)
  -o /usr/local/bin/prototool &&
chmod +x /usr/local/bin/prototoolThis command will place a binary file in /usr/local/bin and will make it executable.
2. Install protoc
Download the protoc tool from the GitHub page. Unpack it and open the root folder. Then execute the following commands in the terminal:
./configureMakemake checksudo make installsudo ldconfig
3. Install the protoc-gen-go and protoc-gen-gql plugins
Now we need to install the protoc-gen-go and protoc-gen-gql plugins to generate Go code:
go install google.golang.org/protobuf/cmd/protoc-gen-go
go install github.com/danielvladco/go-proto-gql/protoc-gen-gqlThese utilities will be installed to $GOPATH/bin if the environment variables (GOPATH, PATH) are correctly configured. GOPATH must be a root folder for the binary files located in $GOPATH/bin and must be the root folder for projects. Also, GOPATH needs to be specified in PATH.
In our case, GOPATH=/home/docker/go/, the utilities protoc-gen-go and protoc-gen-gql are located in /home/docker/go/bin/, and the project is in /home/docker/go/src/.
Read also:
Building Microservices with Golang vs Java vs C#: Performance and Feature-by-Feature Comparison
Plan the project architecture
To keep the architecture of this project simple, we’ll use the same books and users we mentioned previously when describing the differences between GraphQL and REST. Our goal is to create three services: two microservices and a GraphQL gateway service.
Since our services should be independent, we make the gateway service receive all requests associated with books and their holders and make the other two services store information about books and holders in ArangoDB.
This is going to be a simplified version of an e-library. There will be no physical connection between services — only a logical connection, since all the services are part of the same architecture.
The logical connection is represented in the following way: once a holder takes a certain book, the holder and book are associated with the book’s ID. Then we can request the user’s ID by the book’s ID.

Now we can start implementing the project.
The project will have the following structure:
tutorial
├── graph_api - the graphql layer
├── gen - a place for the generated Go code
├── db - code for working with the database
├── proto - a place for proto files
│   └── books
│   └── holders
├── books - API implementation for books
├── holders - API implementation for holders
├── docker-compose.yml - configuration of a service composition
├── Dockerfile.dev - containers configuration
└── prototool.yaml - configuration file for the prototool code generatorNext, let’s create a project in $GOPATH/src/tutorial (in our case, it’s /home/docker/go/src/tutorial). In the project’s root folder, we have to create a configuration file called prototool.yaml. It will show the storage for the generated code and allow us to generate and regenerate Go code with a single Prototool call. This is especially convenient if we need to make frequent changes to certain microservices.
Create a prototool.yaml file in the root project folder with the following command:
prototool config initYou will get a prototool.yaml file with the following content:
protoc:
  version: 3.8.0 // a version can vary
lint:
group: uber2Now let’s add more content to it by specifying the path for Go code generation:
protoc:
  version: 3.8.0
lint:
  group: uber2

generate:
  go_options:
    import_path: tutorial
  plugins:
    - name: go
      type: go
      flags: plugins=grpc
output: gen/goCreate a microservices API
Since we’re going to generate code, the first thing we need to do is create data structures and specify operations that will be performed on these structures while the services are working.
Further code generation will be based on these data structures and this set of operations. A code generation utility is just a tool that reads structures and operations on them and uses those structures and operations to generate server code.
Now we create proto files in the proto folder for our future services, starting with a book message:
syntax = "proto3";

package tutorial.grpc.books.v1;

//  Book definition
message Book {
  string id = 1;
  string author = 2;
  string title = 3;
  string isbn = 4;
}Let’s explain this code:
syntax = "proto3"— Here we specify that we’re using the proto3 protocol. When a code generator reads the file with this code, it will know that everything below should be interpreted as proto3.package tutorial.grpc.books.v1— Here we specify the name of the packet where the generator will place the server code associated with operations on books.message— The content after “message” is the data structure for a book, where each field must be numbered.
Let’s take a look at similar code but for holders:
syntax = "proto3";

package tutorial.grpc.holders.v1;

// Holder definition
message Holder {
  string id = 1;
  string first_name = 2;
  string last_name = 3;
  string phone = 4;
  string email = 5;
  repeated string held_books = 6;
}Now we need to determine operations for books, requests to the server, and responses from the server. To do this, we need to create an interface that starts with “service.” Inside the interface, we describe future requests to the server.
For instance, rpc ListBooks(ListBooksRequest) returns (ListBooksResponse) is a request for reading all books that receives the ListBooksRequest data structure and returns the ListBooksResponse data structure in response.
Let’s explore code for the Books API:
syntax = "proto3";

package tutorial.grpc.books.v1;

import "proto/books/books_messages.proto";

// API for managing books
service BooksAPI {
  // Get all books
  rpc ListBooks(ListBooksRequest) returns (ListBooksResponse);
  // Get book by ID
  rpc GetBook(GetBookRequest) returns (GetBookResponse);
  // Get book by IDs
  rpc GetBooks(GetBooksRequest) returns (GetBooksResponse);
  // Get book by title
  rpc GetBookByISBN(GetBookByISBNRequest) returns (GetBookByISBNResponse);
  // Add new book
  rpc AddBook(AddBookRequest) returns (AddBookResponse);
  // Delete book
  rpc DeleteBook(DeleteBookRequest) returns (DeleteBookResponse);
}

message ListBooksRequest {
}

message ListBooksResponse {
  repeated Book books = 1;
}

message GetBookRequest {
  string id = 1;
}

message GetBookResponse {
  Book book = 1;
}

message GetBooksRequest {
  repeated string ids = 1;
}

message GetBooksResponse {
  repeated Book books = 1;
}

message GetBookByISBNRequest {
  string isbn = 1;
}

message GetBookByISBNResponse {
  Book book = 1;
}

message AddBookRequest {
  Book book = 1;
}

message AddBookResponse {
  Book book = 1;
}

message DeleteBookRequest {
  string id = 1;
}

message DeleteBookResponse {
}Now let’s describe the service’s interface for working with book holders (the Holders API):
syntax = "proto3";

package tutorial.grpc.holders.v1;

import "proto/holders/holders_messages.proto";

// API for managing customers
service HoldersAPI {
  // Get all customers
  rpc ListHolders(ListHoldersRequest) returns (ListHoldersResponse);
  // Get customer by book ID
  rpc GetHolderByBookId(GetHolderByBookIdRequest) returns (GetHolderByBookIdResponse);
  // Get customer by ID
  rpc GetHolder(GetHolderRequest) returns (GetHolderResponse);
  // Add new customer
  rpc AddHolder(AddHolderRequest) returns (AddHolderResponse);
  // Update customer
  rpc UpdateHolder(UpdateHolderRequest) returns (UpdateHolderResponse);
}

message ListHoldersRequest {
}

message ListHoldersResponse {
  repeated Holder holders = 1;
}

message GetHolderByBookIdRequest {
  string id = 1;
}

message GetHolderByBookIdResponse {
  Holder holder = 1;
}

message GetHolderRequest {
  string id = 1;
}

message GetHolderResponse {
  Holder holder = 1;
}

message AddHolderRequest {
  Holder holder = 1;
}

message AddHolderResponse {
  Holder holder = 1;
}

message UpdateHolderRequest {
  Holder holder = 1;
}

message UpdateHolderResponse {
  Holder holder = 1;
}At this stage, our work with the microservices API is done and we can move on to generating and implementing code for our microservices.
Generate and implement microservices code
Now we can generate code from proto files. Let’s execute the following command in the root folder where our prototool.yaml file is located:
prototool generateAccording to the scheme we mentioned at the beginning of this article, Prototool will find all the proto files and use prototool.yaml to place service interfaces in gen/go/proto. Support models will also be there. After that, a shell for the API will be ready and we can start working on implementing the API.
Let’s start with the Books service. The Holders service is organized similarly.
We’ll create everything manually. The project’s root folder already contains the books folder. Let’s open it and create the main.go file, where we’ll implement our server’s launch, and the server folder, where we’ll place the API-server implementation in the server.go file.
The implementation contains the same methods we’ve already described in the proto files. We used an ArangoDB collection for book storage.
Implementing and interacting with ArangoDB is quite easy. For simple operations when an input query has a resource ID (adding, removing, reading), we use built-in methods: CreateDocument, RemoveDocument, ReadDocument.
For more complicated cases, when it’s required to search by a subfield, we use ArangoDB requests of the following types:
- Find a book by ISBN subfield
FOR book IN %s

        FILTER book.isbn == @isbn

RETURN book`- Find a holder by book identifier
FOR holder IN %s

        FOR bookId IN holder.held_books

            FILTER bookId == @bookId

RETURN holder`The code for accessing the database as well as the code for adding collections when launching services is located in the db folder on GitHub.
Testing microservice APIs
It’s also worth mentioning the technology for testing our services’ APIs.
Let’s say we create a server that interacts with a database located inside a container. We’d also like to test that all interactions are performed correctly right at the development stage instead of doing preliminary implementations and waiting for further manual testing.
Meanwhile, the testing process itself should be performed in a realistic environment without any stubs and mocks. In this case, testcontainers come in handy since they allow us to build integration tests based on interactions with a real container.
For these purposes, we use the following testcontainers packets:
"github.com/testcontainers/testcontainers-go"

"github.com/testcontainers/testcontainers-go/wait"These packets allow us to upload the container image we need and launch it before running tests.
Then we can create a test server and interact with a real container without using a fake implementation:
func TestAddBook(t *testing.T) {

    contextWithTimeOut, cancelFn := context.WithTimeout(context.Background(), time.Second*deadlinePerTest)

    defer cancelFn()

    srv := newTestServer(t, contextWithTimeOut) // create a test server

    addResponse, err := srv.AddBook(operationContext, &booksv1.AddBookRequest{Book: testBook}) // API call

    assert.NoError(t, err)

    assert.NotNil(t, addResponse)

    assert.NotEmpty(t, addResponse.Book.Id)

}This allows us to test any API that involves interactions with services inside of Docker containers in the real world. Now we can move to building the GraphQL layer.
Building the GraphQL layer
To create the GraphQL layer, we need to:
- Generate schemas from proto files
- Generate and implement code for the GraphQL service

Generating schemas from proto files
At this point, our services are ready and it’s time to generate schemas for the GraphQL service. We generate schemas based on the same proto files. For this task, we use the protoc utility and point it to the gql_out plugin, which means that the results must be .graphqls files. We also specify the relative paths to our proto files.
Let’s start with generating Graphql schemas:
protoc --gql_out=paths=source_relative:. -I=. -I=./proto/books ./proto/books/*.proto
protoc --gql_out=paths=source_relative:. -I=. -I=./proto/customers ./proto/customers/*.protoAs a result, we receive ready schemas for Books and Holders in the folder with proto files (proto/books and proto/holders):
Books.pb.graphqls:
type Book {
    id: String
    author: String
    title: String
    isbn: String
}

input BookInput {
    id: String
    author: String
    title: String
    isbn: String
}

type Mutation {
    booksAPIListBooks: ListBooksResponse
    booksAPIGetBook(in: GetBookRequestInput): GetBookResponse
    booksAPIGetBookByISBN(in: GetBookByISBNRequestInput): GetBookByISBNResponse
    booksAPIAddBook(in: AddBookRequestInput): AddBookResponse
    booksAPIDeleteBook(in: DeleteBookRequestInput): Boolean
}Holders.pb.graphqls:
type Holder {
    id: String
    firstName: String
    lastName: String
    phone: String
    email: String
    heldBooks: [String!]
}

input HolderInput {
    id: String
    firstName: String
    lastName: String
    phone: String
    email: String
    heldBooks: [String!]
}

type Mutation {
    holdersAPIListHolders: ListHoldersResponse
    holdersAPIGetHolderByBookId(in: GetHolderByBookIdRequestInput): GetHolderByBookIdResponse
    holdersAPIGetHolder(in: GetHolderRequestInput): GetHolderResponse
    holdersAPIAddHolder(in: AddHolderRequestInput): AddHolderResponse
    holdersAPIUpdateHolder(in: UpdateHolderRequestInput): UpdateHolderResponse
}These definitions (Holder, HolderInput, Book, and BookInput) are very similar to those described in the proto files.
Note: We automatically generate GraphQL schemas only to save time. We don’t use the received definitions (data structures and automatically generated GraphQL requests) the way they were formed by the generator. We still need to make the GraphQL definitions the most convenient for the user interface.
Now we create the schemas folder in the graph_api folder. Inside this schemas folder, we need to create four schemas: two schemas with book and holder descriptions and two with query and mutations operations.
book.graphql:
type Book {
    id: String!
    author: String!
    title: String!
    isbn: String!
}

input BookInput {
    id: String
    author: String
    title: String
    isbn: String
}holder.graphql:
type Holder {
    id: String!
    firstName: String!
    lastName: String!
    phone: String!
    email: String!
    heldBooks: [Book!]!
}

input HolderInput {  # Input is used in operations of a "mutation" type
    id: String
    firstName: String
    lastName: String
    phone: String
    email: String
}query.graphql:
type Query {
  # Requests for reading books and holders
  books(id: String, isbn: String, holderId: String): [Book!]
  holders(id: String, bookId: String): [Holder!]
}Mutations.graphql:
type Mutation {
  # Books
  createBook(inputData: BookInput!): Book  # create a new book
  deleteBook(id: String!): Boolean! # delete an existing book
  takeBookInUse(holderId: String!, bookId: String!): Boolean! # assign a book to a user
  returnBook(holderId: String!, bookId: String!): Boolean! # unassign a book from a user
  # Holders
  createHolder(inputData: HolderInput!): Holder # create a new holder
}The schemes are slightly different from those generated from the proto files since we modified them to make the UI more convenient:
- We made some fields mandatory using the “!” mark. This means that if users don’t specify these fields in requests, default values will be generated for them.
- The Holder scheme contains an array of books instead of book IDs. This way, we bind two models into one graph.
- We simplified the operations generated from the proto files and added new ones. Requests for reading books and users are marked as Query. We also combined searching for books by ID and International Standard Book Number (ISBN) into one request. ID and ISBN aren’t mandatory fields. Therefore, in case they aren’t specified in a request, all available books will be returned.
By doing this, we combined three separate operations into a single operation. In the case of searching by holders, we used the same logic.
The operations available for a client are creating and deleting a book, taking and returning a book by holder, and creating a user.
Generating and implementing code for the GraphQL service
To generate and implement the code for our GraphQL service, we first need to download the gqlgen packet from GitHub. We use it for generating code for GraphQL service schemas.
Let’s execute the downloaded packet in the terminal:
go get github.com/99designs/gqlgenJust like for generating code from proto files, we need a configuration file that will control the location of generated code and structure this code for our service. To do that, we create a gqlgen.yml file in the root of the gateway_api folder. By default, it’s enough to use the Gqlgen.yml configurator with the following content:
# Place where are all schema files are located
schema:
  - ./schemas/*.graphql


# Location for auto generated server code
exec:
  filename: gen/generated.go
  package: gen

# Location for auto generated models
model:
  filename: model/models_gen.go
  package: model

# Location for implementing resolvers
resolver:
  layout: follow-schema
  dir: resolvers
  package: resolvers

autobind:
  - "tutorial/graph_api/model"

# This section declares type mapping between the GraphQL and go type systems
models:
  ID:
    model:
      - github.com/99designs/gqlgen/graphql.ID
      - github.com/99designs/gqlgen/graphql.Int
      - github.com/99designs/gqlgen/graphql.Int64
      - github.com/99designs/gqlgen/graphql.Int32
  Int:
    model:
      - github.com/99designs/gqlgen/graphql.Int
      - github.com/99designs/gqlgen/graphql.Int64
- github.com/99designs/gqlgen/graphql.Int32Then we go to the folder with schemas and start generating the code:
cd schemas
gqlgen generateIf our schemas are syntactically correct, once this command is executed, we’ll receive the following structure in the graph_api folder:
├── graph_api - root folder of our service
│   ├── gen                    - code generated for our server
│   │   └── generated.go
│   ├── model                      - models generated from the schemas
│   │   └── models_gen.go
│   ├── resolvers                  - resolvers for our operations
│   │   ├── holder_resolver.go     - additional method resolver for searching books by IDs upon user request
│   │   ├── mutations_resolver.go  - a set of operations for changes
│   │   ├── query_resolver.go      - a set of operations for reading
│   │   └── resolver.go            - a structure of the resolver that creates a connection between API gRPC services and GraphQL
│   ├── schemas                    - schemas that we placed here manually
│   │   ├── book.graphql
│   │   ├── holder.graphql
│   │   ├── mutations.graphql
│   │   ├── query.graphql
└── gqlgen.yaml - configuratorLet’s explain what’s happening in the code above. When executing gqlgen generate, the code generator analyzes the schemas we prepared and generates code in the following catalogs:
gen— Supporting code of the GraphQL gateway that validates parameters transferred to the API against the schema. This layer generates errors if something goes wrong and eliminates the need for a developer to check code that contains business logic.model— Contains data models that correspond with the schema definitions. In our case, this catalog stores Go structures related to the BookInput, HolderInput, Book, and Holder definitions.resolvers— Contains frames for our method resolvers and the structure of a root resolver. The structure of the root resolver can be expanded in any way to contain all necessary resources for resolving requests. Later, we’ll add clients for our microservices to this catalog so our resolver can interact with them.
The code generator automatically makes frames for our method resolvers in the following way:
func (r *queryResolver) Holders(ctx context.Context, id *string, bookID *string) ([]*model.Holder, error) {
    panic(fmt.Errorf("not implemented"))
}All we need to do is add the implementation that retrieves the required object depending on the specified parameters. Here’s an example of how to implement such a method resolver:
func (r *queryResolver) Holders(ctx context.Context, id *string, bookID *string) ([]*model.Holder, error) {
    holders := []*model.Holder{}

    if id != nil {
        log.Printf("Holder id: %s", *id)
        getHolderResponse, err := r.apiHolder.Holders().GetHolder(ctx, &holdersv1.GetHolderRequest{Id: *id})
        if err != nil {
            return nil, err
        }
        holders = append(holders, service2GraphHolder(getHolderResponse.Holder))
    } else if bookID != nil {
        log.Printf("Book id: %s", *bookID)
        getHolderByBookIdResponse, err := r.apiHolder.Holders().GetHolderByBookId(ctx, &holdersv1.GetHolderByBookIdRequest{Id: *bookID})
        if err != nil {
            return nil, err
        }
        holders = append(holders, service2GraphHolder(getHolderByBookIdResponse.Holder))
    } else {
        log.Printf("All books will be retrieved")
        listHoldersResponse, err := r.apiHolder.Holders().ListHolders(ctx, &holdersv1.ListHoldersRequest{})
        if err != nil {
            return nil, err
        }
        for _, holder := range listHoldersResponse.Holders {
            holders = append(holders, service2GraphHolder(holder))
        }
    }

    return holders, nil
}You can explore the implementation of other methods in the resolvers folder of our project on GitHub.
Modifying the Holder model
When we were comparing REST with GraphQL, we mentioned that GraphQL schemas and models used in the implementation may not be 100% identical. A model can contain only a link to the information about an object, while a schema can contain the object itself. Providing such an object by a link is the work of a resolver. Once we generate the GraphQL layer for the first time, a code generator prepares models, including the Holder model, and places them in the model folder.
Here is the Holder model:
type Holder struct {
    ID    	string   `json:"id"`
    FirstName string   `json:"firstName"`
    LastName  string   `json:"lastName"`
    Phone 	string   `json:"phone"`
    Email 	string   `json:"email"`
    HeldBooks []Books  `json:"heldBooks"` # a book array
}As you can see, we declare a schema with a holder that has a list of books but not book IDs — and the code generator creates exactly this model.
The issue here is that the holder’s model at the service level doesn’t contain books — only their IDs. This means that the model in the GraphQL layer doesn’t match the actual holder’s model stored in the database at the service layer. We can leave the model in the GraphQL layer as is, but in this case, we have to fill out the heldBooks list each time a holder is requested using the API.
This isn’t convenient for us, as we want to take books from the Books service only when they’re requested through the API. To arrange this, let’s do the following:
- Create a holder.go file in the model folder and copy the Holder structure to this folder.
- Change the HeldBooks fields from the books array to the IDs (lines) array.
- Go to the schemas folder and generate the GraphQL layer one more time.
As a result, GraphQL automatically adds the holder.resolver.go file to the resolvers folder. The code generator detects that the model folder already contains the Holder structure and doesn’t generate it. Meanwhile, the Holder structure is different from the schemas, so the generator offers to implement an additional method resolver to reconcile the differences.
The additional resolver looks like this:
func (r *holderResolver) HeldBooks(ctx context.Context, obj *model.Holder) ([]*model.Book, error) {
    panic(fmt.Errorf("not implemented"))
}This method will be executed each time we request Holders and specify the heldBooks field, thus requesting books linked to a certain user. This method won’t be used if a request doesn’t contain the heldBooks field, which means that access to the Books service will be performed only on demand. You can explore the additional method resolver implementation on the Apriorit GitHub page.
Finally, we can connect GraphQL to gRPC.
Connecting GraphQL to gRPC
Let’s show how these services are connected using the following scheme:
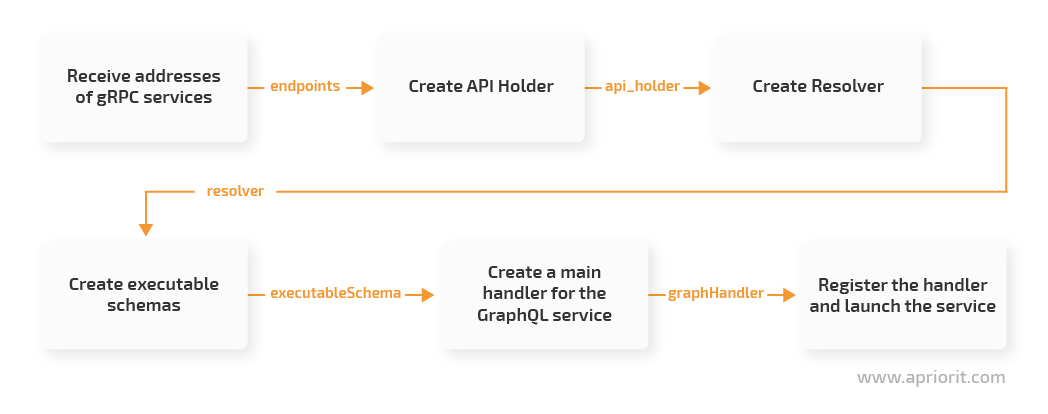
All these steps will be executed in the initialization code of the GraphQL service.
Creating a gRPC API Holder
We need to access the Books and Holders services each time a new GraphQL request is received. Inside the graph_api catalog, we create a services catalog with a services.go file inside it. This will be an RAII shell for our services’ clients: a constructor initializes gRPC clients and the Close method closes the connection to the services. You can explore the ServicesKeeper (which is a structure that stores clients for services) implementation on the Apriorit GitHub page.
Creating a GraphQL resolver
While generating GraphQL code from the schemas, we generated a structure of the root resolver located in graph_api/resolvers/resolver.go. The file’s heading says “add any dependencies you require here” — and this is what we’ll do. Let’s add a field with the interface of an RAII shell for services to the resolver and add ServicesKeeper as a constructor parameter:
package resolvers

import (
    services "tutorial/graph_api/services"
)

type Resolver struct {
    services services.Services
}

func NewResolver(s services.Services) *Resolver {
    return &Resolver{services: s}
}Now the services are available through the Services interface using any method resolver.
Adding initialization code for the GraphQL service
You can explore the initialization code on our GitHub page, but let’s first comment on some key aspects of this code:
1. We read the addresses of our services from the environment variables (set during the Docker composition launch, which we’ll talk about later.)
2. We create an entity with software clients for our Books and Holders microservices.
3. Since we’re going to register two handlers, we create a router that matches addresses with relevant handlers
router := mux.NewRouter()4. We create a so-called playground for GraphQL to be able to form requests to a service using a convenient graphical interface. Then we bind it with the server’s root address and specify that all requests should go to the /tutorial endpoint. Here’s how to register a playground:
router.Handle("/", playground.Handler("GraphQL playground", "/tutorial"))5. We create a resolver based on the API holder and the executable schemas based on their resolver:
gen.NewExecutableSchema(gen.Config{Resolvers: resolvers.NewResolver(apiHolder)})Note: The NewExecutableSchema constructor is created during code generation from the graphQL schemas.
6. We register the main handler of the service, GraphQLHandler:
router.Handle("/tutorial", graphAPIHandler)7. We implement the service’s launch code and graceful shutdown when pressing Ctrl+C.
Gathering services into a Docker composition
At this stage, we already have the following components:
- ArangoDB database
- Books and Holders microservices
- GraphQL gateway
These components have to be initialized in the order specified above and have to be able to communicate with each other through the network interface. For these purposes, we use Docker and Docker Compose to place each component in its isolated container. Each container is built on an image. To organize a simultaneous services launch, we build a Dockerfile that describes our containers and the composition from these containers:
FROM golang:1.14-stretch # Downloading an image for graphql, books, holders services
WORKDIR /tutorial
# Copying all dependencies to the container
COPY ./go.mod .
COPY ./go.sum .
RUN go mod download
# Exposing ports that will be available from the container
EXPOSE 80
EXPOSE 60001
# Installing a work directory inside the container
WORKDIR /tutorial
Our Docker composition looks like this:
version: "3.7"

# Common context for all services
x-common-dev: &common-tutorial  // Go codebase
  build:
    context: .
    dockerfile: Dockerfile.dev // a container’s description and a set of operations, that will be executed once composition is complete
  volumes:
    - ./:/tutorial

services:
  arangodb:
    image: arangodb:latest
    environment:
      ARANGO_ROOT_PASSWORD: rootpassword
    ports:
      - 8530:8529
    volumes:
      - db_container:/var/lib/arangodb3

books:
    <<: *common-tutorial
    command: go run ./books
    environment:
      ARANGODB_DB: tutorial_books
      APP_PORT: 60001
    ports:
      - 60001:60001
    links:
      - arangodb

  holders:
    <<: *common-tutorial
    command: go run ./holders
    environment:
      ARANGODB_DB: tutorial_holders
      APP_PORT: 60001
    ports:
      - 60005:60001
    links:
      - arangodb

  graphql:
    <<: *common-tutorial
    command: go run ./graph_api
    environment:
      BOOKS_SERVICE: books:60001
      HOLDERS_SERVICE: holders:60001
      GRAPH_API_PORT: 80
    ports:
      - 80:80
    links:
      - books
      - holders

volumes:
db_container:We’ve prepared a general codebase for our services in Go (x-common-dev). The containers for our services are developed based on the container available in the repository of container images on Docker Hub.
Now we sequentially declare all participants in the composition. The first thing we need to specify after the services label is our ArangoDB database. Then we need to mention our three services: Books, Holders, and GraphQL. All of them have similar configurations.
Let’s explore the configuration of the GraphQL service:
graphql: # service name
  <<: 	*common-tutorial  # a container will be built based on the known golang:1.14-stretch image available in the open repository of Docker images
  command: go run ./graph_api # path to the service’s launch code (our main.go file is here)
  environment: # specify the necessary environment variables
    BOOKS_SERVICE: books:60001   # access address to the Books service from a container
    HOLDERS_SERVICE: holders:60001 # access address to the Holders service from a container
    GRAPH_API_PORT: 80  # port for our GraphQL service
  ports:
    - 80:80   # pair "front end and back end ports"
  links:  # gateway refers to two microservices so that it can access these microservices using their names
    - books
- holdersLaunching all services together
Once the composition is built, we need to compile and launch it:
docker-compose build
docker-compose upIf everything goes well, we’ll receive compilation logs similar to these. The compilation logs represent steps for building a container for each service:
arangodb uses an image, skipping #  Dockerfile isn’t used for the database
Building books
Step 1/8 : FROM golang:1.14-stretch
 ---> a58e31ece45e
Step 2/8 : WORKDIR /tutorial
 ---> Using cache
 ---> 0698687f85d7
Step 3/8 : COPY ./go.mod .
 ---> Using cache
 ---> b8fb1dc1910e
Step 4/8 : COPY ./go.sum .
 ---> Using cache
 ---> db7cec4171fe
Step 5/8 : RUN go mod download
 ---> Using cache
 ---> 776d62849ea0
Step 6/8 : EXPOSE 80
 ---> Using cache
 ---> 1a207dcd6029
Step 7/8 : EXPOSE 60001
 ---> Using cache
 ---> 93048d13f978
Step 8/8 : WORKDIR /tutorial
 ---> Using cache
 ---> 91c2f41e60e2

Successfully built 91c2f41e60e2
Successfully tagged tutorial_books:latest
Building holders
Step 1/8 : FROM golang:1.14-stretch
 ---> a58e31ece45e
Step 2/8 : WORKDIR /tutorial
 ---> Using cache
 ---> 0698687f85d7
Step 3/8 : COPY ./go.mod .
 ---> Using cache
 ---> b8fb1dc1910e
Step 4/8 : COPY ./go.sum .
 ---> Using cache
 ---> db7cec4171fe
Step 5/8 : RUN go mod download
 ---> Using cache
 ---> 776d62849ea0
Step 6/8 : EXPOSE 80
 ---> Using cache
 ---> 1a207dcd6029
Step 7/8 : EXPOSE 60001
 ---> Using cache
 ---> 93048d13f978
Step 8/8 : WORKDIR /tutorial
 ---> Using cache
 ---> 91c2f41e60e2

Successfully built 91c2f41e60e2
Successfully tagged tutorial_holders:latest
Building graphql
Step 1/8 : FROM golang:1.14-stretch
 ---> a58e31ece45e
Step 2/8 : WORKDIR /tutorial
 ---> Using cache
 ---> 0698687f85d7
Step 3/8 : COPY ./go.mod .
 ---> Using cache
 ---> b8fb1dc1910e
Step 4/8 : COPY ./go.sum .
 ---> Using cache
 ---> db7cec4171fe
Step 5/8 : RUN go mod download
 ---> Using cache
 ---> 776d62849ea0
Step 6/8 : EXPOSE 80
 ---> Using cache
 ---> 1a207dcd6029
Step 7/8 : EXPOSE 60001
 ---> Using cache
 ---> 93048d13f978
Step 8/8 : WORKDIR /tutorial
 ---> Using cache
 ---> 91c2f41e60e2

Successfully built 91c2f41e60e2
Successfully tagged tutorial_graphql:latestNow let’s launch a Docker composition:
Creating network "tutorial_default" with the default driver
Creating tutorial_arangodb_1 ... done
Creating tutorial_books_1	... done
Creating tutorial_holders_1  ... done
Creating tutorial_graphql_1 ... doneNow we can execute docker ps in the terminal and receive the following output:

On the left, you can see unique hashes of our containers that can be used for viewing the information about them. All we need to do at this stage is understand how GraphQL has been launched and connected to the other two services. For this, let’s execute docker logs <hash>:
docker logs be52a1b19419

2020/06/18 10:29:31 Connection to Books Service: books:60001...
2020/06/18 10:29:31 Connection to Holders Service: holders:60001...
2020/06/18 10:29:31 Please connect to the http://localhost:80/ for GraphQL playgroundThe results show that the service has connected to the Books and Holders services and even invited us to play.
Let’s copy the http://localhost:80/ address to our browser address bar. Here’s what we see:
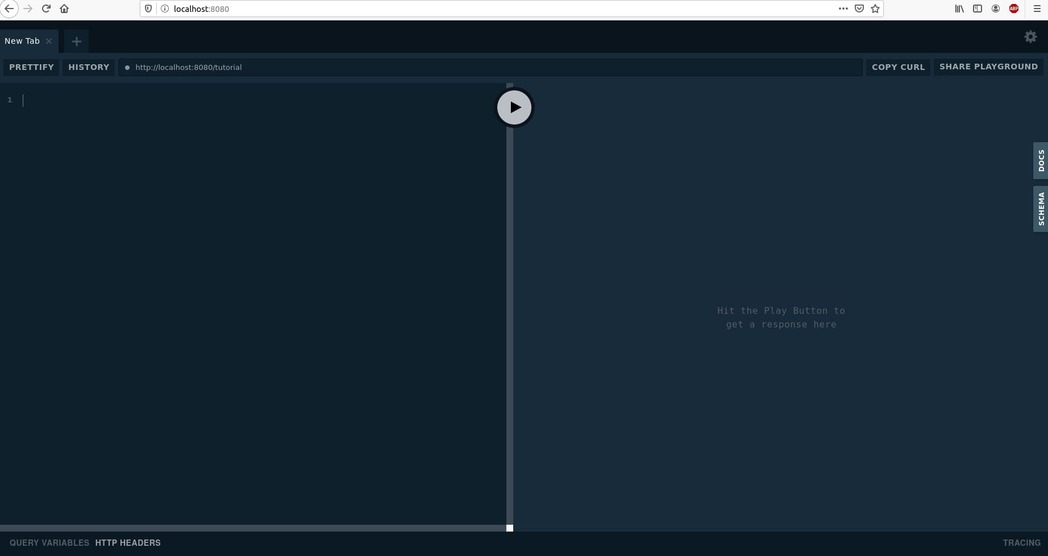
We can access the GraphQL service at the root address and see a graphical interface that allows us to interact with the service by sending GraphQL requests. At the top, we see an address for sending requests and connecting the schemes.
Let’s send two requests — one for creating a holder and one for creating a book — and explore the responses.
First, we create the holder request:
mutation{
  createHolder(inputData: {firstName: "John", lastName: "Smith", phone: "798-345-675", email: "<span id="cloakfa79bde109a6ce4662fe6d3a8e3cd81e"><a href="mailto:john@io.com">[email protected]</a></span><script type="text/javascript">
        document.getElementById('cloakfa79bde109a6ce4662fe6d3a8e3cd81e').innerHTML = '';
        var prefix = 'ma' + 'il' + 'to';
        var path = 'hr' + 'ef' + '=';
        var addyfa79bde109a6ce4662fe6d3a8e3cd81e = 'john' + '@';
        addyfa79bde109a6ce4662fe6d3a8e3cd81e = addyfa79bde109a6ce4662fe6d3a8e3cd81e + 'io' + '.' + 'com';
        var addy_textfa79bde109a6ce4662fe6d3a8e3cd81e = 'john' + '@' + 'io' + '.' + 'com';document.getElementById('cloakfa79bde109a6ce4662fe6d3a8e3cd81e').innerHTML += '<a ' + path + '\'' + prefix + ':' + addyfa79bde109a6ce4662fe6d3a8e3cd81e + '\'>'+addy_textfa79bde109a6ce4662fe6d3a8e3cd81e+'<\/a>';
    </script>"}) {
    id
    firstName
    lastName
    email
    phone
  }
}
The received response is:
{
  "data": {
    "createHolder": {
      "id": "4041",
      "firstName": "John",
      "lastName": "Smith",
      "email": "<span id="cloak08dbc452f91fcf3c0a3856a8a1f68643"><a href="mailto:[email protected]">[email protected]</a></span><script type="text/javascript">
        document.getElementById('cloak08dbc452f91fcf3c0a3856a8a1f68643').innerHTML = '';
        var prefix = 'ma' + 'il' + 'to';
        var path = 'hr' + 'ef' + '=';
        var addy08dbc452f91fcf3c0a3856a8a1f68643 = 'john' + '@';
        addy08dbc452f91fcf3c0a3856a8a1f68643 = addy08dbc452f91fcf3c0a3856a8a1f68643 + 'io' + '.' + 'com';
        var addy_text08dbc452f91fcf3c0a3856a8a1f68643 = 'john' + '@' + 'io' + '.' + 'com';document.getElementById('cloak08dbc452f91fcf3c0a3856a8a1f68643').innerHTML += '<a ' + path + '\'' + prefix + ':' + addy08dbc452f91fcf3c0a3856a8a1f68643 + '\'>'+addy_text08dbc452f91fcf3c0a3856a8a1f68643+'<\/a>';
    </script>",
      "phone": "798-345-675"
    }
  }
}
Now, let’s try a request to create a book:
mutation {
  createBook(inputData: {author: "Sam Newman", title: "Building microservices", isbn: "978-1491950357"}) {
    id
    author
    title
    isbn
  }
}This is the response to our second request:
{
  "data": {
    "createBook": {
        "id": "4130",
        "author": "Sam Newman",
        "title": "Building microservices",
        "isbn": "978-1491950357"
      },
  }
}Now we assign the book to the holder:
Request:
mutation {
  takeBookInUse(holderId: "4041", bookId: "4130")
}

Response:
{
  "data": {
    "takeBookInUse": true
  }
}After this, we can return to our GraphQL description at the beginning of the article and send a request to receive a user. The results should be exactly as we described them before. Users associated with books and information about all users and taken books can be requested in one call with no need to execute multiple calls for each entity.
Conclusion
Before connecting gRPC microservices to GraphQL, it’s essential to understand all the components involved. This is why we reviewed technologies for a microservices architecture and one way to build microservices with code generators. We also mentioned a method for testing APIs and using testing containers.
Thanks to code generators, we wrote more than 50% of the code for our project automatically, which allowed us to save time and focus on the logic of service interactions. You can explore the full code of our test project on the Apriorit GitHub page.
At Apriorit, we have dedicated teams of experienced cloud and virtualization developers who are ready to help you build a robust product from scratch or improve an existing product. We use various techniques and approaches, including building microservices with Node.js. Contact us to start discussing your project right now!
Have a question?
Ask our expert!
VP of Innovation and Technology, Canada Branch Director


