 Skip to main content

Building complex applications with unique features and complex UIs requires lots of effort and native app developers. However, you can create simple apps and mockups quickly and easily thanks to advanced frameworks for cross-platform mobile development.
Modern tools like Ionic and React Native for JavaScript and Xamarin for .NET allow developers to share code between platforms, saving time and reducing expenses.
In this article, we focus on the Ionic framework. We describe how to use it for creating an app and share our experience working with it. This information will be helpful for developers who want to build cross-platform solutions for web and mobile platforms and are looking for a suitable framework.
Contents:
Ionic overview
Ionic is a framework for developing hybrid applications that supports mobile and web platforms. Thanks to adaptive styling, Ionic apps look the same across all platforms, but specific elements like menus can be adapted to each individual platform.
In a nutshell, developers work with the Ionic framework in the following way:
- Write code in JavaScript and pages in HTML and CSS once.
- Launch the application on Android and iOS and in any browser.
Since Ionic is based on the popular Apache Cordova framework, Ionic applications are hybrid HTML apps. On mobile devices, they run in a special environment (UIWebView for iOS and WebView for Android) that displays HTML and executes JavaScript code. Thus, the application launches like it would in a browser.
Ionic emulates native UI guidelines and uses native SDKs, combining powerful device functionality and a rich set of technologies.
Ionic is built on three main principles:
- Cross-platform — Write code once and launch the same application on different platforms.
- Comply with web standards — Use basic web technologies like HTML and CSS for markup.
- JavaScript — Use JavaScript to eliminate strict requirements for placing components, allowing the main components to work independently on a web page with only the script tag.
The last principle implies that developers have free rein to use any frontend frameworks like Angular, React, and Vue with JavaScript. This allows them to structure code according to the framework’s architecture and use previously implemented features from Angular, React, or Vue like routing, dynamic data binding, and working with HTTP.
In this way, Ionic gives developers the opportunity to create cross-platform apps integrated with Angular, React, or Vue out of the box.
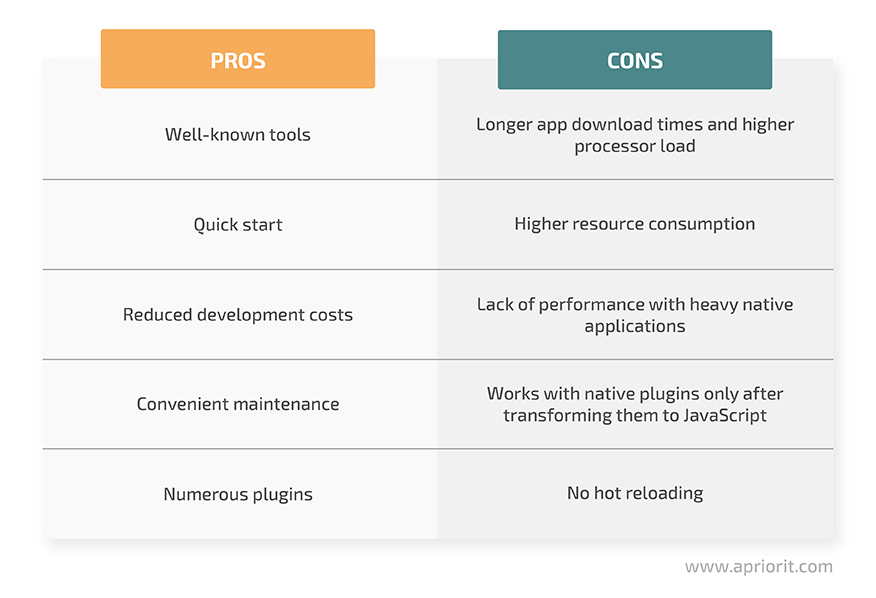
To sum up, the key benefits of the Ionic framework are:
- Well-known tools — Ionic supports popular Angular and React frameworks.
- Quick start — Ionic has lots of templates that help developers quickly build mockups and provides a UI components library.
- Reduced development costs — The framework speeds up development at the early stages and allows for building simple apps and mockups without hiring native developers.
- Convenient maintenance — Ionic offers built-in browser instruments and debugging tools.
- Numerous plugins — You can use various plugins from Ionic, Cordova, and Capacitor to easily add native device functionality to any Ionic app.
However, this framework also has a few drawbacks:
- Using a built-in browser leads to longer app loading times compared to native apps and higher processor loads to simulate platform components in the browser environment.
- Since an Ionic app runs in a browser environment, complex graphical effects like animations can consume more resources than they would in native apps.
- When working with heavy applications, Ionic can show poor performance.
- Ionic can’t implement native plugins without transforming them to JavaScript. You may need to create custom plugins for native apps if you want to enable a specific feature or access a non-standard piece of hardware.
- Ionic doesn’t provide hot reloading and uses live reloading instead.
Benefits and drawbacks of the Ionic platform
Ionic supports several popular frontend frameworks. In this article, we highlight key capabilities that Ionic offers in combination with Angular.
Looking to build a seamless cross-platform mobile web application?
Leverage our expertise in mobile development to create high-performance, scalable apps that work flawlessly across a fleet of devices.
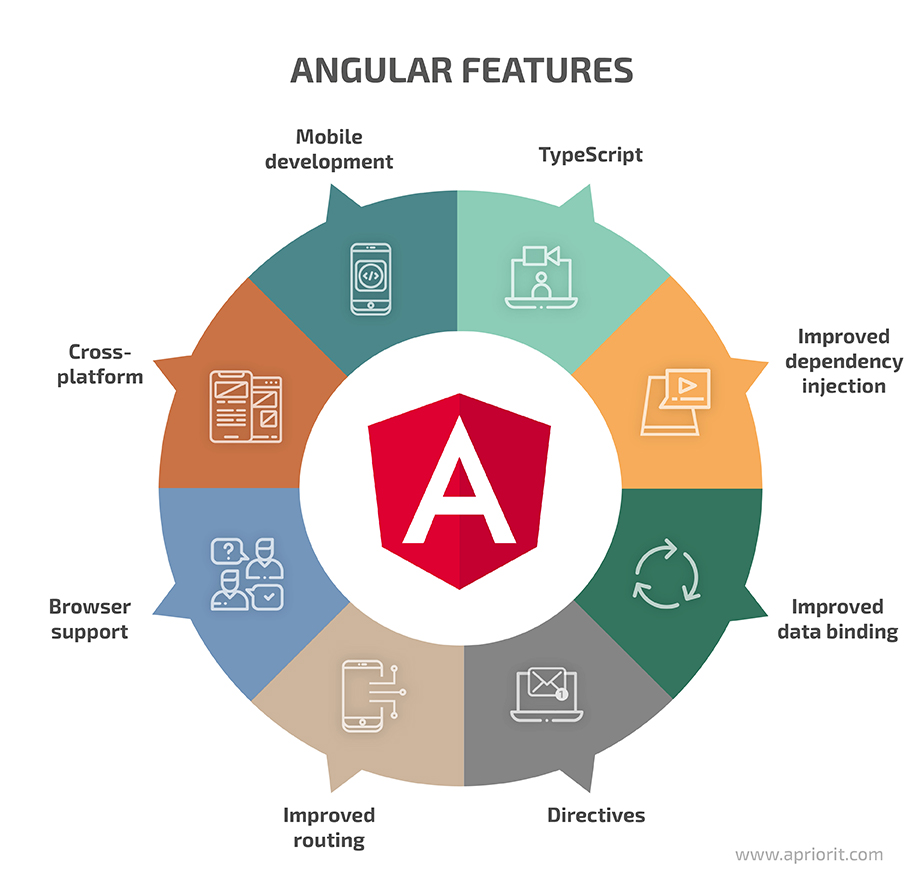
Using Ionic with Angular
Angular is a powerful framework for developing single-page applications (SPAs) in TypeScript. It uses a component approach to page development, a strict architecture, powerful data binding, and routing.
Ionic allows you to leverage the full capabilities of Angular’s key features: components, services, and directives.
Now let’s move to the actual development and explore the process of creating an application with Ionic and Angular step by step. In the next section, we’ll demonstrate a common structure for an Ionic app and outline how it differs from the structure of a regular Angular app.
Creating an application with Ionic and Angular
Ionic has its own command-line interface (CLI) similar to the Angular CLI. If you don’t have it on your computer yet, you can install the CLI using the Node Package Manager (NPM):
npm install -g @ionic/cliThen you can start developing an Ionic app. To do that, use the start command:
ionic start myAppName blankThere’s no need in specifying the addition of Angular to the project, since the latest Ionic versions include Angular by default.
Pay attention to the last parameter of the command. In this example, we use the blank template type to create an app with a plain page. This is the template developers usually use to build real-life applications from scratch.
However, Ionic offers other template types that you can use to build cross-platform web applications with basic components. Most of these templates, though, are most suitable for getting familiar with the framework or for some simple mockups that must be created fast.
Ionic also offers various components for deploying apps and customizing them for the Android and iOS platforms.
The newly created app will have the following structure:
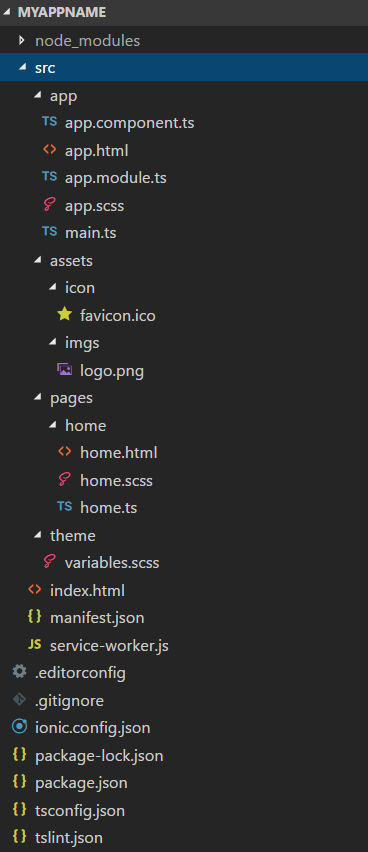
Application structure
As you can see, this is the structure of an ordinary Angular application. However, there are some differences like the page folder. While Angular applications are built from a basic component that includes child elements, Ionic’s basic unit is a page that provides a screenshot of the app.
From Angular’s point of view, pages and components are the same, but in Ionic, they have different roles. In Ionic, a page is a component that acts like an entire view and may have nested components.
A page has several advantages over a component in Ionic:
- Routing — You can specify a URL address right on the page without the need to configure a path for each component in a separate file as in Angular.
- Lazy loading — Significantly boost application performance by making a module (which includes a page) load right before a user interacts with it.
Read also
Pentesting Android Applications: Tools and Step-by-Step Instructions
Explore advanced techniques for reverse engineering and pentesting Android applications. Learn how to identify and fix vulnerabilities to enhance the security of your mobile apps.

Adapting app components
Ionic has a huge set of components like buttons, checkboxes, and fields for entering text. Their advantage over usual HTML elements is adaptivity. Ionic elements adjust to the platform on which the app runs.
For example, let’s take a look at the Action Sheet — a dialog that shows a list of options. It’s located at the top of the screen in the program’s menu and needs to be manually closed by a user before they can start interacting with an app.
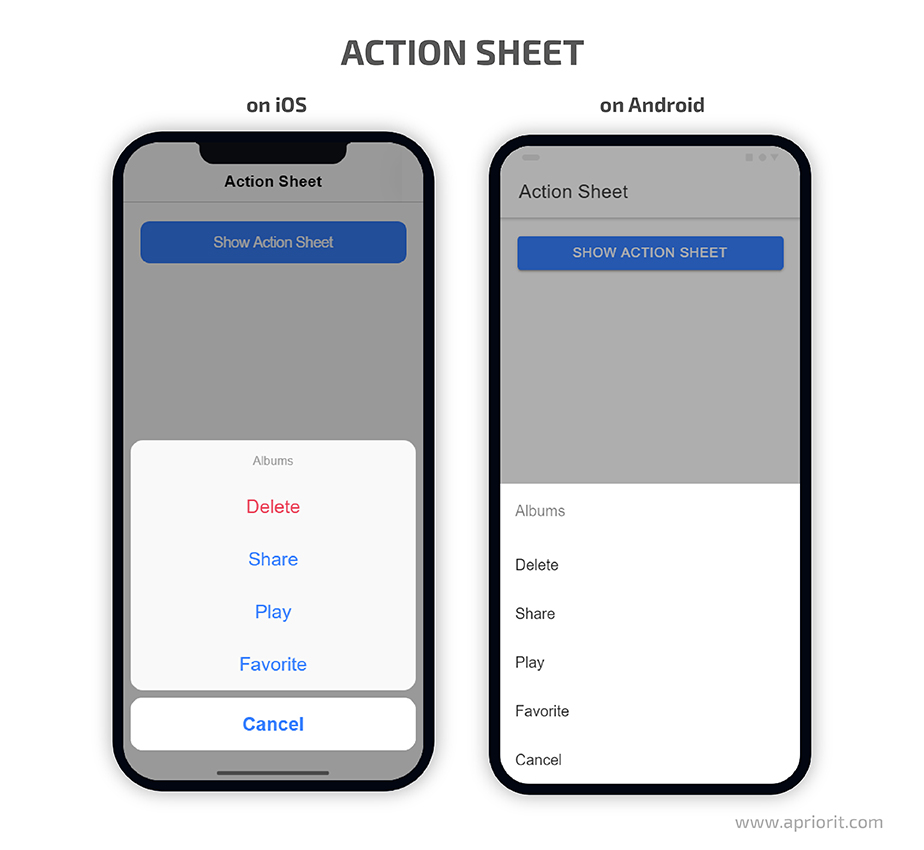
With this component, there’s no need to use any platform-specific settings. You can just write code and Ionic will adapt it to the platform.
Using Ionic Native for additional settings
Ionic Native is a set of TypeScript wrappers for open-source Cordova and PhoneGap plugins that allow you to use native functions in an Ionic app.
You can use it to work with Bluetooth, receive GPS coordinates, and check for internet connection and battery charge.
Let’s take a look at the code below to explore the process of receiving GPS coordinates in Ionic:
import { Geolocation } from '@ionic-native/geolocation';
import { Platform } from 'ionic-angular';

class MyComponentOrService {

  constructor(private platform: Platform, private geolocation: Geolocation) {

    platform.ready().then(() => {

      // get current position
      geolocation.getCurrentPosition().then(pos => {
        console.log('lat: ' + pos.coords.latitude + ', lon: ' + pos.coords.longitude);
      });

      const watch = geolocation.watchPosition().subscribe(pos => {
        console.log('lat: ' + pos.coords.latitude + ', lon: ' + pos.coords.longitude);
      });

      // to stop watching
      watch.unsubscribe();
    });
  }
}Now let’s take a look at the debugging process.
Debugging
In this section, we briefly describe specifics of the debugging process for web, Android, and iOS versions of our sample application.
Web version debugging
Debugging Ionic web applications isn’t much different from debugging Angular or simple JavaScript apps. Similarly to Angular, Ionic requires you to build a debug version and run it on Node.js. All this you can do just by running a single command in the command prompt (CMD):
ionic serveAfter that, you can debug your application using a browser (Chrome DevTools or Firefox Developer Tools) or using your preferred integrated development environment (IDE). For example, Visual Studio Code supports debugging JavaScript and TypeScript code out of the box.
Remote debugging on Android
Apart from debugging an app right in the browser, Chrome DevTools can be used for remote debugging of an Android app right on the device or in an emulator. To do that, you need to install Android Debug Bridge on your computer and connect a device using USB or use an emulator.
Also, Visual Studio Code has a plugin that allows developers to debug Cordova apps, including those built with Ionic. This plugin creates a bridge between a debugger and a device and allows you to add breakpoints straight to the IDE.
Remote debugging on iOS
Debugging an iOS application is a bit more complicated.
You’ll need a physical device running macOS or a built-in emulator. No other applications are required apart from Apple Development Tools. The Safari browser is enough to redirect an app to a device.
The next step after debugging is deployment. Let’s explore how it’s done for all application versions.
Related project
Developing and Supporting a CRM System for a Medical Transportation Company
Find out how our team upgraded and secured a CRM system for a medical transportation company, helping our client deliver compliant, secure, and adaptable software.
Deployment
In this section, we briefly describe the specifics of deploying an app’s web, Android, and iOS versions. It’s pretty straightforward for all platforms.
For web version deployment, you can use a single command:
ionic buildAfter that, just copy the output files to the server where your app is hosted. As you can see, this process isn’t different from an Angular build using the CLI.
To form an Android application package (APK) file, execute this command:
ionic cordova build android --prod --releaseAn APK file will be created, and you can send it to other devices. However, you’ll need to sign it if you plan to upload the app to the Google Play Store.
For iOS deployment, you’ll need a real iOS device or an emulator running on macOS with the Xcode IDE installed. Once you have the environment ready, execute the following command to build an iOS app:
ionic cordova build ios --prodThen run Xcode and deploy the app to your device. Sign your app for further commercial use.
What to consider when developing apps with Ionic
Developing a hybrid app with Ionic often may be faster and more affordable than developing several native apps.
Choosing Ionic over several native apps could be a good decision if:
- Your requirements don’t involve working with low-level modules of operating systems or creating a rich graphical interface
- A customer wants to show an MVP to investors as soon as possible, which makes time a critical factor
Based on our experience, we’d like to highlight several recommendations worth paying attention to when starting cross-platform web application development on Ionic.
1. Local data storage
If a framework uses JavaScript and an app is launched in a browser environment, it doesn’t mean you have to store app data (sessions, keys, tokens, metadata) in the browser’s local or session storage across all platforms, since platforms may not support it in full. At the beginning of development, you need to find a cross-platform library that offers high-level access to a platform’s native storage.
2. Routing
Ionic doesn’t insist on using specific URLs for routing because navigation can work without it. On mobile devices, a site will be shown in the web view component, and users won’t be able to change a URL or add it directly to a browser. However, you should clearly configure routing. It’s required for the web version so a page can be opened right from a URL.
3. Performance
The Ionic framework can have some performance issues, especially when working with heavy applications. Therefore, you should take care of performance testing as soon as possible so poor performance won’t be a surprise for end users.
Read also
Using Web Debugging Proxies for Application Testing
Improve the performance and security of your applications by efficiently configuring and using the right tools for HTTP/HTTPS traffic monitoring.
Conclusion
Ionic can be a useful framework for building cross-platform mobile apps, since it significantly accelerates development for multiple platforms. Also, it supports popular Angular and React frameworks and has lots of templates, which simplifies developers’ work.
This framework for cross-platform mobile application development also brings cost efficiency, as it allows developers to write code that works for both Android and iOS and develop adaptable page markup.
At Apriorit, we have dedicated teams of professionals in web and mobile apps development who will be happy to assist you with building a robust product from scratch or improve an existing product. Contact us to start discussing your dream project!
Need a dedicated team of mobile development experts?
Our expert team will deliver a robust and user-friendly app that meets your business needs. Partner with Apriorit for a flawless development experience.
Have a question?
Ask our expert!
Director of Global Markets Development


