 Skip to main content
Microsoft Windows Forms® (WinForms) is a library that allows you to develop rich applications with graphical user interface (GUI). This library is a part of .NET Framework. Therefore, such a WinForms application can be developed with any .NET language (C#, F#, VB, etc.), and run on any platform supported by .NET Framework. Not only can it be run on Windows, but also on Linux or Mac OS X (see Mono project). Thus, WinForms is considered multi-platform. However, it is a rather old technology. For new projects, consider using Windows Presentation Foundation® (WPF) instead.
Contents:
In case of Windows, WinForms is a wrapper for Windows API and GDI+. Therefore, it combines both the performance of the native code and the ease of developing on a .NET language.
With WinForms, you are able to create highly customized controls and forms. However, it takes you much more time than using WPF or proprietary third-party tools, such as DevExpress®, because of relatively low-level API of WinForms.
In the current paper, we consider the four steps to create a basic Widows Forms application. A simple C# demo application is used to demonstrate these steps. You can find the source code in the Download section below.
A Demo Application
A demo application represents a simple phone book. This application has the functionality to create new contacts and to remove them. However, we did not provide the possibility to edit contacts in order to preserve application simplicity. The application keeps its data in SQLite database. To communicate with the database, SQLite entity framework is used (EF6). The database contains a singled grid with five columns as depicted in Fig.1.
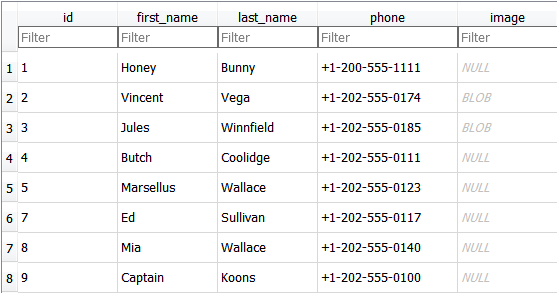
Figure 1. Accounts table in Contacts.db database
Step 1. Design the application architecture
We assume the application specification is ready before designing the application architecture. To separate business logic from its presenter we suggest using MVC-like architecture. It will allow you to modify each part of the software independently.
In our demo-application, a user interacts with the model through the GUI, and the model updates the GUI through the events. Such interaction provides loose coupling between the application components. Thus, the solution of the demo-application will consist of the two following projects: PhoneBookGUI and PhoneBookModel.
The model must have the methods to manipulate with the contact data. The class diagram in Figure 2 depicts two classes to manipulate with contact data. The methods of the model class accept a Contact object to add a contact data to the database. Besides, there are methods that allow us either to select a single contact with a specific id from the database or select a specific range of the contact entries. The RemoveContact method deletes a contact by its id, and Count method allows obtaining the number of contacts in the database. The ContactAddedEvent is called if a contact had been successfully added to the database. Similarly, the ContactRemovedEvent is called on removing a contact from the database. This is the way the model informs that its state was changed.
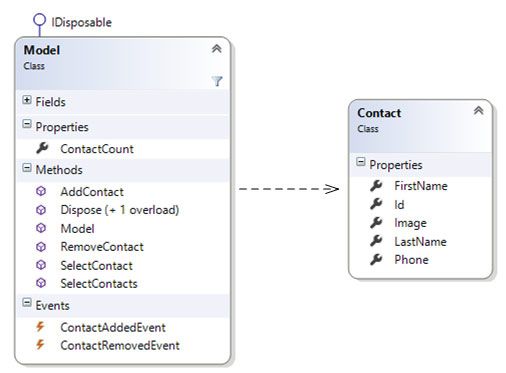
Figure 2. The model class diagram.
The application GUI consists of the MainForm, which holds references to NewContactForm and ContactView controls. Besides, it has two buttons. The first button allows us to add a new contact with NewContactForm and the second button allows us to remove a contact selected in the ContactView control. The forms inherit System.Windows.Forms.Form class, and ContactView inherits System.Windows.Forms.UserControl class. The mentioned GUI classes are demonstrated on the diagram in Figure 3.
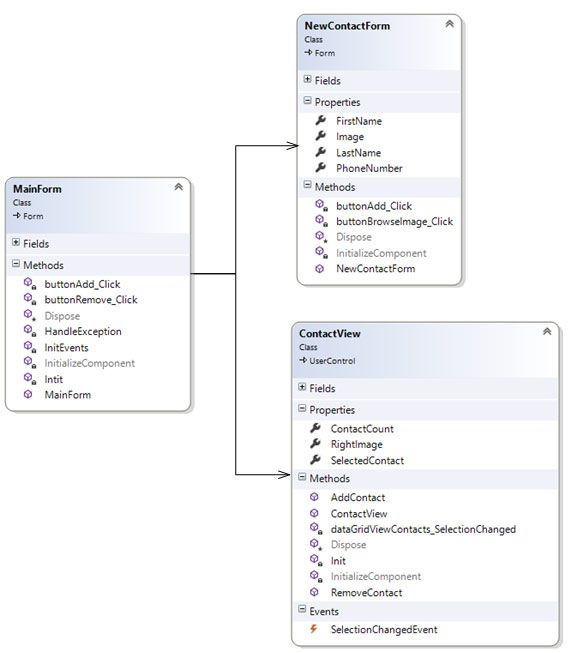
Figure 3. The GUI class diagram
Step 2. Implement the model logic
The model must be implemented in accordance with the architecture designed. The model wraps the code working with the database from the rest of the application.
Because the model holds a database object, it has to implement IDisposable interface to release it. However, if the lifetime of the model equals the lifetime of the application, you do not have to do it in most cases.
If you decide to change the database type, the model implementation must guarantee that the other part of the software remains intact. Therefore, all specific exceptions must be caught, and all specific errors must be handled. A good practice is to create a base class for exceptions. The other exception classes should inherit it to describe a more specific error. In our demo application, ModelException is a base class for the model exceptions.
In case of successful model update, the model needs to inform that its state was changed. Events are ideal candidates for this role. They allow us easily to implement publish–subscribe pattern to provide a loose coupling between application components.
Step 3. Add user forms and controls
Templates for custom user forms and controls may be created via the Add New Item Wizard in Visual Studio. A new class for a custom element is generated by this wizard. Such a class is partial, and it usually consists of two files. One file includes the content that is changed through the Properties window. Thus, it is not recommended that this file be modified manually. The other file may be modified manually to implement a necessary business logic.
Figure 4 demonstrates the GUI of the demo phonebook application.
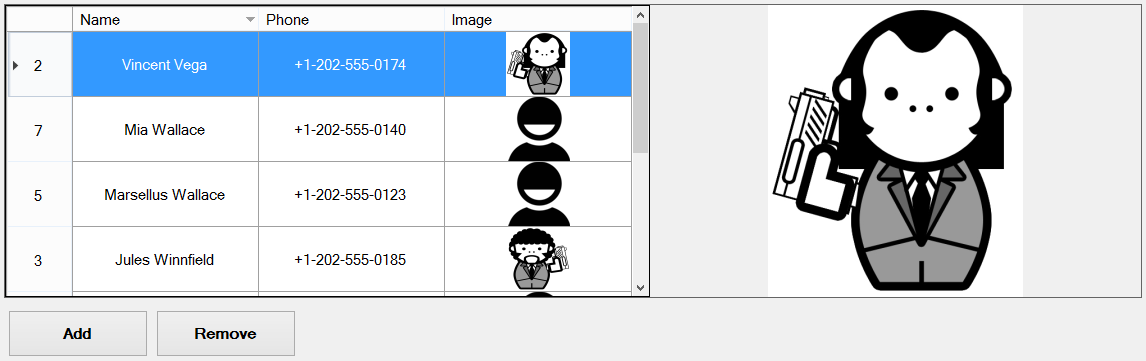
Figure 4. The GUI of the phonebook demo application
The main form holds the ContactView control and two buttons. The ContactView control displays contact entries taken from the database, and the buttons are needed to add and remove user contacts.
The ContactView control is a custom control. Creation of custom controls allows you to combine existing controls into reusable building blocks. ContactView control consists of DataGridView and PictureBox controls, which are standard WinForms controls. The first control displays contact info in the grid whereas the second control display a zoomed contact image selected in the grid.
To align controls on the form, we used layouts. It allows the controls to be flexibly scaled on the form if its size changes.
On pressing the Add button, a NewContactForm instance appears. This form is demonstrated in Figure 5. It contains standard controls to add entries for a new contact.
The existed contact entry may be deleted on pressing the remove button. In this case a contact, which is selected in ContactView control, is removed.
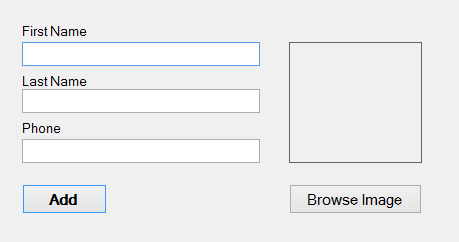
Figure 5. The form for adding a new contact
Step 4. Implement GUI logic
After all custom controls and forms are created, their styles are adjusted and the controls are aligned on the forms, the logic for interaction between the controls and between the GUI and the model must be implemented. This logic consists of control event handlers and model event handlers. A common practice is to inherit event argument classes from the System.EventArgs class, and to implement an event as a specialization of the System.EventHandler template.
A model is updated through the GUI. If the update is successful, the model updates the GUI though the events. Otherwise, the model methods throw exceptions that must be caught and handled. The most important step here is to provide consistence between the model and GUI states in case of errors.
After the GUI is implemented, a high-level testing of the application must be carried out.
Conclusion
We discussed the main points to be observed to create a WinForms application that follows MVC-like model. WinForms is a rather old technology, but it still can be used for developing applications with highly customized GUI. Besides, it is a good solution for simple applications. We demonstrated the recommended steps on the demo Contact Book application, which source code was provided. The recommendations given will make the support for your application easy with low amount of bugs.
Downloads
Have a question?
Ask our expert!
Program Manager


