 Skip to main content

Did you know that over 90% of the top 1,000 apps in the Google Play Store are obfuscated? That’s how top market players build their product’s first line of defense against the most sophisticated cybersecurity risks like application code decompilation and analysis.
Usually, this doesn’t end with just one layer of code maskingー higher-ranked Android apps tend to combine multiple obfuscation techniques.
To help you figure out the best way to enhance your product’s protection, in this article, we explore the dangers of code decompiling and how code obfuscation can help your team secure your project. Apart from overviewing the most popular code obfuscation techniques, we also offer a practical example of obfuscating Android code using Android Gradle Plugin.
If you are a development leader or product owner who cares deeply for the security of your Android project, this article is for you.
Contents:
- Why use code obfuscation to secure Android apps?
- Why is code decompiling dangerous?
- 5 key code obfuscation techniques
- Understanding the basics of Android code obfuscation
- How to build an APK
- How to work with Gradle
- How to work with ASM
- An example of Java code obfuscation using an AGP customization
- Conclusion
Why use code obfuscation to secure Android apps?
What is code obfuscation in Android?
Code obfuscation is the art of making it harder for malicious actors to understand decompiled code while preserving its functionality.
Your business can benefit in several ways from securing your Android app with code obfuscation techniques:
| Business benefit | How code obfuscation helps achieve it |
|---|---|
| Intellectual property protection | Makes it almost impossible to understand and replicate proprietary algorithms, unique business logic, and innovative features, preserving your competitive advantage and market value |
| Licensing protection | Disguises license keys and anti-tampering mechanisms, mitigating attempts to bypass licensing restrictions, eliminating in-app purchase manipulations, and protecting your revenue streams from unauthorized app use and distribution |
| Regulatory compliance | Minimizes sensitive data leaks and breaches, helping your business comply with security standards like the GDPR and industry-specific regulations |
| Cost efficiency | Is cost-effective to implement and maintain as part of the build pipeline, especially when leveraging automated obfuscation processes |
By raising the barrier for attackers attempting to decompile and analyze your app, your team reduces the risk of unauthorized modifications, code tampering, and app cloning. In the next section, we take a deeper look at the threats behind app code decompilation.
Planning to enhance your mobile app’s protection?
Achieve the perfect balance of app security and performance by delegating your software development and cybersecurity tasks to Apriorit experts.
Why is code decompiling dangerous?
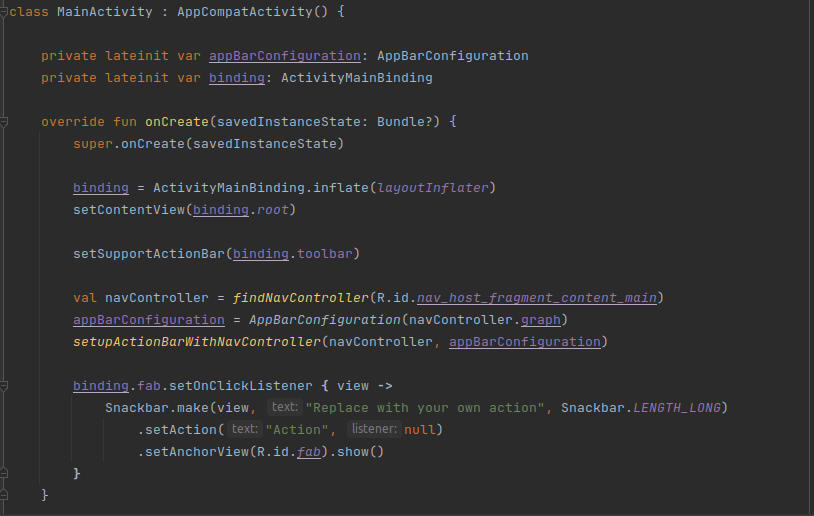
If you don’t use code obfuscation in Android apps, malicious actors can easily analyze Java or Kotlin code with the help of tools like ByteCode Viewer or JADX.
In screenshot 1, you can see what typical source code of an Android app looks like.
Now, let’s take a look at screenshot 2 to see the decompiled code.
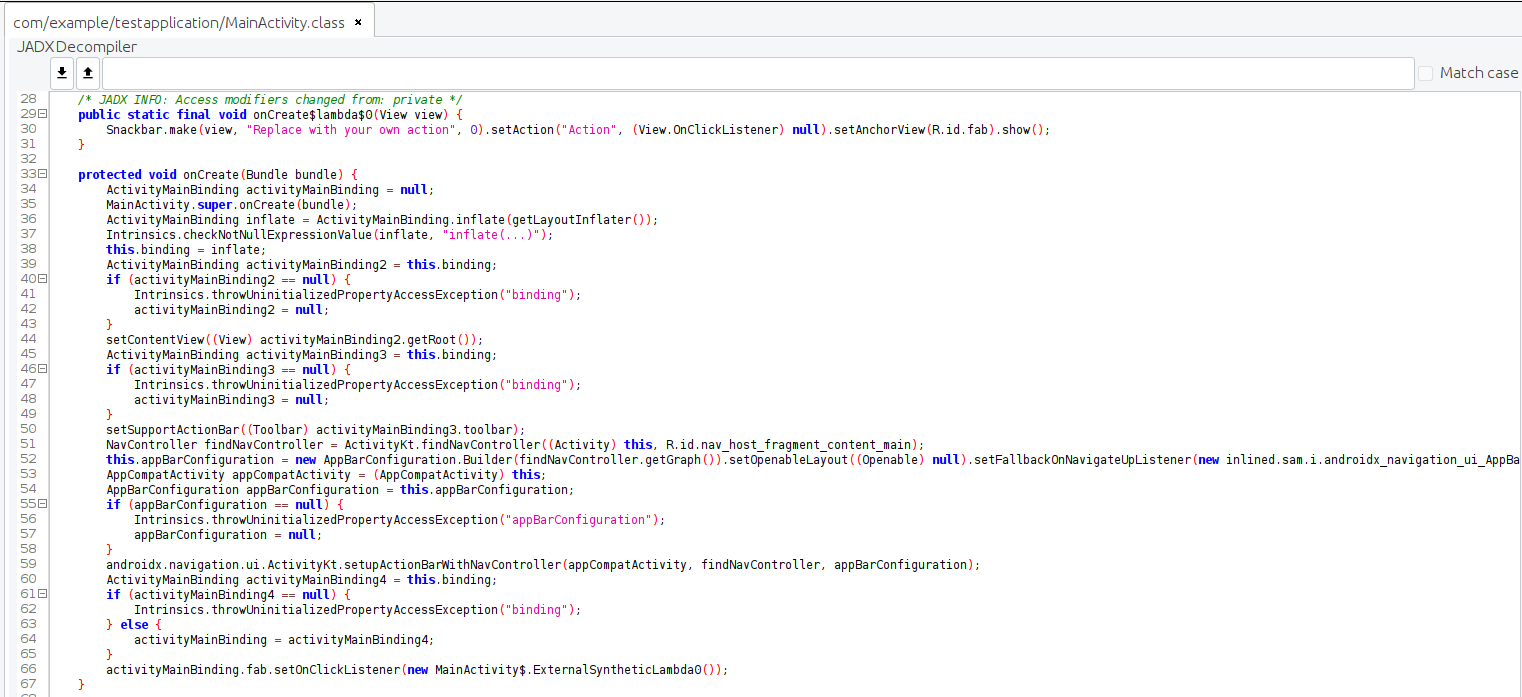
As you can see, the decompiled code in the example above saves class and function names, allowing anyone to easily understand what’s going on.
After decompiling and analyzing code in this way, an attacker could introduce changes to your original app. For example, they could add permissions to access a user gallery and then use social engineering techniques to persuade people to download a modified app on their devices. As a result, the attacker could access user galleries, abuse user data, and damage the reputation of the original app.
Obviously, developers can apply techniques to check app and certificate integrity, preventing the possibility to modify the Dalvik bytecode or sign an app with a non-original key. However, the question is: How fast can an attacker find a way to bypass such measures when decompiling your app’s code?
App cybersecurity is complex and must be considered comprehensively. A single obfuscation technique can’t guarantee decent protection on its own. Only a thoughtfully designed combination of measures can create a reliable defense, covering different attack vectors and significantly complicating a hacker’s job.
Let’s discover the main techniques for code obfuscation in Android apps and see how they can help your team protect your product.
Read also
Pentesting Android Applications: Tools and Step-by-Step Instructions
Explore practical guidance on identifying Android app weaknesses and strengthening the security posture of your products.

5 key code obfuscation techniques
What are the most common techniques used in code obfuscation?
There are a variety of ways to transform your app’s code for protection purposes. Below, we overview the five most commonly used Android app obfuscation techniques, with practical examples for each.
Note: Almost all obfuscation techniques degrade app performance, some more and some less. For example, your processor might spend extra time on program execution because of processing condition blocks. It is up to experienced developers to carefully choose the right obfuscation techniques and enhance them with other protection measures to wisely balance security posture and performance.

1. Class and method renaming
The name of this technique speaks for itself ー developers change the original name of a class or method to a senseless set of symbols. For example, you could rename the InitializeDecryptor method to U.
However, such a task is more complicated than it seems, as developers must take into account inheritance, reflection, and other peculiarities of the Java language.
Say we decide to rename the X method in the following code:
class A {
    public void X() {}
}

class B extends A {
    @Override
    public void X() {}
}

public class Main {
    public static void main(String[] args) throws Exception {
        A a = new B();
        a.getClass().getMethod("X").invoke(a);
    }
}We must rename the X method not only in the A and B classes, but also in the following string:
a.getClass().getMethod("X").invoke(a);Otherwise, the code won’t work as intended.
2. String obfuscation
The idea of this technique is to encode a string in such a way that it would be challenging to understand it during static code analysis.
Let’s compare code before and after string obfuscation:

Note: We’ll show a practical example of applying this technique for Java code in the last section of this article.
3. Bogus Control Flow (BCF) and Control Flow Flattening (CFF)
These are two classic code obfuscation techniques that work at the level of bytecode blocks. They help developers change execution logic, manipulating separate bytecode blocks that form functions or program methods.
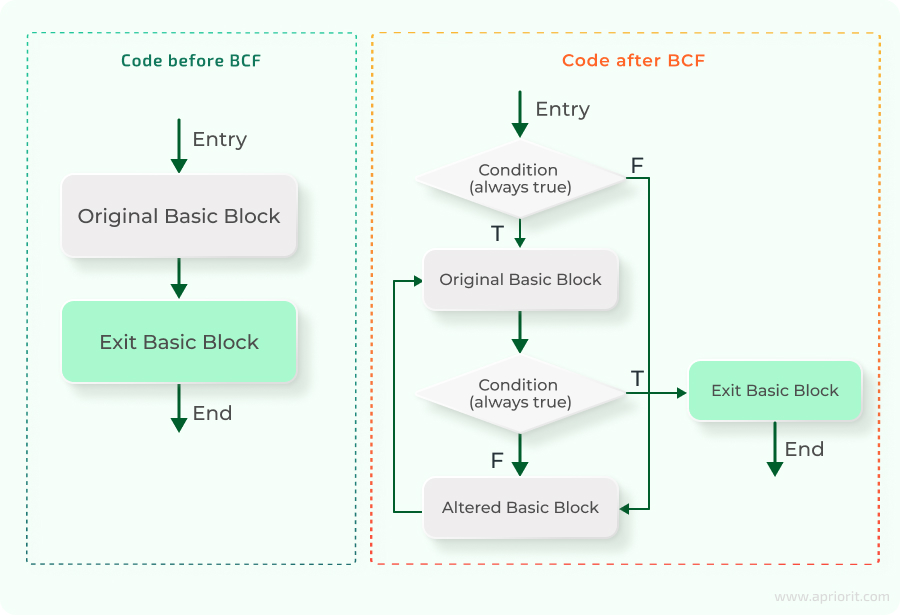
Bogus Control Flow (BCF) creates fake branches that are never executed and don’t affect the program results while significantly complicating analysis for a malicious actor. Below, we show an example of how BCF works using block schemes.
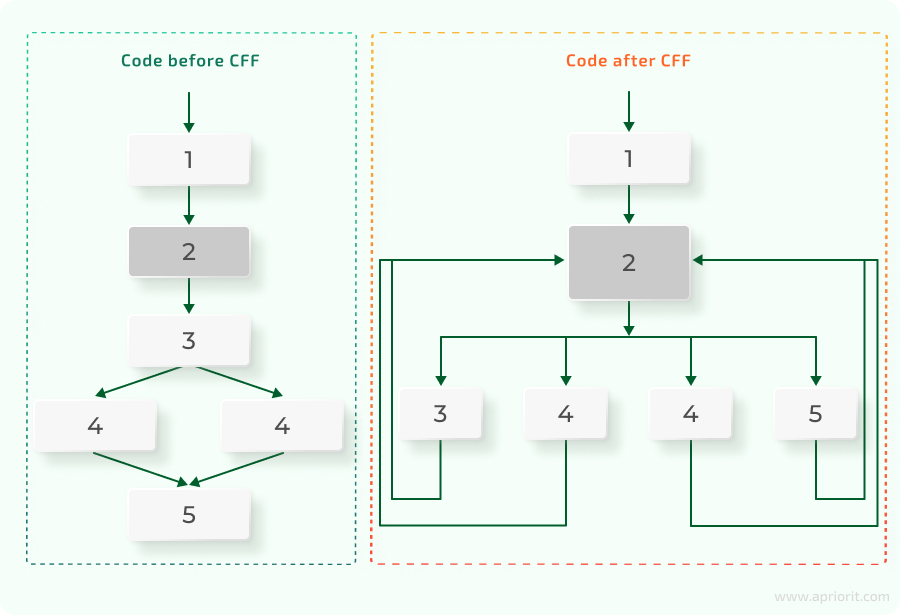
Control Flow Flattening (CFF) helps developers to hide real logical connections between different parts of code, making those connections look nonlinear. Usually, CFF implementation means putting a method’s logic into a single, centralized, switch statement. Here’s an example of how CFF looks in block schemes:
4. Constant masking
Constant masking helps developers to eliminate obvious markers that can give malicious actors a hint of what’s going on in code. For example, the 0xDEADBEEF constant can point to some mechanisms for memory validation, which can be a starting point for a hacker.
Here’s how you can obfuscate 0xDEADBEEF using the constant masking technique:
const int maskedValue = 0x7b081b4a;
const int deadbeef = maskedValue ^ 0xa5a5a5a5;5. Instruction substitution
When using this technique, developers change simple arithmetic or logical operations to more complex equivalents.
For example, you can change the XOR (value ^ mask)operation to (value | mask) & ~(value & mask).
Related project
Building a Complex Parental Control App for Android
Dive into the journey of creating a reliable solution with powerful monitoring functionality, seamless integration capabilities, and a custom Market service.
Understanding the basics of Android code obfuscation
Let’s briefly overview what your team must be aware of before proceeding to Android code obfuscation examples:
- How to build an APK
- How to work with build optimization tools (Gradle, in our example)
- How to work with ASM
How to build an APK
The obfuscation process should be transparent to app developers and restrict them as little as possible. To determine when it’s best to add a particular obfuscation mechanism, engineers need to thoroughly understand the Android application build process.
Android Studio projects usually consist of the following components:
- Java/Kotlin source code
- Resource files
- AndroidManifest.xml
- C++ source code (if the app has a native part written in C++)
The build process usually consists of the following five stages:
- Resource compilation
- Java/Kotlin code compilation
- Conversion of Java bytecode to Dalvik bytecode
- C++ code compilation (optional)
- APK creation
How to work with Gradle
As you can see, building an Android app is quite complex, requiring many steps. To optimize as much as possible, development teams use build tools like Gradle and AGP.
Gradle is a build system that uses a task-based approach and provides the ability to configure a project in Groovy or Kotlin. Tasks are sets of commands that transform input data into output data. An example of a task could be copying a file from one directory to another, or compiling .java files into .class files.
For the purpose of this article, we’re mostly interested in Gradle’s ability to create plugins. Plugins define tasks and their configuration and combine them into a specific build flow. Thus, a plugin works as a module that developers can add to their projects and thereby add new functionality to the build process. A popular example is Android Gradle Plugin (AGP) for building Android applications.
Note: We suggest avoiding approaches to adding new functionalities such as:
- Simply placing your code in the
afterEvaluatemethod - Finding a standard task in AGP and adding your code to it using the
doLastmethod - Specifying an explicit dependency to a standard task in AGP using the
dependOnmethod
In large projects, such actions can result in severe side effects such as unpredictable task execution order, complex and incomprehensible bugs, and significant complications to a plugin’s further support and extension.
So, what should you do?
Pro tip: Leverage Android extension points when adding new functionality. For example, AGP offers the following:
finalizeDsl()allows you to change the DSL object to create an additional build variantbeforeVariants()allows you to access a build’s variant and change its configurationsonVariants()allows you to access and transform artifacts of AGP tasks for each build variant
How to work with ASM
ASM is a framework for analyzing and modifying Java bytecode. It works at the Java class level and provides two approaches for interacting with classes: event-based and tree-based.
The event-based approach is faster than the tree-based approach, but modifying existing classes with its help can be somewhat difficult.
The event-based approach uses the Visitor pattern and has three main visitors:
ClassVisitorallows you to visit existing classes, analyze them, and introduce changesClassWritercreates new classesClassLoaderallows you to create a custom approach to loading a class into process memory
Read also
How to Ensure Your Mobile Banking App’s Security: Tips and Best Practices
Learn how to strengthen your mobile app against cyber threats using proven security techniques based on the example of banking apps.

An example of Java code obfuscation using an Android Gradle Plugin customization
Now, it’s time to see how all this works in practice.
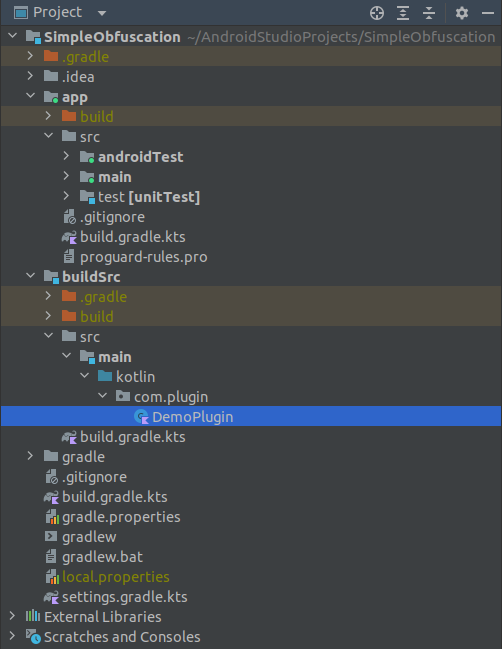
Let’s start with creating a plugin and connecting it to our application according to Gradle’s instructions for writing plugins. Here’s how our project’s structure looks after adding a custom plugin:
And here’s our plugin’s source code:
package com.plugins

import org.gradle.api.Plugin
import org.gradle.api.Project

class DemoPlugin : Plugin<Project> {

   override fun apply(project: Project) {
       println("Hello world!")
   }
}In this example, let’s only obfuscate strings that contain constants.
These strings are added to our function’s stack via LDC commands. Thus, we need to find all LDC commands and check whether their values are strings. If they are, we need to change such commands to deobfuscation commands.
This approach will help us make sure that our app keeps working correctly by obfuscating code strings at the plugin level and replacing LDC commands with calls to deobfuscation functions at the app level.
Therefore, we have two steps to perform at the plugin level:
- Add a class containing code of deobfuscation functions
- Replace LDC commands with calls to deobfuscation functions
To tackle the first step, let’s add a file containing the required class source code to the list of source code files to compile. AGP even has a special function for this called addGeneratedSourceDirectory, which is part of the SourceDirectories API. The addGeneratedSourceDirectory function allows us to add the results of a custom task to the list of source code directories and include the directory containing the generated code in the compilation process.
We’ll place a file containing the deobfuscation class’s source code into the plugin resources and create a task that will copy this file to the generated directory during the app build.
Here’s the code for deobfuscation:
package com.simple.obfuscator;
public class Obfuscator {
   public static char deobfuscateChar(char input, long addKey, long mulKey) {
       long modKey = 256;
       long modInverse = modularInverse(mulKey, modKey);
       long originalCode = (((input * modInverse) % modKey - addKey) % modKey + modKey) % modKey;
       return (char) originalCode;
   }
   private static long modularInverse(long a, long m) {
       long m0 = m, x0 = 0, x1 = 1;
       if (m == 1) return 0;
       while (a > 1) {
           long q = a / m0;
           long t = m0;
           m0 = a % m0;
           a = t;
           t = x0;
           x0 = x1 - q * x0;
           x1 = t;
       }
       if (x1 < 0) x1 += m;
       return x1;
   }
}And here’s the task that will copy files from resources and place them in the generated directory during the app build.
abstract class CopyObfuscatorClass: org.gradle.api.DefaultTask() {
   @get:OutputDirectory
   abstract val destinationDir: DirectoryProperty
   @TaskAction
   fun copy() {
       val clsName = "/Obfuscator.java"
       val pkgName = "/com/simple/obfuscator"
       val dst = File(destinationDir.asFile.get(), "${pkgName}${clsName}")
       dst.parentFile.mkdirs()
       if(!dst.exists()) {
           val src: InputStream? = javaClass.getResourceAsStream(clsName)
           if (src != null) {
               Files.copy(src, Paths.get(dst.toURI()))
           }
       }
   }
}As you can see, our task includes the destinationDir parameter, which determines a directory to which a copied file containing the deobfuscation class’s source code will be written. And since we copy the file from plugin resources, we use the getResourceAsStream method to grant our app access to resources.
Now, we need to add our task to the project’s build flow by adding the following code to the onVariants callback. Let’s break this process into the two steps:
1. Register the task and set a value for the destinationDir parameter:
val generateCodeTask: TaskProvider<CopyObfuscatorClassTask> = project.tasks.register(
   "generate${capitalizedVariant}Code",
   CopyObfuscatorClass::class.java
) {
   destinationDir.set(project.layout.buildDirectory.dir("generated/java"))
}2. Add our task’s output as additional source code:
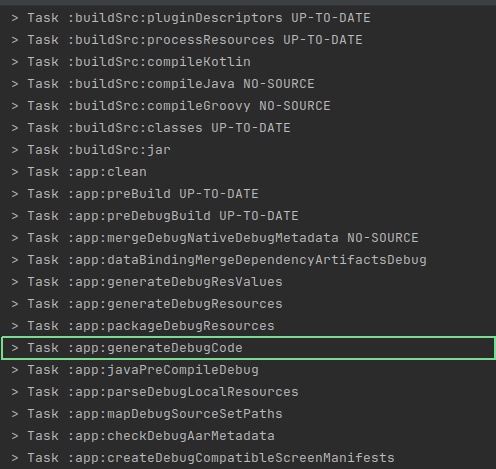
variant.sources.java?.addGeneratedSourceDirectory(generateCodeTask, CopyObfuscatorClassTask::destinationDir)Now, if we rebuild the app, we’ll see our task in the list of executed tasks:
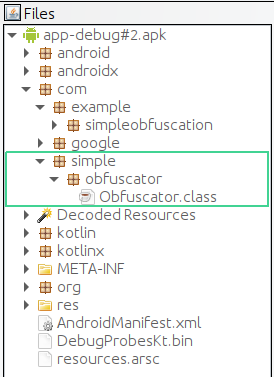
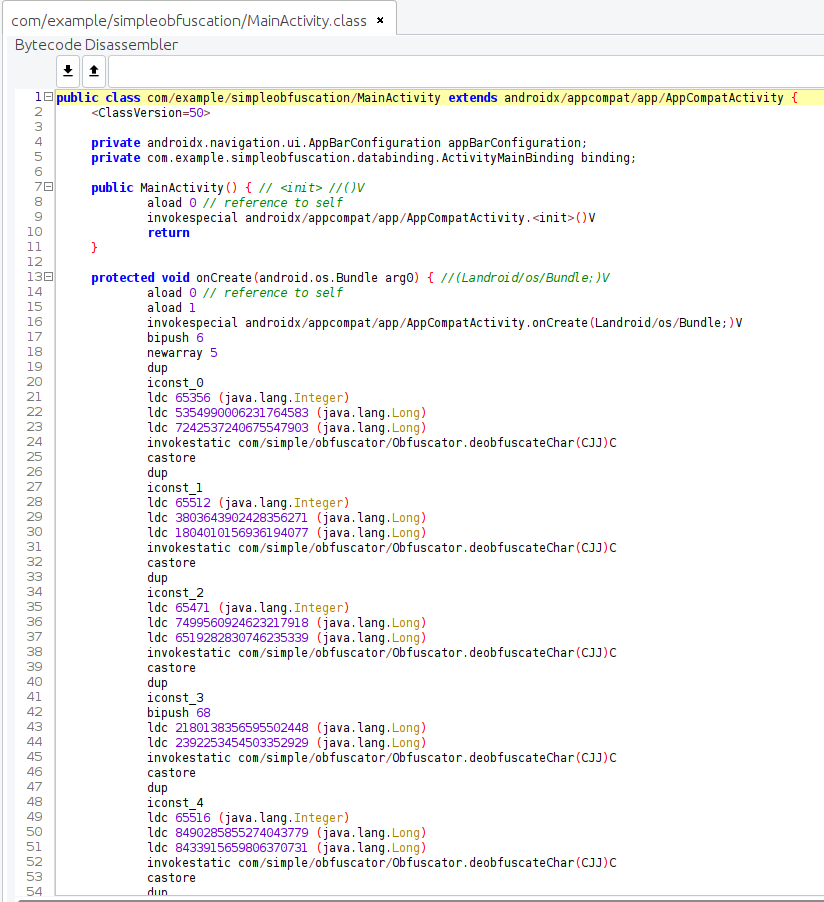
And once we decompile the APK, we’ll see the com.simple.obfuscator.Obfuscator class:
As you can see, the project structure remains the same, meaning that all processes remain clear to app developers.
To transform our code, let’s use the transformClassesWith API, which allows us to register the ASM ClassVisitor to manipulate the bytecode of existing classes.
First, we need to define our own AsmClassVisitorFactory, ClassVisitor, and MethodVisitor:
abstract class ObfuscatorClassVisitorFactory :
   AsmClassVisitorFactory<ObfuscatorClassVisitorFactory.ObfuscatorParameters> {

   interface ObfuscatorParameters : InstrumentationParameters {
   }

   override fun createClassVisitor(
       classContext: ClassContext,
       nextClassVisitor: ClassVisitor
   ): ClassVisitor = ObfuscatorClassVisitor(
       api = instrumentationContext.apiVersion.get(),
       next = nextClassVisitor,
   )

   override fun isInstrumentable(classData: ClassData): Boolean {
       return classData.className != "com/simple/obfuscator/Obfuscator"
   }

   //other code
}Second, we have to override two functions in the ObfuscatorClassVisitorFactory class:
createClassVisitor— createsObfuscatorClassVisitorobjects (of our custom class)isInstrumentable— determines whether to createClassVisitorfor classes. We’ll add a filter to make sure that the obfuscation function won’t be added to the obfuscator class itself.
We’ll make the ObfuscatorClassVisitor class private. It inherits from ClassVisitor and overrides the visitMethod function. This function will return the instance of the ObfuscatorMethodVisitor class. And the ObfuscatorMethodVisitor class, in turn, inherits from the MethodVisitor class. Here’s what it looks like in code:
private class ObfuscatorClassVisitor(
   api: Int,
   next: ClassVisitor,
) : ClassVisitor(api, next) {

   override fun visitMethod(
       access: Int,
       name: String?,
       descriptor: String?,
       signature: String?,
       exceptions: Array<out String>?
   ): MethodVisitor {
       val next = super.visitMethod(access, name, descriptor, signature, exceptions)
       return ObfuscatorMethodVisitor(api, next)
   }
}Now, let’s move to the ObfuscatorMethodVisitor class for the most interesting part of the bytecode transformation. Since we will only obfuscate constant strings, we’ll need to analyze the LDC instruction. Therefore, we need to override the visitLdcInsn function. If its value is a string, we add obfuscation; if not, we call the parent visitLdcInsn function.
internal class ObfuscatorMethodVisitor(
   api: Int,
   next: MethodVisitor,
) : MethodVisitor(api, next) {

   override fun visitLdcInsn(
       value: Any
   ) {
       if (value is String) {

           // DO TRANSFORMATION

       } else {
           super.visitLdcInsn(value)
       }
   }
}We’ll add deobfuscation to each symbol of a chosen string. Thus, we’ll need to do the following:
- Create an empty char array.
- Set each symbol of the string to the array by index.
- Before adding symbols to the array, make sure each symbol is deobfuscated via the
deobfuscateCharfunction call of thecom.simple.obfuscator.Obfuscatorclass. - Ensure that the resulting array will be converted into a string with the help of the
String.valueOf()method.
Here’s how to create an array:
mv.visitLdcInsn(value.length)
mv.visitIntInsn(Opcodes.NEWARRAY, Opcodes.T_CHAR)Then, for each symbol of the string, we need to:
- Generate
addKeyandmulKey - Obfuscate symbols
- Duplicate the link to our array
- Upload the array element index, obfuscated string symbol,
addKey, andmulKeyto the stack - Add the deobfuscation function call
- Save the deobfuscated symbol to the array
Here’s how to do it:
for ((index, c) in value.toCharArray().withIndex()) {
   val addKey = random.nextLong().absoluteValue
   var mulKey = random.nextLong().absoluteValue

   if (mulKey % 2 == 0L) {
       mulKey++
   }
   val obfuscatedChar = Obfuscator.obfuscateChar(c, addKey, mulKey)
   mv.visitInsn(Opcodes.DUP)
   mv.visitLdcInsn(index)
   mv.visitLdcInsn(obfuscatedChar)

   mv.visitLdcInsn(addKey);
   mv.visitLdcInsn(mulKey);
   mv.visitMethodInsn(
       Opcodes.INVOKESTATIC,
       "com/simple/obfuscator/Obfuscator",
       "deobfuscateChar",
       "(CJJ)C",
       false
   )

   mv.visitInsn(Opcodes.CASTORE)
}And here’s code for the Obfuscator.obfuscateChar function:
private class Obfuscator {
   companion object {
       fun obfuscateChar(c: Char, addKey: Long, mulKey: Long): Any? {
           val obfuscatedCode = ((c.code.toLong() + addKey) % 256 * mulKey % 256) % 256
           return Char(obfuscatedCode.toUShort())
       }
   }
}Now, we need to convert our array byte into a string:
mv.visitMethodInsn(
   Opcodes.INVOKESTATIC,
   "java/lang/String",
   "valueOf",
   "([C)Ljava/lang/String;",
falseThere’s a chance that some local variables or some other data can be added to the stack during code obfuscation. Therefore, we need to fix data in the Stack Map Frames after modifications. To update data regarding the maximum number of local changes or maximum stack slots, we have to override the visitMaxs function. Here’s an example of how to do it:
override fun visitMaxs(maxStack: Int, maxLocals: Int) {
   super.visitMaxs(maxStack + additionalStack, maxLocals)
   additionalStack = 0
}Here’s what we’re adding to the stack in our case:
- A link to the array (one stack slot)
- An array index of the int type (one stack slot)
- An obfuscated symbol of the char type (one stack slot)
addKeyof the long type (2 stack slots)mulKeyof the long type (2 stack slots)
Thus, we need to increase the stack by seven slots for each method that includes constant strings.
Now, let’s register our ObfuscatorClassVisitorFactory on the plugin level:
variant.instrumentation.transformClassesWith(
   ObfuscatorClassVisitorFactory::class.java,
   InstrumentationScope.PROJECT
){}To check how the plugin works, let’s add logging (with two constant strings) to the onCreate function in the MainActivity class at the app level:
public class MainActivity extends AppCompatActivity {

   private AppBarConfiguration appBarConfiguration;
   private ActivityMainBinding binding;

   @Override
   protected void onCreate(Bundle savedInstanceState) {
       super.onCreate(savedInstanceState);
       Log.i("MY_TAG", "onCreate: Hello World!" );

       // SOME CODE
   }

   //SOME CODE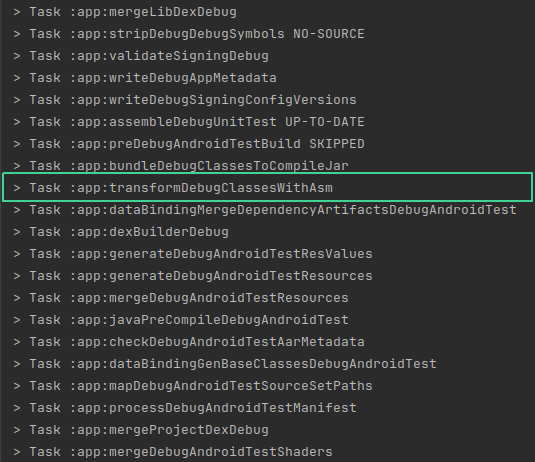
}Now, if we rebuild our project, we’ll see a new task: transform<variant>ClassesWithAsm:
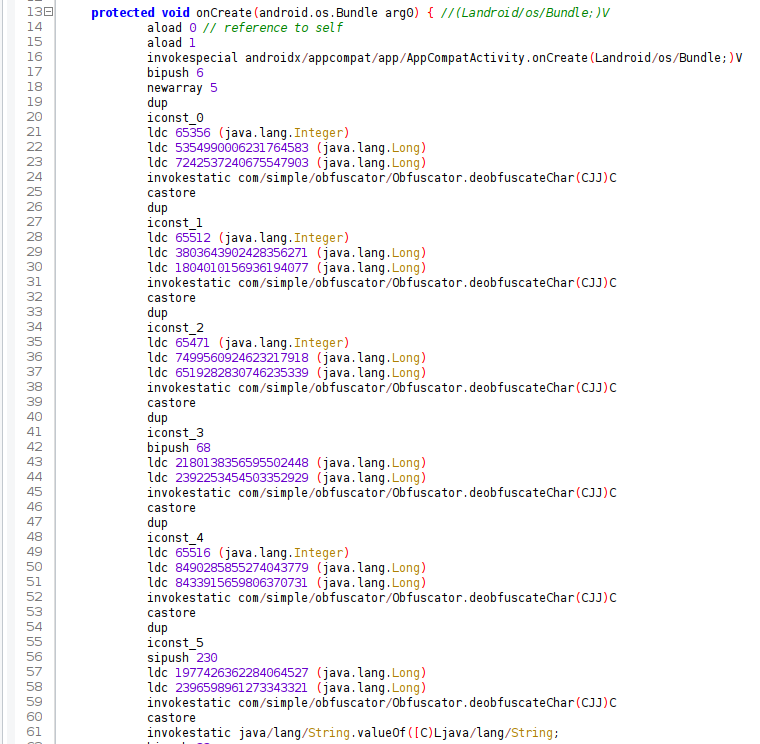
And here’s how the strings will look after decompilation:
Below, you can see that logs keep working correctly when the app is running:

If you want to explore our example in detail, visit Apriorit’s GitHub page for a repository containing a sample application and a Gradle plugin that allows you to obfuscate constant strings in an Android application.
Note: This obfuscation example is pretty simple and is shown for demonstration purposes. It’s relatively easy to restore the original look of the strings using tools like Frida.
A truly strong defense requires a complex approach, with several obfuscation techniques and many other cybersecurity mechanisms. To make sure your apps, data, and infrastructure are protected, delegate software development and cybersecurity tasks to experienced professionals like Apriorit.
Conclusion
A professionally planned app security strategy can help your business deliver a reliable product and attract users. And minimizing the legal and financial risks associated with data leaks and intellectual property theft will help you maintain your reputation. Obfuscation isn’t a silver bullet. But it’s the right solution to help you safeguard critical data, ensure compliance, save money, and maintain your reputation.
When working on Android projects, going the extra mile with security is always a good idea, as Android apps have historically been frequent targets for attackers. According to Digital.ai’s 2025 State of App Sec Threat Report, 90.4% of monitored Android platform apps were targeted in January 2025.
If you want to start an Android project (or are already working on one) and security is among your top priorities, reach out to Apriorit to unlock access to:
- Professional mobile development services ー and receive a custom app built according to all of your business goals, technical needs, and compliance requirements
- Experienced cybersecurity engineers ー and be sure that your app is thoroughly protected from relevant threats with no decrease in performance
Start your app obfuscation journey now!
Partner with Apriorit to deliver a smooth Android or iOS app with the best and most relevant protection measures for your project.
Have a question?
Ask our expert!
VP of Innovation and Technology, Canada Branch Director


