 Skip to main content

Kernel development is extremely complicated. Any issues with the kernel affect overall system operations. Naturally, developers try as much as possible to avoid working in kernel mode. The newest version of macOS provides features to avoid just that.
Released in October 2019, macOS Catalina introduced several important changes and new security features. Among the most important are DriverKit and system extensions. Both are designed to substitute kernel extensions (kexts) used in previous versions of macOS. In future macOS releases, kexts with system extension equivalents will not load. That’s why it’s important to introduce new macOS functionality to your Mac applications today.
In this article, we discuss the capabilities of DriverKit and system extensions in macOS Catalina and how they improve the security and stability of the operating system while letting you write less code in the kernel. We also show you how to block connections with the Network Extension framework and how to monitor and block new processes with the Endpoint Security framework.
This post will be useful for macOS developers who are planning to create new applications with macOS system extensions and DriverKit and are looking for examples of these features in use.
Contents:
Overview of system extensions
What is a system extension on a Mac computer? System extensions are one of the key changes in macOS 10.15 Catalina. System extensions are parts of an application (not a standalone system extension) interface that allows a developer to extend system capabilities without having kernel-level access. In previous versions of macOS, a developer could access certain functionality (e.g. network monitoring and event monitoring) only at the kernel level.
Let’s talk a bit about system extensions vs kernel extensions. In macOS, they share lots of similarities, but system extensions are executed in the user space unlike kernel extensions that operate in the kernel space. When activated, system extensions become available for all users in the system.
System extensions also make macOS operations stabler and more secure. Now, issues with a system extension have no influence on the operation of the operating system. If this part of an application crashes, it doesn’t affect the operating system kernel or other applications.
System extensions are installed using a framework instead of an installer or a package. The process looks like this:
- A user requests to activate a system extension with the activationRequest API.
- The user approves the system extension launch in System Preferences.
After a system extension is activated, macOS manages its lifecycle as required. For example, if a device is connected, macOS launches driver extensions.
System extensions are upgraded by updating the application that contains them. When this happens, the operating system notices a new version of the extension and starts it instead of the old one.
In order to deactivate a system extension, a user needs to delete the corresponding application. Applications interact with the OS using activation and deactivation requests, thus letting the system know whether it needs to activate or deactivate an extension. Such requests are managed by the System Extension framework.
There are three types of system extensions in macOS Catalina:
- Driver extensions
- Endpoint security extensions
- Network extensions
Interactions between an application and the kernel using system extensions look like this:
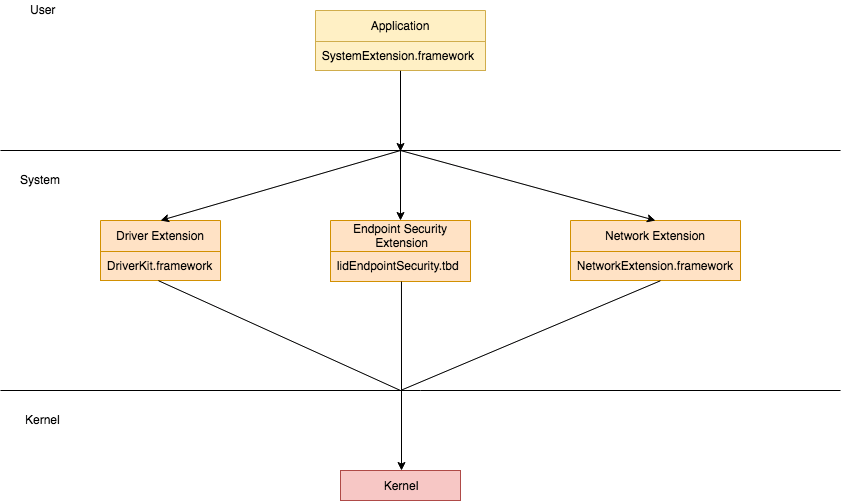
Let’s take a closer look at driver extensions.
Want to improve your project with a custom driver?
Delegate the non-trivial development tasks of any complexity to Apriorit’s experienced kernel and driver engineers.
Driver Extensions
A driver extension is a SPacketTunnelSystem extension that manages hardware devices in the user space. Driver extensions are built with the new DriverKit SDK, which extends the IOKit SDK. However, DriverKit APIs have some limitations. The Driver Extension framework doesn’t provide direct access to the file system, network, and interprocess communications. DriverKit is required for developing a device driver that runs in the user space.
You can use the System Extension framework for working with driver extensions in macOS 10.15 and higher. Driver extensions also have a new file format: .dext. In previous versions of macOS, you should use only kernel extensions: .kext.
A driver extension has several advantages compared to a kext. Kexts don’t allow for using system frameworks. With a driver extension, a developer can use various frameworks in the macOS SDK. Also, kexts support only C and C++, whereas new driver extensions support any programming language, including Swift.
The DriverKit SDK also includes a new file type: .iig. It defines the interface as a C++ class. This file type is processed with the IOKit Interface Generator tool. The interface contains standard C/C++ types, and you can also assign new attributes to messaging and dispatching queues.
The Mach-O header of DriverKit executable files doesn’t have the LC_MAIN command. This means it’s impossible to run this file from the terminal. Running it with the LLDB debugger also results in an error.
Driver extensions are easier to debug than kexts because they run in the user space. With kernel extensions, a developer needs two devices for debugging because attaching a debugger to the kennel halts the device. In order to continue debugging, a developer needs to connect a second device to find bugs. A driver extension can be debugged while the kernel is running.
Let’s see how to activate a system extension, how macOS responds to the activation query, and how to process those responses.
1. Activating a system extension
You can activate a system extension in Swift with this request:
let request = OSSystemExtensionRequest.activationRequest(forExtensionWithIdentifier:extensionIdentifier, queue:.main)
request.delegate = self
OSSystemExtensionManager.shared.submitRequest(request)In response, macOS calls for a callback from the delegate. The callback function will return the results of the request or an error.
2. Processing the results of the activation request
There are several types of callbacks that the system can make in response to an activation request:
1. func request(_ request: OSSystemExtensionRequest, didFailWithError error: Error) is called when a request wasn’t executed because of some error. This method has the following arguments:
- request — The request that failed
- error — The reason the request failed
2. func requestNeedsUserApproval(_ request: OSSystemExtensionRequest) is called when an extension needs to be confirmed by a user for activation.
The first time an extension runs the user must grant it explicit permission. In this case, the activation request waits until the user approves it or closes the application.
After the first launch, a new alert with an option to activate the extension will appear in System Preferences → Security & Privacy. When a user clicks the Allow button, the activation request will be executed. After that, the application will call the request(_ request: OSSystemExtensionRequest, didFinishWithResult result: OSSystemExtensionRequest.Result) callback.
3. func request(_ request: OSSystemExtensionRequest, actionForReplacingExtension existing: OSSystemExtensionProperties, withExtension extension: OSSystemExtensionProperties) -> OSSystemExtensionRequest.ReplacementAction is called when the feature was previously activated.
This callback indicates that the activation request calls for the extension with the same team and bundle identifiers but different version identifiers (e.g. CFBundleVersion vs CFBundleShortVersionString).
This method decides if there’s a need to substitute the current part of the application with a new version. The callback has the following arguments:
- request — The request that encountered the conflict
- existing — The NSBundle of the existing extension
- extension — The NSBundle of the extension matching the bundle identifier of the request
After the method decides whether to perform substitution, it returns a ReplacementAction — an action to resolve the conflict between extension versions.
Here are the options for resolving such conflicts:
- cancel — Cancels the replacement; the system extension will not be launched
- replace — Replaces the existing system extension
4. func request(_ request: OSSystemExtensionRequest, didFinishWithResult result: OSSystemExtensionRequest.Result) is called when the request is successfully executed.
The successful result has additional information in the form of arguments. Here are two examples of such arguments:
- completed — The request was successfully completed.
- willCompleteAfterReboot — The request will be successfully completed after a reboot.
Below are some possible callback functions from the delegate while loading a system extension:
func request(_ request: OSSystemExtensionRequest, didFailWithError error: Error) {
    os_log("System extension request failed %@", error.localizedDescription)
}


func requestNeedsUserApproval(_ request: OSSystemExtensionRequest) {
    os_log("System extension requires user approval")
}


func request(_ request: OSSystemExtensionRequest, actionForReplacingExtension existing: OSSystemExtensionProperties, withExtension extension: OSSystemExtensionProperties) -> OSSystemExtensionRequest.ReplacementAction {
    os_log("Replacing extension: %@ %@", existing, extension)
    return .replace
}


func request(_ request: OSSystemExtensionRequest, didFinishWithResult result: OSSystemExtensionRequest.Result) {
    os_log("System extension activating request result: %d", result.rawValue)
}Let’s take a look at new capabilities of the Network Extension framework. We’ll also show you how to use it to block network connections.
Related project
Developing Drivers for Low Latency Virtual Reality Headsets
Find out the benefits of developing a custom driver for VR headsets designed for professional training. We reveal insights of building a high-quality driver with stable performance and high bandwidth for data transfer.

Network Extension
The Network Extension framework allows a user to configure and extend key network features of macOS. For example, this framework helps you to configure a VPN and monitor or block network activity.
Network extension is a substitute for network kernel extension. Xcode 11 contains templates for creating network extensions. Some of this functionality was included in previous macOS versions, but it was augmented in macOS 10.15 Catalina. The network extension can be used as a system extension. This means if an application that launched a network extension is closed, the system extension will continue to work and will monitor and manage network traffic.
Let’s see how the Network Extension framework operates using the example of monitoring and blocking incoming network connections. The process consists of four steps:
- Adding a network extension provider
- Requesting activation of a system extension
- Configuring the filter and activating the system extension
- Shutting down the network extension and unloading the system extension
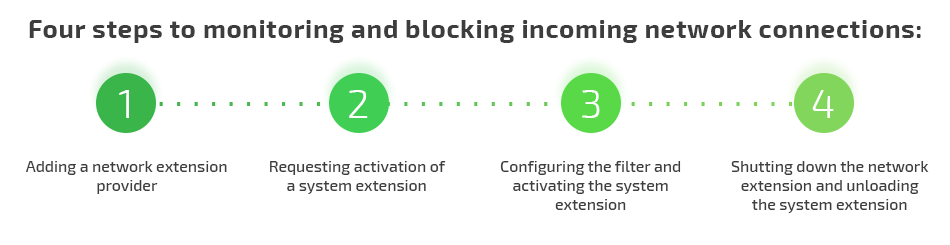
Let’s review this process in detail.
1. Adding a network extension provider
In previous macOS versions, when a new project target was created, Application Extensions supplied a network extension with two types of providers:
- AppProxy — Implements a VPN client for a flow-oriented, custom VPN protocol
- PacketTunnel — Implements a VPN client for a packet-oriented, custom VPN protocol
In macOS Catalina, Network Extension has additional types of providers:
- FilterData — Creates an on-device network data flow filter
- FilterPacket — Creates an on-device network packet filter
- DNSProxy — Creates an on-device DNS proxy
We’ll take a closer look at FilterDataProvider in the example below. FilterDataProvider allows a user to process methods for filter configuration, connection processing, etc. Let’s take a look at some of its functions.
The startFilter function is executed by the API when a filter is launched. It contains the completionHandler argument — a block that has to be called when the filter launch is completed. If an error occurs, the block has to receive an NSError with a non-null value. If there are no errors, the block receives the nil result.
The startFilter callback configures filter settings that are later applied with the Apply method.
Here’s an example of this function:
func startFilter(completionHandler: @escaping (Error?) -> Void)The stopFilter function is called when a filter is stopped and performs all the steps required to stop the filter. It contains the following arguments:
- reason — A NEProviderStopReason indicating why the filter is being stopped
- completionHandler — A block that must be called when the filter has been stopped
Here’s an example of the stopFilter function in use:
func stopFilter(with reason: NEProviderStopReason, completionHandler: @escaping () -> Void)The handleNewFlow function is called by a platform when it needs to make a decision about filtering a new network data flow. Using this function, you can associate a flow with the locally saved rules and return a corresponding result.
The flow argument contains data on the new flow.
The handleNewFlow method returns a verdict: NEFilterNewFlowVerdict. Here are the possible verdicts:
- allow — Indicates that the flow should be allowed
- drop — Indicates that the flow should be dropped
- pause — Indicates that none of the data provider’s handler callbacks should be called for the flow until after the flow is resumed
Here’s an example of the handleNewFlow function:
func handleNewFlow(_ flow: NEFilterFlow) -> NEFilterNewFlowVerdictFor this function, Transmission Control Protocol flows may be paused indefinitely. User Datagram Protocol flows will be dropped if not resumed within 10 seconds after being paused. It’s impossible to pause a flow that’s already paused.
If a new network data flow is paused, it can be resumed with the resumeFlow:withVerdict method. This method collects the flow argument and the decision to allow or drop the flow.
After we’ve configured and added a network filter, let’s activate the system extension.
Read also
How to Use Network Hooks for Proxying Network Activity in macOS
Explore the ways you can use network hooks for proxying network activity. Learn how to manipulate and control network activity in macOS systems.

2. Requesting activation of a system extension
Say we have a simple application with a system extension. The activation starts with calling the activationRequest method from the OSSystemExtensionRequest class. This method returns a system extension activation request that’s located in the Contents/Library/SystemExtensions folder of the main application.
Note: If an application creates a request and sends it to an active extension, it will be executed fast and without user interactions. But if a request is sent to an inactive extension, the application may require user confirmation.
An activation request may be successful, but it also may indicate the need for a system reboot. A system reboot can be required to deactivate and replace the running extension.
The activation request is created using the following arguments:
- forExtensionWithIdentifier — The bundle identifier of the target extension
- queue — The dispatch queue to use when calling delegate methods
Here’s an example of requesting and activating a system extension:
let activationRequest = OSSystemExtensionRequest.activationRequest(forExtensionWithIdentifier: extensionIdentifier, queue: .main)
activationRequest.delegate = self
OSSystemExtensionManager.shared.submitRequest(activationRequest)When this piece of code is executed, the operating system calls a method from a delegate. The delegate method returns an activation result or an error. The result options are the same as for the driver extension activation process described earlier.
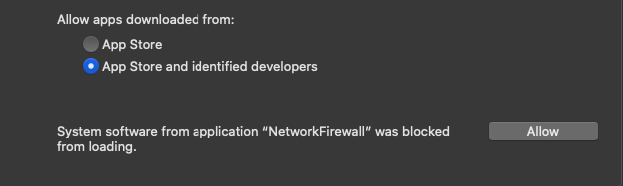
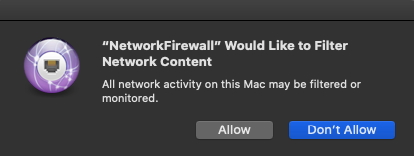
If the system extension is loaded for the first time, it may be blocked. In this case, macOS displays this warning:
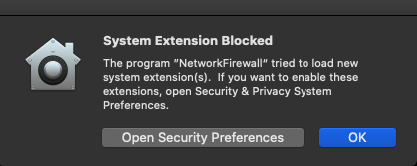
You can allow the extension to load in System Preferences → Security & Privacy:
At this point, we’ve requested activation of the system extension, but it hasn’t been activated yet. Let’s see how to start the system extension and manage network connections with it.
3. Configuring the filter and activating the system extension
Configuring a filter starts with calling the loadFromPreferences method from the NSFilterManager object. This call is necessary for loading the configuration. Also, this method has to be called at least once before calling the saveToPreferencesWithCompletionHandler method.
The loadFromPreferences method contains the completeHandler block that’s called after the configuration is loaded. If loading is successful, loadError will result in nil. If there’s an error during loading, loadError will indicate it. You can call the localizedDescription method to see the error description.
If filterManager is not configured, you need to call the NEFilterProviderConfiguration method, configure the necessary settings, and send them to the filterManager object. In order to save changes, call saveToPreferences from filterManager.
If the system extension is activated successfully, this piece of code is executed:
let filterManager = NEFilterManager.shared()

filterManager.loadFromPreferences { loadError in

    if let error = loadError {
        os_log("Failed to load preferences from filter manager: %@", error.localizedDescription)
        return
    }

    if filterManager.providerConfiguration == nil {
        let providerConfiguration = NEFilterProviderConfiguration()
        providerConfiguration.filterSockets = true
        providerConfiguration.filterPackets = false
        filterManager.providerConfiguration = providerConfiguration
        if let appName = Bundle.main.infoDictionary?["CFBundleName"] as? String {
            filterManager.localizedDescription = appName
        }
    }

    filterManager.isEnabled = true

    filterManager.saveToPreferences { saveError in
        if let error = saveError {
            os_log("Failed to save the filter configuration: %@", error.localizedDescription)
            return
        }

        self.registerWithProvider()
    }
}When the configuration is saved, macOS shows this warning:
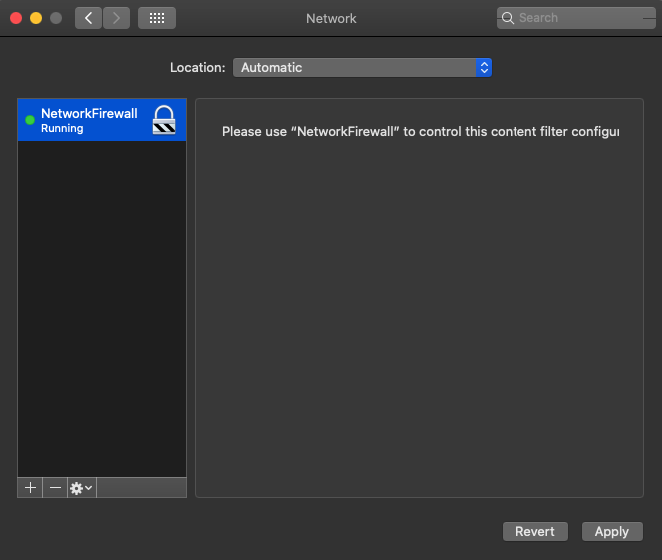
When you click Allow, the system starts the system extension module and begins monitoring network activity.
Also, a NetworkFirewall will appear in System Preferences → Network:
After that, the framework starts calling methods from the Network Extension Provider framework. In this way, the operating system can filter network connections.
Finally, let’s see how to deactivate network and system extensions.
4. Shutting down the network extension and unloading the system extension
Deactivating the network firewall resembles the process of activating it that we described earlier.
NEFilterManager contains the isEnabled field. In order to deactivate the filter, set this field value to “false” and save the preferences. Here’s an example of filter deactivation:
let filterManager = NEFilterManager.shared()

filterManager.isEnabled = true

filterManager.saveToPreferences { saveError in
    if let error = saveError {
        os_log("Failed to save the filter configuration: %@", error.localizedDescription)
        return
    }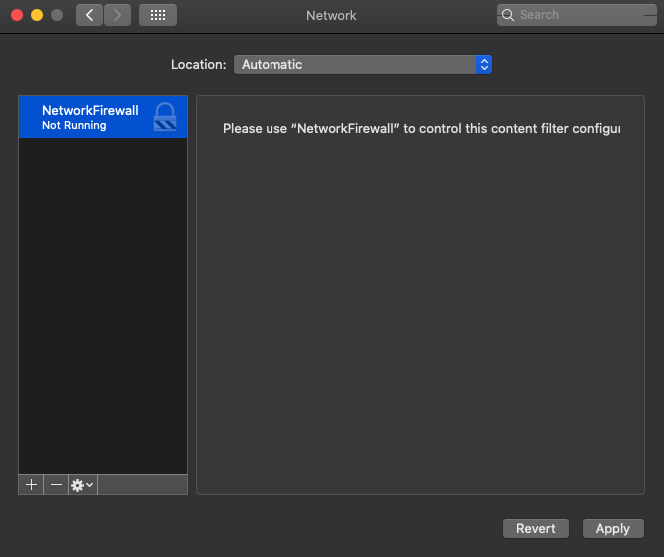
}The filter is shut down now. It’s displayed as “Not Running” in System Preferences → Network:
Deactivating a system extension in macOS 10.15 is similar to activating a network firewall. Here’s an example of the process:
let deactivationRequest = OSSystemExtensionRequest.deactivationRequest(forExtensionWithIdentifier: extensionIdentifier, queue: .main)
deactivationRequest.delegate = self
OSSystemExtensionManager.shared.submitRequest(deactivationRequest)When this code is executed, the system extension is stopped. Now let’s take a look at the final component of System Extensions framework.
Related project
Developing a Custom Secrets Management Desktop Application for Secure Password Sharing and Storage
Explore the real-life case of creating a custom application for secrets management that can work on macOS, Windows, and Linux.

Endpoint Security API
The Endpoint Security API allows you to monitor the system for malicious actions and stop them. It’s used to strengthen macOS Catalina security. The list of events it can manage includes:
- mounting file systems
- executing processes
- raising signals
- forking processes
In previous macOS versions, such events were monitored by Kauth.
The Endpoint Security lifecycle consists of three stages:
- Registering a client and installing a message handler
- Subscribing clients to events
- Unsubscribing and releasing clients
To illustrate the work of this type of extensions, let’s set up monitoring for the launch of new processes.
1. Registering a client and installing a message handler
Let’s call es_new_client to initialize a new es_client_t and connect it to the Endpoint Security subsystem.
Callers must be entitled with com.apple.developer.endpoint-security.client. If this entitlement isn’t set, the API will return a ES_NEW_CLIENT_RESULT_ERR_NOT_ENTITLED error.
Now, let’s install a handler block. It will be called whenever a message is sent to a client. The handle_event_message function will handle messages. Installing this block looks like this:
var client: OpaquePointer?

let result = es_new_client(&client) { (client, message) in
    handle_event_message(message);
}The message argument is an es_message_t structure. Let’s take a look at this structure and the message handling process.
The es_message_t structure is a high-level data type. The Endpoint Security API sends messages to its clients. These messages may be authorization requests that require a verdict or notifications about system events.
Let’s review several fields of this structure:
- action_type — Indicates if the action field is an authorization or notification action
- event_type — Indicates which event struct is defined in the event union
- process — Provides information on the process: process identifier (PID), group ID (GID), path, and so on
- event — Indicates various structures of events; depending on the type of event, information can be extracted from a specific structure
For example, in order to get information on the event process, we first need to check the event type. If the event isn’t a process launch, we can ignore its processing. Next, let’s log information on the process identifier (PID), parent process identifier (PPID), and process path. Here’s how it’s done:
func handle_event_message(_ msg: UnsafePointer<es_message_t>)
{
    if ES_EVENT_TYPE_NOTIFY_EXEC != msg.pointee.event_type {
        return
    }

    if let process = msg.pointee.process {
        os_log("PID: %d", audit_token_to_pid(process.pointee.audit_token))
        os_log("PPID: %d", process.pointee.ppid)

        if let executable = process.pointee.executable {
            os_log("Process file path: %{public}@", String(cString: executable.pointee.path.data))
        }
    }
}If the process is being launched, you can get information about it in the same way. The only change is that we should use msg.pointee.event.exec.target instead of msg.pointee.process. Both indicate the es_event_exec_t structure that contains information on the process.
It’s possible to stop process launches if the client is subscribed to the ES_ACTION_TYPE_AUTH type for starting new processes. Let’s see how to block a process when it’s launching.
The first step is to check the action type. If we don’t have to return a result, we’ll ignore further manipulations. If we have to return a result, we can provide it by calling es_respond_auth_result, which is contained in the ES_AUTH_RESULT_DENY parameter. All errors have to be logged; otherwise, the process will be blocked.
Here’s an example of blocking a process when it’s being launched:
let handlerBlock : es_handler_block_t = { (client, message) in

    if ES_ACTION_TYPE_AUTH != message.pointee.action_type {
        return
    }

    self.handle_event_message(message)

    let result = es_respond_auth_result(client, message, ES_AUTH_RESULT_DENY, false)

    if result != ES_RESPOND_RESULT_SUCCESS {
        os_log("Failed to respond auth result. Code: %u.", result.rawValue)
    }
}Let’s take a look at the es_respond_result_t es_respond_auth_result(es_client_t * _Nonnull client, const es_message_t * _Nonnull message, es_auth_result_t result, bool cache) function:
- client — The client that produced the event
- message — The message being responded to
- result — A result indicating the action the ES subsystem should take:
- ES_AUTH_RESULT_DENY — The event is not authorized and should be blocked.
- ES_AUTH_RESULT_ALLOW — The event is authorized and should be allowed to continue.
- cache — Indicates if this result should be cached
2. Subscribing clients to events
In order to subscribe clients to events, we have to clear all cached results by calling the es_clear_cache function. This function accepts any object created with es_new_client. After that, call es_subscribe to subscribe a client to an ES_EVENT_TYPE_AUTH_EXEC event. This event will take place before the launch of the process, thus allowing you to confirm or deny it.
This is what the subscription process looks like:
if let client = client {

    let cacheResult = es_clear_cache(client)

    if cacheResult != ES_CLEAR_CACHE_RESULT_SUCCESS {
        fatalError("Failed to clear cache")
    }

    var events = [ ES_EVENT_TYPE_NOTIFY_EXEC ]
    let ret = es_subscribe(client, &events, UInt32(events.count))

    if ret != ES_RETURN_SUCCESS {
        fatalError("Failed to subscribe events)
    }
}In this example, the client variable is created by calling the es_new_client function.
The es_return_t es_subscribe(es_client_t * _Nonnull client, es_event_type_t * _Nonnull events, uint32_t event_count) function accepts the following arguments:
- client — The client that will be subscribing
- events — The number of events the client must be subscribed to
- event_count — The number of events that were transferred to “events”
3. Unsubscribing and releasing clients
When event monitoring is finished, we need to clean up and free resources. To do so, we need to unsubscribe all events and release the client: delete the client, free resources, and disconnect the client from the Endpoint Security subsystem. It’s done this way:
if let client = client {
    es_unsubscribe_all(client);
    es_delete_client(client);
}After that, our client will be unsubscribed from all events. The client instance will be destroyed and disconnected from the Endpoint Security system.
Conclusion
In this article, we reviewed system extensions — new functionality in macOS 10.15 Catalina. This functionality includes three components:
- Driver Extension framework for managing hardware (includes the DriverKit SDK)
- Network Extension framework for configuring and extending macOS network functionality
- Endpoint Security API for tracking and preventing system events
System extensions extend the possibilities of macOS and allow developers to work with applications in the user space instead of the kernel space, avoiding kernel development. This new functionality makes macOS more reliable, secure, and easy to work with. Therefore, it’s best to use these new features for developing new solutions. However, you can still use kernel extensions to support existing software.
At Apriorit, we constantly monitor and research new macOS features. Our eagerness to learn combined with our extensive experience in macOS development, as well as kernel and driver development, means we’re up for any challenge.
Looking for skilled macOS developers?
Overcome all the challenges and deliver a robust macOS solution with the help of Aprioit’s experienced engineers.
Have a question?
Ask our expert!
VP of Innovation and Technology, Canada Branch Director


