 Skip to main content

Timely software modernization helps to keep software secure, efficient, and in compliance with legal requirements. But some types of modernization like refactoring require a great many resources to perform while posing a risk of introducing new bugs and vulnerabilities.
For software based on .NET technologies, there’s a great alternative to refactoring — implementing .NET Standard. It allows developers to upgrade their software without rewriting the code, make their software more portable and flexible, and introduce new features.
In this article, we discuss what .NET Standard is and what role it plays in the .NET ecosystem. We also show you how to migrate a project to .NET Standard in order to make it cross-platform and allow support for modern features.
This article will be useful for owners and developers of legacy .NET applications that are looking for ways to improve their software without significant investments of time and money.
Contents:
Why modernize legacy applications?
IT technologies change and improve so quickly that most software needs to be modernized shortly after its release. Here’s how Gartner defines legacy software that has to be upgraded:
Legacy application or a system is an information system that may be based on outdated technologies, but is critical to day-to-day operations. Replacing legacy applications and systems with systems based on new and different technologies is one of the information systems (IS) professional’s most significant challenges. As enterprises upgrade or change their technologies, they must ensure compatibility with old systems and data formats that are still in use
Gartner
Software modernization is a tricky and complex process of migrating, rewriting, or porting software to implement modern languages, platforms, libraries, and functionalities. Usually, the software modernization process consists of three key stages:
- Assessing the current state of the legacy software and defining modernization goals
- Choosing the type of modernization and planning the modernization process. At this stage, it’s important that developers and business management work together to define resources allocated for modernization and the possible impact on the business.
- Typical development and testing process
Timely software modernization provides companies with numerous benefits:
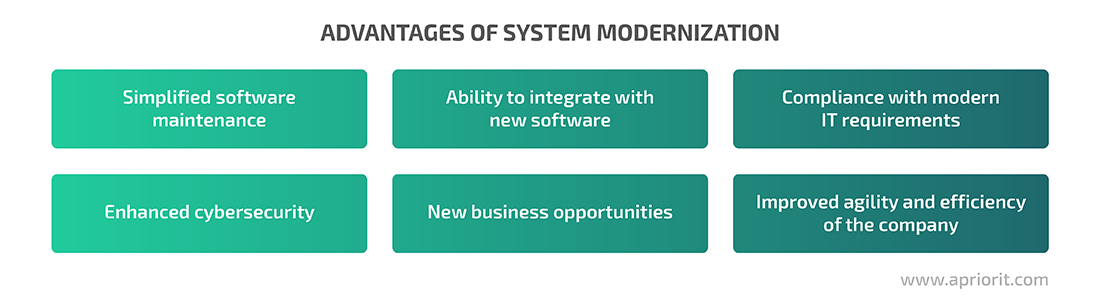
All of these benefits can significantly reduce an organization’s IT spending. For example, the US government planned to spend about $90 billion on IT in the 2019 fiscal year. Almost $80 billion of that was allocated to operating and maintaining existing IT systems, some of which are 51 years old. Modernizing this software to meet modern development standards could greatly reduce maintenance efforts and expenses.
Periodic system modernization is a must for companies that want to save their IT budgets in the long run and improve operational efficiency. One of the most common ways to modernize software is by refactoring code. However, there are many downsides to this method:
- It takes time to refactor and test the code. To rework application code, developers need knowledge of legacy technologies and ways to modernize them. The older the application, the more time developers need to bring it up to modern standards. After refactoring, software has to be tested from scratch, which also takes a lot of time.
- There’s a risk of introducing new bugs. Each change to legacy code brings the risk of creating new bugs, especially if refactoring is not done by the same developers who built the application.
- Refactoring is accompanied by possible downtime and business losses. During refactoring, software can be unstable, unproductive, or unavailable. This affects the operations of the organizations that use this software.

Because of these downsides, refactoring an application may not be the best way to modernize it. And with applications based on .NET technologies, it’s possible to perform legacy system modernization without refactoring. In particular, you can turn your .NET application into a cross-platform .NET solution by migrating it to .NET Standard.
Later in this article, we’ll analyze a practical example of such migration. But first, let’s explore what .NET Standard is and what role it plays in the .NET ecosystem.
Getting started with .NET Standard
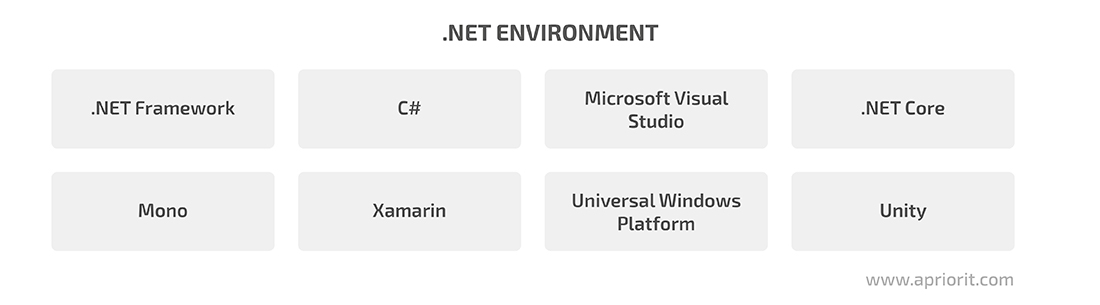
The .NET ecosystem contains so much more than the well-known .NET Framework, C#, and Microsoft Visual Studio. It also includes:
- .NET Core — A framework for Windows, Linux, and macOS applications that was designed to help developers create cross-platform applications in .NET
- Mono — A runtime similar to .NET Framework used for Android, iOS, and macOS applications
- Xamarin — An open-source platform for iOS, Android, and Windows application development
- Universal Windows Platform — A platform that allows for developing applications for Windows 10, Windows 10 Mobile, Xbox One, and HoloLens
- Unity — A platform for developing 2D and 3D applications in real time
With so many runtimes and platforms, developers need some common logic across all implementations in order to unify them and allow for code reuse. That is what .NET Standard is.
.NET Standard is a formal specification for .NET APIs. The keyword here is formal, because it’s not something that developers usually install in their systems. Its purpose is to share the same code standards between different .NET runtimes and platforms. System modernization with .NET Standard helps to make .NET applications more flexible and work across platforms within the .NET ecosystem.
Before the implementation of .NET Standard, developers used portable class libraries (PCLs) to reuse their code. But those libraries weren’t a one-size-fits-all solution, since they targeted only specific .NET runtimes. .NET Standard is a modern replacement for PCLs that has a high-level API, doesn’t depend on the target platform, and provides more robust options for platform-agnostic development.
Versions of .NET Standard are backwards compatible: Each new version of .NET Standard contains API surface areas for previous versions.
All .NET components support a specific version of .NET Standard. Its documentation provides the following compatibility table:
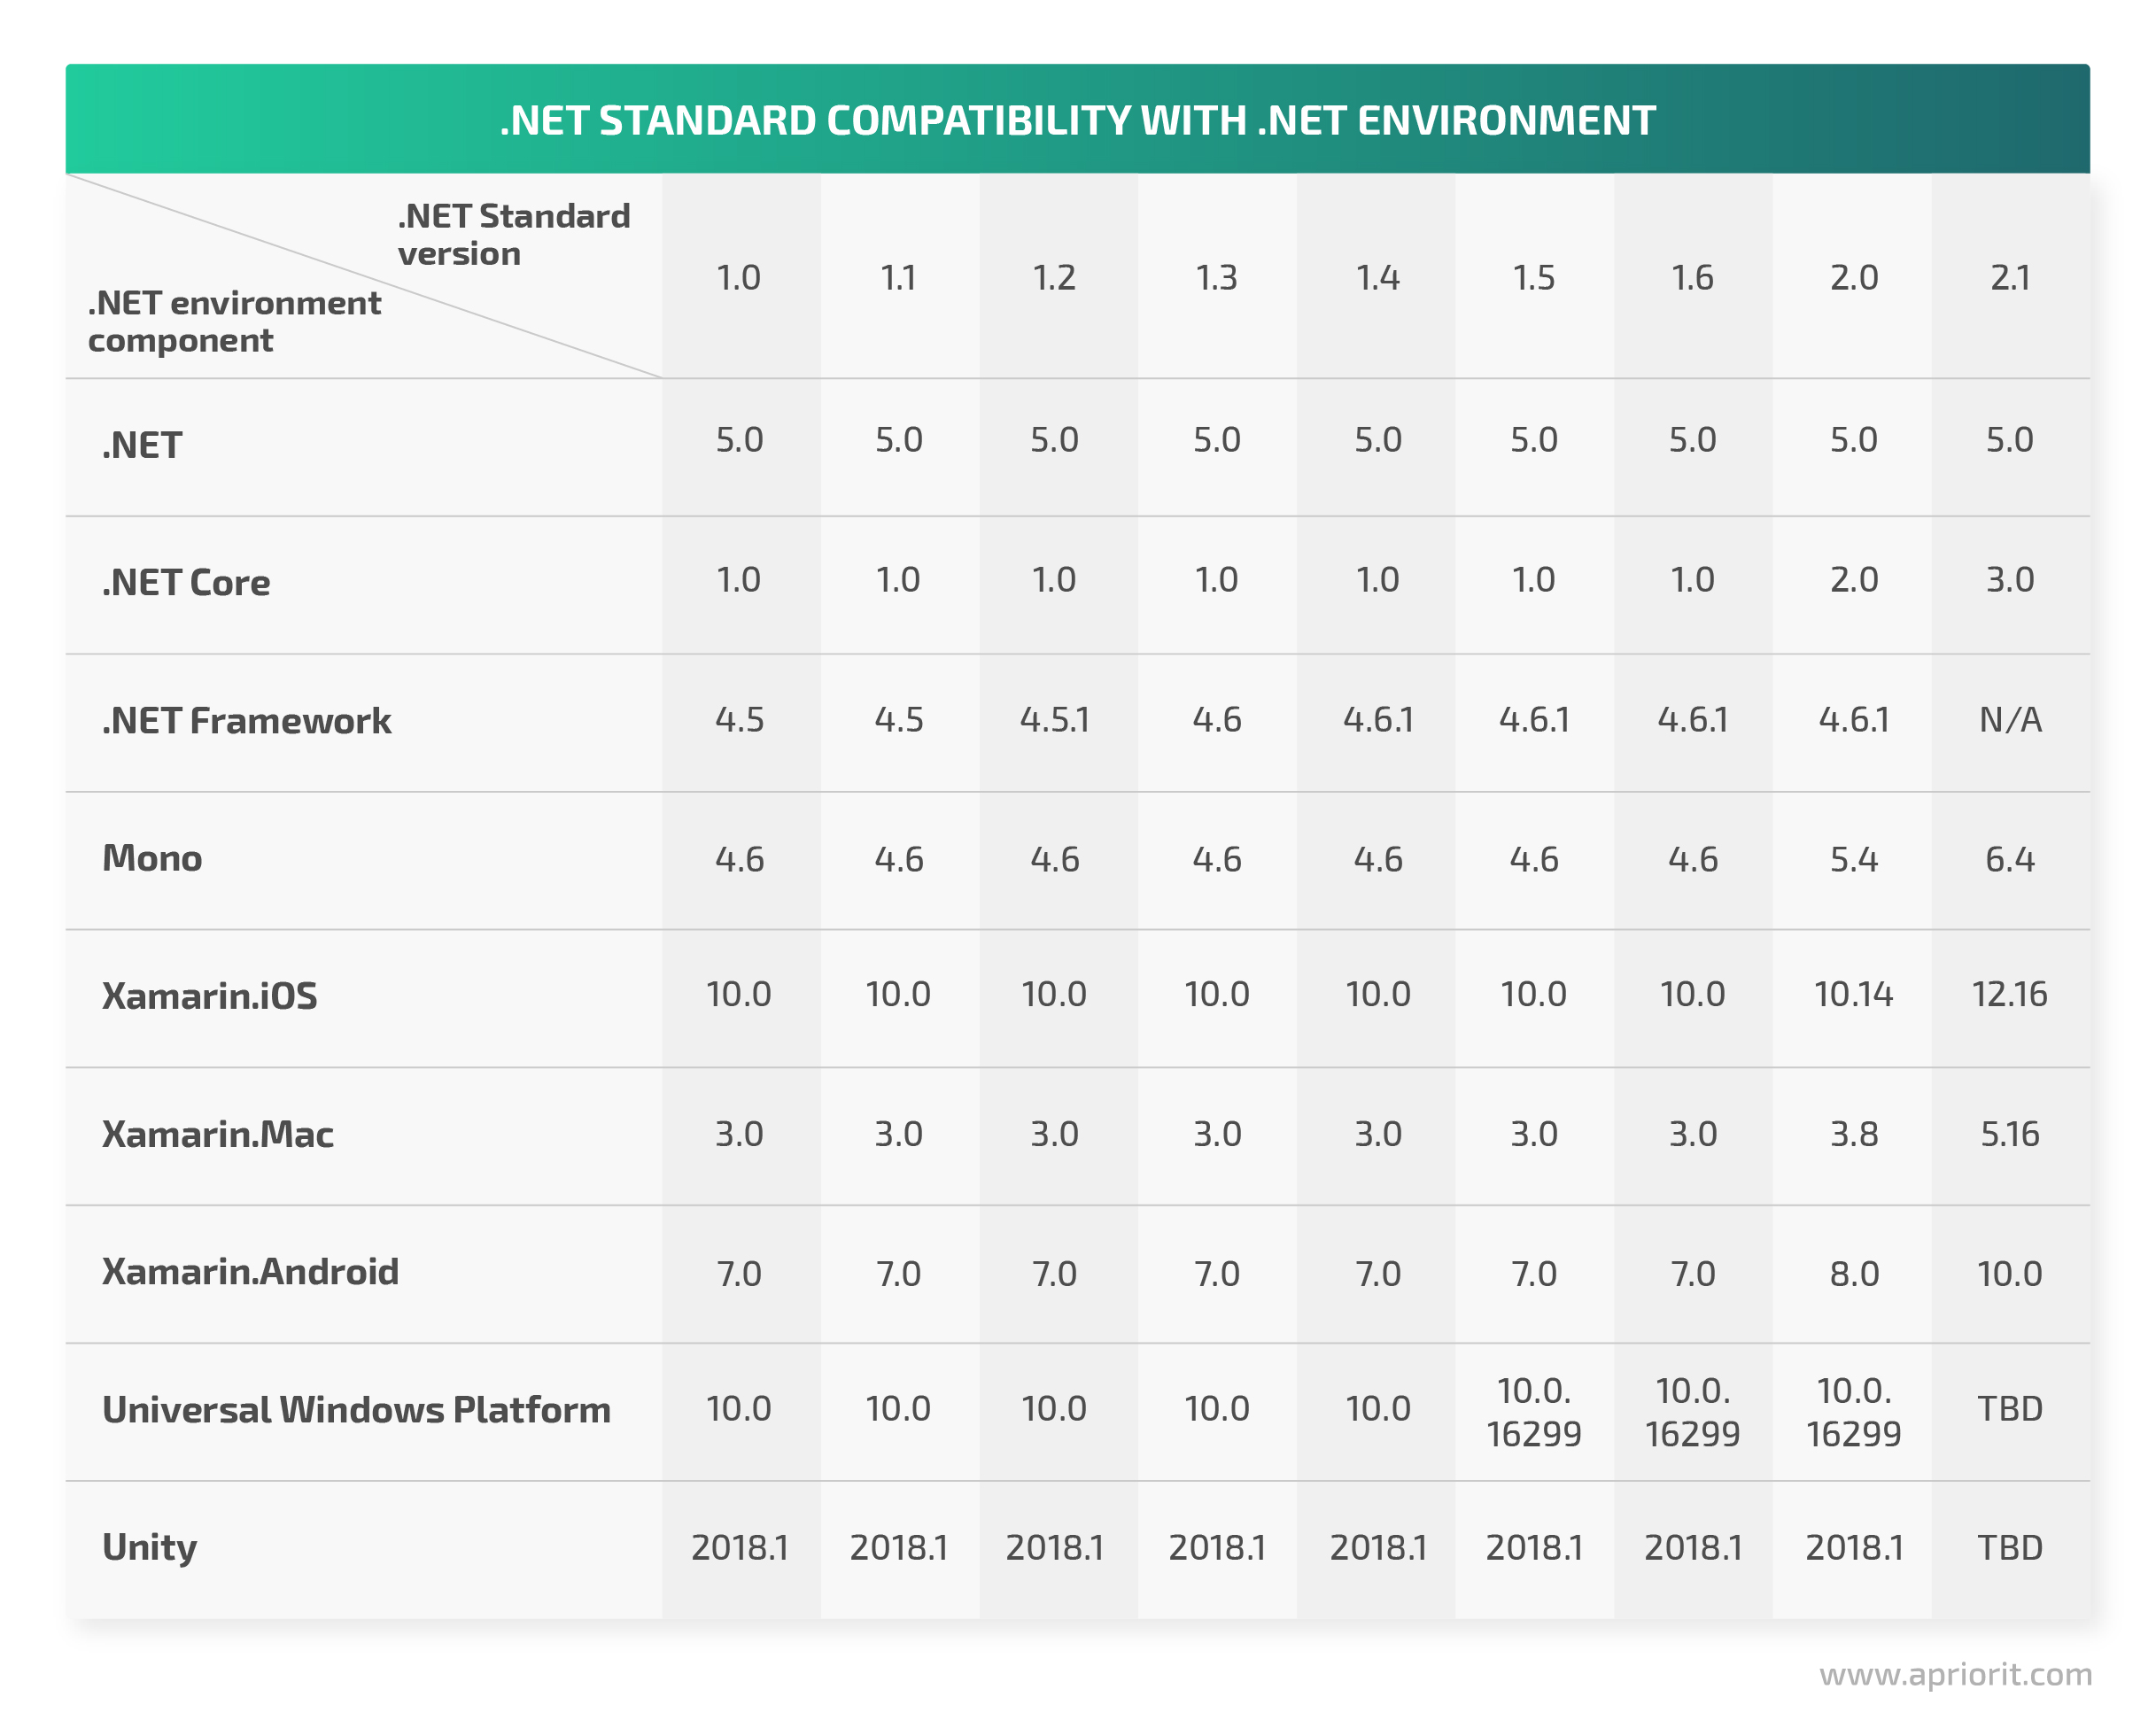
Note that the version numbers of .NET components correspond with the minimum supported version of .NET Standard. For example, it’s impossible to make a .NET Standard 2.0 application target .NET Framework 4.5.
It’s not always the best idea to simply target the newest .NET Standard version. For example, using the oldest version of .NET Standard makes a library compatible with more projects. But for application development, we’d want to use the latest .NET Standard with the newest features and APIs.
Now, let’s see how to migrate an app to .NET Standard.
Migrating a sample solution to .NET Standard
As an example, we’ll take a solution that targets .NET Framework 4.7.2 and will retarget it to support .NET Standard 1.5. The solution has the following dependencies:

First of all, we should analyze the compatibility of existing code with the targeted version of .NET Standard using the .NET Portability Analyzer extension. Once the extension is installed, we need to open the context menu on our project and click on Portability Analyzer Settings.
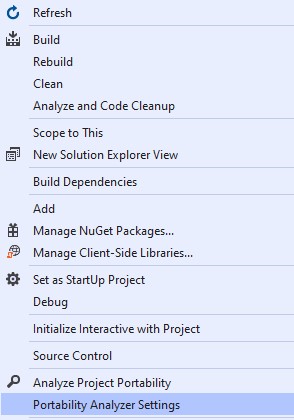
Figure 1. .NET portability analyzer dialog box
Then, we will go to the General section and choose the desired target platform, its version, and its output format.
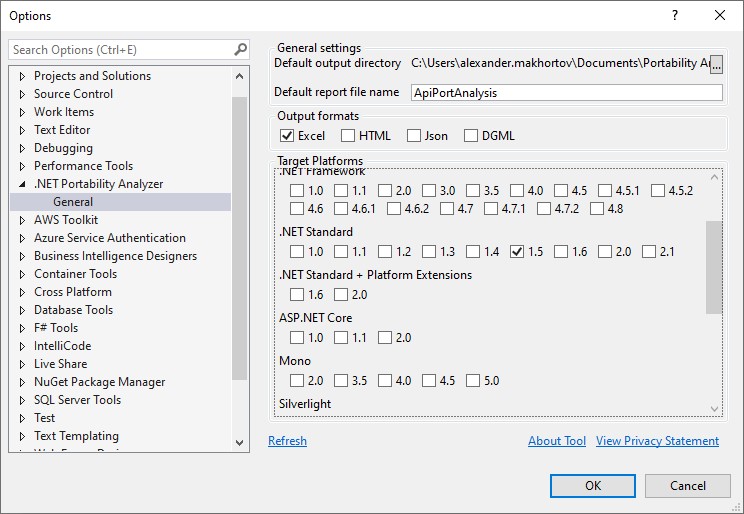
Figure 2. Choosing a target platform
After that, we will select the Analyze Project Portability tab in the context menu.
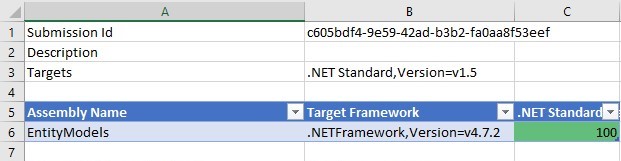
Figure 3. Analyze Project Portability tab
The information in this tab will be needed later for successfully migrating our project to .NET Standard.
Now, we can start the migration process. The first step is to edit the .csproj file from the EntityModels project. This file contains the description for .NET assembly, including files, configuration, referenced assemblies, and referenced packages. We need to replace the contents of the .csproj file from our project with the contents of the .csproj file template from the .NET SDK and fill out the required fields.
The file contents will look like this:
<Project Sdk="Microsoft.NET.Sdk">
  <PropertyGroup>
    <ProjectGuid>{57B99944-3533-4CA2-8A3B-17CEE4B2CCCB}</ProjectGuid>
    <RootNamespace>EntityModels</RootNamespace>
    <AssemblyName>EntityModels</AssemblyName>
    <TargetFramework>netstandard1.5</TargetFramework>
  </PropertyGroup>
  <PropertyGroup Condition="'$(Configuration)|$(Platform)'=='Debug|AnyCPU'">
    <DefineConstants>DEBUG;TRACE</DefineConstants>
  </PropertyGroup>
</Project>Next, we’ll port the DataMaps project, which has dependencies on other projects and external packages:
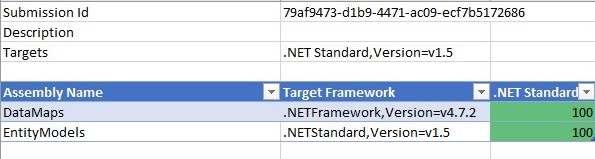
Figure 4. Analyze Project Portability tab after porting DataMaps
We will manually change the .csproj file from the DataMaps project in the same way we did for the previous project. After our manipulations, the file will look like this:
<Project Sdk="Microsoft.NET.Sdk">
  <PropertyGroup>
    <ProjectGuid>{C95EEDC7-FD98-47F7-B2D8-736574DFFEBF}</ProjectGuid>
    <RootNamespace>DataMaps</RootNamespace>
    <AssemblyName>DataMaps</AssemblyName>
    <TargetFramework>netstandard1.5</TargetFramework>
  </PropertyGroup>
  <ItemGroup>
    <PackageReference Include="Dapper.FluentMap.Dommel" Version="1.7.1" />
  </ItemGroup>
</Project>After executing this code, we see the CS0246 error. To fix this issue, we need to install a NuGet package or add a reference to a DLL. Sometimes, external packages support specific platforms and have various lists of dependencies for each platform. In our case, we decided to reference another assembly in this project:
<Project Sdk="Microsoft.NET.Sdk">
  <PropertyGroup>
    <ProjectGuid>{C95EEDC7-FD98-47F7-B2D8-736574DFFEBF}</ProjectGuid>
    <RootNamespace>DataMaps</RootNamespace>
    <AssemblyName>DataMaps</AssemblyName>
    <TargetFramework>netstandard1.5</TargetFramework>
  </PropertyGroup>
  <ItemGroup>
    <PackageReference Include="Dapper.FluentMap.Dommel" Version="1.7.1" />
  </ItemGroup>
  <ItemGroup>
    <ProjectReference Include="..EntityModelsEntityModels.csproj">
      <Project>{57b99944-3533-4ca2-8a3b-17cee4b2cccb}</Project>
      <Name>EntityModels</Name>
    </ProjectReference>
  </ItemGroup>
</Project>In the Analyze Project Portability tab, we can see that projects we haven’t yet migrated to .NET Standard don’t fully support it. Therefore, we’ll need to manipulate them before retargeting to .NET Standard.
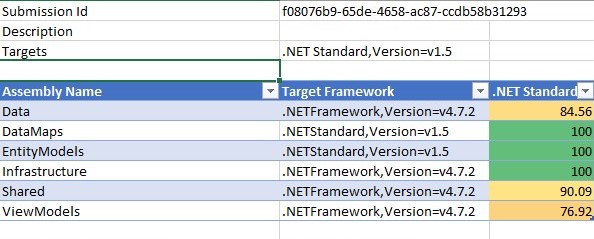
Figure 5. Analyze Project Portability tab with all projects in our solution
Now, we need to start reworking the Data, Shares, and ViewModels projects. Let’s go to the Details tab of the analyzer’s report and filter records with the ViewModels assembly.
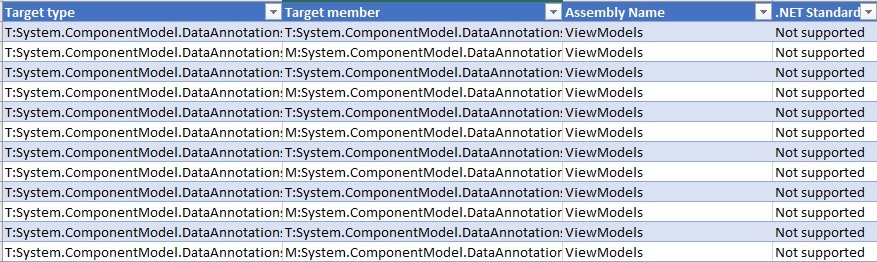
Figure 6. Details of the ViewModels project
We can see that DataAnnotations attributes, which we can use to validate data, aren’t supported in .NET Standard. In this case, we need to substitute them with data validation rules from the FluentValidation extension.
After these manipulations, let’s run the analyzer again.
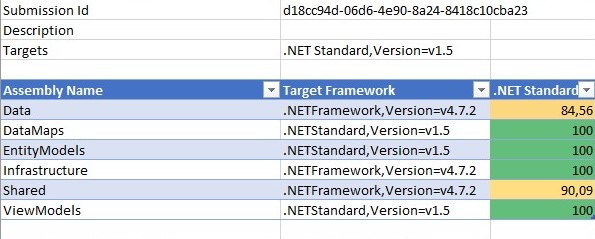
Figure 7. Three of our projects now target .NET Standard
Next, let’s migrate the Shared project to .NET Standard. Once again, we need to take a closer look at it in the Details tab in the analyzer to see if it supports .NET Standard:

Figure 8. Details of the Shared project
As you can see, this project supports only .NET Standard 2.0 and higher. In order not to downgrade it, we’ll target the Shared project and its dependencies (EntityModels and ViewModels) to .NET Standard 2.0. We are still going to migrate all other projects that aren’t dependent on Shared to .NET Standard 1.5.
Here’s how we target the Shared project and its dependencies:
<Project Sdk="Microsoft.NET.Sdk">
  <PropertyGroup>
    <ProjectGuid>{838B39D1-3392-4700-8A72-6EC2AF83B104}</ProjectGuid>
    <RootNamespace>Shared</RootNamespace>
    <AssemblyName>Shared</AssemblyName>
    <TargetFramework>netstandard2</TargetFramework>
    <CopyLocalLockFileAssemblies>true</CopyLocalLockFileAssemblies>
  </PropertyGroup>
  <PropertyGroup Condition="'$(Configuration)|$(Platform)'=='Debug|AnyCPU'">
    <DefineConstants>DEBUG;TRACE</DefineConstants>
  </PropertyGroup>
  <ItemGroup>
    <Folder Include="Properties" />
  </ItemGroup>
  <ItemGroup>
    <PackageReference Include="AutoMapper" Version="9.0.0" />
  </ItemGroup>
  <ItemGroup>
    <ProjectReference Include="..EntityModelsEntityModels.csproj" />
    <ProjectReference Include="..ViewModelsViewModels.csproj" />
  </ItemGroup>
</Project>We’ll migrate the Infrastructure project to .Net Standard 1.5 in the same way.
Now, it’s time to run the analyzer on the Data project, but this time we will target .NET Standard 2.0 instead of 1.5.
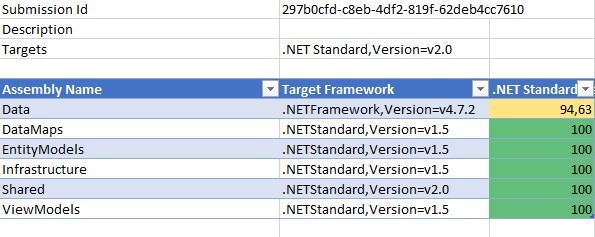
Figure 9. Only the Data project doesn’t target .NET Standard
This time, the results look better. The only thing left to deal with is the Data project.

Figure 10. Details of the Data project
As we did for previously migrated projects, we’ll change the .csproj file from the Data project to enable support for .NET Standard and reinstall NuGet packages.
Finally, we can build and try to run the application. However, if there are some NuGet DLLs missing in the output folder, the application won’t run and we’ll receive errors. To fix this, we have to add the following code to the .csproj files of all of our .NET Standard projects:
<PropertyGroup>
  <ProjectGuid>{838B9D1-33392-4700-6EC2AF83B104}</ProjectGuid>
  <<RootNamespace>Shared</RootNamespace>
  <AssemblyName>Shared</AssemblyName>
  <TargetFramework>netstandard2</TargetFramework>
  <CopyLocalFileAssemblies>true</CopyLocalFileAssemblies> // This flag indicates that referenced assemblies will be copied to the output folder
</PropertyGroup>At this point, we can try building and running the application once more. After building it, we get another error related to ConfigurationManager. Unfortunately, .NET Standard doesn’t support ConfigurationManager. To fix this issue, we can change the project to multitarget to allow it to target both .NET Standard 2.0 and .NET Framework 4.7.2. We can do this with the following code in the .csproj file:
<Project Sdk="Microsoft.NET.Sdk">
  <PropertyGroup>
    <ProjectGuid>{C8B1FBD3-0AC1-494D-87D9-2BE76F72FDD7}</ProjectGuid>
    <AppDesignerFolder>Properties</AppDesignerFolder>
    <RootNamespace>Properties</RootNamespace>
    <AssemblyName>Properties</AssemblyName>
    <TargetFramework>netstandard2;net472</TargetFramework> // Here we enable multitargeting for this project
    <CopyLocalLockFileAssemblies>true</CopyLocalLockFileAssemblies>
  </PropertyGroup>
  <PropertyGroup Condition="'$(Configuration)|$(Platform)'=='Debug|AnyCPU'">
    <DefineConstants>DEBUG;TRACE</DefineConstants>
  </PropertyGroup>
  <PropertyGroup Condition="'$(TargetFramework)'=='net472'">
    <DefineConstants>$(DefineConstraints);NET_FRAMEWORK</DefineConstants> // Here we indicate that C# is defined if the project targets .NET Framework
</PropertyGroup>Now, we have to rewrite the source code that needed ConfigurationManager accordingly. This is the only bit of refactoring we need to use in this example. The source code has to look like this:
#if NET_FRAMEWORK
            _connectionString = ConfigurationManager.
                ConnectionStrings["DataContext"].ConnectionString;
#else
            throw new NotImplementedException();
#endifThe project was originally built for .NET Framework 4.7.2, so when it needs to use ConfigurationManager, it will retarget from .NET Standard 2.0 to .NET Framework 4.7.2.
Also, check out our article where we discuss how businesses can benefit from adding the Places API to web solutions.
Conclusion
Legacy software modernization is a must for any outdated software. Using legacy IT systems leads only to higher support expenses, security vulnerabilities, and productivity losses. But modernization itself brings many challenges such as possible downtime, the risk of creating new vulnerabilities, and spending too much time and effort.
With applications based on .NET environments, it’s possible to avoid refactoring by modernizing an application with .NET Standard. In this article, we showed how to migrate a .NET Framework project to .NET Standard without rewriting it.
At Apriorit, our dedicated .NET development team always makes sure the .NET projects we develop are up to our customers’ tasks and follow the latest programming standards. Contact us and we’ll take care of upgrading your legacy system!
Have a question?
Ask our expert!
Program Manager


