To implement functionality that allows your macOS application to access files and folders on a remote server, you usually have to use third-party solutions to create your own file system. In iOS, this issue is eliminated thanks to the File Provider extension.
Apple has updated the documentation for the File Provider extension, adding macOS 10.15 and macOS 11 to the Availability section. However, they don’t provide much information on its implementation for macOS. We’re not sure when exactly Apple will officially announce the File Provider API for macOS and provide code examples. So we decided to research our own way to implement this API.
In this article, we show how to create a File Provider extension for macOS using the Finder Sync Extension template. As an example, we develop a PoC that has minimal functionality and displays a list of files on a virtual disk with no opportunity to modify their contents.
Contents:
What is File Provider and can we use it in macOS?
File Provider is a system extension that helps applications access files and folders synchronized with a remote server. It was first introduced by Apple for iOS 11.
This API lets developers build applications like iCloud, Dropbox, and OneDrive without the need to use third-party solutions like FUSE. Another significant benefit of File Provider is that you don’t need to develop any additional kernel extensions to create your own file system.
The first signs that it’s possible to use the File Provider API on macOS appeared when the line “macOS 10.15+” was added to the extension’s Availability section. Starting from macOS 11 Big Sur, Apple added more information to the official documentation and even described how File Provider works on macOS:

Figure 1. How File Provider works on macOS
Unlike iOS, for which the File Provider API implementation is explained in detail, macOS lacks official information and detailed examples for enabling this extension. For those who are curious about using the File Provider API on macOS, here’s what we have at the moment:
- File Provider API documentation with the list of supported macOS platforms
- A brief description of how the File Provider API works
- A page on macOS Support with simplified function descriptions and a “Create a File Provider extension for macOS” line
Using the File Provider API instead of third-party solutions can save lots of development time and simplify the process of building applications.
Although Apple hasn’t provided any code examples, we decided to create a File Provider extension for macOS on our own. Our attempt was successful, and we will now describe how we did it in detail.
Planning to launch software for macOS?
Partner up with Apriorit’s top macOS developers to create an efficient and secure solution!
Creating a File Provider extension for macOS 11
File Provider is an extension for macOS and not a separate application, though it’s distributed inside a usual Apple application in the Plugins folder. Any application can store the File Provider extension as long as both the app and the extension are created by the same developer and have the same Bundle ID.
To save time while creating a File Provider extension for macOS, we can use a template. An obvious solution would be to use a template from Xcode, but it doesn’t have one for the File Provider extension yet. That’s why we’ll take another template as a basis — Finder Sync Extension.
For the purposes of our experiment, we’ll develop a simple proof of concept (PoC) that can create a virtual disk and display a list of files on it. Let’s start with creating the virtual disk.
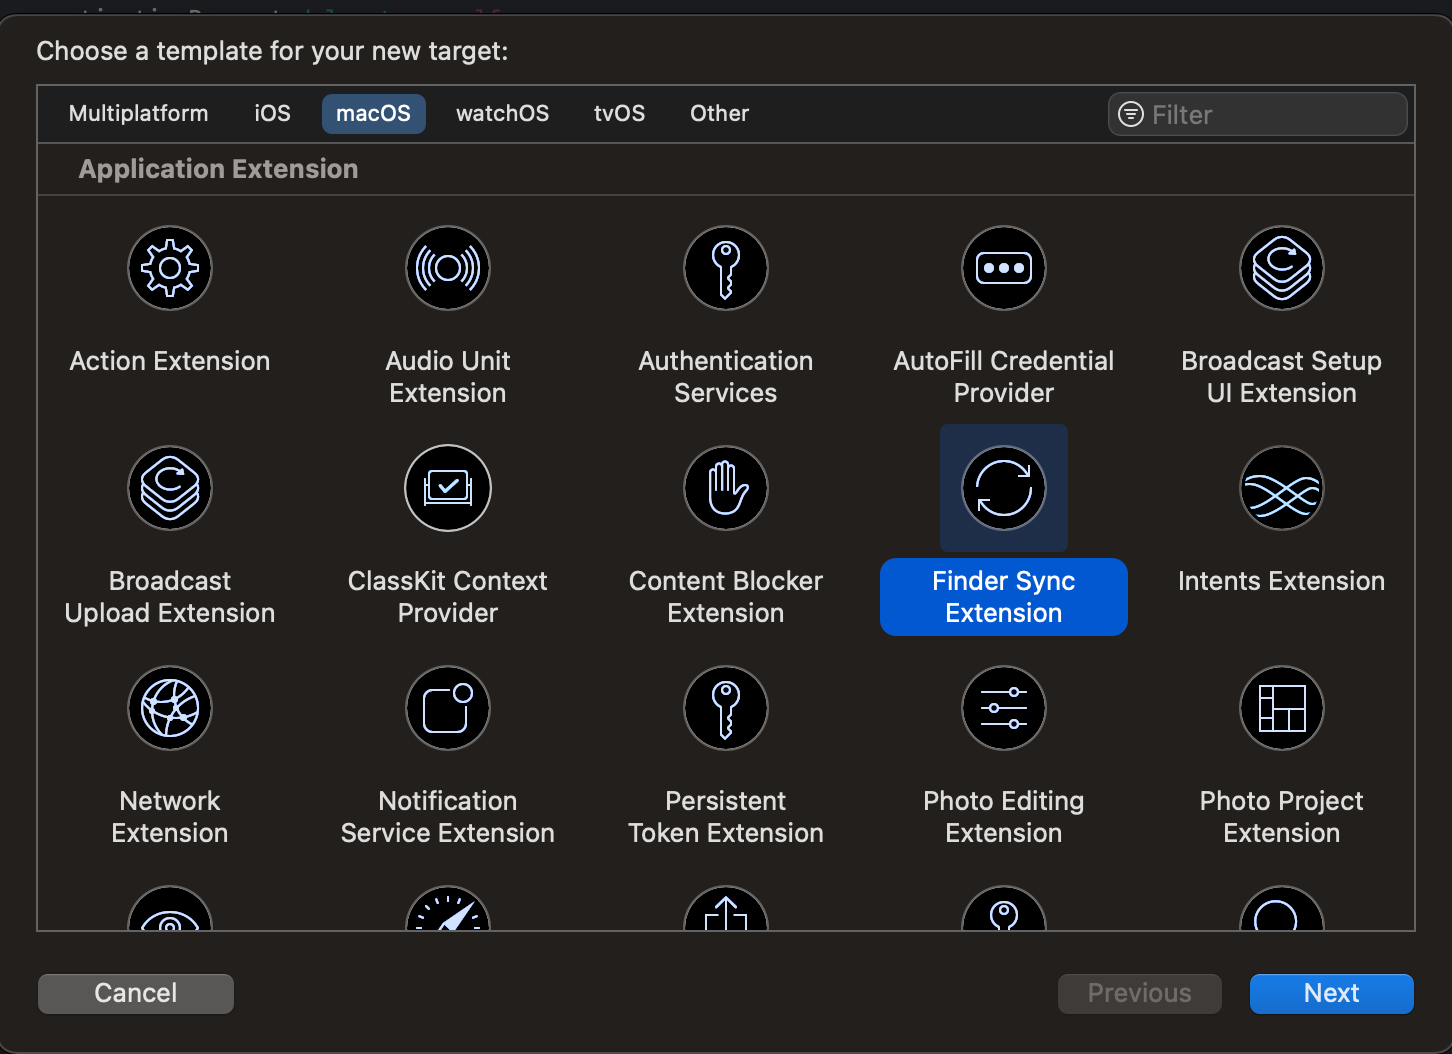
First, we create a new application (a so-called container) using a standard template. Then, we create a new target inside this application using the Finder Sync Extension template:

Figure 2. Developing an application using the Finder Sync Extension template
If we look into the File Provider extension on iOS, we can notice that all differences between the Finder Sync extension template and the iOS File Provider template are located in the Info.plist file that describes the characteristics of the application.
Here’s the code of the Info.plist file from iOS:
<key>NSExtension</key>
<dict>
    <key>NSExtensionFileProviderDocumentGroup</key>
    <string>group.com.yourappgroup</string>
    <key>NSExtensionFileProviderSupportsEnumeration</key>
    <true/>
    <key>NSExtensionPointIdentifier</key>
    <string>com.apple.fileprovider-nonui</string>
    <key>NSExtensionPrincipalClass</key>
    <string>FileProviderClass</string>
</dict>We’re not sure whether all the fields are required for our application, but let’s fill out all of them. Pay special attention to the FileProviderClass, which is responsible for starting the entire extension and is inherited from the NSFileProviderReplicatedExtension protocol.
The next step is to implement the main class — FileProviderClass — we just mentioned above. Here’s a piece from Apple’s documentation that will help us:
NSFileProviderReplicatedExtension. The system manages the content accessed through the File Provider extension. Available in macOS 11+.
In macOS, the system takes responsibility for monitoring and managing the local copies of your documents. The file provider focuses on syncing data between the local copy and the remote storage—uploading any local changes and downloading any remote changes. For more information, see NSFileProviderReplicatedExtension.
So, we need to inherit FileProviderClass from the NSFileProviderReplicatedExtension protocol and implement the required functions mentioned in the code below (for now, let’s use stubs):
- (instancetype)initWithDomain:(NSFileProviderDomain *)domain;
- (void)invalidate;
- (NSProgress *)itemForIdentifier:(NSFileProviderItemIdentifier)identifier request:(NSFileProviderRequest *)request completionHandler:(void(^)(NSFileProviderItem _Nullable, NSError * _Nullable))completionHandler;
- (NSProgress *)fetchContentsForItemWithIdentifier:(NSFileProviderItemIdentifier)itemIdentifier version:(nullable NSFileProviderItemVersion *)requestedVersion request:(NSFileProviderRequest *)request completionHandler:(void(^)(NSURL * _Nullable fileContents, NSFileProviderItem  _Nullable item, NSError * _Nullable error))completionHandler;
- (nullable id<nsfileproviderenumerator>)enumeratorForContainerItemIdentifier:(NSFileProviderItemIdentifier)containerItemIdentifier request:(NSFileProviderRequest *)request error:(NSError **)error;Then, we can move to installing the File Provider extension in macOS. Let’s do it the same way as in iOS:
let domain = NSFileProviderDomain(identifier: NSFileProviderDomainIdentifier("com.myapp.fileprovider"), displayName: "FileCloudSync") NSFileProviderManager.add(domain)
{
    error in print("Add file provider domain: \(error as NSError?)")
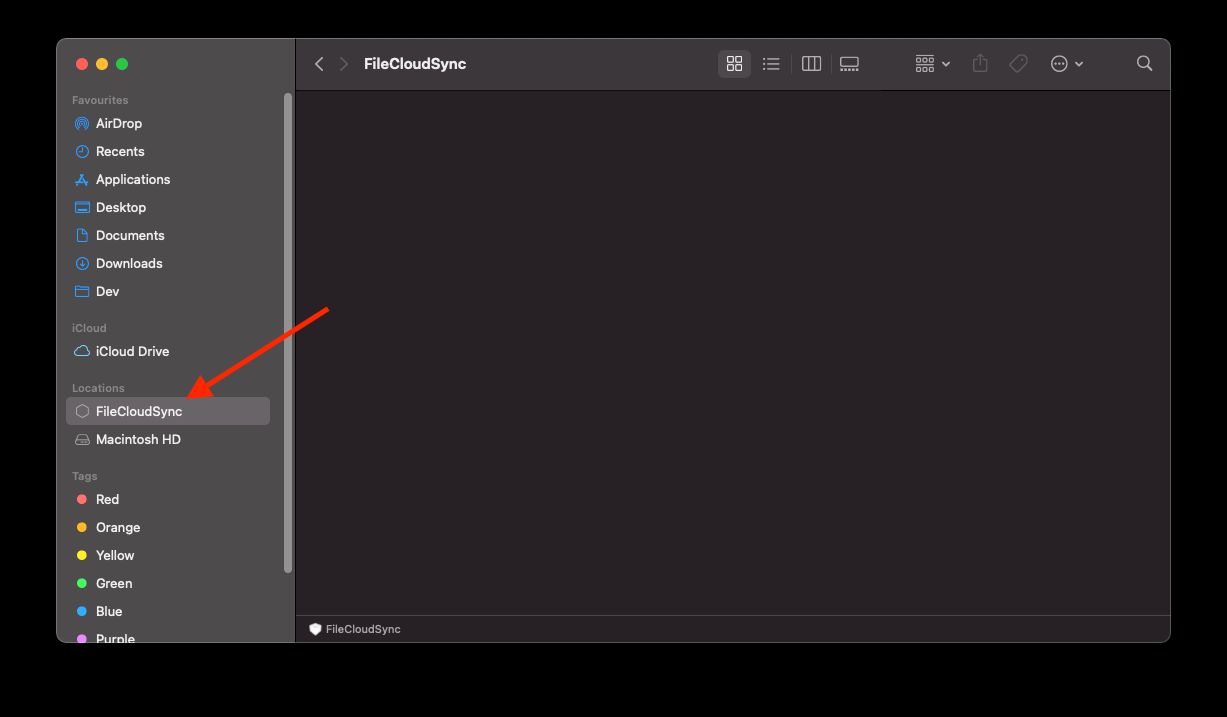
}Now, we run our application, which initializes the File Provider extension installation into the system (using the NSFileProviderManager.add() installer), and voilà — we see a new disk in the system:

Figure 3. Running an application and seeing a new disk in the system
We managed to create a virtual disk, but it’s empty for now. In the next section, we explore the main functionality for displaying files.
Related project
Cross-Platform Data Backup Solution Development: Windows, Android, macOS, iOS
Explore the case of expanding a data backup solution, allowing it to support three more platforms — macOS, iOS, and Android — in addition to Windows. Discover how Apriorit’s development efforts helped our client to double the total number of users.
Displaying files on the virtual disk
Initially, our extension doesn’t even try to load a file to our virtual disk (we have to initialize file uploading) or read its contents. To display files, the system needs metadata that describes the hierarchy of files and folders.
File Provider describes files using the NSFileProviderItem protocol. We need to inherit it and define the minimum number of required fields. Initially, the protocol lists only three fields that are required to be filled out for redeclaration:
@property (nonatomic, readonly, copy) NSFileProviderItemIdentifier itemIdentifier;
@property (nonatomic, readonly, copy) NSFileProviderItemIdentifier parentItemIdentifier;
@property (nonatomic, readonly, copy) NSString *filename;But it’s not that simple. If we go to the documentation (under the NSFileProviderItem header), we’ll see the following:
/** ContentType (UTType) for the item.
On macOS, items must implement contentType.
On iOS, items must implement either contentType or typeIdentifier.


Note that contentType is not available on iOS 13 and earlier, so typeIdentifier is required in order to target iOS 13 and earlier.
*/


@property (nonatomic, readonly, copy) UTType *contentType API_AVAILABLE(ios(14.0), macos(11.0));So, we have another mandatory field we have to fill out: contentType.
In addition, we implemented a few more fields:
@property (nonatomic, readonly) NSFileProviderItemCapabilities capabilities;
@property (nonatomic, readonly, copy, nullable) NSNumber *documentSize;
@property (nonatomic, readonly, copy, nullable) NSDate *creationDate;
@property (nonatomic, readonly, copy, nullable) NSDate *contentModificationDate;There are also lots of other fields, but they aren’t necessary for basic File Provider operation.
Also, we need to implement the NSFileProviderEnumerator protocol and several of its methods:
- (void)invalidate;
- (void)enumerateItemsForObserver:(id<nsfileproviderenumerationobserver>)observer startingAtPage:(NSFileProviderPage)page NS_SWIFT_NAME(enumerateItems(for:startingAt:));The code comments in the Apple framework’s headers also contain the following note that we should keep in mind:

So, we need to implement a few more methods:
- (void)enumerateChangesForObserver:(id<nsfileproviderchangeobserver>)observer fromSyncAnchor:(NSFileProviderSyncAnchor)syncAnchor NS_SWIFT_NAME(enumerateChanges(for:from:));
- (void)currentSyncAnchorWithCompletionHandler:(void(^)(_Nullable NSFileProviderSyncAnchor currentAnchor))completionHandler;Now, let’s look closer at the practical implementation of some classes and functions.
Read also
Developing Kernel Extensions (Kexts) for macOS
Reveal the insights of working with kernel extensions from Apriorit’s macOS development experts. We share tips and tricks for creating, signing, and installing macOS kexts.

Implementing key elements of File Provider
To ensure the basic functionality of our virtual disk, we need to implement at least the following:

Let’s take a closer look at each of these in detail.
NSFileProviderItem protocol
NSFileProviderItem is a protocol that defines the properties of an item managed by the File Provider extension. Here, we just need to fill out the fields and specify the file name.
Let’s look closer at some of these fields:
filename— must contain only the file’s name, not the entire file path.itemIdentifier— a unique file identifier. In this field, we need to specify the entire path to the file.parentItemIdentifier— a field containing the name of the parent itemIdentifier. If the file is located in a subfolder, then its parentItemIdentifier is the itemIdentifier of its parent folder.documentSize— specifies the size of the file.contentType— a class that describes a file or folder. It can be represented as RTF, PDF, MP3, DOC, or almost any other common file type. To determine the file type, you can use the [UTType typeWithFilenameExtension:…] function.
Also, there are three basic Item Identifiers that we need to handle:
- NSFileProviderRootContainerItemIdentifier — the persistent identifier for the root directory of the File Provider’s shared file hierarchy. All files in the root folder must have NSFileProviderRootContainerItemIdentifier as their Parent Identifier.
- NSFileProviderWorkingSetContainerItemIdentifier — the persistent identifier representing the working set of documents and directories that will be displayed in Recents, Favorites, and other folders.
- NSFileProviderTrashContainerItemIdentifier — the persistent identifier for the parent folder of all deleted items.
Note: If you make any mistake in the itemIdentifier–parentItemIdentifier hierarchy or specify the wrong contentType, all the files in the current folder won’t be displayed. Also, there won’t be any mention of errors in logs, which isn’t convenient for debugging.
NSFileProviderEnumerator protocol
The NSFileProviderEnumerator protocol is responsible for overriding a certain directory or pointing to changes made to it if an override was already performed. Functions in this protocol will be called only if a system requests a list of files in the directory or if external triggers are called that signal structural changes inside this directory.
The required functions of the NSFileProviderEnumerator protocol include:
1. -(void)enumerateItemsForObserver:(id<NSFileProviderEnumerationObserver>)observer startingAtPage:(NSFileProviderPage)page
This function is called by the system when you need to retrieve the contents of the target directory: for example, when a user opens a folder or a system receives a request to refresh the directory’s content.
Let’s explore a code example for requesting the list of files:
- (void)enumerateItemsForObserver:(id<nsfileproviderenumerationobserver>)observer startingAtPage:(NSFileProviderPage)page {
    NSMutableArray<syncitem> *items = [NSMutableArray new];
    NSArray<nsstring> *contents = [_server getListForPath:currentItemIdentifier];

    for (NSString *path in contents)
    {
        NSString *identifier = [Utils convertPathToIdentifier:path];
        FileProviderItem *item = [[FileProviderItem alloc] initWithItemIdentity:path];
        [items addObject:item];
    }


    [observer didEnumerateItems:items];
    [observer finishEnumeratingUpToPage:nil];
}Once we receive the list of files, we have to call two methods from the observer object: didEnumerateItems and finishEnumeratingUpToPage. We’re not obliged to call these methods in the context of the current function, so we can retrieve the list of files later and it won’t halt the system’s work.
If there are a significant number of files to display, the page parameter is required for continuous file uploading. However, in our example, we don’t have a lot of files to display, so we don’t need to use this parameter.
2. -(void)enumerateChangesForObserver:(id<NSFileProviderChangeObserver>) fromSyncAnchor:(NSFileProviderSyncAnchor)
This function is called when our server sends us a notification saying that files on the server have changed and that we need to download changes. To trigger the call of the enumerateChangesForObserver function, we need to call the signalEnumeratorForContainerItemIdentifier function:
[[NSFileProviderManager defaultManager] signalEnumeratorForContainerItemIdentifier:itemIdentifier completionHandler:^(NSError * _Nullable error){
    completionHandler(item, nil);
}];3. - (void)currentSyncAnchorWithCompletionHandler:(void(^)(_Nullable NSFileProviderSyncAnchor))
The system calls this function to determine whether the changes in the current folder were synchronized. We need to provide the NSFileProviderSyncAnchor class with user data. For example, a simple SyncAnchor class can use the time and date of the last successful update. After that, a request for the list of changes for this SyncAnchor class will only retrieve changes downloaded after the specified date.
Related project
Developing a Custom Secrets Management Desktop Application for Secure Password Sharing and Storage
Unveil the details of designing and developing a secrets manager as an on-demand solution with support for macOS, Windows, and Linux platforms. Check out how Apriorit developers helped our client improve the overall security score of their company by 30%.

NSFileProviderReplicatedExtension class
NSFileProviderReplicatedExtension is our main class created by the system at the launch of the File Provider extension. Using this class, we can retrieve metadata about a file and its contents. Also, the system will use this class to call functions that represent interactions between a user and files on our virtual disk. In this class, we can also create all NSFileProviderEnumerator classes for our folders.
The required functions of the NSFileProviderReplicatedExtension class include:
1. -(NSProgress *)itemForIdentifier:(NSFileProviderItemIdentifier) request:(NSFileProviderRequest *) completionHandler:(void(^)(NSFileProviderItem, NSError *))
This function helps the system receive metadata about a file. Also, it retrieves the NSProgress object that represents the current progress of downloading files from the server. Here’s how it works:
- (NSProgress *)itemForIdentifier:(NSFileProviderItemIdentifier)identifier request:(NSFileProviderRequest *)request completionHandler:(void(^)(NSFileProviderItem _Nullable, NSError * _Nullable))completionHandler
{
    NSProgress *progress = [NSProgress progressWithTotalUnitCount:1];
    FileProviderItem *item = [[FileProviderItem alloc] initWithItemIdentity:identifier];

    completionHandler(item, nil);

    return progress;
}2. -(NSProgress *)fetchContentsForItemWithIdentifier:(NSFileProviderItemIdentifier) version:(NSFileProviderItemVersion *) request:(NSFileProviderRequest *) completionHandler:(void(^)(NSURL *, NSFileProviderItem, NSError *))
This function helps the system receive the path to the already downloaded file in the temporary folder. After receiving the file path, the system can manipulate the file and copy it to other locations. Here’s an example of how this function works:
- (NSProgress *)fetchContentsForItemWithIdentifier:(NSFileProviderItemIdentifier)itemIdentifier version:(nullable NSFileProviderItemVersion *)requestedVersion request:(NSFileProviderRequest *)request completionHandler:(void(^)(NSURL * _Nullable fileContents, NSFileProviderItem _Nullable item, NSError * _Nullable error))completionHandler
{
    NSProgress *progress = [NSProgress progressWithTotalUnitCount:1];
    FileProviderItem *item = [[FileProviderItem alloc] initWithItemIdentity:itemIdentifier];

    completionHandler([Utils URLForDownloadedIdentifier:itemIdentifier], item, nil);

    return progress;
}3. -(NSProgress *)createItemBasedOnTemplate:(NSFileProviderItem) fields:(NSFileProviderItemFields) contents:(NSURL *) options:(NSFileProviderCreateItemOptions) request:(NSFileProviderRequest *) completionHandler:(void (^)(NSFileProviderItem, NSFileProviderItemFields, BOOL, NSError *))
4. -(NSProgress *)modifyItem:(NSFileProviderItem) baseVersion:(NSFileProviderItemVersion *) changedFields:(NSFileProviderItemFields) contents:(NSURL *) options:(NSFileProviderModifyItemOptions) request:(NSFileProviderRequest *) completionHandler:(void(^)(NSFileProviderItem, NSFileProviderItemField, BOOL, NSError *))
5. -(NSProgress *)deleteItemWithIdentifier:(NSFileProviderItemIdentifier) baseVersion:(NSFileProviderItemVersion *) options:(NSFileProviderDeleteItemOptions) request:(NSFileProviderRequest *) completionHandler:(void (^)(NSError *))
These three functions will be called when a user creates, modifies, or deletes a downloaded file on the virtual disk. For our PoC, we didn’t implement these functions, since our goal was to only list files without their contents and with an opportunity to modify them. However, we will need them when building a real application.
6. -(nullable id<NSFileProviderEnumerator>)enumeratorForContainerItemIdentifier:(NSFileProviderItemIdentifier) request:(NSFileProviderRequest *) error:(NSError **)
The system calls this function to list the folders on our virtual disk. Here, we have to retrieve our custom class inherited from the NSFileProviderEnumerator protocol. This class will be called by the system when it wants to get the contents of a certain folder.
Here’s how we create an object that will be requested by the system to receive the contents of a folder:
- (nullable id<nsfileproviderenumerator>)enumeratorForContainerItemIdentifier:(NSFileProviderItemIdentifier)containerItemIdentifier request:(NSFileProviderRequest *)request error:(NSError **)error
{
    error = nil;
    return [[FileEnumerator alloc] initWithItemIdentifier:containerItemIdentifier];
}Note: For each Identifier, we need to create its own main class, inherited from the NSFileProviderEnumerator protocol.
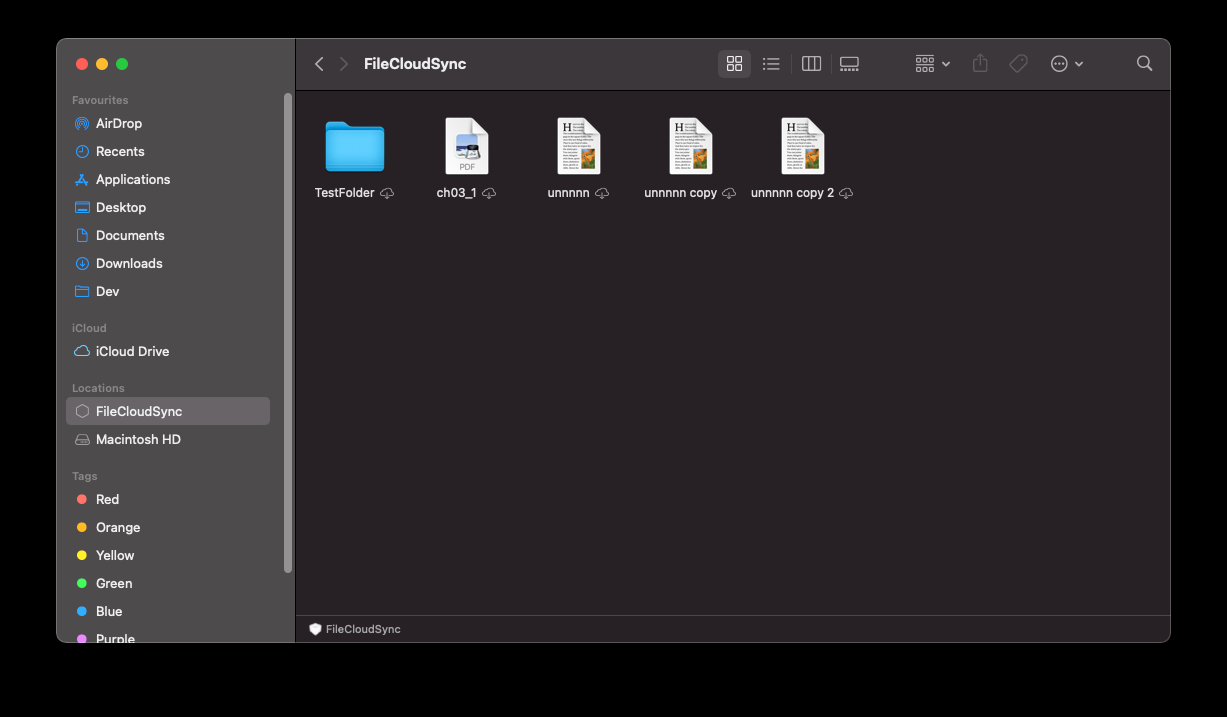
As a result, we get a list of files on our virtual disk:

Figure 4. A list of files on our virtual disk
That’s all. This is the minimum functionality you need when developing a virtual disk using the File Provider API on macOS.
Conclusion
In this article, we showed you how you can implement the File Provider API in your macOS application, starting from macOS 11.
At this point, Apple hasn’t officially presented this API for macOS, and the File Provider documentation contains additional classes and functions with the Beta label. We expect Apple to provide more information on how to build the File Provider API for macOS after the announcement of macOS 12. However, the API’s basic functionality already works well on macOS 11, which we proved with our small PoC.
At Apriorit, we have an experienced macOS development team ready to help you create efficient and bug-free solutions.
Have a macOS-related project in mind?
Whatever task you have in mind, Apriorit’s expert macOS developers are ready to help you overcome tricky challenges and deliver the solution you expect.


