 Skip to main content
Malicious actors often target user and admin credentials because they hope to use them to access sensitive data. According to Verizon, credentials accounted for up to 85% of data compromised by social engineering attacks in 2021. To steal user credentials, hackers can use malware or various password cracking methods.
Weak password policies and lack of protection from password cracking are two of the most common vulnerabilities that lead to account compromise.
In this article, we discuss the danger of password cracking and offer best practices to mitigate malicious authentication attempts. We also explore how the Fail2ban service can help you secure access to user accounts and provide a step-by-step guide on how to configure Fail2ban, along with sharing our own experience in configuring Fail2ban notifications in a Viber chatbot.
This article will help web product owners and software development teams to identify and eliminate vulnerabilities of their Linux servers.
Contents:
What is password cracking?
To access a web application, users need to create a profile inside the system. To do that, users typically create a login and password as credentials for securing account access. Depending on the application type, they also may have to provide additional data like personal information, messages, and bank accounts. All this data is valuable to threat actors, who can attempt to gain access to user profiles from different applications using various password stealing methods.
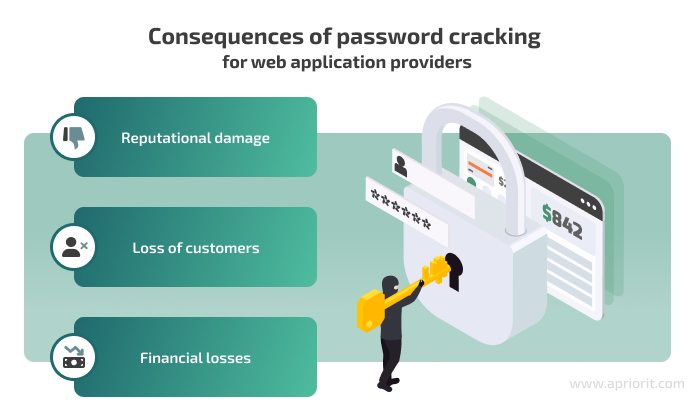
When developing a web application, it’s essential to keep risks of password theft in mind and implement robust security mechanisms to mitigate them. Otherwise, if attackers manage to access user accounts and expose personal information, web application providers can face consequences such as loss of customers and reputational damage. They are also likely to bear financial losses if users decide to bring a case to court.
One way to steal users’ data is with password cracking.
The main goal of this approach is to guess passwords for applications or computer services. The technique itself is not necessarily malicious, and it can be used in security testing as a target vulnerability validation technique.
Password cracking is a process of recovering passwords from password hashes stored in a computer system or transmitted over networks. It is usually performed during assessments to identify accounts with weak passwords.
NIST SP 800-115 Technical Guide to Information Security Testing and Assessment
When applying password cracking techniques, hackers often use special applications and tools that apply multiple credential variants until they find the correct pair. The number of credentials per second that the password cracking application applies to guess a password depends on the performance of the attacker’s computer. Also, the time required to guess a user’s password depends on the password strength.
There are various password cracking methods:
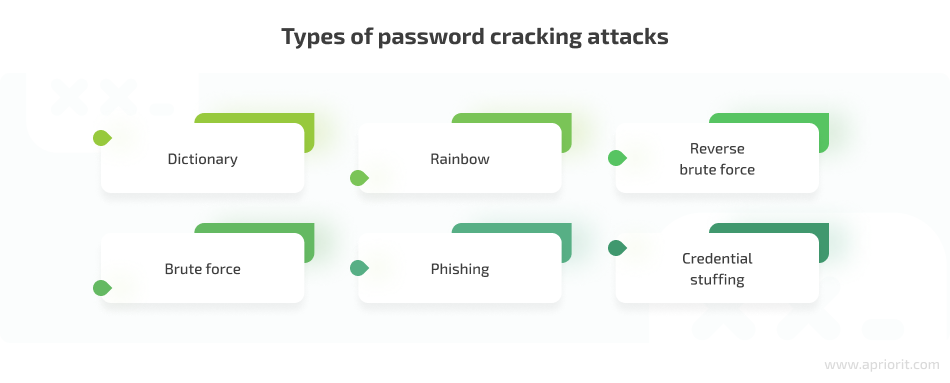
A dictionary attack is a method of getting access to an IT resource by systematically entering every word in a dictionary as a password. Hackers often use cracking dictionaries, which store frequently used passwords and familiar words, such as names and places in different languages. Such dictionaries can also include previously stolen user credentials that hackers collect and add. Dictionary attacks are a fast way of guessing weak passwords, but usually they aren’t successful with uncommon and strong passwords.
A brute force attack is a straightforward trial-and-error method that focuses on generating all possible passwords up to a certain length. Hackers check for all password combinations, including combinations of all letters, numbers, and special symbols, starting with the minimal possible password length. The number of possible combinations depends on the length of the password. In theory, this method of cracking gives a 100% success rate. It’s only a matter of time, as a short password can be guessed in minutes, while a very long and complex password can take decades to crack.
Rainbow attacks. Most applications encrypt user passwords using hashes and store them in an encrypted form. Hackers use rainbow tables that store pre-computed password hashes to crack the password hashes in a database.
Phishing. With phishing, attackers trick users to click an email attachment or a URL link leading them to sign in to a fake version of a web application and reveal their password.
Reverse brute force. Malicious actors use a common password against multiple usernames to gain access to an account.
Credential stuffing. If hackers know the username and password of a compromised account, they can try to use this combination across multiple systems where this user might have accounts. According to Security eMagazine, 53% of people admit to using the same password for different accounts.
Hoping that attackers will fail to crack the passwords of your web application’s users is not an option. So let’s explore how to protect users’ data from password cracking and mitigate the cybersecurity risks of account compromise.
7 ways to protect your web application from password cracking
To secure your product’s user accounts from being compromised, you need to implement a comprehensive approach. Below, we discuss the seven most necessary cybersecurity practices to mitigate password cracking.
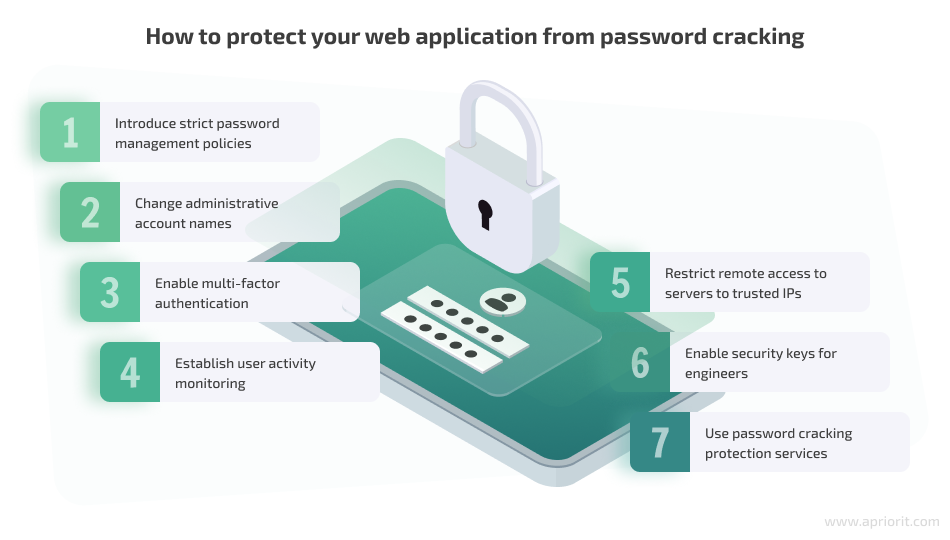
1. Introduce strict password management policies
The more complex passwords are, the more complicated it is for hackers to crack them. Make sure your developers configure your application’s password rules to keep users from creating weak credentials.
When creating a list of password rules, consider researching what top tech organizations recommend and use. For example, you can check the password policy recommendations from NIST Special Publication 800-63-3 Digital Identity Guidelines and have a peek at what reliable products like Microsoft 365 and IBM Security Privileged Identity Manager recommend for password security.
Common best practices for password policies include the following:
- Passwords should contain special symbols, numbers, and both lowercase and uppercase letters.
- The minimum password length should be eight symbols. The longer, the better.
- Passwords should expire and be changed within a specified time period: every month, once every three months, twice a year, etc.
- Your application should have a password history so that when a user changes a password, it can check the new password against all previous passwords. A new password should be approved only if it’s actually new.
2. Change administrative account names
Avoid obvious usernames for administrative accounts like “administrator,” “admin,” or “root.” Such usernames are likely to be the first target for threat actors when they launch password cracking attacks.
3. Enable multi-factor authentication
Secure user access to your application with multi-factor authentication (MFA). Such authentication tools make users perform two or more steps before they can log in to an application.
The first step usually requires a traditional login and password. During the following steps, users can be required to type in a security code from an SMS, use a token, provide a fingerprint, etc.
Even if threat actors successfully guess credentials, MFA will be another obstacle for accessing user accounts.
4. Establish user activity monitoring
Consider implementing user activity monitoring solutions as part of your web application security. Such solutions gather information on all user activity within your infrastructure, so if unusual user behavior occurs that might be a sign of a password cracking attack, you can spot it.
User monitoring solutions are often used together with sophisticated software like AI-driven access control tools that analyze gathered user activity data, detect anomalies, and either block suspicious attempts to log in or notify security engineers about potential threats.
For example, such solutions can save device details and IP addresses of user machines. If anyone tries to log in from a different IP address or device, an access control tool can apply additional MFA methods or restrict access.
5. Restrict remote access to servers to trusted IPs
Your administrator and engineer accounts can also suffer from password cracking attacks. So make sure that remote access to your servers is enabled only for trusted IP addresses.
For example, you can provide access to the IP addresses of engineers who need to access servers in their daily routine. To do that, you can use firewalls (or security groups if you use cloud provider services).
6. Enable security keys for engineers
Engineers who need to access servers remotely should generate security keys. For example, these could be SSH keys for SSH access. This way, admins can securely connect to servers or other machines remotely without needing to use a login and password. SSH key authentication secures access to servers and encrypts traffic in transit between the client and the server.
Another method of passwordless access to servers is using hardware security keys like FIDO2 or Google Titan. These are USB devices that can be used instead of common authentication methods.
In such cases, accessing servers using a login and password should be disabled. Access should be allowed only for key holders. Passwords can’t be cracked if they’re absent.
7. Use password cracking protection services
Last but not least, there are special tools designed to protect services against password cracking.
Generally, such tools automatically scan login attempts and block IP addresses that show malicious signs, such as too many password failures. The most popular of these tools are:
At Apriorit, we prefer working with Fail2ban, as it’s convenient to use and efficient at blocking potentially malicious authentication attempts. Let’s take a closer look at Fail2ban and discuss how to configure and use it in practice.
What is Fail2ban and how does it work?
Fail2ban is a tool for scanning log files, detecting suspicious activity such as too many failed authentication attempts, and blocking potentially malicious IP addresses.
This free service helps protect Linux machines from brute forcing and other automated attacks. Usually, Fail2ban is used to update firewall rules to reject IP addresses for a specified amount of time.
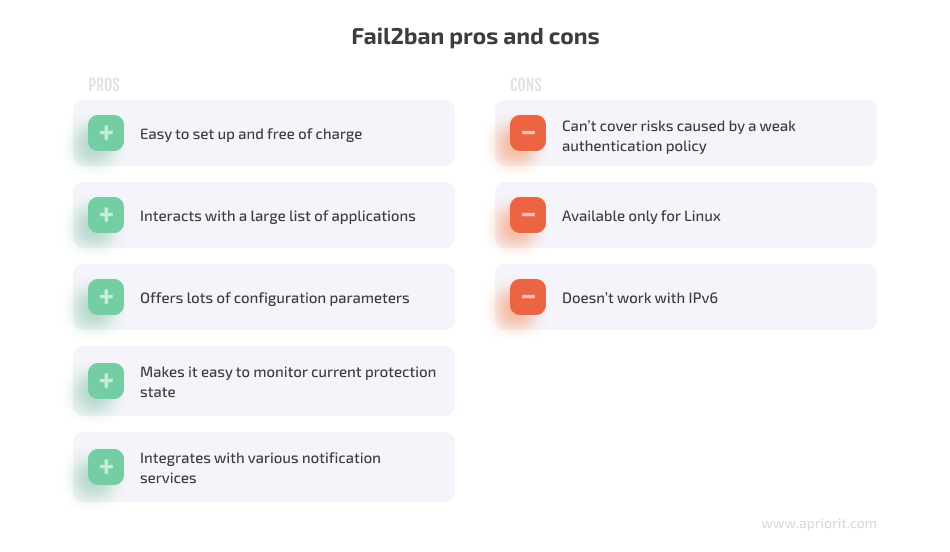
Fail2ban has the following benefits:
- Easy to set up
- Free to use
- Can interact with a large list of applications
- Offers lots of configuration parameters
- Easy to monitor current protection state
- Integrates with various notification services
Although Fail2ban can help you minimize the number of incorrect authentication attempts and somewhat reduce the risks of password cracking and unauthorized access, it isn’t a silver bullet.
On the downside, Fail2ban can’t cover issues that arise because of a weak server authentication policy. Even the best Fail2ban configuration can’t substitute for the password protection best practices we discussed above. Also, Fail2ban is available only for Linux and doesn’t work with IPv6.
To efficiently secure your services, you could also apply tools for multi-factor and public/private authentication mechanisms.
How does Fail2ban work?
Here’s a simple explanation of its mechanism:
- Any application or server always saves logs in specific files, including unique logs of failed authentication attempts.
- Fail2ban scans those files, searching for logs related to failed authentication.
- If a failed authentication attempt is detected, Fail2ban saves the time of the attempt and the responsible IP address.
- Fail2ban counts failed authentication attempts from the same IP during the specified period of time.
- If the IP address exceeds the number of allowed attempts, Fail2ban creates a new firewall rule to block this IP address.
As a result, a suspicious IP address will lose the ability to access the server. After a configurable period of time, the IP address can be unbanned automatically, or you can unban it manually.
For example, you can configure Fail2ban in a way that if any threat actor starts a password cracking attack, their IP address will be banned for five hours.
Now, let’s explore the configuration process itself.
How to configure Fail2ban
You can configure Fail2ban to read logs of different applications. Out of the box, this tool can interact with the following application types:
- SSH servers
- HTTP servers
- Webmail and groupware servers
- Web applications
- HTTP proxy servers
- FTP servers
- Mail servers
- Mail server authenticators
- DNS servers
- Various server applications from various categories
By default, Fail2ban enables communication using the sshd, an OpenSSH server process. This means that after several failed SSH authentication attempts, the responsible IP addresses will be banned.
To interact with any application, Fail2ban uses a Jail, which is a combination of one filter and one or several actions. This interaction allows you to ban IP addresses after failed authentication attempts.
Jail configurations are saved to the jail.conf file by default. If you want to change the default settings, copy the configuration file and name the copy jail.local. If a jail.local file exists, Fail2ban will use it automatically instead of the default one.
We don’t recommend making changes to the original configuration file because in case of any mistake, it will be challenging to go back to the default settings. Also, once a new update for Fail2ban is installed, the jail.conf file will be updated as well, and all your custom settings will be gone.
Here’s how Fail2ban determines failed authentication attempts:
- The tool has a path to the log files of services written in the jail.local configuration file.
- Failed authentication logs and regular exceptions are automatically added to the Fail2ban text filter.
- The tool scans log files using the text filter.
If you open the configuration file, you’ll find a fairly large list of applications that Fail2ban can interact with. The names of these applications are in brackets, as shown in the example code below:
# Mail servers
[assp]
port = smtp,465,submission
logpath = /root/path/to/assp/logs/maillog.txt

[courier-smtp]
port = smtp,465,submission
logpath = %(syslog_mail)s
backend = %(syslog_backend)s

[postfix]
# To use another modes set filter parameter "mode" in jail.local:
mode = more
port = smtp,465,submission
logpath = %(postfix_log)s
backend = %(postfix_backend)s

[postfix-rbl]
filter = postfix[mode=rbl]
port = smtp,465,submission
logpath = %(postfix_log)s
backend = %(postfix_backend)s
maxretry = 1[assp]
port = smtp,465,submission logpath = /root/path/to/assp/logs/maillog.txt [courier-smtp]
port = smtp,465,submission logpath = %(syslog_mail)s backend = %(syslog_backend)s [postfix]
# To use another modes set filter parameter u0022modeu0022 in jail.local: mode = more port = smtp,465,submission logpath = %(postfix_log)s backend = %(postfix_backend)s[postfix-rbl]
filter = postfix[mode=rbl] port = smtp,465,submission logpath = %(postfix_log)s backend = %(postfix_backend)s maxretry = 1By default, Fail2ban is configured to only work with SSH, and all other communication protocols are disabled. If you need to enable other types of communication, find the required type in the configuration file and add the following string:
enabled = trueHere’s an example:
{code}
[nginx-http-auth]
[nginx-http-auth]
enabled = true
port = http, https
logpath = %(nginx_error_log)sIf needed, you can also change existing parameters of the interaction with a certain application or add new ones. Here’s a list of commonly used parameters:
- ignoreip specifies an IP address to be ignored by Fail2ban. By default, this parameter is set to ignore the current machine’s traffic.
bantime sets the ban duration in seconds. The default value is 600 seconds. - findtime defines the time period for monitoring failed authentication attempts coming from every IP address. The default value is 600 seconds.
- maxretry specifies the limit of failed login attempts for each address during the time specified in findtime.
- usedns determines whether reverse DNS is used in blocking. If set to NO, then Fail2ban will block IP addresses instead of hostnames. If set to YES, the tool will attempt to use reverse DNS to look up the hostname and block it. The value by default is WARN. It works just like the YES value, but also logs a warning. A system engineer can later review all warnings.
- protocol specifies the type of traffic that will be blocked. By default it’s TCP.
- port specifies ports to be banned.
- logpath shows a path to the log file.
Note: The list above doesn’t describe all Fail2ban parameters. You can find all of them in the configuration file.
You can find the log file paths that are set by default in the logpath parameters (for instance, nginx_error_log from the code example above) in files from the /etc/fail2ban folder:
- paths-common.conf — a file with default service log paths
- paths-opensuse.conf, paths-arch.conf, paths-debian.conf — files that contain specific paths for different Linux systems
If you open the files mentioned above, you can see paths to log files similar to these:
apache_error_log = /var/log/apache2/*error.log
apache_access_log = /var/log/apache2/*access.log
auditd_log = /var/log/audit/audit.log
exim_main_log = /var/log/exim/mainlog
nginx_error_log = /var/log/nginx/*error.log
nginx_access_log = /var/log/nginx/*access.logIf necessary, you can edit the filters that indicate what text should be searched in the logs in order to determine failed authentication. Each filter is located in a separate file in the /etc/fail2ban/filter.d folder.
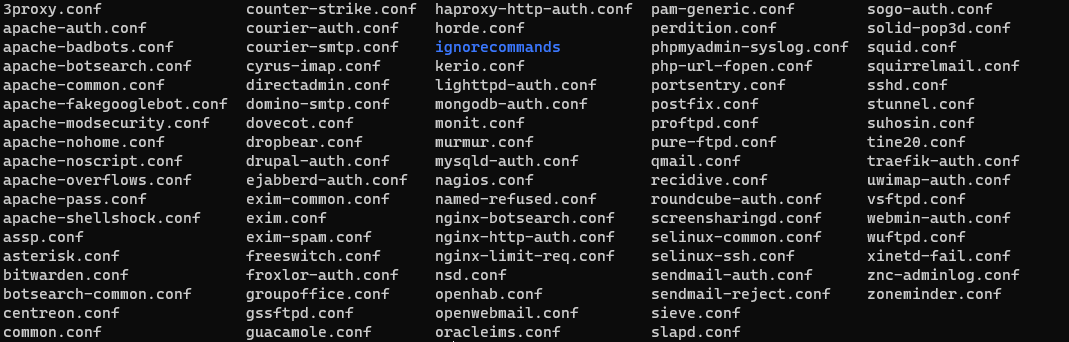
Screenshot 1. A list of filters inside the /etc/fail2ban/filter.d folder
When you open any filter file, you’ll see a regular expression with the required failed authentication text, as shown in the example below:
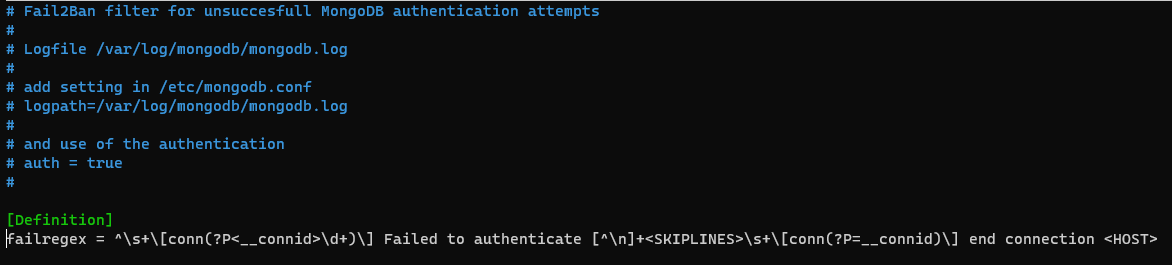
Screenshot 2. Filter text for failed authentication
Once configuration is completed, reload Fail2ban using the following command:
sudo fail2ban-client reloadIf you change the settings of only one Jail file, you don’t need to restart the tool. Just reload it using this command:
sudo fail2ban-client reload <jail>Also, you can configure Fail2ban to interact with any application that is absent in the configuration file. All you need to do is add your custom configurations as described above.
How to use Fail2ban
To check which Jails are currently enabled, use the following command:
sudo fail2ban-client statusHere’s an example of the response:
Status
|- Number of jail: 2
`- Jail list: nginx-http-auth, sshdAs you can see, nginx-http-auth and sshd Jails are enabled on the server. If you want to check the values of any Jail parameter, you don’t need to open the configuration file; just use the following command:
sudo fail2ban-client get <<jail><param>Here’s a code example that shows us that sshd Jail maxretry is equal to 5:
sudo fail2ban-client get sshd maxretry 5If a Jail exceeds its limit for failed authentication attempts, Fail2ban will ban the port specified in the Jail configuration for the IP address. To check the Jail status, use the following command:
sudo fail2ban-client status <jail>Here’s an example of a response that shows us that two IP addresses are currently banned from SSH access:
Status for the jail: sshd
|- Filter
|  |- Currently failed:     0
|  |- Total failed:            25
|  `- File list:                  /var/log/auth.log
`- Actions
   |- Currently banned: 2
   |- Total banned:        5
`- Banned IP list: 192.168.10.107 192.168.10.115If you try to access the server when your IP is in the ban list, you get a “Connection refused” error like this one:
ssh: connect to host 192.168.10.105 port 22: Connection refusedIf the IP address was banned by any HTTP server Jail, the error will be similar:
curl: (7) Failed to connect to 192.168.10.105 port 80: Connection refusedYou can also add any IP address to the ban list manually using the following command:
sudo fail2ban-client set <jail> banip <ip>Here’s an example:
sudo fail2ban-client set nginx-http-auth banip 10.100.1.210To manually unban an IP address, use the following command:
sudo fail2ban-client set <jail> unbanip <ip>Here’s an example:
sudo fail2ban-client set nginx-http-auth unbanip 10.100.1.210With that in mind, let’s move to configuring notifications in Fail2ban.
Read also:
How to Develop Smart Chatbots Using Python: Examples of Developing AI- and ML-Driven Chatbots
How to configure a Viber chatbot to receive Fail2ban notifications
If you want to monitor Fail2ban activity, configure real-time activity notifications with these three steps:
- Configure any notification service you want to use
- Prepare the Fail2ban action configuration file
- Update the action parameter’s value in the jail.local file
Fail2ban has configurations for working with email services. All you need to do is configure the service on the server.
But what if you want to get notifications with a messenger service like Viber? Let’s discuss how you can configure it!
First of all, to use Viber as a notification service, you need to create a Viber chatbot. You can find documentation on Viber chatbot setup and configuration on the Viber API Documentation page.
Once your chatbot is ready, make sure to take the following steps:
1. Get the Viber chatbot’s authentication token. You can find it on the Viber Admin Panel page.
2. Find your user ID in the list of all users subscribed to the Viber chatbot. To do that, use the following HTTP request:
curl -X POST https://chatapi.viber.com/pa/get_account_info -H 'X-Viber-Auth-Token: <auth token="">The response will show you a list of members, as shown in the example below:
"members":[{"id":"<user id="">","name":"John Doe","role":"admin"}]Choose the ID of the necessary member and copy it.
Now, you can start configuring Fail2ban. Go to the /etc/fail2ban/action.d folder that contains configurations for all possible Fail2ban actions.
Create a new configuration file for Viber notifications. Let’s name it viber_notifications.conf. Now add the following content to the file:
#Sending Viber notifications
[Definition]
#Notify on Ban
actionban = curl -X POST https://chatapi.viber.com/pa/send_message \
            -H 'X-Viber-Auth-Token: <auth token="">' \
            -d '{"receiver":"<user id="">", "sender":{"name":"Fail2ban"},"min_api_version":1,"type":"text","text":"**<name>** BANNED **<ip>** for <bantime> seconds after **<failures>** failures"}'

#Notify on Unban
actionunban = curl -X POST https://chatapi.viber.com/pa/send_message \
              -H 'X-Viber-Auth-Token: <auth token="">' \
              -d '{"receiver":"<user id="">", "sender":{"name":"Fail2ban"},"min_api_version":1,"type":"text","text":"**<ip>** is UNBANNED by **<name>**"}'
[Init]
name = defaultLet’s figure out what the strings above mean and what we can configure:
- The actionban and actionunban parameters describe the actions that need to be performed when Fail2ban bans or unbans a suspicious IP address. In our case, it’s HTTP requests that will send the message from your Viber chatbot to the user you specify.
- <Auth Token> and <user id> are parameters we discussed earlier. Just paste your authentication token and the username that you copied.
- sender is the parameter for configuring the name of the notification sender. In our example, we use the name “Fail2ban”.
- type is a parameter that helps you configure the message type. You can send different message types using Viber. In our example, we use the text type.
- text is a parameter that contains the message the bot will send. You can add different variables to the text. For example,
<ip>stands for a banned IP address,<name>for Jail name, and<failures>for failures count. name = defaultis a string that means that the Jail name will be assigned dynamically
Our next step is to configure jail.local. To do that, you need to add an action parameter in the necessary Jail section or update the default parameter in the [DEFAULT] section. The parameter should contain two actions: the first for IP banning and the second for Viber notifications.
Here’s an example of using the action parameter
action = %(action_)s
viber_notificationsNote: %(action_)s is a default action value. This action will ban the IP addresses. Let’s add our Viber action configuration name “viber_notifications” to the second string.
Now, because there were changes made to the jail.conf file, you need to reload the Fail2ban client and restart the service:
sudo fail2ban-client reload
systemctl restart fail2banThe chatbot will look like this:
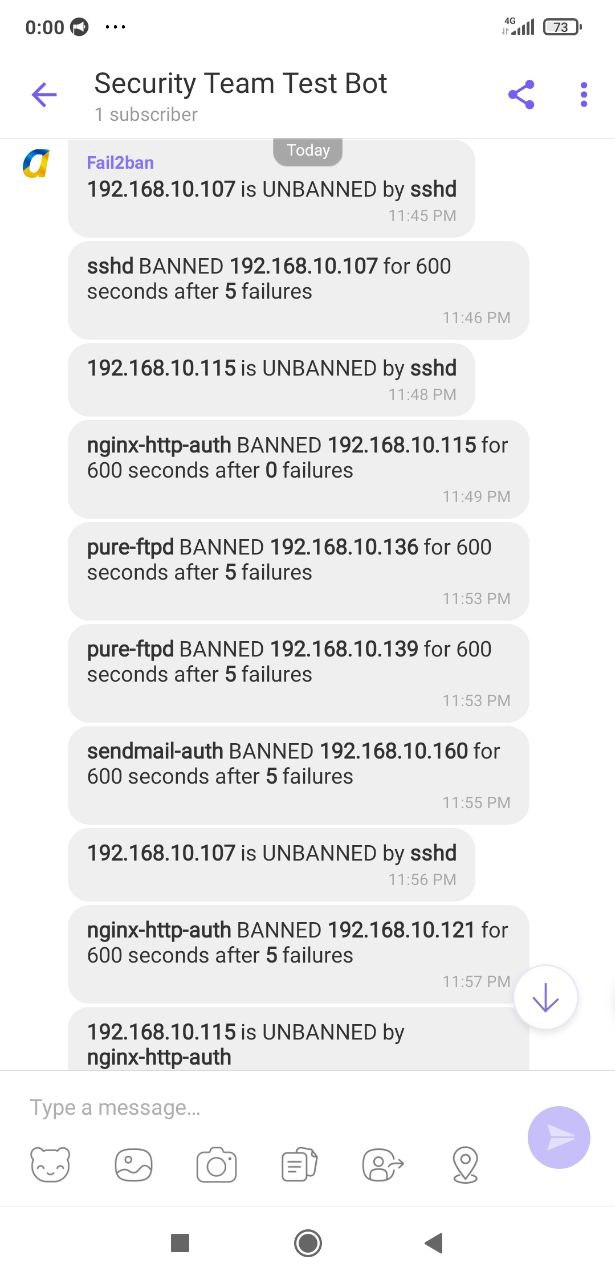
Screenshot 3. Fail2ban notifications in a Viber chatbot
The configuration is completed. Now you can monitor Fail2ban activity in real time using a Viber chatbot!
Conclusion
Password cracking attacks are a serious threat to any application. Malicious actors use different methods to get unauthorized access to user accounts and steal users’ sensitive data.
To defend your applications from such threats, apply strict authentication policies and set up reliable protection from password cracking with services like Fail2ban.
At Apriorit, we build every project with cybersecurity in mind. Our experts in web application development and quality assurance have already mastered the development of threat-protected applications and the configuration of different security services including Fail2ban.
Ready to enhance your application’s security or build a reliable new product from scratch? Contact Apriorit!
Have a question?
Ask our expert!
VP of Engineering


