 Skip to main content

Thanks to its extensive capabilities, artificial intelligence (AI) helps businesses automate their communication with customers while still providing relevant and contextual information. In particular, smart chatbots imitate natural human language in order to communicate with users in a human-like manner.
AI-powered chatbots also allow companies to reduce costs on customer support by 30%. Additionally, a 2021 report forecasts that from 2023 to 2030, the global chatbot market will have an annual growth rate of 23.3%, mainly thanks to the application of AI technologies in chatbots.
In this article, we share Apriorit’s expertise in building smart chatbots in Python using AI and machine learning (ML). You’ll learn what chatbots are and how to make an AI chatbot in Python to optimize your business processes and automate customer care. In the practical part of this article, we’ll show our experience using detailed smart chatbot examples: the first is an AI-based bot in Python built using the Grounded Open Dialogue Language Model (GODEL), and the second is an ML-based bot built using the ChatterBox library.
Contents:
What is a chatbot?
Let’s start with a definition of what a chatbot is.
A chatbot is a computer program that holds an automated conversation with a human via text or speech. In other words, a chatbot simulates a human-like conversation in order to perform a specific task for an end user. These tasks may vary from delivering information to processing financial transactions to making decisions, such as providing first aid.
You can implement chatbots in mobile and web applications. There are many use cases where chatbots can be applied, from customer support to sales to health assistance and beyond.
Depending on their architecture, chatbots can be governed by rules or artificial intelligence. Let’s take a look at the difference between rule-based and AI chatbots:
1. Rule-based or scripted chatbots use predefined scripts to give simple answers to users’ questions. All answers are predefined and stored in a library. To interact with such chatbots, an end user has to choose a query from a given list or write their own question according to suggested rules. Conversation rules include key phrases that trigger corresponding answers. Scripted chatbots can be used for tasks like providing basic customer support or collecting contact details.
2. Self-learning or smart chatbots are based on advanced natural language processing (NLP) techniques. These techniques in combination with simple neural networks are used to mimic human behavior: neural networks can learn from questions during conversation and generate answers. Self-learning chatbots in Python are more efficient, flexible, and popular due to their ability to understand speech nuances. In particular, smart chatbots can analyze user intent, handle complex requests, and provide personalized answers.
Let’s start with describing the general NLP model before going into generative AI development.
Want to power your product with AI?
Leverage Apriorit engineers’ expertise to implement cutting-edge technology in a cost-efficient and secure way.
How a smart chatbot works
As we mentioned above, you can use natural language processing , artificial intelligence, and machine learning for chatbot development.
AI-based chatbots can mimic people’s way of understanding language thanks to the use of NLP algorithms. These algorithms allow chatbots to interpret, recognize, locate, and process human language and speech.
AI neural networks (NNs) have an architecture that enables them to remember the most important parts of previously read text, words, and phrases by passing key information throughout the network and generating responses based on it.
There are three commonly used types of AI neural network architectures for AI chatbot development:
- Recurrent neural network
- Long short-term memory
- Transformer model
Below, we briefly describe each of them so you can better understand which purpose each AI neural network pursues:
1. Recurrent neural network (RNN). The main idea of this model is to pass the most important data from the text that’s being processed to the next layers for the network to learn and improve. As you can see in the scheme below, besides the x input information, there is a pointer that connects hidden h layers, thus transmitting information from layer to layer.
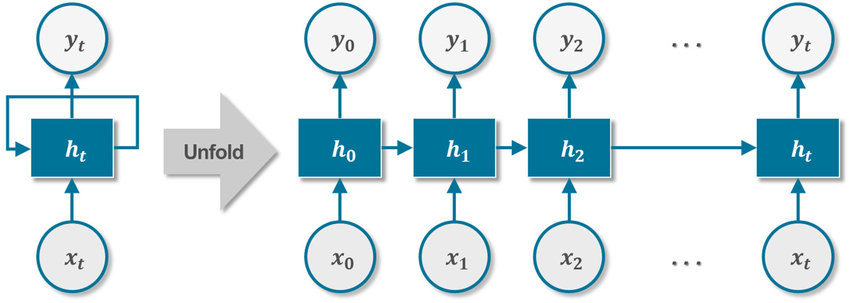
Figure 1. Recurrent neural network architecture
RNNs process data sequentially, one word for input and one word for the output. In the case of processing long sentences, RNNs work too slowly and can fail at handling long texts.
2. Long short-term memory (LSTM). This model is based on the same idea of passing the previous information through all network layers. The only difference is the complexity of the operations performed while passing the data. The network consists of n blocks, as you can see in Figure 2 below.
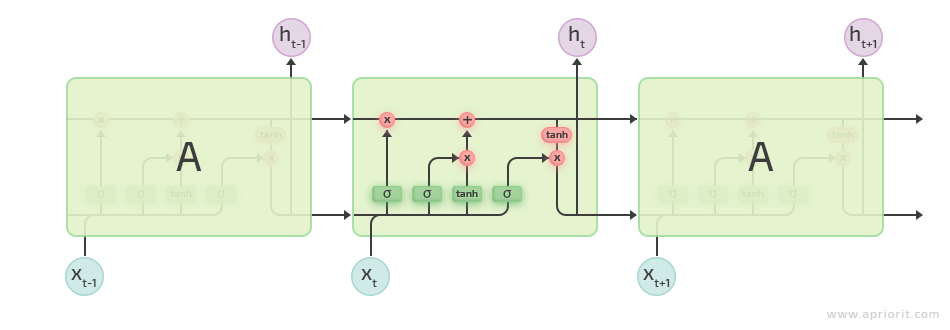
Figure 2. Long short-term memory architecture
LSTM networks are better at processing sentences than RNNs thanks to the use of keep/delete/update gates. However, LSTMs process text slower than RNNs because they implement heavy computational mechanisms inside these gates.
3. The transformer model. This is the first sequence transition AI model based entirely on multi-headed self-attention. It is based on the concept of attention, watching closely for the relations between words in each sequence it processes. In this way, the transformer model can better interpret the overall context and properly understand the situational meaning of a particular word. It’s mostly used for translation or answering questions but has also proven itself to be a beast at solving the problems of above-mentioned neural networks.
Note: You can find a detailed explanation of the transformer architecture in “Attention Is All You Need.”
All these specifics make the transformer model faster for text processing tasks than architectures based on recurrent or convolutional layers.
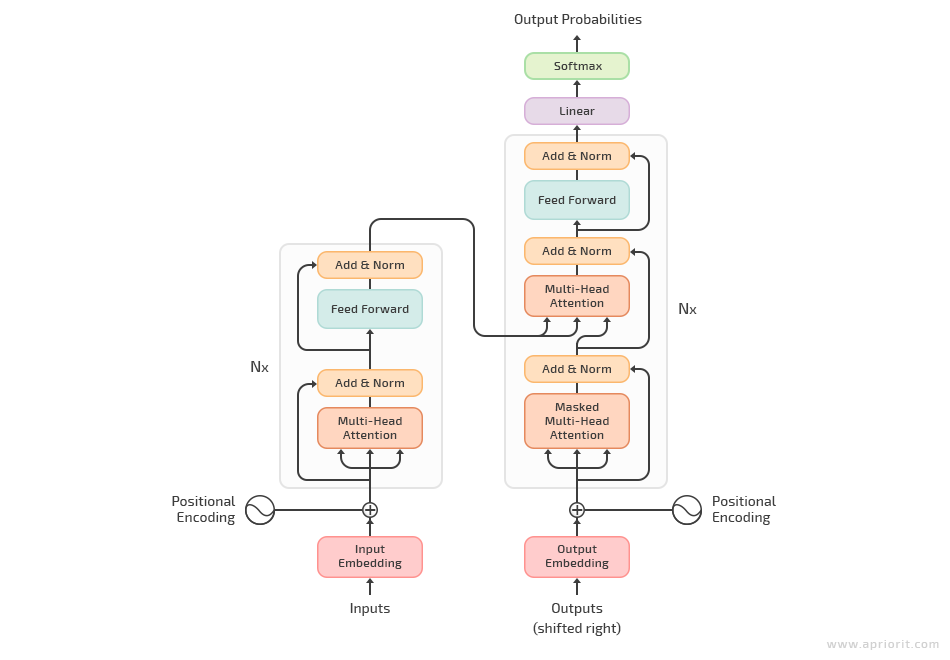
Figure 3. The transformer model architecture
Here are the main benefits of the transformer architecture compared to others:
- The architecture is based on two neural networks that process data in parallel while communicating closely with each other.
- The learning process for long-range dependencies works in transformers better than in RNNs and LSTMs because the self-attention layer connects all positions with a constant number of sequentially executed operations.
In this article, we are going to use the transformer model to generate answers to users’ questions when developing a Python AI chatbot.
Read also
Rule-based Chatbot vs AI Chatbot: Which to Choose for Your Business
Learn about different types of chatbots and get expert advice on choosing a chatbot for your own business.

Two ways of writing smart chatbots in Python
In this article, we decided to focus on creating smart bots with Python, as this language is quite popular for building AI solutions. We’ll make sure to cover other programming languages in our future posts.
Below, we’ll discuss how to build an AI chatbot from scratch or using ready-made solutions:
- From scratch. You can use generative AI models trained on vocabulary concerning specific purposes. For example, you could use bank or house rental vocabulary/conversations.
- Using ready-to-use libraries. These libraries contain almost all the necessary functionality for building a chatbot. All you need to do is define functionality with special parameters (depending on the chatbot’s library).
We’ll demonstrate both approaches: in the first example, we’ll use the transformer AI-based model, and in the second, we’ll use an ML library called ChatterBot. Let’s start with creating an AI-based chatbot using GODEL.
Developing an AI-based chatbot using the transformer model
The transformer model we used for making an AI chatbot in Python is called the GODEL or large-scale pre-training for goal-directed dialog. This model was pre-trained on a dataset with 551 million multi-tern Reddit conversations and 5 million instruction and knowledge-grounded dialogs.
The GODEL model is pre-trained for generating text in chatbots, so it won’t work well with response generation. However, you can fine-tune the model with your dataset to achieve better performance.
Fine-tuning is a way of retraining the model’s output layers on your specific dataset (for example, a bank conversation dataset) so the model can learn industry-related conversation patterns alongside general ones.
To begin, download the GODEL model from its official HuggingFace page and run the following command:
pip install transformersTo interact with the model, we’ll need to install PyTorch from the official website.
We highly recommend you use Jupyter Notebook or Google Colab to test the following code, but you can use any Python environment if you want.
There are two versions of the GODEL model: base and large. The larger the model, the better it will work for chatbots. At the same time, the more you load the model, the more memory it will consume. For our example, we chose a base model.
To code a bot in Python, we import the necessary NLP tools and define the model and the tokenizer:
from transformers import AutoModelForSeq2SeqLM, AutoTokenizer
import torch

# for a large model, change the word ‘base’
model_name = "microsoft/GODEL-v1_1-base-seq2seq"

tokenizer = AutoTokenizer.from_pretrained(model_name)
model = AutoModelForSeq2SeqLM.from_pretrained(model_name)In the first example, we make the chatbot model choose the response with the highest probability at each step. Let’s see what happens.
nickname = input('Your nickname: ')
print('nChat (ask a question to start a conversation): ')

for response_num in range(7):

    # ask bot something
    question = input('{}: '.format(nickname))

    # encode the input and add end of string token
    user_input = tokenizer.encode(question + tokenizer.eos_token, return_tensors="pt")

    # concatenate new user input with the chat history
    chatbot_input = torch.cat([chat_history, user_input], dim=-1) if response_num > 0 else user_input

    # generate a response
    chat_history = model.generate(
        chatbot_input,
        max_length=500,
        pad_token_id=tokenizer.eos_token_id,
    )

    #print the output
    chat = tokenizer.decode(chat_history[:, chatbot_input.shape[-1]:][0], skip_special_tokens=True)

print(f"Bot: {chat}")As the result, we receive the following chat from our bot:
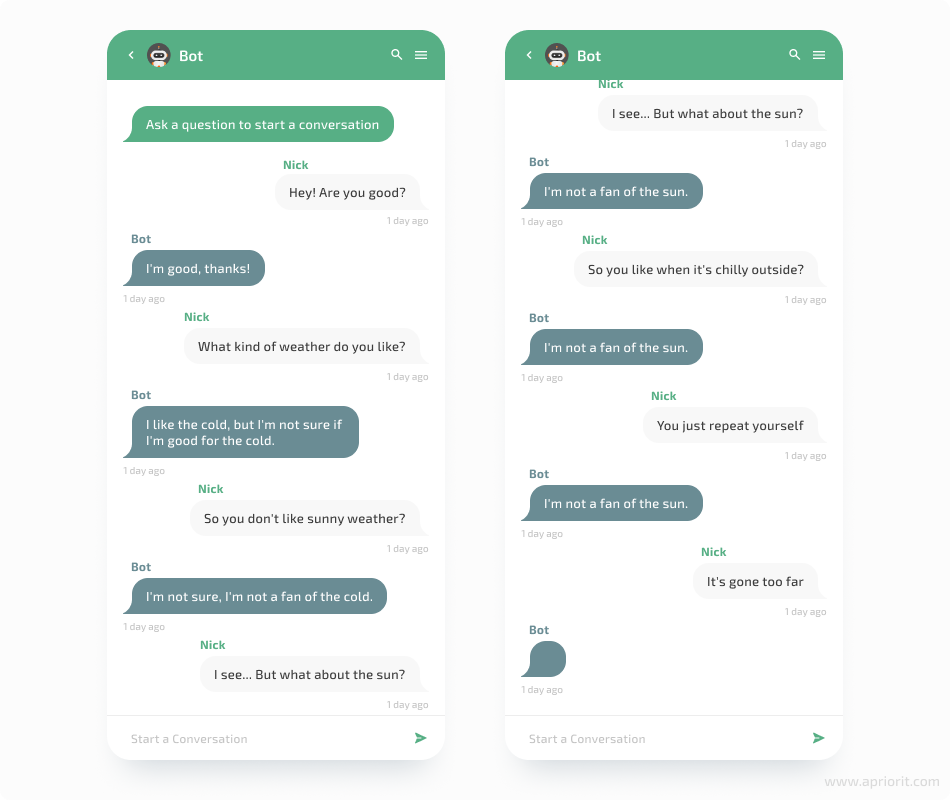
As we can see, our bot can generate a few logical responses, but it actually can’t keep up the conversation. Let’s make some improvements to the code to make our bot smarter.
If we take a look into the transformers library, we will see that the generate method actually has more parameters that can be tuned (documentation is available on the transformer GitHub page). There are different types of response generation: greedy search, beam search, sampling, etc. In the first version of our bot above, we used greedy search, as it’s the default.
Now let’s try to use beam search. The num_beams parameter is responsible for the number of words to select at each step to find the highest overall probability of the sequence. Let’s set the num_beams parameter to 4 and see what happens. We also should set the early_stopping parameter to True (default is False) because it enables us to stop beam search when at least `num_beams` sentences are finished per batch.
Here is the code we get after implementing our changes:
nickname = input('Your nickname: ')
print('nChat (ask a question to start a conversation): ')


for response_num in range(7):

    # ask bot something
    question = input('{}: '.format(nickname))

    # encode the input and add end of string token
    user_input = tokenizer.encode(question + tokenizer.eos_token, return_tensors="pt")

    # concatenate new user input with the chat history
    chatbot_input = torch.cat([chat_history, user_input], dim=-1) if response_num > 0 else user_input

    # generate a response
    chat_history = model.generate(
        chatbot_input,
        max_length=500,
        num_beams=4,
        early_stopping=True,
        pad_token_id=tokenizer.eos_token_id,
    )

    #print the output
    chat = tokenizer.decode(chat_history[:, chatbot_input.shape[-1]:][0], skip_special_tokens=True)

print(f"Bot: {chat}")As the result, our bot can produce the following chat:
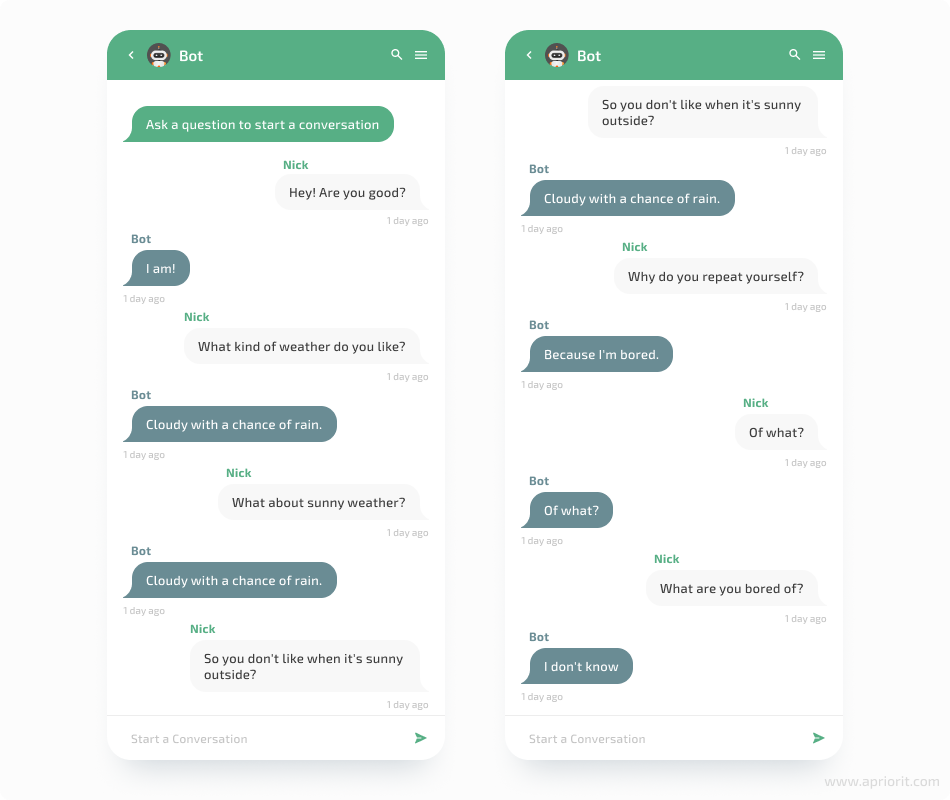
As you can see, both greedy search and beam search are not that good for response generation.
Let’s try the sampling method now.
To do that, we should first find the do_sample parameter in the list of parameters. If its value is False, it means that greedy search is used. To perform the sampling method, we need to set the value of the do_sample parameter to True.
Then, we move to the temperature parameter. It decreases the likelihood of picking low-probability words and increases the likelihood of picking high-probability words. For our example, we set the temperature parameter to 0.7.
Finally, we take a look at the top_k parameter. If it’s set to 0, it will choose the sequence from all given sequences despite the probability value. To fix that, we should assign it a certain number. In this example, we set the value to 75.
Here is the code we receive as a result:
nickname = input('Your nickname: ')
print('nChat (ask a question to start a conversation): ')

for response_num in range(7):

    # ask bot something
    question = input('{}: '.format(nickname))

    # encode the input
    user_input = tokenizer.encode(question + tokenizer.eos_token, return_tensors="pt")

    # concatenate the user input with the chat history
    chatbot_input = torch.cat([chat_history, user_input], dim=-1) if response_num > 0 else user_input

    # generate a response
    chat_history = model.generate(
        chatbot_input,
        max_length=1000,
        do_sample=True,
        top_k=70,
        temperature=0.7,
        pad_token_id=tokenizer.eos_token_id,
    )

    # print the output
    chat = tokenizer.decode(chat_history[:, chatbot_input.shape[-1]:][0], skip_special_tokens=True)

print(f"Bot: {chat}")Now, our bot can imitate human-like conversation in the following way:
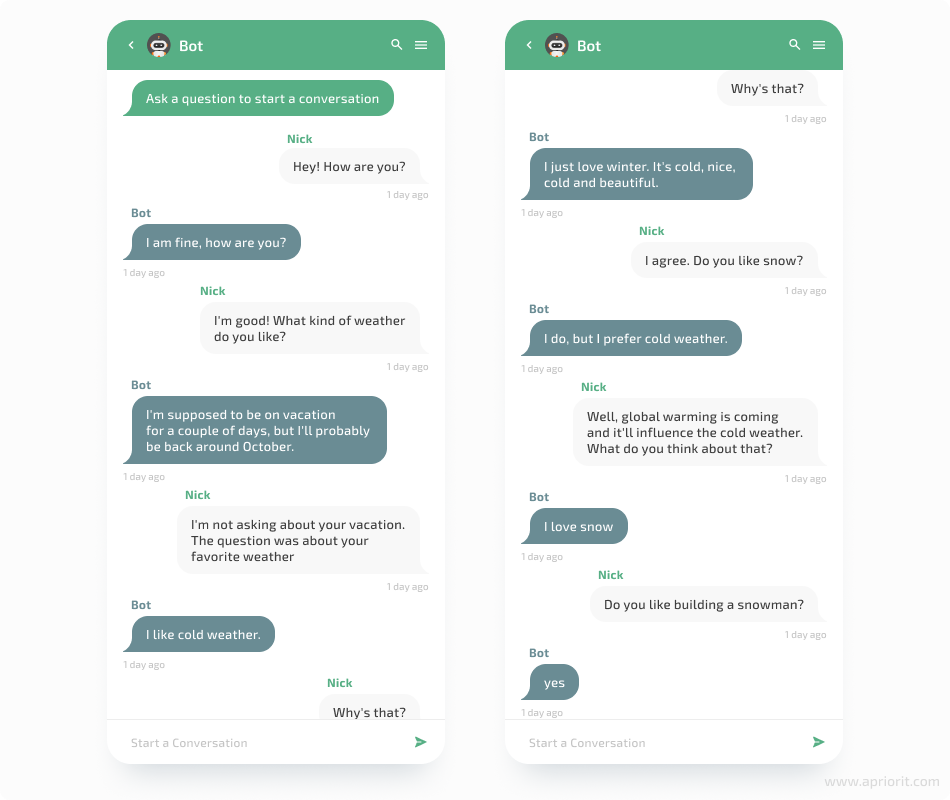
Though it feels like the conversation looks better now, the bot still isn’t smart enough. You can keep on tuning the parameters and see if the result improves.
Let’s improve our bot by tuning the top_p parameter. It’s responsible for choosing a response from the fewest possible words whose cumulative probability exceeds the top_p parameter. Let’s set the top_p parameter to 0.95 and see what happens. You can also apply changes to the top_k parameter in combination with top_p.
Here’s the code we arrived at:
nickname = input('Your nickname: ')
print('nChat (ask a question to start a conversation): ')

for response_num in range(7):

    # ask bot something
    question = input('{}: '.format(nickname))

    # encode the input
    user_input = tokenizer.encode(question + tokenizer.eos_token, return_tensors="pt")

    # concatenate the user input with the chat history
    chatbot_input = torch.cat([chat_history, user_input], dim=-1) if response_num > 0 else user_input

    # generate a response
    chat_history = model.generate(
        chatbot_input,
        max_length=1000,
        do_sample=True,
        top_k=70,
        top_p=0.95,
        temperature=0.7,
        pad_token_id=tokenizer.eos_token_id,
    )

    # print the output
    chat = tokenizer.decode(chat_history[:, chatbot_input.shape[-1]:][0], skip_special_tokens=True)

print(f"Bot: {chat}")As a result, our bot has generated the following conversation:
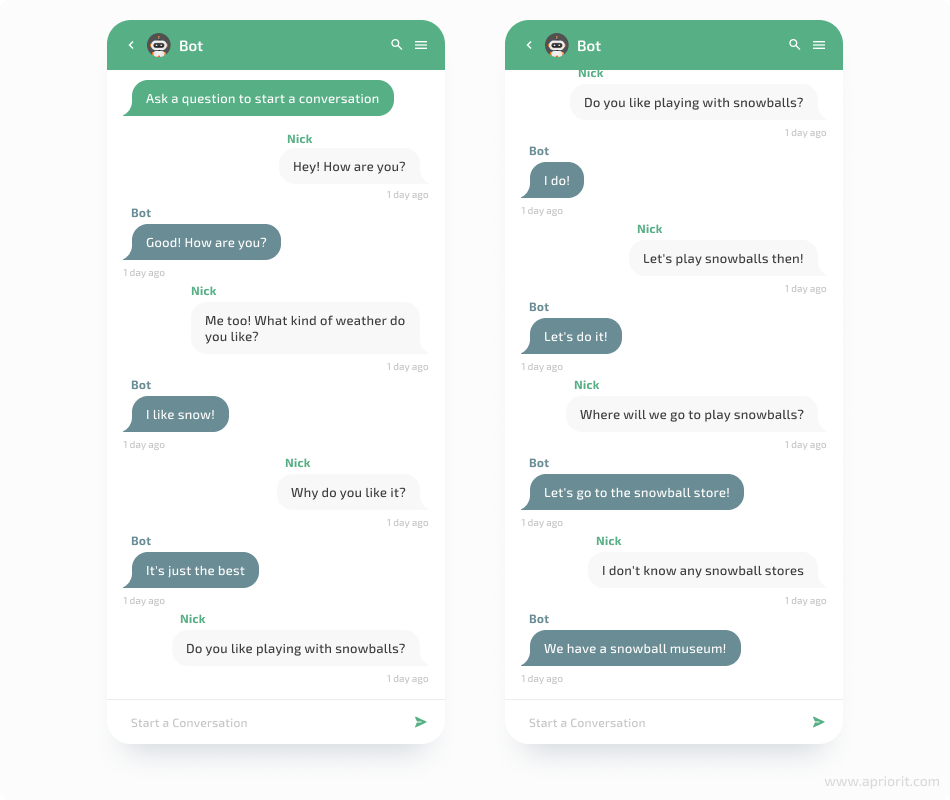
As we can see, the bot conversation seems more legit now. We don’t know if the bot was joking about the snowball store, but the conversation is quite amusing compared to the previous generations.
In this section, we showed only a few methods of text generation. There are still plenty of models to test and many datasets with which to fine-tune your model for your specific tasks.
Now let’s discover another way of creating chatbots, this time using the ChatterBot library.
Read also
How to Create a Custom AI Chatbot: Key Features, Costs, and Time Estimates
Thinking of building a custom AI chatbot? Learn how to evaluate scope, choose the right tech stack, and forecast development expenses for a successful project launch.

Creating an ML-based chatbot using the ChatterBot library
To demonstrate how to create a chatbot in Python using a ready-to-use library, we decided to apply the ChatterBot library.
ChatterBot is an ML conversational dialog engine that’s able to generate human-like responses for smart chatbots. It is a Python library that makes it easy for programmers to build AI chatbots using complex model wrappers with extended functionality. This functionality includes the following components:
- ChatterBot corpus contains user-contributed conversation datasets that can be used to train chatbots to communicate. These datasets are represented in 22 languages and are perfect to make chatbots understand linguistic nuances. The developer can easily train the chatbot from their own dataset straight away.
- Logic adapters determine the logic for how a response to a given query is selected. You can use any number of logic adapters you want. If multiple adapters are used, the bot will return the response with the highest calculated confidence value. If multiple adapters return the same confidence, the first adapter from the adapter list will be chosen.
- Storage adapters make it possible for the developer to easily connect to the database where all conversations are stored. Developers can also change the database, but it has to be supported by SQLAlchemy ORM. In addition, you can modify and query other databases that can be available in ChatterBot.
- Preprocessors are simple functions for input preprocessing, such as for removing consecutive whitespace characters from statement text.
- Filters is a type of functionality created for filtering queries to storage adapters: for example, reducing the number of statements that a chatbot has to process.
In the diagram below, we show the flow of ChatterBot processes:
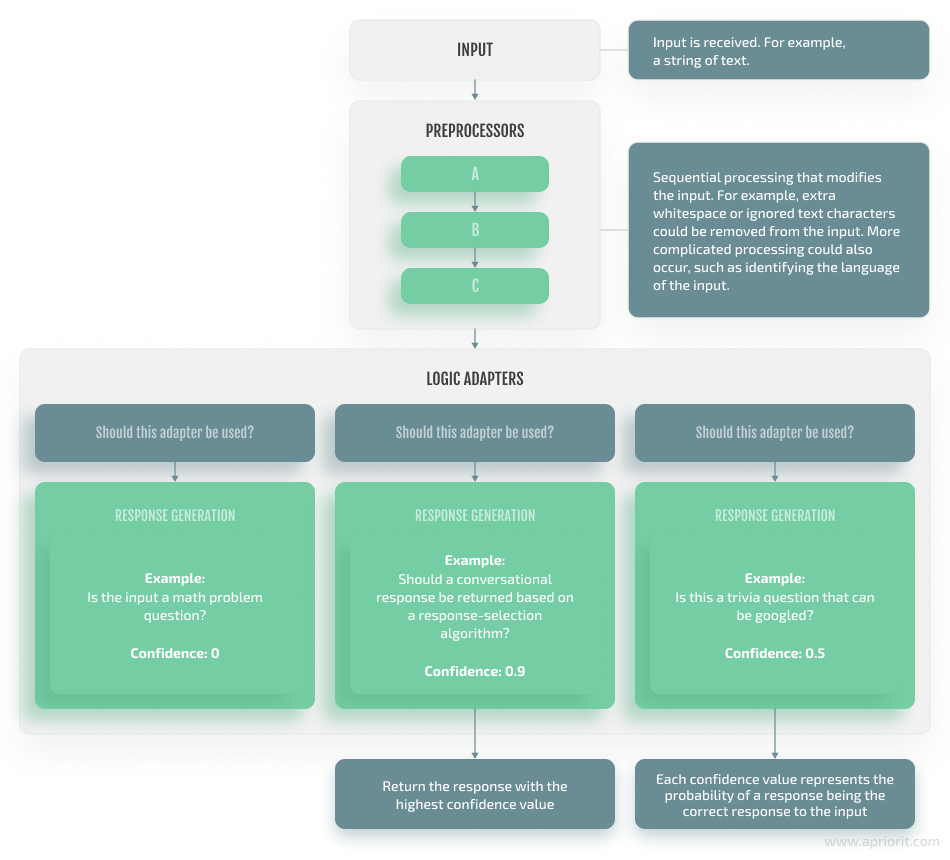
Figure 4. ChatterBot process flow diagram
Let’s start creating our chatbot. Before building an AI chatbot in Python, you have to install ChatterBot using its official documentation:
pip install chatterbotOnce installation is completed, import all needed dependencies from the ChatterBot library:
from chatterbot import ChatBot
from chatterbot.trainers import ListTrainer
from chatterbot.trainers import ChatterBotCorpusTrainerNow, we create a chatbot:
FlightBot= ChatBot(
    name = 'MathsBot',
    read_only = False,
    logic_adapters = [
        'chatterbot.logic.BestMatch'

    ],
    storage_adapter = "chatterbot.storage.SQLStorageAdapter"
)Let’s take a look at the parameters (below we skipped the name parameter since it’s obvious and not that important).
- The read_only parameter is responsible for the chatbot’s learning in the process of the dialog. If it’s set to False, the bot will learn from the current conversation. If we set it to True, then it will not learn during the conversation.
- The logic_adapters parameter is used for setting the algorithm for choosing the response. There are five types of logic adapters represented in the ChatterBot library. You can read more about them on the ChatterBot GitHub page. You can use as many logic adapters as you wish at the same time.
- The storage_adapter parameter is responsible for connecting the bot to a database to store data from conversations. The CHATTERBOT.STORAGE.SQLSTORAGEADAPTER value is used by default, so you don’t have to specify it.
Let’s move further to the training stage of our bot creation process. You can train your chatbot using built-in data (Corpus Trainer) or using your own conversations (List Trainer). Furthermore, you can combine both types of training. Using built-in data, the chatbot will learn different linguistic nuances. Then you can improve your chatbot’s results by feeding the bot with your own conversations.
We start our bot training with the ChatterBot corpus data:
corpus_trainer = ChatterBotCorpusTrainer(FlightBot)
corpus_trainer.train("chatterbot.corpus.english")

conv_1 = [
    "Hey! I need some help!",
    "Hi, how can I help you?",
    "I'd like to book a flight to Iceland.",
    "Your flight has been booked."
]

….

conv_n = [
    “....”,
    ……
]

list_trainer = ListTrainer(FlightBot)

list_trainer.train(conv_1)
….
list_trainer.train(conv_n) # where n - number of conversationsOnce training is finished, we can create a loop to talk to the chatbot:
while True:
    query = input()
    if query=='stop':
        break
    bot_input = FlightBot.get_response(query)
    print(bot_input)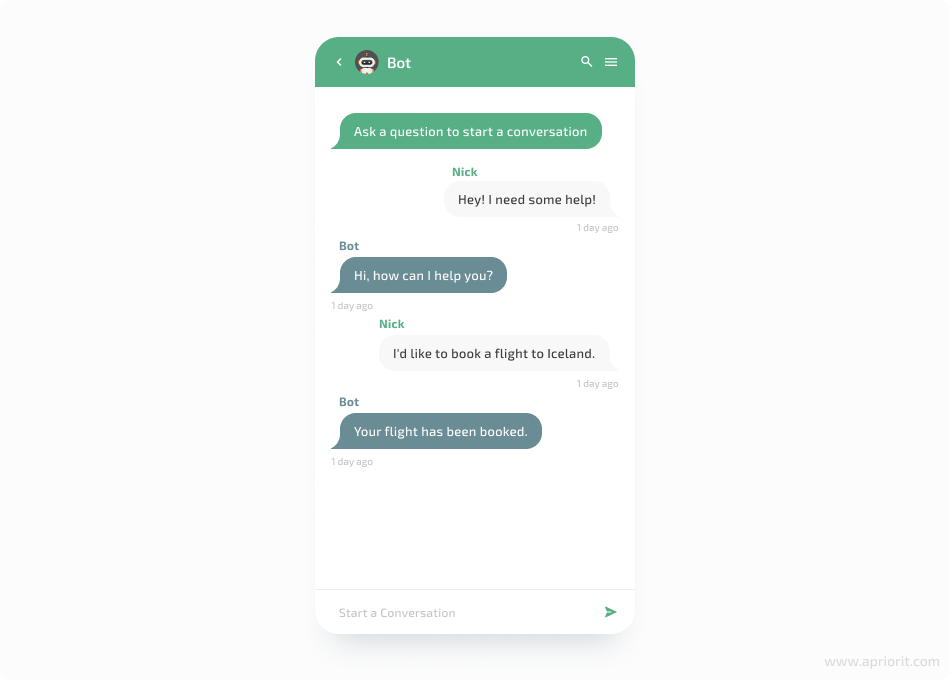
After testing this chatbot, you can see that it uses a machine learning algorithm to choose the best response after being fed a lot of different conversations.
Make sure to check out Apriorit’s blog for more tips on how to build a secure AI chatbot.
Conclusion
In this article, we provided two ways of making bots with Python: a transformer that generates responses from given queries and an advanced bot that chooses responses using logic adapters. For both chatbots, the conversation data is essential, as low-quality data leads to poor chatbot performance.
A transformer bot has more potential for self-development than a bot using logic adapters. Transformers are also more flexible, as you can test different models with various datasets. Besides, you can fine-tune the transformer or even fully train it on your own dataset.
Context-aware chatbots relying on logic adapters work best for simple applications where there are not so many dialog variations and the conversation flow is easy to control.
The choice between AI and ML is in part a choice between levels of chatbot complexity. The complexity of a chatbot depends on why you want to make an AI chatbot in Python.
At Apriorit, we have a team of AI and ML developers with experience creating innovative smart solutions for healthcare, cybersecurity, automotive, and other industries. With us, you can be sure, that your artificial intelligence chatbot project is in the right hands.
Want to implement a smart chatbot?
Apriorit experts can help you design and build a tailored and cost-efficient AI solution that will expand your business opportunities.
Have a question?
Ask our expert!
R&D Delivery Manager


