 Skip to main content

Raising funds to start a new business, such as a carsharing business, is a risky and tiring process in which both business owners and investors might lose money due to malicious activity or opaque money management practices. A blockchain-based crowdfunding platform can minimize these risks. Blockchain technology makes investing transparent, secure, and fair.
In this article, we examine the benefits of a blockchain for a carsharing startup that needs to raise investments. We also show how to build a crowdfunding platform using blockchain and demonstrate how such a system can work.
This article will be useful for owners of carsharing businesses and development leaders looking for a reliable and high-tech way to gather and manage investments.
Contents:
How can a blockchain facilitate crowdfunding?
Organizations commonly adopt blockchains for finance-related tasks reduce operating costs, attract new customers, and solve trust-related problems. But is a blockchain a reliable foundation for a crowdfunding platform?
In the case of our carsharing startup, crowdfunding allows the owner of the carsharing business to attract investors in order to raise the funds to buy vehicles, then return the investments over time after carsharing software starts operating.
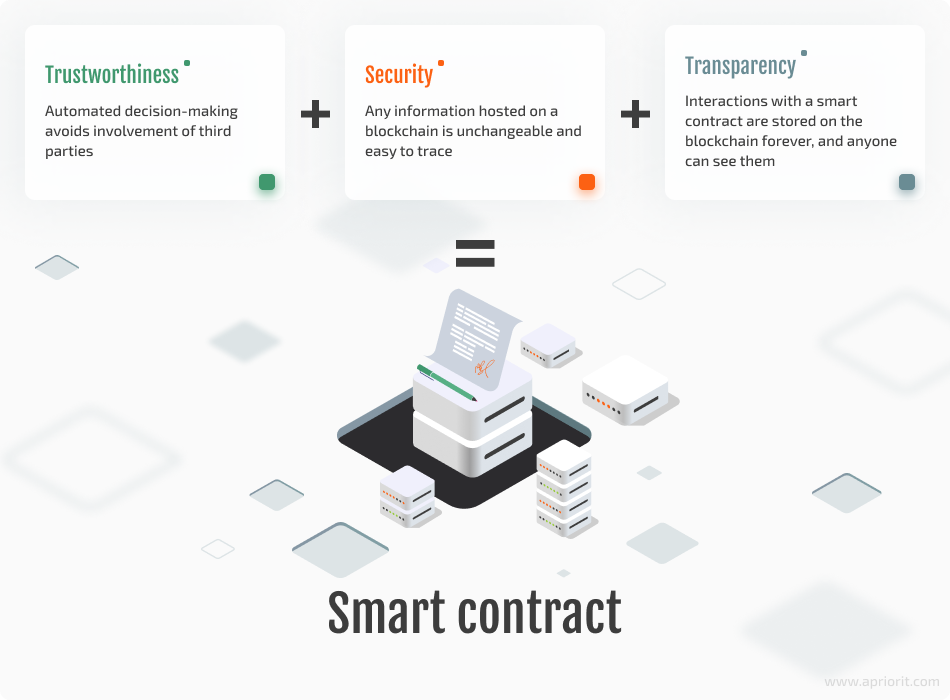
Crowdfunding always comes with a risk for both investors and startups. Blockchain technology can ensure the safety of invested funds and guarantee that both parties will follow through on their promises. The following qualities of smart contracts ensure that a deal will be executed as described in code:
Blockchain technology itself has many cybersecurity benefits, such as unbreakable data integrity, traceability of all transactions and data uploads, and no single point of failure. Using a blockchain for crowdfunding can provide you with the following advantages:
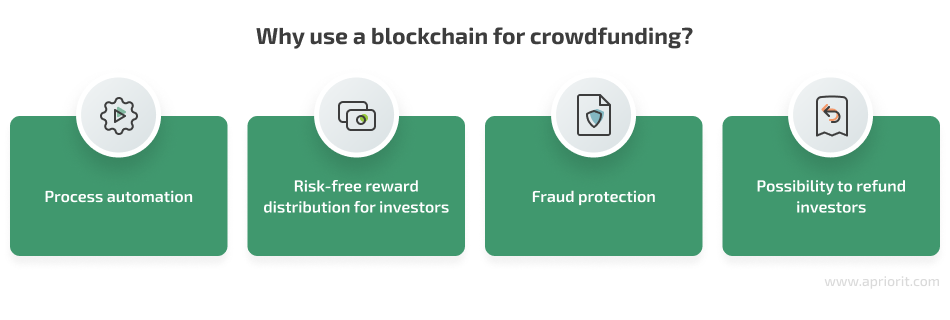
Process automation. A smart contract can embody all the inner logic of a crowdfunding platform. Once the crowdfunding platform is developed, the rental owner only has to register a new sale and wait for investors to come. All other operations like token transfers and reward calculation are done by the smart contracts.
Risk-free reward distribution for investors. Most common and popular blockchain networks are governed by the Code is Law rule, which means that any business process will be executed exactly as it’s described in a smart contract. This rule automates token management and guarantees that investors receive their part of the profits.
Fraud protection. An event that isn’t described in a smart contract simply can’t happen in a blockchain network. Investors won’t be able to change their minds later and retract their tokens before the sale is over if this scenario is not written into the contract. With a smart contract, the business owner can create a thorough business plan without worrying about investors’ honesty. Thus, crowdfunding with blockchain technology reduces the risk of fraud.
Possibility to refund investors. Not all crowdfunding initiatives reach their goals. If an initiative does not finish successfully, a blockchain platform can refund investors.
To see how exactly a blockchain can deliver these advantages, let’s build a sample car rental crowdfunding using blockchain.
Looking for a way to secure and automate your finance management?
Let’s discuss how our development expertise can help you upgrade your product and reach business goals.
Designing an Ethereum-based investment service architecture
In our example, we’ll use the Ethereum blockchain network, since it’s currently the most common network in the world. In 2022, Ethereum processed 338% more transactions than the previous world favorite Bitcoin.
Also in 2022, Ethereum developers rolled out Ethereum 2.0, which transitioned the blockchain from Proof of Work (PoW) to an energy-efficient Proof of Stake (PoS) algorithm. This change made the network more environmentally friendly, more attractive for investors and developers, and more decentralized due to the lower barrier to entry and global distribution of validators.
Our blockchain-based crowdfunding platform for automotive sector will work this way:
- A business owner starts crowdfunding for a new vehicle by putting up a certain number of tokens for sale.
- Investors buy these tokens with Ether.
- The business owner collects the invested Ether, buys a new car, and adds it to their carsharing service.
- An end user rents this car and pays for the rental in cryptocurrency.
- The business owner collects payment for the car rental and distributes the proceeds among investors as their reward.
To build a blockchain-based crowdfunding service, we’ll create smart contracts written in Solidity and JavaScript unit tests that simulate the workflow.
Smart contracts are the most important part of our system, as they embody the platform’s business logic and define each transaction within it. Unit tests will help demonstrate how our system works to show potential investors that our platform is secure and trustworthy.
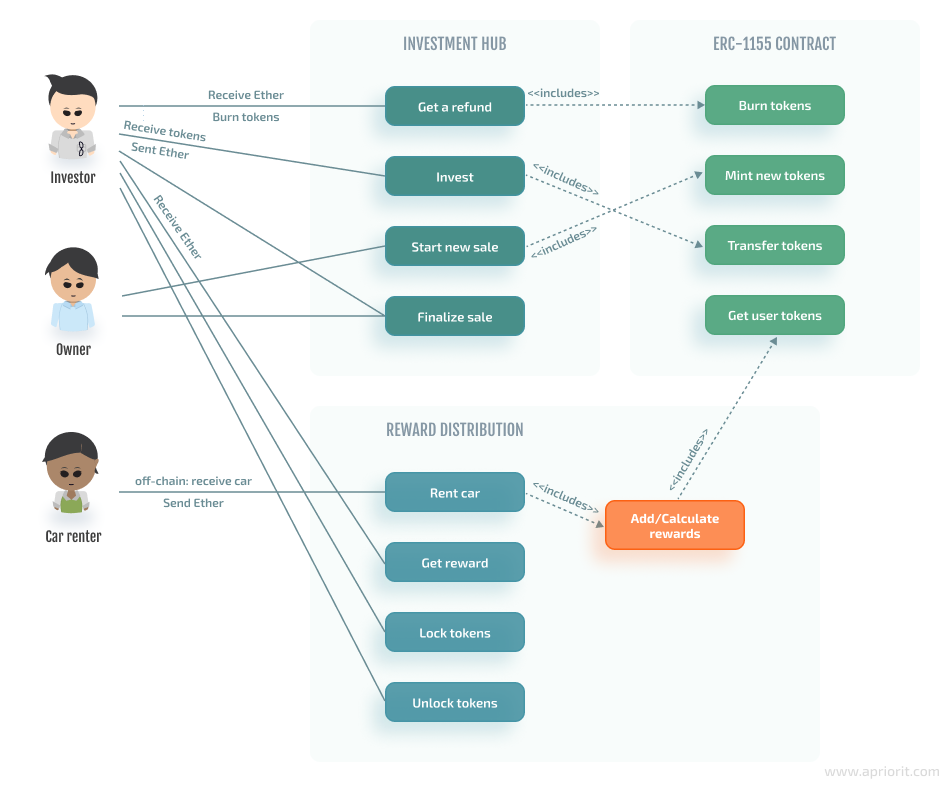
We’ll need several types of smart contracts for various entities within the platform. Cars in our Rental smart contract will be represented by semi-fungible ERC-1155 tokens. This token standard perfectly suits our needs, combining fungible and non-fungible token types for investor shares and cars. ERC-1155 will allow us to easily add new cars and conduct token sales. Rental smart contract will store all investor and end user balances and handle the minting of tokens and their distribution among investors and the platform.
We also need an Invest smart contract that acts as an investment hub where investors can participate in any active sales, receive their rewards, or receive a refund. This contract uses the ERC-1155 Holder standard, which allows it to accept ERC-1155 tokens. Using this contract, the platform owner can start and finalize crowdfunding campaigns for new cars in the form of token sales. It will be a vital component of the system, as it will handle token sales and store sale statuses.
After a token sale is finished and the business owner buys a new car, the owner needs a way to rent the car to other users and distribute the rental proceeds among investors. Another ERC-1155 Holder smart contract called Rewards will handle these tasks.
Additionally, investors need to be able to lock their tokens and receive profit. The distribution of this profit will be based on the number of tokens owned by investors, and the available reward amount will be updated with each new car rental. To calculate a particular investor’s reward, we’ll use the following formula:
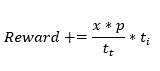
Where:
- number of days the car is rented for
- rental price per day
- total number of locked tokens for the car
- number of locked tokens held by the particular investor
For a fully functional car rental, we’ll need many other off-chain components, such as a mobile app or a website for end users. We won’t discuss these components here, however, as they are outside the scope of this article.
Our service has the following flow: the owner starts a new token sale, and investors buy ERC-1155 tokens. After a successful sale, these tokens will be used to calculate profit for each investor.
Let’s make a use case diagram so we can refer to it during development:
With a clear understanding of how the key elements of our service should work, we can start development.
Read also
In-Car Payment Systems: Automation of Toll Road Payments Based on IOTA
Get insights into IOTA’s role in the evolution of toll payment systems and the reduction of transaction costs. Analyze its key components, concepts, and required integrations illustrated with examples from Apriorit experts.

Preparing for smart contract development
Let’s start the development process by tailoring the development environment to suit our needs. This will help us improve our workflow, reduce possible problems in the future, and avoid complications during application testing.
We’ll test and compile smart contracts with the help of the Hardhat framework. Hardhat is considered one of the best frameworks on the market to assist blockchain developers. It provides a lot of settings and tweaks to explore, but Hardhat’s essential feature in our case is the ability to run a local blockchain network.
During development, we will use locally hosted networks, or testnets — blockchain instances that use the same settings as the main instance but provide the ability to test an application without risking user funds. We prefer using a locally hosted network since it allows us to tweak the network to suit our needs, e.g. change block timestamps to test something time-dependent.
Testing smart contracts is complicated because they are hosted on a blockchain network, meaning it requires time and resources to process transactions. The more tests we run, the higher the cost of quality assurance (QA). More problems arise when we need to test time-dependent features of a smart contract, such as correct handling of sale deadlines.
With these tools at hand, let’s start working on our first smart contract.
Developing an ERC-1155 compatible NFT smart contract
An NFT smart contract is crucial for the operation of contracts in the investment hub and for reward distribution. Here’s how this contract should work:
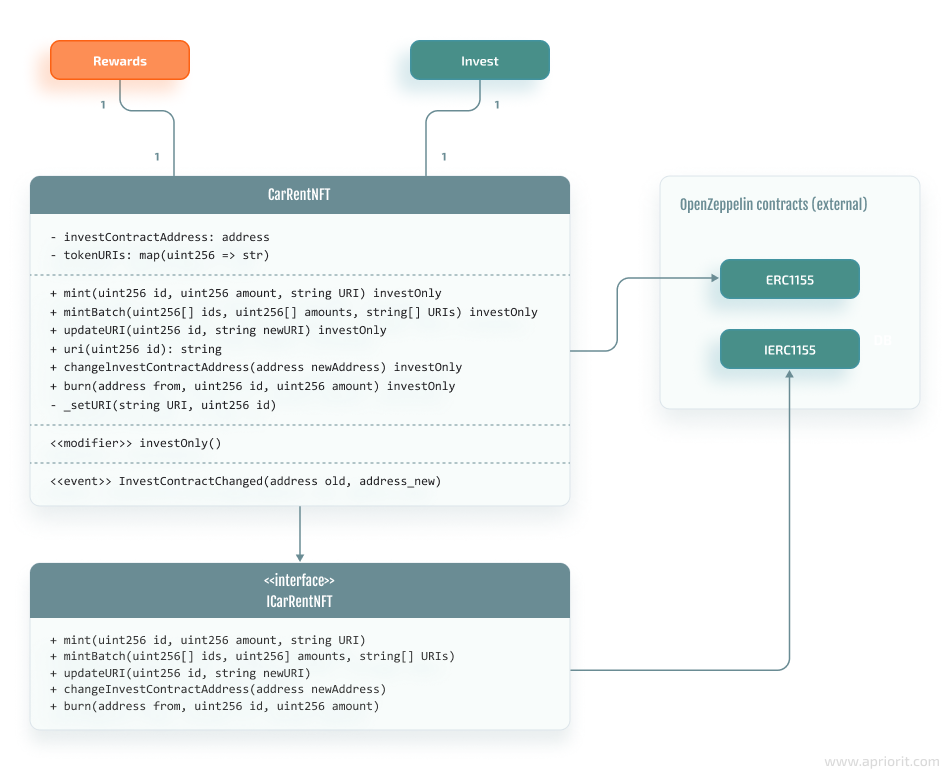
To make this smart contract ERC-1155 compatible, we’ll use OpenZeppelin’s ERC-1155 contract as a base. OpenZeppelin’s solutions are well-tested, optimized, and trusted by developers and users.
It’s considered good practice to create an interface with all public and external functions used in the contract, as it helps you reuse the contract in the future and improves its readability. Publicly available functions of the smart contract will handle minting and burning capabilities. Token transfer functionality is included in OpenZeppelin’s basic implementation.
A couple of other useful features of this smart contract are the ability to start more than one sale at once and the ability to change the NFT’s URI in case, for example, a car is painted or otherwise modified. In this case, old metadata will no longer show the actual state of the car. We also need a way to change the investment hub’s address so we can replace it with a newer version at some point in the future.
Here’s how we can implement all of these external features in code:
interface ICarRentNFT is IERC1155 {
  function mint(
    uint256 id,
    uint256 amount,
    string calldata newURI
  ) external;

  function mintBatch(
    uint256[] calldata ids,
    uint256[] calldata amounts,
    string[] calldata newURIs
  ) external;

  function updateURI(uint256 id, string calldata newURI) external;

  function changeInvestContractAddress(address newAddress) external;

  function burn(
    address from,
    uint256 id,
    uint256 amount
  ) external;
}Now we can create the actual smart contract using our new interface. As only the investment hub should be able to call the mint function, we need to add a storage variable that will store the investment hub’s address and a modifier that will verify that the caller is the hub. These restrictions improve the service’s security, since they forbid any entity other than our investment hub to initiate minting.
Let’s start by creating an initializer for our contract:
constructor(address _investContractAddress) ERC1155('') {
    require(_investContractAddress != address(0), 'INVEST_ADDR_IS_ZERO');
    investContractAddress = _investContractAddress;
}Using the predefined constructor keyword when creating initialization functions helps avoid errors and is the conventional way of initializing contracts.
Here’s how we create the hub verification modifier:
  modifier investOnly() {
    require(msg.sender == investContractAddress, 'NOT_INVEST_CONTRACT');
    _;
}Before creating the mint function, we should also create an additional private function to have a separate link to the metadata for each NFT. Moreover, we should redefine the way our contract returns the URI link for the specified NFT. By default, an ERC-1155 token returns a single link to a CAR archive, which has metadata for each NFT in the collection. Since the number and parameters of cars will be changing, we need to be able to change data about cars and their URI links after the smart contract is published.
In particular, let’s create a function that will save metadata for our NFTs:
  function _setURI(string calldata newURI, uint256 id) internal {
    tokenURIs[id] = newURI;
}The function has two parameters: newURI, which is a link to the file with the NFT’s new metadata stored on the InterPlanetary File System (IPFS); and id, which is the ID of the NFT.
Returning the URI links for NFTs will be done this way:
  function uri(uint256 id) public view override returns (string memory) {
    return tokenURIs[id];
}This function will be mainly used by NFT marketplaces like OpenSea to get metadata for cars.
Now, we can create a function that will handle the minting of new tokens:
  function mint(
    uint256 id,
    uint256 amount,
    string calldata newURI
  ) external investOnly {
    _mint(msg.sender, id, amount, '');
    _setURI(newURI, id);
}Parameters of this function are:
id– ID of the created NFT, which should be unique for the contractamount– number of tokens issued for this particular NFTnewURI– link to the IPFS with the metadata for our NFT
We also added the modifier we previously created to restrict access to this function. As you can see from the listing above, this function uses a private _mint function provided by OpenZeppelin’s contract. The mintBatch function has the same structure, with the only difference being that all its parameters are arrays.
Let’s add the burn function:
  function burn(
    address from,
    uint256 id,
    uint256 amount
  ) external investOnly {
    _burn(from, id, amount);
}Parameters of the burn function are:
from– address to burn the tokens fromid– ID of the tokens’ NFTamount– number of tokens to burn
We should also add the investOnly modifier here because the burn can only happen when a user tries to receive a refund from the investment hub.
Last but not least, we need to add the updateURI and changeInvestContractAddress functions, which will handle updates to NFT metadata and changes in the investment hub address. Here’s the code for these functions:
  function updateURI(uint256 id, string calldata newURI) external investOnly {
    _setURI(newURI, id);
  }

  function changeInvestContractAddress(address newAddress) external investOnly {
    require(newAddress != address(0), 'INVEST_ADDR_IS_ZERO');
    emit InvestContractChanged(investContractAddress, newAddress);
    investContractAddress = newAddress;
}Notice that we also emit an event when the change occurs. Event emission after changing a state variable helps to track the state of a contract, makes it more auditable, and makes it easier to integrate the contract with off-chain solutions.
Now we’re all ready to create other contracts.
Related project
Building AWS-based Blockchain Infrastructure for International Banking
Discover the story of our client, an international banking organization, who needed to implement AWS-based blockchain infrastructure under a tight deadline. Our experts built a robust cloud infrastructure that streamlined international transactions.

Creating the investment hub
Let’s create a smart contract that will allow our investors to invest their money.
As we need to restrict access to some functions in this contract, we’re going to use OpenZeppelin’s Ownable contract to control access and set the owner.
This contract will also hold tokens for all sales. This way, the contract can automatically send tokens right after an investor sends Ether. To achieve this, we can use the ERC1155-Holder contract from OpenZeppelin.
Here’s what the overall logic of our investment hub looks like:
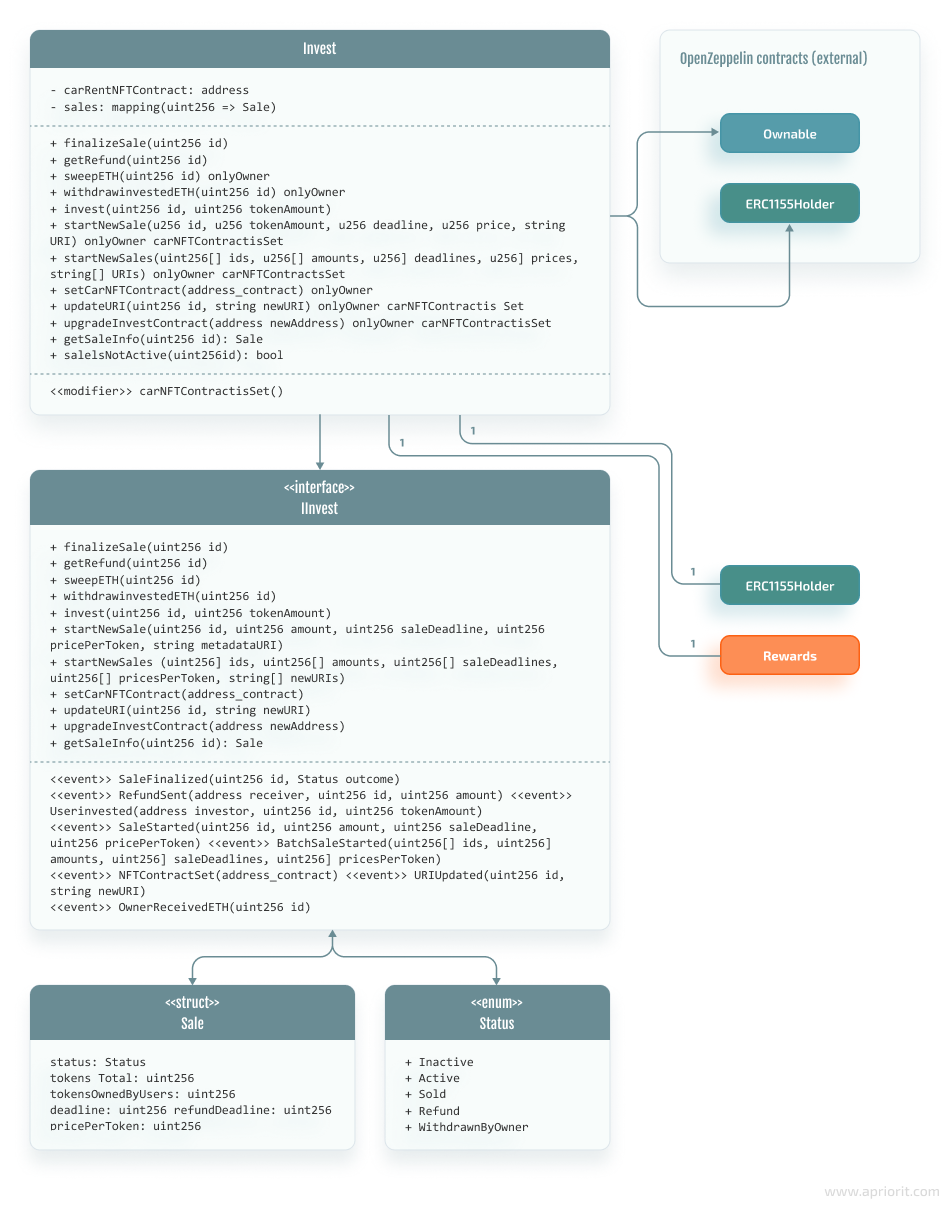
We can start implementing the investment hub by creating all needed storage variables and modifiers that will handle the statuses of all sales. Also, we need to store the address of our NFT contract, which we’ll need later to mint new tokens and transfer them to investors. Let’s create a setter for the NFT contract’s address:
  function setCarNFTContract(address _contract) external onlyOwner {
    require(carRentNFTContract == address(0), 'NFT_CONTRACT_ALREADY_SET');
    require(_contract != address(0), 'NFT_ADDR_IS_ZERO');
    carRentNFTContract = _contract;
    emit NFTContractSet(_contract);
}Notice that we don’t use constructor here, as this contract might be deployed before the NFT contracts. To avoid any errors, we added a separate setter function.
As we’ll set constructor after deployment, we should also add a modifier that will ensure the NFT contract is ready to be used:
  modifier carNFTContractIsSet() {
    require(carRentNFTContract != address(0), 'NFT_CONTRACT_NOT_SET');
    _;
}This modifier will help us avoid errors in case the owner forgets to set the NFT contract’s address.
Now we can create a function for starting a new sale:
  function startNewSale(
    uint256 id,
    uint256 amount,
    uint256 saleDeadline,
    uint256 pricePerToken,
    string calldata metadataURI
  ) external onlyOwner carNFTContractIsSet {
    if (!saleIsNotActive(id)) {
      revert SaleAlreadyStarted(id);
    } else if (saleDeadline < block.timestamp) {
      revert DeadlineIsInPast(id, saleDeadline, block.timestamp);
    }
    ICarRentNFT(carRentNFTContract).mint(id, amount, metadataURI);
    Sale memory newSale = Sale(Status.Active, amount, 0, saleDeadline, 0, pricePerToken);
    sales[id] = newSale;
    emit SaleStarted(id, amount, saleDeadline, pricePerToken);
}Parameters of this function are:
id– id of the sale or NFTamount– total number of tokens for this salesaleDeadline– sale deadline in the form of a UNIX timestamppricePerToken– price for each tokenmetadataURI– link to the file with metadata stored on the IPFS
As you can see from the listing above, we are using custom errors like SaleAlreadyStarted, DeadlineIsInPast, WrongAmountOfEther, and TooManyTokens. Using them improves code readability and auditability along with the overall user experience (UX).
It’s time to give our investors the possibility to invest:
  function invest(uint256 id, uint256 tokenAmount) external payable {
    Sale memory sale = getSaleInfo(id);
    require(sale.status == Status.Active, 'SALE_NOT_ACTIVE');
    require(sale.deadline > block.timestamp, 'SALE_IS_OVER');
    if (tokenAmount > sale.tokensTotal - sale.tokensOwnedByUsers) {
      revert TooManyTokens(tokenAmount, sale.tokensTotal - sale.tokensOwnedByUsers);
    } else if (msg.value != tokenAmount * sale.pricePerToken) {
      revert WrongAmountOfEther(msg.value, tokenAmount * sale.pricePerToken);
    }
    ICarRentNFT(carRentNFTContract).safeTransferFrom(address(this), msg.sender, id, tokenAmount, '');
    sale.tokensOwnedByUsers += tokenAmount;
    sales[id] = sale;
    emit UserInvested(msg.sender, id, tokenAmount);
}Parameters here are:
id– id of the sale the user wants to invest intokenAmount– number of tokens the investor wants to buy
As we expect to receive Ether from our investors, we should declare this function as payable. Also, we should check several properties of each sale:
- Has not been finalized before
- Deadline has not passed
- There are enough tokens to sell
- The investor has sent the right amount of Ether
If all these checks pass, we can transfer tokens to our new investor.
Then, we need to create a way for sales to be finalized:
  function finalizeSale(uint256 id) external {
    Sale memory sale = getSaleInfo(id);
    require(sale.status == Status.Active, 'SALE_NOT_ACTIVE');
    if (block.timestamp > sale.deadline && sale.tokensOwnedByUsers != sale.tokensTotal) {
      sale.status = Status.Refund;
      sale.refundDeadline = block.timestamp + 2 weeks;
    } else if (sale.tokensOwnedByUsers == sale.tokensTotal) {
      sale.status = Status.Sold;
    } else {
      revert('SALE_NOT_OVER');
    }
    sales[id] = sale;
    emit SaleFinalized(id, sale.status);
}We don’t restrict access to this function for our investors, as we want everyone to be able to finalize a sale. This way, users will trust our contract more, as there is no way for the owner to intentionally lock the sale by not finalizing it.
It’s possible that not all tokens will be sold before the deadline. In this case, we’ll give two weeks for our investors to request a refund. However, there is no way for them to get a refund right now, so let’s implement a getRefund function:
  function getRefund(uint256 id) external {
    Sale memory sale = getSaleInfo(id);
    require(sale.status == Status.Refund, 'NOT_REFUND_PERIOD');
    require(sale.refundDeadline > block.timestamp, 'REFUND_PERIOD_ENDED');
    ICarRentNFT carRentNFT = ICarRentNFT(carRentNFTContract);
    require(carRentNFT.balanceOf(msg.sender, id) > 0, 'REFUND_ZERO_BALANCE');
    uint256 userTokens = carRentNFT.balanceOf(msg.sender, id);
    uint256 refundAmount = userTokens * sale.pricePerToken;
    sale.tokensOwnedByUsers -= userTokens;
    sales[id] = sale;
    carRentNFT.burn(msg.sender, id, userTokens);
    emit RefundSent(msg.sender, id, refundAmount);
    (bool result, ) = msg.sender.call{value: refundAmount}('');
    require(result, 'ETH_TRANSFER_FAILED');
}Of course, we should check that the refund period is active, two weeks haven’t passed since the unsuccessful conclusion of the campaign, and the user is eligible to receive a refund. All refunded tokens are burned, as they are no longer used.
If any investors don’t claim their refund, the owner should be able to withdraw any unrefunded Ether after two weeks. The owner should only be able to withdraw Ether if the refund period has ended and there is still unrefunded Ether left from the sale. Here’s the function that will allow the owner to do this:
  function sweepETH(uint256 id) external onlyOwner {
    Sale memory sale = getSaleInfo(id);
    require(sale.status == Status.Refund && sale.refundDeadline < block.timestamp, 'CANT_SWEEP_YET');
    require(sale.tokensOwnedByUsers > 0, 'NO_ETH_LEFT');
    uint256 sweepAmount = sale.pricePerToken * sale.tokensOwnedByUsers;
    sale.tokensOwnedByUsers = 0;
    sales[id] = sale;
    (bool result, ) = msg.sender.call{value: sweepAmount}('');
    require(result, 'ETH_TRANSFER_FAILED');
}If all tokens are sold before the deadline, the owner should be able to withdraw the gathered Ether to buy a car. For now, buying a car is an off-chain process, so we won’t describe it.
Withdrawing should only be available when the sale is finished and all tokens are sold. Also, only the owner should have the right to withdraw the Ether. Let’s add this last function to the investment hub:
  function withdrawInvestedETH(uint256 id) external onlyOwner {
    Sale memory sale = getSaleInfo(id);
    require(sale.status == Status.Sold, 'SALE_NOT_SOLD');
    uint256 investedETH = sale.pricePerToken * sale.tokensTotal;
    sale.status = Status.WithdrawnByOwner;
    sales[id] = sale;
    emit OwnerReceivedETH(id);
    (bool result, ) = msg.sender.call{value: investedETH}('');
    require(result, 'ETH_TRANSFER_FAILED');
}With that, our smart contract for the investment hub is finished. Now we can create the last contract that will handle rewards distribution.
Read also
How Much Does Blockchain App Development Cost: A Detailed Overview
Get the complete picture of blockchain app development costs. In this guide, Apriorit developers walk you through the factors impacting your budget and ways to streamline your project without sacrificing innovation.

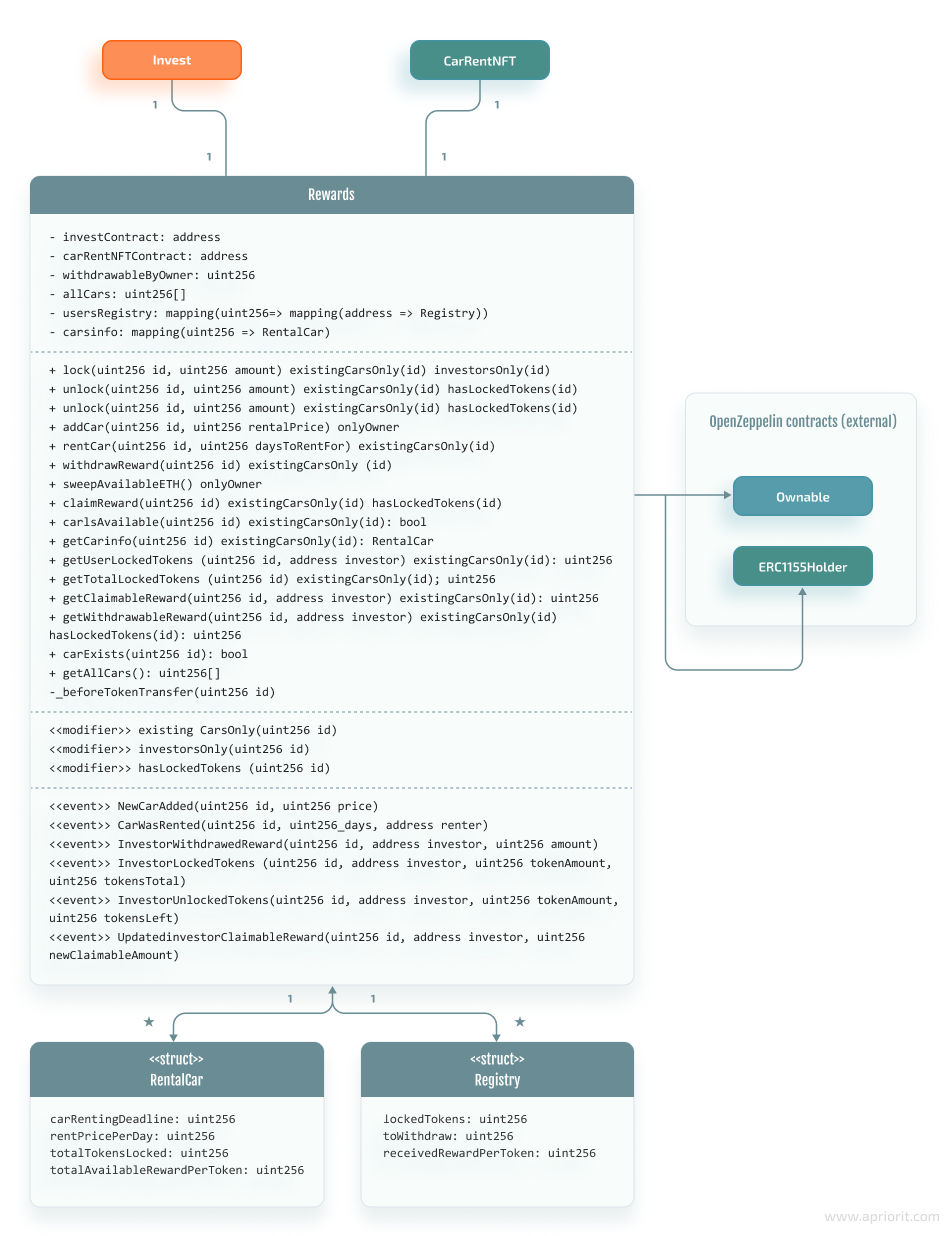
Configuring rewards distribution
The last contract will allow us to rent our cars to people and distribute the rewards to our investors. It will have the following key elements:
- A registry to store our cars’ rental statuses and return dates
- A way to store vehicle information: rental price, available rewards, etc.
- An array to store all cars on our platform
Here’s how this smart contract should work:
Let’s begin by creating a constructor for this contract to set the addresses of other contracts:
  constructor(address _investContract, address _carRentNFTContract) {
    require(_investContract != address(0), 'INVEST_ADDR_ZERO');
    require(_carRentNFTContract != address(0), 'NFT_ADDR_ZERO');
    investContract = _investContract;
    carRentNFTContract = _carRentNFTContract;
}Then, we can create a way for the owner to add new cars to the system:
  function addCar(uint256 id, uint256 rentalPrice) external onlyOwner {
    require(IInvest(investContract).getSaleInfo(id).status == IInvest.Status.WithdrawnByOwner, 'NOT_BOUGHT_YET');
    require(rentalPrice >= IInvest(investContract).getSaleInfo(id).tokensTotal, 'RENT_PRICE_TOO_LOW');
    RentalCar memory newCar = RentalCar(0, rentalPrice, 0, 0);
    carsInfo[id] = newCar;
    allCars.push(id);
    emit NewCarAdded(id, rentalPrice);
}Parameters are:
id– ID of the sale, NFT, or added carrentalPrice– price per day for renting the car
As you can see from the snippet above, we use the investing contract to check that the crowdfunding campaign for the car that the owner is trying to add exists and was successfully finished. Also, we make sure that the owner sets the right rental price and that each investor receives at least one Wei.
Next, let’s add a function that allows end users to rent a car:
  function rentCar(uint256 id, uint256 daysToRentFor) external payable existingCarsOnly(id) {
    require(daysToRentFor > 0, 'ZERO_DAYS_RENTAL');
    require(carIsAvailable(id), 'CAR_IS_RENTED');
    RentalCar memory carToRent = getCarInfo(id);
    if (carToRent.rentPricePerDay * daysToRentFor != msg.value) {
      revert WrongAmountOfEther(msg.value, carToRent.rentPricePerDay * daysToRentFor);
    }
    carToRent.carRentingDeadline = block.timestamp + (daysToRentFor * 1 days);
    uint256 totalLockedTokens = getTotalLockedTokens(id);
    if (totalLockedTokens == 0) {
      withdrawableByOwner += msg.value;
    } else {
      uint256 rewardPerToken = msg.value / totalLockedTokens;
      carToRent.totalAvailableRewardPerToken += rewardPerToken;
    }
    carsInfo[id] = carToRent;
    emit CarWasRented(id, daysToRentFor, msg.sender);
}Before renting a car to a user, this function verifies that:
- The end user is renting the car for at least one day
- Another user isn’t renting the same car
- The user has sent the correct amount of Ether
If everything is fine, the user can enjoy their newly rented car. We can also add an existingCarsOnly modifier that checks whether the owner has added the car that the user is trying to rent:
  modifier existingCarsOnly(uint256 id) {
    require(carExists(id), 'WRONG_CAR_ID');
    _;
  }

  function carExists(uint256 id) public view returns (bool) {
    return carsInfo[id].rentPricePerDay > 0;
}Now is the right time to implement the mechanism for withdrawing rewards. We’ll enforce a new rule to prevent investors from cheating by withdrawing their tokens before the sale is finished. Any investor who wants to receive a reward has to lock their tokens in the contract. We’ll add a function that automatically claims the reward for our investors when they are locking or unlocking their tokens. This will help us prevent re-entrancy attacks and malicious investor behavior.
Let’s create a way for our investors to lock their tokens:
  function lock(uint256 id, uint256 amount) external existingCarsOnly(id) investorsOnly(id) {
    _beforeTokenTransfer(id);
    ICarRentNFT(carRentNFTContract).safeTransferFrom(msg.sender, address(this), id, amount, '');
    usersRegistry[id][msg.sender].lockedTokens += amount;
    carsInfo[id].totalTokensLocked += amount;
    emit InvestorLockedTokens(id, msg.sender, amount, usersRegistry[id][msg.sender].lockedTokens);
}As you can see, we also check that the caller is actually an investor by using the new modifier investorsOnly:
  modifier investorsOnly(uint256 id) {
    require(ICarRentNFT(carRentNFTContract).balanceOf(msg.sender, id) > 0, 'NOT_INVESTOR');
    _;
}Also, we are calling the _beforeTokenTransfer function before each token lock and unlock:
  function _beforeTokenTransfer(uint256 id) internal {
    if (getClaimableReward(id, msg.sender) > 0) {
      if (getUserLockedTokens(id, msg.sender) > 0) {
        claimReward(id);
      } else {
        usersRegistry[id][msg.sender].receivedRewardPerToken = carsInfo[id].totalAvailableRewardPerToken;
      }
    }
}In the code above, there’s also a new function called claimReward. We will get to it later in the article. For now, we must add the unlock function:
  function unlock(uint256 id, uint256 amount) external existingCarsOnly(id) hasLockedTokens(id) {
    require(amount <= getUserLockedTokens(id, msg.sender), 'TOO_MANY_TOKENS');
    _beforeTokenTransfer(id);
    ICarRentNFT(carRentNFTContract).safeTransferFrom(address(this), msg.sender, id, amount, '');
    usersRegistry[id][msg.sender].lockedTokens -= amount;
    carsInfo[id].totalTokensLocked -= amount;
    emit InvestorUnlockedTokens(id, msg.sender, amount, usersRegistry[id][msg.sender].lockedTokens);
}Now investors can lock and unlock their tokens, but they still can’t withdraw their rewards. Let’s fix it with help of the claimReward function:
  function claimReward(uint256 id) public existingCarsOnly(id) hasLockedTokens(id) {
    require(getClaimableReward(id, msg.sender) > 0, 'NO_CLAIMABLE_REWARD');
    Registry memory investorData = usersRegistry[id][msg.sender];
    uint256 claimableRewardPerToken = getClaimableReward(id, msg.sender);
    investorData.toWithdraw += claimableRewardPerToken * investorData.lockedTokens;
    investorData.receivedRewardPerToken = carsInfo[id].totalAvailableRewardPerToken;
    usersRegistry[id][msg.sender] = investorData;
    emit UpdatedInvestorClaimableReward(id, msg.sender, investorData.toWithdraw);
}This function allows investors to claim their rewards. We divided rewards withdrawal into two separate steps — claimReward and withdrawReward — to prevent reentrancy. Furthermore, we introduced a new modifier – hasLockedTokens — which verifies that the caller has locked tokens:
  modifier hasLockedTokens(uint256 id) {
    require(getUserLockedTokens(id, msg.sender) > 0, 'NO_LOCKED_TOKENS');
    _;
}It’s time to add a withdrawal feature:
  function withdrawReward(uint256 id) public existingCarsOnly(id) {
    require(getWithdrawableReward(id, msg.sender) > 0, 'NO_WITHDRAWABLE_REWARD');
    uint256 withdrawAmount = getWithdrawableReward(id, msg.sender);
    usersRegistry[id][msg.sender].toWithdraw = 0;
    emit InvestorWithdrawedReward(id, msg.sender, withdrawAmount);
    (bool result, ) = msg.sender.call{value: withdrawAmount}('');
    require(result, 'ETH_TRANSFER_FAILED');
}This function only handles the actual transfer of Ether and requires the investor to claim their reward beforehand.
We only have one scenario left. What happens if investors don’t lock their tokens? Who gets the reward? If there are no investors with locked tokens, the reward should immediately be withdrawable by the owner. Otherwise, the Ether will be left on the contract’s balance forever.
Let’s create this last function:
  function sweepAvailableETH() external onlyOwner {
    require(withdrawableByOwner > 0, 'NOTHING_TO_SWEEP');
    uint256 withdrawAmount = withdrawableByOwner;
    withdrawableByOwner = 0;
    (bool result, ) = msg.sender.call{value: withdrawAmount}('');
    require(result, 'CALL_FAILED');
}With this last function, we are done with the smart contracts. Our service is fully implemented and we can move on to testing and deploying it.
Related project
Evaluating Smart Contract Security for Decentralized Finance (DeFi)
Smart contract audits are a great way to ensure the security of your crypto assets. We helped our client, Plenty platform, to assess their smart contracts and prove their safety to end users.
Deploying and testing the smart contracts
During development, we covered the smart contracts with unit tests to detect errors in code as soon as possible. You can check out these tests in our Apriorit GitHub repository. Now it’s time to test the contracts as a system and demonstrate the workflow.
Let’s start by writing a script for deploying and initializing our smart contracts. The Hardhat framework will help us with this task. Here’s how we can use it to deploy the Invest contract:
  const Invest = await hre.ethers.getContractFactory('Invest');
const investInstance = await Invest.deploy();Hardhat shares the same deployment syntax for all networks. If at some point you’ll want to deploy your contracts to another blockchain network, you only need to add the new network to Hardhat’s config file and set it as the default network.
The rest of the deployment script looks similar to the code snippet above. You can check it out in our GitHub repository. Now we can start configuring and running our showcase test.
The test requires two investors: a car renter and an owner. Also, we are going to use the following settings for all our tests:
owner– deployer and owner of the contractsinvestors: array– the list of investors who have bought tokens and will receive rewards; in our test, this list includes two investorsdeadline– a fixed deadline for finishing the token sale, which is going to be one hour in the futuresaleID– ID of the sale; for our test, saleID equals 1totalTokens– total number of tokens for the sale; for this sale, there are going to be 10 tokenscarRentNFTInstance– deployed NFT contractinvestInstance– deployed Invest contractrewardsInstance– deployed Rewards contract
The price per token for this sale will be ten Wei. The first investor will buy six tokens, and the second will buy four. Our car’s daily rental price will be 1000 Wei.
Hardhat uses the Mocha and Chai frameworks to handle testing. Let’s start by creating a callback that will be run before all other tests and will deploy a fresh pair of contracts:
  before('deploys fresh set of contracts', async () => {
    const signers = await hre.ethers.getSigners();
    investors = [new Investor(6, signers[1]), new Investor(4, signers[2])];
    deadline = await getDeadlineTimestamp(); // 1 hour in the future
    [owner, carRenter, investInstance, carRentNFTInstance, rewardsInstance] = await deploy();
    await investInstance.setCarNFTContract(carRentNFTInstance.address);
});Here we use the script we created earlier. When all the contracts are deployed, we set the NFT contract in our Invest contract. Now we are ready to test them. Let’s start by creating a new sale:
    it('owner starts a new sale', async () => {
      const URI = 'ipfs://bafkreien5b3ghtffb5zkuo2itth26zo3fvobsc5orrerfd4aihfz6d4d6u';
      await expect(investInstance.connect(owner).startNewSale(saleID, totalTokens, deadline, pricePerToken, URI))
        .to.emit(investInstance, 'SaleStarted')
        .withArgs(saleID, totalTokens, deadline, pricePerToken);
});As you can see, our events now help us test the functions and verify that they work as intended. Users can invest in the new sale:
    it('investors buy tokens', async () => {
      // First investor buys tokens
      let tokensToBuy = investors[0].tokens;
      let etherToPay = tokensToBuy * pricePerToken;
      await expect(investInstance.connect(investors[0].signer).invest(saleID, tokensToBuy, { value: etherToPay }))
        .to.emit(investInstance, 'UserInvested')
        .withArgs(investors[0].signer.address, saleID, tokensToBuy);

      // Second investor buys tokens
      tokensToBuy = investors[1].tokens;
      etherToPay = tokensToBuy * pricePerToken;
      await expect(investInstance.connect(investors[1].signer).invest(saleID, tokensToBuy, { value: etherToPay }))
        .to.emit(investInstance, 'UserInvested')
        .withArgs(investors[1].signer.address, saleID, tokensToBuy);
});Our first investor bought six tokens, and the second bought four. There are no more tokens, so we can finalize the sale and withdraw the invested Ether:
    it('owner finalizes the sale and withdraws Ether', async () => {
      await expect(investInstance.connect(owner).finalizeSale(saleID)).to.emit(investInstance, 'SaleFinalized').withArgs(saleID, saleStatus.Sold);
      await expect(investInstance.connect(owner).withdrawInvestedETH(saleID)).to.changeEtherBalance(owner.address, pricePerToken * totalTokens);
});Note that even though in this case the owner finalizes the sale, the smart contract allows any user to do it.
After the sale is finished and the owner receives the funds, they can buy a new car. Then they should add the new car to the Rewards contract:
    it('owner finalizes the sale and withdraws Ether', async () => {
      await expect(investInstance.connect(owner).finalizeSale(saleID)).to.emit(investInstance, 'SaleFinalized').withArgs(saleID, saleStatus.Sold);
      await expect(investInstance.connect(owner).withdrawInvestedETH(saleID)).to.changeEtherBalance(owner.address, pricePerToken * totalTokens);
});Now a new car is available and can be rented to end users. But it’s not over yet for our investors, as they should lock their tokens if they want to receive their share of the reward:
 it('investors lock their tokens', async () => {
      // The investors approve the Rewards contract to transfer the tokens
      await carRentNFTInstance.connect(investors[0].signer).setApprovalForAll(rewardsInstance.address, true);
      await carRentNFTInstance.connect(investors[1].signer).setApprovalForAll(rewardsInstance.address, true);

      // First investor locks their tokens
      await expect(rewardsInstance.connect(investors[0].signer).lock(saleID, investors[0].tokens))
        .to.emit(rewardsInstance, 'InvestorLockedTokens')
        .withArgs(saleID, investors[0].signer.address, investors[0].tokens, investors[0].tokens);

      // Second investor locks their tokens
      await expect(rewardsInstance.connect(investors[1].signer).lock(saleID, investors[1].tokens))
        .to.emit(rewardsInstance, 'InvestorLockedTokens')
        .withArgs(saleID, investors[1].signer.address, investors[1].tokens, investors[1].tokens);
});Locking their tokens allows the investors to receive their shares in the future. Meanwhile, our end user has decided to rent the car for five days:
     it('user rents a car', async () => {
      const etherToPay = daysToRentFor * rentPricePerDay;
      await expect(rewardsInstance.connect(carRenter).rentCar(saleID, daysToRentFor, { value: etherToPay }))
        .to.emit(rewardsInstance, 'CarWasRented')
        .withArgs(saleID, daysToRentFor, carRenter.address);
});Finally, the moment our investors were waiting for – reward distribution. To get their reward, investors must do two things:
 it('investors claim and withdraw the available reward', async () => {
      // First investor claims their reward
      let expectedReward = Math.floor((daysToRentFor * rentPricePerDay) / totalTokens) * investors[0].tokens;
      await expect(rewardsInstance.connect(investors[0].signer).claimReward(saleID))
        .to.emit(rewardsInstance, 'UpdatedInvestorClaimableReward')
        .withArgs(saleID, investors[0].signer.address, expectedReward);

      // First investor withdraws the claimed reward
      await expect(rewardsInstance.connect(investors[0].signer).withdrawReward(saleID))
        .to.emit(rewardsInstance, 'InvestorWithdrawedReward')
        .withArgs(saleID, investors[0].signer.address, expectedReward);

      // Second investor claims their reward
      expectedReward = Math.floor((daysToRentFor * rentPricePerDay) / totalTokens) * investors[1].tokens;
      await expect(rewardsInstance.connect(investors[1].signer).claimReward(saleID))
        .to.emit(rewardsInstance, 'UpdatedInvestorClaimableReward')
        .withArgs(saleID, investors[1].signer.address, expectedReward);

      // Second investor withdraws the claimed reward
      await expect(rewardsInstance.connect(investors[1].signer).withdrawReward(saleID))
        .to.emit(rewardsInstance, 'InvestorWithdrawedReward')
        .withArgs(saleID, investors[1].signer.address, expectedReward);
});Investors have received their reward, and the end user has rented the car. Our service works as intended, providing the owner with a secure and convenient crowdfunding opportunity, providing investors with a transparent token exchange, and providing end users with a new way to rent cars.
In our GitHub repository for this project, you will find the three smart contracts we discussed here as well as NPM scripts for easy deployment and testing of the service. Keep in mind that we implemented only the core elements of a blockchain-based crowdfunding service for carsharing, which will require additional customization before using it to provide real services.
Conclusion
Crowdfunding can help new businesses quickly acquire funds to bring their ideas to life, but crowdfunding can be risky for both entrepreneurs and investors. A blockchain allows for gathering and managing funds securely, transparently, and quickly.
With our practical example, we showed key steps of blockchain-based crowdfunding platform development to gather funds for a car rental service. To implement our business idea, we only needed three smart contracts, several scripts, and unit tests for our code. Though this project is tailored for the automotive industry, we can use our expertise in blockchain development to create a reliable investment platform for any business need.
Secure your finances and data with blockchain
Let Apriorit blockchain team develop a custom solution that empowers your operations and makes your data immutable and protected.
Have a question?
Ask our expert!
VP of Engineering


