 Skip to main content

Cloud marketplaces present a great opportunity to promote your product and bring it closer to your customers. But publishing an application on any of them is a tricky process, especially for complex multi-component products.
In this article, we share our experience publishing a client–server application on Azure Marketplace. We show how to create ARM templates, configure scripts with the Desired State Configuration (DSC) platform, and test the application with the ARM Template Tool Kit (TTK).
This article will be useful for product teams that want to publish their applications on Azure Marketplace but have little to no experience working with this platform.
Contents:
Planning the application’s offer type and implementation plan
Adding any application to a cloud marketplace is more complicated than simply uploading it to cloud storage. Once your application has been developed, you need to take a look at its architecture and the infrastructure instances it will need to run. Based on these parameters, you can choose relevant cloud services, pricing plans, hardware configurations, etc.
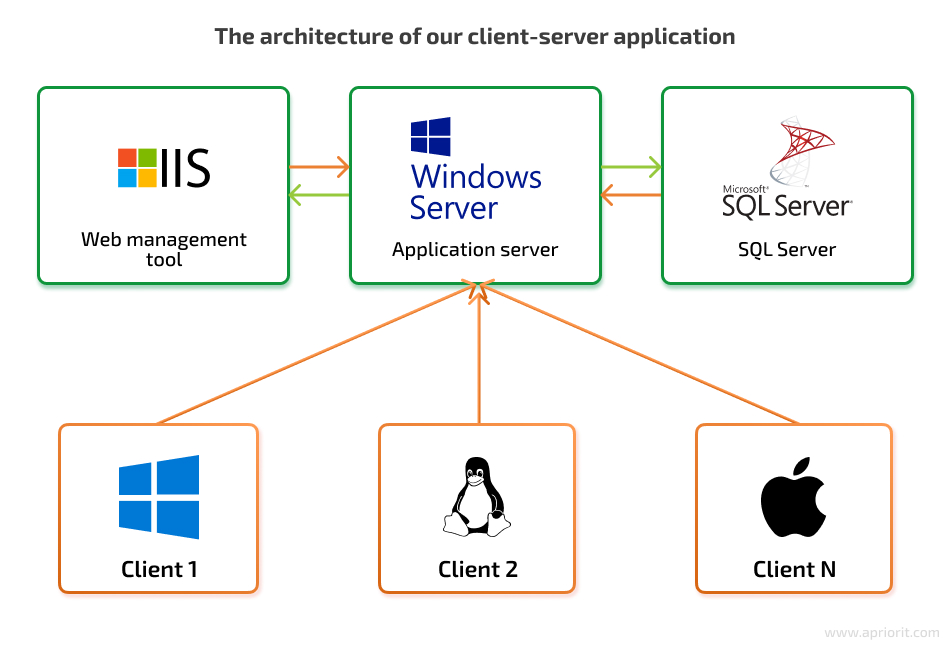
In this article, we describe all processes of publishing a client–server application on Azure Marketplace based on our recent project. The server part of the application consists of several components:
- Application server
- Web management tool
- SQL server (MS SQL or PostgreSQL)
Azure provides multiple offer types including Azure Application, Azure Container, and virtual machine to deliver an application to customers via Marketplace. The best offer type to choose depends on the type of your application and the infrastructure it requires. To make the right choice, start with answering these three questions:
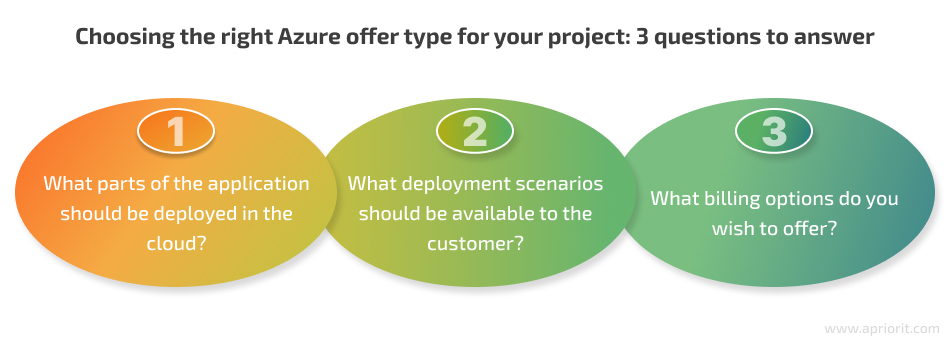
- What parts of the application should be deployed in the cloud?
The choice of offer type depends on the cloud services an application requires. If some parts of your application are deployed in the cloud, it limits your options in choosing needed services. For example, if our application doesn’t need a SQL server, we don’t need to use Azure Dataservice. This means we can simply prepare the image of a virtual machine with our application and choose an offer type that doesn’t include data management services.
In our example, installing the client software requires some planning from customers. Also, there could be communication and security issues if such software is installed without customer involvement.
Our application requires an end user to deploy the application server, web management tool, and SQL server in the cloud.
- What deployment scenarios should be available to the customer?
An application’s configuration often differs depending on the scope of features to be used, the existing infrastructure, and the planned load. That’s why it’s a good practice to offer several deployment scenarios for your application.
For our client–server application, we defined the following options:
- Deploying the app and SQL server on a single virtual machine for use cases with a small number of users
- Deploying the app and SQL server on separate virtual machines for use cases with a medium or large number of users
- Deploying the app on a single virtual machine and database within the Azure SQL server if a customer doesn’t want to manage the SQL server by themselves
- What billing options do you wish to offer?
Azure provides multiple billing options for applications that use a particular offer type. The most common billing option that works for most applications is bring your own license (BYOL). This is called a non-transactable offer and doesn’t require any additional configuration. A customer just gets a license from a publisher and activates it in the deployed application.
Because of this simplicity, we chose the BYOL billing option for our application.
After answering these questions, we decided to deliver our app as an Azure Application. This offer type allows us to deploy and configure a solution using multiple Azure resources like virtual machines, networking, and storage. This is the best option for applications that need more than one virtual machine or some additional services like Azure SQL server and Azure VM extensions.
Azure Application has two implementation plans available:
- Solution template, which is the most common plan as it fits all solutions that will be managed by a customer
- Managed application, which should be considered only in case a publisher needs to manage the application on behalf of the customer or a billing option other than BYOL is required
For our project, the solution template plan appeared to be the most suitable publishing option. How, let’s see how to publish applications in Azure Marketplace using this template.
Implementing an Azure Application solution template plan
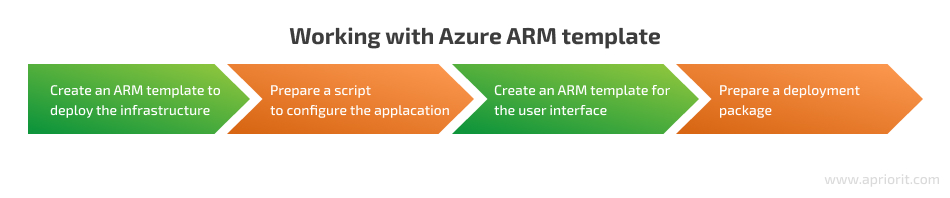
A solution template plan is mainly implemented using Azure Resource Manager (AMR) templates, which are JSON files that describe required infrastructure, configurations, and the user interface in the Marketplace to provide configuration parameters. It may also contain some auxiliary scripts to finalize the application’s configuration on the deployed infrastructure. All of these files must be packed into a .zip deployment package.
To deploy an Azure app using an ARM template, we need to follow these steps:
You can use one of the available templates from Azure or write a custom template that suits your application. Let’s examine an example of an ARM template for a client–server application.
1. Create an ARM template to deploy the infrastructure
First, let’s take a look at the template structure. The mandatory elements of the ARM template are $schema, contentVersion, and resources.
{
    "$schema": "https://schema.management.azure.com/schemas/2019-04-01/deploymentTemplate.json#",
    "contentVersion": "1.0.0.0",
    "resources": []
}resources describe each element of the infrastructure. You can check available resources and their syntax in the Azure resource reference documentation.
To deploy a single virtual machine, we need to add the following resource types to the template:
{
    "$schema": "https://schema.management.azure.com/schemas/2019-04-01/deploymentTemplate.json#",
    "contentVersion": "1.0.0.0",
    "resources": [
        {
            "name": "networkInterfaceName",
            "type": "Microsoft.Network/networkInterfaces",
            "apiVersion": "2021-08-01",
            "location": "westeurope",
            "properties": {}
        },
        {
            "name": "networkSecurityGroupName",
            "type": "Microsoft.Network/networkSecurityGroups",
            "apiVersion": "2019-02-01",
            "location": "westeurope",
            "properties": {}
        },
        {
            "name": "virtualNetworkName",
            "type": "Microsoft.Network/virtualNetworks",
            "apiVersion": "2021-01-01",
            "location": "westeurope",
            "properties": {}
        },
        {
            "name": "publicIpAddressName",
            "type": "Microsoft.Network/publicIpAddresses",
            "apiVersion": "2020-08-01",
            "location": "westeurope",
            "properties": {}
        },
        {
            "name": "virtualMachineName",
            "type": "Microsoft.Network/virtualMachines",
            "apiVersion": "2022-03-01",
            "location": "westeurope",
            "properties": {}
        }
    ]
}The mandatory elements of each resource are name, type, apiVersion, location, and properties. The properties element which contains a set of configurations of the defined resource.
We can set properties and other elements in the template dynamically via parameters. Parameters are specified before we select the resources section in the template. Each parameter must have a name and a type specified. In resources, parameters are addressed via special syntax as shown in the example below:
{
    "$schema": "https://schema.management.azure.com/schemas/2019-04-01/deploymentTemplate.json#",
    "contentVersion": "1.0.0.0",
    "parameters": {
        "addressPrefixes": {
            "type": "array"
        },
        "subnets": {
            "type": "array"
        }
    },
    "resources": [
        {
            "name": "networkInterfaceName",
            "type": "Microsoft.Network/networkInterfaces",
            "apiVersion": "2021-08-01",
            "location": "westeurope",
            "properties": {
                "addressSpace": {
                    "addressPrefixes": "[parameters('addressPrefixes')]"
                },
                "subnets": "[parameters('subnets')]"
            }
        }
    ]
}We can also dynamically configure resources with variables. This is useful when some properties depend on parameters defined by a user. For example, we can use variables when we want to give the customer a choice to deploy a virtual machine (VM) with Microsoft SQL server or PostgreSQL. Depending on the user’s choice, the application must use a corresponding VM image. Here’s an example of how we can use variables:
{
    "$schema": "https://schema.management.azure.com/schemas/2019-04-01/deploymentTemplate.json#",
    "contentVersion": "1.0.0.0",
    "parameters": {
        "sqlServerType": {
            "type": "string",
            "defaultValue": "MSSQL",
            "allowedValues": [ "MSSQL",  "PG" ],
        }
    },
    “variables”: {
        "image": "[if(equals(parameters('sqlServerType'), 'MSSQL'), 'MSSQLserverImage', 'PGserverImage')]"
    },
    "resources": [
        {
            "name": "virtualMachineName",
            "type": "Microsoft.Compute/virtualMachines",
            "apiVersion": "2022-03-01",
            "location": "westeurope",
            "properties": {
                "storageProfile": {
                    "imageReference": {
        	            "publisher": "publisherName",
        	            "offer": "offerName",
        	            "sku": "[variables('image')]",
        	            "version": "latest"
                    }
                }
                …
            }
        }
    ]
}The image variable is dynamically set based on the sqlServerType parameter. We can assign a value to this variable using built-in if() and equals() functions. The equals() function compares two strings. If these strings are equal, the if() function assigns the variable the first value that follows the equals() function. In our example above, that value is MSSQLserverImage. If these strings are not equal, the variable is assigned the last value, which is PGserverImage in our example. You can check out other template functions in the Azure documentation.
Deployment of resources runs in parallel by default, but some resources require the deployment of other resources. The dependsOn property in the resource description allows you to define a specific order of resource deployment.
When deploying a single virtual machine, we must start by creating network resources and only then work on a virtual machine. Among network resources, the security group, virtual network, and public IP address can be created without any conditions while the network interface depends on all of them. Here’s how our template will look:
{
    "$schema": "https://schema.management.azure.com/schemas/2019-04-01/deploymentTemplate.json#",
    "contentVersion": "1.0.0.0",
    "resources": [
        {
            "name": "networkInterfaceName",
            "type": "Microsoft.Network/networkInterfaces",
            "apiVersion": "2021-08-01",
            "location": "westeurope",
            "dependsOn": [
                "Microsoft.Network/networkSecurityGroups/networkSecurityGroupName",
                "Microsoft.Network/virtualNetworks/virtualNetworkName",
                "Microsoft.Network/publicIpAddresses/publicIpAddressName"
            ],
            "properties": {}
        },
        {
            "name": "networkSecurityGroupName",
            "type": "Microsoft.Network/networkSecurityGroups",
            "apiVersion": "2019-02-01",
            "location": "westeurope",
            "properties": {}
        },
        {
            "name": "virtualNetworkName",
            "type": "Microsoft.Network/virtualNetworks",
            "apiVersion": "2021-01-01",
            "location": "westeurope",
            "properties": {}
        },
        {
            "name": "publicIpAddressName",
            "type": "Microsoft.Network/publicIpAddresses",
            "apiVersion": "2020-08-01",
            "location": "westeurope",
            "properties": {}
        },
        {
            "name": "virtualMachineName",
            "type": "Microsoft.Network/virtualMachines",
            "apiVersion": "2022-03-01",
            "location": "westeurope",
            "dependsOn": [ "Microsoft.Network/networkInterfaces/networkInterfaceName" ],
            "properties": {}
        }
    ]
}To address the specific resource in the dependsOn element, we should use the full resource name, which consists of several components:
- Provider namespace (
Microsoft.Network) - Resource type (
networkInterfaces,networkSecurityGroups,virtualNetworks, or/publicIpAddresses) - Name of the resource defined in the template
When implementing a multi-part solution, it may be challenging to read and maintain a long ARM template. We can create linked templates to break one template into multiple. For example, if we want to separate a network configuration, we should create a new template with the network configuration only and then invoke it in the main template via a special resource of the Microsoft.Resources/deployments type.
Here’s how the network template will look:
{
    "$schema": "https://schema.management.azure.com/schemas/2019-04-01/deploymentTemplate.json#",
    "contentVersion": "1.0.0.0",
    "resources": [
        {
            "name": "networkInterfaceName",
            "type": "Microsoft.Network/networkInterfaces",
            "apiVersion": "2021-08-01",
            "location": "westeurope",
            "dependsOn": [
                "Microsoft.Network/networkSecurityGroups/networkSecurityGroupName",
                "Microsoft.Network/virtualNetworks/virtualNetworkName",
                "Microsoft.Network/publicIpAddresses/publicIpAddressName"
            ],
            "properties": {}
        },
        {
            "name": "networkSecurityGroupName",
            "type": "Microsoft.Network/networkSecurityGroups",
            "apiVersion": "2019-02-01",
            "location": "westeurope",
            "properties": {}
        },
        {
            "name": "virtualNetworkName",
            "type": "Microsoft.Network/virtualNetworks",
            "apiVersion": "2021-01-01",
            "location": "westeurope",
            "properties": {}
        },
        {
            "name": "publicIpAddressName",
            "type": "Microsoft.Network/publicIpAddresses",
            "apiVersion": "2020-08-01",
            "location": "westeurope",
            "properties": {}
        }
    ]
}The main ARM template will contain the rest of the resources for our application:
{
    "$schema": "https://schema.management.azure.com/schemas/2019-04-01/deploymentTemplate.json#",
    "contentVersion": "1.0.0.0",
    "resources": [
        {
            "name": "networkDeployment",
            "type": "Microsoft.Resources/deployments",
            "apiVersion": "2021-04-01",
            "properties": {
                "mode": "Incremental",
                "templateLink": {
                    "uri":"https://storageAddress/networkTemplate.json",
                    "contentVersion":"1.0.0.0"
                }
            }
        },
        {
            "name": "virtualMachineName",
            "type": "Microsoft.Network/virtualMachines",
            "apiVersion": "2022-03-01",
            "location": "westeurope",
            "dependsOn": [ "Microsoft.Resources/deployments/networkDeployment" ],
            "properties": {}
        }
    ]
}Note that deployment of the virtual machine now should depend on the Microsoft.Resources/deployments resource instead of Microsoft.Network/networkInterfaces because resources from linked templates are not accessible in the main template or other linked templates by default. If you need to address some resource from one template in another, use the output option in the source template and then pass this value to the target template using the properties element.
For example, we created a separate network deployment template, but we would like to know the fully qualified domain name created for the virtual machine. In this case, the network template will have a different ending compared to the previous example of the network template:
{
    "$schema": "https://schema.management.azure.com/schemas/2019-04-01/deploymentTemplate.json#",
    "contentVersion": "1.0.0.0",
    "resources": [
        …some code here…
        {
            "name": "publicIpAddressName",
            "type": "Microsoft.Network/publicIpAddresses",
            "apiVersion": "2020-08-01",
            "location": "westeurope",
            "properties": {
                "dnsSettings": {
                    "domainNameLabel": "string",
                    "fqdn": "string",
                    "reverseFqdn": "string"
                },
            …some code here…
            }
        }
    ],
    “outputs”: {
        "hostname": {
            "type": "string",
            "value": "[reference(resourceId('Microsoft.Network/publicIPAddresses', 'publicIPAddressName')).dnsSettings.fqdn]"
        }
    }
}In this example, we use the built-in resourceId() function to retrieve the ID of the deployed resource of the public IP address. In function parameters, specify the Microsoft.Network/publicIPAddresses resource type and name. The built-in reference() function allows us to retrieve the value of the fqdn property in the dnsSettings properties of the resource configuration.
In some cases, the need to deploy a resource can depend on configurations chosen by the user. For example, we can deploy our client–server application on a single virtual machine or two discrete machines. Deployment of the second virtual machine isn’t always required. We can reflect this in our template with the condition property in the resource description. Let’s take a look at the changes in the main template:
{
    "$schema": "https://schema.management.azure.com/schemas/2019-04-01/deploymentTemplate.json#",
    "contentVersion": "1.0.0.0",
    "parameters": {
        "installAppOnDiscreteVms": {
            "type": "string",
            "defaultValue": "No",
            "allowedValues": [ "Yes",  "No" ],
        }
    },
    "resources": [
        {
            "name": "networkDeployment",
            "type": "Microsoft.Resources/deployments",
            "apiVersion": "2021-04-01",
            "properties": {
                "mode": "Incremental",
                "templateLink": {
                    "uri":"https://storageAddress/networkTemplate.json",
                    "contentVersion":"1.0.0.0"
                }
            }
        },
        {
            "name": "virtualMachine1Name",
            "type": "Microsoft.Network/virtualMachines",
            "apiVersion": "2022-03-01",
            "location": "westeurope",
            "dependsOn": [ "Microsoft.Resources/deployments/networkDeployment" ],
            "properties": {}
        },
        {
            "condition": "[equals(parameters('installAppOnDiscreteVms'), 'Yes')]",
            "name": "virtualMachine2Name",
            "type": "Microsoft.Network/virtualMachines",
            "apiVersion": "2022-03-01",
            "location": "westeurope",
            "dependsOn": [ "Microsoft.Resources/deployments/networkDeployment" ],
            "properties": {}
        }
    ]
}The built-in equals() function can return true or false while comparing the value of the installAppOnDiscreteVms parameter to the Yes string. If the condition property gets the True value, the resource will be deployed. Otherwise, deployment will be skipped.
Finally, to configure our application on the deployed virtual machines, we must add the Microsoft.Compute/virtualMachines/extensions resource type to the template. This resource allows us to run a single command or script on the target machine. For example, if we need to install a PostgreSQL server on a virtual machine, we can upload the following PowerShell script to external storage:
$fileName = "postgresql-13.1-1-windows-x64.exe"
Invoke-WebRequest -Uri http://get.enterprisedb.com/postgresql/$fileName -OutFile $env:TEMP\$fileName
& "$env:TEMP\$fileName" --mode unattended --superpassword "Password1"When the script is ready, we have to add the Microsoft.Compute/virtualMachines/extensions resource to the ARM template, which helps us to start the VM and load the installPgserver.ps1 script.
Here’s how the main template looks now:
{
"$schema": "https://schema.management.azure.com/schemas/2019-04-01/deploymentTemplate.json#",
"contentVersion": "1.0.0.0",
"resources": [
…some code here…
{
"name": "virtualMachineName",
"type": "Microsoft.Network/virtualMachines",
"apiVersion": "2022-03-01",
"location": "westeurope",
"dependsOn": [ "Microsoft.Resources/deployments/networkDeployment" ],
"properties": {}
},
{
"name": "virtualMachineName/InstallPGserver",
"type": "Microsoft.Compute/virtualMachines/extensions",
"apiVersion": "2021-04-01",
"location": "westeurope",
"dependsOn": [ "Microsoft.Compute/virtualMachines/virtualMachineName" ],
"properties": {
"publisher": "Microsoft.Compute",
"type": "CustomScriptExtension",
"typeHandlerVersion": "1.7",
"autoUpgradeMinorVersion": true,
"settings": {
"fileUris": [ "https://storageAddress/installPGserver.ps1" ],
"commandToExecute": "powershell.exe -ExecutionPolicy Unrestricted -File installPgserver.ps1"
}
}
}
]
}Note that this resource has the CustomScriptExtension type, which allows us to configure the virtual machine or install an application. This extension works for most simple deployment cases. However, we can’t use it to implement complex configurations, which, for example, require a virtual machine reboot.
Let’s take a look at another way to configure our application using Desired State Configuration.
2. Prepare a script to configure the application
Desired State Configuration is a PowerShell management platform that allows you to apply a set of configurations to a target machine. Adding a DSC extension to an ARM template helps you to manage configurations during application deployment in Azure.
A simple DSC script consists of a configuration name and the name of a node where those configurations should be applied. Here’s how it looks:
configuration AppConfig
{
node "localhost" {}
}The node contains configurations for the target machine. Similarly to an ARM template, the node uses a set of resources to describe the desired configuration. The most useful are:
Script— run a PowerShell scriptWindowsFeature— install a Windows featureRegistry— manage registry keys and valuesEnvironment— manage environment variables
You can check out other resources in the PowerShell DSC documentation.
To access our client–server application, a customer has to install a web server based on Internet Information Services (IIS). We need to enable this configuration for the deployed virtual machine by adding the WindowsFeature resource to the node configuration and describing what feature we require in what state:
configuration AppConfig
{
node "localhost"
{
WindowsFeature IISinstallation
{
Ensure = "Present"
Name = "Web-WebServer"
}
}
}This way of adding resources is very handy in case we need to add more complex configurations. Let’s say we need several additional configurations for our web server. We don’t need to repeat the WindowsFeature resource for each of them. Instead, we can use the WindowsFeatureSet resource once and list all features we need to install:
configuration AppConfig
{
node "localhost"
{
WindowsFeatureSet IISinstallation
{
Ensure = "Present"
Name = @("Web-WebServer", "Web-WebSockets", "Web-Asp-Net", "Web-Asp-Net45", "Web-Mgmt-Console")
IncludeAllSubFeature = $true
}
}
}The Script resource allows us to create a PowerShell script or add an existing script to our DSC configuration. For example, we can simply add the previous script for installing the PostgreSQL application on the deployed virtual machine to our existing DSC script:
configuration AppConfig
{
node "localhost"
{
WindowsFeatureSet IISinstallation
{
Ensure = "Present"
Name = @("Web-WebServer", "Web-WebSockets", "Web-Asp-Net", "Web-Asp-Net45", "Web-Mgmt-Console")
IncludeAllSubFeature = $true
}
Script PGinstallation
{
SetScript = {
$fileName = "postgresql-13.1-1-windows-x64.exe"
Invoke-WebRequest -Uri http://get.enterprisedb.com/postgresql/$fileName -OutFile $env:TEMP\$fileName
& "$env:TEMP\$fileName" --mode unattended --superpassword "Password1"
}
TestScript = { Get-Service -Name "postgresql*" }
GetScript = { @{ Result = 'PostgreSQL is installed' } }
}
}We need to place this script in the SetScript property. This script will be run only if the expression in the TestScript property returns False. The expression in the GetScript property gets information about the resource’s current state (file content, application version, etc.).
We can also pass parameters to the DSC script in the form of a simple PowerShell script. For example, if we want to make the password of the superuser account of the PostgreSQL server configurable by the user, we can add a block with PSCredential type parameters before the node configurations. Addressing the parameter in the script block is possible via the $Using: statement.
Here’s how it looks in our DSC script:
configuration AppConfig
{
    param (
        [PSCredential] $PGsuperuser
    )

    node "localhost"
    {
        WindowsFeatureSet IISinstallation
        {
            Ensure = "Present"
            Name = @("Web-WebServer", "Web-WebSockets", "Web-Asp-Net", "Web-Asp-Net45", "Web-Mgmt-Console")
            IncludeAllSubFeature = $true
        }
        Script PGinstallation
        {
            SetScript = {
                $fileName = "postgresql-13.1-1-windows-x64.exe"
                Invoke-WebRequest -Uri http://get.enterprisedb.com/postgresql/$fileName -OutFile $env:TEMP\$fileName
                & "$env:TEMP\$fileName" --mode unattended --superpassword $Using:PGsuperuser.GetNetworkCredential().Password
            }
            TestScript = { Get-Service -Name "postgresql*" }
            GetScript = { @{ Result = 'PostgreSQL is installed' } }
    }
}To execute the DSC script on the virtual machine, let’s add the DSC extension to the ARM main template:
{
    "$schema": "https://schema.management.azure.com/schemas/2019-04-01/deploymentTemplate.json#",
    "contentVersion": "1.0.0.0",
    "resources": [
        …some code here…
        {
            "name": "virtualMachineName",
            "type": "Microsoft.Network/virtualMachines",
            "apiVersion": "2022-03-01",
            "location": "westeurope",
            "dependsOn": [ "Microsoft.Resources/deployments/networkDeployment" ],
            "properties": {}
        },
        {
            "name": "Microsoft.Powershell.DSC",
            "type": "Microsoft.Compute/virtualMachines/extensions",
            "apiVersion": "2022-08-01",
            "location": "westeurope",
            "dependsOn": [ "Microsoft.Compute/virtualMachines/virtualMachineName" ],
            "properties": {
                "publisher": "Microsoft.Powershell",
                "type": "DSC",
                "typeHandlerVersion": "2.77",
                "autoUpgradeMinorVersion": true,
                "settings": {
                    "ModuleUrl": "https://storageAddress/DSCscript.ps1",
                    "configurationFunction": "AppConfig",
                    "wmfVersion": "5.0",
                    "Properties": {},
                },
                "protectedSettings": {
                    "Properties": {
                        "PGsuperuser": {
                            "userName": "postgres",
                            "password": "Password1"
                        }
                    }
                }
            }
        }
    ]
}Parameters that should be passed to the DSC script must be described in the settings or protectedSettings blocks. The difference between them is that the parameters in the first block are passed to the script as plain text, and the parameters in the second block are passed encrypted.
With that, our application and configurations for it are ready for deployment. We can start adding the application to Azure Marketplace.
3. Create an ARM template for the user interface in Azure Marketplace
Our customers will configure the deployment of our application via a user interface in the Azure Marketplace portal. We can create this interface with another ARM template. Such an interface has the Basics and Review + create as well as custom tabs described by the app publisher in the template.
An ARM template for the user interface needs a different structure compared to an ARM template for infrastructure deployment. This template contains the following main elements:
$schemahandlerversionparameters
The parameters element changes the most compared to the previous template. Now this block contains the config, basics, steps, outputs, and resourceTypes properties. We’ll mainly change the steps and outputs properties.
Here’s what the structure for such an ARM template looks like:
JSON
{
    "$schema": "https://schema.management.azure.com/schemas/0.1.2-preview/CreateUIDefinition.MultiVm.json#",
    "handler": "Microsoft.Azure.CreateUIDef",
    "version": "0.1.2-preview",
    "parameters": {
        "config": { },
        "basics": [ ],
        "steps": [ ],
        "outputs": { },
        "resourceTypes": [ ]
    }
}The steps property describes all custom tabs that must be shown to the user after the Basics tab in the user interface. Each new tab must have name, label, and elements properties.
{
    "$schema": "https://schema.management.azure.com/schemas/0.1.2-preview/CreateUIDefinition.MultiVm.json#",
    "handler": "Microsoft.Azure.CreateUIDef",
    "version": "0.1.2-preview",
    "parameters": {
        "config": { },
        "basics": [ ],
        "steps": [
            {
                 "name": "testStep",
                 "label": "Test Step",
                 "elements": [ ]
            }
        ],
        "outputs": { }
    }
}Each element of each tab has three required properties:
name— name of the tabtype— definition of the tab’s view and functionalitylabel— text to display to end users
Elements can also have additional properties: defaultValue, toolTip, constraints, etc. You can check out the full list of available UI elements in the Azure Managed Applications documentation.
To deploy our application, customers need to choose between Microsoft SQL and PostgreSQL servers. We can add a UI element of the Microsoft.Common.DropDown type to the template and describe the available options in its constraints property:
{
    "$schema": "https://schema.management.azure.com/schemas/0.1.2-preview/CreateUIDefinition.MultiVm.json#",
    "handler": "Microsoft.Azure.CreateUIDef",
    "version": "0.1.2-preview",
    "parameters": {
        "config": { },
        "basics": [ ],
        "steps": [
            {
                 "name": "sqlConfiguration",
                 "label": "SQL configuration",
                 "elements": [
                     {
                         "name": "sqlServerType",
                         "type": "Microsoft.Common.DropDown",
                         "label": "SQL Server type",
                         "defaultValue": "MS SQL",
                         "constraints": {
                             "allowedValues": [
                                 {
                                     "label": "MS SQL",
                                     "description": "Virtual machine with MS SQL installed.",
                                     "value": "MSSQL"
                                 },
                                 {
                                     "label": "PostgreSQL",
                                     "description": "Virtual machine with PostgreSQL installed.",
                                     "value": "PG"
                                 }
                             ]
                        }
                    }
                ]
            }
        ],
        "outputs": { }
    }
}Here’s how this element looks in the UI:
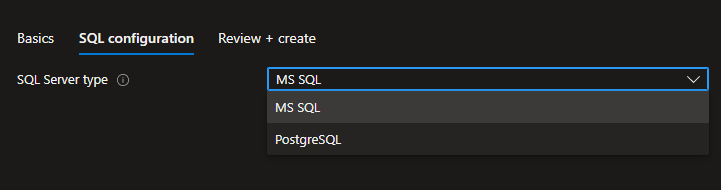
Microsoft.Common.DropDownWe can configure the same parameter via the Microsoft.Common.OptionsGroup element. The variations only change the look of this tab. It’s best to use a dropdown menu when you have a lot of options, while OptionsGroup is more suitable if you only have a few options.
Here’s how to implement it:
{
    "$schema": "https://schema.management.azure.com/schemas/0.1.2-preview/CreateUIDefinition.MultiVm.json#",
    "handler": "Microsoft.Azure.CreateUIDef",
    "version": "0.1.2-preview",
    "parameters": {
        "config": { },
        "basics": [ ],
        "steps": [
            {
                 "name": "sqlConfiguration",
                 "label": "SQL configuration",
                 "elements": [
                     {
                         "name": "sqlServerType",
                         "type": "Microsoft.Common.OptionsGroup",
                         "label": "SQL Server type",
                         "defaultValue": "MS SQL",
                         "constraints": {
                             "allowedValues": [
                                 {
                                     "label": "MS SQL",
                                     "description": "Virtual machine with MS SQL installed.",
                                     "value": "MSSQL"
                                 },
                                 {
                                     "label": "PostgreSQL",
                                     "description": "Virtual machine with PostgreSQL installed.",
                                     "value": "PG"
                                 }
                             ]
                        }
                    }
                ]
            }
        ],
        "outputs": { }
    }
}In this case, the UI tab will look slightly different:
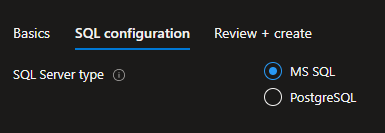
Microsoft.Common.OptionsGroupEach listed option in the SQL configuration tab has the value property, which is passed to the ARM template that deploys infrastructure. The list of values to pass to the ARM template for infrastructure deployment should be specified in the outputs property:
{
    "$schema": "https://schema.management.azure.com/schemas/0.1.2-preview/CreateUIDefinition.MultiVm.json#",
    "handler": "Microsoft.Azure.CreateUIDef",
    "version": "0.1.2-preview",
    "parameters": {
        "config": { },
        "basics": [ ],
        "steps": [
            {
                 "name": "sqlConfiguration",
                 "label": "SQL configuration",
                 "elements": [
                     {
                         "name": "sqlServerType",
                         "type": "Microsoft.Common.OptionsGroup",
                         "label": "SQL Server type",
                         "defaultValue": "MS SQL",
                         "constraints": {
                             "allowedValues": [
                                 {
                                     "label": "MS SQL",
                                     "description": "Virtual machine with MS SQL installed.",
                                     "value": "MSSQL"
                                 },
                                 {
                                     "label": "PostgreSQL",
                                     "description": "Virtual machine with PostgreSQL installed.",
                                     "value": "PG"
                                 }
                             ]
                        }
                    }
                ]
            }
        ],
        "outputs": {
            "sqlServerType": "[steps('sqlConfiguration').sqlServerType]"
        }
    }
}The property name in the outputs block must correspond to the name of the parameter in the ARM deployment template this value is intended for. We need to use specific syntax to address the value in the UI template.
To make the UI template easier to read, we can group elements into one block using the Microsoft.Common.Section element. For example, if our application requires the deployment of one or two virtual machines, we can describe configurations for each virtual machine in a separate section:
{
    "$schema": "https://schema.management.azure.com/schemas/0.1.2-preview/CreateUIDefinition.MultiVm.json#",
    "handler": "Microsoft.Azure.CreateUIDef",
    "version": "0.1.2-preview",
    "parameters": {
        "config": { },
        "basics": [ ],
        "steps": [
            {
                "name": "vmConfiguration",
                "label": "VM configuration",
                "elements": [
                    {
                        "name": "vm1Configuration",
                        "type": "Microsoft.Common.Section",
                        "label": "VM1 Configuration",
                        "elements": [
                            {
                                "name": "vmName",
                                "type": "Microsoft.Common.TextBox",
                                "label": "Virtual machine name",
                                "defaultValue": "APP-VM-01",
                            }
                        ]
                    },
                    {
                        "name": "vm2Configuration",
                        "type": "Microsoft.Common.Section",
                        "label": "VM2 Configuration",
                        "elements": [
                            {
                                "name": "vmName",
                                "type": "Microsoft.Common.TextBox",
                                "label": "Virtual machine name",
                                "defaultValue": "APP-VM-02",
                            }
                        ]
                    }
                ]
            }
        ]
    }
}In the UI, we’ll see corresponding sets of parameters for two virtual machines:
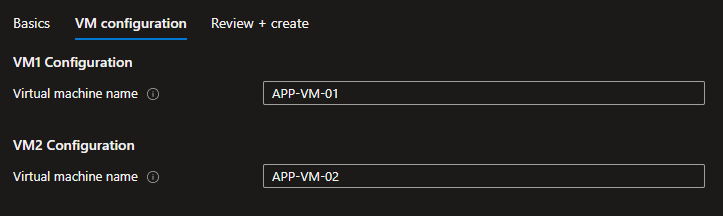
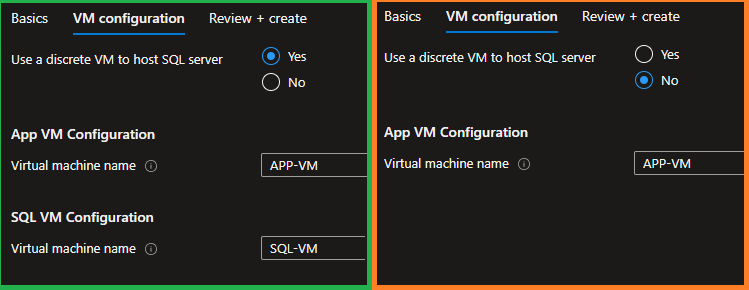
Our customer can choose the number of VMs to deploy based on the planned application load. If they choose to deploy one VM, there is no need to show configuration options for the second VM. We can hide these second configurations with the visible option:
{
    "$schema": "https://schema.management.azure.com/schemas/0.1.2-preview/CreateUIDefinition.MultiVm.json#",
    "handler": "Microsoft.Azure.CreateUIDef",
    "version": "0.1.2-preview",
    "parameters": {
        "config": { },
        "basics": [ ],
        "steps": [
            {
                "name": "vmConfiguration",
                "label": "VM configuration",
                "elements": [
                    {
                        "name": "deploySqlVm",
                        "type": "Microsoft.Common.OptionsGroup",
                        "label": "Use a discrete VM to host SQL server",
                        "defaultValue": "Yes",
                        "constraints": {
                            "allowedValues": [
                                {
                                    "label": "Yes",
                                    "description": "SQL server on a discrete VM",
                                    "value": "yes"
                                },
                                {
                                    "label": "No",
                                    "description": "SQL server and the app share VM",
                                    "value": "no"
                                }
                            ]
                        }
                    },
                    {
                        "name": "appVmConfiguration",
                        "type": "Microsoft.Common.Section",
                        "label": "App VM Configuration",
                        "elements": [
                            {
                                "name": "vmName",
                                "type": "Microsoft.Common.TextBox",
                                "label": "Virtual machine name",
                                "defaultValue": "APP-VM",
                            }
                        ]
                    },
                    {
                        "name": "sqlVmConfiguration",
                        "type": "Microsoft.Common.Section",
                        "label": "SQL VM Configuration",
                        "elements": [
                            {
                                "name": "vmName",
                                "type": "Microsoft.Common.TextBox",
                                "label": "Virtual machine name",
                                "defaultValue": "SQL-VM",
                            }
                        ],
                        "visible": "[equals(steps('vmConfiguration').deploySqlVm, 'yes')]"
                    }
                ]
            }
        ]
    }
}The visible property shows the element only if the [equals(steps('vmConfiguration').deploySqlVm, 'yes')] expression returns True. We can use built-in functions in such expressions similarly to the ones used in the ARM deployment templates. In the example above, the equals() function compares the value of the deploySqlVm element to the yes string. As a result, we have two possible views of the same tab depending on the user’s choice:
Such a complex template structure may not be necessary for our example with only two virtual machines. But when there are multiple configurations for a single VM (credentials, size, disk type, etc.), hiding unnecessary configurations with the visible property makes the UI easier to understand.
Now our application is ready for deployment. We only need to prepare the archive with the deployment package.
4. Prepare a deployment package
To make our application available on Azure Marketplace, we must pack the templates and scripts we prepared into a .zip file called the deployment package. In the root of the deployment package, there must be two files with these exact names:
- mainTemplate.json — the ARM deployment template which is used as an entry point for deployment. Linked templates (if any) can have any names and be placed in the root of the package as well as in other subfolders.
- createUiDefinition.json — the ARM template used for the user interface in the Azure portal
The size of the deployment package can be up to 1GB. We’ll need to upload this archive to Microsoft Partner Center when publishing the application.
To deliver quality applications to our customers, we need to not only prepare templates and scripts but also to test them. Let’s see which quality assurance (QA) activities we need to perform with our templates.
Testing our Azure Application
QA activities with an Azure Application should start at the early development stages and continue even after the application is published. For our application, we can outline the following QA stages:
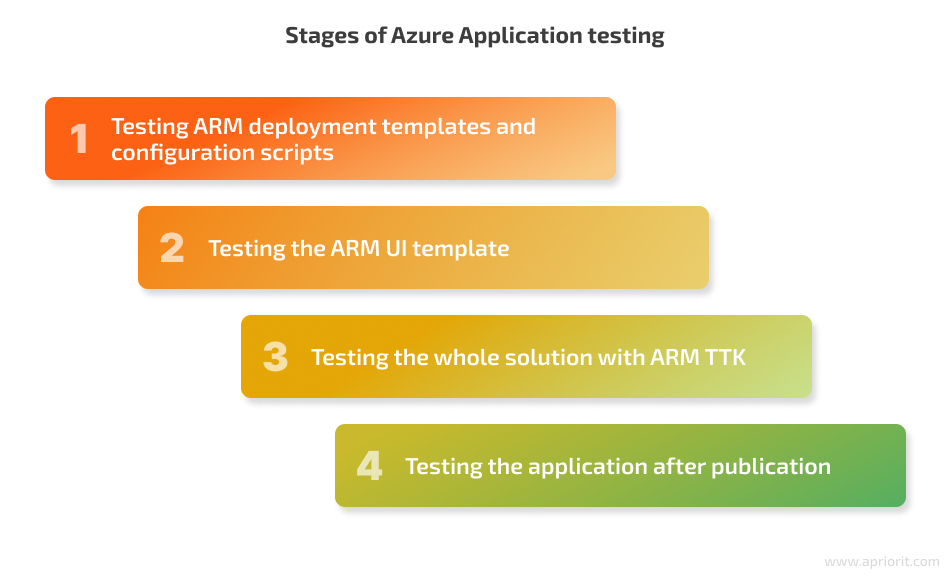
1. Testing ARM deployment templates and configuration scripts
We need to test ARM templates and configuration scripts to:
- Ensure the deployment of required infrastructure
- Check that the application is installed and configured properly
To test ARM deployment templates outside of Azure Marketplace, we’ll use Azure CLI — a command-line tool that connects to Azure and executes administrative commands on Azure resources. You can find more information on the tool and an installation guide in the Azure CLI documentation.
Testing with Azure CLI consists of the following steps:
1. Open PowerShell and log in to our Azure account:
az login2. Create a resource group for testing:
az group create --name "testRG1" --location "westeurope"3. Create variables for complex objects to be passed as parameters. For example, let’s create credentials for the VM administrator:
$creds = Get-Credential -UserName Administrator4. Launch deployment:
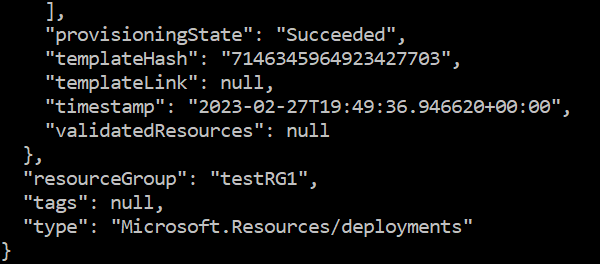
az deployment group create –resource-group "testRG1" –name "testDeployment1" –template-file –parameters …When deployment is finished, the Azure CLI will return the results along with parameters used in deployment:
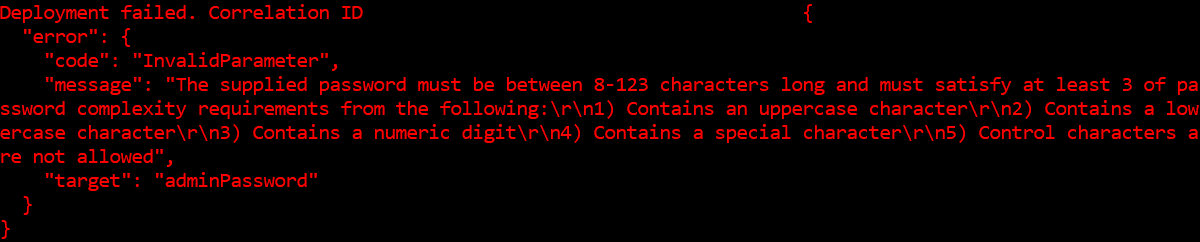
If the deployment fails, Azure CLI will return information about the failure. For example, if we provide the wrong password for a Windows Server VM, we’ll receive the following result:
You can check deployed infrastructure in the Azure portal in the defined resource group. To clean the deployment, you can delete the entire resource group with this command:
az group delete –name "testRG1" –yes2. Testing the ARM UI template
Testing the UI template allows us to ensure that all UI elements are displayed correctly to end users and that the required parameters are successfully obtained at this stage. To test the UI before publishing our application in Azure, we can use the Create UI Definition Sandbox in the following way:
- Clear the default template and insert our own.
- Click Preview
- Go through the configuration wizard we implemented
In particular, we need to ensure that the chosen configuration has passed validation:

We can also select View outputs payload and check that all required parameters have been assigned values:
3. Testing the application with ARM TTK
One of the requirements for publishing any Azure Application is validating it with the ARM template test toolkit (ARM TTK). This tool checks if templates are compliant with Azure’s recommended practices. You can find a list of all necessary tests in the ARM TTK documentation.
Let’s launch ARM TTK via a simple command in PowerShell:
Test-AzMarketplacePackage -TemplatePath /path/to/the/templatesARM TTK will run all tests automatically and print to the console the list of tests it has run on our template, along with their results. The possible results of tests are:
- + — passed
- ? — warning
- – — error
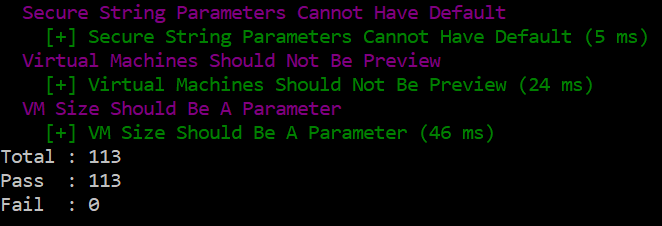
All tests run on our application passed successfully. If any tests had failed, we would have needed to fix the application to be able to publish it to the Azure Marketplace.
4. Testing the application before and after publication
These types of testing occur after implementation is finished at the publishing stage. In this case, we need to ensure one more time that the user interface, infrastructure deployment, and application configuration work as expected. This time, we can test it via the Azure portal and see how end users interact with our application.
After our application gets initial validation from Azure, we can access the preview version on the Azure Marketplace via the Microsoft Partner Center. Eventually, when the offer gets certified and goes public, it becomes available on the Azure Marketplace for everyone.
Publishing the application
Before publishing an application to Azure Marketplace, you need a commercial marketplace account in Partner Center that’s enrolled in the commercial marketplace program. You can follow this official guide to create your account.
Now, we can start creating our offer. In the Marketplace Partner Center, let’s go to the Marketplace offers page and create a new offer:
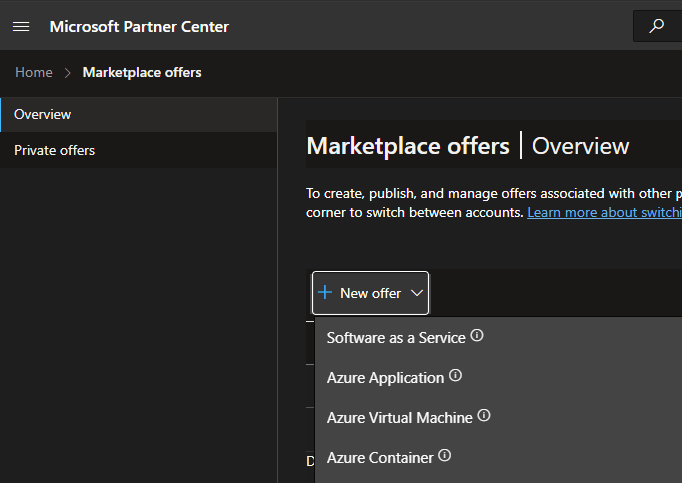
A new offer needs some details that describe our product:
- Public name
- Short and full description
- Search keywords
- Privacy policy and product information links
- Support and engineering contact
- Marketplace media (screenshots of your application, how-to video, logos, etc.)
Next, we need to create a plan for our offer. The plan will define the application’s scope and limits. One offer can have multiple plans. When creating a plan, we need to provide a plan name, summary, and description. When our plan is ready, we can go to the Technical configuration page and submit the deployment package prepared earlier.
We can track the publish status of our application on the Offer overview page of the Marketplace Partner Center. It consists of the following stages:
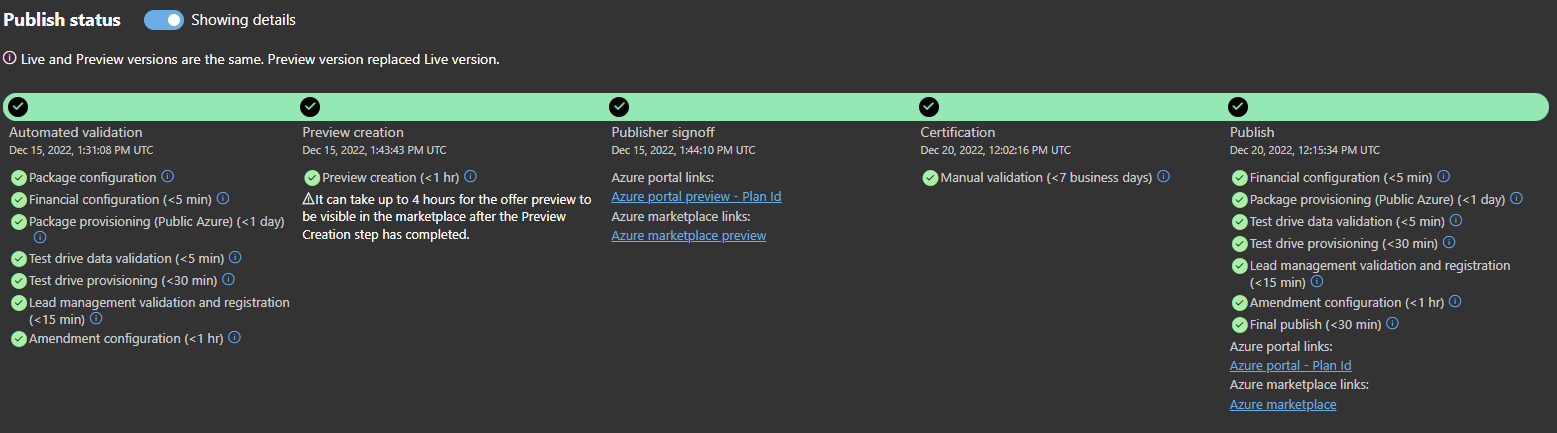
If any issues occur at one of these stages, the publisher needs to fix them and resubmit the offer. When the application reaches the Publisher signoff stage, Azure generates links to the preview version and starts testing the application in Azure portal. We also can check that the product information we provided looks like we planned.
In our experience, the whole process of publishing the offer takes up to seven business days. After that, the application becomes available to customers.
Conclusion
To publish an application on Azure Marketplace, a development team needs to know how to work with Azure tools for app testing and deployment. Multi-component applications require deep expertise in cloud computing and infrastructure management.
Apriorit’s cloud infrastructure management team has lots of experience working with popular cloud marketplaces, including for Azure, Google Cloud, and AWS. We have successfully deployed and managed countless cloud-based projects and know how to handle various licensing, infrastructure maintenance, and quality assurance issues.
Reach out to benefit from our cloud infrastructure management expertise and publish your application in the cloud!
Have a question?
Ask our expert!
VP of Innovation and Technology, Canada Branch Director


