 Skip to main content

Using microservices is a great way to make your software product flexible and accelerate the development process. However, it might not be obvious where to start, which tools to use, and how to configure them.
In this article, we show a practical example of how to build a microservices architecture and deploy a .NET application to Azure Service Fabric step by step.
We created this article to give developers who are considering migrating their products to microservices a helicopter view of this architecture.
Contents:
Defining the architecture of a microservices-based solution
In a microservices architecture, a single application is composed of many autonomous services.
The microservices architecture works with containerization technology, which is a form of virtualization that enables you to run applications in isolated spaces called containers. Containers are executable software units that contain application code along with associated libraries and dependencies.
Microservices offer lots of valuable benefits including:
- Independently deployed modules
- Easy management
- Improved fault tolerance
- Agility
With microservices, you can update and change each service separately without rebuilding and redeploying the entire application.
However, some specialists including Martin Fowler prefer to start software development with a monolithic architecture. And indeed, building a microservices-based solution can be tricky due to challenges such as data integrity, complexity, and lack of governance.
Thanks to our experience developing various projects based on a microservices approach, we know where to start and what pitfalls to expect. Let’s create a demo project with a simplified order workflow.
The architecture we offer can be used as a starting point for building an e-commerce solution, a ticket booking system, or any other software that provides paid goods or services. We’ll write a simple program in .NET and then deploy the .NET web app to Azure Service Fabric.
Here’s a scheme of the architecture we’re aiming for:
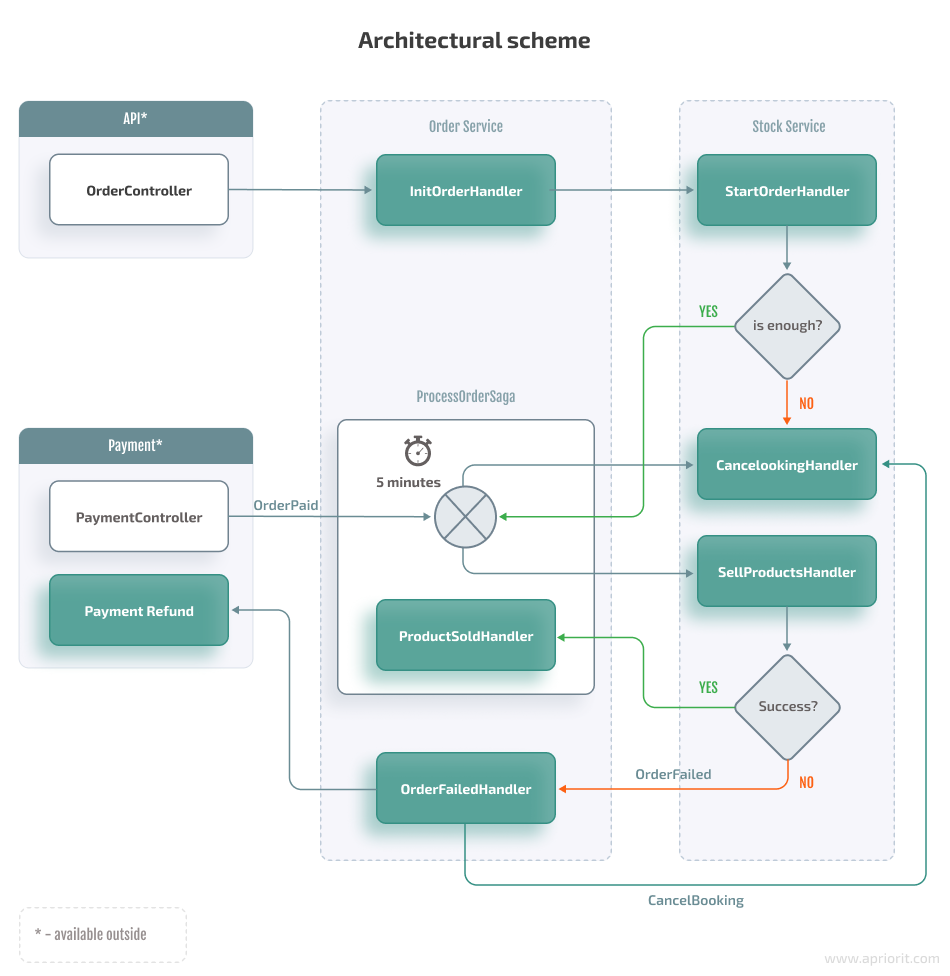
The solution we’ll build has four microservices, and two of them have public APIs. Here’s a brief description of our application’s flow:
- The API sends a command to OrderService to create an order.
- InitOrderHandler checks the data validity of the request and assigns unique identifiers to the request and the order.
- StockService checks whether there are enough products left to complete the order. If yes, it books the required number of products. If not, the service cancels the order.
- ProcessOrderSaga receives control over the next actions and waits five minutes to receive an OrderPaid message.
- If payment is received, ProcessOrderSaga completes the order. Otherwise, it cancels the booking.
But before we start discussing microservices development in detail, let’s briefly explore useful tools for the deployment process and how they can help us with building our solution.
Related services:
Cloud Infrastructure Management Services
Choosing a container orchestrator
The two main complications developers face when deploying a microservices-based solution are:
- Microservices are harder to run and deploy compared to a monolithic architecture.
- Different teams may work on different microservices, and as a result, updates may not be synchronized on time. This is why it’s better to be able to update parts independently.
To simplify work with microservices and be able to update the application’s parts independently, you can use a container orchestrator. Such software allows engineers to automate deployments, scale applications, monitor services’ health, and control versioning.
There are plenty of helpful orchestration platforms. Some of the most popular include:
- Kubernetes — This is the de facto industry-leading orchestration platform for automated software deployment, management, and scaling. The Kubernetes containerization platform is convenient to use, allows for locating hardware anywhere, and can manage containers on separate machines.
- Azure Service Fabric — This platform is for deploying, managing, and scaling microservices across a cluster of machines. It offers the ability to scale up to thousands of machines and supports both Windows and Linux on-premises, in Azure, and in other cloud environments.
For this article, we decided to go with Azure Service Fabric as our container orchestrator. It started as an internal Microsoft product and provides an ideal experience when scaling Microsoft’s own products. As Azure Service Fabric powers Microsoft Azure, we expect this tool to be kept alive and up to date for a long time — at least as long as Azure itself is alive.
Here are a couple of benefits that allow this open-source platform to compete with other orchestrators and be successfully used for software development and production:

- Fast and easy deployment of services across multiple distributed machines. Azure Service Fabric allows you to deploy virtual machines (VMs) once to form a cluster of machines that hosts the Service Fabric application platform. Then, you can quickly deploy application packages to the cluster. It also provides the opportunity to automatically roll back a deployment in case of system failure.
- Multiple ways to run an application. Azure Service Fabric supports running applications in containers or natively as executables. It also allows you to use Azure Service Fabric locally, in any cloud, and inside any operating system. Running Azure Service Fabric in a cloud other than Azure is technically the same process as creating a standalone cluster.
- Convenient integration options. You can easily integrate Azure Service Fabric into your CI/CD pipeline using Azure Pipelines, Jenkins, and Octopus. It also integrates with Azure API management, allowing you to import service definitions. You don’t need to modify application code whenever you want to define complex routing rules or add access controls, rate limiting, monitoring, event logging, and response caching.
- Scalability and microservices replication. Azure Service Fabric is able to scale seamlessly based on demand. It also bundles each deployment as a structured package, which makes it easily replicable across an environment.
- Monitoring opportunities. Service Fabric helps you monitor applications, services, and their supporting infrastructure strictly and thoroughly.
This platform also allows you to store and process data in the same location thanks to its focus on stateful services. Such a strategy reduces latency and enables developers to perform near real-time computations.
Using Azure Service Fabric also allows for a smooth migration process. Microsoft suggests a migration plan that allows you to migrate your applications to microservices gradually and smoothly by reusing and improving existing code.
Now, let’s explore in detail how to deploy a web .NET application to Azure Service Fabric.
Read also:
Infrastructure Automation: 7 DevOps Tools for Orchestration, Secrets Management, and Monitoring
Deploying a .NET application to Azure Service Fabric
To get started, you need to install the Service Fabric SDK and tools. Then, you can either go through the quickstart guide and download a sample project or create a Service Fabric Application in Microsoft Visual Studio (VS).
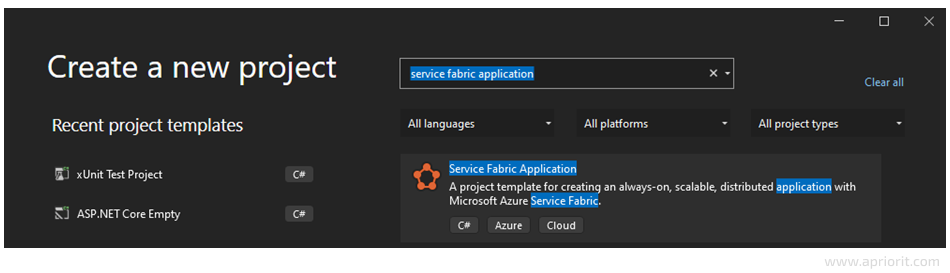
The template is smart enough to immediately offer a choice of types of services to create: ASP.NET web API, web app, or even React or Angular UI. As a result, we have two projects in a solution:
- One for developing the microservices themselves
- Another for deploying our .NET app to Azure Service Fabric
To explore a detailed description of the second project, check out the official documentation.
Adding more services is easy: just right-click the Azure Service Fabric project and go to Add => New Service Fabric Service.
Note: Debugging an application locally and deploying it to an Azure cluster are well-described in the official documentation. But keep in mind that you should run Visual Studio using an administrator account for debugging.
Once we’ve created a remote cluster and published our application to it, we can open the Service Fabric explorer via Resource Groups by clicking on the Service Fabric Cluster instance:
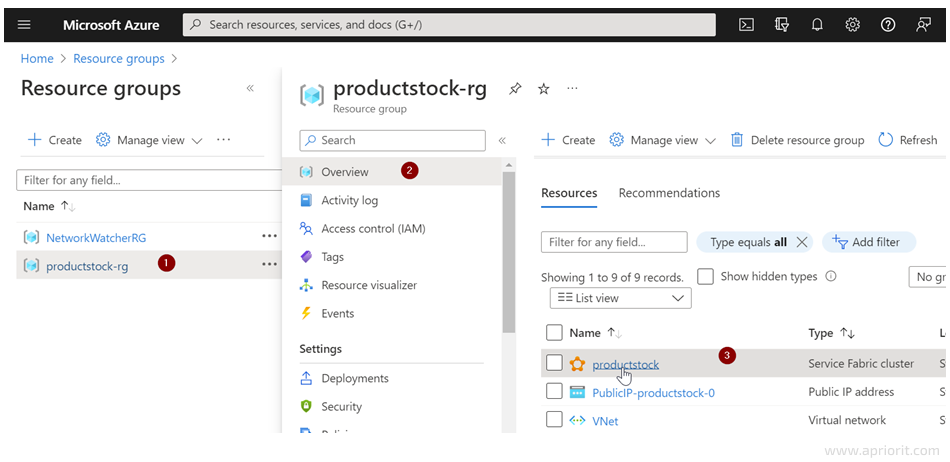
We see exactly the same interface as the local one. Here, we can observe lots of helpful details like node states and information about deployed applications:

When learning how to deploy a .NET application to Azure Service Fabric, you also should take versioning in account. Let’s explore how versioning and automatic rollback on failure work in Azure.
Versioning and automatic rollback on failure in Azure
Software constantly changes. And processes like application delivery, updating, and deployment can be quite non-trivial tasks in a client environment, especially in distributed systems.
Besides, there’s always a chance that some process might fail. To prevent the negative consequences of potential failure, developers often group changes into versions and organize a rollback mechanism.
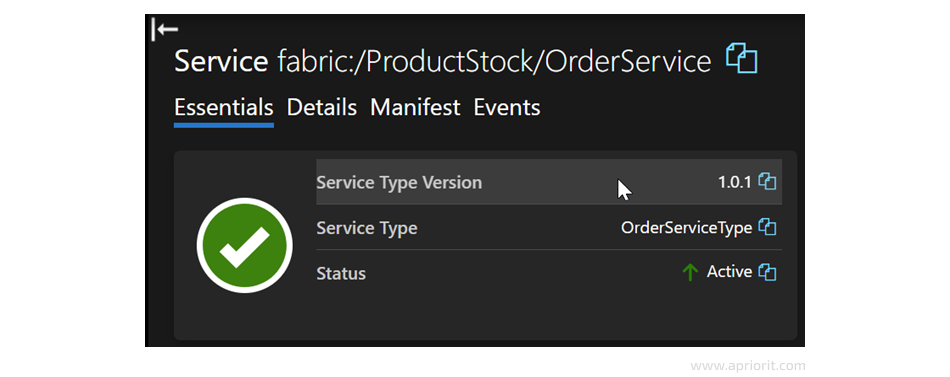
Let’s see versioning and recovery strategies in action. After changing the controller’s code and publishing a new 1.0.1 stable version according to Microsoft’s instructions, we can see that the version has been successfully updated:
Now, it’s time to explore how an automatic rollback works. Our goal is to make the timeout when upgrading (UpgradeDomainTimeoutSec) short enough because when this timeout is reached, the upgrade stops and then proceeds according to the settings for FailureAction.
Here’s how we upgrade settings:
- Set Upgrade Mode to Monitored
- Set FailureAction to Rollback
- Configure short enough timeouts:
- 2 seconds for HealthCheckRetryTimeout
- 6 seconds for UpgradeDomainTimeout and UpgradeTimeout
- 0 seconds for HealthCheckWaitDuration
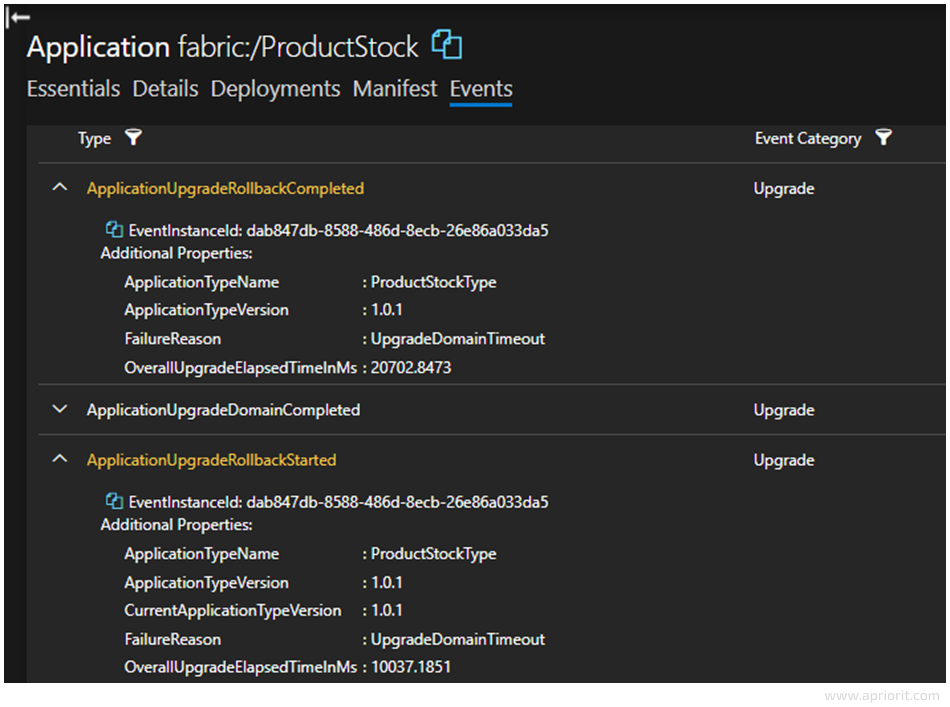
And finally, we have the automatic rollback:
If you need to perform a manual rollback and do other things such as create, remove, upgrade, start/restart clusters, or generate reports, use Azure PowerShell for Service Fabric.
You’ll learn how to work with this tool in the next section.
Read also:
How to Accelerate Microservices Development: A Practical Guide to Applying Code Generation
Adding Azure PowerShell to Service Fabric
The first thing to do is install the Azure AZ module to PowerShell using the following command:
PS C:\> Install-Module -Name Az -Scope CurrentUser -Repository PSGallery -Force Then, to perform any operation, we run the connect command first:
PS C:\> Connect-ServiceFabricCluster -ConnectionEndpoint "localhost:19000" The official documentation states that it’s not possible to roll back updates when Upgrade Mode is set to UnmonitoredAuto or UnmonitoredManual. So we reset UpgradeDomainTimeout and UpgradeTimeout settings to the default infinity value, launch publishing in VS, and run the command in PowerShell:
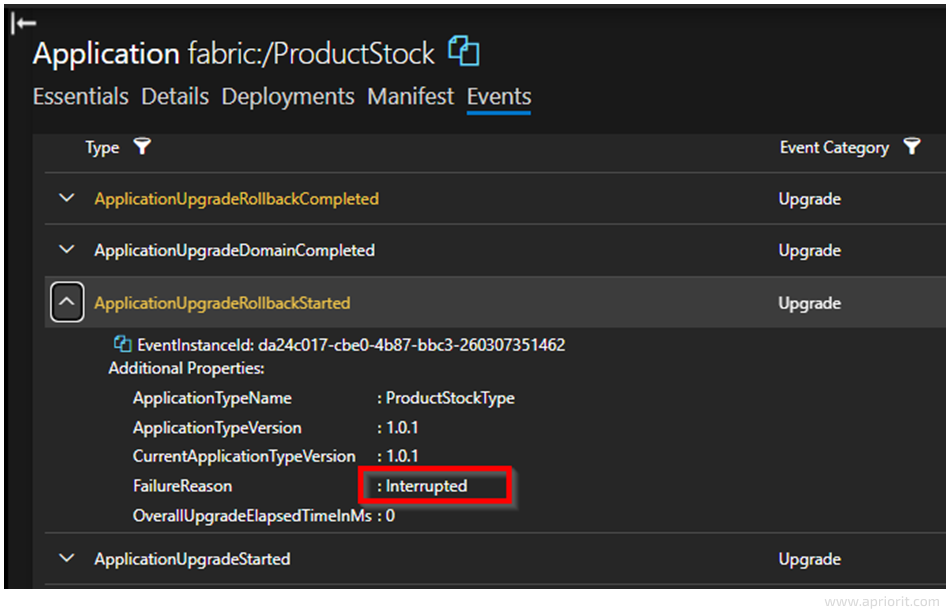
PS C:\> Start-ServiceFabricApplicationRollback -ApplicationName fabric:/ProductStock We expect to see an error in PowerShell that looks like a pop-up when running this command while the application hasn’t been upgraded:

But in fact, the upgrade is interrupted, as you can see in the screenshot below:
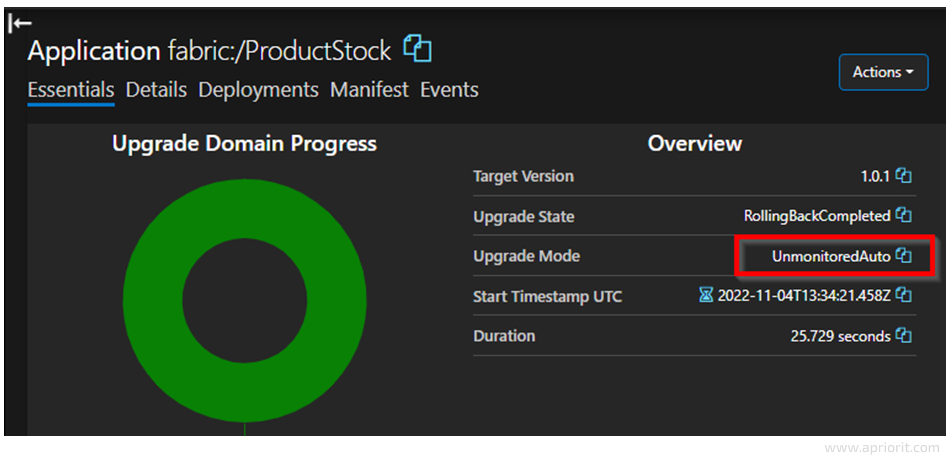
We can see that Upgrade Mode was changed to UnmonitoredAuto — this probably happened automatically:
Now we are able to deploy the application locally and to the cloud. Let’s develop each microservice according to the architectural scheme we provided at the beginning of the article.
Ensuring microservices communication with NServiceBus
Let’s start with communication between microservices, as it’s extremely important for smooth and efficient software functioning. We can categorize microservices communication based on whether the interaction between microservices is:
- One-to-one or one-to-many
- Synchronous or asynchronous
Synchronous communication means that a client requires a response in a timely manner and may be blocked until they receive it. Synchronous communication is considered an antipattern. You can even use a synchronous protocol in an asynchronous way if you want to poll the other services. If a client demands data from another service to complete a task, it’s acceptable to replicate necessary data in both databases, which is avoided in monolithic applications and normalized database structures in general.
In asynchronous communication, all messages are divided into three types:
- One-to-one communication if a command obliges the receiver to act
- One-to-many communication if an event informs that something important occurs in a service. When a service emits an event, it doesn’t expect something to happen in other services.
- Document, also called Message or Query, if some data is sent to another service. A receiver decides what to do with it.
To deliver messages, an application may use message brokers.
A message broker is a separate infrastructure unit that functions as a router and translates messages, organizes special sending strategies like FIFO (first in, first out), guarantees delivery, fallbacks, transactions, etc. The advantages and drawbacks of brokered and brokerless systems come down to balancing performance and reliability: brokerless systems have better latency, but guaranteeing delivery is challenging.
The Azure platform has three messaging services:
- Event Grid
- Event Hubs
- Service Bus
Let’s take a look at Azure Service Bus (ASB). It provides libraries for .NET, Java, Python, and JavaScript/TypeScript for free. Here, we will focus on NServiceBus — a commercial platform built on top of the ASB framework.
NServiceBus helps developers focus on business logic by abstracting infrastructure concerns. Here’s what this means:
- Uncle Bob’s Clean Architecture urges developers to defer framework and technology decisions as much as possible. Choosing NServiceBus is one of those decisions. Developers are often not concerned about specific messaging queues and where to run them (on-premises or in the cloud) because these decisions aren’t critical at the beginning. NServiceBus supports out-of-the-box solutions like RabbitMQ, MSMQ, Azure Service Bus, and Amazon SQS, allowing you to switch between them using just two lines of code.
- NServiceBus recommends not writing anything except business logic in message handlers. This framework prescribes putting any infrastructure-related work you usually don’t need at the beginning of development in separate pipelines.
- NServiceBus allows you to easily test your services with any testing framework such as xUnit, NUnit, or MSTest.
Another significant advantage is that NServiceBus encapsulates each message in a simple class, as shown in the code snippet below.
namespace Messages.Commands
{
	public class InitOrder : BaseMessage, ICommand
	{
    	public InitOrder(Guid userId, DateTime createdAt, IEnumerable<BookedProduct> products)
    	{
        	UserId = userId;
        	CreatedAt = createdAt;
        	Products = products;
    	}
    	public DateTime CreatedAt { get; set; }
    	public IEnumerable<BookedProduct> Products { get; set; }
	}

	public struct BookedProduct
	{
    	public int ProductId { get; set; }
    	public int Quantity { get; set; }
	}
}Note: If you want to use ASB, make sure to create additional logic to transform a binary format, set of bytes, or string into a readable structure.
Now let’s discuss how to configure NServiceBus.
Configuring NServiceBus
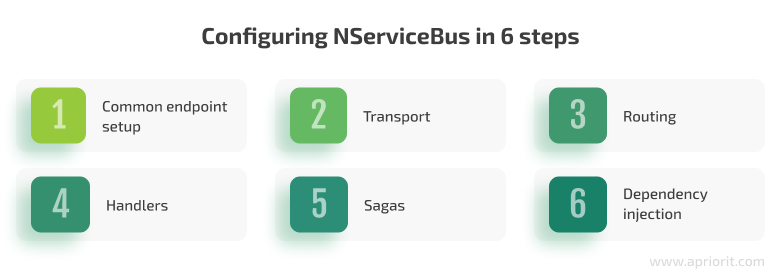
As stated in the documentation, messages are routed between endpoints. We have already shown you a simple example of a message, where an endpoint is a logical component that can be deployed to a number of machines. Each deployment is called an instance. An endpoint configuration is a bit complicated, so let’s break down the configuration process into several steps:
1. Common endpoint setup
To simplify the setup of multiple endpoints, we create an abstract wrapper class:
public abstract class ConfiguredEndpoint : EndpointConfiguration
{
    	public string Name { get; private set; }
    	public IConfiguration Configuration { get; private set; }
    	public RoutingSettings RoutingSettings { get; private set; }

    	public ConfiguredEndpoint(IConfiguration configuration, string name)
        	: base(name)
    	{
        	Name = name;
        	Configuration = configuration;
        	RoutingSettings = this.ApplyCommonConfiguration();
    	}
}Calling :base(name) assigns a name according to the documentation.
ApplyCommonConfiguration is an extension method that:
- Calls the
EnableInstallersmethod for development environments (since it is not recommended for production) - Configures transport depending on the
Configurationclass property - Returns the available
RoutingSettingsobject after transport configuration
Any new endpoint inherits the basic class, as shown in the code below:
public class StockServiceEndpoint : ConfiguredEndpoint
{
    	public StockServiceEndpoint(IConfiguration configuration)
        	: base(configuration, EndpointNames.STOCK)
    	{ }
} Since an endpoint’s name is extremely important for routing, we place all names into constants to prevent misprints in the future:
public static class EndpointNames
{
    	public const string STOCK = "StockService";
    	public const string ORDER = "OrderService";
}2. Transport
With NServiceBus, several messaging technologies are available out of the box, and it is easy to switch between them. NServiceBus offers a helpful how-to article to help you select a transport for a project. However, we should also keep in mind limitations for transactions.
For our example, we will choose RabbitMQ:
private static TransportExtensions CreateRabbitMQTransport(EndpointConfiguration endpointConfiguration, string connectionString)
{
	var transport = endpointConfiguration
    	.UseTransport<RabbitMQTransport>();
	transport.UseConventionalRoutingTopology(QueueType.Quorum);
	transport.ConnectionString(connectionString);
	return transport;
}3. Routing
Calling the transport.Routing() method of the object returned in the previous section allows us to define services that should process exact messages and commands:
public class OrderServiceEndpoint : ConfiguredEndpoint
{
	public OrderServiceEndpoint(IConfiguration configuration) :
        	base(configuration, EndpointNames.ORDER)
	{
    		var stock = EndpointNames.STOCK;
    		RoutingSettings.RouteToEndpoint(typeof(StartOrder), stock);
    		RoutingSettings.RouteToEndpoint(typeof(CancelOrder), stock);
    		RoutingSettings.RouteToEndpoint(typeof(SellProducts), stock);
	}
}Depending on the chosen transport, events may need to call the RegisterPublisher method. In the case of tools like RabbitMQ, Azure Service Bus, and MS SQL, it’s enough to have handlers for events.
4. Handlers
To become a handler, a class should implement the IHandleMessages<T> interface, where T is derivable from IMessage, ICommand, or IEvent. The simplest handler looks like this:
public class OrderCompletedHandler : IHandleMessages<OrderCompleted>
{
	public Task Handle(OrderCompleted message, IMessageHandlerContext context)
	{
    		/* business logic here */
    		return Task.CompletedTask;
	}
}But business logic usually has asynchronous calls and/or sends other messages further. So handlers may look like this:
public class StartOrderHandler : IHandleMessages<StartOrder>
{
	private readonly IStockService _stockService;
	private readonly IMapper _mapper;


	public StartOrderHandler(IStockService stockService, IMapper mapper)
	{
    		_stockService = stockService;
    		_mapper = mapper;
	}


	public async Task Handle(StartOrder message, IMessageHandlerContext context)
	{
    		if (await _stockService.AddProductsBookingAsync(_mapper.Map<OrderDto>(message)))
    		{
        		var productsBooked = new ProductsBooked
        		{
            			OrderId = message.OrderId,
        		};
        		await context.Send(productsBooked).ConfigureAwait(false);
    		}
    		else
    		{
        		var cancellation = new CancelOrder
        		{
            			OrderId = message.OrderId
        		};
        		await context.SendLocal(cancellation).ConfigureAwait(false);
    		}
	}
}This example shows us two major things:
- A dependency injection, which we discuss later
- Sending a message somewhere according to routing rules or locally
Another available option is to reply to a message or command. It’s not possible to reply to an event, because events don’t expect anything by nature. To process a reply, you need to create a separate handler.
5. Sagas
The saga pattern is a common architectural pattern to keep data consistent in microservices. In long workflows with lots of service interactions, some steps may fail, in which case you should be able to roll back data changes. You can achieve this by executing a sequence of transactions, which in terms of a single microservice must satisfy ACID criteria (atomic, consistent, isolated, and durable). For cases of failure, there should be a mechanism to execute a set of compensating transactions.
It’s possible to enable the saga pattern in Azure Service Bus using sessions, but its code is difficult to read. The saga patterns in NServiceBus definitely are easier to understand. It’s also more convenient in NServiceBus to prevent endless workflows using timeouts and delegate work to different services in case some are slow or not responding.
Sagas are usually more challenging to write and harder to debug than handlers. Also, the saga patterns in NServiceBus require persistence setup. You can do it with one line of code:
endpointConfiguration.UsePersistence<PersistenceToUseGoesHere>(); PersistenceToUseGoesHere is one of the data storage options. It’s important to make sure that necessary service tables, collections, etc. are either created automatically by the EnableInstallers() call or created manually.
Note: Remember that any handler (standalone or inside the saga pattern) has to be idempotent; in other words, the result of multiple executions should be the same.
6. Dependency Injection
Dependency injection is a standard pattern to achieve loose coupling. NServiceBus provides two options for doing it using:
- A built-in container with its own lifecycles
- A number of third-party libraries including Autofac and Ninject
For our solution, we used a .NET DI. Here’s what the final endpoint setup looks like:
builder.Host
	.ConfigureServices(c =>
	{
    	var mapperConfig = new MapperConfiguration(cfg => {
        	cfg.AddProfile<MappingProfile>();
    	});
    	var mapperConfigExpression = EntityConverter.GetDefaultMapperConfiguration(new string[] {
        	typeof(MappingProfile).Assembly.GetName().Name!
    	});

  c.AddScoped<IMapper>(x => new Mapper(mapperConfig));
    	c.AddDbContext<ApplicationDbContext>(
        	options => options.UseSqlServer(serviceConfig.GetConnectionString(EndpointConfigurationExtensions.DB_PARAMETER_NAME))
    	);
    	c.AddScoped(typeof(IRepository<>), typeof(EfRepository<>));
		c.AddScoped<IOrderService, Orders.Services.OrderService>();
	})
	.UseNServiceBus(context =>
	{
    	return new OrderServiceEndpoint(serviceConfig);
});In the code above, OrderServiceEndpoint is a class created earlier in the third Routing subsection.
And that’s it. We managed to:
- Create a simple microservices application
- Deploy and upgrade it locally and in the Azure cloud
- Explore the NServiceBus framework as an abstraction over Azure Service Bus
- Decompose a microservices structure into separate logical pieces
However, when working on a large real-life solution, you also need to take into account lots of additional details. Here are a few important topics we skipped in this text because they deserve a separate article:
- Application scaling
- Error handling
- Integration testing
- Data caching
- Logging
- Kubernetes as an alternative to Service Fabric
- Distributed tracing (telemetry)
- Performance and load monitoring
Conclusion
Building microservices with Node.js using Azure Service Fabric can be tricky, especially if you have minimal to no experience. Although the official documentation for dedicated tools like Azure Service Fabric provides extensive descriptions of all processes, there’s still a chance of encountering unobvious pitfalls along the way.
At Apriorit, we have professional teams in back-end web development with vast experience delivering robust microservices solutions and managing cloud infrastructure. Our engineers know how to overcome challenges of microservices architecture. We are ready to assist you with a project of any complexity and ensure successful software deployment.
Contact us to start developing your efficient microservices-based software!
Have a question?
Ask our expert!
VP of Innovation and Technology, Canada Branch Director


