 Skip to main content

Key takeaways:
- Implementing a Windows process monitoring solution helps businesses enhance system security and stability, ensure business continuity, and reduce regulatory risks.
- A reliable process monitoring solution for Windows requires a stable driver to track processes and send alerts to a user-mode application.
- The practical example in this article (including sample code) demonstrates how to develop a mechanism that allows or blocks Windows processes.
- Engaging a vendor with deep expertise in Windows kernel and driver development, including extensive experience in cybersecurity, will let you build a robust, full-fledged process monitoring solution.
Say that your team is developing Windows security software or you are looking for ways to enhance the protection of your corporate Windows systems. In either case, operating system vulnerabilities pose a challenge, and one threat vector is malware execution.
How can you address this risk? One of the options is to monitor running processes.
Windows process monitoring tools help you identify resource-heavy processes that impact the operating system’s performance and detect malicious activity to provide incident response. However, a reliable solution requires a stable driver that tracks when a process is started and alerts a user-mode application of this fact.
In this article, we explore how to implement process monitoring in Windows. You’ll find insights on developing a driver that monitors Windows processes and alerts when a process is started, including practical examples and source code.
This article will be helpful for development teams and their leaders who are considering implementing process monitoring capabilities in their software products or corporate security systems.
Contents:
- Why implement Windows process monitoring solutions?
- Project description and structure
- 1. Creating and loading Windows processes
- 2. Initializing the driver
- 3. Alerting user mode of a process
- 4. Starting a Windows process
- How to monitor processes in Windows: Installing and using the driver
- How Apriorit can help you build a process monitoring solution
- Conclusion
Why implement Windows process monitoring solutions?
Enabling Windows process monitoring is crucial if your team is working on:
- Developing software products for securing Windows systems or other software solutions
- Creating application monitoring tools
- Enhancing corporate systems that gather information about processes running within the organization’s environments
Implementing a Windows process monitoring tool ensures constant visibility and control over running processes. This provides a range of business advantages, such as:
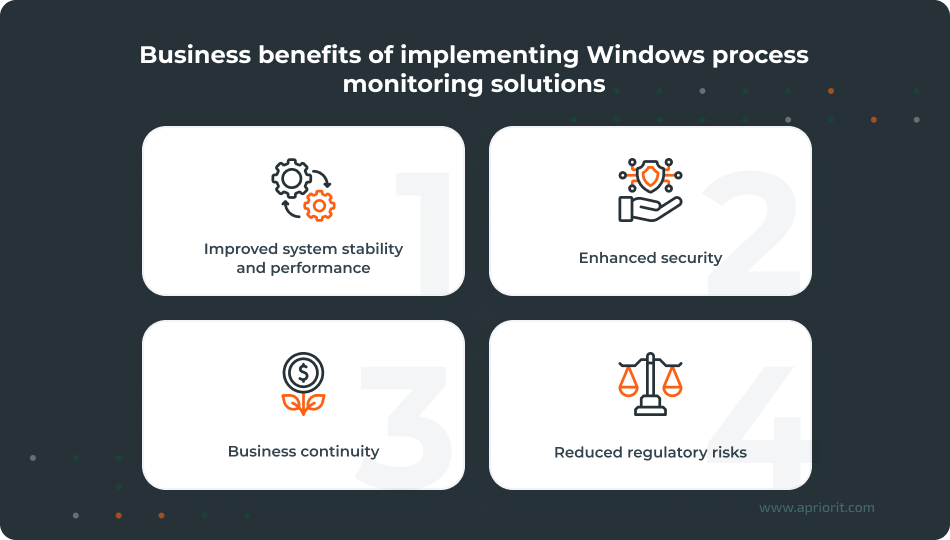
- Improved system stability and performance. Real-time process monitoring solutions help detect apps that consume excessive CPU resources and memory. This allows for improving overall stability and performance.
- Enhanced security. Identifying and alerting the security team of suspicious and unauthorized processes helps to avert cybersecurity threats and speed up incident response, strengthening the system’s security posture.
- Business continuity. Adopting a process monitoring solution enables tracking of critical Windows processes. Timely tracking and response help companies avoid system downtime and improve reliability.
- Reduced regulatory risks. By allowing for vulnerability detection, which is a part of continuous security monitoring, process tracking can simplify compliance with SOC 2 and NIST requirements.
Since the reliability of software for monitoring Windows processes mostly depends on driver stability, let’s explore how to build a driver with a mechanism for blocking Windows processes.
Note: The code presented below illustrates the process blocking technique but is not ready for implementation in real projects.
Looking for experienced specialists to build a Windows process monitoring tool?
Apriorit experts will help you develop a solution that strengthens your Windows security posture.
Project description and structure
In this article, we show you how to create a driver that alerts a user-mode application of each new Windows process. By user-mode application, we mean our own app with a GUI that displays running processes and lets users (or admins) block or allow them.
When a Windows process attempts to start, the driver provides the user with the process ID (PID) and name. The process is paused until it is allowed by the user in the user-mode application.
The structure of our driver project is the following:
- .Common – Files common for the user and driver
- .ProcessDll – Main DLL with all APIs
- .ProcessMonitor – Process monitoring driver
- .ProcMonGUI – GUI written using the Microsoft Foundation Class (MFC) library
The described project supports x86 and x64 Windows architectures and provides the necessary build configurations. The build process is managed by CMake, which generates the required project files.
For our driver, we use the standard C++ library to manage resources. It’s partially supported in kernel mode.
We also use the FindWDK tool to build the driver with CMake. We link the standard library to the driver and the Kernel foundation library by Apriorit to manage Unicode strings, STL containers, and synchronization primitives.
The project has four stages, the first of which involves creating and loading Windows processes.
1. Creating and loading Windows processes
To create a Windows process, let’s call one of the following functions:
CreateProcessCreateProcessAsUserCreateProcessWithTokenWCreateProcessWithLogonW
We’ll also need to use the following Windows components to create processes:
- Kernel32.dll (Windows client library)
- Windows Executive
- Windows environment subsystem process (Csrss)
We can separate operations for creating the Windows Executive process object (which other environment subsystems can use later) from operations for creating a Windows process. This is possible because the Windows architecture supports different environment subsystems. Thus, some CreateProcess function actions are specific to Windows semantics.
Here’s how to create a process using the CreateProcess function:
- Open the image file (.exe), which will be executed in the process.
- Create the Windows Executive process object.
- Create an initial thread (stack, context, and Windows Executive thread object).
- The Windows subsystem receives a notification on process and thread creation.
- Start the initial thread if the
CREATE_SUSPENDEDflag is not set. - Initialize the address space in the context of the new process and thread (e.g., load necessary DLLs), then start a program.
Notifications play a significant role in creating and loading processes, alerting your team on the creation of a new process and mapping of an image file to memory. You’ll receive the first type of notification when the system creates a process and the second type each time the system maps an image file (either an executable file or a DLL). These notifications give the driver information about a new process start, and, thus, allow it to alert the user-mode application.
Now, let’s explore the mechanism for transferring information to the user mode.
Read also
How to Develop a Virtual Disk Driver for Windows: A Practical Example
Avoid performance issues and eliminate security vulnerabilities. Discover expert tips and implementation details to deliver a truly efficient driver.

2. Initializing the driver
Initializing the ProcessMonitor class instance is the first step in the driver initialization stage. Doing so creates a singleton instance, initializes internal structures, and then subscribes the driver to process creation and image mapping notifications:
…
	NTSTATUS status = ProcessMonitor::Init();
	if (NT_SUCCESS(status))
	{
    	status = ::PsSetCreateProcessNotifyRoutine(&CreateProcessNotifyRoutine, false);
  }
	if (NT_SUCCESS(status))
	{
    	status = ::PsSetLoadImageNotifyRoutine(&LoadImageNotifyRoutine);
	}
… The driver creates a list of processes that have already been started. Based on the solution architecture, the user-mode application requests the list of started processes when an event occurs, and the driver provides it.
We need to separate processes that are allowed to start from those that are already running. To do so, let’s use the project’s ProcessHelper structure.
The ProcessHelper structure instance that is generated when creating a new process directly relates to that process. ProcessHelper contains information about whether a process was allowed to start, as well as its name, PID, and additional data.
The StartupProcessManagerList() function analyzes all running processes and creates a list of these processes.
After building a list of running processes, the driver is initialized and begins operating.
3. Alerting user mode of a process
The DeviceIoControl() function ensures communication between the driver and the user-mode application. Using the ProcessMonitor::Init() function, the user-mode application performs preliminary settings for communication with the driver, which will alert on the start of new processes:
m_notifyEvent.Reset();

HANDLE event = m_notifyEvent.GetHandle();
IoControl(
	IOCTL_REGISTER_EVENT,
	&event,
	sizeof(event),
	nullptr,
0);DeviceIoControl and the IOCTL_REGISTER_EVENT code let us create and initialize the Event object and send it to the driver. The driver gets this event, records it to set it later to the signaled state, and thus alerts the user-mode application that a new process has started. Here is driver code for getting an event:
. . .
   std::unique_lock autoWriteLock(m_lock);
	 m_userNotifyEvent.Cleanup();
	 status = m_userNotifyEvent.Initialize(event) ? STATUS_SUCCESS : STATUS_INVALID_HANDLE;
. . . When the driver sets an event, it checks all processes to detect paused ones. If it discovers paused processes, the driver immediately alerts the user-mode application about those processes waiting in the queue. After that, the driver waits for the process to start and is ready to notify the controlling application through the event.
4. Starting a Windows process
During a Windows process start, the process manager notifies the driver about the creation of the process, which triggers several image mapping notifications, depending on the number of loaded libraries.
Let’s take a look at some examples. After the driver receives a process creation notification, we execute the following code:
ProcessHelperPtr procHelper = new(PagedPool) ProcessHelper(parentPid, pid);
if (procHelper)
{
  if (!m_activeProcesses.Add(std::move(procHelper)))
  {
    return;
  }
}
else [[unlikely]]
{
  ERR_FN(("Failed to allocate memory for ProcessHelper object\n"));
} Where:
ProcessHelperPtr is a boost::intrusive_ptr — a thread-safe smart pointer that uses intrusive reference counting. Using ProcessHelperPtr is the same as using boost::intrusive_ptr<ProcessHelper>.
When creating a process, we can also create an assistant to store the following information about the process identifier:
- Name
- State (shows if the process is paused)
- Marker (shows whether the process is new or whether the user has already chosen to allow or not allow it)
After process creation, we receive a notification about image mapping. Mapping is performed in the context of the process with the PID we receive. After that, we must check whether the notification has been received and the process has been added to the list. If it’s there, the driver continues to fill in data about the process. Here’s how to check this:
ProcessHelperPtr procHelper = nullptr;
// Explicit scope to access and release the list
{
  const ProcessHelperList& procList = m_activeProcesses.AquireList();
  utils::ScopedListReleaser<ProcessHelperHolder> procListGuard(m_activeProcesses);

  ProcessHelperList::const_iterator it = procList.find(pid);
  if (it != procList.end())
  {
      procHelper = it->second;
  }

  if (!procHelper)
  {
      return;
  }
}Now, let’s check whether we have mapped an image or a DLL and whether we have obtained the process name. To do that, we need to perform the following simple validations:
// Check if the process already has ImageName assigned.
// If assigned, then the current callback was called for the DLL image mapped in the process //address space.
// Ignore it in this case.
if (!procHelper->imageName.isEmpty())
{
  return;
}

// Convert native image path to DOS path. Lowercase the final path to optimize
// path checking speed on rules processing.
kf::UString<PagedPool> dosName{};
utils::KernelFileNameToDosName(nativeImageName, dosName);
if (!dosName.isEmpty())
{
  if (NTSTATUS status = dosName.toLowerCase(); !NT_SUCCESS(status)) [[unlikely]]
  {
      ERR_FN(("Failed to convert the process dos image name to lower case. Clean process record."));
      m_activeProcesses.Delete(pid);
      return;
  }

  procHelper->imageName.init(std::move(dosName));
}
else
{
  procHelper->imageName.init(nativeImageName);
}After passing all validations and ensuring the process is valid, we initialize the process event and notify the user-mode process about it. Then we wait for the initialized process event. The process event is a part of the ProcessHelper and is associated with the specific process.
Why is this so complicated? Why not just execute everything in a process creation notification callback instead of receiving a process image mapping notification and waiting for process approval?
The answer is simple. A process creation notification is sent asynchronously and executed in the parent process’s thread context, which creates a new process that we want to pause. Thus, waiting in the process creation notification callback will come to nothing. The process will just start.
In turn, a process image mapping notification is sent synchronously and executed in a new process’s thread context. Thus, we can pause the process when waiting for process approval in the callback. That’s what we need to do to monitor and filter the creation of new processes.
The example below demonstrates how to pause a new process:
{
	std::shared_lock sharedLock(m_lock);

	if (!m_userNotifyEvent.Valid()) [[unlikely]]
	{
      return;
	}

	if (!procHelper->resumeEvent.Initialize(false, false)) [[unlikely]]
	{
      ERR_FN(("Failded to initialize resume event for ProcessId: %lu\n", HandleToULong(procHelper->pid)));
      return;
	}

	// Notify user mode library counterpart (if core in Normal state)
	m_userNotifyEvent.Set();
}

NTSTATUS waitStatus = STATUS_SUCCESS;
unsigned waitTimeout = 4 * 60 * 1000;
if (procHelper->resumeEvent.Wait(waitTimeout, &waitStatus) && waitStatus == STATUS_TIMEOUT)
{
	  Reset();
} When the driver notifies that a new process has started, the user-mode application stops waiting and starts processing the request.
This is what our user-mode application waiting process looks like:
do
{
	if (m_notifyEvent.Wait() && !m_terminateMonitoring)
	{
    Dispatch();
	}
}
while (!m_terminateMonitoring);Using the Dispatch() function allows us to request the driver for the list of processes that were started after the last request.
In the user-mode application, the user chooses which processes to allow and block. After that, the user-mode application sends the corresponding Allow or Block code to the driver.
. . .
if (checkList[i].AddToBlacklist)
{
    Block(checkList[i].ProcessInfo);
}
else
{
    Allow(checkList[i].ProcessInfo);
}
. . .Each Allow and Block function calls the DeviceIoControl function with the IOCTL_ALLOW or IOCTL_BLOCK code, respectively. The driver searches the process by PID. If the process is paused, the driver will resume it. If the process marker states that the process must be blocked, we set the TRUE value to the terminate flag and forcibly terminate the process.
To terminate a process, we start the deletion thread and resume process execution. Then the thread immediately discovers and terminates the process. Here’s an example of how to implement this:
void ScheduleProcessTerminate(HANDLE processId)
{
	TERSE_FN(("Schedule terminate process ProcessId: %lu\n", HandleToULong(processId)));

	OBJECT_ATTRIBUTES objAttr{};
	InitializeObjectAttributes(&objAttr, nullptr, OBJ_KERNEL_HANDLE, nullptr, nullptr);

	kf::Guard::Handle threadHandle{};
	NTSTATUS status = ::PsCreateSystemThread(&threadHandle.get(), THREAD_ALL_ACCESS,
  &objAttr, nullptr, nullptr, SystemThreadToTerminateTargetProcess, processId);

	if (!NT_SUCCESS(status)) [[unlikely]]
	{
    ERR_FN(("Failed to thread to terminate ProcessId: %lu\n", HandleToULong(processId)));
  }
}

void SystemThreadToTerminateTargetProcess(_In_ PVOID startContext)
{
	HANDLE processId = static_cast<HANDLE>(startContext);
  kf::Guard::EProcess process{};

	NTSTATUS status = ::PsLookupProcessByProcessId(processId, &process.get());
	if (NT_SUCCESS(status)) [[likely]]
	{
      kf::Guard::Handle processHandle{};
      status = ::ObOpenObjectByPointer(process, OBJ_KERNEL_HANDLE, nullptr,
        PROCESS_ALL_ACCESS, nullptr, KernelMode, &processHandle.get());

      if (NT_SUCCESS(status)) [[likely]]
      {
          ::ZwTerminateProcess(processHandle, STATUS_SUCCESS);
          TERSE_FN(("Terminated ProcessId: %lu\n", HandleToULong(processId)));
      }
	}
	else [[unlikely]]
	{
      TERSE_FN(("Probably terminated ProcessId: %lu\n", HandleToULong(processId)));
  }

	// Exit system thread
	::PsTerminateSystemThread(STATUS_SUCCESS);
}Schematically, the procedure for approving the start of a Windows process looks as follows:
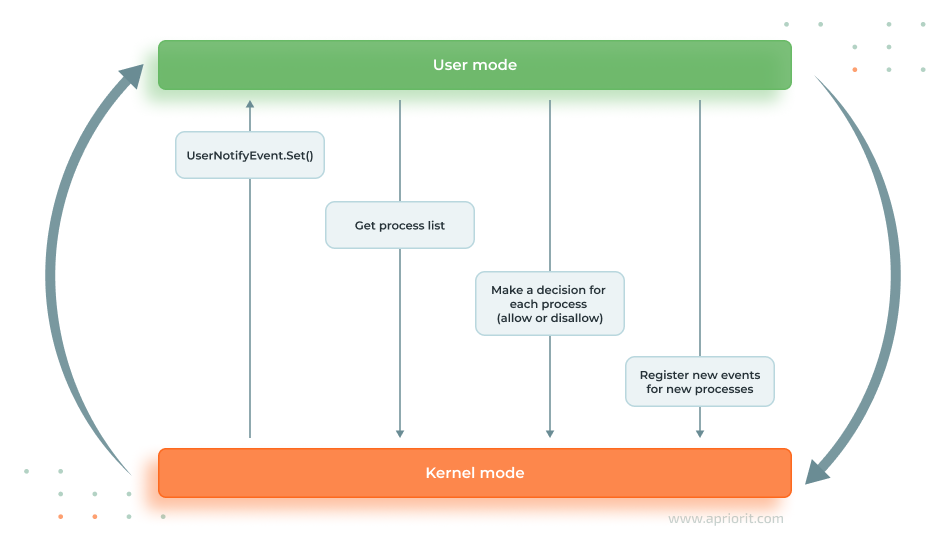
Image 1. Diagram for approving the start of a Windows process
Now that we have explored the back end, let’s see how to install and use the driver in the GUI.
Read also
How to Develop a Windows File System Minifilter Driver: Complete Tutorial
To prevent unauthorized access to files and processes, explore our step-by-step guide on building a minifilter.

How to monitor processes in Windows: Installing and using the driver
In the main window of the process monitoring tool (i.e., our user-mode application), we can install, uninstall, start, and stop the driver, and also start or stop process monitoring:

Image 2. Main window in the process monitoring tool
After installing and starting the driver, in the Monitoring group, choose Start to begin process monitoring. Once a new process starts, the Greylisted process window opens.
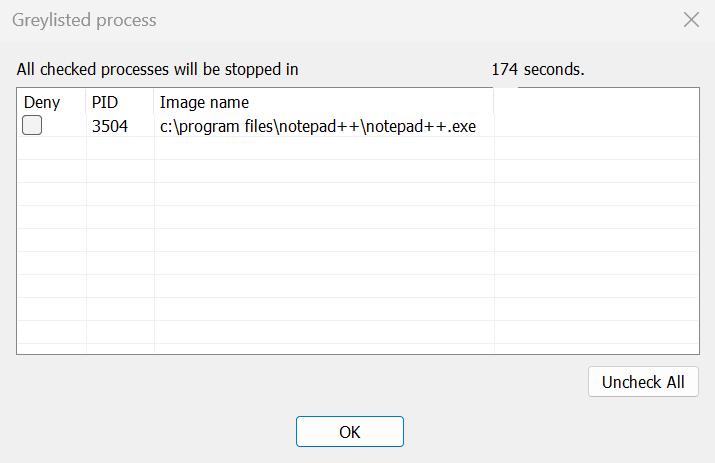
Image 3. Greylisted process window
If you want to stop a process, select it and choose OK. The process will be stopped.
This simple example only demonstrates a process blocking technique and is not ready for use in real projects.
You can find the solution’s source code and binary files in the Apriorit GitHub repository. Using the sample code, you can extend the solution with additional options — for example, showing a few windows simultaneously, delaying the process start for an unlimited time, or adding rules to allow or block specific process types.
Building a full-fledged process monitoring solution requires profound knowledge and practical skills in kernel and driver development. Let’s explore how Apriorit specialists can help you with this.
Read also
A Brief Tutorial on Modifying Network Traffic in Windows and Linux
Find practical examples of improving security and performance by intercepting and modifying network traffic.

How Apriorit can help you build a process monitoring solution
20+ years of experience in driver development, system programming, and cybersecurity give us extensive and unique expertise in creating stable solutions of any complexity. Our services include:
- Developing custom drivers and modernizing legacy drivers for Windows, Linux, and macOS
- Enhancing driver security by auditing security code and mitigating vulnerabilities
- Conducting load and security testing of your driver solution
- Providing long-term driver maintenance and supporting legacy system compatibility
Depending on your budget and project requirements, you can choose an appropriate cooperation model: dedicated team, fixed price, or time and materials. To ensure all commitments are met for your project, we also offer the services of project managers with industry-specific backgrounds.
Conclusion
Monitoring Windows processes gives your organization many advantages, from enhancing the security and stability of Windows systems to complying with regulatory requirements.
The example we have given shows you how to implement a process blocking mechanism with a Windows process monitoring tool. But to build a complete and stable solution for process monitoring, it’s essential to engage professionals in kernel-mode and user-mode driver development.
By outsourcing driver development tasks to Apriorit experts, you will get a robust, secure, and compliant process monitoring solution.
Need professional assistance in Windows driver development?
Partner with Apriorit to get a secure and efficient solution that meets your expectations!
FAQ
What is process monitoring?
Process monitoring involves ongoing tracking, analysis, and reporting on all processes running in an operating system to ensure its stability and security.
Why is process monitoring important?
Process monitoring allows for detecting malicious and unauthorized processes, memory leaks, and DLL injections, helping to enhance incident response and overall operating system stability.
How does process monitoring work?
When a program or service starts, an operating system creates a process. A process monitoring tool collects data on running processes according to set filters and sends alerts to security officers. Security officers can then analyze these alerts to identify and eliminate malicious processes.
What should you consider when developing a Windows kernel-mode driver for system monitoring?
When developing a reliable Windows kernel-mode driver, it’s critical to consider system stability risks (system crashes, memory leaks), security risks, compatibility issues, complex kernel rules (IRQL, synchronization, safe callbacks), and performance overhead.
Have a question?
Ask our expert!
Program Manager


