 Skip to main content
There are two types of Outlook plugins: COM and JavaScript. In this article, we will try to compare them by looking at both pros and cons of each of them.
We will also provide you with a practical example of the client-side Outlook plugin, written with JavaScript that receives information about attachments and adds it to the body of the email. This can be used to check whether an email has the right files attached and whether it will be sent to the right people.
All and all, with this plugin you will be able to check the following information:
- Whether “sent to” field includes any undesirable addressees
- What kind of files are attached to the message (in the future, an option to check attachments for viruses may become available)
- Add additional properties on sending the message
In this article, we also showed how to use JavaScript plugin to do the following things while sending email:
- Adding the “Analyze And Send” button that will call our code for getting the data from an email while trying to send it
- Gathering information about attachments (AttachmentId, Name, ContentType, Size, LastModifiedTime)
- Adding received information to the email body. We will show how to change the message body with JavaScript in full detail.
- Adding custom properties to the email. We will show how to add the necessary property that can be further used by the receiver.
- Sending the modified email to specific addressees
Need assistance with email-related tasks for your product?
Enhance your project team with Apriorit system programming developers to solve challenges of any complexity and receive the exact software you want.
Contents:
Setting up manifestFile
Let’s look at this topic in closer detail. First, we need to configure a manifest file. This file describes where the button, that we want to create, will be located, what will happen when it’s pressed, and what permissions do we need to work with the mailbox. In this example, when the button has been clicked, the function that handles analysis of attachments and sends the emails to addressees will be called. Main things to know about the manifest file:
- Access to EWS operations (GetItem and SendItem) received via the mailbox.makeEWSRequestAsync function. These operations require ReadWriteMailbox permissions. Required type of permissions in the manifest:
- Plugin works only for outgoing messages. This is why the Analyze and Send button will appear only when creating a new email. For this we need to set a type for ExtensionPoint in a MessageComposeCommandSurface:
<ExtensionPoint xsi:type="MessageComposeCommandSurface">- A function should be called on a button click. Setting the necessary property:
<Action xsi:type="ExecuteFunction">
	<FunctionName>sendEmail</FunctionName>
</Action>where sendEmail is a function that will be called when the button has been clicked
We also need to specify the path to the html file where the necessary JavaScript file with implemented sendEmail is specified.
<bt:Url id="functionFile" DefaultValue=" YOUR_WEB_SERVER /AppCompose/FunctionFile/AttachmentInfo.html"/>- Change all references of YOUR_WEB SERVER in the manifest file to your server using the HTTPS protocol
Adding Add-in to Web version of Outlook
After the manifest file has been described, we should add Add-in to a Web version of Outlook (outlook.com).
- IN the upper right corner click the gear icon. Next, choose the Manage integrations menu (fig. 1)
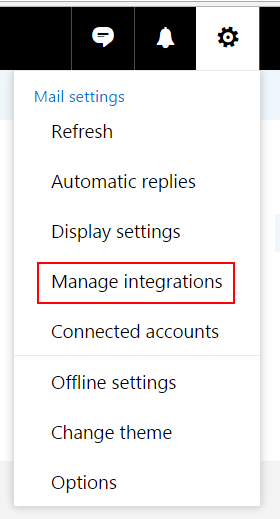
Fig. 1 Manage integrations menu
- In the opened window click the Click here to add a custom add-in button and then select Add from file… menu (Fig. 2)
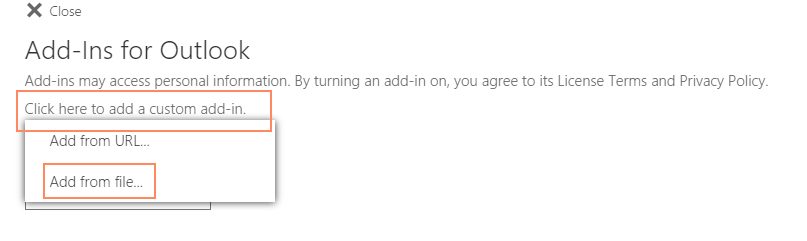
Fig. 2 Add from file… menu
- Click Install to install an Add-in. If the installation has been completed successfully, Add-in should appear in the My add-ins category (Fig. 3).

Fig. 3. Successfully installed Add-in
Now when creating the new email, you should see a blue button the lower right corner. After clicking the button, an information on attachments will be received, added to the body of message and the email will be sent to addressees.

Fig.4. Custom button
Related project
Improving a Windows Audio Driver to Obtain a WHQL Release Signature
Explore the project insights of delivering software for improving audio quality with the help of artificial intelligence (AI) technologies. Find out how Apriorit’s tireless work helped our client enhance their solution, improve user experience, and obtain a WHQL certification.

Getting data from the Exchange Server
Now let’s look into more detail into what happens when we click the Analyze and Send button. When clicking the button, we execute the sendEmail function. This function is declared in the Attachementinfo.js file. The path to this file, as well as an information on what function exactly should be called are both described via html in manifest files (which we already covered). sendEmail receives an event that we need to complete. To get the data on attachment, we need to make an EWS request, but in order to do this, we need to receive mail id. When new email is created, this id hasn’t been assigned yet. In order to do this, we need to save the email in the draft by calling the saveAsync function:
Office.context.mailbox.item.saveAsync(saveItemCallBack);The necessary id will be received in the saveItemCallBack function. Now we need to formulate and make an EWS request to get the data on attachments:
function getItemDataRequest(itemId) {
    var soapToGetItemData = '<?xml version="1.0" encoding="utf-8"?>' +
                    '<soap:Envelope xmlns:xsi="http://www.w3.org/2001/XMLSchema-instance"' +
                    '               xmlns:m="http://schemas.microsoft.com/exchange/services/2006/messages"' +
                    '               xmlns:xsd="http://www.w3.org/2001/XMLSchema"' +
                    '               xmlns:soap="http://schemas.xmlsoap.org/soap/envelope/"' +
                    '               xmlns:t="http://schemas.microsoft.com/exchange/services/2006/types">' +
                    '  <soap:Header>' +
                    '    <RequestServerVersion Version="Exchange2013" xmlns="http://schemas.microsoft.com/exchange/services/2006/types" soap:mustUnderstand="0" />' +
                    '  </soap:Header>' +
                    '  <soap:Body>' +
                    '    <GetItem' +
                    '                xmlns="http://schemas.microsoft.com/exchange/services/2006/messages"' +
                    '                xmlns:t="http://schemas.microsoft.com/exchange/services/2006/types">' +
                    '      <ItemShape>' +
                    '        <t:BaseShape>IdOnly</t:BaseShape>' +
                    '        <t:AdditionalProperties>' +
                    '            <t:FieldURI FieldURI="item:Attachments" /> ' +
                    '        </t:AdditionalProperties> ' +
                    '      </ItemShape>' +
                    '      <ItemIds>' +
                    '        <t:ItemId Id="' + itemId + '"/>' +
                    '      </ItemIds>' +
                    '    </GetItem>' +
                    '  </soap:Body>' +
                    '</soap:Envelope>';
    return soapToGetItemData;
}
Office.context.mailbox.makeEwsRequestAsync(soapToGetItemData, itemDataCallback);Getting data on attachments
If the request is correct and there are no errors, then through an itemDataCallback we will start receiving data on attachments.
function buildAttachmentsInfo(xmlDoc) {
    var attachmentsInfo = "You have no any attachments.";
    if ($('HasAttachments', xmlDoc).length == 0) {
        return attachmentsInfo;
    }
    var attachSeparator = "---------------------------------------------
";
    if ($('HasAttachments', xmlDoc)[0].textContent == "true") {
        attachmentsInfo = "";
        var childNodes = $('Attachments', xmlDoc)[0].childNodes;
        childNodes.forEach(function (fileAttachmentItem, fileAttachmentIndex) {
            fileAttachmentItem.childNodes.forEach(function (item, index) {
                if (item.tagName.includes("AttachmentId")) {
                    attachmentsInfo = attachmentsInfo.concat(item.tagName.replace("t:", "") + ': ' + item.getAttribute("Id") + "<br>");
                    return;
                }
                attachmentsInfo = attachmentsInfo.concat(item.tagName.replace("t:", "") + ': ' + item.textContent + "<br>");
            });
            attachmentsInfo = attachmentsInfo.concat(attachSeparator);
        });
    }
    return attachmentsInfo;
}Adding additional properties to email
JavaScript API also allows to add custom properties to an email. Here’s an example of how it can be done:
Office.context.mailbox.item.loadCustomPropertiesAsync(function (asyncResult) {
        var customProps = asyncResult.value;
        customProps.set("myProp", "value");
        customProps.saveAsync(function (asyncResult) {...});
});Modifying the body of an email
When all the necessary properties are received and added, then we can add the information into the body of an email. In order to do this we need to receive the whole text that is contained in the email and replace it fully with the new one. In this case, we will use the setAsync function, and not the setSelectedDataAsync, because setSelectedDataAsync add the position of the cursor or replaces selected text. Example:
Office.context.mailbox.item.body.getAsync("html", { asyncContext: "This is passed to the callback" }, function (result) {
        var newText = result.value + "<br>" + attachmentsInfo;
        Office.context.mailbox.item.body.setAsync(newText, { coercionType: Office.CoercionType.Html }, function (asyncResult) {…};
});Read also
Mail Server Security: Potential Vulnerabilities and Protection Methods
Increase the protection level of your email server and prevent commonattacks. Read on to find out proven security measures for email servers.

Sending an email
Everything is complete. Now we can send our email to addressees. To do this, we need to form and execute EWS request to send the message:
function getSendItemRequest(itemId, changeKey) {
    var soapSendItemRequest = '<?xml version="1.0" encoding="utf-8"?>' +
                            '<soap:Envelope xmlns:xsi="http://www.w3.org/2001/XMLSchema-instance"' +
                            '               xmlns:m="http://schemas.microsoft.com/exchange/services/2006/messages"' +
                            '               xmlns:xsd="http://www.w3.org/2001/XMLSchema"' +
                            '               xmlns:soap="http://schemas.xmlsoap.org/soap/envelope/"' +
                            '               xmlns:t="http://schemas.microsoft.com/exchange/services/2006/types">' +
                            '  <soap:Header>' +
                            '    <RequestServerVersion Version="Exchange2013" xmlns="http://schemas.microsoft.com/exchange/services/2006/types" soap:mustUnderstand="0" />' +
                            '  </soap:Header>' +
                            '  <soap:Body> ' +
                            '    <SendItem xmlns="http://schemas.microsoft.com/exchange/services/2006/messages" ' +
                            '              SaveItemToFolder="true"> ' +
                            '      <ItemIds> ' +
                            '        <t:ItemId Id="' + itemId + '" ChangeKey="' + changeKey + '" /> ' +
                            '      </ItemIds> ' +
                            '      <m:SavedItemFolderId>' +
                            '         <t:DistinguishedFolderId Id="sentitems" />' +
                            '      </m:SavedItemFolderId>' +
                            '    </SendItem> ' +
                            '  </soap:Body> ' +
                            '</soap:Envelope> ';
    return soapSendItemRequest;
}
Office.context.mailbox.makeEwsRequestAsync(soapToGetItemData, function (asyncResult){…});This function will receive two parameters: itemId and changeKey. ItemId can be received by saving the email in the draft folder (as described above), while changeKey can be received in response to the request. It looks like we’re all set, but not quite. Because we changed the content of the email, we need to save it again in order to receive the new changeKey in response to the request:
…
Office.context.mailbox.item.saveAsync(function (result) {
                var soapToGetItemData = getItemDataRequest(result.value);
                Office.context.mailbox.makeEwsRequestAsync(soapToGetItemData, function (asyncResult) {
                    if (asyncResult.error != null) {
                        updateAndComplete("EWS Status: " + asyncResult.error.message);
                        return;
                    }
                    var xmlDoc = getXMLDocParser(asyncResult.value);
                    var changeKey = $('ItemId', xmlDoc)[0].getAttribute("ChangeKey");
                    var soapToSendItem = getSendItemRequest(result.value, changeKey);
                    Office.context.mailbox.makeEwsRequestAsync(soapToSendItem, function (asyncResult) {
                        if (asyncResult.error != null) {
                            statusUpdate("EWS Status: " + asyncResult.error.message);
                            return;
                        }
                        Office.context.mailbox.item.close();
                        clickEvent.completed();
                    });
                });
…If everything went well, then modified email will be sent to the addressees. An example of an email before and after delivery:
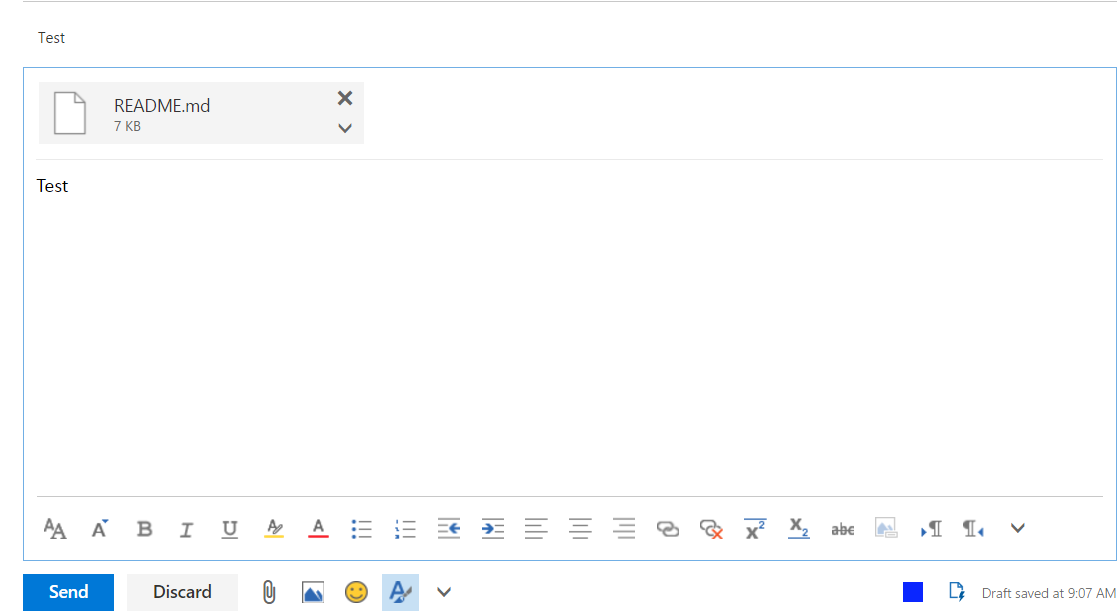
Fig.5 Email before sending
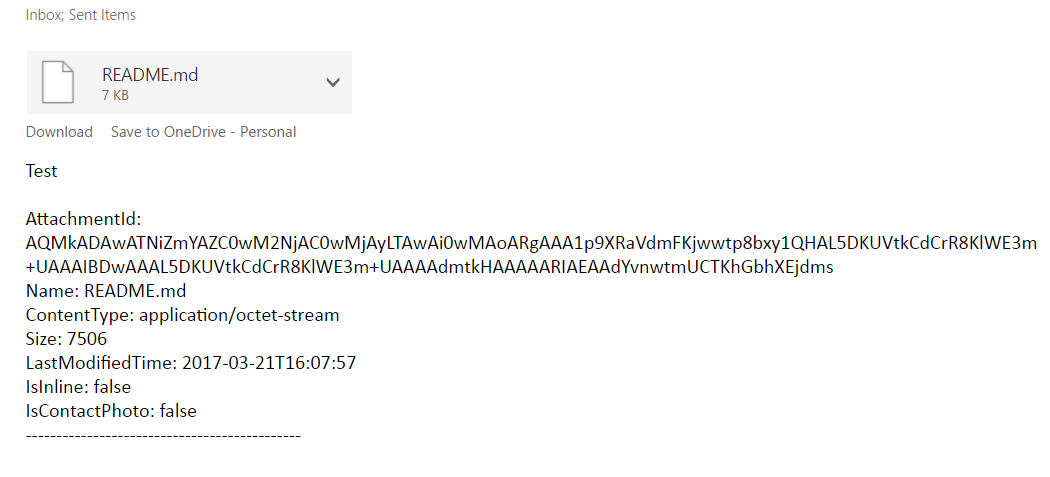
Fig. 6 Email after delivery
Related project
Developing a Custom MDM Solution with Enhanced Data Security
Discover the secrets of creating an enterprise MDM solution for the efficient management of Android tablets while maintaining a high level of data security.
Advantages and disadvantages of using COM and JavaScript API
Main disadvantages of JS plugin
- Cannot run Add-in without user input
- Works only with Exchange accounts (Exchange Server 2013 and newer). Also, doesn’t support IMAP and POP protocols
- Very limited functionality when sending messages (Compose mode)
Main advantages of JS plugin
- Existing platform to publish Add-ins for end-users (office store).
- Plugin is cross-platform, and available for Wen, Windows, MacOS, and iOS.
COM Add-in soles some problems from JS Add-in, but has its own set of disadvantages.
Main advantages of COM plugin over JS:
- Can work in the background. User does not required to press any buttons
- There are no limitations for accounts. Plugin can work in Oulook for all accounts
- Can receive attachment content when sending an email
Main disadvantages of COM plugin:
- Works only on Windows desktops
- Plugin cannot be distributed through office store
- If you need a plugin to work with, for example, both Outlook 2007 and Outlook 2016, then you need to create an individual plugin for each version.
Sadly, when sending message there is no way to get the content of the attachment. Because of this, for example, we can’t use third-party tools to check for viruses. Also, you can create the Send Email button click event that would allow you to analyze attachments automatically without any user input. Instead, you need to make a separate button that needs to be clicked. Maybe in the future Microsoft will add such ability.
References
Track the sample source code at our GitHub page
Conclusion
Developing JavaScript plugins for Outlook can help you streamline email management and enhance the functionality of this email client. When thoroughly developed, such plugins might offer cross-platform compatibility, ease of distribution, and the ability to create custom features that improve user experience.
However, creating JavaScript plugins for Outlook has its limitations and pitfalls to watch for. At Apriorit, we have engineers experienced in different programming languages, including .NET, ready to assist you with any project.
Looking for professional software developers?
Receive top-notch results by outsourcing engineering activities to Apriorit’s experts with rich expertise in .NET, C/C++, JavaScript, and other languages and technologies.
Have a question?
Ask our expert!
Program Manager


