 Skip to main content

In today’s world, where we constantly use phones and handheld devices, mobile data encryption is extremely important. Unauthorized access to application content or network traffic can lead to leaks of private information and losses, both for individual users and entire companies.
While modern mobile operating systems allow encrypting mobile devices, which users can use to protect themselves, it is ultimately the developer’s responsibility to make sure that their software is thoroughly safeguarded. To this end, developers should provide reliable mobile app data encryption that leaves no user data without protection
We’ve already discussed encryption algorithms in an Android app in our previous article. This time, we’ll cover mobile data encryption and decryption tools that iOS provides us for securing our mobile apps.
Contents:
Keychain
There are several techniques for mobile data encryption in iOS that can help you safeguard user data. Let’s look at them in detail:
Keychain offers built-in secure storage for small pieces of data (passwords, keys, etc.) on iOS and macOS. Data stored in Keychain is encrypted and isn’t accessible by other apps running on a device (unlike NSUserDefaults, which is just an XML file with plain data). On iOS devices, Keychain is automatically locked when the device is locked and unlocked when the user unlocks the device.
Apple recommends always using iOS Keychain encryption for storing passwords, tokens, encryption keys, and similar data.
To work with Keychain, Apple provides the Keychain Services API. This is a low-level API written in C. Because it’s a low-level API, adding it to an app is not a trivial task.
But fortunately, you can use a high-level wrapper from Apple – KeychainWrapper – or use some third-party solution like SwiftKeychainWrapper.
If you use KeychainWrapper, your code will look something like this:
// storing value in Keychain
let saveSuccessful: Bool = KeychainWrapper.standard.set("Some String", forKey: "myKey")
// reading value
let retrievedString: String? = customKeychainWrapperInstance.string(forKey: "myKey")
// removing data
let removeSuccessful: Bool = customKeychainWrapperInstance.removeObject(forKey: "myKey")Keychain data accessibility
Something important that you shouldn’t ignore is the accessibility of the data stored in Keychain. The kSecAttrAccessible attribute is used to set up accessibility options.
You should always use the most restrictive option that makes sense for your app:
kSecAttrAccessibleWhenPasscodeSet: If a passcode is not set on the device, the item will not be stored. If a user disables the passcode, the item will be deleted.
kSecAttrAccessibleWhenUnlocked (default value): The Keychain item is secure when the device is off and when it’s locked.
kSecAttrAccessibleAfterFirstUnlock: The Keychain item is secure while the device is off as well as when the device is turned on (or restarted) but before the passcode has been entered for the first time. After the first unlock, the data remains accessible until the next restart.
kSecAttrAccessibleAlways: The most insecure option; data is accessible regardless of the lock state of the device. Not recommended by Apple.
If you add “ThisDeviceOnly” to the accessibility attribute (e.g. kSecAttrAccessibleWhenUnlockedThisDeviceOnly), the Keychain item will not be restored on other devices through iTunes backups, iCloud backups, or iCloud Keychain. (This access restriction is only available in iOS 8.0 and later).
Important note: An item with the attribute “ThisDeviceOnly” will still be included in the backup. This means that a hacker still has the ability to crack the backup and access this data.
Data Protection
Data protection is a feature that protects data saved by your app on the disk (actually, in the app’s sandbox container). It uses built-in hardware to store files in an encrypted format on-disk and to decrypt them on demand.
Protected files are inaccessible even to the app that created them if the device is locked by passcode (or Touch ID).
To enable data protection: In the Capabilities pane of the Xcode project settings, click the switch in the Data Protection section.

To protect a file, you need to add a separate attribute for the protection level. This can be done using the NSData or NSFileManager API:
// Creating file with protection attribute using NSFileManager class:
FileManager.default.createFile(atPath: pathToFile, contents: data, attributes: [FileAttributeKey.protectionKey : FileProtectionType.complete]);
// Changing the protection attribute for existing file:
 FileManager.default.setAttributes([FileAttributeKey.protectionKey : FileProtectionType.complete], ofItemAtPath: pathToFile)
// Creating file using NSData class:
data.write(toFile: pathToFile, options: NSData.WritingOptions.completeFileProtection)You can use one of the following protection types:
- completeFileProtection
- completeFileProtectionUnlessOpen
- completeFileProtectionUntilFirstUserAuthentication
- noFileProtection
You can find more information in Apple Documentation: NSData.writingOptions, NSFileManager FileProtectionTypes.
Unfortunately, Data Protection will work only if a user has passcode protection. To be sure that Data Protection will secure your information, you need to verify that a user has passcode protection enabled. We’ll consider how to check this in the next section.
Touch ID and Passcode
Check if passcode protection is enabled:
Passcode protection is very important for iOS Data Protection and for data stored in the Keychain. Therefore, we may need to know if passcode protection is set on a device. If it’s not, we can, for example, notify a user about possible weaknesses or even change our security strategy.
Prior to iOS 8, there was no way to detect passcode settings.
For iOS 8, we need to use a trick: try to set a value in Keychain with the onlyWhenPassIsSet accessibility attribute:
let attributes = [kSecClass as String:kSecClassGenericPassword, kSecAttrService as String:"LocalDeviceServices", kSecAttrAccount as String:"NoAccount", kSecValueData as String:”SomeData”!, kSecAttrAccessible as String:kSecAttrAccessibleWhenPasscodeSetThisDeviceOnly]
// Trying to save item to Keychain
let status = SecItemAdd(attributes, nil)
if status == 0 {
    SecItemDelete(attributes)
    // Passcode is set
}
else {
    // Passcode is disabled
}iOS 9 and later has an API (LocalAuthentication.framework) to easily check if passcode protection is enabled.
import LocalAuthentication
LAContext().canEvaluatePolicy(.DeviceOwnerAuthentication, error: nil)Touch ID
Touch ID is a very convenient way to authenticate a user. This feature is available on iPhone 5s and higher.
From the user’s side, it’s much easier to use a fingerprint than to type a password.
But from the security side, a hacker still can crack your application and “skip” the fingerprint verification logic.
In this case, a password that can be used as an encryption key will be more reliable.
Still, fingerprint authentication in iOS is very useful if a user has checked the “save password” option but still wants to hide application content from third-party eyes.
It’s easy to add Touch ID authentication to your app using the Local Authentication framework:
import LocalAuthentication
var authContext = LAContext()
// Check if Touch ID is enabled on the device
if authContext.canEvaluatePolicy(LAPolicy.DeviceOwnerAuthenticationWithBiometrics, error: nil) {

// Authentication authContext.evaluatePolicy(.deviceOwnerAuthenticationWithBiometrics, localizedReason: "Message to the user", reply: { (success, error) in
        if success {
            // Success
        } else {
            // Error
        }}
    );
}
else
{
    // Touch ID is not enabled on the device
}In-App Purchases
Another topic we want to talk about is in-app purchases. If your app contains in-app purchases, you would like to secure the paid content from being cracked.
Apple provides the StoreKit framework for managing purchases. To keep this article short, we won’t explain how to work with it here.
After a successful purchase, Apple sends a response that contains a receipt, which is a signed document specifying what was purchased, when, by whom, in what app, and more. Not only does the purchase transaction have a receipt, but the application itself usually has its own receipt.
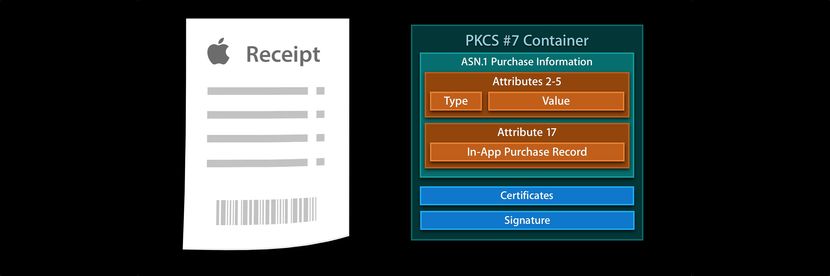
Apple doesn’t provide any framework or functions to validate this receipt, because if it did then hackers would know what to crack.
You should take care with receipt validation in your app. Apple has an appropriate guide on receipt validation.
There are two options available for validating receipts.
Option #1: Validate receipts locally
Local validation is not trivial, and requires a good knowledge of cryptography.
There’s a good guide from objc.io on local receipt validation: https://www.objc.io/issues/17-security/receipt-validation/.
Option #2: Use the App Store server for validation
This is much easier, but also has a few hidden obstacles.
First of all, you shouldn’t directly communicate with the App Store server for receipt validation because if you do, a hacker can read the requests and responses from the server. Also, the shared secret generated in iTunes Connect could be compromised.
To avoid this situation, you should send receipts to a server you control and this server should request the App Store validation.
Another attack vector for the second option is a MITM attack.
You should do your best to “hide” paid content inside your app. A useful solution can be holding paid content on the server and providing it only for valid receipts.
Also, don’t forget to check the product ID, bundle ID, and app version when validating receipts.
Secure coding is also very important for receipt validation security (and not only for this). We’ll cover secure coding a little bit in the next section.
Cryptographic Services
You may have noticed that the built-in security services also have limitations, such as when passcode protection is disabled or devices are jailbroken.
In some cases, it may be best to use third-party mobile data encryption technologies to protect your data.
Generally, cryptography on iOS is no different than on other systems. Security and the CommonCrypto framework provide a lot of cryptographic services, including:
- Key generation
- Encryption and decryption algorithms
- Digital signatures (signing and verification)
- Hashing
- Secure communications (SSL and TLS)
Here’s a list of some high-level third-party wrappers for the crypto services API:
IDZSwiftCommonCrypto – A wrapper for Apple’s CommonCrypto library, written in Swift.
Arcane – A lightweight Swift wrapper around CommonCrypto.
SwiftyRSA – An RSA public/private key encryption tool written in Swift.
SwiftHash – Hashing in Swift.
Also, note that some “heavy” cryptographic algorithms may cause battery drain issues. The Xcode instruments profiler is your friend for catching battery issues.
Secure Coding
Another important aspect of app security is the source code itself. The Secure Coding guide from Apple explains common vulnerabilities and secure coding techniques.
Here are a few tips to secure your code:
- Use the Xcode Static Analyzer to find common issues.
- Obfuscate your code. Objective-C has a lot of runtime information that makes it vulnerable to symbol analysis/injection/replacement.
- Bury security-related logic in your code to make it hard to locate and patch.
- Don’t use shared libraries, as they can be patched or swapped.
- Detect and block the debugger.
- Clear the Pasteboard once the application enters background.
- Don’t show sensitive data in logs.
- Validate input.
- Validate incoming URLs received through the URL Scheme (an example of calls vulnerability). Use Universal Links if possible.
- Be careful when using WebView – show only trusted services, avoid enabling JavaScript if possible, and take care about XSS protection.
- Include jailbreak detection.
Third-party solutions:
iOS-App-Security-Class – A simple class to check whether an iOS app has been cracked, is being debugged or is being enriched with custom dylib, as well as to detect jailbroken environments.
Obfuscator-iOS – Secure your app by obfuscating all hard-coded security-sensitive strings.
Conclusion
In this article, we tried to answer the question of what is mobile data encryption and how you can use it to protect user data. We’ve covered iOS data encryption on mobile devices, and addressed the following issues:
- Encrypt sensitive data with data protection
- Use TouchID and passwords for authentication
- Verify in-app purchases
- Know when and how to use cryptography
- Code securely
We’ve also reviewed some restrictions and hidden obstacles.
The next step is to think what your app needs to protect, choose services or techniques, and start coding. Whether you develop for Android or iOS, it is important to always have a solid encryption policy that will help your users protect themselves and feel secure.


