 Skip to main content

The API layer is one of the essential software components of any application. It connects a client to a server, combines microservices, and allows services and products to communicate with each other. This is why it’s crucial to pay attention to API testing when developing a web project.
In this article, we explore what REST API testing is, list its pros and cons, and share an example of how to test REST API services on the .NET platform. This article will be helpful for developers who want to know how to use REST APIs to create automated tests.
Contents:
REST API testing
What is a REST API and how does it work?
Automation testing is a great way to enhance any testing strategy. It allows you to run a set of tests over and over again automatically, saving both time and money.
Depending on the application development phase they’re applied to, automated tests can be split into three categories:
- Unit tests are performed by developers after completion of the initial development stage and before involving testers.
- API tests are run during the integration phase by the development or testing team to check the request and response functionality on which the application is built. These tests can be applied even before building the user interface (UI) layer.
- UI tests are run by testers during the test execution phase to check the functionality and business logic of an application on the front end. These tests can be applied only after the UI layer is built.
In this article, we take a closer look at API testing, which is a part of API management strategy that is worth applying to any web project, especially if it’s built using the microservices architecture. Some microservices may not have a UI at all, so you’ll need to test the back end by directly interacting with its API.
While there are many architectural approaches defining how an API should look, we’ll focus on testing Representational State Transfer (REST) APIs. Currently, REST is one of the leading API approaches, including over API designs based on the Web Services Description Language (WSDL) and the Simple Object Access Protocol (SOAP).
Here’s how a REST API works:
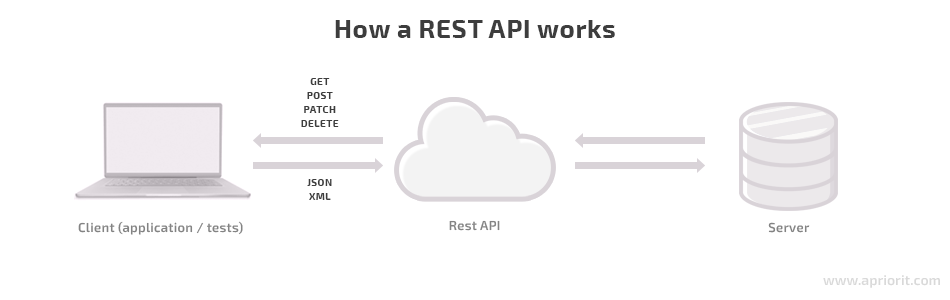
REST API testing checks if a REST API works correctly by sending different requests to it and validating the API’s responses.
The overall REST API testing process consists of two main steps:
- Sending a request to a server
- Processing the server’s response
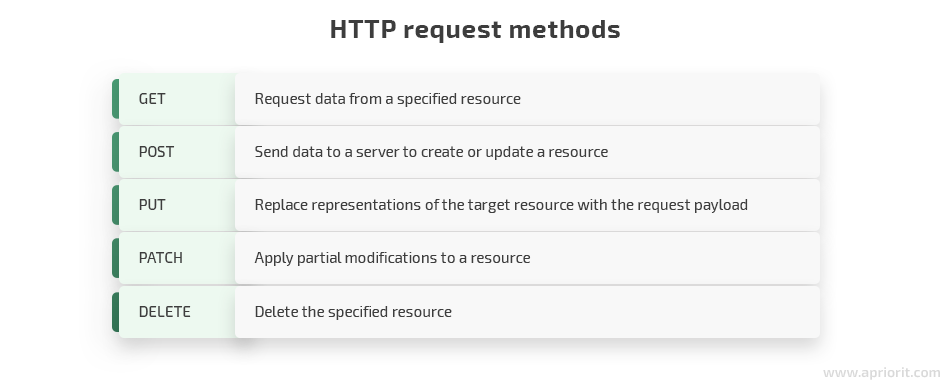
REST API testing relies on the use of HTTP request methods. The five most commonly used methods are:
Aside from these methods, in order to send a request to a server, you’ll need to know:
- The request URL
- Request headers
- The request body
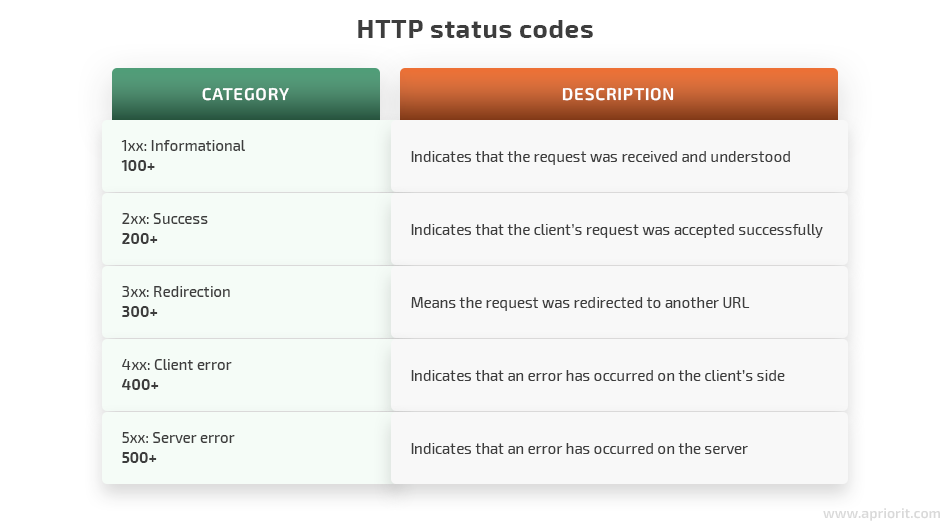
When you move to processing a server’s response, pay attention to the response body and the HTTP status code. The HTTP status code will show you the request results and point to the reason for failure if something goes wrong. These codes range from 100 to 500+ and can be divided into the five following categories:
However, there’s more to REST API testing than just sending requests and analyzing responses. In particular, you need to make sure you’re authorized to interact with the API under test in the first place.
Prior authorization
In most cases, interacting with a REST API is impossible without prior authorization.
Once a user is registered in an application, we send the necessary data to the authentication server. If authentication is successful, the server sends an access token (authorization key) to the user. The server then uses this key to distinguish authorized users and restrict any interactions with server entities for unauthorized users.
In some open APIs, however, a key may not be needed or can be provided upon request — for example, after a user registers on a website.
One of the widely applied protocols for integrating with authorization services is the OAuth protocol. This protocol defines four possible types of authorization approval depending on the authorization request method:
- An authorization code is used with server-side applications.
- Password credentials are used by trusted applications to obtain an access token with a username and password. For instance, password credentials can be used by applications that are part of the service under test.
- Client credentials are used when an application is accessing the API.
- Implicit authorization is used by mobile and web applications that work on end user devices.
You’ll need to choose one of these authorization request methods based on your application implementation.
API version support
By supporting API versioning, developers can solve several issues at once:
- Make it easy to extend an API without disturbing the clients that already use it.
- Enable new clients to use the latest API version.
- Make sure that if a new API version contains bugs or errors, it won’t affect the performance of previous stable versions.
During API testing, we interact with a specific API version written in our request to the endpoint. Depending on the API’s implementation, we can determine its version using one of the following methods:
- Use the address line. Example: yourInstance.api.com/services/version/
- Use parameters in the request. Example: yourInstance.api.com?version=v2
The response from the server will contain data about available versions in JSON or XML format. This is what a response in JSON format might look like:
[
    {
        "label": "Summer '15",
        "url": "/services/data/v22.0",
        "version": "2.0"
    },
    {
        "label": "Winter '16",
        "url": "/services/data/v23.0",
        "version": "3.0"
    },
...
    {
        "label": "Spring '20",
        "url": "/services/data/v23.0",
        "version": "42.0"
    }
]Now, let’s explore a practical example of testing REST API services on the .NET platform.
Testing REST API services on the .NET platform
While we use the .NET platform as the basis for our REST API testing examples, the principles shown here will be the same for other programming languages. Java, Python, JavaScript, Ruby, Objective-C, and other popular languages all have libraries for REST API testing.
Before we start the testing process, we need to choose the right testing tools for automated API testing. At Apriorit, we often use the following tools, as they’re convenient and effective:
| Tool | Description | Benefits |
| NUnit | Testing framework to create automated unit tests |
|
| RestSharp | Client HTTP library for working with the REST API |
|
| Json.NET | Framework for convenient JSON data serialization and deserialization of requests to and responses from a server |
|
*According to the Newtonsoft website
Let’s test an authorization method provided by the OAuth protocol using a resource owner’s login and password credentials. We’ll need to use the POST request method, which should result in generating and receiving an access token.
Note that this access token will be valid for a limited time. Once this time passes, you’ll need to request a new one.
We start by preparing test data that will be sent to the server:
- grant_type — authorization type
- client_id (consumer key) — a unique public client identifier, required for determining the application that’s requesting access
- client_secret — the client’s secret private key used together with the client’s identifier
- username — user’s login
- password — user’s password
Here’s what this data looks like in JSON format:
{
  "grant_type": "password",
  "client_id": "3MVG9eQyYZ1h89HeOU3hfhO",
  "client_secret": "1423E5F4427CF5D111948B6C135",
  "username": "user_login",
  "password": "user_pwd"
}Note: In most cases, client_id and client_secret are generated when a user registers on the testing platform.
Next, we receive an authorization token and check the process of receiving it for errors:
{
  var client = new RestClient(baseUrl);
  var request =  new RestRequest(resourcePath, method);
  request.AddJsonBody(authParametersData)
  var response = client.Execute(request);
  Assert.IsTrue(string.IsNullOrWhiteSpace(response.ErrorMessage));
  var output = JsonConvert.DeserializeObject<AuthTokenData>(response.Content);
}Let’s define the variables from the code above:
- baseUrl is the basic address of the request, required for the client’s REST initialization. This is the address that receives the request on the API side. Example: https://test.api.com/
- resourcePath is the path to the required resource. In our case, it’s a path to the tokenization service. Example: “services/oauth2/token”
- method is an HTTP request method. In our case, it’s POST.
- authParametersData is user data in JSON format.
- AuthTokenData is a class for deserialization of authorization data.
If authorization was successful, we’ll receive a response from the server in JSON format that will look like the following:
{
  "access_token": "MTQ0NjOkZmQ5OTDE9ZTNGZmZjI3.0gMR_n6XpHhMSDYly",
  "token_type": "Bearer",
  "issued_at": "1589880516720",
   "signature": "pmxBm0GwUP0I8635LJV0w8QkXUfDSuQ+z3u3UJ/ARc="
}Thus, the AuthTokenData class for response deserialization will look like this:
class AuthTokenData
{
    [JsonProperty(PropertyName = "access_token")]
    public string AccessToken { get; set; }
    [JsonProperty(PropertyName = "token_type")]
    public string TokenType { get; set; }
    [JsonProperty(PropertyName = "issued_at")]
    public string IssuedAt { get; set; }
    [JsonProperty(PropertyName = "signature")]
    public string Signature { get; set; }
}Once an authorization token is received, we can fully interact with the API and set access limitations. Note that all API interactions are only possible while the received token is valid.
Therefore, during RestClient initialization, you need to add a relevant header with the received token type and the authorization token itself:
{
    RestClient client = new RestClient(BaseUrl);
    client.AddDefaultHeader("Authorization", string.Format("Bearer {0}", accessToken));
}In fact, headers are used for communicating with both the client and the server. You can find the full list of HTTP headers on the official MDN website.
Other types of allowed actions (GET, PUT, PATCH, DELETE) work similarly to the example above:
{
  var request =  new RestRequest(resourcePath, method);
  var response = client.Execute(request);
  Assert.IsTrue(string.IsNullOrWhiteSpace(response.ErrorMessage));
}Where:
- resourcePath is the path to the required resource. In most cases, it will also contain the REST API version. Example: /services/data/v48.0/targetEntity
- method is an HTTP request method. Example: GET, PUT
Also, depending on the request type, its execution might require:
- data of the entity under test
{
  request.AddJsonBody(EntityData);
}- deserialization of the server response
{
  JsonConvert.DeserializeObject<entity>(response.Content);
}We’ve explored the basic flow of working with a REST API and got a general idea of what a REST API is and ways to use one.
Pros and cons of REST API testing
At Apriorit, we often turn to using REST API to create automated tests, as this approach has several significant benefits:
- Better testing speed. It takes less than a second to call requests and process their results, which is much faster than UI testing.
- Ability to test at early development stages. Usually, developers work on an API first and only then move to the UI. By using REST API testing, you can start checking system behavior and find defects while still developing the functionality itself.
- Precise error localization. Thanks to HTTP status codes, you can instantly detect whether an issue is caused by the server or a client and can start solving it immediately.
- Speed of automated test coverage. It’s much faster to implement automated REST API tests than UI tests. The reason is that REST API tests require less code and don’t need to interact with the user interface.
- Scalability of automated tests. Thanks to versioning support and the opportunity to test an application without a graphical interface, automated REST API tests require minimal support. REST API tests will work correctly even if the version of API is upgraded, since they continue to communicate with an older version specified in them.
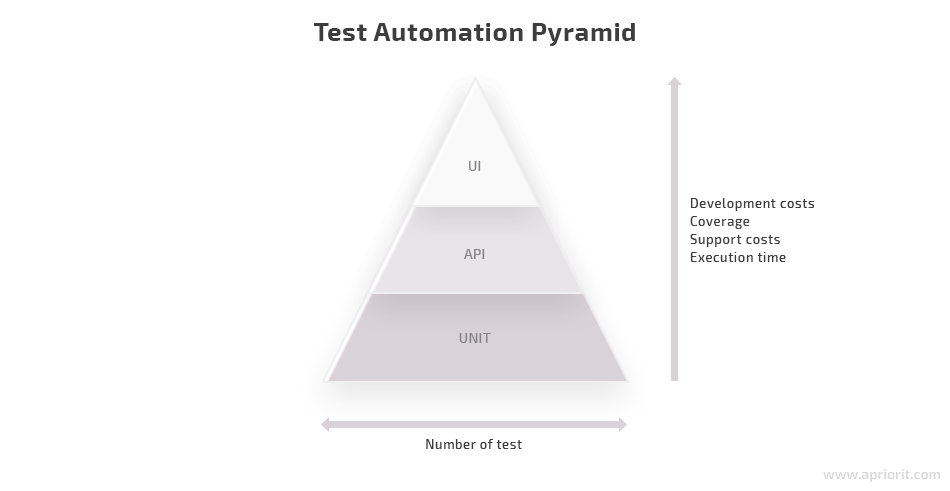
Downsides of working with REST API tests include the inability to check:
- web elements on a page
- user actions
- the way application components interact with each other
These functionalities must be covered with UI tests. However, keep in mind that UI tests should cover the fewest test cases, as shown in the scheme below. The majority of your testing efforts should go to API and unit tests.
Read also:
6 Ways to Improve Software Testing
Conclusion
Using a REST API for automation testing is a great approach that helps developers test an application at early development stages and ensure fast and stable automated test coverage. If you also want to learn how to address API security threats, check out our article on the 6 most common security issues in API development and how to fix them.
At Apriorit, we understand the importance of REST AP testing and apply API testing to all kinds of web projects. Our professional team of quality engineers and testers is ready to help you make any solution bug-free and efficient. Contact us to start working on your project.
Have a question?
Ask our expert!
VP of Engineering


