 Skip to main content

Protecting sensitive data is one of the key security tasks for all organizations. To ensure this protection, organizations need to carefully control who can access what, so implementing an identity and access management (IAM) mechanism is essential.
However, with the variety of IAM options, it can be challenging to decide which service to use, how to configure it, and whether you might need a custom solution for your security purposes.
In this article, we explore the differences between several approaches for developing identity and access management services. We show detailed examples of how you can build a custom on-premises system and a cloud-based system and compare these systems against key criteria for IAM systems.
This guide will be helpful for development leaders who want to explore options for building an IAM system and learn technical details and nuances.
Contents:
What are IAM services and how can you build one?
Identity and access management enables the right individuals to access the right resources at the right time for the right reasons according to Gartner. Organizations of different types and sizes strive to implement IAM practices to secure sensitive information and prevent data leaks by controlling users’ access to critical information.
To implement these practices, organizations use specialized systems that provide necessary functionalities such as two-factor or multi-factor authentication, user identity management, user authorization features, permissions controls, and so on.
An efficient IAM service should pursue the zero-trust principle, meaning it has to provide the following:
- Identity-based security to make sure that a logged-in user is known by the system and that the user’s identity is confirmed
- Role-based access rights to ensure that each account has as few privileges as possible: for example, only access rights needed for daily work
- Additional security measures to protect users, such as multi-factor authentication (MFA), login attempt counting, policies against brute-force and bot attacks, audit logs, and backup possibilities
You can deploy an IAM system on-premises, subscribe to a cloud-based model provided by a third-party vendor, or use a hybrid model.
For the purposes of this article, we decided to compare a few ways to build an IAM solution:
- Develop an on-premises IAM solution based on a self-hosted server as a fork of the Open Integration Hub (OIH).
- Configure an IAM solution managed by a cloud provider using Auth0.
- Configure an IAM solution managed by a cloud provider using AWS Cognito.
But before we start comparing approaches to developing identity and access management services, let’s discuss the functionality for our solutions and explore its flow.
Key functionality for an IAM system
It’s essential to define requirements for our future solution so we can fairly compare the different implementations once they’re ready.
Our goal is to deliver an IAM system that covers from 1000 to 5000 users, which is a realistic number of users in small and midsize organizations.
Common tasks such a solution must cover are:
- Providing a user registration flow that is simple for end users
- Password-based authentication that confirms users are who they say they are
- Token-based authorization that ensures a user is granted the exact level and type of access rights they’re entitled to
- Creation of unique roles and permissions and the ability to assign/remove them to/from entities
- Protection against any attempts to steal a user’s identity
- Access review and incident response
Additional functionalities that an IAM solution may include are:
- Secure authentication, such as support for MFA
- Authentication with third-party identity providers such as social networks, Google, and Microsoft
- Multitenancy support to provide the ability to manage more than one organization
- Ready-made UI forms to reduce the time and cost of creating a custom UI form from scratch
In this article, we explore three different ways to create an IAM solution, ensuring features from the must-have list and trying to implement additional functionality listed above if the platforms we use will allow.
Typical IAM management flow
The following diagram visualizes a basic theoretical IAM management flow from user, admin, and tenant perspectives:
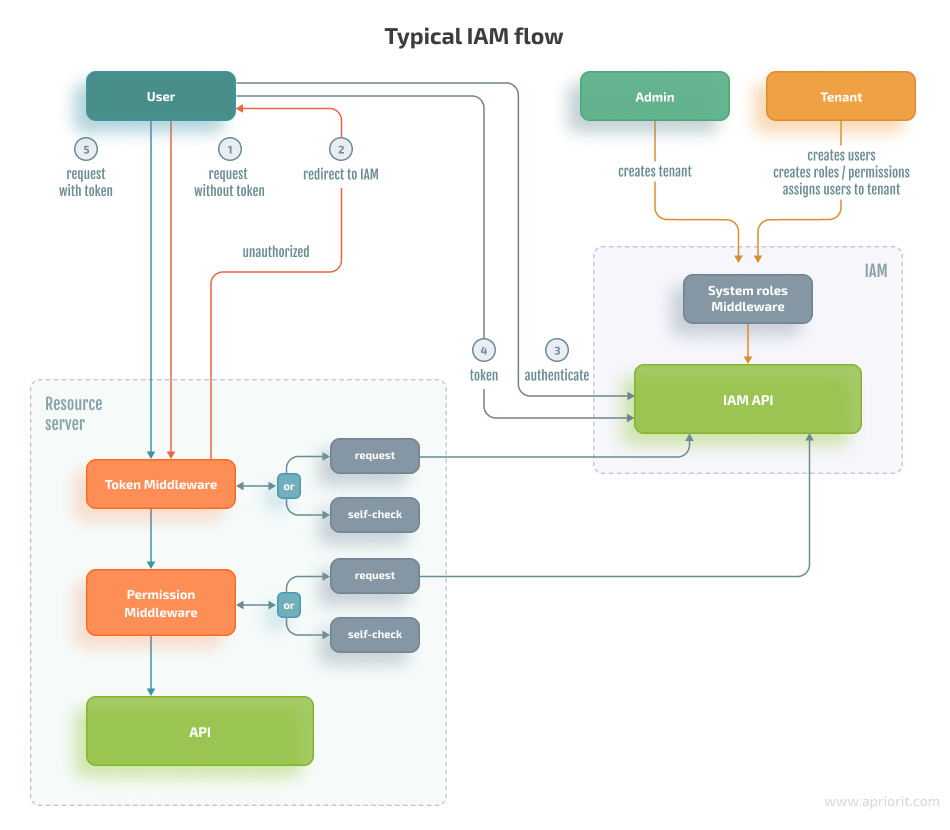
Here’s how a user interacts with an IAM solution:
- The user either already has an access token or an access token is redirected to the IAM service for authentication.
- To authenticate, the user specifies their username and password or chooses another authentication option such as authenticating through a social network or using the authorization code flow approach.
- When the user is authenticated, the system makes a request to the resource server.
- The resource server contains a library that verifies that the user is authorized to access the part of the business logic within the resource server or makes a request to the IAM service, which checks user permissions against its database.
An admin has the following:
- A predefined set of roles assigned to them
- System permissions that enable them to create new tenant spaces
A tenant has the following:
- A predefined set of roles that allow them to perform only tenant-related operations
- Opportunities to manage users and roles/permissions within their tenant space
With the requirements and general program flow defined, let’s move to the actual implementation. We start with developing a custom IAM service based on the Open Integration Hub.
1. Developing a custom-made IAM solution using the Open Integration Hub
Open Integration Hub (OIH) is a framework that helps developers ensure easy data exchange between business applications. It consists of a variety of services, including the Identity and Access Management service.
Developing an IAM service using OIH is a good choice if you need full control over the solution. However, this framework doesn’t provide any fancy UI for customization, and you’ll have to do all the work manually.
In this case, we’ll use an on-premises IAM server and spend time on:
- Forking, auditing, and modifying source code where necessary
- Fixing issues and maintaining deployment pipelines, backup/restore procedures, etc.
The major distinctives of the IAM service offered by OIH are that it:
- Supports a minimal set of tasks including organization and user management, authentication, authorization, and role-based access control (RBAC)
- Contains a minimal set of dependencies, relying on very few external services
- Uses basic and well-known technologies like JSON Web Tokens (JWT), OAuth 2.0, and OpenId Connect
To start working on your custom solution, you need to take the following steps:
- Fork the source code of an existing IAM solution
- Modify logic if necessary
- Create a Mongo database
- Configure the RabbitMQ broker
- Prepare the hosting environment
Now, let’s discuss how to achieve the basic flows for our solution using OIH.
1.1. Authentication
For authentication, we’ll describe an approach that doesn’t involve external social connections. To pass authentication, a user should be added to at least one organization (become bound to a tenant). Otherwise, the authentication flow should fail.
The authentication process has three main stages:
Stage 1: A user provides their login and password and retrieves a session token from the api/v1/session endpoint. At this stage, we don’t require any information about user membership. The only goal is to authenticate this user and get the session token that can be exchanged with JWT.
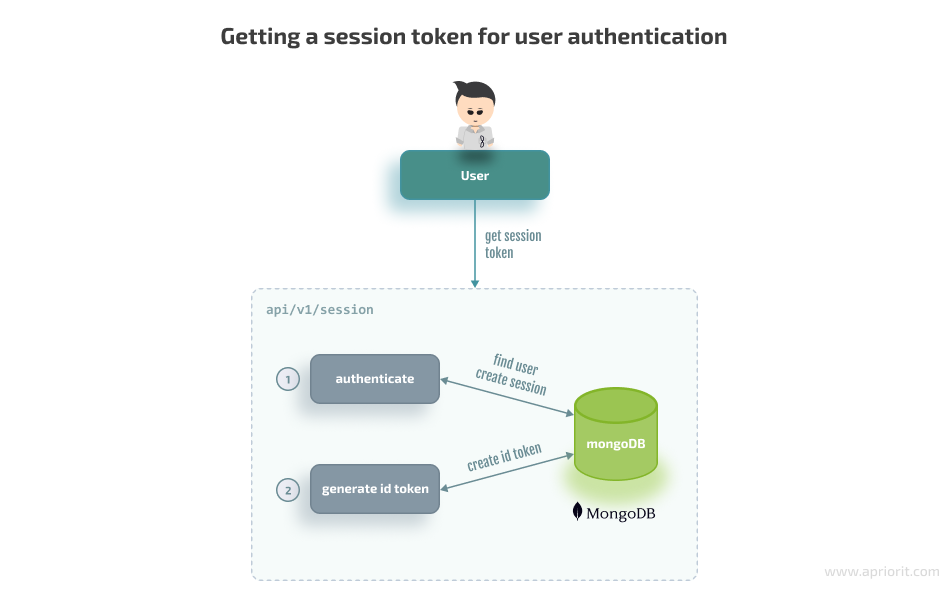
The following code snippet demonstrates how to get a token in the api.js file:
router.post('/session', authMiddleware.authenticate, authMiddleware.accountIsEnabled, async (req, res, next) => {

    if (!req.user) {
        // req.user will be set after authMiddleware.authenticate
        return next({ status: 401, message: CONSTANTS.ERROR_CODES.NOT_LOGGED_IN });
    }

    const t = await TokenUtils.create(req.user); // id token will be created in a local database
    req.headers.authorization = 'Bearer ${t.token}';
    res.status(200).send({ token: t.token, id: t._id });
});For readability purposes, a session endpoint is broken down into multiple pre-handlers. Our system will call each pre-handler before creating the ID token.
At this point, we are mostly interested in the middleware function, also called a pre-handler or hook function — authMiddleware.authenticate — which works through integration with the Passport library, which in turn uses the Mongo database for session storage:
authenticate: (req, res, next) => {
        passport.authenticate('local', async (err, user, errorMsg) => {
            if (err) {
                return next(err);
            }

            if (errorMsg) {
                if (errorMsg.name === 'IncorrectPasswordError') {
                    /* todo: increase login timeout for the user*/
                    await Account.updateOne({
                        username: req.body.username,
                    }, {
                        $inc: {
                            'safeguard.failedLoginAttempts': 1,
                        },
                    }, {
                        timestamps: false,
                    });
                    return next({ status: 401, message: CONSTANTS.ERROR_CODES.PASSWORD_INCORRECT });
                }
                if (errorMsg.name === 'IncorrectUsernameError') {
                    return next({ status: 401, message: CONSTANTS.ERROR_CODES.USER_NOT_FOUND });
                }
            }
            if (!user) {
                return next({ status: 401, message: CONSTANTS.ERROR_CODES.DEFAULT });
            }

            req.logIn(user, async (err) => {
                if (err) {
                    log.error('Failed to log in user', err);
                    return next({ status: 500, message: CONSTANTS.ERROR_CODES.DEFAULT });
                }

                if (req.body['remember-me']) {
                    req.session.cookie.maxAge = 30 * 24 * 60 * 60 * 1000; // 30 days
                } else {
                    req.session.cookie.expires = false; // expires at end of session
                }

                await Account.updateOne({
                    username: req.body.username,
                }, {
                    $set: {
                        'safeguard.lastLogin': new Date(),
                        'safeguard.failedLoginAttempts': 0,
                    },
                }, {
                    timestamps: false,
                });

                req.session.save((err) => {
                    if (err) {
                        log.error('Error saving session', err);
                        return next(err);
                    }

                    return next();

                });

            });

        })(req, res, next);
},The Passport library relies on an authentication-based strategy that you can initialize using the following code:
const passport = require('passport');
const MongoStore = require('connect-mongo')(session);
const LocalStrategy = require('passport-local').Strategyconst
session = require('express-session');

/*
...
*/
const mongoSession = session({
      secret: process.env.IAM_SESSION_COOKIE_SECRET,
      name: process.env.IAM_SESSION_COOKIE_NAME,
      store: new MongoStore({
           mongooseConnection: this.mongoose.connection,
           touchAfter: 4 * 3600,
           autoRemove: 'native',
           autoRemoveInterval: 60 * 4,
           ttl: 3 * 24 * 60 * 60,
      }),
            saveUninitialized: false,
            resave: false,
      });

this.app.use(mongoSession);
this.app.use(passport.initialize());
this.app.use(passport.session());

// authenticationStrategy reads a user from the database and checks a password
passport.use(new LocalStrategy(authenticationStrategy()));

/*
...
*/When the authentication middleware is triggered, the Passport library calls our authentication strategy.
If everything goes well, the authentication strategy will return user data and a session will be saved in storage. Login attempts will be reset to 0.
In case of any errors, we need to first check if the password was incorrect and increase the number of failed login attempts. This is the place where we can implement brute force security. We need to keep track of failed login attempts and propose a strategy to block login attempts for some amount of time.
Stage 2: When the ID token is retrieved, we can use it to get the list of organizations a user belongs to:
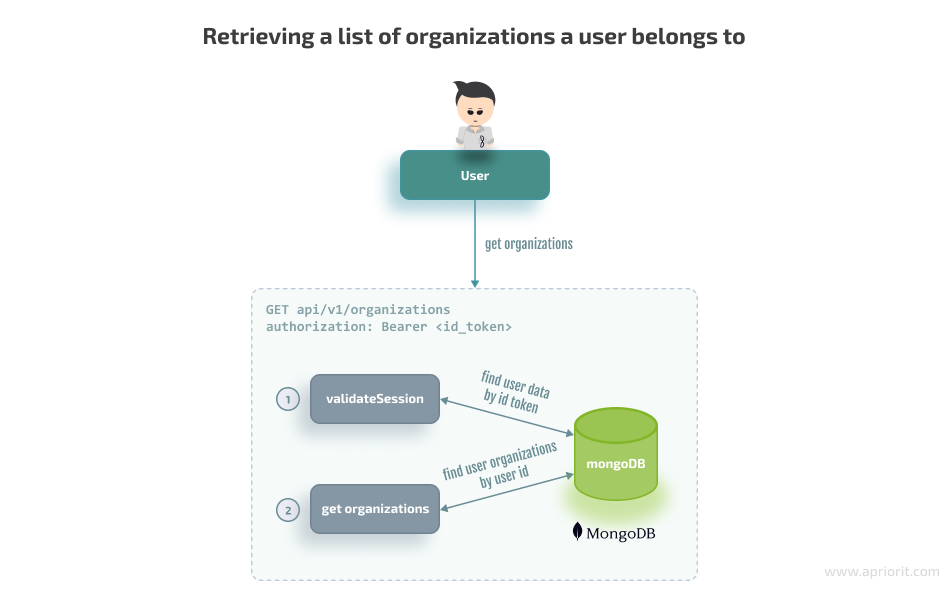
Here’s the code to retrieve the list of organizations:
router.get('/organizations', authMiddleware.validateSession, async (req, res, next) => {
     try {
         const account = await AccountDAO.findOne({ _id: req.user.userid });
         res.status(200).send({
             account,
             organizations: req.user.organizations, // organizations is a part of user representation and defines user membership in organizations
         });

     } catch (err) {
         logger.error(err);
         return next({ status: 500, message: CONSTANTS.ERROR_CODES.DEFAULT });
     }
});And here’s how the validateSession middleware will check the ID token retrieved in the first step:
validateAuthentication: async (req, res, next) => {
        let payload = null;
        let client = null;
        let token = null;

        /** User has a valid cookie */
        if (req.user) {
            req.user = req.user.toJSON();
            req.user.userid = req.user._id.toString();
            return next();
        }

        // here we need id token retrieved from /session
        if (!req.headers.authorization) {
            return next({ status: 401 });
        }

        try {
             const header = req.headers.authorization.split(' ');
             if (!header || header.length < 2) {
                    log.debug('Authorization header is incorrect');
                    return next({ status: 401, message: CONSTANTS.ERROR_CODES.INVALID_HEADER });
              }
              token = header[1];
              payload = await TokenUtils.getAccountData(token);
        } catch (err) {
              log.warn('Failed to parse token', err);
              return next({ status: 401, message: CONSTANTS.ERROR_CODES.SESSION_EXPIRED });
        }

        if (payload) {
            req.user = req.user || {};
            return next();
        } else {
            log.error('Token payload is empty or invalid', { payload });
            return next({ status: 401, message: CONSTANTS.ERROR_CODES.VALIDATION_ERROR });
        }
}Stage 3: Finally, a user can choose an organization and ask for a JWT to access it:
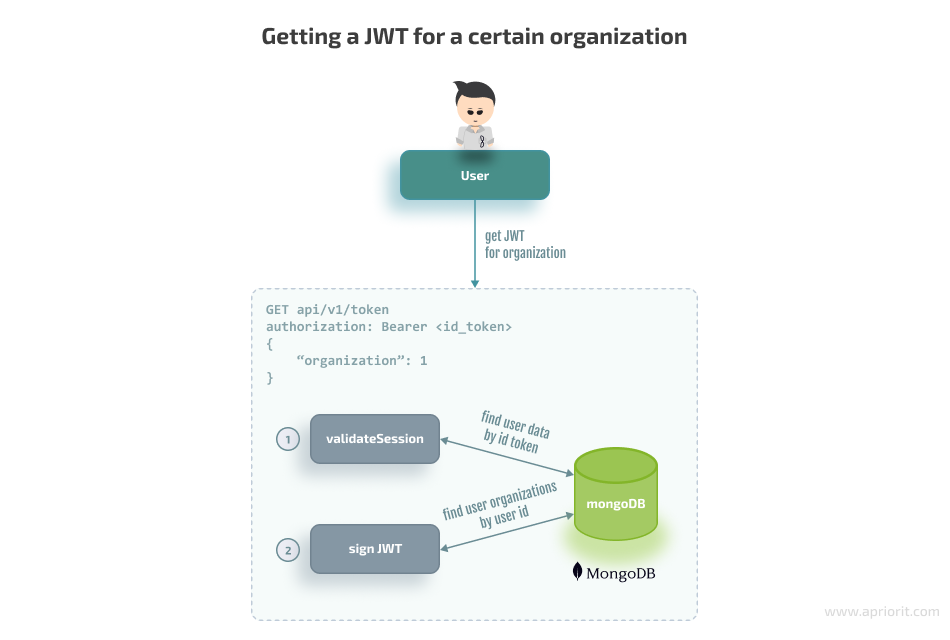
And here’s the code for getting the JWT for a certain organization:
router.post('/token', authMiddleware.validateAuthentication,
     async (req, res, next) => {
         const { organization } = req.body;

         if (!organization) {
             return next({ status: 400, message: 'Missing organization' });
         }

         try {
             if (await AccountDAO.userHasOrganization({ userId: req.user.userid, tenantId: organization })) {
                 const jwtpayload = jwtUtils.getJwtPayload(await AccountDAO.findOne({ _id: req.user.userid }));
                 const token = await jwtUtils.basic.sign(jwtpayload);
                 req.headers.authorization = 'Bearer ${token}';
                 res.status(200).send({ token: token });
             } else {
                 res.sendStatus(403);
             }
         } catch (err) {
             logger.error(err);
             return next({ status: 500, message: CONSTANTS.ERROR_CODES.DEFAULT });
         }
});The JWT token will provide full information about a user’s identity, including the user’s organization, roles, and permissions. After that, an external API server of the organization can validate the JWT token and user permissions.
1.2. Authorization
Now, let’s discuss how to ensure authorization functionality, Here’s how the flow looks:
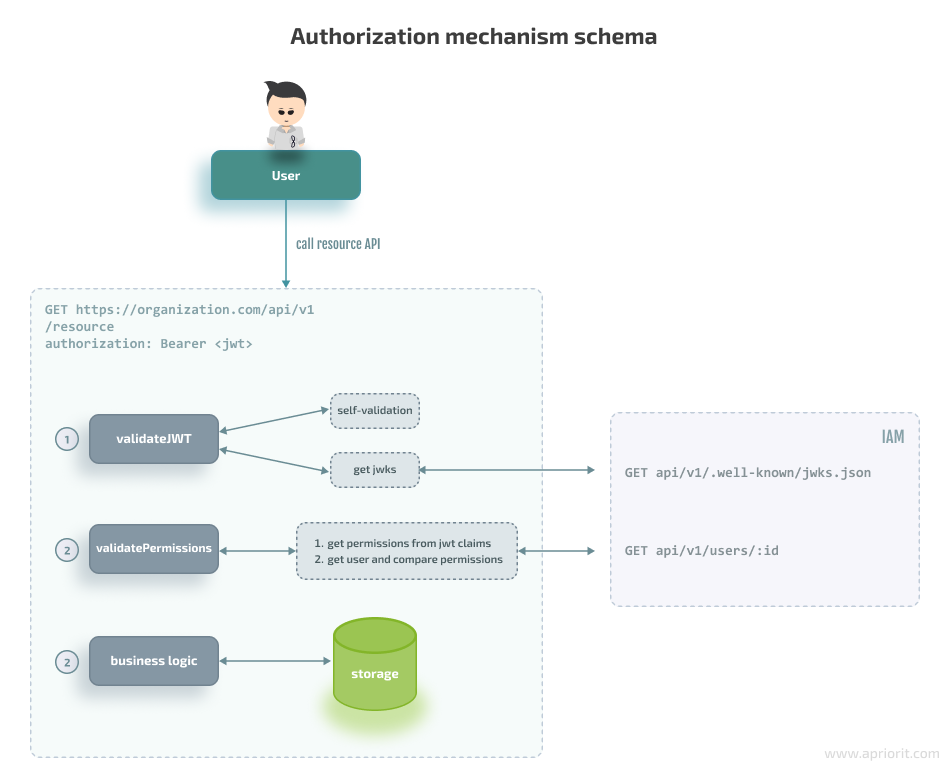
Authorization mechanisms can be part of the IAM service, or authorization may occur completely on the side of the organization’s API service. That leads us to two possible cases:
- An external API service and IAM service share the same secret when a hash-based message authentication code (HMAC) is used for signing an algorithm and the JWT validation library is used locally. The downside of such an approach is that we need to update the signing key manually every time it changes in the IAM service.
- An external API service fetches the JSON Web Key Sets (JWKS) public key first and then validates the JWT using the JWKS. In this scenario, the RSA algorithm is used, and the IAM service is responsible for maintaining and updating the signing key.
In both cases, the organization’s API service should rely on the JWT library to validate the JWT. In the second scenario, the IAM server contains a public RSA key generated at server startup or on demand and returns it to the external API server:
router.get('/.well-known/jwks.json', async (req, res) => {
    if (CONF.jwt.algorithmType === CONSTANTS.JWT_ALGORITHMS.RSA) {
        const jwks = await keystore.getRsaKeys();
        return res.send(jwks);
    } else {
        return res.status(423).send({ message: 'RSA algorithm is not activated' });
    }
});Here’s the code for the RSA key generation flow in the keystore.js file:
const jose = require('node-jose');
const { JWK: { createKeyStore } } = jose;
const keystore = createKeyStore();
const keyStorePath = path.join(__dirname, 'keystore/keystore.json');

const generateRSARaw = async (keySize) => {
    try {
        await keystore.generate('RSA', keySize, {
                kid: 'sig-rs-0',
                use: 'sig',
        });
    } catch (err) {
        log.error(err);
    }

    return keystore.toJSON(true);
};

generateRSAFile = async (keySize) => {
    const keystoreDir = path.dirname(keyStorePath);

    if (!fs.existsSync(keystoreDir)) {
        log.info('Creating keystore dir ${keystoreDir}');
        fs.mkdirSync(keystoreDir);
    }

    if (!fs.existsSync(keyStorePath)) {
        log.info('Creating keystore file ${keyStorePath}');
        const keystore = await generateRSARaw(keySize);
        return fs.writeFileSync(keyStorePath, JSON.stringify(keystore), 'utf8');
    }

};

getKeystoreFile = async () => {
    await generateRSAFile();
    return require(keyStorePath);
};

getKeystore = async () => {
    const keystoreFile = await getKeystoreFile();
    return jose.JWK.asKeyStore(keystoreFile.keys);
};

getRsaKeys = async () => {
    const keystore = await getKeystore();
    return keystore.get({ kty: 'RSA', use: 'sig' });
};1.3. Role-based access control (RBAC)
Let’s start with defining the minimum set of permissions and role-based operations restricted for admins and tenants:
GET /api/v1/roles– get all rolesPOST /api/v1/roles– create a roleGET /api/v1/roles/:id– get a role by IDPATCH /api/v1/roles/:id– modify a roleDELETE /api/v1/roles/:id– delete a roleGET /api/v1/permission/:id– get a permission by IDPOST /api/v1/permission– create a permissionPATCH /api/v1/permission/:id– modify a permissionDELETE /api/v1/permission/:id– delete a permission
To work with roles, a user-tenant should be logged in and have tenant-specific permissions such as tenant.roles.create and tenant.roles.update. Such permissions are system-defined and are created manually. Some are restricted and can’t be assigned to custom roles to avoid assigning system-critical roles to everyone.
Here’s the code for configuring permissions in the access-control.js file:
const PERMISSIONS = {
    restricted: {
        'all': 'all',
        'iam.account.create': 'iam.account.create',
        'iam.account.read': 'iam.account.read',
        'iam.account.update': 'iam.account.update',
        'iam.account.delete': 'iam.account.delete',
        // to do: other critical permissions than cannot be assigned to everyone
    },
    common: {
        'tenant.all': 'tenant.all',
        'tenant.account.read': 'tenant.account.read',
        'tenant.account.create': 'tenant.account.create',
        'tenant.account.update': 'tenant.account.update',
        'tenant.account.delete': 'tenant.account.delete',

        'tenant.membership.create': 'tenant.membership.create',
        'tenant.membership.update': 'tenant.membership.update',
        'tenant.membership.delete': 'tenant.membership.delete',

        'tenant.profile.read': 'tenant.profile.read',
        'tenant.profile.update': 'tenant.profile.update',
        'tenant.profile.delete': 'tenant.profile.delete',

        'tenant.roles.read': 'tenant.roles.read',
        'tenant.roles.create': 'tenant.roles.create',
        'tenant.roles.update': 'tenant.roles.update',
        'tenant.roles.delete': 'tenant.roles.delete',
    },
};Now, let’s demonstrate some of the operations aimed at managing the RBAC functionality in our IAM solution.
The following example shows the flow of how a user-tenant can create a role. Here, we need to:
- Check if the tenant has permissions to create the role
- Validate input data and check that permissions are not in the list of system-critical roles
- Check that the role’s name is not system-defined
router.post('/', auth.hasTenantPermissions([PERMISSIONS['tenant.roles.create']]), async (req, res, next) => {
    const {
        name,
        description = '',
        permissions = [],
    } = req.body;

    if (!name || typeof permissions !== 'object') {
        return next({ status: 400, message: CONSTANTS.ERROR_CODES.INPUT_INVALID });
    }

    if (!permissionsAreNotRestricted(permissions)) {
        logger.warn('Attempt to assign a restricted permission to a role by user ${req.user.userid}');
        return next({
            status: 403, message: CONSTANTS.ERROR_CODES.FORBIDDEN, details: 'Restricted permission used',
        });
    }

    if (roleNameIsRestricted(name)) {
        return next({
            status: 403, message: CONSTANTS.ERROR_CODES.FORBIDDEN, details: 'Restricted role name',
        });
    }

    try {
        const newRole = await RolesDAO.create({
            name,
            permissions,
            description,
            tenant: req.user.tenant,
        });

        res.status(200).send(newRole);
    } catch (err) {
        logger.error(err);
        return next({ status: 500, message: CONSTANTS.ERROR_CODES.DEFAULT });
    }

});Let’s proceed to an example of how a user-tenant can create users. Here, we first check if the tenant has an account creation role and then validate the user data.
During user data validation, we should follow the principle of least privilege, which means the following:
- Roles should not be assigned from a tenant to a user, meaning that a tenant can’t delegate roles to an ordinary user.
- Restricted permissions shouldn’t be granted to a user, meaning that a regular user must not have system-critical permissions.
const rolesBelongToTenant = async (roles, tenant) => {
    const tenantRoles = (await RolesDAO.find({ tenant })).map((role) => role._id.toString());
    const falseRoles = roles.filter((role) => tenantRoles.indexOf(role) < 0);
    return falseRoles.length === 0;
};

const validateUserData = async (req, res, next) => {
    const userData = req.body;
    if (!req.user.isAdmin) {
        if (userData.roles && userData.roles.length && !(await rolesBelongToTenant(userData.roles, req.user.tenant))) {
            return next({
                status: 403, message: CONSTANTS.ERROR_CODES.FORBIDDEN, details: 'Tenant role used',
            });
        }
        if (userData.permissions && !permissionsAreNotRestricted(userData.permissions)) {
            return next({
                status: 403, message: CONSTANTS.ERROR_CODES.FORBIDDEN, details: 'Restricted permission used',
            });
        }
        req.body.tenant = req.user.tenant;
    }

    return next();
};

router.post('/', auth.hasTenantPermissions([PERMISSIONS['tenant.account.create']]), validateUserData, async (req, res, next) => {
    const userData = req.body;
    try {
        const user = await AccountDAO.create({ userData });
        return res.send({ id: user._id });

    } catch (err) {
        if (err.name === 'ValidationError') {
            log.debug(err);
            return next({
                status: 400,
                message: CONSTANTS.ERROR_CODES.INPUT_INVALID,
            });
        } else {
            return next(err);
        }
    }
});Let’s summarize the implemented RBAC functionality and explain key points:
- Our IAM service now stores roles and permissions and assigns them to users. Users that have tenant permissions can create roles and assign them during the user creation/updating process.
- There’s a set of predefined hardcoded roles/permissions for the purposes of authorization with the IAM API itself. You can create other roles/permissions dynamically and save them in storage.
- Each role has a set of permissions. When a user token is validated, the user permissions contained in the payload can be interpreted by other services as rights to call certain functions. The IAM service describes all permissions, and each separate API service understands only a limited set of permissions.
1.4. Audit logging
Audit logs are records of event logs regarding a specific activity on the server. This functionality works through integrating openintegrationhub/event-bus with the RabbitMQ broker.
Here’s what we need to do to ensure audit logging:
1. Configure a manager that holds a connection in the event-manager.js file:
const { EventBusManager } = require('@openintegrationhub/event-bus');

class EventManager {
    constructor(opts) {
        this.eventBus = opts && opts.eventBus;
    }

    async start() {
        EventBusManager.init({ eventBus: this.eventBus, serviceName: conf.general.loggingNameSpace });
    }

    async stop() {
        await EventBusManager.destroy();
    }
}

module.exports = EventManager;2. Configure the API entry point that initializes the event manager. It is usually in the index.js file:
const { EventBus } = require('@openintegrationhub/event-bus');
const EventManager = require('./event-manager');

(async () => {
    try {
        // configuring the event manager
        const eventBus = new EventBus({ serviceName: conf.general.loggingNameSpace, rabbitmqUri: conf.general.rabbitmqUrl });
        await eventBus.connect();
        const eventManager = new EventManager({ eventBus });

        // other code that runs at startup
    } catch (err) {
        log.error(err);
        process.exit(1);
    }
})();3. And here’s a logging example in the file.js file:
const { Event, EventBusManager } = require('@openintegrationhub/event-bus');

func: (req, res, next) => {
      data = await someAction();
      if (!data) {
          const event = new Event({
            headers: {
              name: 'service.action.dataMissing',
            },
            payload: { user: req.body.username },
          });
          EventBusManager.getEventBus().publish(event);
      }
}Once we’ve completed these steps, we need to build a consumer that listens to events and saves them in storage while providing the ability to gather logs from the API.
Now, let’s explore how to ensure the same functionalities for an IAM system when building a solution based on cloud services.
2. Building a cloud-based IAM service using Auth0
Auth0 is a cloud-based platform that provides identity access management services to help developers enhance their applications with customized IAM services.
When using Auth0 to configure our own IAM solution, we don’t need to host and support an environment. Also, this service offers some ready-made user forms, including login forms. You can do most of the configurations manually using the Auth0 dashboard.
Auth0 provides a quota of 7000 users for free, so according to our requirements, we can integrate it for free. However, such an option has limitations:
- No support for multiple organizations. On the bright side, we can still create multiple APIs with separate permissions in each and treat them as organizations.
- No support for connections through social media services.
- Connection with a custom database is unavailable, which means no legacy database support and no self backups.
- Only 1000 machine-to-machine tokens are available per month, which can be a problem when we want to manage everything programmatically.
To start working with Auth0, you need to create an admin profile using the Auth0 registration form and go to the Auth0 dashboard. The Auth0 admin dashboard offers lots of options, but the minimal set of requirements to start integration includes the following:
- An already created application(s)
- Already created APIs and permissions
Auth0 applications hold credentials (clientId and clientSecret, which are part of the authentication and authorization flows) and contain multiple APIs.
APIs are divided into two types:
- A system API, meant to be used by backend servers or trusted parties performing administrative tasks. Generally speaking, anything that can be done through the Auth0 dashboard can also be done through this API. A system API is created by default and contains a predefined set of permissions that are required to manage the IAM dashboard server-side.
- A public API, meant to be used by front ends and untrusted parties. Public APIs can be created manually and contain system permissions as well as custom-defined permissions.
We will create an application with a generated base URL (https://dev-mt-ji-7q.us.auth0.com/) and one API named https://example.com for further use for demonstration purposes.
2.1. Authentication
To configure an authentication mechanism, you can use a custom or predefined login form. Let’s explore both options.
2.1.1. Using a custom login form
The process of using a custom login form is called the Resource Owner Password Flow. Here’s how it works:
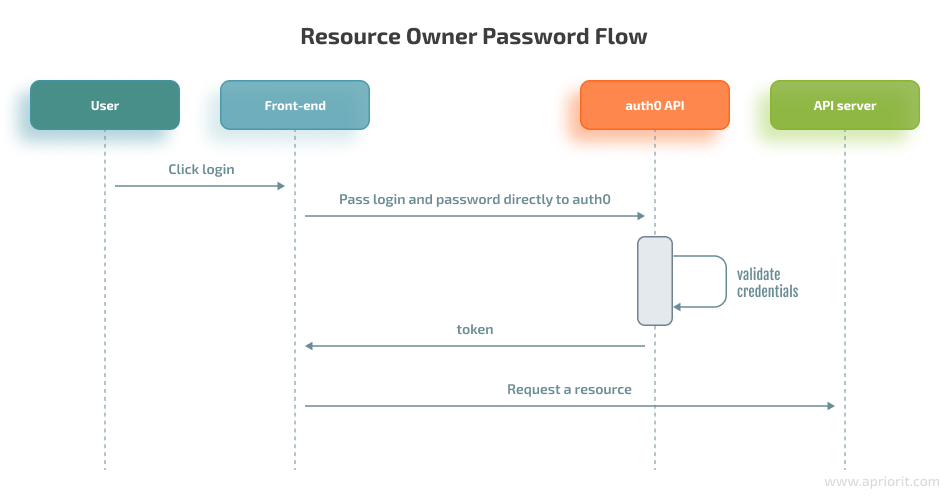
- The user clicks Login and types in their login and password.
- Any application can send the user’s login and password to our Auth0 application (/oauth/token endpoint), whose base URL is the URL of the application created in the dashboard (https://dev-mt-ji-7q.us.auth0.com/). This URL will be generated during creation.
- Our Auth0 application checks the login and password.
- Our Auth0 application returns an Access Token and a Refresh Token.
The website now can use the Access Token to call an API server to access resources.
For the Resource Owner Password Flow, we need to enable the password grant type, which is disabled by default. Authentication can be achieved via a single request to the IAM provider, which is the auth0 API server. The only downside of this approach is that credentials sent to the back end can be stored for future use before being exchanged for an Access Token, which opens the possibility for potential leaks.
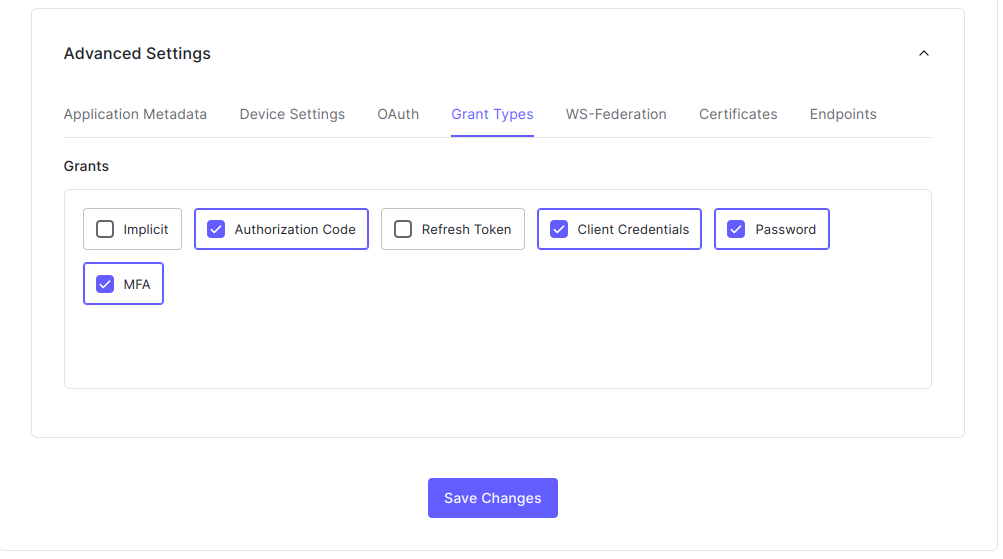
To secure the login flow, it’s essential to use MFA. But before we can use the MFA APIs, we need to enable the MFA grant type for our application. To do that, go to Applications -> choose our application -> Advanced settings -> Grant types, then check the password and MFA checkboxes.
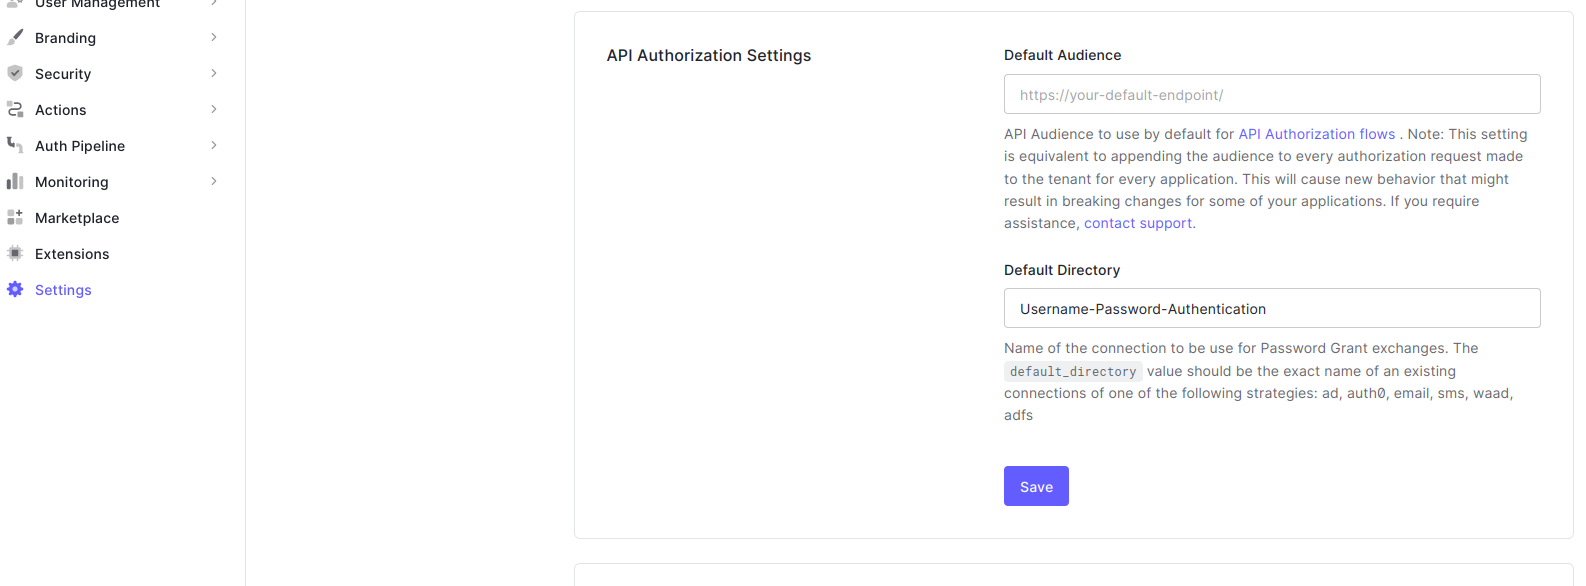
The next thing to do is go to Settings -> API Authorization Settings and type Username-Password-Authentication in the Default Directory field, then click Save.
Now that everything is prepared for ensuring the authentication process, let’s explore a detailed login flow with MFA:
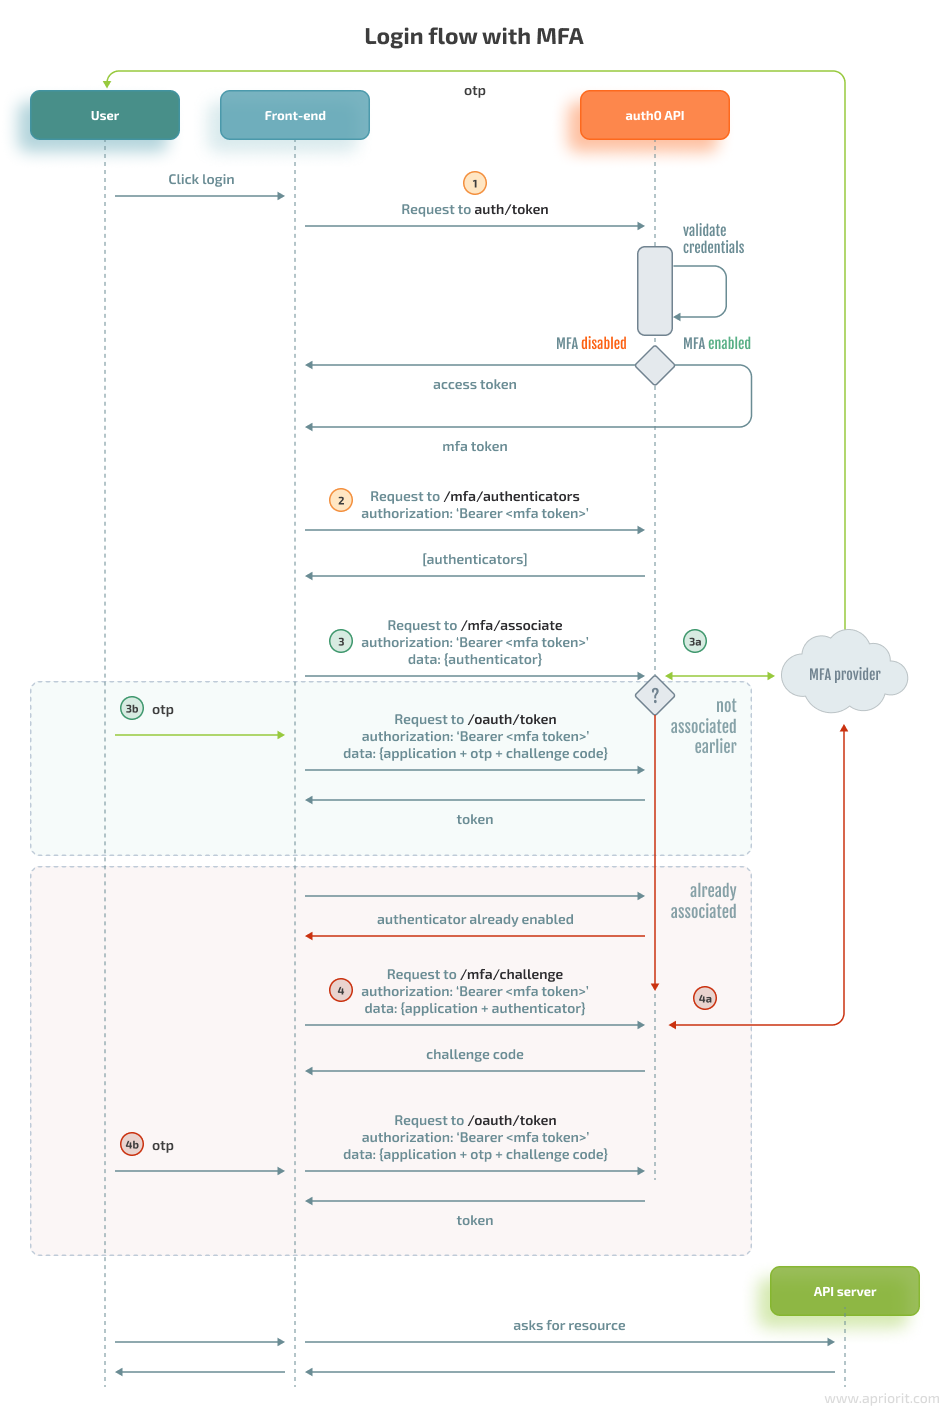
Such a flow involves user authenticators that send challenges to users. All requests should be made from our external API server. To better understand the scheme above, let’s summarize possible scenarios:
- If MFA is disabled, then the oauth/token endpoint returns the JWT. Step 1 shown below will lead directly to the JWT.
- If MFA is enabled but the authenticator has not yet been associated, we go through the following steps:
- Step 1: Request a token, after which the server will receive
error mfa_required. - Step 2: Request the user authenticators that are required to trigger a challenge.
- Step 3: Associate the authenticator with Auth0. The API server receives a temporary code, and the user receives a one-time password (OTP), which is step 3a.
- Step 3b: The token request is repeated with the server code and the user’s OTP code.
- Step 1: Request a token, after which the server will receive
- If MFA is enabled and the authenticator has been already associated, we go through the following steps:
- Step 1: Request a token, after which the server will receive the error mfa_required.
- Step 2: Request the user authenticators to trigger a challenge.
- Step 3: Associate the authenticator with Auth0, a server will receive an error because the authenticator is already associated. Step 3a isn’t triggered here because an OTP is not yet obtained by the user.
- Step 4: Request the user challenge, which returns a temporary code for the server, sends the OTP to the user (step 4a), and repeats a request for the token (step 4b) with the server code and the user’s OTP code. In further authorization attempts, Step 3 can be omitted.
Now, let’s explore these steps in detail with code examples:
Step 1. Send a request to the /oauth/token endpoint. Without MFA, this endpoint should return the JWT immediately. If MFA is enabled, a user will be prompted to pass the challenge.
var axios = require("axios").default;

var options = {
  method: 'POST',
  url: 'https://dev-mt-ji-7q.us.auth0.com/oauth/token', // https://dev-mt-ji-7q.us.auth0.com is generated after application creation
  headers: {'content-type': 'application/x-www-form-urlencoded'},
  data: new URLSearchParams({
    grant_type: 'password', // authentication by user password
    username: '[email protected]',
    password: 'pwd',
    client_id: 'vFqyrkC6qz6gUyhPqL6rXBTjkY8jyN9a', // application client id
    client_secret: 'YOUR_CLIENT_SECRET', // application secret
    audience: 'https://example.com', // this is the API that was created earlier
    scope: 'email'
  })
};

axios.request(options).then(function (response) {
  console.log(response.data);
}).catch(function (error) {
  console.error(error);
});
If MFA is enabled, the response includes the mfa_required error and mfa_token. Then, we need to ask for available MFA user authenticators.
Step 2. Get MFA authenticators using the following code:
var options = {
  method: 'GET',
  url: 'https://dev-mt-ji-7q.us.auth0.com/mfa/authenticators',
  headers: {authorization: 'Bearer MFA_TOKEN', 'content-type': 'application/json'}
};

axios.request(options).then(function (response) {
  console.log(response.data);
}).catch(function (error) {
  console.error(error);
});Now, let’s get an array with the available authenticators for users:
[
    {
        "id": "email|dev_NU1Ofuw3Cw0XCt5x",
        "authenticator_type": "oob",
        "active": true,
        "oob_channel": "email",
        "name": "[email protected]"
    }
]
Step 3: Register the authenticator once per authenticator type.
Here’s how to make a request and associate the authenticator with the API:
var options = {
  method: 'POST',
  url: 'https://dev-mt-ji-7q.us.auth0.com/mfa/associate',
  headers: {authorization: 'Bearer MFA_TOKEN', 'content-type': 'application/json'},
  data: {authenticator_types: ['oob'], oob_channels: ['sms'], phone_number: '+11...9'}
};

axios.request(options).then(function (response) {
  console.log(response.data);
}).catch(function (error) {
  console.error(error);
});If the authenticator was not enabled earlier, we’ll receive a code in response and the user will receive the OTP:
{
  "authenticator_type": "oob",
  "binding_method": "prompt",
  "recovery_codes": [ "N3BGPZZWJ85JLCNPZBDW6QXC" ],
  "oob_channel": "sms",
  "oob_code": "ata6daXAiOi..."
}Then both the OTP and code should be provided to oauth/token (step 3b).
If the authenticator is already associated, we’ll receive an error and go to the challenge endpoint instead (see Step 4).
Step 4: Send challenge to the user:
var options = {
  method: 'POST',
  url: 'https://dev-mt-ji-7q.us.auth0.com/mfa/challenge',
  data: {
    client_id: 'YOUR_CLIENT_ID',
    client_secret: 'YOUR_CLIENT_SECRET',
    challenge_type: 'oob',
    authenticator_id: 'sms|dev_NU1Ofuw3Cw0XCt5x',
    mfa_token: 'MFA_TOKEN'
  }
};

axios.request(options).then(function (response) {
  console.log(response.data);
}).catch(function (error) {
  console.error(error);
});
When challenge is passed, the user receivers otp code (4a) and goes to step 4bStep 3b/4b: After the previous step (3a or 4a), the user will receive the OTP code that should be provided to /oauth/token:
var options = {
  method: 'POST',
  url: 'https://dev-mt-ji-7q.us.auth0.com/oauth/token',
  headers: {
    authorization: 'Bearer MFA_TOKEN',
    'content-type': 'application/x-www-form-urlencoded'
  },
  data: new URLSearchParams({
    grant_type: 'http://auth0.com/oauth/grant-type/mfa-oob',
    client_id: 'vFqyrkC6qz6gUyhPqL6rXBTjkY8jyN9a',
    client_secret: 'YOUR_CLIENT_SECRET',
    mfa_token: 'MFA_TOKEN',
    oob_code: 'OOB_CODE',
    binding_code: 'USER_OTP_CODE'
  })
};

axios.request(options).then(function (response) {
  console.log(response.data);
}).catch(function (error) {
  console.error(error);
});In response, we’ll receive the JWT:
{
  "id_token": "eyJ...i",
  "access_token": "eyJ...i",
  "expires_in": 600,
  "scope": "openid profile",
  "token_type": "Bearer"
}

Note: Steps 3b and 4b are the same step in practice but have been split into different steps here to facilitate better understanding of the authorization flow (see scheme A login flow with MFA). 2.1.2. Using a predefined login form
To use a predefined login form, we need to follow the Authorization Code Flow. In this scenario, we request the authorization code from the /authorize endpoint and pass our redirect_url to Auth0. The user will be prompted to log in using the Auth0 forms. After successful login, the user will be redirected to our API, which will exchange the authorization code for a JWT token.
Here’s how to get code:
var options = {
  method: 'POST',
  url: 'https://dev-mt-ji-7q.us.auth0.com/authorize',
  headers: {
    authorization: 'Bearer MFA_TOKEN',
    'content-type': 'application/x-www-form-urlencoded'
  },
  data: new URLSearchParams({
    response_type: 'code',
    client_id: 'vFqyrkC6qz6gUyhPqL6rXBTjkY8jyN9a'
    connection: null (Auth0 login form will be prompted),
    redirect_uri: 'link to application which will receive auth code',
  })
};

axios.request(options).then(function (response) {
  console.log(response.data);
}).catch(function (error) {
  console.error(error);
});Here’s how to get token for code:
var options = {
  method: 'POST',
  url: 'https://dev-mt-ji-7q.us.auth0.com/oauth/token',
  headers: {
    authorization: 'Bearer MFA_TOKEN',
    'content-type': 'application/x-www-form-urlencoded'
  },
  data: new URLSearchParams({
    grant_type: 'authorization_code',
    client_id: 'vFqyrkC6qz6gUyhPqL6rXBTjkY8jyN9a',
    client_secret: 'YOUR_CLIENT_SECRET',
    code: 'authcode',
  })
};

axios.request(options).then(function (response) {
  console.log(response.data);
}).catch(function (error) {
  console.error(error);
});2.2. Authorization
To build the authorization flow, we can use the express-oauth2-jwt-bearer SDK.
It requires creating middleware on the external API server initialized with the audience (https://example.com) and the issuer URL (https://dev-mt-ji-7q.us.auth0.com). The middleware checks the bearer, starting from the header. To additionally check permissions of an entity in the token, we can configure middleware for scope checking using the express-oauth2-jwt-bearer SDK.
const express = require('express');
const app = express();
const { auth, requiredScopes } = require('express-oauth2-jwt-bearer');

// Authorization middleware. When used, the Access Token must
// exist and be verified against the Auth0 JSON Web Key Set.
const checkJwt = auth({
  audience: 'https://example.com',
  issuerBaseURL: 'https://dev-mt-ji-7q.us.auth0.com/',
});

// This route needs authentication
app.get('/api/private', checkJwt, function(req, res) {
  res.json({
    message: 'Hello from a private endpoint! You need to be authenticated to see this.'
  });
});

const checkScopes = requiredScopes('get:users');

app.get('/api/users', checkJwt, checkScopes, function(req, res) {
  const auth = req.auth;
  const userData = await UserDAO.getById(auth.payload.sub);
  res.json(userData);
});

app.listen(3000, function() {
  console.log
}The authentication process is simple, as we can fully rely on the Auth0 API to check tokens and permissions.
2.3. RBAC
Auth0 offers two ways for ensuring role-based access control:
- Using the authorization core
- Using the RBAC extension
When we use the authorization core, Auth0 allows us to enable RBAC for our APIs created within Auth0. To enable RBAC functionality, we can use either the Dashboard or the Management API (programmatically).
Here’s what we need to do to use the authorization core scheme:
- Register the API within the Auth0 application
- Create custom permissions within the API (in terms of Auth0, every API which delimits different external services has its own set of permissions)
- Create custom roles
- Assign permissions to roles
- Assign roles to users
- Assign permissions to users directly
We can create and assign roles and permissions through the dashboard or programmatically. Roles and permissions can be included in a token if required to validate them during the authorization process.
In addition to the core authorization approach, the RBAC extension creates another type of resource called groups and rules:
- A rule is arbitrary JavaScript code used as an authorization hook that can be applied to extend default authorization behavior when authenticating a user. Enabled rules will be executed at the final step of the authentication process. Rules can be used to deny access for specific users under certain circumstances or to ask for information from third-party services.
- Groups are departments of users.
You can learn more about the RBAC extension on the Auth0 website.
2.4. Brute-force and bots protection
Brute-force protection safeguards organizations against a single IP address attacking a single user account. When the same IP address tries and fails multiple times to log in as the same user, brute-force protection does the following:
- Sends an email to the affected user
- Blocks the suspicious IP address from logging in as that user
Brute-force protection applies to all users, including tenant administrators. If an IP address is blocked due to brute-force protection, it remains blocked until one of these events occurs:
- An administrator removes the block
- An administrator raises the login threshold
- 30 days pass
- The affected user selects the unblock link in the email notification (if configured)
- The affected user changes their password (on all linked accounts)
You can activate and customize functionality for brute-force and bots protection in the Auth0 dashboard.
2.5. Audit logs
Auth0 enables you to view all tenant-related logs from the dashboard as well as to gather some logs in real time through hooks.
Currently, hooks only support basic operations such as user pre-registration and user post-registration. To send all possible logs to the external storage, we can configure it through the dashboard and move logs to the AWS CloudWatch service.
2.6. Backup possibilities
Auth0 does their own backups for recovery purposes, but there are no ways to do the same by ourselves except for exporting users to a file through an API call.
Once we’ve explored how to configure functionalities for our cloud-based IAM service with help from Auth0, let’s proceed to a similar example that involves using another cloud service called AWS Cognito.
3. Building a cloud-based IAM service using AWS Cognito
AWS Cognito is another example of a cloud-based identity and access management service that helps organizations avoid creating a self-hosted IAM solution from scratch. AWS Cognito provides easy and secure user registration, access control, and user identity management.
This service scales up to 40 million users and supports authentication via social accounts such as Facebook and Google. Within AWS Cognito, identities are managed through two types of pools:
- User pools refer to directories of users like logical organization/departments, etc.
- Identity pools. It’s essential to create an identity pool if you need to adjust the RBAC feature. These pools provide access to other AWS resources for logged in users.
User pools offer the following functionalities:
- Registration
- User groups
- Login/logout
- Password recovery
- MFA
The very first thing to do is set up AWS Cognito for integration:
1. Create a user pool. We won’t go into detail about how to create a pool, since the process is pretty intuitive. It’s kind of like taking a quiz that asks you to choose different pool options depending on your needs.
So, let’s only outline the most important settings:
- What data is required to sign in
- What user attributes should be present in the token
- Sign-up password rules
- Whether MFA is required
- Whether it’s required to verify a user’s mobile phone number or email
Let’s assume we’ve created a pool named Developers where:
- Users can log in with an email address
- Email addresses should be verified
- A user’s profile will contain the user’s first name and last name, email, and phone numbers
- The password policy requires at least 8 characters
- MFA is enabled through SMS
2. Create an application client that is a part of the authentication process. During its creation, we’ll be asked to customize the token’s time to live (TTL). To do that, go to General settings -> App clients -> Add an app client.
After that, we’ll see an App integration option. Here’s what we need to do next:
- Go to App integration -> App client settings and set a callback URL (which is our API server that will receive an authorization code during the authentication process) and enable the Authorization code grant option. In the Allowed OAuth Scopes section, choose email and openid.
- Go to App integration -> Domain name and provide our domain name. This name will be part of the base URL for the authentication link. The name should be unique within the AWS Cognito space.
After these steps, we end up with the following:
- A base URL for authentication in our application, like https://<domain>.auth.us-<region>.amazoncognito.com
- clientId/clientSecret
- user pool identifier
- redirect URL, e.g. for receiving authorization codes
3.1. Authentication
Here, we have two options to manage authentication:
- Use the self-hosted UI forms and manage all API calls manually through amazon-cognito-identity-js or aws-amplify. This can be done completely serverlessly, but we won’t show how to do it here because this is a complex topic that requires a separate article.
- Use the Cognito-hosted UI forms and call Cognito via plain HTTP
AWS Cognito supports various types of authentication flows such as plain OAuth with different grant types and OIDC (e.g. Google).
Let’s take a look at authentication over OAuth with the authorization code grant type. A typical login workflow in such a case looks the same as described in the Auth0 section, except that login forms are loaded from AWS Cognito.
Let’s look closer at how to use the Cognito-hosted UI and plain HTTP:
1. A web server requests the login page from AWS Cognito:
This login page contains the following:
- BASEURL=iamtest.auth.us-east-1.amazoncognito.com, which includes pages hosted by Cognito. The pages can be customized in the UI customization section. We’ll use default pages.
- /login to sign in to the endpoint
- client_id=7ou2226v1vvlp5obm34k0omt39, which is our public application ID
- response_type=code, which is the OAuth grant type authorization code that will be sent to the API server in exchange for tokens
- scope=email+openid, which is an access token that will be limited to this scope
- redirect_uri=https://example.com, which is a self-hosted resource server that will receive the authorization code
2. A user provides credentials to the website, clicks log in, and provides the OTP code (if MFA is enabled). Then, AWS Cognito redirects the user to redirect_uri with the authorization code:
https://example.com/?code=13fc34f7-5334-46e6-a77a-75fb52ab37b33. Here’s how the API server exchanges code for tokens:
const res = await fetch(`https://iamtest.auth.us-east-1.amazoncognito.com/oauth2/token`, {
    method: "POST",
    headers: new Headers({"content-type": "application/x-www-form-urlencoded"}),
    body: Object.entries({
        "grant_type": "authorization_code",
        "client_id": clientId,
        "code": auth_code,
        "redirect_uri": redirect_uri,
    }).map(([k, v]) => `${k}=${v}`).join("&"),
});
if (!res.ok) {
    console.log(await res.json());
}
const tokens = await res.json();The JSON returned in the resulting response has the following keys:
- id_token – A valid user pool ID token. The ID token is only provided if the openID scope was requested.
- access_token – A valid user pool access token.
- Refresh_token – A special token used to obtain additional access tokens.
4. API server redirects to the logout page:
https://iamtest.auth.us-east-1.amazoncognito.com/logout?response_type=code&client_id=7ou2226v1vvlp5obm34k0omt39&redirect_uri=https://example.comNow, let’s take a look at how to use the SDK:
import { Auth } from 'aws-amplify';

/*1. Login initiated*/
async function initSignIn() {
  try {
    const user = await Auth.signIn(username, password);
    // todo: cache user
    if (
      // since we enabled SMS only
      user.challengeName === 'SMS_MFA'
    ) {
      throw new Error MFARequired(user.challengeName);
    } else {
      // The user signs in without challenge
      console.log(user);
    }
  } catch (err) {
    if (err.code === 'UserNotConfirmedException') {
      // User is not confirmed
    } else if (err.code === 'NotAuthorizedException') {
      // incorrect password
    } else if (err.code === 'UserNotFoundException') {
      // User does not exist in Cognito pool
    } else {
      console.log(err);
    }
  }

/*2. User provides code through UI*/

/*Login confirmed*/
async function confirmSignIn(code) {
  try {
    // get user from cache
    const loggedUser = await Auth.confirmSignIn(
        user, // object from Auth.signIn()
        code, // Confirmation code
        'SMS_MFA'
    );
  } catch (err) {
    console.log(err);
}3.2. Authorization
There are lots of helpful libraries to manage authorization via AWS Cognito. To authorize a user on our own resource server, we can use the aws-jwt-verify library. We need to provide application and user pool identifiers to validate the access token.
Also, we can completely rely on the aws-jwt-verify library because it will perform the following checks on our behalf:
- Automatically fetch .well-known/jwks.json from https://cognito-idp.{region}.amazonaws.com/{userPoolId}/.well-known/jwks.json and validate the signature using the key that matches the “kid” part from the access token header
- Check that the token is not expired
- Compare the aud claim from the payload with our application ID that is bound to the user pool
Here’s how to enable the authorization mechanism using AWS Cognito:
import { CognitoJwtVerifier } from "aws-jwt-verify";

const validateAuth = async (req, res, next) => {
  / Verifier that expects valid access tokens:
  const verifier = CognitoJwtVerifier.create({
    userPoolId: "<user_pool_id>",
    tokenUse: "access",
    clientId: "<client_id>",
  });

  try {
    if (req.headers.authorization && req.headers.authorization.split(" ")[0] === "Bearer") {
      const payload = await verifier.verify(
        req.headers.authorization.split(" ")[1] // JWT
      );
      req.context = payload; // for the later usage
    } else {
      // no token
      res.status(401).send("unauthorized")
    }
  } catch {
    console.log("Token not valid!");
  }

  next();
}3.3. RBAC
The role-based access control feature in AWS Cognito works through IAM roles/policies. You can use RBAC to control access only to AWS resources, such as S3 buckets and DynamoDB, configured under a root account. Scenarios that allow or deny other AWS users to use AWS services configured by the same account that has configured the Cognito-based IAM solution are outside the scope of this article.
However, if we need to define a logical set of permissions, it can be achieved only partially through Cognito groups. We can create groups in the pool settings and assign users to each group. To do that, we need to choose our pool in the AWS console and go to Users and groups → Create group → Add users.
Then, our resource server will receive user groups from the access token claim named cognito:groups and will map each group to some set of permissions. Unfortunately, there is no way to define custom permissions via Cognito. The resource server will have to define them and map them to groups by itself.
3.4. Brute-force and bots protection
Security measures offered by AWS Cognito include failed login attempts and other operations that require authorization counts. Once the limit of such counts is achieved, the security mechanisms will block certain operations for some time. This is called a lockout, and the lockout time grows exponentially from 1 second to 15 minutes as the number of failed login attempts increases.
Unfortunately, these native checks provided by AWS Cognito can’t be customized. But you can add your own strategy using the pre authentication trigger via AWS Lambda.
3.5. Audit logs
Logging and monitoring in AWS Cognito can be achieved by combining AWS CloudTrail with AWS CloudWatch.
AWS CloudTrail allows you to track actions taken by users, roles, and AWS services through capturing API calls and reporting them as events. Then, you can activate alarms for specific CloudTrail events in CloudWatch.
3.6. Backup possibilities
Partially backing up user pools is possible via the Cognito User Profiles Export feature. This feature uses AWS Step Function and DynamoDB to periodically export users and groups from the user pool to the DynamoDB table that should be enabled in the same region as the user pool.
Such a solution doesn’t export sensitive data such as passwords, user pools with MFA enabled, and IAM roles attached to Cognito groups.
Which development option to choose: comparison of results
Now that we’ve explored all three ways to build an IAM service, let’s summarize the results of our IAM services comparison.
A custom on-premises IAM solution based on OIH is a good choice for comparatively simple and cheap identity and access management solutions and for those who need to control every aspect of how their system works.
But when developing such a system, you’ll have to focus on source code support as well as managing the backend infrastructure. All aspects of such a solution should be controlled by engineers who implement and support it.
Building an IAM solution on cloud providers could help you avoid physical maintenance costs while ensuring uptime along with distributed and redundant systems.
Both AWS Cognito and Auth0 provide a wider range of possibilities to cover multiple needs, offer the ability to scale with minimal effort, and allow you to focus on what you need instead of how to do it.
Also, they help you accelerate development by providing a fancy UI to conveniently set up many aspects of your IAM solution and offer ready-made user interfaces like sign-up and sign-in forms.
Let’s put the results of our comparison of identity and access management services development approaches in a table to see differences among the most important criteria:
| Features | Custom-made (OIH) | AWS Cognito | Auth0 |
|---|---|---|---|
| Multitenancy | + | + | + |
| MFA | – | + | + |
| Brute-force protection | – | + | + |
| Ready-made templates (login, logout, etc.) | – | + | + |
| Login through third-party services | + | + | + |
| SDKs over API | – | + | + |
| Free tier limits | No limits | First 50,000 users are free | First 7,000 users are free |
| Ability to update the solution and make critical configuration changes | + Full access to the code and storage | +/- Some options can be set only during the creation of an AWS Cognito user pool (tenant space) in the AWS administration panel | + All types of resources can be modified at any time |
| Registration | Users can be created only by a user-tenant | Users can sign up by themselves or can be imported from a CSV file; user accounts can be created by an admin and invited to sign in | Users can sign up by themselves; user accounts can be created by an admin and invited to sign in |
| Authentication | Basic, OIDC | Basic (+ authorization code flow), OIDC, passwordless | Basic (+ authorization code flow), OIDC, passwordless (SMS or email) |
| Authorization | JWT-based (self-made authorization strategy) | JWT-based through an SDK | JWT based through an SDK |
| RBAC | + Manually configured set of roles and permissions | + Groups can be configured and treated as roles but no permissions can be assigned to roles | + Manually configured set of roles and permissions |
| Integration efforts | Code should be audited and issues should be fixed. All IAM components need to be deployed manually. Any changes should be made directly in the source code. No SDK to access IAM API. UI forms are not provided. | Manual configuration over the AWS Console. No need to host your own backend solution and rewrite sources. SDKs are available: AWS Amplify and other libraries as an entry point to core features. UI forms are provided out of the box and can be customized. | Manual configuration over the Auth0 dashboard. No need to host your own backend solution and rewrite sources. Manual authentication implementation is required only when using your own legacy database (integration with a self-hosted database). SDKs are available: the express-oauth2-jwt-bearer library. Customizable UI forms are provided out of the box. |
| Events/logging | Using RabbitMQ | Using AWS Lambda, CloudTrail, and CloudWatch | Limited set of actions can be caught through hooks. Supports integration with CloudWatch. |
| Pricing | Free | The first 50,000 users are free. For more, Cognito charges per user. AWS Simple Notification Service has pricing schemes for MFA via SMS. | The first 7,000 users are free. There are three pricing options with free tier limits of 7,000 and 10,000 users. An enterprise plan with extended features and unlimited users is available. |
Note: Once you set options when creating an AWS Cognito user pool in the AWS administration panel, these options are disabled and can’t be changed easily. If you need to make changes, you should delete the whole instance and create a new one, which can be resource- and time-consuming.
Conclusion
Choosing whether to build a custom or cloud-based IAM solution can be challenging. To deliver an efficient and secure identity and access management solution, you need to clearly understand the goals and nuances of organizations that will use it. It’s also vital to know the existing development approaches, opportunities they offer, and their pros and cons.
At Apriorit, we have experienced development teams ready to help you with creating cloud-based or on-premises applications of any complexity. We also have expertise working on various cybersecurity solutions.
Contact us to start discussing your project and start developing robust and competitive products!
Have a question?
Ask our expert!
VP of Innovation and Technology, Canada Branch Director


