 Skip to main content

With the ever-increasing number of internet-connected devices, the demand for Internet Protocol (IP) addresses has outpaced the supply of Internet Protocol version 4 (IPv4) addresses, leading to the adoption of Internet Protocol version 6 (IPv6) to lessen the load on IPv4 addresses.
Using IPv6 in your virtual private network (VPN) service can help you achieve better security, support more features, and access larger address space. This protocol can future-proof your solution, enable it to function in specific 5G networks, and support IPv6-enabled corporate and private networks.
In this article, we show how to add IPv6 support to a per-app VPN after explaining the differences between the IPv4 and IPv6 protocols. In our example, we add IPv6 support through Network Address Translation 64 (NAT64) even when we can’t directly access IPv6 networks, and explain what purpose does NAT64 serve in IPv6. You can use the method we present here in restricted environments where fine-grained control over networking might not be possible. Restricted environments are those where only IPv6 or only IPv4 networking is available. In such environments, it is impossible to reach certain target servers that exist in the unsupported address space.
Contents:
An introduction to virtual private networks
VPN technology allows multiple computers to connect securely and privately over the internet via software-defined virtual networks. Those virtual networks are created independently of the physical topology of the underlying physical network infrastructure. You can achieve this in the following steps:
- Tunnel traffic between virtual network interfaces that package and relay VPN packets over the physical network
- Abstract this entire process to VPN clients
Here is an example of a simple VPN setup:
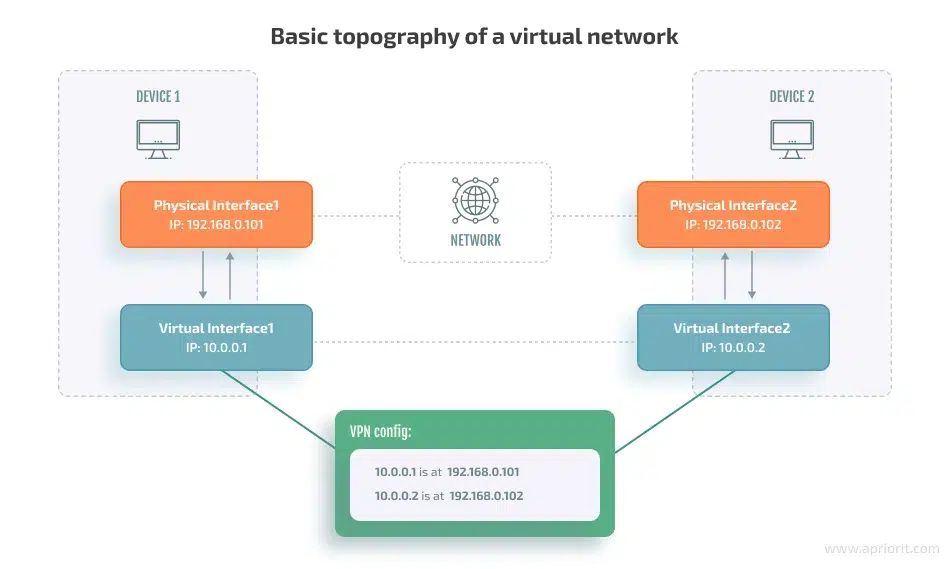
In this setup, if Client device 1 wants to send data to Client device 2, here is what happens:
- Client device 1 can use the 10.0.0.2 address to send packets to the VPN server via its VPN interface.
- The interface consults its configuration information and figures out the next destination for the packet. When the interface has to send the packet to another physical host, a physical interface, which is a network adapter of the VPN server, transmits the entire packet along with headers.
- This new packet contains routing information for the physical network.
- The target host receives the new packet, unpacks the original VPN packet, and continues routing in the same manner.
Here is what the wrapped packet looks like:
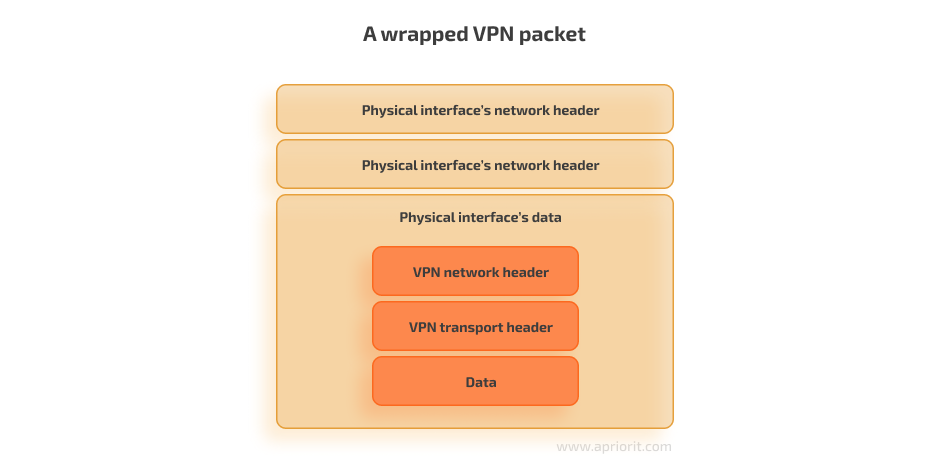
Note that the software implementation of the VPN interface generates the physical interface’s packet, allowing it to carry out additional actions on VPN packets before they are routed. For example, the physical interface’s packet can encrypt the entire payload so that physical hosts won’t be able to access the nested VPN packet, which is a packet that has been encapsulated within another VPN packet.
This idea of nesting packets before routing them can also be applied to regular packets. Here is how this idea would work in this case:
- The VPN service asks the operating system to route packets through its virtual interface.
- The VPN interface routes the packets according to its configuration file.
For example, the VPN interface can send packets to a VPN server that unpacks the arriving packets, proxies them to the original destination, and returns the responses to the VPN client.
This is the scenario that most people think about when considering how a VPN works. Virtual private networks allow outbound traffic of the client to be encrypted and proxied to provide an additional level of security and hide information from the client’s internet service provider (ISP).
VPNs are implemented with the help of communication protocols, encryption, and authentication that assists in encrypting and transmitting data securely over the internet. In the next section, we discuss what communication protocols are crucial for implementing a VPN solution.
Overview of IPv4 and IPv6, and their connection to VPNs
Most VPN implementations operate on the network layer of the Open Systems Interconnection model. According to this model, VPN implementations process IP packets and handle their routing. This requires the software behind the VPN network interface to implement the Internet Protocol and possibly also a handful of transport layer protocols.
A network protocol is a set of rules that describe the structure of the data and how peers should handle it. The Internet Protocol is a specific network protocol that enables the communication between devices on the internet. When working with VPNs, you typically need to work with several protocols, such as the Internet Protocol or Transmission Control Protocols (TCPs) that facilitate secure communication between devices over the internet. Both IPv4 and IPv6 are used in VPNs to transmit data between devices. Also, the implemented TCP can reconstruct TCP packets from raw bytes received from the network and create new TCP packets that are consistent with the rules of the TCPs.
Implementing a network communication protocol usually includes the following steps:
- Writing functions for creating and parsing packets
- Implementing a state machine that changes based on the contents of processed packets
The method of delivering packets is not a part of the protocol and can be taken care of outside of the protocol implementation process.
Now, let’s take a closer look at two particular protocols: IPv4 and IPv6. These are the dominant internet protocols, with IPv4 being the most used and IPv6 being the most recent.
IPv6 vs IPv4: What is the difference?
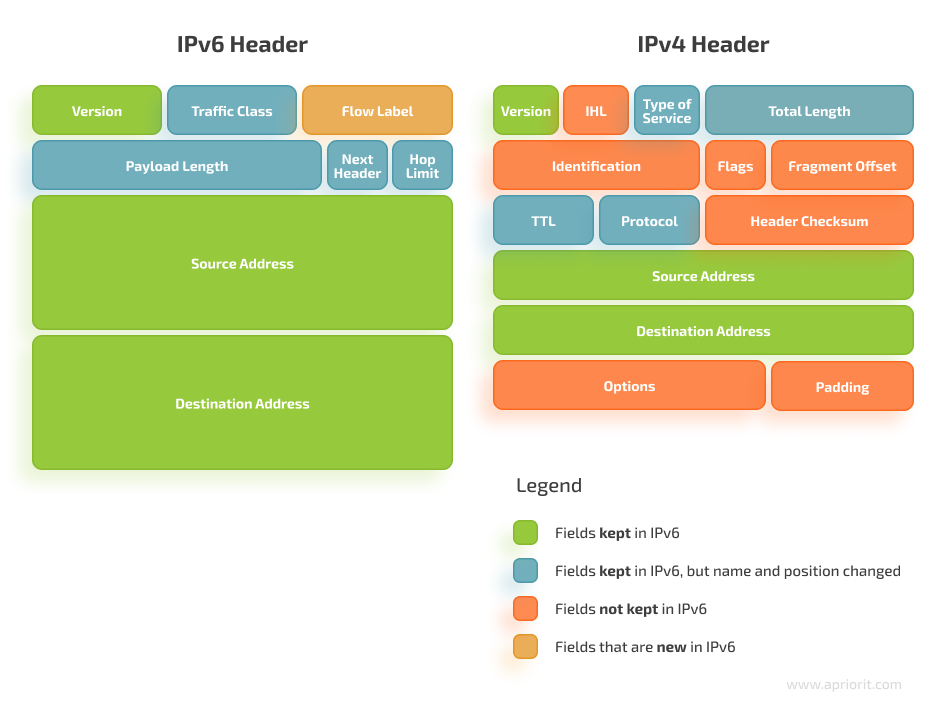
IPv4 is the most widely used protocol in the world right now, even though it’s not the most recent version of the Internet Protocol. IPv4 addresses are 32-bit numbers represented in decimal notation as four sets of numbers separated by dots; for example, 192.168.0.1.
IPv4 supports a maximum of approximately 4.3 billion unique addresses since the address field is only 4 bytes (or 32 bits) long. IPv6 uses 128-bit addresses and provides a much larger address space. This is the main advantage of IPv6 over IPv4. Since the number of devices connected to the internet surpassed the 4 billion mark a long time ago, the IPv4’s address space is completely exhausted. In IPv6 networks, the number of possible addresses is 2^128, or about 340 sextillion, which is approximately 79 trillion times greater than 4.3 billion. There are also several important benefits of transmitting IPv6 traffic over an IPv4 network:
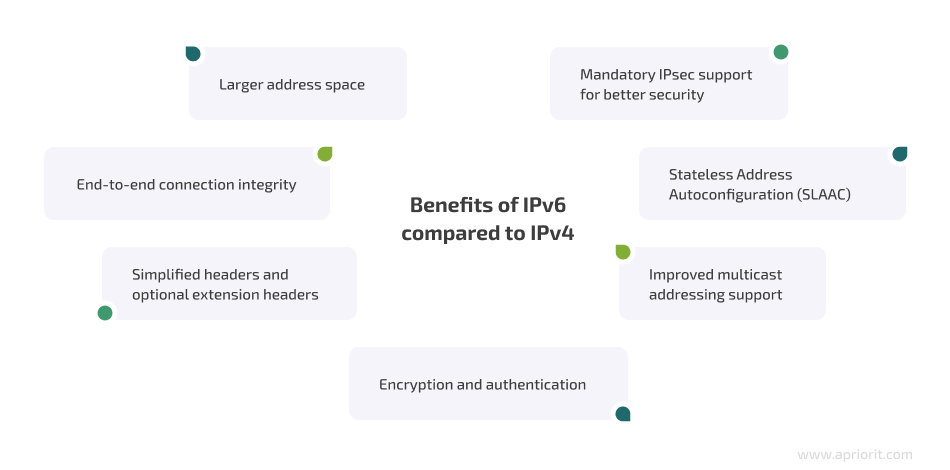
The base IPv6 header contains only the most vital information for the protocol to function. If a peer needs extra information to be carried in the header, they can chain various optional headers together. This approach reduces the overhead for the most common use cases of the protocol, such as sending a packet from A to B.
Now that you know the main benefits of switching to the IPv6 protocol, let’s take a look at how to route IPv6 traffic over an IPv4 infrastructure.
Improving VPN security with IPv6
To introduce any protocol, you need to go through the documentation and implement the state machine and the functions for processing packets that are specific to the chosen protocol. But you might also experience some issues during this step. Let’s take a look at a standard mechanism for implementing IPv6 support in a VPN service.
As you allow IPv6 traffic from IPv4, you can achieve the following:
- Allow client apps to reach servers on the IPv6 network
- Support networking in IPv6-only environments
The process of implementing the IPv6 protocol is straightforward. The VPN service gets all client data from its virtual network interface that is managed by the operating system. This data includes the actual protocol headers up to the IP header, which the VPN service has to handle. The VPN service also must be able to construct response packets based on information received from the virtual network interface.
With the IPv6 protocol, processing packets is fairly simple:
- The VPN service stores the original header until it fetches the response from the target server.
- The VPN service reuses the header to construct a response packet by swapping the source and destination addresses and updating the payload-dependent fields.
- The new header is prepended to the response data and written back into the virtual interface for the operating system to handle.
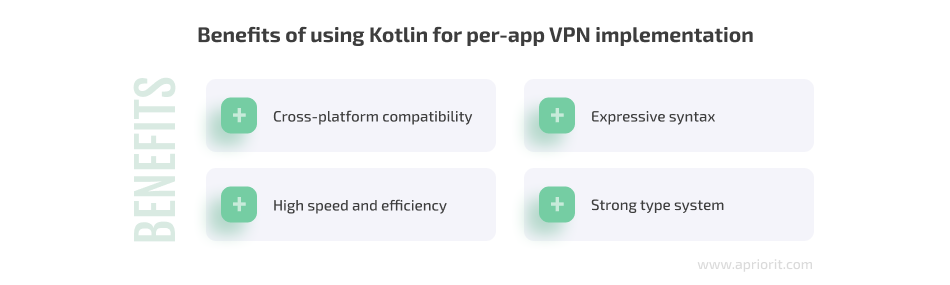
There are other programming languages that you can use for implementing a VPN service in your app, such as C/C++, Java, Python, and Rust. For this article, we explore a Kotlin implementation of a VPN service. Kotlin has some benefits when you need to implement a per-app VPN, which allows you to create a separate VPN connection for each app isolating the web traffic:
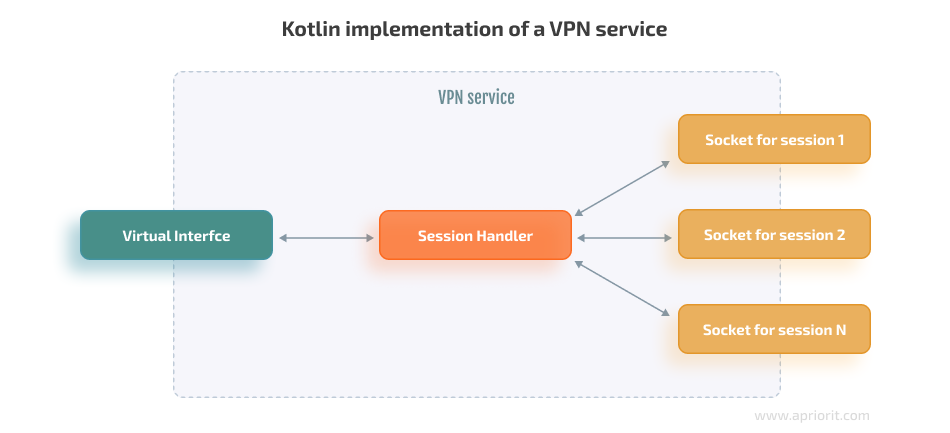
Say that our VPN service has direct access to a virtual network interface’s file descriptor. The service proxies packets to the outside world by forwarding their payloads through a number of sockets. The sockets themselves and the related metadata are stored in the Session abstraction. Then, the packets are processed by the SessionHandler class.
Here’s what the SessionHandler class does when processing the packets:
- Parses the packets
- Decides what to do with them based on information stored in the corresponding session
- Forwards the contents of the packets
- Handles the responses
- Repackages the responses for the client before putting them back into the network interface
Since the virtual network interface is represented by a file descriptor, receiving packets from it is as easy as reading data from a regular file:
fun readPackets(pfd: ParcelFileDescriptor, shutdownCondition: () -> Boolean): ByteArray {
    // preallocate a buffer to read the new packets into
    val readBuffer = ByteBuffer.allocate(VPN_TUNNEL_MTU)
    // create an input stream for the underlying raw file descriptor
    val stream = FileInputStream(pfd.fileDescriptor)
    // read packets and process them until a shutdown condition is met
    while (!shutdownCondition()) {
        // read bytes from the stream into the underlying byte array of the readBuffer method
        length = stream.read(readBuffer.array())
        // trim the buffer to the exact length of the received packet and reset the position of the internal buffer's counter so that it points to the first byte
        packetBuffer.limit(length)
        packetBuffer.position(0)
        // transfer the packet into a new array that matches the packet's size exactly
        val packet = ByteArray(length)
        packetBuffer.get(packet)
        // pass the packet to the session handler for processing
        SessionHandler.process(packet)
    }
}The raw bytes are hard to work with, especially when you need to interpret and manipulate them as a complex data structure like a protocol header. In Kotlin, it’s possible to create thin wrappers that can interpret the raw bytes and provide an easy interface for changing the header’s fields. Such wrappers provide functions that correspond to each field in the header, offering easy read and write access to them.
You can also turn all of these functions into fields with custom getters and setters. In this case, the client code working with a wrapper will look like it’s manipulating a regular data class. Here’s what a wrapper for an IP header looks like:
class IPWrapper(bytes: ByteArray) {
    // wrap the bytes into the ByteBuffer class for easier byte manipulation and extra functionality
    // be sure to account for the ByteBuffer's statefulness and specify indices explicitly when accessing
    // the bytes
    private val buffer = ByteBuffer.wrap(bytes).order(ByteOrder.BIG_ENDIAN)


    // the IP version is stored in the first 4 bits of the header
    var ipVersion
        // to get it, read the first byte and shift it by 4 bits to the right
        get() = (buffer.get(0).toInt() shr 4)
        // and to set it, shift the desired value to the left by 4 bits and perform the bitwise shift OR
        // on the first byte of the underlying byte array
        set(value) { buffer.put(0, ((value shl 4) or (buffer.get(0).toInt() and 0x0F)).toByte()) }


    // IPv4 and IPv6 headers contain different fields, so if client code attempts to access a field that
    // is not present in the underlying packet, throw an exception
    var headerLength
        get() =
            // check the ip version by calling the ipVersion member declared earlier
            if (ipVersion == 4) (buffer.get(0) and 0x0F)
            // IPv6 header does not have a field for the header length, so there is no value this getter can return
            else throw Exception("IPv6 doesn't have a Header Length field!")
        set(value) {
            // similarly, if the field is there, set it
            if (ipVersion == 4) buffer.put(0, ((value and 0x0F) or (buffer.get(0).toInt() and 0xF0)).toByte())
            // if it's not, throw an exception
            else throw Exception("IPv6 doesn't have a Header Length field!")
        }


    // IP headers can be of different versions, and it's convenient to have a single wrapper class
    // for both IPv4 and IPv6
    var srcIp
        get() = InetAddress.getByAddress( run {
            val (startPos, len) =
                if (ipVersion == 4) listOf(SOURCE_IP_POS_IPV4, ADDR_LEN_IPV4)
                else listOf(SOURCE_IP_POS_IPV6, ADDR_LEN_IPV6)
            // when getting the IP address, simply copy the bytes that represent it and pass the result
            // into Java's InetAddress.getByAddress function that will do the rest of the parsing
            buffer.array().copyOfRange(startPos, startPos + len)
        })
        set(value) {
            value.address.copyInto(
                buffer.array(),
                if (ipVersion == 4) SOURCE_IP_POS_IPV4
                else SOURCE_IP_POS_IPV6
            )
        }


    // do the same for the destination address
    var destIp
        get() = /* ... */
        set(value) =  /* ... */


    // other fields can be implemented in a similar fashion

    /* ... */

    // this wrapper can also have various convenience functions; for example, it can provide
    // means for easily getting the wrapped packet's headers to quickly create response headers
    fun copyHeaders() = /* ... */
    // or handle the checksum computations for the IP and the nested transport headers
    fun updateChecksums() = /* ... */
}As soon as the SessionHandler class receives the packet, it can put packet bytes into the IPWrapper object and use the IPWrapper class to access any information it needs from the IP header. For example, when creating the response packet, the SessionHandler class can simply copy the header and update the fields instead of creating a completely new header:
fun createResponsePacket(lastPacketFromClient: IPWrapper, payload: ByteArray) =
    // call the IPWrapper constructor and pass to it the copied headers plus whatever data the VPN service needs to send
    // then use Kotlin's apply function to modify the resulting byte array in place using the wrapper's functionality
    IPWrapper(lastPacketFromClient.copyHeaders() + payload).apply {
        // addresses in the response packet should be swapped
        srcIp = lastPacketFromClient.destIp
        destIp = lastPacketFromClient.srcIp
        // IPv4 has an identification field in its header while IPv6 uses a separate extension header.
        // client code should attempt to set the identification number regardless of the protocol number but
        // expect this operation to fail for IPv6 because the extension header might be missing
        try {
            identification = getIdentification()
        } catch (e: Exception) {
            Log.i("Failed to set identification number: $e")
        }
        // IPv4 has a field for the packet's total length while IPv6 has a field payload length. client code is expected
        // to be aware of these differences and handle them correctly
        if (ipVersion == 4) {
            totalLength = bytes.size
        } else {
            payloadLength = (bytes.size - IPv6_FIXED_HEADER_LENGTH).toUShort()
        }

        // IP packets usually have some kind of transport packets nested inside them. those headers also have to be handled
        // in a similar fashion to the IP headers:
        updateTransportHeader(this)

        // when all fields in the headers have been updated, it’s safe to update all the checksum fields
        updateChecksums()
}You can write the resulting response packet back into the VPN’s network interface:
fun sendResponsePacket(pfd: ParcelFileDescriptor, packet: IPWrapper) {
    // create an output stream to write the bytes back into the network interface’s file descriptor
    val stream = FileOutputStream(pfd).fileDescriptor
    stream.write(packet.bytes)
}Once the SessionHandler class has put the packet’s bytes into the IPWrapper class, the routing software will parse the IP header generated by the VPN service and route the packet to its destination. In this case, the destination is the local application that had its outbound traffic redirected to the VPN’s network interface by the operating system’s routing rules.
Now, let’s see how you can check your VPN with the support of IPv6 if you only have access to IPv4 networks.
Testing IPv6 implementation with NAT64
While implementing the protocol was relatively simple, testing it is where the real challenge begins. So, how are NAT64, IPv4, and IPv6 connected with each other?
IPv6 is clearly superior to IPv4, but the infrastructure for supporting IPv6 is not there yet. A lot of ISPs across the world still don’t have support for IPv6 so they can’t convert IPv6 to IPv4 and vice versa. As a result, their clients are unable to access any servers that use IPv6. The opposite situation also exists: there are networks that operate only with IPv6 and don’t process IPv4 packets.
To solve these incompatibility issues, you can use one of the following transition mechanisms:
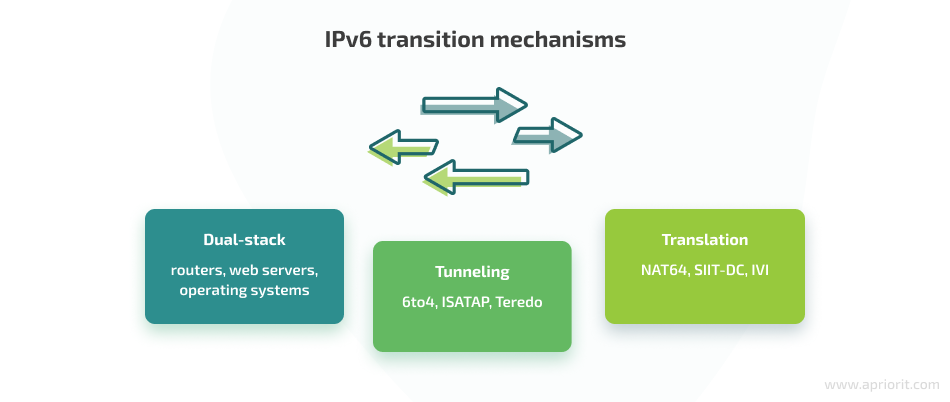
For the approach described below, we used NAT64 — a translation mechanism that maps all 4 billion IPv4 addresses to a reserved chunk of the IPv6 address space. Our client specifically requested using NAT64 to translate between IPv4 addresses and IPv6 addresses.
Let’s see how this mechanism works in practice and what does NAT64 do for IPv6. Say a router connecting networks that use different IP versions receives an IPv6 packet with a destination address from the NAT64 range of addresses. Here is what happens next:
- The router removes the 96-bit-long NAT64 prefix from the received IPv6 packet, leaving 32 bits of the IPv4 address.
- After that, the router creates a new IPv4 header for the packet so it can continue traveling through the network.
The same happens when a router receives an IPv4 packet and has to route it through an IPv6 network:
- The router transforms the IPv4 address into an IPv6 address by prepending a NAT64 prefix.
- The router recreates the IP header for the packet and then routes the packet through the IPv6 network.
You can use these transition mechanisms to test the IPv6 implementation, especially in places where IPv6 networks are unavailable. To see how your VPN service handles IPv6 packets in an IPv4-only environment, open IPv6 sockets with destination addresses from the NAT64 range on your service’s VPN interface:
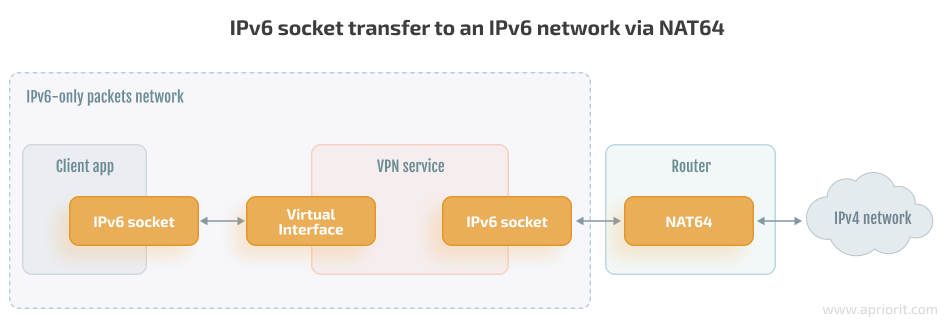
If your VPN service operates appropriately, it will receive those packets and process them as if they were regular IPv6 packets. And when those packets are finally routed via physical network interfaces, they will reach a router that will convert them into regular IPv4 packets. Then, your VPN service will be able to receive the response data from the destination service, create a response IPv6 packet for the client, and send it via its virtual interface.
Conclusion
While IPv4 is still more popular, IPv6 offers more benefits for both users and developers. In this article, we explain why you need to convert IPv4 into IPv6 in your application and how you can add support for NAT64 to your app. Using NAT64 to map IPv6 addresses to IPv4 destinations is also permitted in restricted environments where you don’t have full control over the network.
Even though the approach presented in this article is tailored for per-app VPN services, Apriorit developers can offer you alternative ways to enhance your application’s security and performance, as well as network monitoring and management. Together, we can help your product achieve maximum security, speed, and efficiency!
Reach out to discover how your software can benefit from our expertise!
Have a question?
Ask our expert!
Program Manager


