 Skip to main content
Minifilter drivers are must-have components of Windows development projects that are necessary to control or change system behavior. Compared to legacy file system filter drivers, minifilters require less code, improve communication within the system, and lower security and misconfiguration risks.
In this article, we guide you through file system minifilter development using a practical example — a minifilter that shows opened files in the debug output and prevents unauthorized access to files and processes. To illustrate the simplicity and effectiveness of the minifilter approach, we use the example from our article on file system driver development.
This Windows file system minifilter driver development tutorial will be useful for C/C++ developers and Windows device driver developers.
Contents:
What are minifilters in Windows?
Filter drivers in Windows are used to control and modify the behavior of one or several devices. There are two types of filter drivers: legacy file system filter drivers and minifilter drivers. A legacy Windows file system filter driver can directly modify file system behavior and is called during each file system input/output (I/O) operation.
A minifilter driver connects to the file system indirectly by registering all needed callback filtering procedures in a filter manager — a Windows file system filter driver that that gets activated and connects to the file system stack only when a minifilter is loaded. The filter manager calls the filtering procedures registered by a minifilter for a specific I/O operation.
While legacy file system filter drivers are still used in many products, Microsoft recommends replacing them with minifilters for several reasons:
- Minifilters don’t have direct access to the file system, which makes them safer if a malicious actor gets unauthorized access to the system.
- Minifilters are much easier to develop and use than their legacy alternatives.
- While legacy filters often have cooperation issues, the filter manager ensures proper communication between filters, reducing conflicts between drivers from different vendors.
- Minifilters can be dynamically loaded, unloaded, or updated without rebooting the system.
Minifilters are often used in the development of cybersecurity products like firewalls, activity monitoring, antivirus solutions, backup systems, file and storage management, and virtualization software.
In our previous article, we showed how to develop a Windows file system driver that displays the names of opened files in the debug output. To help you compare legacy drivers with minifilters, as well as to demonstrate the minifilter development process, we’ll develop a minifilter driver example that accomplishes the same task.
Control your devices and solutions at the lowest level
Apriorit experts will help you develop custom drivers and integrate them with existing and legacy systems, or design a completely new low-level solution that fits your needs.
Implementing a file system minifilter driver
Before we start development, we need to install Visual Studio 2022 with all available SDKs and the Windows Driver Kit (WDK). Then we can move to the key files composing our minifilter driver:
- Main.cpp
- FsMinifilter.cpp
- FsMinifilter.inf
Main.cpp
To develop a file system minifilter driver for Windows, we first need to declare a global variable that will store the handle of our minifilter driver after it’s registered, launched, and stopped:
//
// The minifilter handle that results from a call to FltRegisterFilter
// NOTE: This handle must be passed to FltUnregisterFilter during minifilter unloading
//
PFLT_FILTER g_minifilterHandle = NULL;Then we need to implement the DriverEntry function, which is our driver’s entry point. We register our minifilter driver in this function:
NTSTATUS DriverEntry(IN PDRIVER_OBJECT DriverObject, IN PUNICODE_STRING RegistryPath)
{
    //
    // Register minifilter driver
    //
    NTSTATUS status = FltRegisterFilter(DriverObject, &g_filterRegistration, &g_minifilterHandle);
    if (!NT_SUCCESS(status))
    {
        return status;
    }

    // ...
}Next, we need to call the FltStartFiltering function to launch our minifilter so it can actually start filtering I/O requests:
NTSTATUS DriverEntry(IN PDRIVER_OBJECT DriverObject, IN PUNICODE_STRING RegistryPath)
{
    // ...

    //
    // start minifilter driver
    //
    Status = FltStartFiltering(g_minifilterHandle);
    if (!NT_SUCCESS(status))
    {
        FltUnregisterFilter(g_minifilterHandle);
    }

    return status;
}When registering the minifilter, we pass the address of the FLT_REGISTRATION struct object to the FltRegisterFilter function:
//
// The FLT_REGISTRATION structure provides information about a file system minifilter to the filter manager.
//
CONST FLT_REGISTRATION g_filterRegistration =
{
    sizeof(FLT_REGISTRATION),      //  Size
    FLT_REGISTRATION_VERSION,      //  Version
    0,                             //  Flags
    NULL,                          //  Context registration
    g_callbacks,                   //  Operation callbacks
    InstanceFilterUnloadCallback,  //  FilterUnload
    InstanceSetupCallback,         //  InstanceSetup
    InstanceQueryTeardownCallback, //  InstanceQueryTeardown
    NULL,                          //  InstanceTeardownStart
    NULL,                          //  InstanceTeardownComplete
    NULL,                          //  GenerateFileName
    NULL,                          //  GenerateDestinationFileName
    NULL                           //  NormalizeNameComponent
};The FltRegisterFilter function contains special callback procedures for loading, initiating, and disabling the driver. We’ll get back to these procedures a bit later.
Right now, we need to pass the array of FLT_OPERATION_REGISTRATION structures describing pre-operation and post-operation procedures for a specific I/O operation to the FLT_REGISTRATION structure. For our minifilter, registering a pre-operation callback for the IRP_MJ_CREATE operation will be enough:
//
// Constant FLT_REGISTRATION structure for our filter.
// This initializes the callback routines our filter wants to register for.
//
CONST FLT_OPERATION_REGISTRATION g_callbacks[] =
{
    {
        IRP_MJ_CREATE,
        0,
        PreOperationCreate,
        0
    },

    { IRP_MJ_OPERATION_END }
};Read also
Improving a Windows Audio Driver to Obtain a WHQL Release Signature
Explore how Apriorit’s expertise in driver development helped our client improve their audio driver’s performance and stability, earning them a WHQL Release Signature.

FsMinifilter.cpp
This file contains all callback procedures needed for the operation of our minifilter driver.
A minifilter driver can register pre- and post-operation procedures for every I/O operation. These procedures are pretty similar to dispatch and completion procedures of a regular filter driver.
We need to implement a pre-operation procedure for the IRP_MJ_CREATE operation in which we output the file names:
FLT_PREOP_CALLBACK_STATUS FLTAPI PreOperationCreate(
    _Inout_ PFLT_CALLBACK_DATA Data,
    _In_ PCFLT_RELATED_OBJECTS FltObjects,
    _Flt_CompletionContext_Outptr_ PVOID* CompletionContext
)
{
    //
    // Pre-create callback to get file info during creation or opening
    //

    DbgPrint("%wZ\n", &Data->Iopb->TargetFileObject->FileName);

    return FLT_PREOP_SUCCESS_NO_CALLBACK;
}Next, we need to implement the InstanceFilterUnloadCallback procedure for unloading our minifilter. In this procedure, we call the FltUnregisterFilter function.
Note: Microsoft documentation strongly recommends registering this procedure so that the filter manager can unload the minifilter when needed:
NTSTATUS FLTAPI InstanceFilterUnloadCallback(_In_ FLT_FILTER_UNLOAD_FLAGS Flags)
{
    //
    // This is called before a filter is unloaded.
    // If NULL is specified for this routine, then the filter can never be unloaded.
    //

    if (NULL != g_minifilterHandle)
    {
        FltUnregisterFilter(g_minifilterHandle);
    }

    return STATUS_SUCCESS;
}The two other procedures — InstanceSetupCallback and InstanceQueryTeardownCallback — are needed for our driver to be able to connect to and disconnect from all disk partitions. These procedures are just stubs that do nothing and return STATUS_SUCCESS:
NTSTATUS FLTAPI InstanceSetupCallback(
    _In_ PCFLT_RELATED_OBJECTS  FltObjects,
    _In_ FLT_INSTANCE_SETUP_FLAGS  Flags,
    _In_ DEVICE_TYPE  VolumeDeviceType,
    _In_ FLT_FILESYSTEM_TYPE  VolumeFilesystemType)
{
    //
    // This is called to see if a filter would like to attach an instance to the given volume.
    //

    return STATUS_SUCCESS;
}

NTSTATUS FLTAPI InstanceQueryTeardownCallback(
    _In_ PCFLT_RELATED_OBJECTS FltObjects,
    _In_ FLT_INSTANCE_QUERY_TEARDOWN_FLAGS Flags
)
{
    //
    // This is called to see if the filter wants to detach from the given volume.
    //

    return STATUS_SUCCESS;
}Read also
NDIS Driver Development: Why You Need NDIS Drivers and When to Use Them
Optimize your Windows network drivers with high-performing and secure NDIS drivers. Explore the key principles and best practices of NDIS development, as well as proven debugging strategies.

FsMinifilter.inf
When creating a driver project, Visual Studio generates an INF file: a configuration file containing all information that the operating system needs for installing a minifilter driver. We need to change some template values in the INF file generated by Visual Studio:
- Set Class and ClassGuid values for the minifilter driver. The ClassGuid value can be generated with the help of Visual Studio, while the Class value can be chosen in Windows documentation for minifilter development.
Here’s how we set those values in our example:
;; ...
[Version]
Class    = "Bottom"
ClassGuid = {21D41938-DAA8-4615-86AE-E37344C18BD8}
;; ...- Set the LoadOrderGroup value in accordance with the Class value chosen earlier:
;; ...
[MiniFilter.Service]
LoadOrderGroup = "FSFilter Bottom"
;; ...- Set the Instance1.Altitude value, which determines the order in which a specific minifilter driver will be loaded within a particular Class (at your discretion):
;; ...
Instance1.Altitude = "47777"
;; ...With these three files composed, we successfully created a minifilter driver and can now move to building and installing it.
Installing a minifilter driver
Now we need to install the driver using the INF file. To start, stop, and remove the driver, we use the Service Control (SC) utility (sc.exe).
Let’s start with installing the driver.
- To install the minifilter driver, right-click the INF file and select the Install option:

Figure 1. Installing a minifilter driver
- Check if the driver was installed properly and then start it:
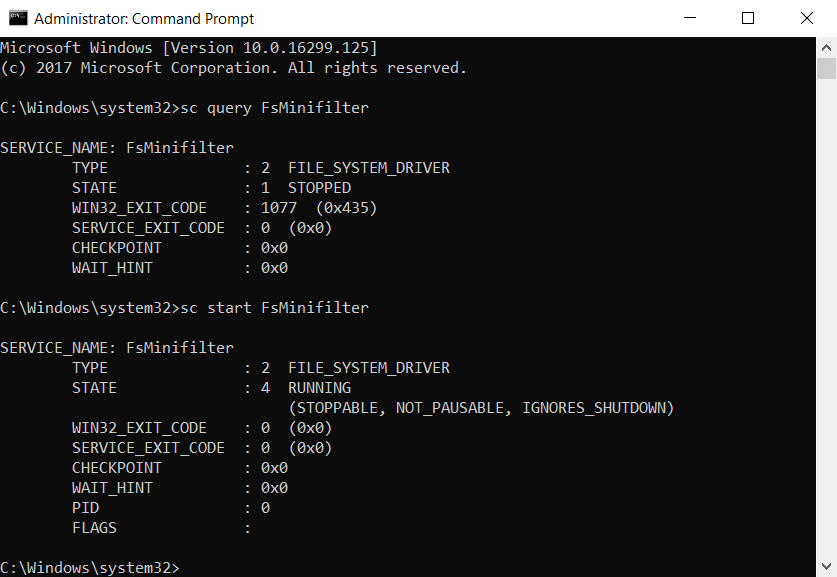
Figure 2. Starting a minifilter driver
- To stop or delete our minifilter driver, we use the SC utility:
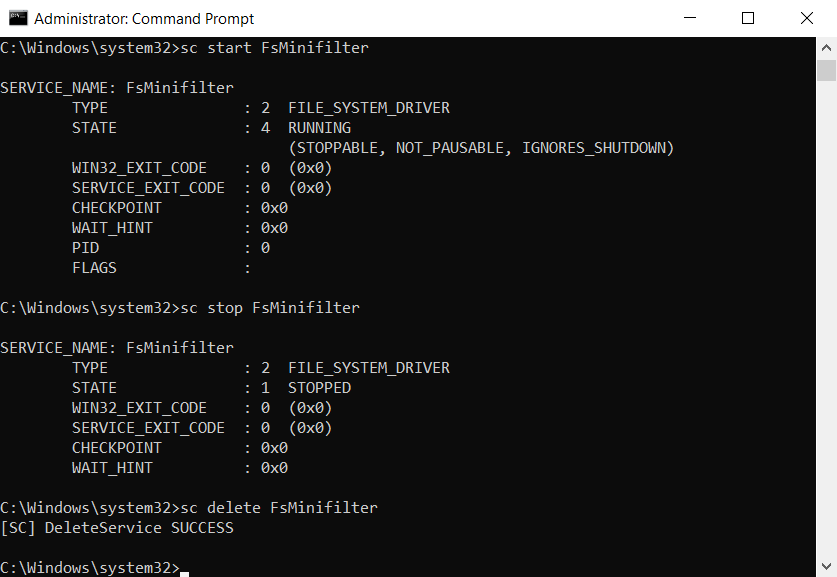
Figure 3. Stopping and deleting a minifilter driver
As you can see, our minifilter driver is quite easy to work with. But can it actually do the job? Let’s find out!
Read also
Linux Device Drivers: Tutorial for Linux Driver Development
Follow this guide from Apriorit development experts to understand how Linux drivers work and how to approach the development process.

Checking the performance of our minifilter driver
To see if our code works as it’s supposed to, we’ll use the following tools for minifilter development:
- Sysinternals DebugView utility for monitoring the debug output
- OSR DeviceTree utility for displaying devices and drivers
Once the minifilter driver is up and running, open the DebugView utility to see the names of all opened files:
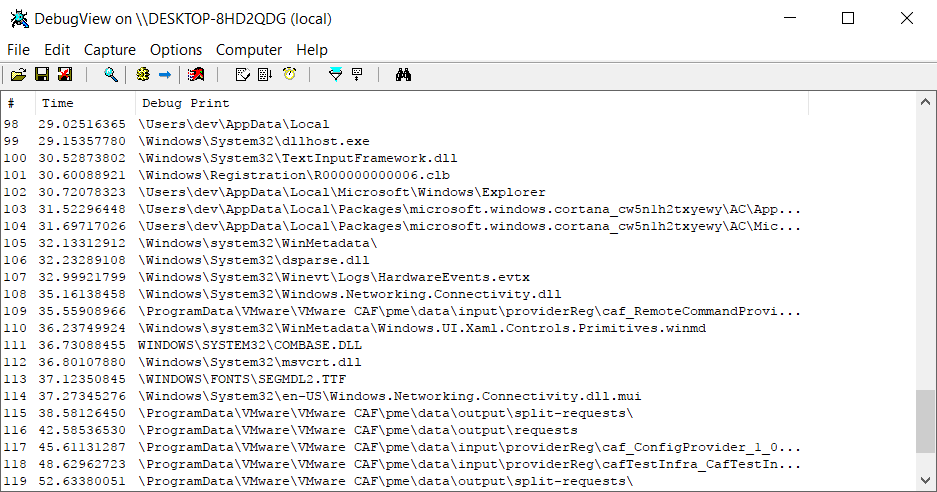
Figure 4. Debug output monitoring
We also need to launch the DeviceTree utility to see how our minifilter driver connects to volume devices. As it’s the filter manager and not the minifilter itself that connects directly to the file system, in the device tree of our file system, we’ll see the filter manager but no minifilters:
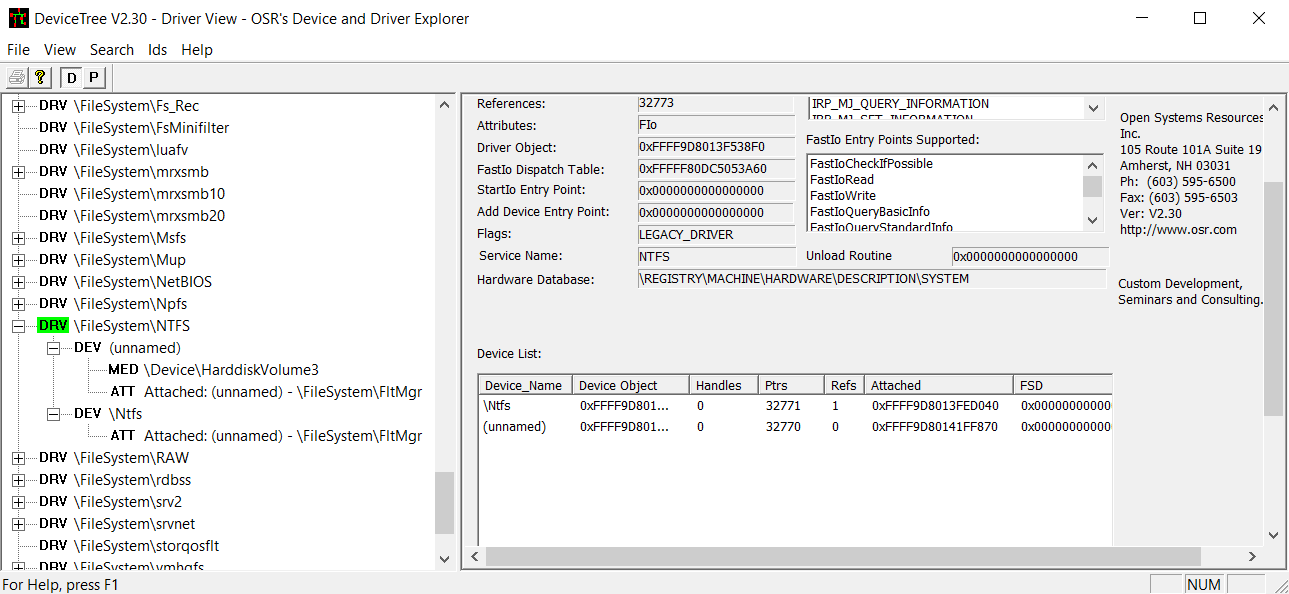
Figure 5. Our filter manager in the device tree
As you can see, building and attaching a file system minifilter driver takes much less effort than working with legacy filter drivers.
Our sample driver can now print the names of opened files in the debug output. In a real-life project, a minifilter can have more than one task. For example, it can also contribute to your system’s security by preventing unauthorized processes and file launches. In the next section, we show how to add this functionality to your minifilter driver.
Related project
Developing Drivers for Low Latency Virtual Reality Headsets
Discover how our team created a tailored Linux driver for a VR headset, helping our client ensure low latency and high performance.

Adding access protection features
The IRP_MJ_CREATE operations we discussed earlier are central to preventing unauthorized access. When a user or the system opens a file, the minifilter can examine this request in PreCreate and PostCreate callbacks. The PreCreate callback, formally defined as PFLT_PRE_OPERATION_CALLBACK, is invoked by the Filter Manager before the file system processes the IRP_MJ_CREATE request. The PostCreate callback, defined as PFLT_POST_OPERATION_CALLBACK, is invoked after the file system has processed the IRP_MJ_CREATE request.
To block file launching or opening, we can use only the PreCreate callback, which allows the driver to determine whether a request is unauthorized based on the rules we implement. If it is, the driver blocks further processing of the request, returns an access denied status, and stops the system from calling IRP_MJ_CREATE. If the request is authorized, the driver allows it without affecting the system.
With this in mind, let’s augment the driver we developed earlier with new security features. We can do that by modifying our PreOperationCreate handler.
The first step is to filter out PreCreate callback requests that are irrelevant to our protection functionality. This helps to improve the minifilter’s performance and resource utilization. In our case, we can skip processing requests for cases not relevant to launching processes or opening files.
Let’s skip request processing if the file represents Named pipe, Mailslot, or Volume:
    if (FltObjects->FileObject->Flags & (FO_NAMED_PIPE | FO_MAILSLOT | FO_VOLUME_OPEN))
    {
        return FLT_PREOP_SUCCESS_NO_CALLBACK;
}Also, we can skip requests if their target file represents a directory or paging file, or if the target file is opened by file ID:
   const auto& createParams = Data->Iopb->Parameters.Create;
if (FlagOn(createParams.Options, FILE_DIRECTORY_FILE) ||
    FsRtlIsPagingFile(FltObjects->FileObject) ||
    // If the file opens by file ID, it is outside the scope of our example.
    FlagOn(createParams.Options, FILE_OPEN_BY_FILE_ID))
{
    return FLT_PREOP_SUCCESS_NO_CALLBACK;
}In modern Windows systems, a file is typically referenced by its full path, like C:\Users\WDKRemoteUser\Desktop\passwords.txt. However, NTFS and FAT file systems can use short paths like C:\Users\WDKREM~1\Desktop\PASSWO~1.TXT to ensure compatibility with older systems. If the validation logic of the driver protection checks for exact matching on full paths or file names, short names can help bypass this check. That’s why we added the FltGetFileNameInformation function call with the name option FLT_FILE_NAME_NORMALIZED. It helps our minifilter restrict access to the file or process even if the short path is requested.
Note that NTFS assigns each file a unique identifier, often referred to as a File ID. It’s possible (though uncommon) to open a file using its ID and specialized software. When developing a minifilter driver, we recommend adding a way to correctly process requests with file IDs to improve the driver’s protection capabilities.
Finally, we can process the I/O request and determine whether it is unauthorized. To do this, we can examine the file name and attributes of the target file:
// Process the filename of the unauthorized file that shouldn’t be opened in the system.

 const UNICODE_STRING unauthorizedFileName = RTL_CONSTANT_STRING(L"passwords.txt");

  if(RtlCompareUnicodeString(&fileNameInfo->FinalComponent, &unauthorizedFileName, TRUE) == 0)
 {
     DbgPrint("FsMinifiler - Blocked! The user tried to launch an unauthorized file: %wZ\n", &fileNameInfo->Name);

     // Deny access to the target file to protect the system from unauthorized file opening.
     Data->IoStatus.Status = STATUS_ACCESS_DENIED;
     Data->IoStatus.Information = IO_REPARSE;

     return FLT_PREOP_COMPLETE;
 }

 // Process the filename of the unauthorized process that shouldn’t be launched in the system.
 const UNICODE_STRING unauthorizedProcessName = RTL_CONSTANT_STRING(L"msedge.exe");

 if ((createParams.SecurityContext->DesiredAccess & FILE_EXECUTE) &&
     RtlCompareUnicodeString(&fileNameInfo->FinalComponent, &unauthorizedProcessName, TRUE) == 0)
 {
     DbgPrint("FsMinifiler - Blocked! The user tried to launch an unauthorized file: %wZ\n", &fileNameInfo->Name);

     // Deny access to the target process to protect the system from unauthorized launching.
     Data->IoStatus.Status = STATUS_ACCESS_DENIED;
     Data->IoStatus.Information = IO_REPARSE;
     return FLT_PREOP_COMPLETE;
}With this code, we configured the driver to block opening requests for files named passwords.txt and execution requests for processes named msedge.exe. After implementing these changes, we can install and run our driver to test its protection functionality.
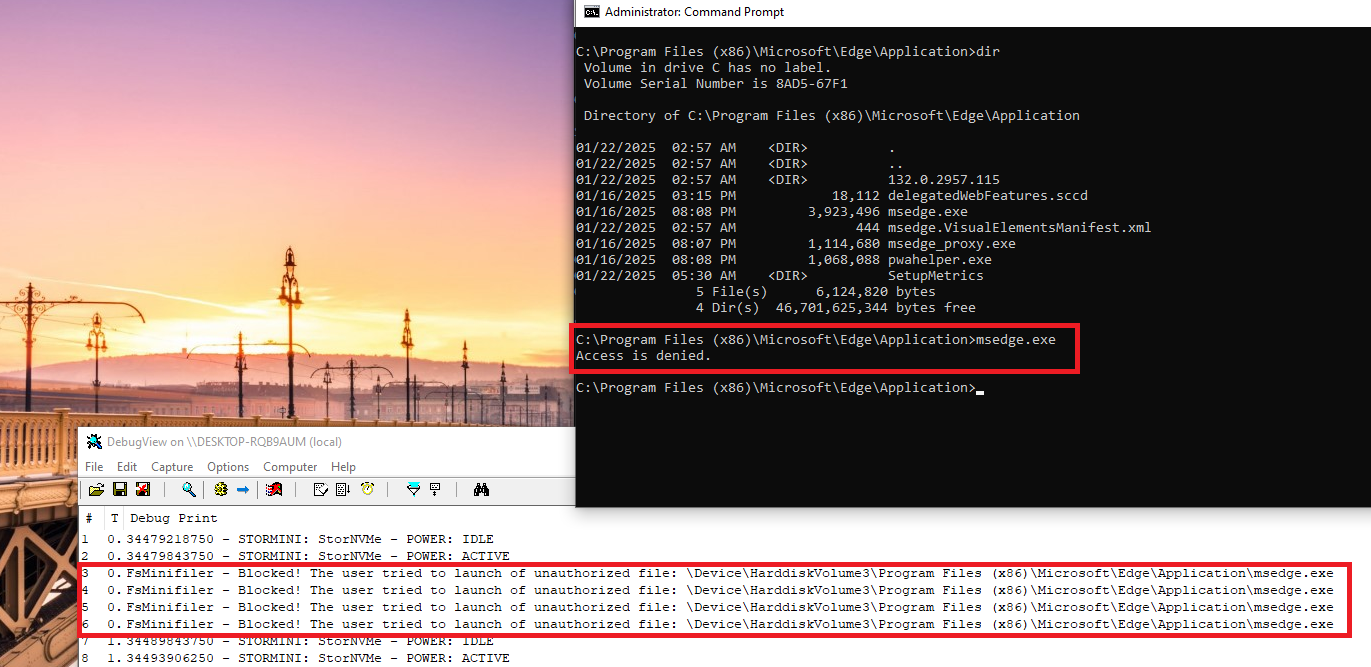
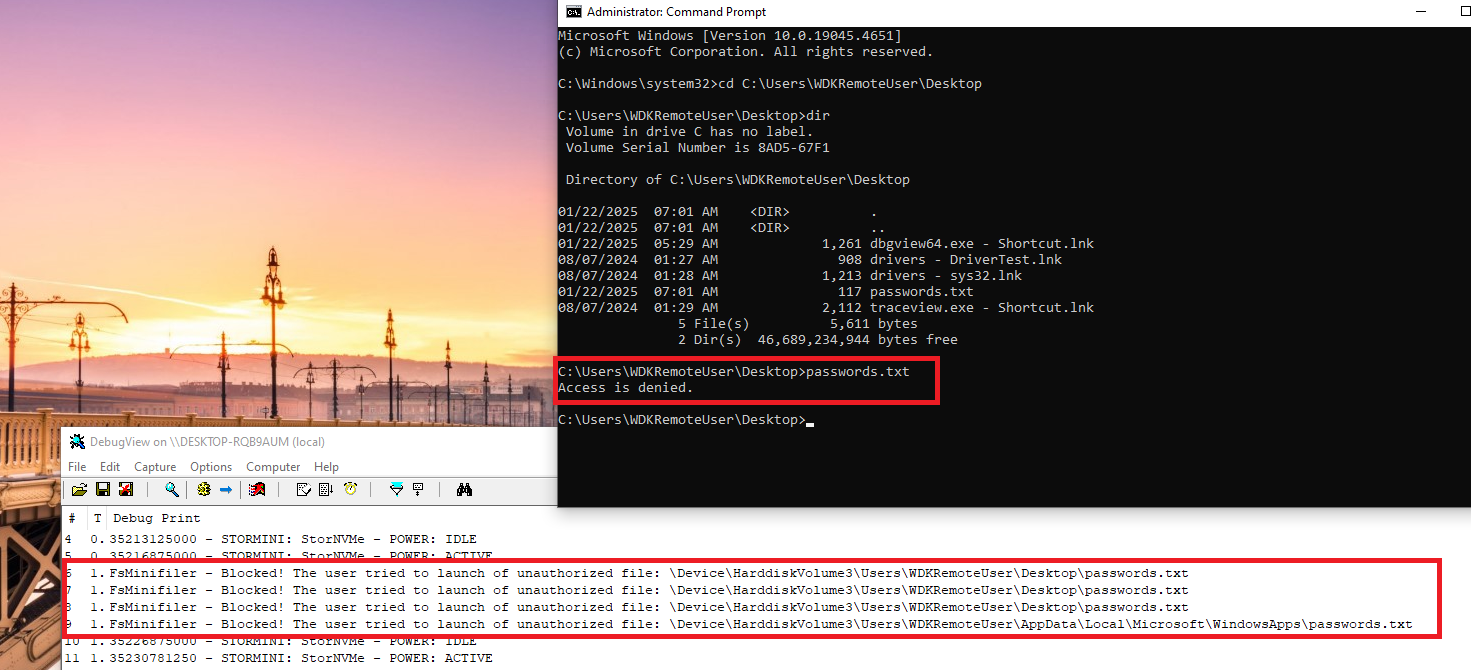
Figures 6 and 7 illustrate that our minifilter driver prevents unauthorized process launches and file openings. Even when a user attempts to execute an unauthorized process or file via the command line with administrator privileges, the driver blocks this request. You can check out the complete project solution in our GitHub.
This is a simple example of a Windows minifilter driver that intercepts and filters IRP_MJ_CREATE operations to prevent the execution of unauthorized files. It’s a useful feature, but you can’t rely on this feature alone to secure your system. Consider adding blocklists of file names or file paths, wildcard matching, and other security checks (such as file digital signature validation, device type, and user identity checks) to fully protect your system.
Conclusion
Minifilter drivers can provide the same results as legacy file system filter drivers but require less effort to develop. Thanks to their simplicity, flexibility, reliability, and great performance, minifilters are the main filter driver development approach that Microsoft recommends for Windows systems.
When working with minifilters, you can implement filters for precisely the I/O operations you need for the task at hand. You can also enhance your system security and prevent unauthorized access to files and processes. Our minifilter driver development tutorial provides you with the knowledge and key skills to do it.
At Apriorit, we have a team of creative kernel and driver development experts and file system minifilter developers who have mastered the art of building device drivers and minifilters of any complexity. Get in touch with us to start discussing your next ambitious project.
Planning a complex driver development project?
Leverage Apriorit’s 20+ years of experience in this field to get a secure, high-performing, and reliable driver that fits your needs.
Have a question?
Ask our expert!
Program Manager


