 Skip to main content
Organizations that handle sensitive data need secure, reliable, and efficient ways to store and manage it. Virtual disks allow you to isolate, encrypt, and control access to data.
However, developing virtual disk drivers requires deep expertise in both Windows driver development and system-level software engineering. Without this expertise, you run the risk of performance issues, security vulnerabilities, and compliance challenges.
At Apriorit, we specialize in building robust virtualization solutions that help businesses securely store and manage critical data. In this article, we break down the complexities of developing a virtual disk driver for Windows 10, including control utilities, Windows Driver Framework (WDF) components, device stacks, and input/output control calls.
Whether your organization needs a custom virtual disk solution for Windows 10 or Windows 11, this guide outlines key development principles that will help you ensure security, stability, and seamless integration into enterprise environments.
Contents:
Basic terms of Windows driver development
Before we start creating a virtual disk and a driver for it, let’s define the key terms we’ll be using in this article.
A driver is a software component that helps an operating system expose hardware functionality to user applications. Some drivers work without actual hardware, since they can emulate devices or alter the behavior of other drivers.
A device can be either a software or hardware component. For instance, hardware components like a CD-ROM drive or a USB flash drive are usually called “devices.” However, drivers can create software objects that are also called “devices” because they represent hardware components.
A disk device provides storage for data that is managed by a certain system. File systems allow users to work with files and directories. A virtual disk device has no real hardware and stores data in an ordinary file.
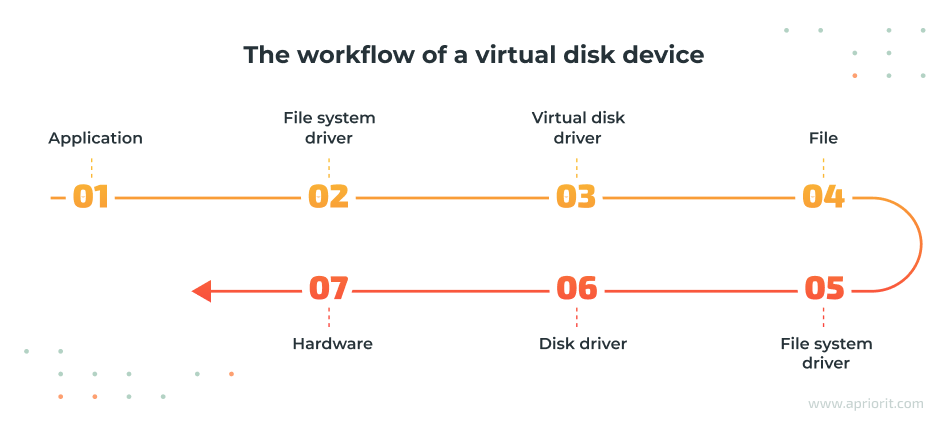
Virtual disk drivers mount CD and DVD images as well as virtual machine disk images. They also provide encrypted storage for sensitive data.
Since Windows 10 is our target operating system in this test project, we use tools and services that Microsoft provides for developers. Let’s start with Windows Driver Frameworks, or WDF — a set of libraries developed by Microsoft that greatly simplifies driver development. For example, WDF can reduce a dummy Plug and Play driver from 3,000 to 300 lines of code. We highly recommend using WDF instead of the low-level Windows Driver Model.
WDF consists of the kernel-mode driver framework (KMDF) and user-mode driver framework (UMDF). In this article, we’ll use KMDF and run our driver in kernel mode. In our previous article, we showed how to develop a virtual disk driver in user mode.
Some time ago, Windows drivers were written only in C. But nowadays, C++ has taken over, as it’s a more advanced and less error-prone language. We’ll use basic C++ functionality to develop a driver for a virtual disk, so the code examples we provide will still be understandable to people who know only C.
With that in mind, let’s start developing the Windows virtual disk driver.
Ready to optimize your real and virtual devices?
Contact us today to explore how our driver development expertise can revolutionize your device drivers!
Developing the Windows virtual disk driver
Before starting development, we need to set up the kernel-mode debugging tool on our host machine according to the Microsoft documentation. Here’s the list of things we’ll use in our virtual driver development tutorial:
- Windows 10
- Visual Studio 2019
- Windows Driver Kit (WDK) for Windows 10
- Basic C/C++ knowledge
- A virtual machine of your choice
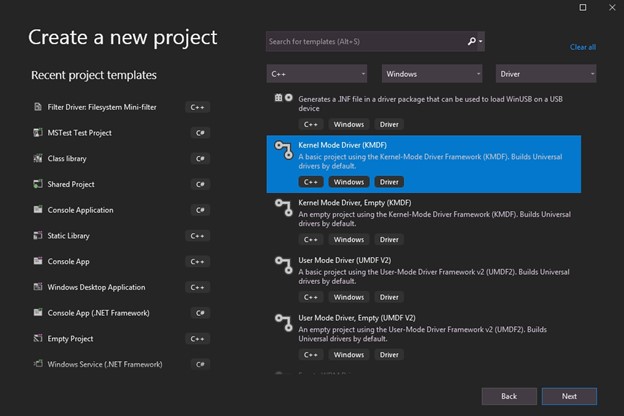
Visual Studio 2019 has a template for a driver project, so we’ll use it. A typical driver project has a bunch of .c, .cpp, and .h files with code, a .rc file for resources, and a .inf file for installation instructions. Here’s how we create such a project in Visual Studio 2019:
Let’s explore each component of our virtual disk driver in detail.
Pch is the precompiled header that contains system headers and significantly reduces build times, as it needs to be compiled only once (and not for each .cpp file).Main.cpp contains the driver entry point, which is the very first driver function that will be called by the Windows kernel. This entry point delegates all the work to our Driver class. Note that DriverEntry is marked as an EXTERN_C function:
EXTERN_C NTSTATUS DriverEntry(_In_ PDRIVER_OBJECT driverObject, _In_ PUNICODE_STRING registryPath)
{
    return Driver::create(driverObject, registryPath);
}Here, Driver is a simple class that has only two methods:
- Driver::create initializes a driver object by calling a corresponding WDF function and registers the Driver::onDeviceAdd callback.
- Driver::onDeviceAdd is called for each device object that matches our driver.
Here’s how the Device class looks:
NTSTATUS Driver::create(PDRIVER_OBJECT driverObject, PUNICODE_STRING registryPath)
{
    WDF_DRIVER_CONFIG config;
    WDF_DRIVER_CONFIG_INIT(&config, onDeviceAdd);

    return WdfDriverCreate(driverObject, registryPath, WDF_NO_OBJECT_ATTRIBUTES, &config, WDF_NO_HANDLE);
}

NTSTATUS Driver::onDeviceAdd(WDFDRIVER, PWDFDEVICE_INIT deviceInit)
{
    return Device::create(deviceInit);
}The Device class is responsible for processing queries to our virtual disk from the operating system.
Read also
How to Use WinDbg for Kernel Debugging to Develop a Reliable Windows Driver
Discover how to debug your Windows driver and make sure that it’s fast, efficient, and secure.

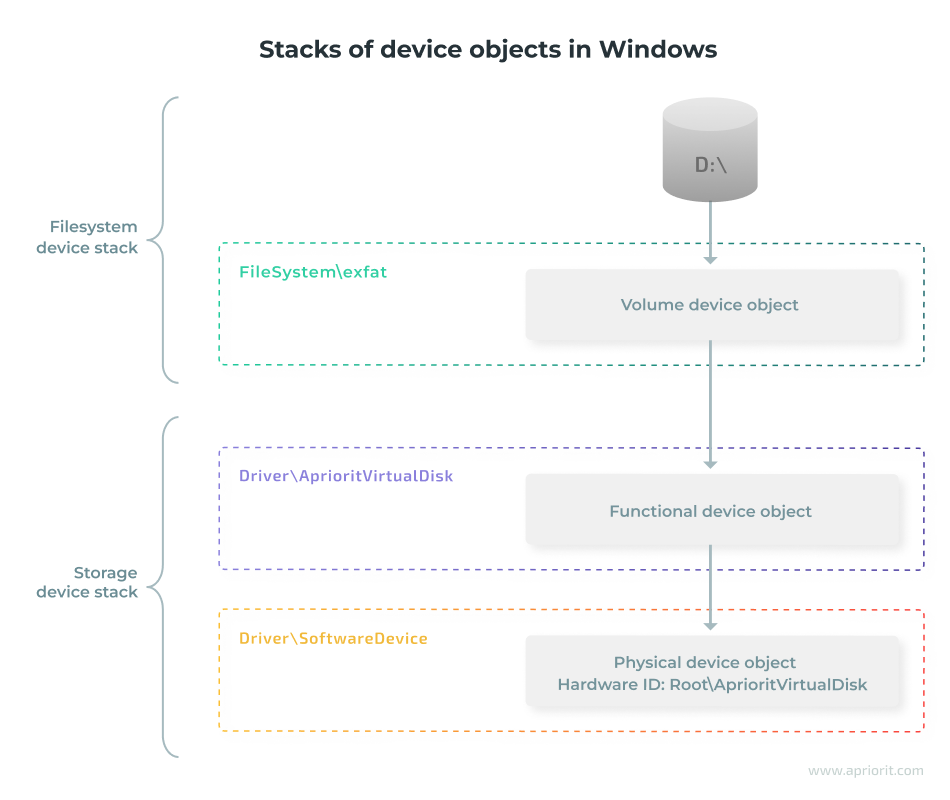
Device objects in Windows are layered and form stacks. Our Device object is positioned between the so-called physical device object and the volume device object that belongs to the file system driver. In our case, the Device object belongs to the SoftwareDevice driver. Its role is just to report the hardware ID to the system so the OS can match the ID to our driver, load it, and call Driver::onDeviceAdd.
Note that the volume device object forms another device stack and is seen by applications as a drive letter.
In reality, there are also filter device objects in both storage and file system stacks. They add functionality such as providing disk snapshots for backups and checking files for viruses.
The Device::create method sets device name, security attributes, and type. After that, it calls the WdfDeviceCreate function to create a device object and allocate memory for the instance of our Device class. Also, it registers the Device::onCleanup handler that will clean up resources by calling the class destructor.
Once the instance of our Device class is created, we call the Device::init method to continue initialization:
//
// Create a device
//

WDF_OBJECT_ATTRIBUTES deviceAttributes;
WDF_OBJECT_ATTRIBUTES_INIT_CONTEXT_TYPE(&deviceAttributes, Device);
deviceAttributes.EvtCleanupCallback = onCleanup;

WDFDEVICE wdfDevice;
status = WdfDeviceCreate(&deviceInit, &deviceAttributes, &wdfDevice);
if (!NT_SUCCESS(status))
{
    return status;
}

//
// Initialize a device
//

auto self = new(getDevice(wdfDevice)) Device();

status = self->init(wdfDevice);
if (!NT_SUCCESS(status))
{
    return status;
}Device::init reads the device property key where we store a path to the file we’re going to use as a virtual disk. Then it does the following:
- Opens the file
- Receives its size
- Creates a GUID_DEVINTERFACE_VOLUME device interface with the system’s predefined type
- Creates two queues for processing requests: a default queue and a file queue
The IOCTL calls are used to report meta information about our device, such as disk size, writability, and geometry. Here’s how they work:
void Device::onIoDeviceControl(WDFQUEUE queue, WDFREQUEST request, size_t outputBufferLength, size_t, ULONG ioControlCode)
{
    NTSTATUS status = STATUS_SUCCESS;
    ULONG_PTR bytesWritten = 0;
    auto self = getDevice(queue);

    //
    // Handle required control codes
    //

    switch (ioControlCode)
    {
    case IOCTL_STORAGE_GET_DEVICE_NUMBER:
    {
        STORAGE_DEVICE_NUMBER* info;
        status = WdfRequestRetrieveOutputBuffer(request, sizeof(*info), reinterpret_cast<void**>(&info), nullptr);
        if (!NT_SUCCESS(status))
        {
            break;
        }

        info->DeviceType = FILE_DEVICE_DISK;
        info->DeviceNumber = MAXULONG;
        info->PartitionNumber = MAXULONG;

        bytesWritten = sizeof(*info);
        break;
    }
…We implemented the following IOCTL codes in our driver:
- IOCTL_STORAGE_GET_DEVICE_NUMBER
- IOCTL_STORAGE_GET_HOTPLUG_INFO
- IOCTL_DISK_GET_LENGTH_INFO
- IOCTL_DISK_GET_MEDIA_TYPES
- IOCTL_DISK_GET_DRIVE_GEOMETRY
- IOCTL_DISK_IS_WRITABLE
- IOCTL_MOUNTDEV_QUERY_DEVICE_NAME
- IOCTL_MOUNTDEV_QUERY_UNIQUE_ID
The Windows operating system uses more IOCTLs, but they aren’t required for the system’s basic functionality. Since we don’t implement all IOCTL calls, advanced disk features like those from Disk Management snap-in won’t work.
Read also
How to Develop a Windows File System Minifilter Driver: Complete Tutorial
Learn how to build, configure, and troubleshoot your driver using our in-depth practical guide.
The device’s read/write handler gets buffer, length, and offset parameters and performs read and write operations with them on the disk image file. Here’s how this handler looks:
void Device::onIoRead(WDFQUEUE queue, WDFREQUEST request, size_t length)
{
    //
    // Get a buffer and its parameters
    //

    PVOID outputBuffer;
    NTSTATUS status = WdfRequestRetrieveOutputBuffer(request, 0, &outputBuffer, nullptr);
    if (!NT_SUCCESS(status))
    {
        WdfRequestCompleteWithInformation(request, status, 0);
        return;
    }

    WDF_REQUEST_PARAMETERS requestParams;
    WDF_REQUEST_PARAMETERS_INIT(&requestParams);
    WdfRequestGetParameters(request, &requestParams);

    //
    // Read from the file
    //

    IO_STATUS_BLOCK iosb{};
    status = ZwReadFile(getDevice(queue)->m_fileHandle,
        nullptr,
        nullptr,
        nullptr,
        &iosb,
        outputBuffer,
        static_cast<ULONG>(length),
reinterpret_cast<PLARGE_INTEGER>(&requestParams.Parameters.Read.DeviceOffset),
        nullptr);
    WdfRequestCompleteWithInformation(request, status, iosb.Information);
}Note that there is a catch: file operations in the Windows kernel need an asynchronous procedure call (APC) to be enabled for the thread. However, APC is disabled for the thread where our read/write handler is invoked. So we need another thread to process them.
As we mentioned earlier, our driver has two request queues: the default queue and the file queue. The default queue processes all requests at any interrupt request level (IRQL). If a request is a read/write operation, the driver forwards the request to the file queue.
The file queue supports only the PASSIVE_LEVEL IRQL. We need to raise the IRQL to DISPATCH_LEVEL before forwarding the read/write request to stop WDF from processing the request in the current file system thread and make it use a worker thread.
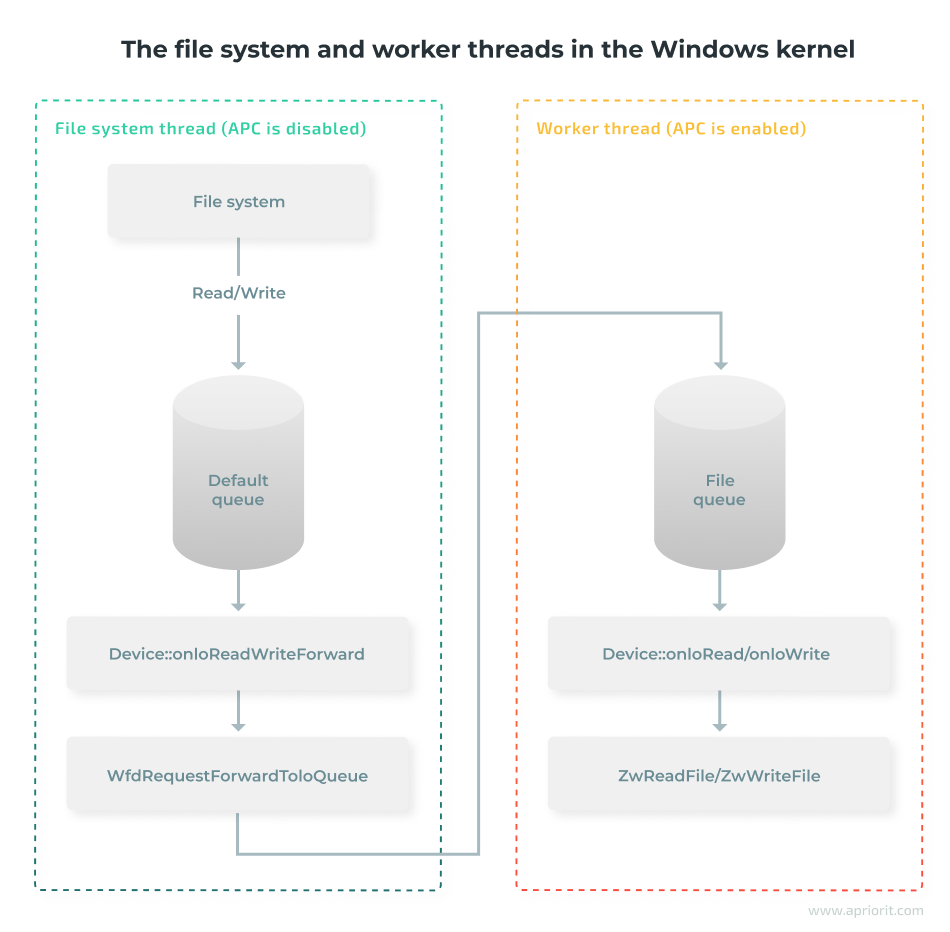
This is how the Device::onIoReadWriteForward function forwards requests from one queue to another:
void Device::onIoReadWriteForward(WDFQUEUE queue, WDFREQUEST request, size_t)
{
    //
    // Forward read/write requests to the file i/o queue. To force processing in another thread, raise the IRQL.
    //

    KIRQL oldIrql;
    KeRaiseIrql(DISPATCH_LEVEL, &oldIrql);
    WdfRequestForwardToIoQueue(request, getDevice(queue)->m_fileQueue);
    KeLowerIrql(oldIrql);
}The PropertyKeys.h file contains a definition of our device property key that’s shared between the driver and the control utility. We can use this file to pass a disk file image path to the driver for device initialization. Here’s how we can do it:
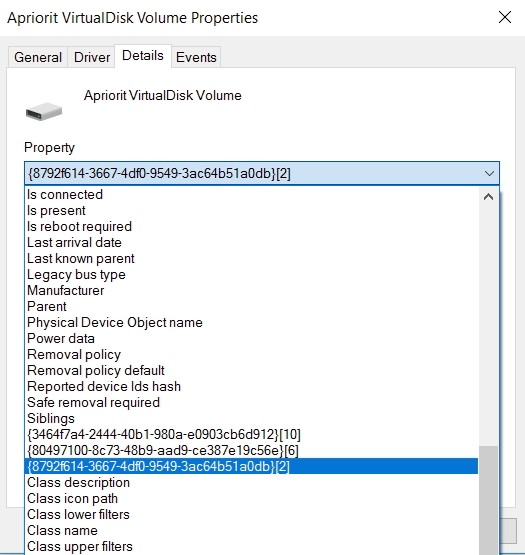
// Use this property to pass a disk image file path to the driver
DEFINE_DEVPROPKEY(DEVPKEY_VIRTUALDISK_FILEPATH, 0x8792f614, 0x3667, 0x4df0, 0x95, 0x49, 0x3a, 0xc6, 0x4b, 0x51, 0xa0, 0xdb, 2);We can find standard and custom device properties in the device manager:
The NewImpl helper file helps us place new and delete operators for C++ support. Implementing this helper is simple:
void* __cdecl operator new(size_t, void* ptr)
{
    return ptr;
}

void __cdecl operator delete(void*, size_t)
{
}Placing the new operator is used to call class constructors. WDF allocates memory for the device context before the call. Here’s an example of such a call:
auto self = new(getDevice(wdfDevice)) Device();The class destructor is called explicitly from the WDF cleanup callback:
void Device::onCleanup(WDFOBJECT wdfDevice)
{
    getDevice(reinterpret_cast<WDFDEVICE>(wdfDevice))->~Device();
}This mechanism allows for moving initialization and deinitialization code to constructors and destructors as well as keeping objects in memory allocated by the framework.
Read also
Controlling and Monitoring a Network with User Mode and Driver Mode Techniques: Overview, Pros and Cons, WFP Implementation
Take charge of your network traffic! Optimize your network management and get insights on implementing powerful user-mode and driver-mode techniques from a guide by Apriorit experts.

Сreating the device control utility
Now, we need to develop a utility that allows us to launch a virtual disk, make Windows 10 see it, and close it when we don’t need it.
The device control utility has a simple command-line interface with two commands: to open and close. The utility also receives the path to the file we’re going to use as the virtual disk:
void printHelp()
{
    cout
        << "Virtual disk control utility. Copyright(C) 2022 Apriorit, Inc." << endl
        << endl
        << "Usage: " << endl
        << "  VirtualDiskControl open <filepath> [filesize] - Open an existing disk image or create a new one" << endl
        << "                                                  with the size `filesize` MB." << endl
        << "                                                  `filesize` is optional, default value is 100." << endl
        << "  VirtualDiskControl close <filepath>           - Close disk image." << endl;
}
</filepath></filepath>To load our driver, the control utility uses Software Device API. It calls the SwDeviceCreate function to instruct the system-provided SoftwareDevice driver to create a new physical device object with the specific hardware ID:
const wchar_t kHardwareIds[] = Lu0022RootAprioritVirtualDisku0022;Then the operating system will search for a driver in the driver database and load the driver that matches the hardware ID. Also, the control utility sets the device property to pass the target file path to the driver:
const DEVPROPERTY devPropFilePath
{
    .CompKey = { DEVPKEY_VIRTUALDISK_FILEPATH, DEVPROP_STORE_SYSTEM, 0 },
    .Type = DEVPROP_TYPE_STRING,
    .BufferSize = static_cast<ULONG>((fullFilePath.size() + 1) * sizeof(wchar_t)),
    .Buffer = const_cast<wchar_t*>(fullFilePath.c_str()),
};The operating system distinguishes devices by their instance IDs. We use a file path hash as an instance ID:
const auto instanceId = to_wstring(hash<wstring>{}(filePath));Device lifetime is controlled by the SwDeviceSetLifetime function.
The control utility is the last thing we need to implement in our driver. Now we can run the virtual disk using the driver to see how it works.
If you’re also interested in improving your application’s cybersecurity, check out our article about heap spray attempts and how to fight them.
Read also
Linux Device Drivers: Tutorial for Linux Driver Development
Explore how to build a high-quality Linux device driver to enhance your product’s reliability, expand its functionality, and optimize performance.

Running the virtual disk
We recommend testing your drivers on a virtual machine (VM) before launching them on real hardware. This way, you’ll protect your machine from possible harm caused by driver malfunctions. You can explore more information about testing in our article on Windows driver testing.
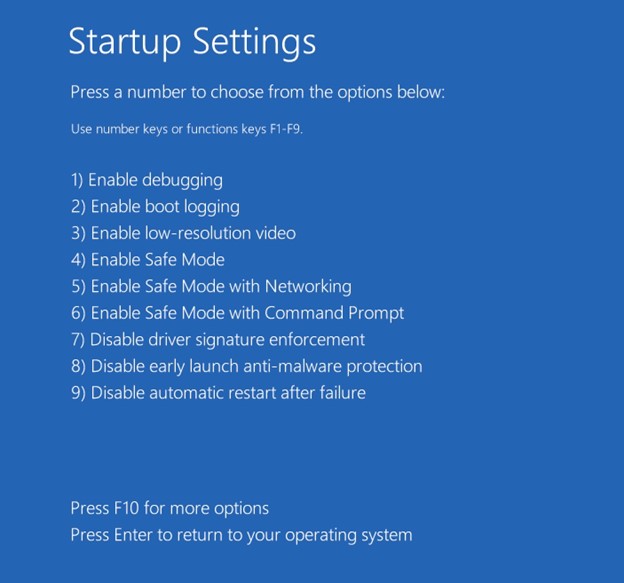
Before running the virtual disk, we create a virtual machine (VM) for Windows 10. We can use any VM for this: Hyper-V, VMware, VirtualBox, QEMU, etc. Then, we disable driver signature enforcement in the Windows startup settings, since it’s not required if kernel debugging is active.
In the following video, we share how to run and test the virtual disk. You can also follow the text instructions below:
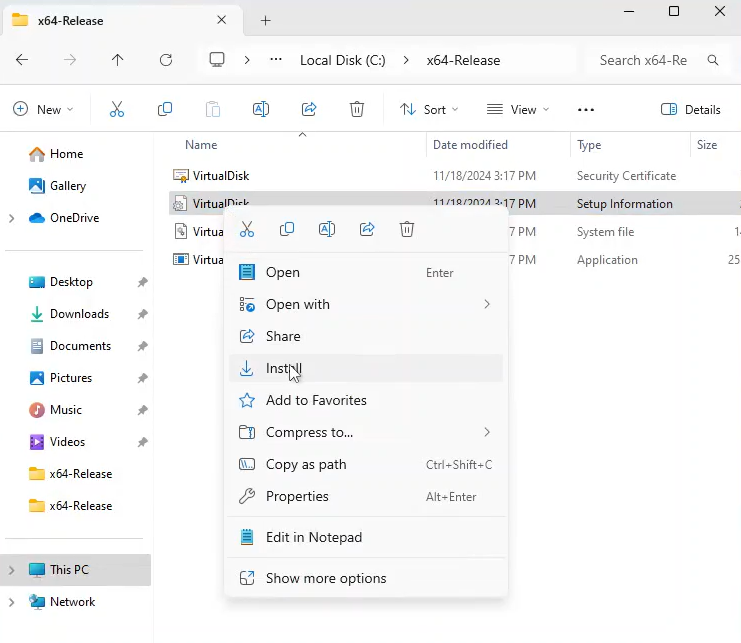
NTo start, we need to copy and unzip the following files from our Git repository and place them in a folder on the C drive:
- VirtualDisk.inf
- VirtualDisk.sys
- VirtualDiskControl.exe
The files should have the same bitness as the operating system.
Next, we install the driver by right-clicking on the .inf file and selecting Install:
Because this is a test driver that we created for demonstration purposes, it’s not signed by Microsoft, so we get a warning. We choose “Install this driver anyway” and see the following dialog box:
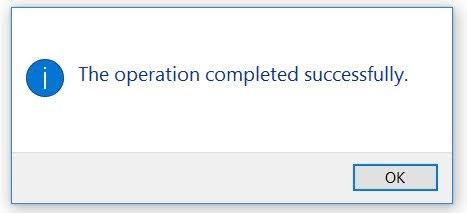
Now we’ve added our driver to the operating system’s driver database. It’s time to open a Command Prompt console with administrator rights and launch our control utility:
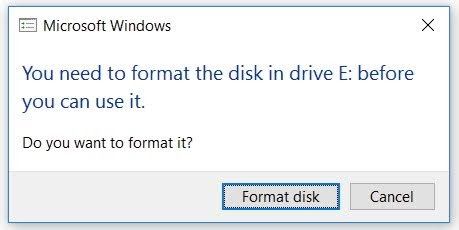
с:\x64-Release>VirtualDiskControl.exe open c:\diskimage.bin
Device instance id: 8978055535008094025
Full file path: \??\c:\diskimage.bin
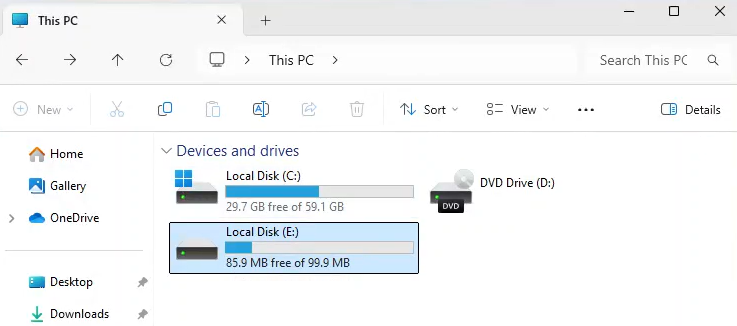
c:\x64-Release>The newly created virtual disk is not formatted, so we need to format it:
After that, we can use our virtual disk:
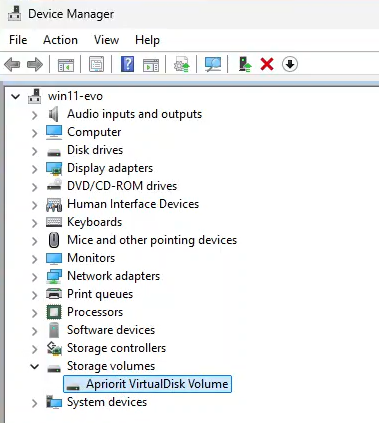
We can now check whether our device is in the Device Manager:
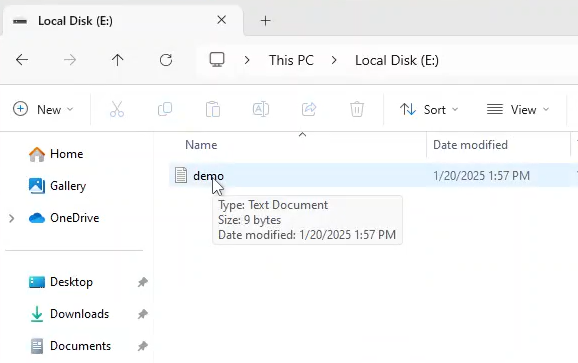
Now, let’s test if our virtual disk is stable and works properly. To do this, we’ll create a text file called “demo” and save it on the disk.
Then, we’ll unmount and remount the virtual disk to make sure our information is successfully saved.
To unmount the disk, we’ll use the same command as before, but replace open with close.
с:\x64-Release>VirtualDiskControl.exe close c:\diskimage.bin
Device instance id: 8978055535008094025
Full file path: \??\c:\diskimage.bin

c:\x64-Release>As a result, our disk has disappeared from File Explorer.
Now, let’s remount the disk, again using the open command. As a result, our disk appears again in the list of virtual disks and contains the text file we created previously:
At this stage, we’ve confirmed that our virtual disk works correctly and that we can read from and write to it.
Now we can use this driver on real machines and do whatever we need with our virtual disks.
To learn more about drivers, check out our article about wireless driver development.
Related project
Developing Drivers for Low Latency Virtual Reality Headsets
Learn how the Apriorit team elevated our client’s virtual reality headset and reduced its time-to-market through cutting-edge driver development and streamlined virtual and physical testing!
How Apriorit can help you develop an efficient driver
At Apriorit, we have extensive experience in Windows driver and kernel development, helping businesses build secure, high-performance virtualization solutions. If you need a reliable virtual disk driver to ensure your software’s interoperability, stability, and compliance, we can assist with a range of services including:
- Custom virtual disk driver development. Whether you need a secure container for sensitive data, an encrypted storage solution, or an efficient way to manage virtualized environments, we will develop a driver that meets your exact requirements.
- Device stack and I/O control integration. Apriorit development and QA professionals will ensure that your virtual disk driver properly integrates into the Windows device stack, handling input/output control requests efficiently and securely.
- Driver security and stability. Poorly developed drivers can lead to vulnerabilities, crashes, and system instability. Our experts follow secure coding best practices, while our QA specialists perform regular security, stress, and performance testing to ensure your driver is secure and reliable.
- Compliance and certification support. If your driver needs to meet Windows Hardware Quality Labs (WHQL) certification or other compliance standards, we will help you navigate the certification process and implement necessary adjustments.
- Optimization and troubleshooting. Whether you need to improve an existing virtual disk driver, resolve performance bottlenecks, or debug complex kernel-level issues, the Apriorit team will diagnose and optimize your driver for maximum efficiency.
Whatever virtual disk solution you have in mind, Apriorit is ready to provide end-to-end driver development services, from initial design to deployment and maintenance.
Conclusion
In this article and demo, we’ve provided an overview of virtual disk driver development, but a production-ready solution requires additional functionality, rigorous testing, and seamless integration into enterprise environments.
Developing Windows drivers is a complex task that requires in-depth expertise in operating system internals, driver architecture, and low-level programming. Without this specialized knowledge, you risk getting an inefficient, unstable, or even insecure solution that fails to meet performance and compliance requirements.
At Apriorit, we have extensive experience in developing custom drivers for Windows, Linux, and macOS. Our team of experts with niche knowledge ensure that you get secure, high-performance solutions that reflect your business and technical needs. If your organization needs a reliable, custom-built virtual disk driver, Apriorit is ready to help.
Have a niche problem in kernel development?
Apriorit experts can tackle any task, no matter how challenging! Let’s discuss how we can make your software more secure, efficient, and functional.
References
Have a question?
Ask our expert!
Program Manager


