 Skip to main content
This article describes the process of recovering of deleted data from the flash drive.
Contents:
Description of the FAT File System Format
As the majority of modern flash drives are formatted in FAT file system, let’s examine the structure of this file system. This file system consists of 3 main areas: reserved area, table (FAT area), and data area. The reserved area stores the description of the file system structure. The FAT area contains the state of all clusters of the file system. The cluster can be free, used, or marked as damaged (bad). The data area contains the contents of files. So, if it is written “abc” in the text file, this value will be located in the data area.

FAT file system:
- Reserved area;
- FAT area;
- Data area.
Reserved Area
There are three versions of this file system: Fat12, Fat16, and Fat32. The reserved areas for Fat12/Fat16 and Fat32 file systems differ in their structure beginning from the 37th byte. The common fields are described in the table below.
| Offset |
Field value |
Is this filed necessary for analysis? |
|
0-2 |
Assembler command to go to the assembler code of the loader. |
No |
|
3-10 |
Name of OS in ASCII. |
No |
|
11-12 |
Number of bytes in the sector. |
Yes |
|
13 |
Number of sectors in the cluster. Values can be the powers of two but the size of the cluster must not exceed 32 Kbytes. |
Yes |
|
14-15 |
Size of the reserved area in the sectors. |
Yes |
|
16 |
Number of FAT copies (usually, two). |
Yes |
|
17-18 |
The maximum number of files in the root directory. In FAT32, this field is not used and is equal to null. |
Yes |
|
19-20 |
The number of sectors in the file system. If there is more than 65535 sectors, the field value is equal to null and the alternative 4-byte field is used. |
Yes |
|
21 |
Type of the media; 0xf0 for portable data medium. |
No |
|
22-23 |
Size of a FAT copy in sectors. In FAT 32 file system, the field is not used. |
Yes |
|
24-25 |
Number of sectors in the track. |
No |
|
26-27 |
Number of heads. |
No |
|
28-31 |
Number of sectors before the partition. |
No |
|
32-35 |
Number of sectors in the file system. The field is used if there are more than 65535 sectors. |
Yes |
Now, let’s examine the fields that are specific for FAT12/FAT16.
FAT12/FAT16 file system
| Offset |
Description |
Is this filed necessary for analysis? |
|
36 |
BIOS int13h disk number. |
No |
|
37 |
Is not used. |
No |
|
38 |
If the value is 0x29, the following data is valid. |
No |
|
39-42 |
Volume number. |
No |
|
43-53 |
Volume label. |
No |
|
54-61 |
File system label. It can be false. |
No |
|
62-511 |
Is not used. |
No |
Now, let’s take a look at the fieldsof FAT32:
FAT32 file system
| Offset |
Description |
Is this filed necessary for analysis? |
|
36-39 |
Size of one FAT copy in sectors. |
Yes |
|
40-41 |
Update mode (not all table copies can be updated). |
Yes |
|
42-43 |
Main and additional version number. |
Yes |
|
44-47 |
Number of the cluster where the root directory is located. |
Yes |
|
48-49 |
Sector where the FSINFO structure is located. |
No |
|
50-51 |
Sector where the reserved copy of the boot sector is located. |
No |
|
52-63 |
Reserved. |
No |
|
64 |
BIOS int13h disk number. |
No |
|
65 |
Is not used. |
No |
|
66 |
If the field value is 0x29, the following three parameters are valid. |
No |
|
67-70 |
Volume serial number. |
No |
|
71-81 |
Volume label. |
No |
|
82-89 |
File system label. |
No |
|
90-511 |
Is not used. |
No |
FAT Area
Next to the reserved area is the FAT area. It can contain one or more FAT table copies. The number of copies and their size is defined in the reserved area. The meaning of this table is in the following: records in the table correspond to each cluster. Record number 100 corresponds to the cluster number 100, record number 500 corresponds to the cluster number 500 and so on. Clusters 0 and 1 are absent in the data area but there are records for them in the FAT table. In FAT12, FAT16, and FAT32 file systems, the size of records is 12, 16, and 32 bits, correspondingly. If the record value is equal to null, the cluster is not allocated.
Record that corresponds to the bad cluster is as follows:
| File system |
|
|
Fat12 |
0xff7 |
|
Fat16 |
0xfff7 |
|
Fat32 |
0x0ffffff7 |
All other values point to the following cluster in the chain. Supposing, we have the 1.txt file. Its size is 1200 bytes and the size of the cluster is 512 bytes. So, the file will occupy 3 clusters. Then, the number of the second cluster will be written to the FAT table record that corresponds to the first cluster. And the number of the third cluster will be written to the FAT structure that corresponds to the second cluster. And the FAT structure will contain the following for the third cluster:
| File system |
Value |
|
Fat12 |
0xfff |
|
Fat16 |
0xffff |
|
Fat32 |
0x0fffffff |
That means the end of the file.
Data Area
As for the data area, there are differences between FAT12/16 and FAT32. In FAT12/16 file system, data area always begins from the root directory. Its size can be easily calculated as we know the maximum number of records of the root directory and the size of each record.
FAT32

FAT12/16

- Reserved area;
- FAT area;
- Data area;
- Root directory.
Each file or directory has the corresponding32-byte record in its root directory. Table that describes values of each field of this record is presented below.
| Offset |
Description |
|
0 |
The first symbol of the name. It is equal to 0x00 or 0xe5. |
|
1-10 |
Name symbols. |
|
11 |
Attributes. |
|
12 |
Reserved. |
|
13 |
Creation time (tenth fractions of a second). |
|
14-15 |
Creation time (hh:mm:ss). |
|
16-17 |
Creation date. |
|
18-19 |
Last access date. |
|
20-21 |
2 high bytes of the first cluster. |
|
22-23 |
Last modification date (hh:mm:ss). |
|
24-25 |
Last record date. |
|
26-27 |
2 low bytes of the first cluster. |
|
28-31 |
File size. |
Example of Recovering of the Real Data
We need to get the file system image to give an example of real data recovering. First, we need to get the list of all flash drives connected to the current computer to perform this task. To do this, let’s use the following procedure:
RemovableDeviceInfo_vt Functions::SearchRemovalDisks()
{
    RemovableDeviceInfo_vt devInfos; //result
    /*GUID_DEVCLASS_DISKDRIVE*/
    CONST CLSID CLSID_DeviceInstance = { 0x4D36E967, 0xE325, 0x11CE,
	{ 0xbf, 0xc1, 0x08, 0x00, 0x2b, 0xe1, 0x03, 0x18 } }; // removable disk guid
    HDEVINFO hDevInfo = ::SetupDiGetClassDevs(&CLSID_DeviceInstance,
	NULL, NULL, DIGCF_PRESENT); //getting all devices with a removable disk guid
    if ( INVALID_HANDLE_VALUE == hDevInfo )
    {
        return devInfos;//exit if there are no devices
    }
    try
    {
        std::wstring name;
        RemovableDeviceInfo devInfo;
        SP_DEVINFO_DATA devInfoData;
        devInfoData.cbSize = sizeof(devInfoData);
        for ( DWORD dwCount = 0; ::SetupDiEnumDeviceInfo
	(hDevInfo, dwCount, &devInfoData); ++dwCount ) // enumerating all devices
        {
            DWORD dwSize = 0;
            DWORD dwDataType = 0;
            DWORD dwRemovalPolicy = 0;
            // [Warning]: only Windows XP and later versions
            if ( ::SetupDiGetDeviceRegistryProperty(hDevInfo,
		&devInfoData, SPDRP_REMOVAL_POLICY, &dwDataType,
		(PBYTE)&dwRemovalPolicy, sizeof(dwRemovalPolicy),
		&dwSize) )//Getting information about device from registry
            {
                if ( CM_REMOVAL_POLICY_EXPECT_NO_REMOVAL != dwRemovalPolicy )
                {
                    RemovableDeviceInfo devInfo;
				//Getting information for the current device
                    devInfo.wsDeviceDesc         = GetDeviceRegistryProperty
				(hDevInfo, &devInfoData, SPDRP_DEVICEDESC     );
                    devInfo.wsEnumeratorName     = GetDeviceRegistryProperty
				(hDevInfo, &devInfoData, SPDRP_ENUMERATOR_NAME);
                    devInfo.wsCompatibleIDs      = GetDeviceRegistryProperty
				(hDevInfo, &devInfoData, SPDRP_COMPATIBLEIDS  );
                    devInfo.wsHardwareID         = GetDeviceRegistryProperty
				(hDevInfo, &devInfoData, SPDRP_HARDWAREID     );
                    devInfo.wsMFG                = GetDeviceRegistryProperty
				(hDevInfo, &devInfoData, SPDRP_MFG            );
                    devInfo.wsFriendlyName       = GetDeviceRegistryProperty
				(hDevInfo, &devInfoData, SPDRP_FRIENDLYNAME   );
                    devInfo.wsDevInterfaceVolume = GetDevInterfaceVolume(&devInfoData);
                    devInfo.wsPath               = GetDevicePath        (&devInfoData);
                    devInfo.deviceType           = GetDeviceType        (&devInfoData);
                    devInfo.vHarddiskIndexes     = GetHarddiskIndexes
						(devInfo.wsDevInterfaceVolume);
                    if ( !devInfo.vHarddiskIndexes.empty() )
                    {
                        devInfo.diskGeometry         = GetDeviceGeometry
						(devInfo.wsDevInterfaceVolume);
                    }
					devInfos.push_back(devInfo);
                }
            }
        }
        ::SetupDiDestroyDeviceInfoList( hDevInfo );
        return devInfos;
    }
    catch (...)
    {
        ::SetupDiDestroyDeviceInfoList( hDevInfo );
        throw;
    }
}This function gets the list of all devices with GUID equal to GUID REMOVABLE DISK. After this, properties are read from the registry for each device. As a result, a vector of structures is returned, each of which describes one device. We can get the access to the physical disk image using a symbolic link .PhysicalDriveX(where X is the disk index), for example, as follows:
void MakeDump(const wchar_t* path)
{
	RemovableDeviceInfo_vt devices =
		Functions::SearchRemovalDisks();// get all removable disks
	if (devices.empty())
	{
		std::cout << "Mass storage devices was not foundn";
		return;
	}
	std::cout << "Please enter device numbern";
	for (size_t i = 0; i < devices.size(); ++i)
	{
		std::cout << i << ". ";
		std::cout << devices.at(i).wsFriendlyName.c_str()<< L"n";
	}
	int driveIndex;
	std::cin >> driveIndex;//selecting a disk
	std::vector<unsigned char=""> buffer;
	//creating a path
	std::wstring dumpPath(L"\.PhysicalDrive");
	wchar_t index[MAX_PATH];
	_itow(devices.at(driveIndex).vHarddiskIndexes[0], index , MAX_PATH);
	dumpPath.append(index);
	//opening mass storage for reading
         //requires administrator privilege
	HANDLE hDump( ::CreateFile(
		dumpPath.c_str(),
		GENERIC_READ,
		FILE_SHARE_READ | FILE_SHARE_WRITE,
		NULL,
		OPEN_EXISTING,
		FILE_ATTRIBUTE_NORMAL | FILE_FLAG_BACKUP_SEMANTICS,
		NULL) );
	//opening of file to save a dump
         //requires administrator privilege
	HANDLE hFile = ::CreateFile(path,
		GENERIC_WRITE,
		0,
		0,
		CREATE_NEW,
		FILE_ATTRIBUTE_NORMAL,
		0);
	DiskGeometry diskGeometry = devices.at(driveIndex).diskGeometry;
	DWORD dwRead = 0;
	DWORD dwMb = (1024*1024);
	LARGE_INTEGER liFullSize = {0,0};
	LARGE_INTEGER liTotalRead = {0,0};
	DWORD dwSize = diskGeometry.BytesPerSector * diskGeometry.SectorsPerTrack;
         //Getting the size of a removable disk
	liFullSize.QuadPart = GetLogicalDriveSize(hDump);
	dwSize = diskGeometry.BytesPerSector;
	std::vector<unsigned char=""> tempBuff(dwSize, 0x00);
	double dProgrVal = 0.0;
	double dProgrStep = 100.0 / (liFullSize.QuadPart) * dwSize;
	// reading from removable disk and writing to a dump file
	while ( (liFullSize.QuadPart > liTotalRead.QuadPart) &&
	::ReadFile(hDump, &tempBuff.at(0), dwSize, &dwRead, NULL) && dwRead )
	{
	    DWORD dwBytesWritten;
		if ( ! ::WriteFile(hFile, &tempBuff.front(),
			tempBuff.size(), &dwBytesWritten, 0) )
		{
			throw std::exception("Could not write");
		}
		dProgrVal += dProgrStep;
		std::cout << dProgrVal<<'n';
		liTotalRead.QuadPart += dwRead;
	}
	::CloseHandle(hDump);
	::CloseHandle(hFile);
}
}It should be mentioned that GetFileSize will return the invalid size. To get the valid size, we will use the following function:
ULONGLONG GetLogicalDriveSize(HANDLE hDrive)
{
	PARTITION_INFORMATION lpOutBuffer;
	DWORD lpBytesReturned = 0;
	if(!DeviceIoControl(hDrive,
		IOCTL_DISK_GET_PARTITION_INFO,
		NULL,
		0,
		&lpOutBuffer,
		(DWORD)sizeof(lpOutBuffer),
		&lpBytesReturned,
		NULL))
		throw std::exception("Could not get file size");
	return lpOutBuffer.PartitionLength.QuadPart;
}Now, when we have the dump, we can analyze the file system.
Example
Let’s take a flash drive and write a file to it. And now let’s delete it. Let’s make a dump with the help of the utility that is attached to the article and begin to analyze. My flash drive has FAT16 file system. Let’s begin the analysis from the reserved area.
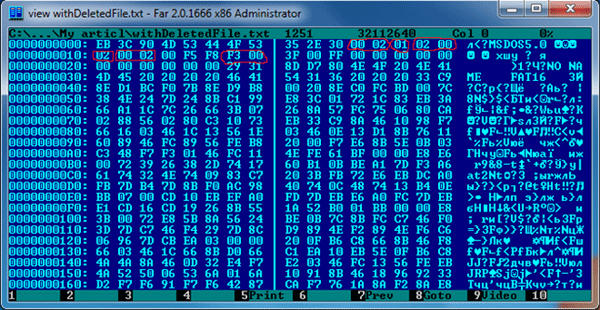
Reserved Area. The FAR file explorer is used; to view hex data in FAR press F3 to view file content and then F4 to view the content in the Hex View.
On the picture above, I highlighted the fields we are interested in. The first 2 highlighted bytes show that the size of the sector is 0x0200 bytes. The second field shows that each cluster is one sector. The third field shows that the size of the reserved area is 2 sectors. The next field shows that there are two FAT copies on the disk. Next is the maximum number of files in the root directory, in our case, it is equal to 0x0200. And the last highlighted field shows that the size of each FAT copy is 0x00f3 sectors. Equipped with this knowledge, we can present the view of the file system.

- Reserved area;
- First copy of the FAT table;
- Second copy of the FAT table;
- Beginning of the root directory;
- Beginning of the data area.
The size of the boot area is 2 sectors. And the size of the sector is 0x200 bytes. So, the first FAT table begins with the 2*0x200=0x400 address. The size of each of two FAT copies is 0xF3 of the sector or 0xF3*0x200= 0x1E600. It means that the address of the beginning of the second table is 0x400+0x1E600=0x1EA00 and the beginning of the root directory is 0x1EA00+0x1E600=0x3D000. The maximum number of records in the root directory is 0x200 and the size of each of them is 0x20. It means that the size of the reserved area is 0x20*0x200=0x4000. So the data area begins from the 0x41000 offset.
Root directory, represented in Hex View in FAR.
Let’s take a look at the beginning of the root directory. We can see that there were three files there but they were deleted. It is clear from the first byte of each record. For non-deleted data, this bit is equal to the first letter of the file name. If the record is deleted, this byte is equal to 0xE5.
Let’s try to recover the third record. The second highlighted field of it shows that the first file cluster had the 0x02 address and the size of the file was 0x00005600. It means that it occupied 0x00005600/0x200 = 0x2B clusters. After this, it would be worth looking at FAT and getting the chain of clusters. But the problem is that the chain did not remain. When deleting the file, all clusters that it occupied are marked as free. That’s why all we have is the initial cluster and the file size. There are two approaches in such situation:
- Suppose that the file took all clusters in succession beginning from the first one. This approach can be applied if the file system is not fragmented.
- Suppose that the file took all free at the current moment clusters beginning from the first one. Such approach can be applied if the file has been recently deleted and the data written after the deletion of the file did not wipe up.
It should be mentioned that there can be situations when any of these strategies can’t recover the deleted file. We will apply the first method. The first cluster is located by the 0x41000 offset, so, the last one is 0x41000+0x5600=0x46600.

Work scenario with the sample project
After the sample project has finished its work, the file D:hello.doc was created. Let’s open it in MS Word:
Recovered file
In case of FAT32 recovering, there will be some differences. The main difference will be that the root directory will be located not in the beginning of the data area but where the field in the reserved area points to.
Download sample project (ZIP, 16.5 KB)
Get more articles in our Dev Blog: Android Rooting Explained
Have a question?
Ask our expert!
Program Manager


