 Skip to main content
Smartphones and tablets help organizations streamline their business processes and improve employees’ efficiency. On the downside, mobile devices are a constant security threat because they can be compromised just like desktop computers and laptops.
The threat is real. Verizon’s Mobile Security Index 2021 report reveals that 23% of respondents (mobile security professionals) were aware that their company had experienced a mobile-related security compromise. And 53% said that the consequences were major.
A great way to protect sensitive data and secure mobile devices is by implementing a mobile device management (MDM) approach. Whether your organization provides employees with smartphones or allows them to use personal mobile devices for work, contributing to the Bring Your Own Device (BYOD) trend, MDM solutions will help you enhance your cybersecurity.
In a previous article, we overviewed key benefits of mobile device management for businesses. In this article, we explore how mobile device management works and describe the typical architecture of an MDM solution. We also provide some useful tips for implementing MDM components as well as examples of code for Android device management systems.
This article will be useful for managers and development leaders who want to ensure the proper process of managing mobile devices and create powerful Android MDM solutions.
Contents:
MDM technology overview
Mobile device management is a methodology and set of technologies that ensure security and control over mobile devices in the workplace, such as smartphones, tablets, and various terminals, including point of sale (PoS) devices. The goal of any MDM system is to monitor the state of mobile devices connected to it, manage these devices, and keep them secure.
For enterprises, an MDM system creates an additional layer of security, providing capabilities for monitoring any user activity on managed mobile devices. Additionally, an MDM solution can provide device-specific and platform-specific functionality related to:
- Data encryption
- Access management
- Secure digital card encryption
- Geolocation monitoring
- And more
Together, this functionality forms the MDM suite.
Most MDM solutions are based on a client–server model. In this model, all management commands are sent from the server to mobile devices, which then execute them. Both client and server components can be developed separately and function independently. However, when working on these components, you need to pay special attention to the flexibility of their interfaces and to their data exchange protocols.
An MDM platform detects devices connected to a network and sends them settings, commands, and configurations for immediate use. This process is fully automated to ensure continuous device usage. An MDM system should store the history of sent commands and the statuses of monitored devices. It should also be able to provide the required level of management granularity by sending necessary settings to all devices, to a particular group of devices, or to a specific device.
Devices connected to a network can be identified according to two parameters:
- International Mobile Equipment Identity (IMEI) number to identify a particular device
- International Mobile Subscriber Identity (IMSI) number to determine a SIM card that’s associated with a particular end user
MDM, EMM, and UEM: What’s the difference?
MDM is often confused with enterprise mobility management (EMM). However, MDM is actually a part of EMM.
EMM, a concept first introduced by Gartner in 2014, refers to a set of people, tools, and processes aimed at organizing, managing, and improving enterprise mobility. Alongside MDM solutions, EMM systems usually include other products for mobile application management, application wrapping, mobile content management, containerization, etc. Also, when composing EMM systems, developers often include cloud-based mobile device management solutions so that data security and encryption isn’t necessarily implemented locally on mobile devices. An MDM solution, in turn, focuses on ensuring data security and protection locally, on every managed device.
In 2018, Gartner rebranded the EMM category, introducing a new term: unified endpoint management (UEM). This approach combines EMM, MDM, and client management systems to effectively manage and secure all enterprise servers and devices from a single console.
Still, MDM remains an important part of these complex systems, providing core functionality for remote management of mobile devices. In the next section, we discuss the architecture design and implementation process for Android-based mobile device management systems.
Looking for skilled engineers in custom mobile app development?
Apriorit iOS and Android experts are ready to help you improve mobile security and data protection or create reliable software from scratch.
Server-side MDM architecture
A classic mobile device management solution architecture consists of three layers:
- Handset software
- Middle-tier server
- Backend server
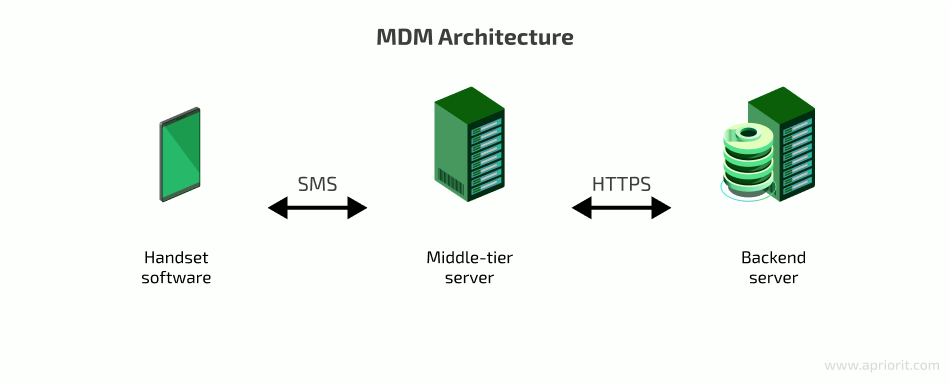
Middle-tier and backend (e.g. Firebase Cloud Messaging) servers communicate via HTTPS using an API that provides commands for device management tasks such as:
- Locking mechanism activation and deactivation
- Checking activation status
- Locking and unlocking a device
- Sending push notifications
- Asynchronous request/retrieval of information about a device’s lock status
A particular device is identified in the MDM server database based on its phone number, IMEI, or IMSI (if a device is associated with a SIM card).
Client devices communicate with the middle-tier server via SMS. A client-side certificate ensures the security of messages. The system stores a public key locally on each device in a standard encrypted container used by the Android KeyChain API, while SMS messages from the server are signed with a private key.
The phone number through which the server sends and the client device receives and sends messages is also stored on the device in a secure container. You can update this container via SMS with a command sent from a valid phone number. Handset software checks the validity of the phone number and verifies the SMS signature directly on the device.
In order to fully cover how the backend server works, we’ll consider how it interacts with its components. Take a look at the following mobile device management architecture diagram.
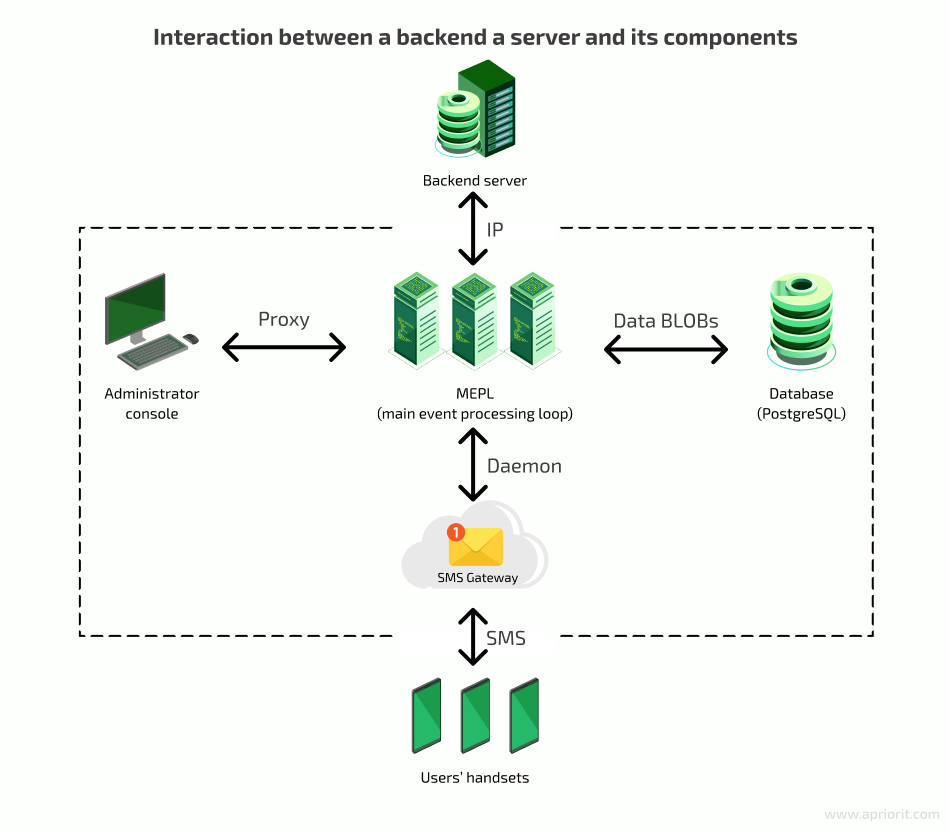
Now, let’s take a closer look at each component in this system.
Main event processing loop
The main event processing loop (MEPL) receives requests and processes them by calling other components in order to create messages, send them within the network, and update the database. Therefore, the MEPL is a link that manages other components.
The MEPL creates database requests for sent and received commands in the form of binary large objects (BLOBs). The system stores BLOBs in a database such as PostgreSQL. It’s important to store server–device command history in order to monitor possible errors and collect user activity statistics.
SMS gateway
An SMS gateway allows the system to send and receive SMS messages without an active phone number. Furthermore, the gateway can transform SMS into email or HTTP requests, and vice versa. A message sent via an SMS gateway is free for the sender. However, there can be some technical restrictions, such as limits to the number of messages that can be sent from one device per day.
It’s worth noting that in our example system, the gateway can work with the main server via HTTP or HTTPS. Once the MEPL receives an HTTP request from the gateway, it processes the message data, generates Short Message Peer-to-Peer (SMPP) messages, and and returns them.
If you also want to discover insights on SMS application development, check out our article on how to develop an application to send and receive SMS on Android.
Alternative to an SMS gateway
An SMS gateway is not the only way of organizing communication between managed devices and an MDM server. There are internet-based frameworks that implement real-time messaging and provide a 100% guarantee of message delivery, including:
Each of these frameworks requires developers to have an activation key for the API they provide. Below, we go through the features of such frameworks, using Ably.io as an example.
To start using the Ably.io software development kit (SDK), the developer has to create an Ably account and generate an API key. The SDK can be added as a dependency in the build.gradle file:
dependencies {
    ...
    implementation "io.ably:ably-android:1.0.0"
    ...
}After synchronizing the gradle file, the Ably.io API should become available. The classes that enable the developer to communicate using this API are:
- AblyRealtime, used to establish a connection with Ably services and connect to channels when a valid API key is provided
- Channel, which represents a connection to the Ably channel through which messages are sent
- Channel.MessageListener, a functional interface an instance of which is provided by the developer to process incoming messages
The general workflow with Ably.io in Kotlin looks like this:
class AblyChannelManager {
    private var channel: Channel? = null

    fun init(apiKey: String, channelName: String) {
        channel = AblyRealtime(apiKey).channels?.get(channelName)
    }

    fun subscribeListener(eventName: String, listener: Channel.MessageListener) =
        try {
            channel?.subscribe(eventName, listener) ?: printNotInitialized()
        } catch {
            /* Handle exception */
        }

    fun unsubscribeListener(eventName: String, listener: Channel.MessageListener) =
        channel?.unsubscribe(eventName, listener) ?: /* Handle uninitialized channel */

    fun sendRequest(eventName: String, request: String) =
        try {
            channel?.publish(eventName, request) ?: printNotInitialized()
        } catch (e: AblyException) {
            SDKLogger.e(e, "Failed to send a request")
        }

}The AblyChannelManager class can be used to receive and publish messages on a specific channel and custom events. These messages are received as plain text and have to be processed by the receiver. Clients that communicate this way can agree on a protocol and message format. The data can be structured as JSON or XML strings that can be encrypted to achieve better security.
The MDM server can send messages to managed devices using various methods, including simple cURL requests. The simplest command for publishing a message using cURL looks like this:
curl https://rest.ably.io/channels/[Channel name]/publish --user "[Ably API key]" --data 'name=[Event name]&&data=[Message]'After executing this command, clients that are listening to [Event name] on the [Channel name] channel will receive a plain text message: [Message].
Now, let’s move to the final component of the server-side MDM architecture.
Related project
Developing a Custom MDM Solution with Enhanced Data Security
Explore a real-life story of creating an enterprise MDM platform for managing Android tablets. Learn how to benefit from a custom solution with enhanced data security.

Administrator console
The administrator console is an interface that allows an administrator to manage the system’s work. In our example, this console is implemented in the form of a desktop application that communicates with the server via a secure channel based on a proxy server. The administrator can use this console for performing various actions, including:
- Analyzing work done on corporate devices
- Monitoring the activity of corporate devices
- Manually sending commands to mobile devices
- Detecting device usage violations
- Blocking particular functionality
The system sends the admin’s commands to the MEPL, then to devices and the database via the SMS gateway.
The connection to Firebase Cloud Messaging or other similar services as well as to other backend infrastructure that plays no significant role in device management relies on an internet connection.
Client-side MDM architecture
In our sample MDM system, an Android application has several key functions:
- Executing server commands
- Reporting on server command statuses
- Protecting corporate data
- Limiting device functionality (up to full locking)
It’s noteworthy that in an MDM architecture, security is the main priority. If it’s impossible to ensure absolute device and data security, we need to at least make sure that hacking one device doesn’t make it easier to hack other devices on the network.
Below, we overview the key elements to take into account when working on the client side of an MDM system:
- Device policy controller
- Device owner and its alternatives
- Unprovisioned and provisioned states
Device policy controller
A device policy controller (DPC) is an Android application that includes all functions mentioned above and manages access rights for system and client applications. A DPC needs to be a system app in order to get all necessary privileges from the operating system to manage other applications and their permissions. However, there’s an issue here: system apps have to be preinstalled on a mobile device. In other words, they need to be baked into the system image (Android ROM) installed on the device.
Let’s see how we can handle this issue for non-rooted devices. We won’t consider rooted devices, as our goal is to avoid having rooted devices in our network.
For non-rooted devices, the /system folders with system apps (/system/app and /system/priv-app) have read-only access. You can update system applications, but these updates won’t become part of the ROM, and resetting the system to its default settings will delete these applications.
To install system apps, you have to set a permission that’s usually provided for system apps only (pre-installed or signed with the same certificate as the ROM) in the AndroidManifest file:
<permission
...
android:protectionLevel = signatureOrSystem
...
/>An application with such permission obviously cannot be uploaded to the Play Store because each ROM has its own signature.
Device owner
The device owner is the first user created during initial device configuration when the device is first set up. Device owner is a privilege assigned to a certain application (MDM or another similar solution) to enforce policies and restrictions on the target device.
As an alternative to creating a traditional device owner profile, you can use Samsung Knox, a mobile security platform. Samsung Knox allows you to create an MDM profile and assign it as a device owner on any device running Knox 2.8 or higher. However, this solution only works for Samsung devices. Also, with Android changes to MDM profiles, some Knox APIs can be deprecated. You can find more information on these changes on the Prepare Knox for Android 11 page of the Samsung Knox documentation.
The good news is that Samsung also provides a Knox SDK for third-party applications. The SDK requires developers to have a license key that can be generated after creating a Samsung account and enrolling in the Partner program.
Different license keys grant developers access to different features of the Knox SDK. The Knox SDK uses the Knox Platform for Enterprise (KPE) license. This license is permission-based, with three options providing access to different combinations of free and paid features:
- KPE Standard — A free license that provides access to call APIs for managing basic device features such as user accounts, location, data encryption, network connections, simple kiosking, and security restrictions.
- KPE Premium — A paid license with access to KPE Standard permissions plus APIs for accessing advanced security features like containers, VPNs, and certificates. This license also offers advanced kiosking and comprehensive device customization.
- KPE DualDAR — A paid license that includes KPE Premium capabilities and permissions to call APIs responsible for double encryption of data at rest.
Happily, the KPE Standard license is sufficient for implementing the most important features of the client side of an MDM system.
The license has to be activated using the Knox SDK:
fun activateKnoxLicense(licenseKey: String, pkgName: String) =
    try {
        KnoxEnterpriseLicenseManager
            .getInstance(context) // Context can be provided to the class that manages Knox functionality
            .activateLicense(licenseKey, pkgName)
    } catch (e: Exception) {
        /* Handle exception */
}The Knox license key is validated on Samsung servers, so the device has to be connected to the internet.
One thing to keep in mind is that Knox is not fully backward-compatible. This means that devices running older versions of Knox need a special backward-compatible key to get access to Knox features. This key enables devices running Knox v2.7.1 and earlier to use the Knox 3.x SDK.
Note: If your app needs to support devices with older Knox versions, you need to generate only one backward-compatible key. This key works on an unlimited number of devices for an unlimited period.
This is how you can use a backward-compatible key:
fun activateKnoxBcLicense(licenseBCKey: String, pkgName: String) =
    EnterpriseLicenseManager
        .getInstance(context) // Context can be provided to the class that manages Knox functionality
.activateLicense(licenseBCKey, pkgName)After the license is activated, you can use the functions from the EnterpriseDeviceManager class to implement all client-side functionalities for managing the device.
The key advantage of using Knox over the traditional device owner approach is that Knox can be deployed directly on the target device. In this case, there’s no need for you to interact with a PC in order to set the necessary permissions for the MDM application. However, Knox can only be used with Samsung devices, which is a serious downside.
Related project
Building a Complex Parental Control App for Android
Explore how Apriorit helped a software provider create a secure parental control application compatible with the most popular Android devices.

Provisioned and unprovisioned states
The unprovisioned state is the state of a target device before the initial configuration. The provisioned state, in turn, is the state of the configured device. For a corporate device with a preinstalled DPC app, the device owner will be the DPC application itself. Therefore, the DPC app will get access to advanced device management capabilities, including:
- Hiding installed apps (both in the app list and in settings)
- Disabling the status bar
- Disabling notifications
- Disabling services such as Google Now and Google Assistant
- Preventing the display from switching off
- Silently installing and uninstalling apps
- Retrieving all necessary DPC runtime permissions
- Blocking debugging mode (so that when connecting via USB, adb doesn’t connect to the device)
Most of these features can be implemented with the Device Administration API. DeviceAdminReceiver is a basic class for implementing a device administration component. It ensures the interpretation of raw intent actions sent by the system. Therefore, it enhances the BroadcastReceiver class. You should declare DeviceAdminReceiver in the AndroidManifest file along with setting the following intent filters:
<receiver

    android:name=".DeviceAdminReceiver"
    android:description="@string/app_name"
    android:label="@string/app_name"
    android:permission="android.permission.BIND_DEVICE_ADMIN">
    <meta-data
        android:name="android.app.device_admin"
     android:resource="@xml/device_admin_receiver"/>
    <intent-filter>
        <action android:name="android.app.action.DEVICE_ADMIN_ENABLED"/>
        <action android:name="android.app.action.PROFILE_PROVISIONING_COMPLETE"/>
        <action android:name="android.intent.action.BOOT_COMPLETED"/>
    </intent-filter>
</receiver>The receiver must have the android.permission.BIND_DEVICE_ADMIN permission to guarantee that the system interacts only with this receiver and not with any other device administration component of a different application. In the DeviceAdminReceiver component metadata, you should set an XML file that will contain specific policies for each administrative component.
<?xml version="1.0" encoding="utf-8"?>

<device-admin>
    <uses-policies>
        <limit-password/>
        <watch-login/>
        <reset-password/>
        <force-lock/>
        <wipe-data/>
        <expire-password/>
        <encrypted-storage/>
        <disable-camera/>
        <disable-keyguard-features/>
     </uses-policies>
</device-admin>Use the DeviceAdminInfo class to set metadata taken from this XML file.
The android.app.action.DEVICE_ADMIN_ENABLED action is the main action that DeviceAdminReceiver has to process in order to manage a device. The receiver will receive events for this intent if you’ve installed the MDM app as a device admin or device owner. The DeviceAdminReceiver class should be inherited from android.app.admin.DeviceAdminReceiver.
Let’s cover the key aspects of implementing DeviceAdminReceiver:
public void onProfileProvisioningComplete(Context context, Intent intent) {

        DevicePolicyManager devicePolicyManager = (DevicePolicyManager) context.getSystemService(Context.DEVICE_POLICY_SERVICE);
        String packageName = context.getPackageName();

        boolean isDeviceOwner = devicePolicyManager.isDeviceOwnerApp(packageName);
        if (!isDeviceOwner) {
            Toast.makeText(context, R.string.admin_receiver_fail, Toast.LENGTH_LONG).show();
            return;
        }
        if (Build.VERSION.SDK_INT >= Build.VERSION_CODES.M) {
            autoGrantRequestedPermissionsToSelf(context);
        }
        addUserRestriction(context);
}The onProfileProvisioningComplete method is activated after the ACTION_PROFILE_PROVISIONING_COMPLETE action. The filter of this action is declared in the AndroidManifest file, indicating that the preparation of the managed device has been completed successfully. When an MDM app sends a request to get administrator permissions, its profile limits the capability to intercept this intent. By calling isDeviceOwnerApp(String), you can check whether your app is the real device owner. If necessary, you can make your app the device owner using adb in the terminal:
adb shell dpm set-device-owner
example.mobile.device.management/.DeviceAdminReceiverAnother way to make your application the device owner is by using an installer app and near-field communication (NFC) technology. With the NFC method, an installer app that’s running on another Android device will initiate DPC app installation from the APK file via NFC and set that app as the device owner. In this case, however, the DPC app can’t be a system app.
The next step is obtaining runtime permissions for Android 6.0 and higher. You should check all permissions needed for the app to work and get runtime permissions (an app usually requests them from a user as components are used).
@TargetApi(Build.VERSION_CODES.M)
 public static void autoGrantRequestedPermissionsToSelf(Context context)  {
     DevicePolicyManager devicePolicyManager = (DevicePolicyManager) context.getSystemService(Context.DEVICE_POLICY_SERVICE);
     String packageName = context.getPackageName();
     ComponentName adminComponentName = getComponentName(context);
     List<String> permissions = getRuntimePermissions(context.getPackageManager(), packageName); //Retrieve a list of requested runtime permissions
     for (String permission : permissions) {
         boolean success =   devicePolicyManager.setPermissionGrantState(adminComponentName, packageName, permission, PERMISSION_GRANT_STATE_GRANTED);
         if (!success) {
              Log.e("Failed to grant permission: " + permission);
         }
     }
 }

 private static List<String> getRuntimePermissions(PackageManager packageManager, String packageName) {
      List<String> permissions = new ArrayList<>();
      PackageInfo packageInfo;
      try {
          packageInfo = packageManager.getPackageInfo(packageName, PackageManager.GET_PERMISSIONS); //Get the list of all requested permissions
      } catch (PackageManager.NameNotFoundException e) {
          return permissions;
      }

 if (packageInfo != null && packageInfo.requestedPermissions != null) {
     for (String requestedPerm : packageInfo.requestedPermissions) {
         if (isRuntimePermission(packageManager, requestedPerm)) { //Keep only runtime permissions
             permissions.add(requestedPerm);
         }
     }
  }
  return permissions;
}

 private static boolean isRuntimePermission(PackageManager packageManager, String permission) {
     try {
         PermissionInfo pInfo = packageManager.getPermissionInfo(permission, 0);
         if (pInfo != null) {
             if ((pInfo.protectionLevel & PermissionInfo.PROTECTION_MASK_BASE) == PermissionInfo.PROTECTION_DANGEROUS) {
                 return true;
             }
         }
      } catch (PackageManager.NameNotFoundException ignore) {
          Log.w(permission + " isn't runtime");
      }
      return false;
}The addUserRestriction and clearUserRestriction methods are responsible for enabling and disabling features such as installing apps from unknown sources (not from the Play Store), resetting to default settings, and debugging. The latter two features are useful in MDM development, which is why you should disable them only for the release product.
public static void addUserRestriction(final Context context) {
    DevicePolicyManager devicePolicyManager = (DevicePolicyManager) context.getSystemService(Context.DEVICE_POLICY_SERVICE);
    ComponentName admin = getComponentName(context);
    addUserRestriction(admin, devicePolicyManager);

    devicePolicyManager.addUserRestriction(admin, DISALLOW_INSTALL_UNKNOWN_SOURCES);
    if (!BuildConfig.DEBUG) {
        devicePolicyManager.addUserRestriction(admin, DISALLOW_FACTORY_RESET);
        devicePolicyManager.addUserRestriction(admin, DISALLOW_DEBUGGING_FEATURES);
    }
    devicePolicyManager.setAutoTimeRequired(admin, true);
}

public static void clearUserRestriction(final Context context) {
    DevicePolicyManager devicePolicyManager = (DevicePolicyManager) context.getSystemService(Context.DEVICE_POLICY_SERVICE);
    ComponentName admin = getComponentName(context);
    devicePolicyManager.clearUserRestriction(admin, DISALLOW_INSTALL_UNKNOWN_SOURCES);
    devicePolicyManager.clearUserRestriction(admin, DISALLOW_FACTORY_RESET);
    devicePolicyManager.clearUserRestriction(admin, DISALLOW_DEBUGGING_FEATURES);
    devicePolicyManager.setAutoTimeRequired(admin, false);
}Now that we’ve described how a DPC app gets the capability to manage a mobile device, let’s proceed to actual device management.
Practical implementation of an MDM solution
As we mentioned earlier, an administrator should be able to block different device functions and prevent a device from being used for non-corporate purposes using a web-based interface. Furthermore, a device should regularly report its status to the mobile device management system. To accomplish this, we should use the LockTask API that’s available only for the device owner in Android 6.0 and higher.
The more precise task is to limit device capabilities to a single activity and make it impossible for the device to do anything else. This means that both the Back and Home system buttons have to return users to this activity. To partially do this, we can make our app the default launcher. Therefore, in lock mode, the home screen will be the single allowed activity.
<activity
        android:name="example.mobile.device.management.MyLockActivity"
        android:label="@string/app_name"
        android:uiOptions="splitActionBarWhenNarrow"
        android:screenOrientation="portrait"
        android:enabled="false">
      <intent-filter>
      <action android:name="android.intent.action.MAIN"/>
        <category android:name="android.intent.category.DEFAULT"/>
        <category android:name="android.intent.category.HOME"/>
      </intent-filter>
</activity>An administrator can enable and disable this mode (so that when it’s disabled, the device works as usual) on each particular device, identifying the device via its IMEI or IMSI. The device will automatically lock in case an unauthorized action is attempted or under unauthorized conditions. Here are some conditions for enabling such scenarios:
- Inserting an invalid SIM card
- Removing a SIM card
- Inappropriate device provisioning
- Leaving the monitored territory
- Device theft or crash
If any of these conditions are met, the device will inform the server about it as soon as it gets the chance.
Let’s consider activity methods that enable lock mode.
//Check status of lock task
  private boolean isLocked(ActivityManager activityManager)
  {
    if(Build.VERSION.SDK_INT >= Build.VERSION_CODES.M) {
      int lockTaskMode = activityManager.getLockTaskModeState();
      return lockTaskMode != ActivityManager.LOCK_TASK_MODE_NONE ? true : false;
    }
    else if(Build.VERSION.SDK_INT >=Build.VERSION_CODES.LOLLIPOP &&
            Build.VERSION.SDK_INT< Build.VERSION_CODES.M) {
      return activityManager.isInLockTaskMode();
    }
    else {
      return false;
    }
  }

  //Start and restart lock task
  private void restartLock(){
    final ActivityManager activityManager = (ActivityManager) getApplicationContext().getSystemService(Context.ACTIVITY_SERVICE);
    if (!isLocked(activityManager) && isLocked.get()) {
      Handler lockHandler = new Handler(Looper.getMainLooper());
      lockHandler.postDelayed(new Runnable() {
        @Override
        public void run() {
          try {
            activityManager.moveTaskToFront(getTaskId(), 0); //Display lock task activity over any other apps
            startLockTask();
            isLocked.set(true);
          }catch (Exception exception) {
            Log.v("startLockTask - Invalid task, not in foreground");
          }
        }
      }, LOCK_TASK_DELAY);
    }
  }

 //Reset lock task
  public void unlockTask() {
    startIntent = null;
    try {
      stopLockTask();
    } catch (Exception e) {
      Log.w("stopLockTask - Invalid task, not in foreground", e);
    }
    isLocked.set(false);
    finish();
}But what should you do if your device must have access to some standard functions even in lock mode? For example, say that emergency calls should still be available, meaning that when the device is in lock mode, the screen will have an emergency call button. Let’s implement this using a standard Android component called EmergencyDialer.
final Button EmergancyCallButton = (Button) findViewById(R.id.bEmergencyCallButton);
EmergancyCallButton.setOnClickListener(new View.OnClickListener() {
  @Override public void onClick(View v) {
    KeyguardManager kManager = (KeyguardManager) getSystemService(KEYGUARD_SERVICE);
    final KeyguardManager.KeyguardLock keyguardLock = kManager.newKeyguardLock("EmergencyDialer.KeyguardLock");
    keyguardLock.disableKeyguard(); //Enable the keyboard

    Intent callIntent = new Intent("com.android.phone.EmergencyDialer.DIAL");
    callIntent.setFlags(Intent.FLAG_ACTIVITY_NO_USER_ACTION | Intent.FLAG_ACTIVITY_BROUGHT_TO_FRONT | Intent.FLAG_ACTIVITY_NO_HISTORY);

    startActivityForResult(callIntent, EMERGENCY_CALL_ACTIVITY_REQUEST_CODE); //Launch EmergencyDialer activity

    final ActivityManager activityManager = (ActivityManager) getApplicationContext().getSystemService(Context.ACTIVITY_SERVICE);
    if (isLocked(activityManager)) {
      Handler lockHandler = new Handler(Looper.getMainLooper());
      lockHandler.postDelayed(new Runnable() {
        @Override public void run() {
          try {
            activityManager.moveTaskToFront(getTaskId(), 0);
            stopLockTask(); //Stop lock task to have possibility make a call
            isEmergencyScreen.set(true);
          } catch (Exception exception) {
            Log.v("stopLockTask - Invalid task, not in foreground", exception);
          }
        }
      }, LOCK_TASK_DELAY);
    }
  }
});

//Restart lock task after emergency dialer activity is closed
@Override
protected void onActivityResult(int requestCode, int resultCode, Intent data) {
    switch(requestCode)
    {
        case EMERGENCY_CALL_ACTIVITY_REQUEST_CODE:
        if (resultCode == RESULT_CANCELED) {
            isEmergencyScreen.set(false);
            screenPinningHelper.setLockTaskPackages();
            restartLock();
        }
        break;

        /*...*/

    }
}You can’t perform an emergency call from the lock task. Therefore, the user will be able to disable the lock mode by opening a notification bar or using the recent apps button. Tapping the Home or Back button, however, will restart the lock task because the activity is a launcher.
This problem can be solved in several ways. For example, you can launch the EmergencyDialer component as a pinned activity. This will display system buttons, but they won’t be functional (available on Android versions 5.0 and higher).
The second possible solution is to intercept system button taps. This method is more reliable than the previous. To intercept button taps, let’s consider the BroadcastReceiver class that will process the ACTION_CLOSE_SYSTEM_DIALOGS event.
public class SysButtonsWatcher {
    private Context mContext;
    private IntentFilter mFilter;
    private OnSysButtonListener mListener;
    private InnerRecevier mRecevier;

    public SysButtonsWatcher(Context context) {
        Log.entry();
        mContext = context;
        mFilter = new IntentFilter(Intent.ACTION_CLOSE_SYSTEM_DIALOGS);
    }

    public void OnSysButtonPressedListener(OnSysButtonListener listener) {
        Log.entry();
        mListener = listener;
        mRecevier = new InnerRecevier();
    }

    public void startWatch() {
        Log.entry();
        if (mRecevier != null) {
            mContext.registerReceiver(mRecevier, mFilter);
        }
    }

    public void stopWatch() {
        Log.entry();
        if (mRecevier != null) {
            mContext.unregisterReceiver(mRecevier);
        }
    }

    class InnerRecevier extends BroadcastReceiver {
        @Override
        public void onReceive(Context context, Intent intent) {
            Log.entry();
            String action = intent.getAction();
            if (action.equals(Intent.ACTION_CLOSE_SYSTEM_DIALOGS)) {
                String reason = intent.getStringExtra("reason");
                if (reason != null) {
                    if (mListener != null) {
                        if (reason.equals("homekey")) { //Home button
                            mListener.onHomePressed();
                        } else if (reason.equals("recentapps")) { //Recent apps button
                            mListener.onHomeLongPressed();
                        } else if (reason.equals("voiceinteraction")) { //Long tap on Home button
                            mListener.onVoiceInteraction();
                        }
                    }
                }
            }
        }
    }
}In this way, the system will intercept a user’s taps on system buttons, thus preventing the lock task from restarting.
When implementing mobile device management for Android, it’s important to make sure that:
- An administrator can identify and manage each device via its phone number, IMEI, and IMSI
- Communication with devices can be implemented via the SMS gateway API of a corresponding communications provider
- Connection between devices and the server is established properly in order to update information about the status of each device
Read also
Maximize Benefits of Mobile Device Management: How to Choose the Right Deployment Option for Your Business
Learn how to benefit from MDM and choose the right deployment strategy for an Android MDM solution depending on the industry it’s aimed for.

What to consider when developing an Android MDM solution
No matter the industry you’re creating an MDM solution for, such a project requires careful planning and implementation. Building each product is unique, as requirements and conditions can vary, but there are a few nuances common for all MDM projects. Below, we list some key points you should be aware of before rushing into MDM development:
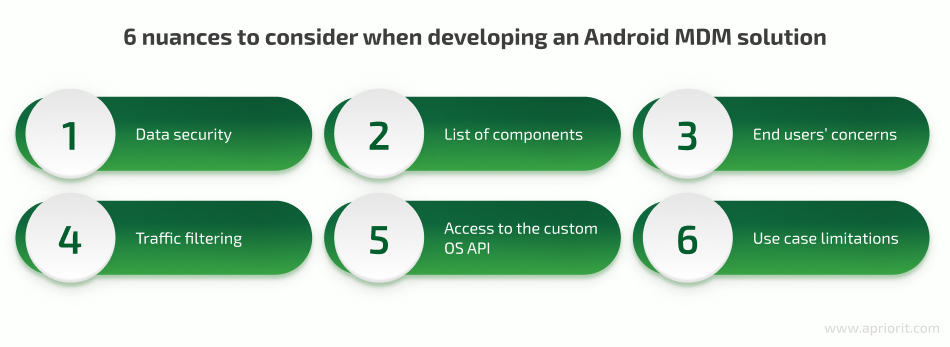
1. Focus on security. Data protection is one of the critical reasons businesses choose to implement MDM solutions. Therefore, before starting the development process, you should research and outline the types of data your customer will most likely want to protect, possible risks they want to eliminate, and security measures they expect an MDM solution to have.
At Apriorit, we have experience developing a custom MDM solution with enhanced data security and an admin panel for centralized management of all tablets connected to the client’s system. We built a product that allowed our client to deliver their services to Android users, maintaining the needed level of data security. Check out our case study to discover how we helped our client deliver their services to Android users and maintain the necessary level of data security.
2. Be specific with the product’s components. Rushing into development without a thoroughly planned list of components is risky. If you find a need to add a new feature or modify an existing one when the product is already under development, this will introduce risks of extra expenses and prolonged deadlines.
Start planning your feature set by adding basic MDM components like device tracking, mobile management, application security, identity and access management, and endpoint security. Make sure to specify details for each feature according to your business goals and project vision. Then, add your custom requirements and needs.
3. Address end users’ concerns. During the project discovery phase, research the needs, concerns, and fears of end users. This information can help you adjust planned features accordingly to better meet user expectations. You can also use these insights to empower the marketing strategy for your software once it’s delivered.
For example, if you’re planning to create a parental control solution, research flaws in existing products and read negative reviews. Some parents fear that MDM products can lead to children’s data compromise, create vulnerabilities that can be exploited by hackers, and leak data.
4. Pay attention to traffic filtering functionality. Traffic filtering is a vital part of any MDM solution, as it helps the solution decide whether traffic should be forwarded to the target server or dropped.
The only way to do this in Android is to implement a VPN service that intercepts all outbound traffic, parses it, and decides what to do based on filtering rules. Instead of rejecting or allowing traffic, a VPN can also redirect it to a remote proxy or ICAP server for further processing. The rules that govern traffic flows have to be pushed from the backend server to each managed device.
5. Ensure that only the agent app can access the custom OS API. An MDM API can transmit sensitive information, so it’s important to make sure that only trusted agents are able to access it. The easiest way to ensure this is to use the approach that Android itself uses. There are multiple APIs in Android that require the client to be signed with the same certificate as the operating system. The same idea can be used for MDM agent apps that have to access custom APIs, and it will make sure that no third-party apps can access those APIs.
Alternatively, you can use an approach similar to what Samsung Knox uses. The API can be distributed in the form of a library that requires the client to obtain some form of a license key before accessing the API itself. This will allow multiple agent and third-party apps to use the same API without having to sign their apps with OS certificates.
6. Know the use case limitations. Note that a traditional approach to Android-targeted MDM might not be able to cover all possible use cases. Common reasons are the range of devices used within an organization and the ways users interact with devices.
Here are a few examples of such use cases:
- A typical business uses a variety of devices, including desktops and Internet of Things, that run on different operating systems.
- The policies for mobile devices are often applicable to other endpoints as well, so it makes sense to have a unified control system for all of them.
- Users tend to interact with more than one device, so policies shouldn’t be restricted to a single device but should instead follow the user.
Conclusion
According to Verizon’s Mobile Security Index 2021 report, 40% of responders said that mobile devices are the company’s biggest security risk. Securing smartphones and tablets within your organization’s infrastructure using MDM and MAM solutions is a must.
Despite the continuous transformation of mobile device management technologies and approaches, MDM remains the core tool for ensuring proper protection and control over mobile devices. MDM solutions allow companies to enforce security policies and restrictions without compromising end user comfort.
At Apriorit, we have a team of passionate Android and iOS developers who are ready to help with projects of any complexity. We’ll gladly enhance the capabilities of an existing MDM system by introducing new features and functionalities or build a brand-new solution from scratch.
Want to build a reliable and secure MDM product?
Take the first step toward ensuring proper protection of your corporate data — get in touch with us and we’ll start working on your perfect MDM software.
Have a question?
Ask our expert!
Director of Global Markets Development


