 Skip to main content


You can take single- and multi-monitor screenshots on Linux using various tools. However, if you need to implement this feature in your product, the best solution is to write your own code from scratch.
In this article, we describe the process of capturing screenshots for single-monitor and multi-monitor setups. For these purposes, we use two implementations of X.Org clients: the Xlib and XCB libraries. We also explain how to save screenshots in the BMP file format.
Contents:
Introduction
Screenshots can be taken for various reasons. For instance, employee monitoring tools often take screenshots to record activity and detect violations like accessing forbidden websites and compromising sensitive data.
And since lots of employees use multiple monitors for convenience and efficiency, it’s necessary to know how to take multi-monitor screenshots.
In this article, we show two comprehensive approaches to capturing multi-monitor screenshots on Linux. Each step is described in detail and illustrated with example code. At the end of the article, you’ll get ready-to-go code for capturing screenshots.
Before we proceed to taking multi-monitor screenshots, let’s define the terms we’ll use.
- X.Org Server — An open-source display server implementation for the X Window System provided by the X.Org Foundation.
- Xlib — A library created for interacting with an X server that allows programmers to write software without needing to deal with hardware details. Xlib serves as an interface between a programming language and graphics card and monitor hardware.
- XCB — A library distributed under the MIT License that was designed as an advanced replacement for Xlib. XCB aims to reduce the library size and complexity and provide direct access to the X11 protocol.
Let’s start with capturing a multi-monitor screenshot using the Xlib library.
Taking a screenshot with Xlib
The Xlib library offers a number of features, including the possibility to take a screenshot of the entire desktop. Here’s the code for the XGetImage function:
XImage *XGetImage(display, d, x, y, width, height, plane_mask, format)
        Display *display;
        Drawable d;
        int x, y;
        unsigned int width, height;
        unsigned long plane_mask;
int format;To take a screenshot, we need to perform the following actions:
- Establish a connection to the X.Org Server
- Get the root window to take a screenshot of it
- Get the bounding box of the root window
- Call the XGetImage function
But first, we need to include the Xlib header in our code so we can use the Xlib library’s functionality:
#include <X11/Xlib.h>After that, we can establish a connection to the X.Org Server and get the root window:
Display* dsp = XOpenDisplay(nullptr);
Window root = RootWindow(dsp, DefaultScreen(dsp));The next step is to determine the width and height of the root window. To do so, we use the XGetWindowAttributes function:
XWindowAttributes attr = {};
XGetWindowAttributes(dsp, root, &attr);

auto width = attr.width;
auto height = attr.height;Now we have all the information needed to call the XGetImage function:
XImage* image = XGetImage(dsp, root, 0, 0, width, height, AllPlanes, ZPixmap);Done! We have an instance of the XImage structure with a screenshot of the entire desktop. Now we can access the RGBA data of the image using the image->data field.
Note: To avoid a memory leak, the received instance of the XImage structure should be freed using the XDestroyImage function. Also, at the end of the program, you should disconnect the display server using the XCloseDisplay function.
To run our program and check its performance, we need to build an executable using the following command:
g++ xlib.cpp -o xlib -lX11 -g -std=c++11Now that we’ve learned how to take screenshots using the Xlib library, let’s explore the same process using the XCB library.
Capturing a screenshot using XCB
XCB, like its older brother Xlib, has a function for getting the screen buffer. It’s called xcb_get_image and looks like this:
xcb_get_image_cookie_t xcb_get_image(
xcb_connection_t *conn,
uint8_t format,
xcb_drawable_t drawable,
int16_t x,
int16_t y,
uint16_t width,
uint16_t height,
uint32_t plane_mask
);In contrast to the Xlib implementation, this function simply generates a request to the server, which should be sent using the xcb_get_image_reply function:
xcb_get_image_reply_t *xcb_get_image_reply(
xcb_connection_t *conn,
xcb_get_image_cookie_t cookie,
xcb_generic_error_t **e
);This request–reply mechanism is a key feature of XCB that makes it a bit more powerful and faster than Xlib. The point is that such requests can be reused, which decreases memory consumption and allows for faster performance, since we don’t waste time allocating memory when reusing already generated requests.
Again, we need to take several preparatory steps before actually taking a screenshot. These steps, however, are pretty much the same as with Xlib.
First, we need to include the XCB header in our code to use the functionality of the XCB library:
#include <xcb/xcb.h>After that, we need to set up a connection to the X.Org Server and get the root window of the screen:
xcb_connection_t* dsp = xcb_connect(nullptr, nullptr);
xcb_window_t root =
xcb_setup_roots_iterator(xcb_get_setup(dsp)).data->root;Now we can determine the size of the root window. In XCB, we use a function called xcb_get_geometry to do that.
Just as XCB has the xcb_get_image function, it also has a function with the _reply suffix that generates and sends requests to the server. You can also use the smart pointer std::shared_ptr to automatically free the memory allocated for XCB replies:
std::shared_ptr<xcb_get_geometry_reply_t> geometry(
    xcb_get_geometry_reply(
        dsp
        , xcb_get_geometry(dsp, root)
        , nullptr
    )
    , free
);
auto width = geometry->width;
auto height = geometry->height;Once we’ve performed all these steps, it’s time to take a screenshot:
std::shared_ptr<xcb_get_image_reply_t> image(
    xcb_get_image_reply(
        dsp
        , xcb_get_image(
            dsp
            , XCB_IMAGE_FORMAT_Z_PIXMAP
            , root
            , 0
            , 0
            , width
            , height
            , static_cast<uint32_t>(~0)
        )
        , nullptr
    )
    , free
);To access the RGBA data of the image, use the xcb_get_image_data function:
uint8_t *xcb_get_image_data(const xcb_get_image_request_t *reply);Note: To prevent memory leaks, you should close the display connection using the xcb_disconnect function at the end of your program.
To build an executable from the source code shown above, you can use the following command:
g++ xcb.cpp -o xcb -lxcb -g -std=c++11Now let’s explore how to save images in the BMP file format.
Saving images in the BMP file format
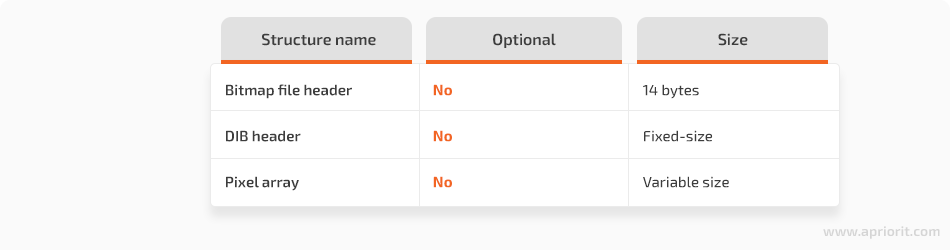
Now that you have the RGBA buffer, you can save it to the file system and open it with any image viewer. To do that, you can use a simple file format like BitMap Picture, or BMP. The structure of the BMP file format is shown in the image below:
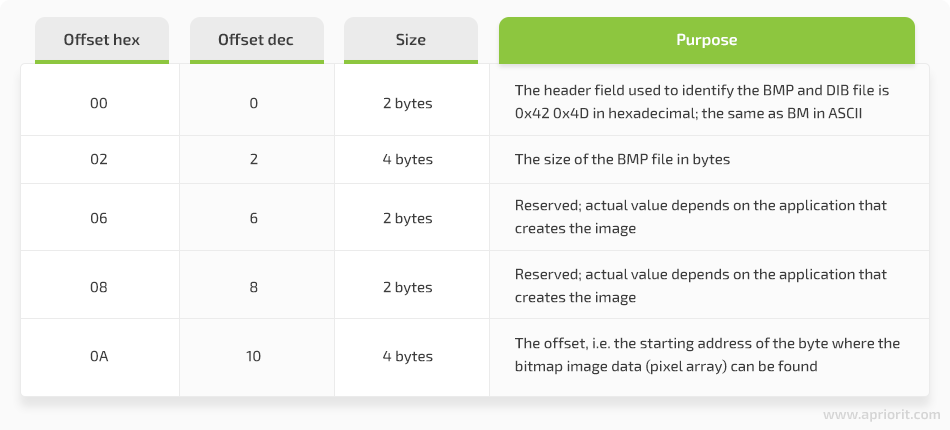
The image below shows the Bitmap file header structure:
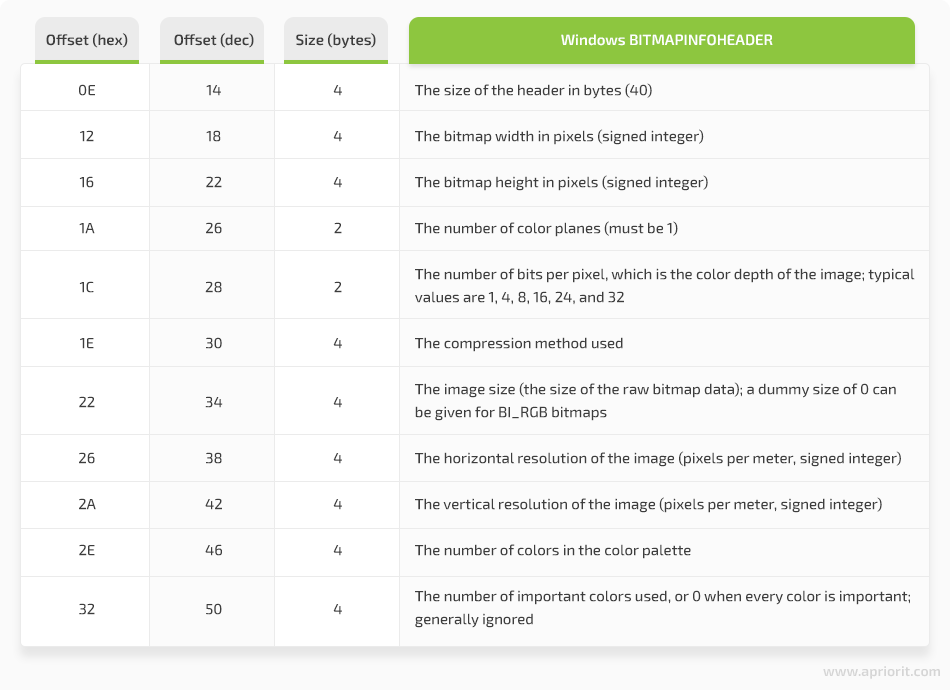
The image below shows the DIB header structure:
To save the raw pixel buffers, we need to implement the following structures first:
#pragma pack(push, 1)
struct BITMAPINFOHEADER {
    int32_t biSize;
    int32_t  biWidth;
    int32_t  biHeight;
    int16_t  biPlanes;
    int16_t  biBitCount;
    int32_t biCompression;
    int32_t biSizeImage;
    int32_t  biXPelsPerMeter;
    int32_t  biYPelsPerMeter;
    int32_t biClrUsed;
    int32_t biClrImportant;
};

struct BITMAPFILEHEADER {
    int16_t  bfType;
    int32_t bfSize;
    int16_t  bfReserved1;
    int16_t  bfReserved2;
    int32_t bfOffBits;
};
#pragma pack(pop)Then we need to implement the PixelsToBitmap function that will convert the raw pixels buffer to the bitmap buffer:
std::vector<uint8_t> PixelsToBitmap(std::vector<uint8_t> pixels, size_t width, size_t height, int16_t depth)
{
    BITMAPFILEHEADER bmpFileHeader = {};
    bmpFileHeader.bfType = kBitmapHeaderMagic;
    bmpFileHeader.bfReserved1 = bmpFileHeader.bfReserved2 = 0;
    bmpFileHeader.bfOffBits = sizeof(BITMAPFILEHEADER) + sizeof(BITMAPINFOHEADER);
    bmpFileHeader.bfSize = bmpFileHeader.bfOffBits + pixels.size();

    BITMAPINFOHEADER bmpInfoHeader = {};
    bmpInfoHeader.biSize = sizeof(BITMAPINFOHEADER);
    bmpInfoHeader.biWidth = width;
    bmpInfoHeader.biHeight = -height;
    bmpInfoHeader.biPlanes = 1;
    bmpInfoHeader.biBitCount = static_cast<int16_t>(depth);
    bmpInfoHeader.biClrUsed = 0;
    bmpInfoHeader.biClrImportant = 0;

    std::vector<uint8_t> bitmap;
    bitmap.reserve(bmpFileHeader.bfSize);

    bitmap.insert(bitmap.end(),
        reinterpret_cast<uint8_t*>(&bmpFileHeader),
        reinterpret_cast<uint8_t*>(&bmpFileHeader) + sizeof(BITMAPFILEHEADER));
    bitmap.insert(bitmap.end(),
        reinterpret_cast<uint8_t*>(&bmpInfoHeader),
        reinterpret_cast<uint8_t*>(&bmpInfoHeader) + sizeof(BITMAPINFOHEADER));
    bitmap.insert(bitmap.end(), pixels.begin(), pixels.end());
    return bitmap;
}Our last step is to call the final function, PixelsToBitmap, which will generate the bitmap buffer that we’ll write to the file.
First, let’s take a look at an example with Xlib:
std::vector<uint8_t> pixels(
image->data
, image->data + image->bytes_per_line * image->height
);
auto bitmap = PixelsToBitmap(
pixels
, width
, height
, image->bits_per_pixel
);

std::ofstream file(
"xlib.bmp"
, std::ios::binary
);
file.write(
reinterpret_cast<const char*>(bitmap.data())
, bitmap.size()
);Now it’s time to explore the same operation with the XCB library:
std::vector<uint8_t> pixels(
    xcb_get_image_data(image.get())
    , xcb_get_image_data(image.get()) +
xcb_get_image_data_length(image.get())
);
auto depth = pixels.size() / width / height * 8;
auto bitmap = PixelsToBitmap(pixels, width, height, depth);

std::ofstream file("xcb.bmp", std::ios::binary);
file.write(
reinterpret_cast<const char*>(bitmap.data())
, bitmap.size()
);The final code is ready and can be used to save screenshots in the BMP file format.
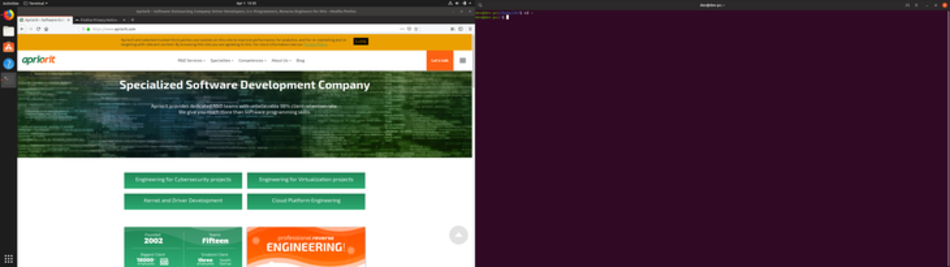
Here’s an example of a screenshot taken with XCB:
Conclusion
In this article, we showed how to capture screenshots using the Xlib and XCB libraries. We also showed how to save these screenshots in the BMP image format.
You can use the example code shown in this article for capturing screenshots in your own product.
At Apriorit, we have experienced teams of dedicated software developers that are ready to help you build a product of any complexity. Contact us if you’re ready to bring your ideas to life.
Have a question?
Ask our expert!
Program Manager


