 Skip to main content

Cybersecurity monitoring systems, IoT-based manufacturing devices, and real-time messaging in social networks are all based on a continuous event stream. Such streams deliver data to applications in real time, allowing users to quickly assess and respond to events.
Event stream processing is challenging because a single application can use multiple streams for various types of events, and the streams can generate lots of data. You can simplify stream management by implementing unified log processing.
In this article, we discuss what a unified log is and how you can implement one in a .NET application using AWS Kinesis. We show you how to design an event stream architecture with AWS Kinesis Stream, write to and read from it using .NET tools, and archive events with Amazon Kinesis Data Firehose. You can check the full code for the data stream in Apriorit’s GitHub repository.
This article will be useful for development leaders who work on AWS-based applications using .NET and want to implement continuous event streaming.
Contents:
What are continuous event streaming and unified log processing?
Before we dive into practical information on how to build continuous and real-time data streaming, let’s define key terms to make sure we’re on the same page.
Continuous data streaming is the process of collecting, managing, and transmitting data generated by some device or application. This process is the cornerstone of Internet of Things (IoT) networks, real-time data exchange, cloud-based applications, cybersecurity and performance monitoring, and many other technologies.
An event is anything that occurs at a particular point in time. And a continuous event stream is a continuous sequence of individual events, ordered by the time each event occurred.

A lot of solutions are responsible for generating and processing continuous event streams. For example, health check applications continuously monitor system parameters (memory usage, disk space, and so on) and hardware and software events to detect and prevent problems. Another example is web analytics solutions that analyze website visitors’ behavior.
An application that relies on continuous streaming usually has several continuous event streams. You can centralize the management of these streams using a unified log. Let’s briefly overview its properties:
- Unified. You can use only one standardized technology for all your logs, while several solutions can send events and read them.
- Append-only. Unified logs accept pushes of only new events. It’s impossible to manually remove and update such logs. Old events are automatically removed after their expiration.
- Distributed. A unified log is located on several machines in the cluster. Usually, unified log systems divide every event stream into multiple partitions called shards. Each shard has a main machine responsible for read and write operations. Shard replication helps you prevent loss of data from a unified log.
- Ordered. Each event has a unique ID number which allows applications to access and process the same event stream. Each processing application will have a cursor position in each shard, which helps to find the next record for processing and not process the same record twice.
Major cloud service providers have dedicated log processing tools for working with continuous data streaming and unified logs in their environments. For example, you can use Stream Analytics by Microsoft Azure or Pub/Sub with Dataflow from Google Cloud. Since each of these tools is quite complicated, in this article, we focus on one of them — Amazon Kinesis from AWS. It has four elements:
- Amazon Kinesis Data Streams — a serverless streaming service that can capture, store, and process data streams
- Amazon Kinesis Data Firehose — a service that extracts data from a stream, transforms it according to a cloud app’s needs, and delivers this data to other instances
- Amazon Kinesis Data Analytics — a tool for analyzing streamed data in real time
- Amazon Kinesis Video Streams — a service designed specifically to handle video streams from devices connected to it
For one of our recent projects, Apriorit’s team used Kinesis Data Stream to establish continuous real-time data stream processing. In the next sections, we share practical experience working with AWS log processing, showing code samples.
What is Amazon Kinesis Data Streams?
Amazon Kinesis Data Streams (or simply Kinesis Streams) is a service you can use to create unified logs where each data record has the following parameters and limitations:
- Unique sequence number that identifies a particular record within the shard.
- Partition key to group data by shard within a stream. This key is a Unicode string and should be assigned by the application that puts data into the stream.
- Data blob of the record is immutable and can take up to 1 MB of disk space.
- Data record is accessible only during a limited amount of time called the retention period. The default retention period is 24 hours, but it can be configured for each stream separately.
Data stream processing with Amazon Kinesis is based on a classic producer-consumer architecture:
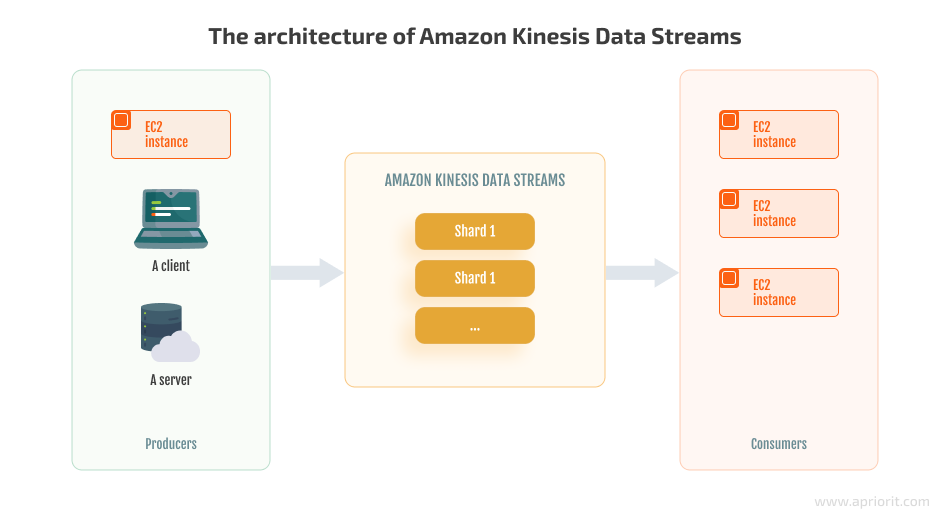
Now it’s time to see how this service works in practice. Say we have a server hosting an application that generates a lot of log files, which causes our server to run out of space. That’s why we need to receive alerts whenever the server’s disk reaches 80% capacity so we can manually clean up disk space.
Let’s start implementing this functionality with Amazon Kinesis Data Streams and .NET, using Apriorit’s best practices.
Configuring Kinesis Data Streams
To create a new stream, we can use the AWS CLI or AWS web interface. In our example, we’ll use the AWS CLI on a Windows machine as it works faster than a web interface. First, we download and run the MSI installer. Second, we open a command prompt window and use the following command to confirm the installation:
C:\>aws –version
aws-cli/2.7.11 Python/3.9.11 Windows/10 exe/AMD64 prompt/offNext, we need to configure our default AWS credentials:
C:\>aws configure
AWS Access Key ID [None]: AKIAIOSFODNN7EXAMPLE
AWS Secret Access Key [None]: wJalrXUtnFEMI/K7MDENG/bPxRfiCYEXAMPLEKEY
Default region name [None]: us-east-1
Default output format [None]: jsonTo create a new stream, we use the following command:
C:\>aws kinesis create-stream --stream-name events --shard-count 2Then we can see the new stream in the AWS web interface:

Now we have our Kinesis stream ready and waiting to receive events.
How to write events to Kinesis Data Streams
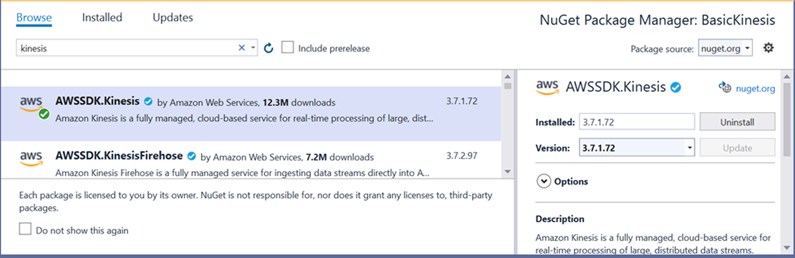
AWS Kinesis offers SDKs to work with its data streams for most programming languages. For our example, we’ll use .NET 6.0. The latest SDK version is available in NuGet packages:
Additionally, we’ll use the JSON library to serialize events.
First, we need a model for the event we send. Let’s create it:
class Event
{
	public string EventId { get; set; }
	public string HostName { get; set; }
	public string DriveName { get; set; }
	public long TotalSize { get; set; }
	public long FreeSpace { get; set; }
	public long AvailableSpace { get; set; }
}We can get this information from the system and use a new random GUID for the EventId. To send generated events, let’s initiate AmazonKinesisClient:
AmazonKinesisClient _kinesisClient = new AmazonKinesisClient(new AmazonKinesisConfig());With this constructor, the SDK will use default credentials, which we’ve configured previously during AWS CLI installation.
The last thing to do is to serialize our events to strings and put them into Kinesis Stream as a MemoryStream:
IEnumerable<Event> drivesInfo = GetEvents();
var requestRecords = new PutRecordsRequest()
{
	StreamName = "events",
	Records = drivesInfo.Select(driveInfo => new PutRecordsRequestEntry
	{
    	Data = new MemoryStream(JsonSerializer.SerializeToUtf8Bytes(driveInfo)),
    	PartitionKey = driveInfo.EventId
	}).ToList()
};
PutRecordsResponse putResult = await _kinesisClient.PutRecordsAsync(requestRecords);Now, we can review our application in the BasicKinesisWrite project in our GitHub repository. It will generate events for each hard drive every 10 seconds and send them to the events stream. We can run it and wait for several minutes to generate a bunch of events in our stream.
Exploring event stream with AWS CLI
Once we have the events stream with some events, let’s see how consumers can interact with our stream. AWS CLI allows us to read events from the stream. But first, we need to get information about all shards of the Kinesis event stream:
C:\>aws kinesis describe-stream --stream-name events
{
	"StreamDescription": {
    	"Shards": [
        	{
            	"ShardId": "shardId-000000000000",
            	"HashKeyRange": {
                	"StartingHashKey": "0",
                	"EndingHashKey": "170141183460469231731687303715884105727"
            	},
            	"SequenceNumberRange": {
                	"StartingSequenceNumber": "49630916364780252209804378684750470886975378207641960450"
            	}
        	},
        	{
            	"ShardId": "shardId-000000000001",
            	"HashKeyRange": {
                	"StartingHashKey": "170141183460469231731687303715884105728",
                	"EndingHashKey": "340282366920938463463374607431768211455"
            	},
            	"SequenceNumberRange": {
                	"StartingSequenceNumber": "49630916364802552955002909307892006605248026569147940882"
            	}
        	}
    	],
    	"StreamARN": "arn:aws:kinesis:us-east-1:542878609705:stream/events",
    	"StreamName": "events",
    	"StreamStatus": "ACTIVE",
    	"RetentionPeriodHours": 24,
    	"EnhancedMonitoring": [
        	{
            	"ShardLevelMetrics": []
        	}
    	],
    	"EncryptionType": "NONE",
    	"KeyId": null,
    	"StreamCreationTimestamp": "2022-06-29T13:58:21+03:00"
	}
}As you can see, we have two shards. Since each shard should be read separately, we need a shard iterator to read the events from a specific shard of the stream. A shard iterator is a temporary object that defines our position in the stream. Each shard iterator can read a batch of events and then return the next shard iterator for the next batch.
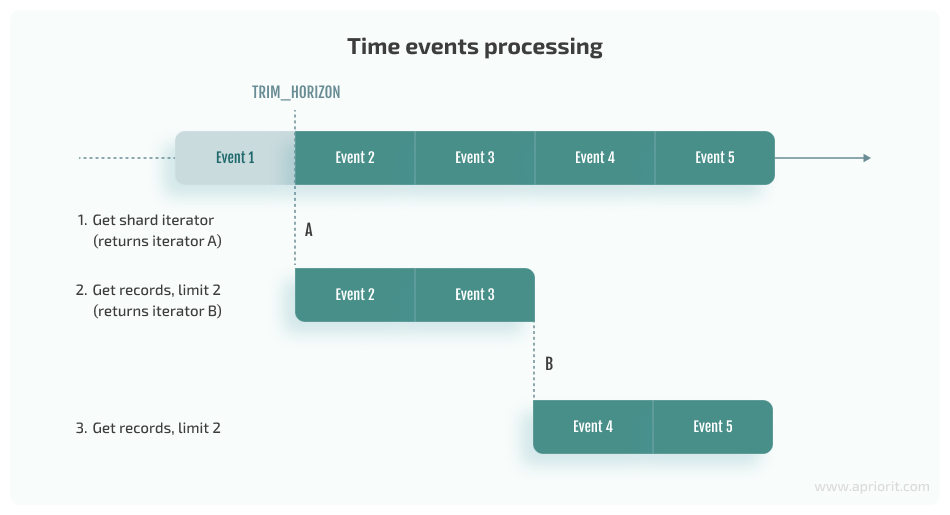
To get a shard iterator, we need to know the ShardId and specify one of the following types of reading starts:
- AT_SEQUENCE_NUMBER or AFTER_SEQUENCE_NUMBER — Start reading from or after a specific sequence number (this number should be provided).
- AT_TIMESTAMP — Start reading from the position defined by the provided timestamp.
- TRIM_HORIZON or LATEST — start reading the oldest or the last record from the shard.
A shard iterator usually starts processing events from the TRIM_HORIZON position and then proceeds with the newly returned shard iterators:
We can get shard iterators by executing the following commands in the AWS CLI:
C:\>aws kinesis get-shard-iterator --stream-name=events --shard-id=shardId-000000000000 --shard-iterator-type=TRIM_HORIZON
{
	"ShardIterator": "AAAAAAAAAAGFH/JYF6Yi5mkJJHKkAiAYI/jkXZh1Cw2YcCqSvC17x+klGVtlXskV/mX/GECXdJnQHBHxuV4uhlD4j/xcUlQK5bRWsDKcuYe88Ky83oI4fE9j0XA8NX9ctIE8eJHBbh6J05WWSuYqdvCx6S1ozhjhiyqDo9HtzOuCwGfIm1gmRvPNAPi1lJ3tcxW7QoJNUk1zDiFP3pwFvS1FiZ8TsZOHTcm2Igw71WUabbO+izDGFw=="
}

C:\>aws kinesis get-records --shard-iterator "AAAAAAAAAAGEDCFZ6KTTnvG8Q/dqXaLQzcqWmbDUp8MgGzufe0Rd13OJWCSsNkYi56+maFR5TfEyyko+qsr1vkXh7kxNfk2hb55NQno4CKPyHslm0UiIvEPXZ4/iDt54El+dbbp9lRh40klXzkXyOnwjSkK/hl4R/qu2gPhItTBaMOW976+RSisBpAxN0r++JgNOM3PEG77Y/Eu2AoYo6GXE7VHBQZoTCcVXKaMvhjbUmA1w5jvezA==" --limit=1
{
	"Records": [
    	{
        	"SequenceNumber": "49630916364780252209804378746047845644715648856763662338",
        	"ApproximateArrivalTimestamp": "2022-06-29T14:25:43.301000+03:00",
    	    "Data": "eyJFdmVudElkIjoiMDk1YjFhYjAtNzhhMC00ZDVlLWI5MDQtY2QzZmIxODc4MDM0IiwiRHJpdmVOYW1lIjoiRDpcXCIsIlRvdGFsU2l6ZSI6MTAwMDE4NjMxMDY1NiwiRnJlZVNwYWNlIjo4NzEwMzM3NTc2OTYsIkF2YWlsYWJsZVNwYWNlIjo4NzEwMzM3NTc2OTZ9",
        	"PartitionKey": "095b1ab0-78a0-4d5e-b904-cd3fb1878034"
    	}
	],
	"NextShardIterator": "AAAAAAAAAAGaMCs/7Ei9mmZFjhhRCsqq/H5UiOA5jv/qXNaUoGbUqsSsKnY59NFOvqMc6ptvIk0AAcUcZHrQ1VLmiDcvPufgGs3cLB3y7/P94yG8JeArP18e4VpXrnP1ApUqST4fpRRReOynCH+ZUxJ+OUzYGktshDULRAbbWJRfMOQ9sZkp7cCp0DCuEBELPk9vnLNtU8sNvh+V/8+i/hrZuj8nogwNQ5sM3r1ex4cQBUqGxWrTnQ==",
	"MillisBehindLatest": 6463000
}

{"EventId":"095b1ab0-78a0-4d5e-b904-cd3fb1878034","DriveName":"D:\\","TotalSize":1000186310656,"FreeSpace":871033757696,"AvailableSpace":871033757696}Now that we’ve overviewed our options for interactions with the event stream, let’s see how to add events to it.
Writing events with Kinesis Agent
In previous sections of this article, we implemented programmatic sending of events, which isn’t the only option for writing new events to a stream. But in some cases, such as collecting events with a local file like an application log, it’s best to use Kinesis Agent for sending events from a file.
Kinesis Agent is a standalone AWS service that continuously monitors files and sends them to the configured event stream. Let’s install and configure Kinesis Agent.
1. Download the latest Kinesis Agent for Windows MSI package from the GitHub repository, launch it, and follow the instructions.
Kinesis Agent works as an Amazon Kinesis Agent for Microsoft Windows service. We need to make it run under a specific user with administrator privileges rather than the default system account. That specific user should set up AWS user credentials for a non-AWS environment.
2. Create the profile in the SDK store using the access key and secret key of the AWS user. To do it, let’s install Powershell 5.1 and run the following commands under the specific user of the Kinesis Agent service:
[Net.ServicePointManager]::SecurityProtocol = [Net.SecurityProtocolType]::Tls12
Install-Module -Name AWSPowerShell -Force
Import-Module AWSPowerShell
Set-AWSCredential -AccessKey access_key -SecretKey secret_key -StoreAs AWS_Kinesis_Credentials3. Update the AWSKinesisTap.exe.config file in the %PROGRAMFILES%\Amazon\AWSKinesisTap directory to specify the name of the profile created in the previous step:
<configuration>
  <appSettings>
	<add key="AWSProfileName" value="AWS_Kinesis_Credentials"/>
  </appSettings>
…4. Use Notepad to create a configuration file for Kinesis Agent for Windows. Save the file to %PROGRAMFILES%\Amazon\AWSKinesisTap\appsettings.json.
The basic structure of this file is a JSON document with the following template:
{
     "Sources": [ ], //source directories with logs
     "Sinks": [ ], //remote kinesis streams on AWS to ship logs to
     "Pipes": [ ] // connections between Sources and Sinks
}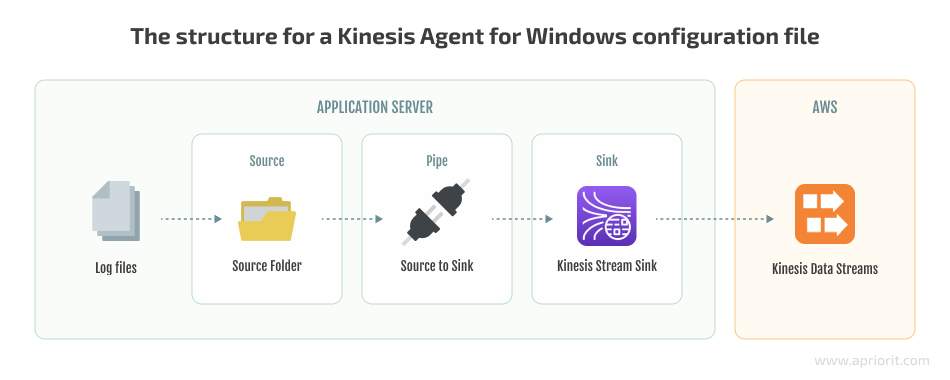
The configuration file should contain Source, Sink, and Pipe configurations, as well as a logs directory (C:\Events, for example) for each Kinesis Data Stream we want to write to. Let’s create the configuration file for our application:
{
  "Sources": [
	{
  	"Id": "EventsSource",
  	"SourceType": "DirectorySource",
  	"RecordParser": "SingleLineJson",
  	"Directory": "C:\\Events",
  	"FileNameFilter": "*.log",
  	"InitialPosition": 0
	}
  ],
  "Sinks": [
	{
  	"Id": "EventsStream",
  	"SinkType": "KinesisStream",
  	"StreamName": "events",
  	"Region": "us-east-1"
	}
  ],
  "Pipes": [
	{
  	"Id": "EventsPipe",
  	"SourceRef": "EventsSource",
  	"SinkRef": "EventsStream"
	}
  ]
}Now that we’ve configured the source of the logs for the Kinesis Data Stream, it’s time to code event writing. It’s similar to event creation, but this time, we’ll write events with the NLog logging library. Each JSON record will be appended as a new line to the C:\Events\events.log file.
Here’s the code for writing events:
LogManager.Setup().LoadConfiguration(builder => {
	builder.ForLogger().FilterMinLevel(LogLevel.Info).WriteToFile(fileName: @"c:\Events\events.log", layout: "${message}");
        	});
…
IEnumerable<Event> drivesInfo = GetEvents();
IEnumerable<string> events = drivesInfo.Select(driveInfo => JsonConvert.SerializeObject(driveInfo));
foreach (string driveEvent in events)
{
	LogManager.GetCurrentClassLogger().Info(driveEvent);
}You can implement the same functionality manually or with any .NET logging library. The whole application is available in the KinesisAgentWrite project in our GitHub repository.
How to read data from Kinesis Data Streams
Now that we know how to write events, let’s move to reading and processing. To receive alerts whenever the server’s disk reaches 80% full, we need to implement the following logic:
- Read each event from each shard of our stream
- Check whether our server’s disk is more than 80% full
- Alert the console if the disk is more than 80% full
Let’s start working on these features.
1. Reading events with single event processing
We can read events by implementing single-event processing, where each input event generates some output processing or events. Such logic is suitable for processing simple events when we don’t need to consider several events for reaction.
Event reading and processing can be accomplished with the same AWS SDK for .NET that we used for writing events. First, we’ll create the instance of the AmazonKinesisClient:
AmazonKinesisClient _kinesisClient = new AmazonKinesisClient(new AmazonKinesisConfig());Then, let’s implement several functions of the AmazonKinesisClient to get all the events. We need the ListShardsAsync function to get the collection of stream shards that we’ll use further for gathering information. This function can return up to 1000 shards and should be called iteratively to get more. Here’s how to implement it:
var shards = new List<Shard>();
ListShardsResponse response = null;
do
{
	var request = response == null ? new ListShardsRequest { StreamName = streamName }
    	: new ListShardsRequest { NextToken = response.NextToken };
	response = await _kinesisClient.ListShardsAsync(request);
	shards.AddRange(response.Shards);
}
while (response.NextToken != null);
We also need to process each shard separately and get the initial shard iterators:
var iteratorRequest = new GetShardIteratorRequest()
{
	ShardId = shard.ShardId,
	ShardIteratorType = ShardIteratorType.TRIM_HORIZON,
	StreamName = streamName
};
string shardIterator = (await _kinesisClient.GetShardIteratorAsync(iteratorRequest)).ShardIterator;Next, we need to implement the key schema for any Kinesis Data Streams processing. The key schema enables a stream to iteratively get all records from the initial shard iterator, process them, and then get the new shard iterator for further processing. We also need a way to handle the special AWS SDK exception called ProvisionedThroughputExceededException. It’s thrown by the SDK when some limits are exceeded: for example, if there are too many requests to Kinesis Data Streams. You can check other limitations in the Kinesis Data Streams documentation.
Here’s how to implement these features:
do
{
	try
	{
    	var recordsRequest = new GetRecordsRequest
    	{
        	ShardIterator = shardIterator,
        	Limit = 10
    	};
    	GetRecordsResponse recordsResponse = await _kinesisClient.GetRecordsAsync(recordsRequest);
    	await ProcessRecords(recordsResponse.Records);
    	shardIterator = recordsResponse.NextShardIterator;
	}
	catch(ProvisionedThroughputExceededException)
	{
    	await Task.Delay(1000);
	}
}
while (!cancellationToken.IsCancellationRequested && shardIterator != null);
The last step of this stage is to implement the ProcessRecords function:
private async Task ProcessRecords(List<Record> records)
{
	foreach(var record in records)
	{
    	var diskEvent = await JsonSerializer.DeserializeAsync<Event>(record.Data);
    	long availableDiskPercent = diskEvent.AvailableSpace * 100 / diskEvent.TotalSize;
    	if (availableDiskPercent < 20)
    	{
        	Console.WriteLine($"{diskEvent.HostName} has only {availableDiskPercent}% of {diskEvent.DriveName} drive available!");
    	}
	}
}We can check out our application in the BasicKinesisRead project. Take a look at this project in our GitHub repository.
2. Checking disk capacity with multiple events processing
Our next task requires a mechanism for processing multiple events to improve our previous alert system. Getting an alert if the disk is more than 80% full for 20 minutes straight requires extra space to store information about events. We’ll use MemoryCache as storage.
We’ll introduce Kinesis Client Library (KCL) to focus on event processing logic. KCL is an intermediate level between records processing logic and Kinesis Stream. It works only on the consumer side and takes care of the following tasks:
- Connecting and enumerating shards in the data stream
- Reading data records from the shard and passing them to the records processor
- Balancing work among several instances with leases that associate each shard with the specific records processor
- Using a checkpointing mechanism for already processed records
KCL is a Java library. .NET support is provided by the Java-based daemon that works in the background when we use KCL. The only part we need to implement manually is a record processor that implements the IShardRecordProcessor interface:
using Amazon.Kinesis.ClientLibrary;

namespace Sample
{
	internal class MainClass
	{
    	public static void Main(string[] args)
    	{
        	KclProcess.Create(new RecordProcessor()).Run();
    	}
	}


	public class RecordProcessor : IShardRecordProcessor
	{
    	public void Initialize(InitializationInput input)
    	{
        	//
        	// Initialize the record processor
        	//
    	}

    	public void ProcessRecords(ProcessRecordsInput input)
    	{
        	//
        	// Process a batch of records from input.Records, and optionally checkpoint by calling
        	// input.Checkpointer.Checkpoint()
        	//
    	}

    	public void LeaseLost(LeaseLossInput leaseLossInput)
    	{
        	//
        	// Perform any cleanup required.
        	// This record processor has lost its lease, so checkpointing is not possible.
        	// This is why LeaseLostInput does not provide a Checkpointer property.
        	//
    	}

    	public void ShardEnded(ShardEndedInput shardEndedInput)
    	{
        	//
        	// The record processor has processed all records in the shard and will no longer receive records.
        	// It is required that this method call shardEndedInput.Checkpointer.Checkpoint() to inform the KCL
        	// that the record processor has acknowledged the completion of the shard.
        	//
    	}

    	public void ShutdownRequested(ShutdownRequestedInput shutdownRequestedInput)
    	{
        	//
        	// This is called when the KCL is being shut down, and if desired the record processor can checkpoint here
        	// by calling shutdownRequestedInput.Checkpointer.Checkpoint(...)
        	//
    	}
	}
}3. Implementing alerts on limited disk capacity
Let’s implement a records processor for our needs. We’ll start with some basic initialization:
class EventsReader : IShardRecordProcessor
{
	private static readonly TimeSpan _backoff = TimeSpan.FromSeconds(3);
	private static readonly TimeSpan _checkpointInterval = TimeSpan.FromMinutes(5);
	private static readonly int _numRetries = 2;
	private DateTime _nextCheckpointTime = DateTime.UtcNow;

	public void Initialize(InitializationInput input)
	{
    	Console.WriteLine($"Shard {input.ShardId} processing was started");
	}
…As you can see, we can get and store information about the current shard during initialization. In the current implementation, we’ll improve our basic records processing by:
- Using a checkpointing mechanism (_checkpointInterval) for the already processed records every five minutes. AWS doesn’t recommend committing too often.
- Using retry logic two times (_numRetries) in case of some error in event processing and checkpointing. A three-second delay (_backoff) will be used before each retry.
The next step is to implement the ProcessRecords function from the interface:
…
	public void ProcessRecords(ProcessRecordsInput input)
	{
    	ProcessRecordsWithRetries(input.Records);
    	if (DateTime.UtcNow >= _nextCheckpointTime)
    	{
        	Checkpoint(input.Checkpointer);
        	_nextCheckpointTime = DateTime.UtcNow + _checkpointInterval;
    	}
	}

	private void Checkpoint(Checkpointer checkpointer)
	{
    	checkpointer.Checkpoint(RetryingCheckpointErrorHandler.Create(_numRetries, _backoff));
	}
…We’ll implement the ProcessRecordsWithRetries function further, as it contains the main event processing logic.
We use a simple technique for calling checkpoint logic at the end of the next record processing. At the time of the next checkpointing defined in _nextCheckpointTime, the application will call the Checkpoint function. Such a method for calling checkpoint logic works well for a steady event flow. For other types of flows, it’s best to use a timer.
Finally, we need to implement the remaining interface functions:
…
	public void LeaseLost(LeaseLossInput leaseLossInput)
	{
    	Console.Error.WriteLine("Lease lost");
	}

	public void ShardEnded(ShardEndedInput shardEndedInput)
	{
    	Console.WriteLine("Lease lost");
        shardEndedInput.Checkpointer.Checkpoint();
	}

	public void ShutdownRequested(ShutdownRequestedInput shutdownRequestedInput)
	{
    	Console.Error.WriteLine("Shutdown requested");
        shutdownRequestedInput.Checkpointer.Checkpoint();
	}
…There are several parameters of special event handling we should note:
- Lost lease on a shard. In this case, the current processor no longer holds the lease and must do a cleanup before shutting down. We can’t do checkpointing at that stage.
- Ended shard. This means that shards were scaled and the current shard was replaced with a new one. All processed records should be checkpointed.
- Requested shutdown. The parent process has requested a shutdown, and all the processed records should be checkpointed.
Now we can implement the main records processing logic. We will use MemoryCache and retry type of logic this time. We’ll implement this task in the following way:
- Check whether our server’s disk is more than 80% full.
- Save the disk name in MemoryCache with an expiration in 20 minutes if the disk is more than 80% full.
- Implement a callback for the cache item expiration so it will generate an alert if the item has expired.
- Remove the disk name from MemoryCache if the disk is less than 80% full so the alert won’t be shown.
Here’s how we can code this task:
…
private void ProcessRecordsWithRetries(List<Record> records)
{
  foreach (Record record in records)
  {
	bool processedSuccessfully = false;
	string data = null;
	for (int i = 0; i < _numRetries; ++i)
	{
  	try
  	{
  	  data = System.Text.Encoding.UTF8.GetString(record.Data);
  	  var diskEvent = JsonSerializer.Deserialize<Event>(data);
  	  long availableDiskPercent = diskEvent.AvailableSpace * 100 / diskEvent.TotalSize;
    	if (availableDiskPercent < 20)
    	{
    	  if (MemoryCache.Default.Get($"{diskEvent.HostName}.{diskEvent.DriveName}") == null)
      	{
        	MemoryCache.Default.Set($"{diskEvent.HostName}.{diskEvent.DriveName}", availableDiskPercent, new CacheItemPolicy
        	{
        	  AbsoluteExpiration = DateTime.UtcNow.AddMinutes(20),
        	  RemovedCallback = RemoveCallback
        	});
      	}
    	}
    	else
    	{
    	  if (MemoryCache.Default.Get($"{diskEvent.HostName}.{diskEvent.DriveName}") != null)
      	{
        	MemoryCache.Default.Remove($"{diskEvent.HostName}.{diskEvent.DriveName}");
      	}
    	}

        processedSuccessfully = true;
    	break;
  	}
  	catch (Exception ex)
  	{
  	  Console.Error.WriteLine($"Exception processing record data: {data}", ex);
    	Thread.Sleep(_backoff);
  	}
	}

	if (!processedSuccessfully)
	{
	  Console.Error.WriteLine($"Couldn't process record {record}. Skipping the record.");
	}
  }
}

private void RemoveCallback(CacheEntryRemovedArguments arguments)
{
  if (arguments.RemovedReason == CacheEntryRemovedReason.Expired)
  {
	Console.WriteLine("The disk space is going down for 20 minutes");
  }
}As always, we can check the whole application in the KCLKinesisRead project in our GitHub repository.
How to archive events with AWS Kinesis Data Firehose
There are a variety of reasons for archiving our events to long-term storage: troubleshooting, implementing an analytics mechanism in the future, replacing the initial .NET program for logs with quick built-in mechanisms for storing Kinesis Data Streams, etc.
The most convenient way to archive events is using AWS Kinesis Data Firehose, a built-in delivery system for Amazon Kinesis Data Streams. We only need to configure it to deliver data when Kinesis Data Streams receive records. This mechanism even supports data transformation before pushing data to a configured resource.
Let’s integrate AWS Kinesis Data Firehose and AWS Simple Storage Service (S3) into our Kinesis Data Streams. We’ll also need to use a .NET producer.
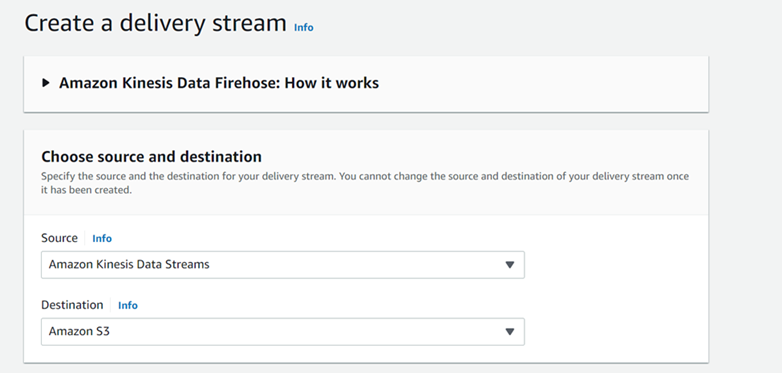
It’s possible to create AWS Kinesis Data Firehose via the console or AWS CLI and modify it after creation. We’ll show how to create it using the AWS management console. Let’s find Amazon Kinesis Data Firehose in the management console search box, select Create a delivery stream, and start the configuration.
We need to select the services for event source and archive destination. They’ll be Amazon Kinesis Data Streams as the source and Amazon S3 as the destination.
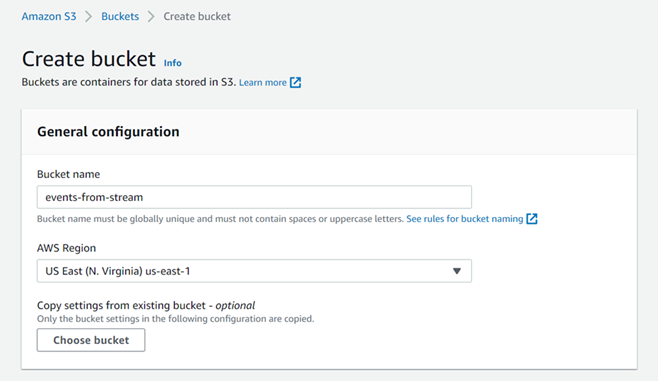
Next, we need to name the new Kinesis Data Firehose delivery stream, select from which Kinesis Stream we’ll get data, and create a new S3 instance for storing data.

Now, let’s create an S3 bucket for streaming events.
After all configurations, the new delivery stream should be created and ready for data processing. Let’s run our producer application and wait for several minutes to generate a bunch of events in our stream. In the AWS console, we can open the S3 bucket we created and find the following structure of the events store:
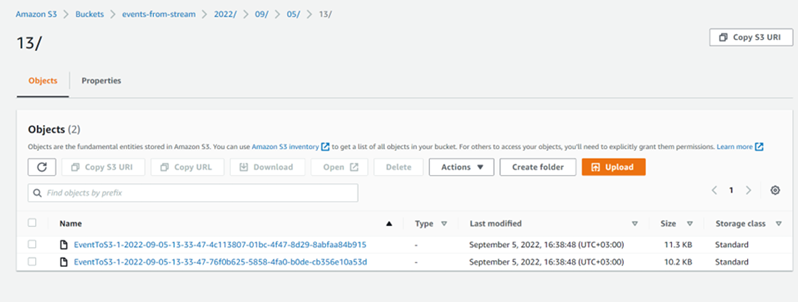
Let’s open the events file EventToS3-1-2022-09-05-13-33-47-4c113807-01bc-4f47-8d29-8abfaa84b915. Here, we can see records about the free space on our server:
{"EventId":"109c0ef0-211c-4498-85a6-e91d430178ef","HostName":"DESKTOP-GFLQ88U","DriveName":"E:\\","TotalSize":5160837120,"FreeSpace":0,"AvailableSpace":0}
{"EventId":"7a0851c5-89b9-4e9d-823c-a9924ef81eb0","HostName":"DESKTOP-GFLQ88U","DriveName":"C:\\","TotalSize":511987150848,"FreeSpace":200222355456,"AvailableSpace":200222355456}
{"EventId":"58400c62-9e0a-4e7c-a387-bc412ad9008b","HostName":"DESKTOP-GFLQ88U","DriveName":"D:\\","TotalSize":1000186310656,"FreeSpace":865078673408,"AvailableSpace":865078673408}
{"EventId":"96d99781-8cd2-4a1a-8c01-516de736eaea","HostName":"DESKTOP-GFLQ88U","DriveName":"E:\\","TotalSize":5160837120,"FreeSpace":0,"AvailableSpace":0}
{"EventId":"93692a0c-7197-4da0-badf-531c9ef3a14e","HostName":"DESKTOP-GFLQ88U","DriveName":"D:\\","TotalSize":1000186310656,"FreeSpace":865078673408,"AvailableSpace":865078673408}
…Later, we can process this data with other applications, such as a classic log monitoring tool.
With this, our unified log provides us full control over event streaming in an application. We can read and write events, add them to a stream, and archive them for further use.
Conclusion
Any application that uses continuous event streaming should be able to manage these events. To simplify event management, developers use tools for working with unified logs. Such tools allow for centralizing logging; creating new streams; and writing, reading, and archiving events.
Today, we showed how to process streaming data with Amazon Kinesis and archive stream events with Amazon Kinesis Firehose.
Using these tools (or corresponding services of other cloud computing providers), Apriorit experts in cloud computing and data processing can implement event streaming and unified logging in a way that benefits your project.
Reach out to benefit from our development expertise!
Have a question?
Ask our expert!
VP of Innovation and Technology, Canada Branch Director


