 Skip to main content

Banking and financial organizations already integrate blockchains into their operations to boost efficiency and security. With the help of this technology, they accelerate transactions, improve data traceability, automate manual processes, and reduce costs. The blockchain also offers enhanced trust, transparency, and security in data management.
However, designing and deploying blockchain infrastructure for financial organizations is complex and challenging. It requires in-depth knowledge of creating and deploying cloud infrastructure, relevant experience, and extensive research.
Recently, we published a case study on building blockchain infrastructure for international banking. In this article, we share more technical details of this process and discuss top-notch DevOps practices and tools. This article will be helpful for lead engineers who plan to build an AWS-based blockchain infrastructure with Terraform and are looking for an extensive guide.
Contents:
- Defining the project’s architecture
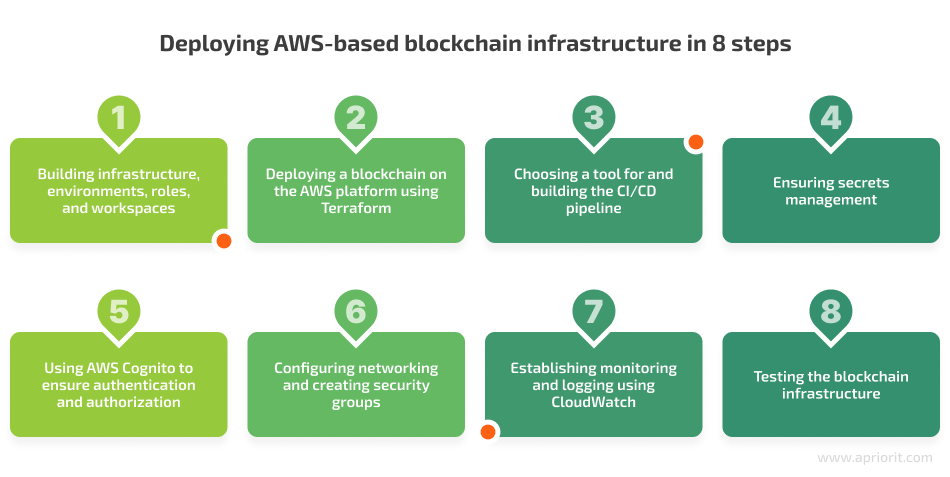
- 1. Building infrastructure, environments, roles, and workspaces
- 2. Deploying a blockchain on the AWS platform using Terraform
- 3. Choosing a tool for and building the CI/CD pipeline
- 4. Ensuring secrets management
- 5. Using AWS Cognito to ensure authentication and authorization
- 6. Configuring networking and creating security groups
- 7. Establishing monitoring and logging using CloudWatch
- 8. Testing the blockchain infrastructure
- Conclusion
Defining the project’s architecture
In one of our projects, a client needed help with building and deploying blockchain infrastructure for international banking.
They were already using the Git workflow and Terraform on this project, so it was logical and beneficial to continue automating their DevOps processes using Amazon Web Services (AWS). AWS provides scalability, reliability, and secure database solutions, making it an ideal platform for building and maintaining a blockchain infrastructure.
Using Apriorit DevOps practices to deploy a blockchain infrastructure on AWS, our engineers were able to:
- Use automation tools such as Ansible, Chef, and Puppet
- Speed up the process of creating, configuring, and deploying resources
- Reduce the risks of human errors
- Improve collaboration between teams
Such practices can enhance the speed and reliability of software solutions while also reducing the time needed to build and deploy resources. This can be a game-changer for developers, helping them get the most out of their cloud infrastructure.
Additionally, choosing the multi-cloud Infrastructure as Code (IaC) approach can help you streamline the process of deploying IT resources, avoiding manual configuration and deployment steps. Thus, developers can quickly and easily create, deploy, and scale their blockchain infrastructure while also taking advantage of automated AWS testing tools.
To fulfill the client’s request, we divided the project into three major steps:
- Establish the Terraform directory structure. During this step, we worked with Terraform configuration files, modules, variables, and outputs.
- Create a workflow in Git to orchestrate the deployment process using GitHub Actions. This step included testing, planning, and applying the Terraform configuration. Additionally, we managed the state of the infrastructure to gain visibility, control, and rollback capabilities.
- Manage the infrastructure deployment using Git workflows. This DevOps method helped us ensure that the client’s infrastructure was running with high availability and scalability.
Here’s the project architecture:
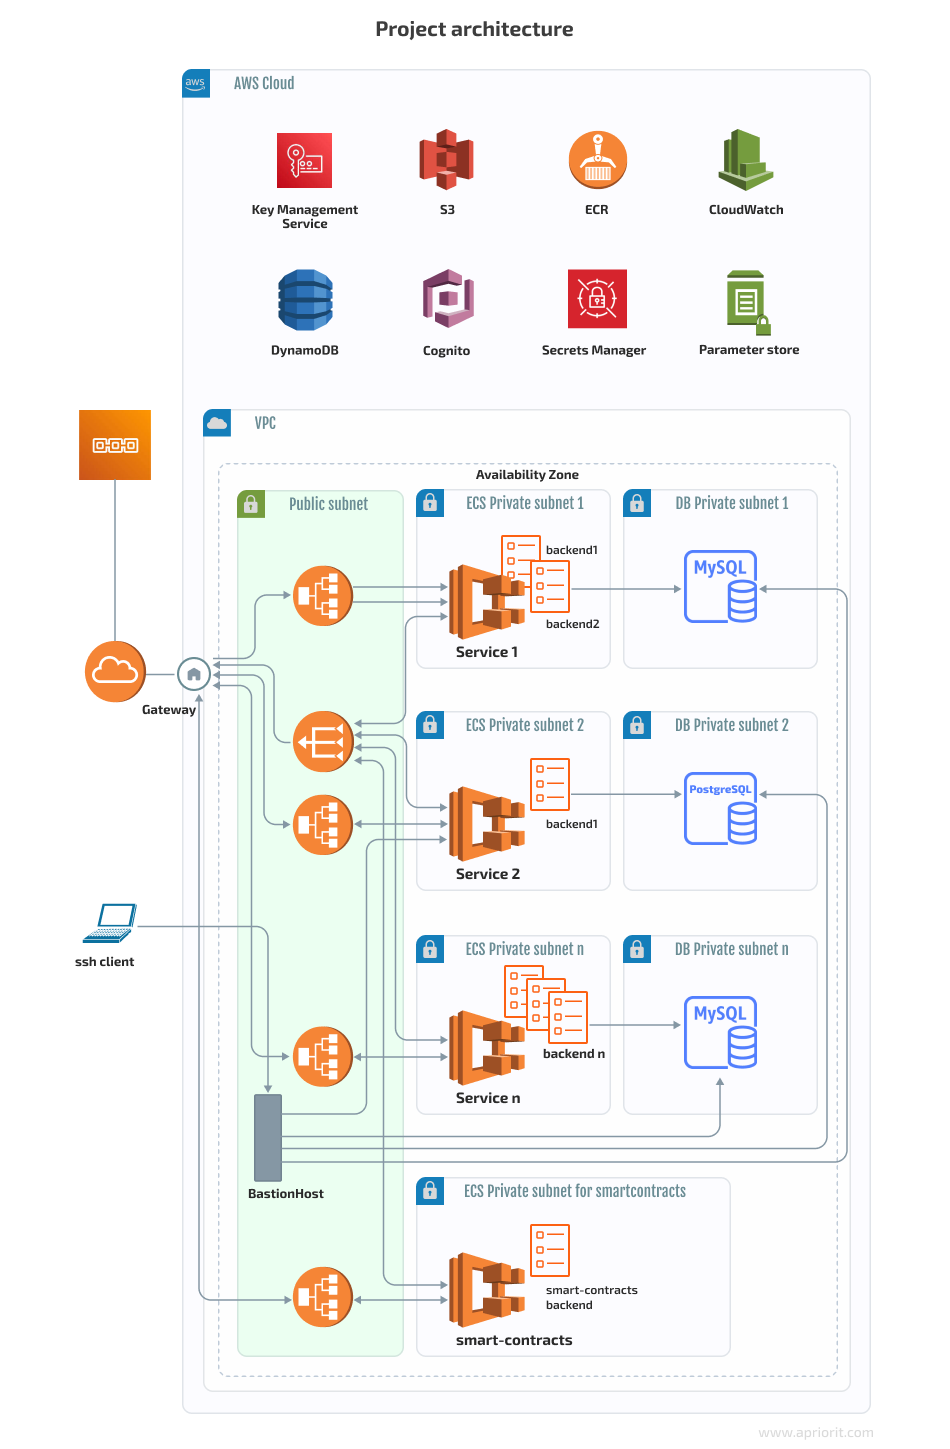
The infrastructure didn’t look like this in the beginning. We started with only:
- One Application Load Balancer (ALB)
- One Elastic Container Service (ECS) with many services and tasks
- One MySQL Relational Database Service (RDS)
We divided the entire work process into eight key steps:
Let’s explore each of these steps in detail, briefly discussing the tools we used and sharing code examples. We’ll start with exploring how to create infrastructure in AWS with Terraform.
1. Building infrastructure, environments, roles, and workspaces
To build the infrastructure, we used Terraform version 1.3.0 and created three environments: development, testing, and production.
To develop the infrastructure, we created roles and used layered infrastructure for flexibility. We used one identity and access management (IAM) role to build the main layer of the project’s infrastructure and other IAM roles to create different services and environments.
Once the roles were ready, we created a profile for each of them:
aws configure --profile blockchain-role1-us-east-1
aws configure --profile blockchain-roleN-us-east-1As you can see, this process required us to specify credentials and a default region.
To use a specific role, we executed the following command in the working directory:
export AWS_PROFILE=blockchain-role1-us-east-1Now, we need to ensure storage of the state. To do that, we used an S3 bucket. Using S3 buckets is a great DevOps practice because it offers a number of advantages including:
- Versioning. S3 buckets are versioned by default, meaning that all changes made to the stored state files are tracked. This makes it easy to track the history of changes and quickly revert to a previous version if needed.
- Durability. S3 buckets are highly durable and will store your state files securely. This means that if your local machine crashes, your state files will still be safe.
- Availability. S3 buckets are available in all regions, meaning you can access your state files from anywhere. This is particularly useful for remote teams.
- Scalability. S3 buckets can scale to meet your storage needs, allowing you to store as many Terraform states as needed.
We stored the description of the required state of the infrastructure – terraform.state – in an Amazon S3 bucket, which supports state locking and consistency checking via DynamoDB:
resource "aws_s3_bucket" "terraform_state" {
  bucket = "my-blockchain-structure-bucket-us-east-1"

  tags = {
    Description = "blockchain-structure terraform.tfstate."
    ManagedByTerraform = "true"
    Name = "blockchain-structure"
  }

  lifecycle {
    prevent_destroy = true
  }
}

resource "aws_dynamodb_table" "terraform_locks" {
  name = "terraform-locks-my-blockchain-structure-us-east-1"
  billing_mode = "PAY_PER_REQUEST"
  hash_key	= "LockID"
  attribute {
    name = "LockID"
    type = "S"
  }
 tags = {
   Environment = "dev"
   Infra = "Core"
   Service = "Terraform"
  }

}Then, we used the following versioning for the S3 bucket:
resource "aws_s3_bucket_versioning" "terraform_state" {
 # Enable versioning so we can see the full revision history of our state files
 bucket = aws_s3_bucket.terraform_state.id
 versioning_configuration {
   status = "Enabled"
 }
}After initializing the project, we needed to create workspaces. We used Terraform workspaces, as they offer several benefits for creating and managing different infrastructure environments in the AWS cloud:
- Simple environment organization. Workspaces allow you to easily organize test, staging, and production environments. This makes it convenient to manage different configurations and settings and simplifies the transition between environments.
- Direct access to environments. Workspaces allow teams to collaborate in different environments by allowing multiple users direct access to the same environment. This eliminates the need to have multiple users maintaining different versions of the same environment and the need to manually transfer an environment to a different user.
- Ease of deployment. Terraform workspaces help you quickly and easily deploy multiple identically configured environments and to quickly recreate a production environment if something goes wrong.
- Change tracking. With Terraform workspaces, you can keep track of changes made to environments over time and roll back any undesirable changes. This helps to ensure that all environments remain consistent and prevents unplanned changes from occurring.
We created the dev workspace by running the following command:
terraform workspace create devNow, let’s discuss how to deploy AWS-based blockchain infrastructure using Terraform.
2. Deploying a blockchain on the AWS platform using Terraform
To deploy a blockchain on the AWS platform, we had to choose between two solutions: Terraform and AWS CloudFormation. Both are Infrastructure as Code (IaC) tools that provide infrastructure automation and management in the AWS cloud.
- Terraform allows you to create AWS resources using a single, unified language. It supports many AWS services. With Terraform, you can also make changes to existing AWS resources, which allows for a more granular approach to modifying the infrastructure.
- AWS CloudFormation has a more limited scope when it comes to configuring AWS resources, and its syntax can be difficult to learn. In addition, CloudFormation doesn’t support all AWS services. In terms of scalability and performance, CloudFormation has the advantage over Terraform: it can deploy resources in parallel, whereas Terraform can only deploy them sequentially.
After comparing these two solutions, we decided to choose Terraform because of its flexibility. Let’s explore the process of deploying blockchain infrastructure with Terraform.
To use the bucket where the infrastructure state is stored, we applied the following Terraform code:
terraform {
  backend "s3" {
	  bucket = "my-blockchain-structure-bucket-us-east-1"
	  key = "path/to/my-env/my-blockchain-structure"
	  region = "us-east-1"
	  dynamodb_table = "terraform-locks-my-blockchain-structure-us-east-1"
	  encrypt = true
  }
}To access the required resources from another layer, we used the terraform_remote_state data source:
data "terraform_remote_state" "network" {
  backend = "s3"
	config = {
  	bucket = "my-blockchain-structure-bucket-us-east-1"
  	key = "path/to/my/blockchain-structure-network/terraform.tfstate"
  	region = "us-east-1"
	}
}And here’s the code that helped us store various Docker images for services from the Amazon Elastic Container Registry (ECR):
resource "aws_ecr_repository" "service1" {
  name = join("/", [var.app, var.name_repository, var.env])
  image_tag_mutability = "MUTABLE"

  image_scanning_configuration {
    scan_on_push = true
  }

  encryption_configuration {
    encryption_type = "AES256"
  }
}


resource "aws_ecr_lifecycle_policy" "repo_lifecycle_policy" {
  repository = aws_ecr_repository.service1.id
  policy = file("${path.module}/policies/ecr_lifecycle_policy.json")
}


policies/ecr_lifecycle_policy.json" :
{
  "rules": [
    {
      "rulePriority": 1,
      "description": "Leave only 5 last images",
      "selection": {
        "tagStatus": "untagged",
        "countType": "imageCountMoreThan",
        "countNumber": 5
                   },
      "action": {
        "type": "expire"
                }
    }
           ]
}With that in mind, let’s move on and discuss how to use Terraform modules to deploy AWS infrastructure.
Using Terraform modules
We decided to use Terraform modules to deploy AWS infrastructure because they:
- Provide a way to quickly deploy cloud infrastructure on AWS with just a few lines of code
- Can be reused to create multiple similar environments, ensuring a more efficient workflow
- Are versioned and can be easily reverted to a previous version in case of errors
- Help us manage complex environments, as all configurations are easily tracked and monitored through the module repository
To create resources for each service, we used a separate module with the necessary submodules. And to access various resources through one ALB, we used the aws_lb_listener_rule resource. We also used the Route53 module to describe the service domain name.
Here’s how we can create any service using the Terraform service module:
module "ecs_blockchain_service" {
  source = "./modules/ecs_blockchain_service"
  app = var.app
  env = terraform.workspace
  account_id = var.account_id
  keypair_name = module.private_key_blockchain_service.keypair_name
  container_name = "blockchain_service"
  container_port = 80
  secrets_blockchain_service  = lookup(var.secret_arn_blockchain_service, terraform.workspace)
  desired_count = var.service_desired
  ecs_subnet_ids	= module.vpc.ecs_subnet_ids
  public_subnet_ids = module.vpc.public_subnet_ids
  sg_lb_id = module.sg.sg_alb_id_blockchain_service
  sg_ecs_id = module.sg.sg_ecs_id_blockchain_service
  sg_rds_id = module.sg.sg_rds_id_blockchain_service
  vpc_id = module.vpc.vpc_id
  aws_region= var.aws_region

  aws_lb_target_group = module.lb_blockchain_service.aws_lb_target_group
  image_url = lookup(var.image_url_blockchain_service, terraform.workspace)
  image_id = data.aws_ami.aws_optimized_ecs.id
  instance_type = lookup(var.ami_blockchain_service_instance_type, terraform.workspace)
  min_size = var.min_size
  max_size = var.max_size
  desired_capacity = var.desired_capacity
  min_elb_capacity = var.min_elb_capacity
  alb_arn_suffix = module.lb_blockchain_service.alb_arn_suffix

  cpu_task_backend1 = lookup(var.cpu_task_backend1, terraform.workspace)
  memory_task_backend1 = lookup(var.memory_task_backend1, terraform.workspace)
  cpu_container_backend1 = lookup(var.cpu_container_backend1, terraform.workspace)
  memory_container_backend1 = lookup(var.memory_container_backend1, terraform.workspace)

  cpu_task_backend2	= lookup(var.cpu_task_backend2, terraform.workspace)
  memory_task_backend2  = lookup(var.memory_task_backend2, terraform.workspace)
  cpu_container_backend2	= lookup(var.cpu_container_backend2, terraform.workspace)
  memory_container_backend2 = lookup(var.memory_container_backend2, terraform.workspace)

  aws_lb_target_group_backend1 = module.lb_blockchain_service.aws_lb_target_group_backend1
  aws_lb_target_group_backend2 = module.lb_blockchain_service.aws_lb_target_group_backend2
  container_name_backend1 = "backend1"
  container_name_backend2 = "backend2"
  container_port_backend1 = 3000
  container_port_backend2 = 3000
  image_url_backend1 = lookup(var.image_url_backend1, terraform.workspace)
  image_url_backend2  = lookup(var.image_url_backend2, terraform.workspace) #var.image_url_backend2
  secrets_backend1 = lookup(var.secret_arn_backend, terraform.workspace)
  secrets_backend1_config_json_file  = lookup(var.secret_arn_backend1_config_json_file, terraform.workspace)
  secrets_backend2 = lookup(var.secret_arn_backend2, terraform.workspace)
  secrets_backend_config_json_file2 = lookup(var.secret_arn_backend_config_json_file2, terraform.workspace)

  db_host_backend1 = module.rds_backend1.endpoint
  db_username_backend1 = module.rds_backend.username
  db_password_backend1 = module.rds_backend.password
  db_port_backend1 = module.rds_backend.port
  db_name_backend1 = module.rds_backend.db_name

  autoscale_up_rpm_cooldown = var.autoscale_up_rpm_cooldown
  autoscale_up_rpm_aggregation_type = var.autoscale_up_rpm_aggregation_type
  autoscale_up_rpm_interval_lower_bound = var.autoscale_up_rpm_interval_lower_bound
  autoscale_up_rpm_adjustment = var.autoscale_up_rpm_adjustment
  autoscale_down_rpm_cooldown = var.autoscale_down_rpm_cooldown
  autoscale_down_rpm_aggregation_type = var.autoscale_down_rpm_aggregation_type
  autoscale_down_rpm_interval_upper_bound = var.autoscale_down_rpm_interval_upper_bound
  autoscale_down_rpm_adjustment = var.autoscale_down_rpm_adjustment

  alarm_rpm_high_evaluation_periods = var.alarm_rpm_high_evaluation_periods
  alarm_rpm_high_period = var.alarm_rpm_high_period
  alarm_rpm_high_statistic = var.alarm_rpm_high_statistic
  alarm_rpm_high_threshold = var.alarm_rpm_high_threshold
  alarm_rpm_low_evaluation_periods = var.alarm_rpm_low_evaluation_periods
  alarm_rpm_low_period = var.alarm_rpm_low_period
  alarm_rpm_low_statistic = var.alarm_rpm_low_statistic
  alarm_rpm_low_threshold = var.alarm_rpm_low_threshold
} 3. Choosing a tool for and building the CI/CD pipeline
For continuous integration (CI) and continuous delivery (CD), we chose between GitHub Actions and AWS CodePipeline. These tools provide similar functionality and allow you to automate software development workflows on AWS. They also help you efficiently manage your deployments and testing.
At Apriorit, we often use AWS CodePipeline to build infrastructure, as it’s a straightforward solution designed specifically for use with the AWS platform. AWS CodePipeline is easy to use and doesn’t require any coding knowledge. However, it’s not as feature-rich as GitHub Actions, and it is a commercial product.
We also have experience working with GitHub Actions, which is considered a more comprehensive solution than AWS CodePipeline. It is free to use and has a wide range of features such as:
- Integration with external services
- Support for multiple languages
- Support for multiple operating systems
On the downside, GitHub Actions is quite complicated to use and requires coding knowledge to be able to use it effectively.
After analyzing the options, we decided to stick to GitHub Actions, as it seemed to be a better fit in our case. Also, our customer was already using GitHub Actions for their software.
After merging the code in the main branch, we launched a pipeline. This pipeline uploads the new image into the ECR, updates it, and launches the new ECS task. We created an IAM role that only has access rights for updating ECS tasks.
Here’s the code we used to build the CI/CD pipeline:
service1.yml :

name: Service1 CI/CD

on:
  push:
branches: ["aws_development"]
paths:

- "service1/**"

env:
  STAGE: "development"
jobs:
  build_push_and_restart_tasks:
runs-on: ubuntu-latest

steps:

- uses: actions/checkout@v3
- name: Configure AWS Credentials
  uses: aws-actions/configure-aws-credentials@v1
  with:
    aws-access-key-id: ${{ secrets.AWS_ACCESS_KEY_ID }}
    aws-secret-access-key: ${{ secrets.AWS_SECRET_ACCESS_KEY }}
    aws-region: ${{ secrets.AWS_REGION }}
- name: Build, tag, and push the My-blockchain-Service1 Backend image to Amazon ECR
  run: |
cd service1
docker build -t my-/backend1/${{ env.STAGE }} .
docker tag my-blockchain-service1/backend1/${{ env.STAGE }}:latest 012345678900.dkr.ecr.us-east-1.amazonaws.com/my-blockchain-service1/backend1/${{ env.STAGE }}:latest
docker push 012345678900.dkr.ecr.us-east-1.amazonaws.com/my-blockchain-service1/backend1/${{ env.STAGE }}:latest
- name: Restart service Backend Task
  run: |
aws ecs update-service --cluster my-blockchain-service1-service-${{ env.STAGE }} --service my-blockchain-service1-backend1-${{ env.STAGE }} --task-definition my-blockchain-service1-backend1-${{ env.STAGE }} --force-new-deployment

aws ecs update-service --cluster my-blockchain-service1-service-${{ env.STAGE }} --service my-blockchain-service1-backend2-${{ env.STAGE }} --task-definition my-blockchain-service1-backend2-${{ env.STAGE }} --force-new-deployment4. Ensuring secrets management
The two most reliable solutions for storing and managing secrets such as Application Programming Interface (API) keys and passwords are AWS Secrets Manager and AWS Parameter Store:
- AWS Secrets Manager is best suited for long-term storage and retrieval of secrets used by applications and services. It allows for the automatic rotation of secrets and integrates with other AWS services such as AWS Lambda, which is used for automatic credential rotation.
- AWS Parameter Store is a great tool for managing configuration parameters that are frequently used by applications and services. It’s not as secure as AWS Secrets Manager, but it’s well-suited for parameters that don’t need to be kept secret for long periods of time. This tool is also helpful for storing credentials that don’t need to be rotated frequently.
For this project, we decided to store sensitive data with limited access in AWS Secrets Manager. Here’s how we configured the rotation rules and shift period:
resource "aws_secretsmanager_secret" "secret_1" {
  name ="/${var.app}/${terraform.workspace}/SECRET1"
  description = “Blockchain secret 1”
  secret_string = “SECRET1”
  rotation_rules {
    automatically_after_days = 7
  }
} For secrets that don’t require frequent changes, we used Parameter Store:
- To create a secret:
resource "aws_ssm_parameter" "secret_2" {
  name = "/${var.app}/${terraform.workspace}/SECRET2"
  type  = "String"
  value = "blockchain-secret1"
}- To get the secret:
data "aws_ssm_parameter" "secret_2" {
  name = "/${var.app}/${terraform.workspace}/SECRET2"
}For instance, we used the secret in the environment block of the ECS task description.
5. Using AWS Cognito to ensure authentication and authorization
For client authorization and authentication, our DevOps team chose AWS Cognito, as it’s a secure, scalable, and cost-effective Amazon native cloud-based platform. This tool provides an array of features for authorization and authentication, including:
- User and group management
- User profiles
- Multi-factor authentication
- Token-based authentication
- And more
AWS Cognito also offers powerful APIs which allow developers to integrate with other services including AWS Lambda, Amazon S3, Amazon Kinesis, and Amazon DynamoDB. Additionally, AWS Cognito simplifies the deployment of applications to multiple devices while maintaining the security of user data.
For this project, we created a Terraform Cognito module to help us quickly and easily set up an authorization and authentication service for the customer’s clients. To do that, we used Terraform to create and configure the Amazon Cognito service. This module offers a powerful yet highly secure and easy-to-use solution that can be integrated with a wide range of applications and services.
For instance, with the Terraform Cognito module, you can create secure user accounts and quickly implement authentication for their clients. Here are a few benefits this module offers:
- User authentication with your existing identity provider
- Secure authorization and authentication
- Customizable user roles and permissions
- Support for multi-factor authentication
- Automatically updated security settings
- Automated user onboarding and management
- Easy integration with other services and applications
- Simple user account management and maintenance
And here’s the code we used to ensure users’ authentication and authorization with the Terraform Cognito module:
module "cognito_service1" {
  source = "./modules/cognito_service1"

  name = join("-", [var.app, "service1", terraform.workspace])
  cognito_resource_server_identifier1 = lookup(var.cognito_resource_server_identifier1, terraform.workspace)
  cognito_resource_server_identifier2 = lookup(var.cognito_resource_server_identifier2, terraform.workspace)
  allowed_oauth_scopes_client1 = lookup(var.allowed_oauth_scopes_client1, terraform.workspace)
  allowed_oauth_scopes_client2	= lookup(var.allowed_oauth_scopes_client2, terraform.workspace)
  callback_urls_service1_client1 = lookup(var.callback_urls_service1_client1, terraform.workspace)
  callback_urls_service1_client2 = lookup(var.callback_urls_service1_client2, terraform.workspace)
  user_pool_domain = join("-", [var.app, "user-pool-service1", terraform.workspace])
  create_cognito_pool = true
}To limit access to certain resources, we used IAM roles with a certain set of policies.
6. Configuring networking and creating security groups
The next step is to create a network and security groups for all services for each environment. To do that, we used the Terraform vpc and sg modules:
module "vpc" {
  source = "./modules/network"
  env = terraform.workspace
  app = var.app
  vpc_cidr = lookup(var.vpc_cidr_env, terraform.workspace)
  public_subnet_number = 2
  ecs_subnet_number	= 3
  db_subnet_number	= 3

  region = var.aws_region
}

module "sg" {
  source = "./modules/sg"
  app = var.app
  env = terraform.workspace
  vpc_cidr_block = module.vpc.vpc_cidr
  vpc_id 	= module.vpc.vpc_id
  db_port	= var.db_port
  whitelist_ips = {
    "DevOPS IP main1" : var.devops1
    "DevOPS IP main2" : var.devops2
    "Dev IP main1" : var.dev_ip1

  }
  whitelist_ips_service = {
   "DevOPS IP main2" : var.devops2
   "Dev IP main2" : var.dev_ip2
  }
  depends_on = [
module.vpc
  ]
}Read also:
Infrastructure Automation: 7 DevOps Tools for Orchestration, Secrets Management, and Monitoring
7. Establishing monitoring and logging using CloudWatch
For resource monitoring, we used CloudWatch — an AWS product that provides a range of services for monitoring applications and systems and can be integrated with other AWS services. This tool is cost-effective, provides insights into system performance, and helps to optimize AWS resources. Additionally, CloudWatch offers a free tier; the cost of the paid tier depends on the number of metrics sent.
Each infrastructure element has its own standard set of CloudWatch parameters to control. In the official documentation, you can find detailed instructions for ALB, RDS, and ECS.
However, certain elements didn’t have standard output in CloudWatch like the logs of certain services running on EC2. For such elements, we launched the CloudWatch agent on EC2. Here’s how to do it:
- Run the CloudWatch agent when launching EC2 using the
sudo yum install -y awslogsline inuser_dataataws_launch_configuration - Add the agent configuration using the official documentation:
sudo cat << EOF >> "/etc/awslogs/awslogs.conf"
 [/var/log/messages]
file = /var/log/messages
log_group_name = /var/log/messages
log_stream_name = {instance_id}
datetime_format = %b %d %H:%M:%S
EOFRead also:
Decentralized Finance (DeFi) Solutions: Benefits, Challenges, and Best Practices to Build One
8. Testing the blockchain infrastructure
Once you’re done with deploying the AWS-based blockchain infrastructure using Terraform, it’s time to check whether everything works as it should.
Testing is a critical part of any infrastructure development process. In AWS, it’s particularly important to test the infrastructure because all services are interconnected and complex. If a single component doesn’t work properly, it could cause major problems across the entire system. Additionally, it’s important to test the infrastructure to ensure that it’s secure and meets the desired performance and availability requirements.
Testing the infrastructure in AWS involves running automated tests, which can help you:
- Check for any inconsistencies or vulnerabilities
- Verify that all components are working as expected and that performance and availability meet the desired SLAs
- Ensure that the infrastructure is scalable so that it can accommodate changes in demand
- Check that the infrastructure is compliant with relevant security and regulatory requirements
Testing our client’s AWS-built blockchain infrastructure involved the following crucial steps:
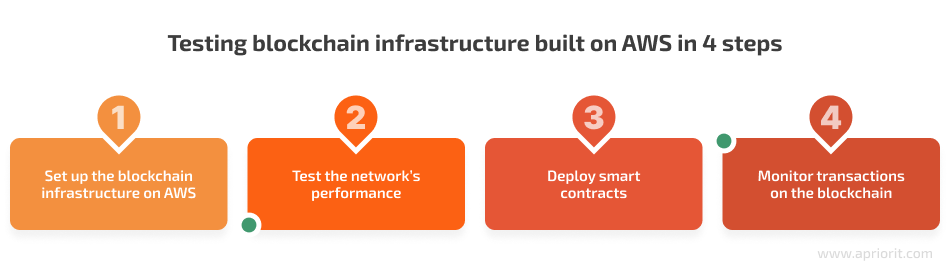
- Set up the blockchain infrastructure on AWS. This involved creating an AWS account, configuring an instance, and launching the blockchain node. With the help of Ansible, we integrated new blockchain nodes into the client’s existing infrastructure and made necessary changes.
- Test the network’s performance. To do that, we used monitoring tools including CloudWatch and Grafana, Kibana, Logstash, and Prometheus, as well as the command-line interface (CLI) for debugging purposes.
- Deploy smart contracts. After successful testing and debugging, we used the blockchain CLI to deploy smart contracts and applications, and we used the blockchain development kit to write and debug contracts.
- Monitor transactions on the blockchain. To do this, we used the blockchain transaction explorer.
The testing process is complex and requires a deep understanding of the technical aspects of AWS and blockchains. For example, you need to be aware of common challenges that may arise during blockchain app testing. One of them is the need for testing tools designed specifically for each blockchain structure. Using the wrong tool can prevent you from building an efficient solution.
Also, pay attention to quality assurance processes, especially security testing. Make sure your blockchain solutions and smart contracts not only work as intended but also meet relevant cybersecurity requirements.
Conclusion
When designing and deploying blockchain infrastructure for your solution, it’s essential to carefully plan every step. Adopting DevOps methodologies for building a blockchain infrastructure with Terraform in AWS offers numerous advantages, such as improved efficiency, reliability, and scalability while creating and deploying resources, as well as secure database solutions.
At Apriorit, we have strong blockchain development and testing teams with experience delivering successful products for various industries, including banking and finance. Our tech experts are ready to help you build robust infrastructure for your project and manage your cloud environments.
Reach out to us to discuss your blockchain project and start working on it!
Have a question?
Ask our expert!
VP of Engineering


