 Skip to main content


Deploying software in the cloud is a popular option for software providers who want to easily make their products available to millions of users, optimize project costs and maintenance processes, and automate billing. Large cloud marketplaces ensure all these benefits and more. But to migrate an existing on-premises product to the cloud, you need to choose a cloud platform, study how it works, and figure out how to make your software compatible.
In this article, we share why cloud platforms are worth your attention, what deployment methods you can use for migrating your product to Amazon Web Services (AWS) Marketplace, and how to prepare your on-premises product for deployment to AWS.
This article will be useful for software providers who want to start distributing their products via AWS marketplace.
Contents:
- 4 reasons to migrate an on-premises solution to the cloud
- AWS Marketplace deployment methods
- Single-AMI vs CloudFormation deployment: which to choose?
- 6 steps to deploy a single AMI in AWS Marketplace
- 5 steps to deploy an application on AWS Marketplace using CloudFormation
- Software licensing for AMI-based products
- Conclusion
4 reasons to migrate an on-premises solution to the cloud
For a long time, on-premises deployment was the ultimate option for software distribution. This model requires end users to deploy, maintain, and administer software on their own hardware. However, this distribution model limits the number of end users who can access and use your product.
To increase the availability of their products, many software providers migrate their on-premises software to cloud computing platforms and start distributing it according to the Software as a Service (SaaS) model. This enables end users to comfortably interact with software via web browsers or cloud marketplaces without having to install that software on their machines.
A cloud marketplace is basically an online shopping mall for applications that are maintained by a cloud computing provider. Usually, a provider sells both their own applications and services as well as third-party software on their marketplace. The most well-known cloud marketplaces are AWS Marketplace, Microsoft Azure Marketplace, Google Cloud Marketplace, and Oracle Marketplace.
Here’s why software providers choose to deploy their solutions in the cloud:
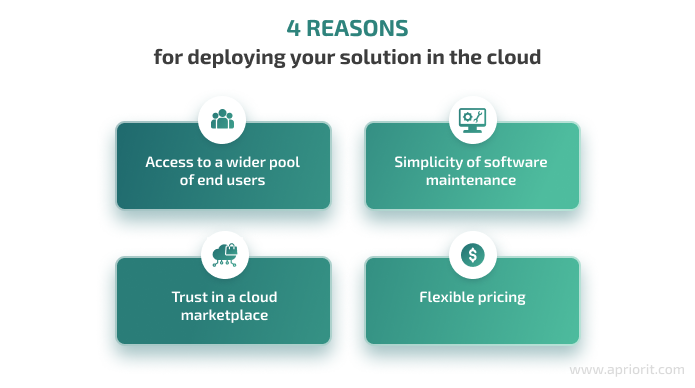
Access to a wider pool of customers. Popular cloud marketplaces have millions of active users all over the world. Deploying your solution on one of these marketplaces makes your product available for every marketplace user.
Simplicity of software maintenance. The cloud provider takes care of a lot of maintenance activities both for the software provider and end users. They deploy software, deliver updates and patches, create bills, and collect payments. For end users, cloud solutions are easier to use than on-premises — they usually don’t require any technical skills to set up and use. For software providers, a cloud marketplace allows them to manage users in groups and automate certain billing processes.
Trust in a cloud marketplace. The reputation of marketplaces depends on the quality of their services and the third-party applications they provide. Marketplaces also verify the identities of their customers and sellers to ensure they are real people or businesses. Thanks to verification, customers tend to trust software offered on well-known marketplaces.
Flexible pricing. Cloud platforms usually bill software providers only for the amount of time they use cloud services. For example, if a user interacts with a service for one week, they don’t need to pay for monthly access or buy a permanent license. And third-party software providers pay only for cloud computing resources they’ve actually used.
To start working with a cloud marketplace of their choice, a software provider first has to study how the marketplace operates, how to deploy applications in the cloud, and how to optimize cloud maintenance expenses. They can request technical support from the marketplace, but such services cost extra.
Let’s take a look at how you can deploy your product on one of the most popular online software shops — AWS Marketplace.
Want to leverage AWS for your infrastructure?
Let’s discuss how our software architects can build an efficient cloud environment for your product.
AWS Marketplace deployment methods
AWS Marketplace is one of the leading cloud software stores that provides access to applications deployed in the AWS environment. AWS achieves a high level of overall security by checking the security of each application submitted to the marketplace as well as by implementing security practices and mechanisms in their cloud computing services.
The ability to choose from several deployment and licensing methods simplifies the process for software providers. To deploy your application to AWS, you can use Amazon Machine Images (AMIs), containers, file-based datasets, Amazon SageMaker, or other options.
When working with AWS, AMI is the most common way to distribute software, as it’s easy to use for both software providers and their customers. For software providers, deploying their product as an Amazon Machine Image allows them to choose the environment for their solution, add preset configurations, and specify requirements for instances that launch this image. AWS Marketplace customers can install an AMI with a couple of clicks, launch it on many instances, and customize it as they need.
There are several options for AMI deployment:
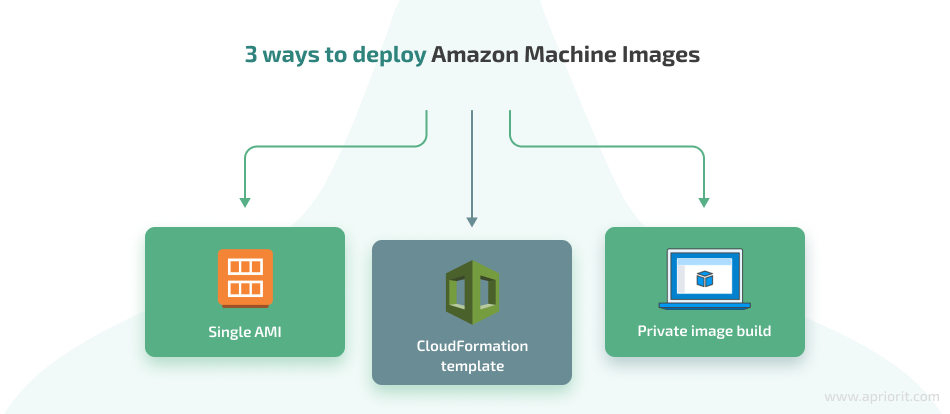
- Single-AMI deployment is the easiest method. In this method, a software provider creates an AMI with installed and preconfigured software and publishes it on the Amazon Elastic Compute Cloud (Amazon EC2) service. End users can then select and launch this AMI from the AWS Marketplace.
- CloudFormation templates allow software providers to combine several products within one image, add several AMIs to their product, and define their distributed architecture and custom product configurations. This method provides more flexibility and scalability for complex deployments.
- Private image build allows end users to install the software provider’s product from the AWS Marketplace to their own golden images and AMIs. This type of deployment is convenient for end users who want to deploy the software in their private infrastructure while maintaining their internal security, compliance, and infrastructure integrity.
In the next sections, we provide instructions for deploying software to AWS using CloudFormation templates and as a single AMI, as they are the fastest and easiest methods of delivering your app to the AWS environment. Before we share step-by-step instructions, let’s discuss both approaches and determine which is best for you.
Read also
What Is Serverless Computing: Architecture, Challenges, and Benefits
Discover how serverless computing can revolutionize your business operations, driving efficiency, scalability, and cost-effectiveness.

Single-AMI vs CloudFormation deployment: which to choose?
What is a single-AMI deployment?
A single-AMI deployment involves packaging the entire application stack, including the operating system, runtime environment, and application code, into a single Amazon Machine Image. When launching instances, users simply select the pre-configured AMI and AWS provisions the necessary resources to run your application.
Key features and benefits of a single-AMI deployment include:
- Simplified deployment. A single AMI streamlines the deployment process by packaging the entire application stack into a single image, eliminating the need to manage multiple components separately.
- Consistency. Using a preconfigured AMI ensures consistency across deployments. Each instance launched from the AMI will have the same configuration, reducing the risk of configuration drift.
- Rapid scaling. A single-AMI deployment allows for rapid scaling of your application by launching additional instances from the same AMI as demand increases.
- Easy maintenance. Updating and maintaining your application becomes easier with a single-AMI deployment, as you only need to update the AMI with the latest version of your application and launch new instances.
You can find out more about single-AMI deployment here. Now, let’s look at AWS CloudFormation for AMI deployment.
What is AWS CloudFormation?
AWS CloudFormation allows you to deploy your product to AWS by defining your infrastructure as code with declarative templates. These templates can be written in JSON or YAML and describe the AWS resources and their configurations needed to run your application.
Key features and benefits of AWS CloudFormation include:
- Infrastructure as Code (IaC). Describe your infrastructure as code with CloudFormation. Infrastructure configurations are repeatable, meaning that by defining and testing your infrastructure once, you can ensure the consistency of every deployment.
- Automated provisioning. Automate the provisioning and configuration of infrastructure resources using predefined templates or scripts.
- Resource management. Track the lifecycle of infrastructure resources, including their creation, modification, and deletion.
- Stacks. Organize your resources into stacks, which represent a collection of AWS resources that you can manage as a single unit.
You can find out more about CloudFormation here.
Which option should you choose for your application?
Deploying an application to AWS Marketplace using a single AMI is straightforward. Simply choose an AMI with the required software preinstalled and configured, then launch it using Amazon Elastic Compute Cloud (Amazon EC2). However, this approach may not suffice for complex AWS deployments.
In scenarios where your AWS deployment becomes intricate, we recommend opting for AWS CloudFormation deployment. This includes situations such as:
- Employing multiple AMIs for different application components
- Setting up a Virtual Private Cloud (VPC) with specific configurations
- Using Amazon-managed databases like RDS
By encapsulating all these elements within a CloudFormation template, you can seamlessly deploy your entire infrastructure and all necessary services to AWS.
To summarize, use single-AMI deployment for straightforward applications and AWS CloudFormation for more complex, multi-component deployments.
Related project
SaaS Growth and CI/CD Process Support with Smart AWS Infrastructure
Learn how the Apriorit team cut our client’s platform maintenance costs by over 300% by migrating the platform to AWS infrastructure and improving its performance and functionality.

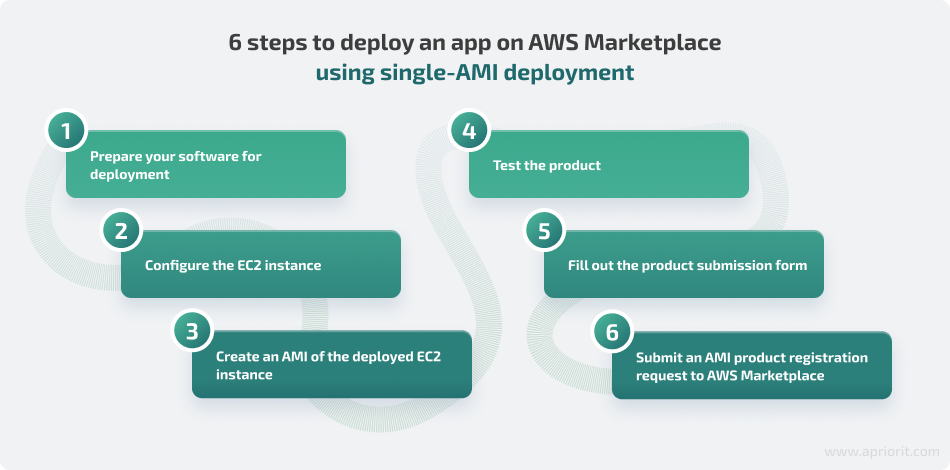
6 steps to deploy a single AMI in AWS Marketplace
There are six major steps in the AMI deployment process:
Let’s see what each step requires you to do.
Step 1. Prepare your software for deployment
Before you start working with the cloud marketplace, determine if your solution satisfies AMI requirements. You need to check how your software identifies end users, which parameters end users have to input to configure your software, etc.
You also may want to adapt your software to a cloud environment to simplify its deployment and API configuration.
End users expect to start using the product right after purchasing it on the AWS Marketplace. Because of that, you may need to introduce changes in the product deployment process. The product should be pre-installed within an AMI or be installed during the AMI launch after the end user purchases it. With custom scripts, you can ensure the correct configuration of your product during installation.
You may also need to make adjustments in your product’s licensing process. After purchasing your product on AWS Marketplace, the end user is supposed to receive a product with the license of their choice if you provide several licensing options. It may be necessary to add license validation to prevent the use of one license on multiple computers.
Step 2. Configure the EC2 instance
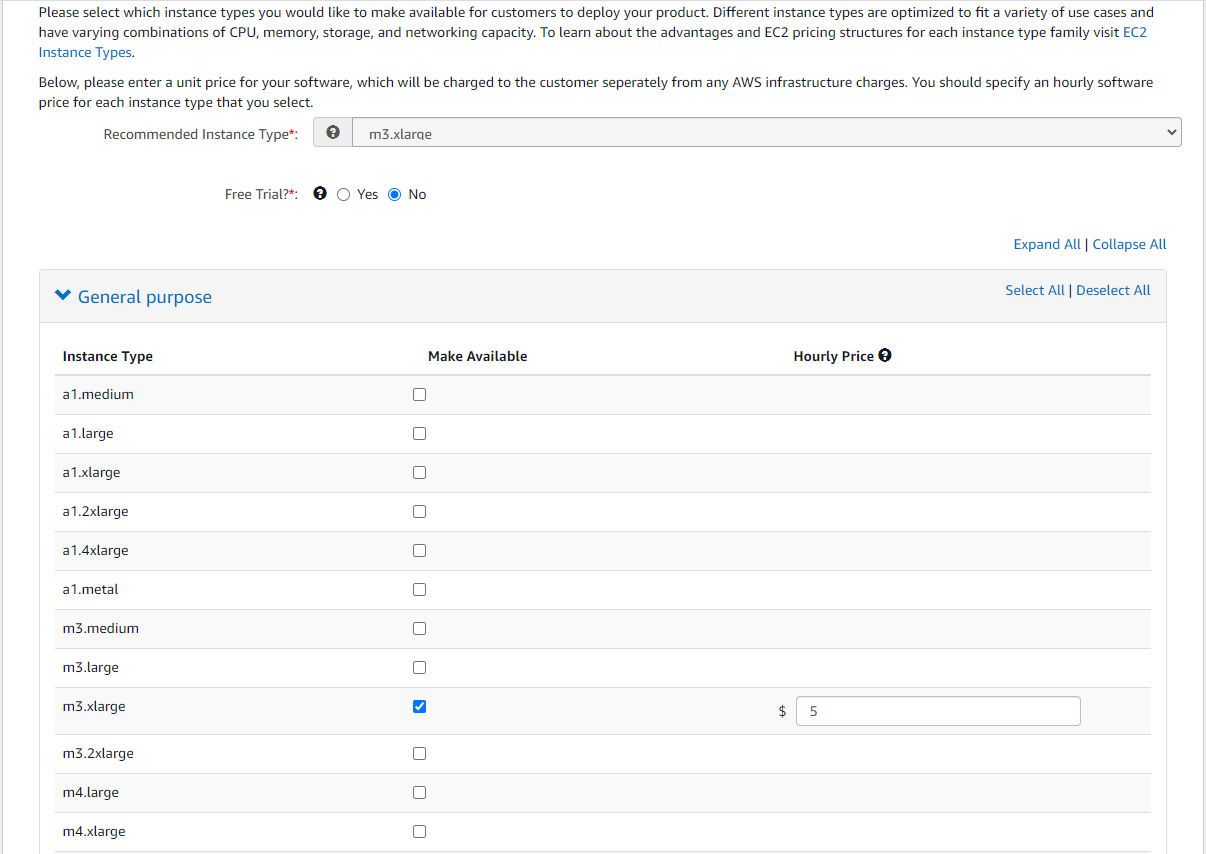
Determine what you should include in your software infrastructure: the required operating system version, additional applications, databases, etc. AWS provides developers with multiple types of EC2 instances with various hardware and software options.
Amazon EC2 lets you choose among a wide range of instances with numerous hardware combinations that are optimized for specific tasks. You can choose an instance with a certain operating system, CPU, amount of RAM, disk space, and bandwidth. If you select an instance that fits your product perfectly, you can eliminate any risks of freezes and lags while saving on cloud computing costs.
Amazon offers recommendations for software developers that are choosing an EC2 instance type for their product, including defining the minimum hardware requirements. If you do so, it will be impossible to launch your product in any other type of instance other than the one you specify.
When choosing an EC2 instance type for your project, it’s best to test several types to figure out the optimal hardware configuration. You can also choose several instances for various versions of your product. For example, your product can use EC2 instances with different amounts of computing power depending on the number of users that can access one AMI.
Related project
Building AWS-based Blockchain Infrastructure for International Banking
Explore how Apriorit transformed international banking operations by building cutting-edge AWS blockchain infrastructure that made our client’s product more secure, scalable, and efficient!

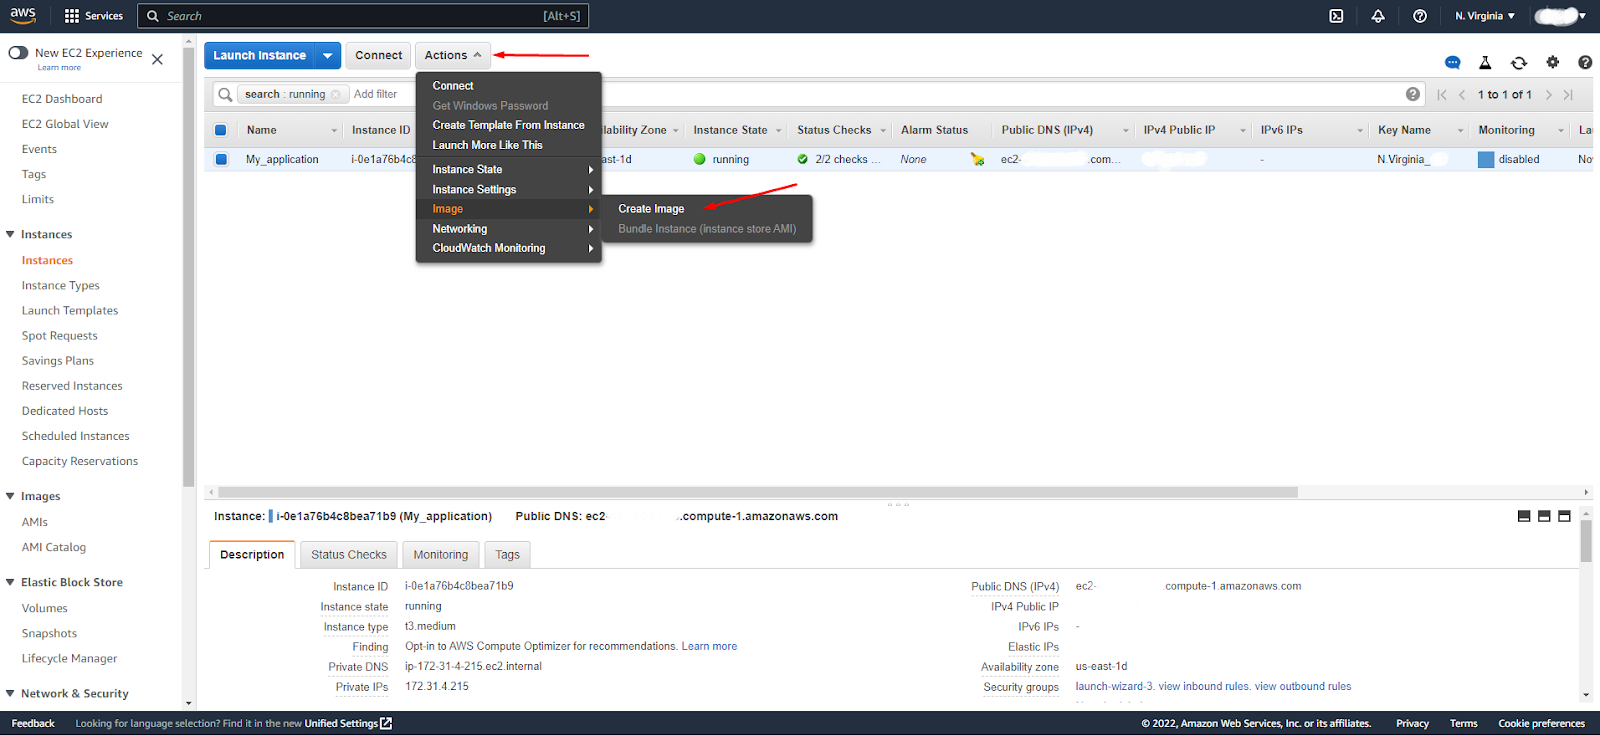
Step 3. Create an AMI from a deployed EC2 instance
After you have deployed and tested your EC2 instance and installed software, you can create an AMI with your product. Also, don’t forget to delete sensitive data like SSH access keys from the EC2 instance before creating the AMI.
Step 4. Test the product
Once the AMI is created, you can test it to make sure cloud migration works as intended. Repeat all steps that your end users must take to purchase and install your software.

At this stage, you can assess how your customers will interact with your product in AWS Marketplace and during installation.
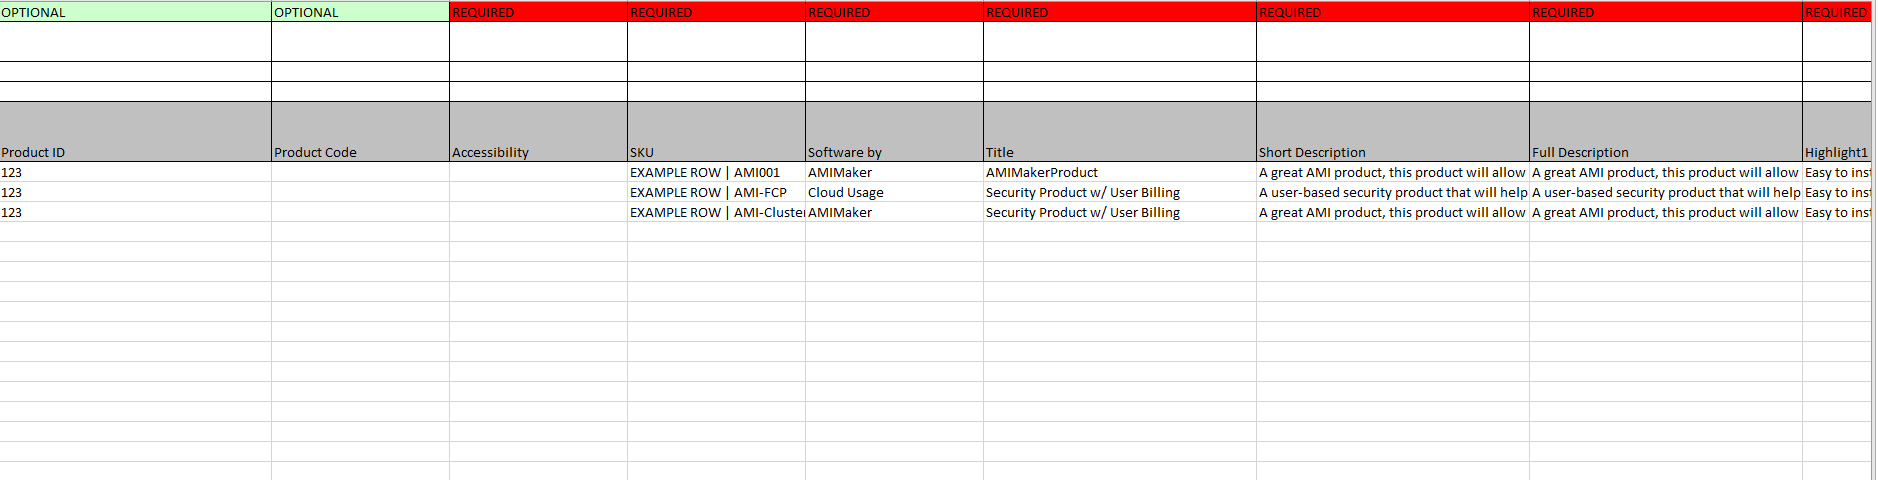
Step 5. Fill out the product submission form
Before registering your single-AMI product on AWS Marketplace, you need to fill out the Commercial Product section of the product submission form. In this form, you need to specify the operating system and third-party solutions your AMI uses, add a description, include keywords for search, provide licensing and refund information, and more.
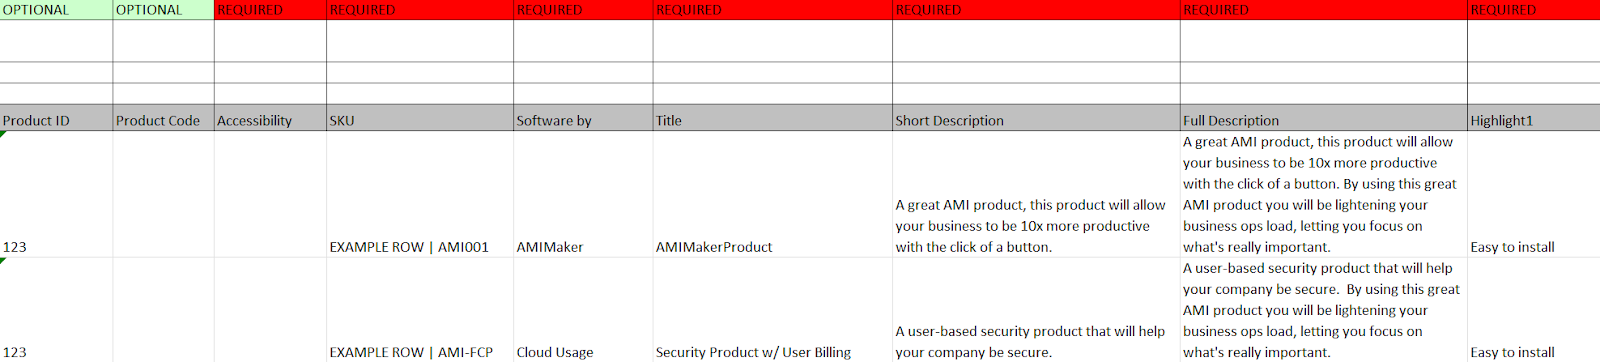
You’ll need to add this form to the product registration request.
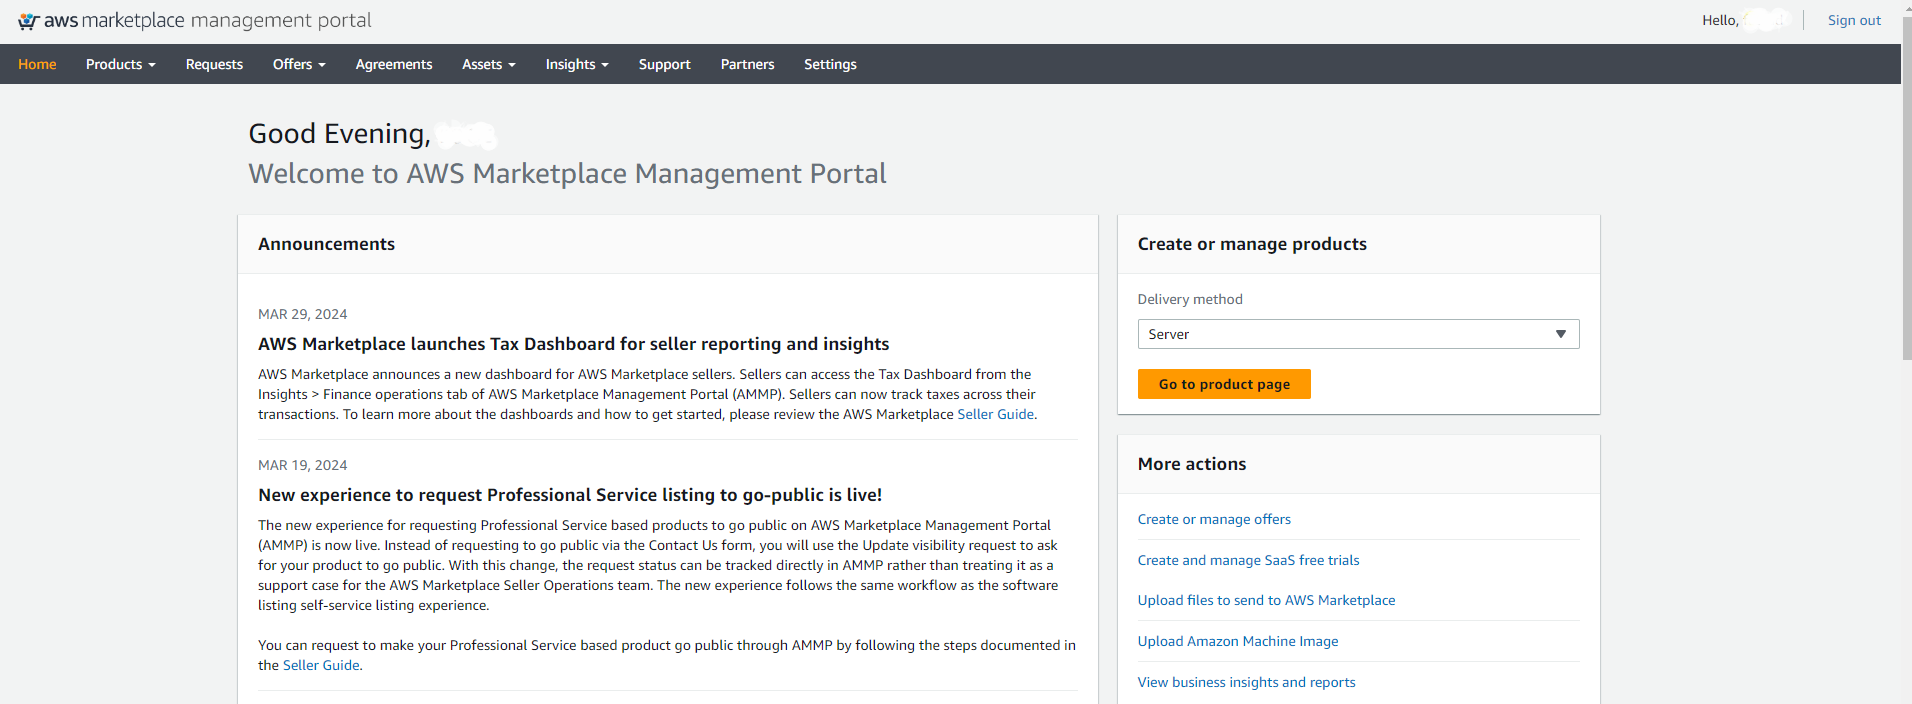
Step 6. Submit an AMI product registration request to AWS Marketplace
Using this checklist from AWS, check your AMI before submitting it to AWS Marketplace. When everything is ready, log in to your AWS seller account and go to AWS Marketplace Management Portal, navigate to the Products menu, select Server, and then select Create Server Product.
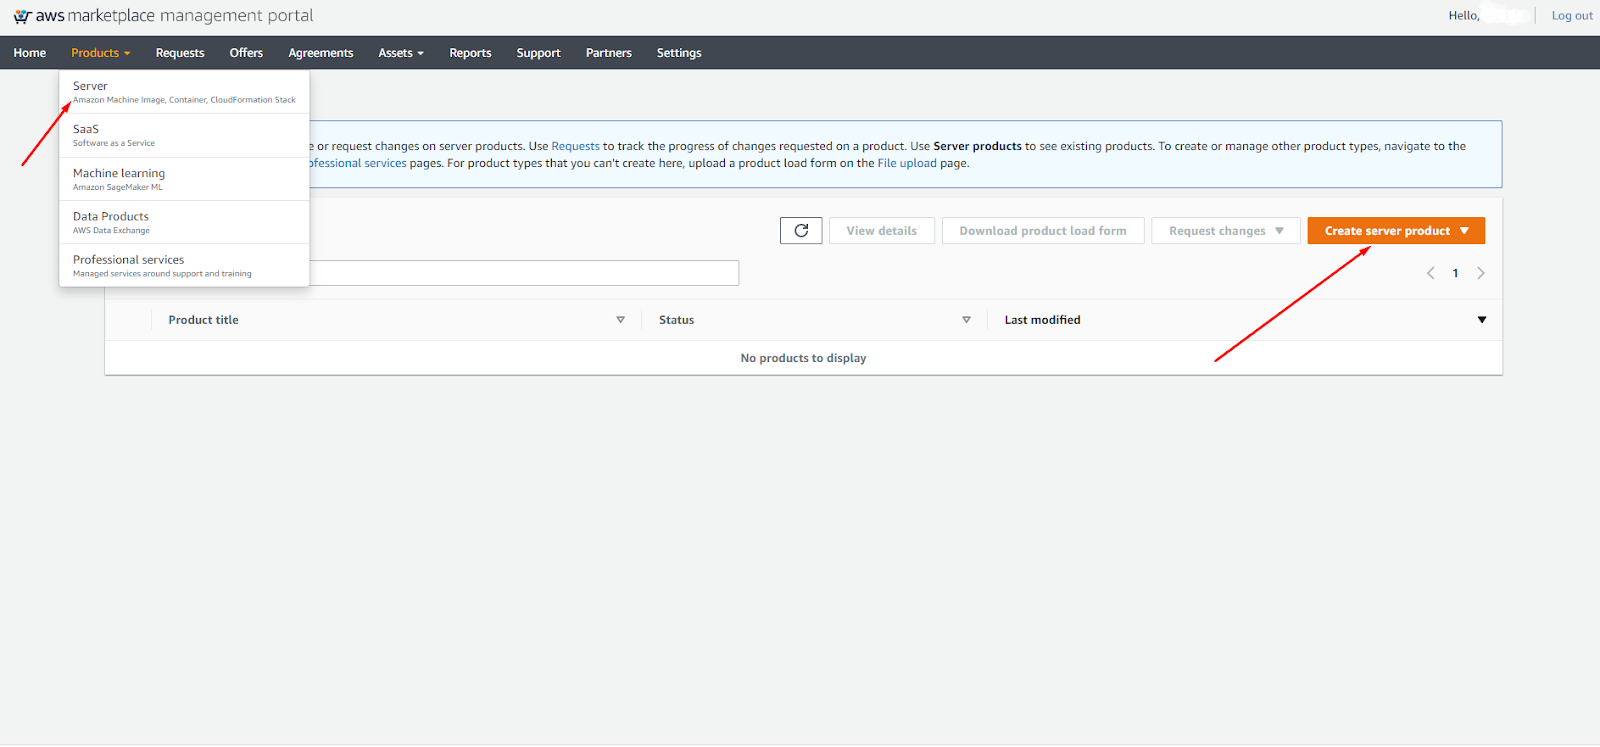
You’ll need to select the licensing type, add information about your product, select the type of EC2 instance to run your AMI, and submit the request.
There are numerous licensing options in AWS Marketplace, so let’s take a look at them in the next section.
Read also
Amazon S3 File Storage: Is It Worth Using in Your Cloud Infrastructure?
Get robust cloud storage for your product. Discover the key use cases of Amazon S3 and find out whether this advanced storage service suits your project in our guide.

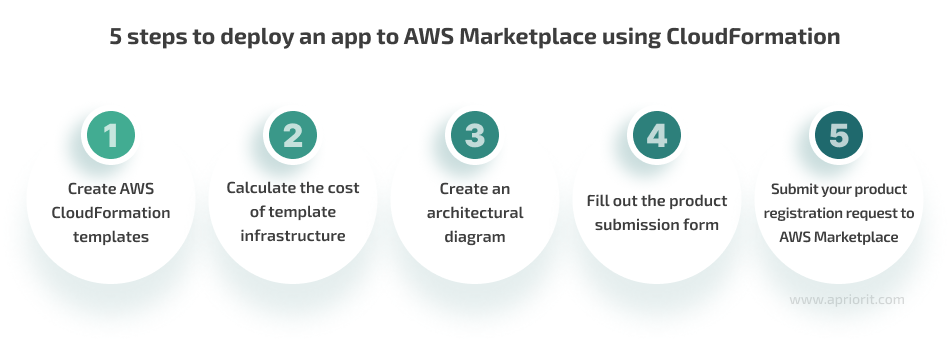
5 steps to deploy an application on AWS Marketplace using CloudFormation
Before we start the five-step CloudFormation deployment, we need to complete the same three preliminary steps from our single-AMI deployment tutorial:
- Prepare the software for deployment
- Configure the EC2 instance
- Create an AMI from the deployed EC2 instance
The next CloudFormation-specific steps are the following:
Let’s start.
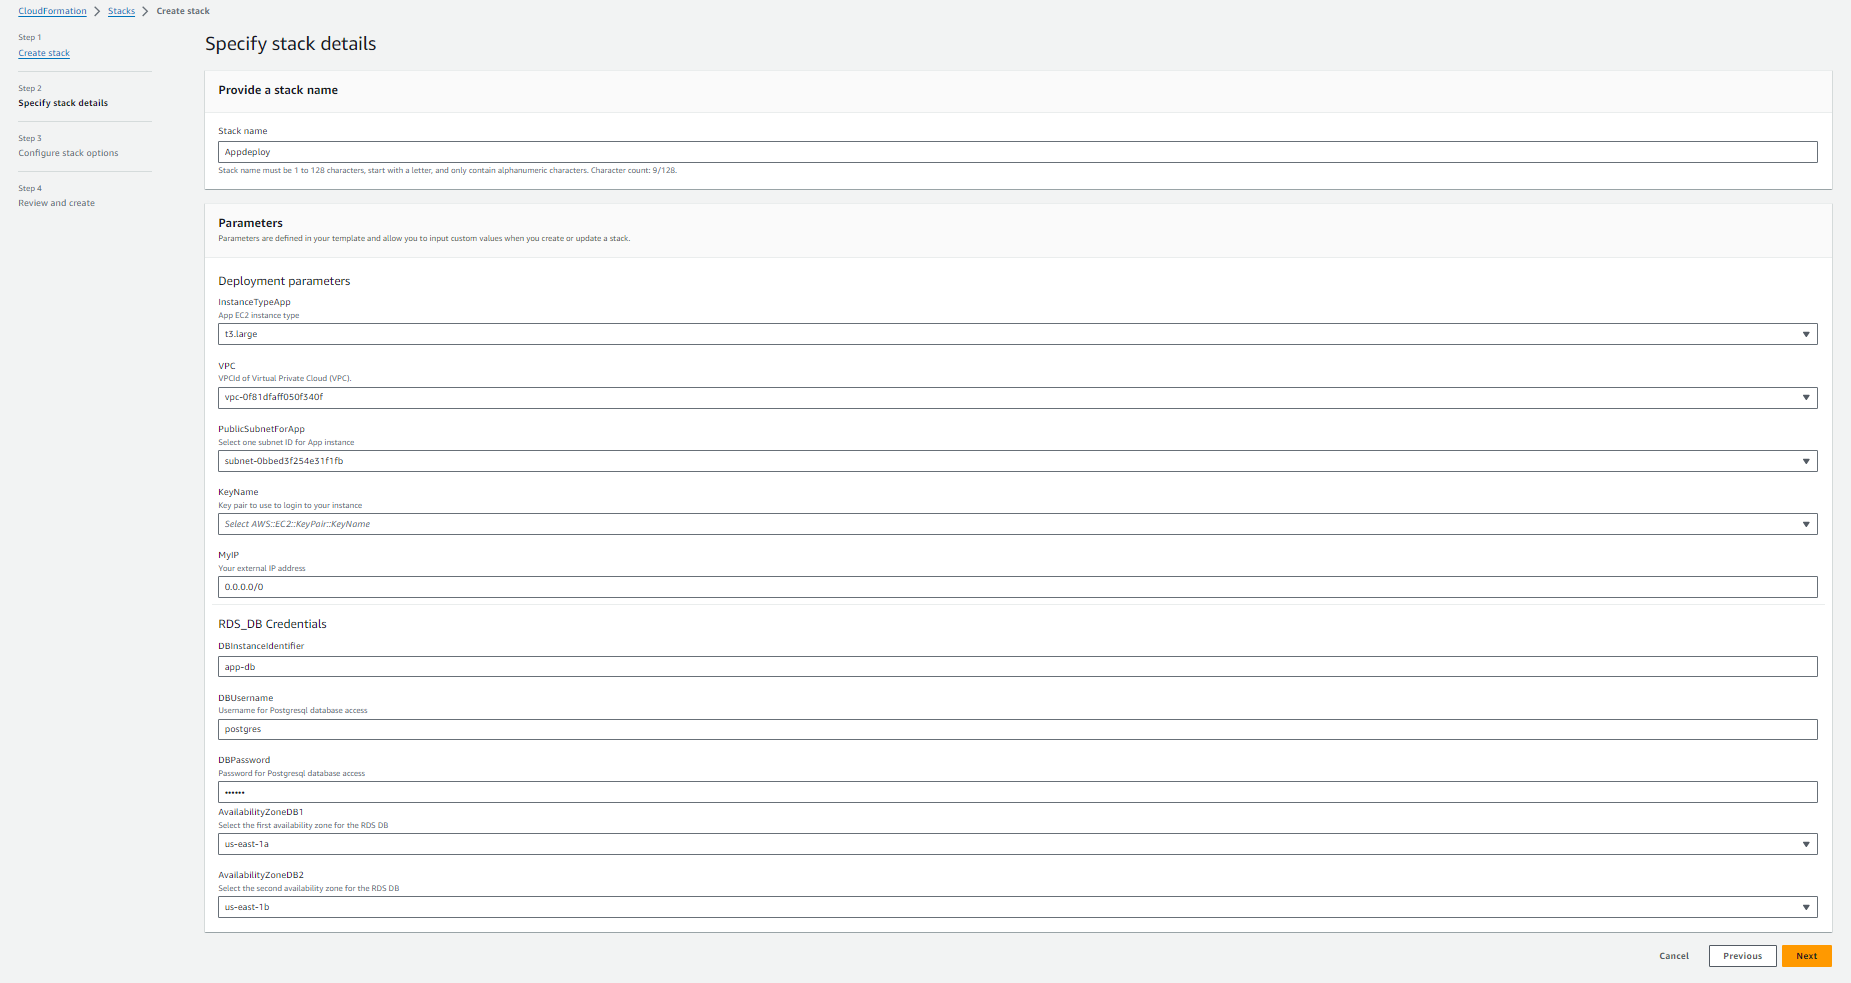
Step 1. Create an AWS CloudFormation template
In the CloudFormation template, you should describe all AWS services required for deploying the infrastructure and hosting your application on AWS Marketplace.
Focus on these key points when creating a template:
- Make sure that your template successfully launches in all AWS Regions enabled for your product.
- Add an AMI mapping table to your template for all AWS Regions enabled for your product.
- Make sure the template’s input parameters do not include any references to the customer’s AWS credentials.
- Make sure that the default SSH port (22) or RDP port (3389) is not accessible from all IP addresses (0.0.0.0).
You can find more detailed recommendations in AWS documentation.
CloudFormation templates can be configured to deliver a single Amazon Machine Image (AMI) or multiple AMIs along with associated configuration files and Lambda functions.
Here is an example of a simple CloudFormation template for delivering a single AMI:
AWSTemplateFormatVersion: 2010-09-09
Description: Template
Parameters:
InstanceTypeApp:
Description: App EC2 instance type
Type: String
Default: t3.micro
AllowedValues:
- t3.micro
- t3.small
- t3.large
ConstraintDescription: Must be a valid EC2 instance type for the Application
DBInstanceIdentifier:
Type: String
Default: app-db
DBUsername:
Description: Username for Postgresql database access
Type: String
MinLength: '1'
MaxLength: '16'
AllowedPattern: '[a-zA-Z][a-zA-Z0-9]*'
ConstraintDescription: Must begin with a letter and contain only alphanumeric characters.
Default: postgres
DBPassword:
NoEcho: 'true'
Description: Password for Postgresql database access
Type: String
MinLength: '8'
MaxLength: '41'
AllowedPattern: '[a-zA-Z0-9]*'
ConstraintDescription: Must contain only alphanumeric characters.
VPC:
Type: 'AWS::EC2::VPC::Id'
Description: VPCId of Virtual Private Cloud (VPC).
AvailabilityZoneDB1:
Type: 'AWS::EC2::AvailabilityZone::Name'
Description: Select the first availability zone for the RDS DB
AvailabilityZoneDB2:
Type: 'AWS::EC2::AvailabilityZone::Name'
Description: Select the second availability zone for the RDS DB
PublicSubnetForApp:
Description: Select one subnet ID for App instance
Type: 'AWS::EC2::Subnet::Id'
KeyName:
Description: Key pair to use to login to your instance
Type: 'AWS::EC2::KeyPair::KeyName'
MyIP:
Description: 'Your external IP address '
Type: String
MinLength: '9'
MaxLength: '18'
Default: 0.0.0.0/0
AllowedPattern: '(\d{1,3})\.(\d{1,3})\.(\d{1,3})\.(\d{1,3})/(\d{1,2})'
ConstraintDescription: must be a valid IP CIDR range of the form x.x.x.x/x.
Mappings:
AWSAMIRegionMap:
AMI:
InstanceApp: PreInstalledApp
us-east-1:
App: ami-XXXXXXXXXXXXXXXXX
us-east-2:
App: ami-XXXXXXXXXXXXXXXXX
us-west-2:
App: ami-XXXXXXXXXXXXXXXXX
ca-central-1:
App: ami-XXXXXXXXXXXXXXXXX
Metadata:
'AWS::CloudFormation::Interface':
ParameterGroups:
- Parameters:
- InstanceTypeApp
- VPC
- PublicSubnetForApp
- KeyName
- MyIP
Label:
default: Deployment parameters
- Parameters:
- DBInstanceIdentifier
- DBUsername
- DBPassword
Label:
default: RDS_DB Credentials
Resources:
InstancesSecurityGroup:
Type: 'AWS::EC2::SecurityGroup'
Properties:
GroupDescription: SecurityGroup_For_App
SecurityGroupIngress:
- IpProtocol: tcp
FromPort: '22'
ToPort: '22'
CidrIp: !Ref MyIP
- IpProtocol: tcp
FromPort: '1323'
ToPort: '1323'
CidrIp: !Ref MyIP
DBSecurityGroup:
Type: 'AWS::EC2::SecurityGroup'
Properties:
GroupDescription: SecurityGroup_For_DB
SecurityGroupIngress:
- IpProtocol: tcp
FromPort: '5432'
ToPort: '5432'
SourceSecurityGroupId: !GetAtt
- InstancesSecurityGroup
- GroupId
AppInstance:
Type: 'AWS::EC2::Instance'
DependsOn:
- InstancesSecurityGroup
- DBInstance
- DBSecurityGroup
Properties:
SubnetId: !Ref PublicSubnetForApp
UserData: !Base64
'Fn::Join':
- ''
- - |
#!/bin/bash -v
- DB_User=
- !Ref DBUsername
- |+
- DB_Pass=
- !Ref DBPassword
- |+
- DB_Hostname=
- !GetAtt
- DBInstance
- Endpoint.Address
- |+
- |
/temp/deploy_script.sh $DB_Hostname DB_User $DB_Pass
InstanceType: !Ref InstanceTypeApp
SecurityGroupIds:
- !GetAtt
- InstancesSecurityGroup
- GroupId
KeyName: !Ref KeyName
ImageId: !FindInMap
- AWSAMIRegionMap
- !Ref 'AWS::Region'
- App
Metadata:
'AWS::CloudFormation::Designer':
id: 6cd52ac9-0c19-44d7-ac19-e17036d4173a
IPAddressAppInstance:
Type: 'AWS::EC2::EIP'
Metadata:
'AWS::CloudFormation::Designer':
id: d4dca167-c879-416c-af32-47acc9624e0e
IPAssoc:
Type: 'AWS::EC2::EIPAssociation'
Properties:
InstanceId: !Ref AppInstance
EIP: !Ref IPAddressAppInstance
PrivateSubnet1:
Type: 'AWS::EC2::Subnet'
Properties:
VpcId: !Ref VPC
AvailabilityZone: !Ref AvailabilityZoneDB1
CidrBlock: 172.31.96.0/20
MapPublicIpOnLaunch: 'false'
PrivateSubnet2:
Type: 'AWS::EC2::Subnet'
Properties:
VpcId: !Ref VPC
AvailabilityZone: !Ref AvailabilityZoneDB2
CidrBlock: 172.31.112.0/20
MapPublicIpOnLaunch: 'false'
SubnetGroup:
Type: 'AWS::RDS::DBSubnetGroup'
Properties:
DBSubnetGroupName: subnetgroup
DBSubnetGroupDescription: Subnet Group
SubnetIds:
- !Ref PrivateSubnet1
- !Ref PrivateSubnet2
DBInstance:
Type: 'AWS::RDS::DBInstance'
DeletionPolicy: Delete
DependsOn:
- InstancesSecurityGroup
Properties:
DBInstanceIdentifier: !Ref DBInstanceIdentifier
AllocatedStorage: '5'
DBInstanceClass: db.t3.micro
DBName: testapp
Engine: postgres
MasterUsername: !Ref DBUsername
MasterUserPassword: !Ref DBPassword
VPCSecurityGroups:
- !GetAtt
- DBSecurityGroup
- GroupId
DBSubnetGroupName: !Ref SubnetGroup
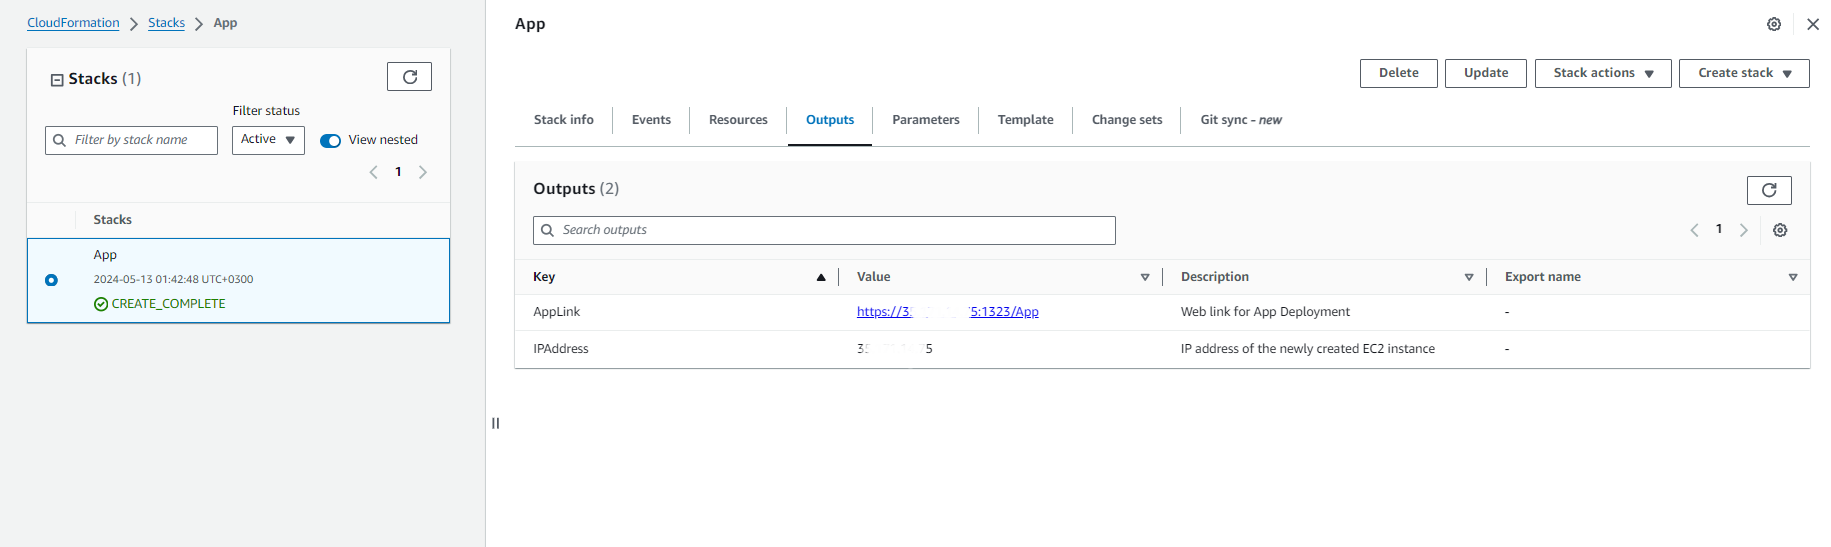
Outputs:
IPAddress:
Description: IP address of the newly created EC2 instance
Value: !Ref IPAddressAppInstance
AppLink:
Description: Web link for App Deployment
Value: !Join
- ''
- - 'https://'
- !Ref IPAddressAppInstance
- ':1323/App'This CloudFormation template deploys the AWS infrastructure required to run the application.
It includes provisions for hosting the application on an EC2 instance, a PostgreSQL database managed by Amazon RDS, and associated networking resources. After successfully deploying this template, the user will see an output link to access the application: https://IPAddressAppInstance:1323/App.
These are the input parameters that users need to specify before deploying the CloudFormation stack:
- InstanceTypeApp: Defines the EC2 instance type for the application.
- DBInstanceIdentifier: Specifies the identifier for the RDS database instance.
- DBUsername: Sets the username for accessing the PostgreSQL database.
- DBPassword: Specifies the password for accessing the PostgreSQL database.
- VPC: Selects the Virtual Private Cloud (VPC) for deployment.
- AvailabilityZoneDB1 & AvailabilityZoneDB2: Specifies availability zones for the RDS database.
- PublicSubnetForApp: Specifies the subnet for deploying the EC2 instance.
- KeyName: Specifies the key pair for SSH access to the EC2 instance.
- MyIP: Specifies the external IP address used to access the deployed application.
Here are the AWS resources that will be deployed:
- InstancesSecurityGroup: Defines the security group for the EC2 instance running the application.
- DBSecurityGroup: Defines security group rules for the RDS database.
- AppInstance: Represents the EC2 instance for hosting the application.
- IPAddressAppInstance: Allocates an Elastic IP address for the EC2 instance.
- IPAssoc: Associates the Elastic IP address with the EC2 instance.
- PrivateSubnet1 & PrivateSubnet2: Denotes the private subnets for the RDS database.
- SubnetGroup: Defines the subnet group for the RDS database.
- DBInstance: Represents the RDS database instance.
These are the output parameters that will be available to the user after successful stack deployment:
- IPAddress: Outputs the public IP address of the EC2 instance with the running application.
- AppLink: Outputs the web link for accessing the deployed application.
Step 2. Calculate the cost of your template infrastructure
You need to calculate the monthly cost of your infrastructure that will be deployed using the CloudFormation template. To calculate the infrastructure cost, use the AWS Pricing Calculator tool.
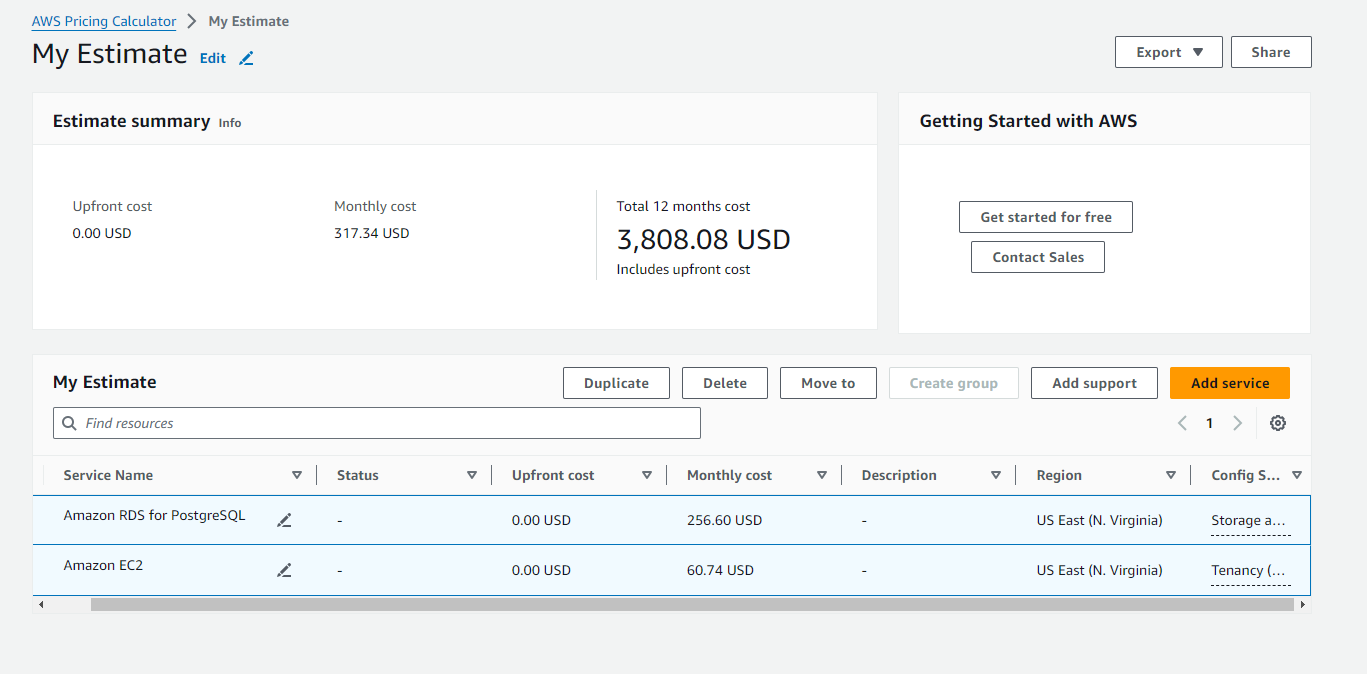
You will need to save and share your calculations with AWS Marketplace, as this is part of the submission process.
Related project
Building a Microservices SaaS Solution for Property Management
Learn how the Apriorit team helped our client attract new customers and optimize maintenance costs by successfully replacing their SaaS platform’s monolithic architecture with microservices.
Step 3. Create an architectural diagram
The architectural diagram should illustrate how components interact and relate to each other within the CloudFormation stack, providing a visual representation of the infrastructure deployment.
You can find AWS Marketplace requirements for the diagram in AWS documentation.
Here is an example of an infrastructure diagram for our CloudFormation template:
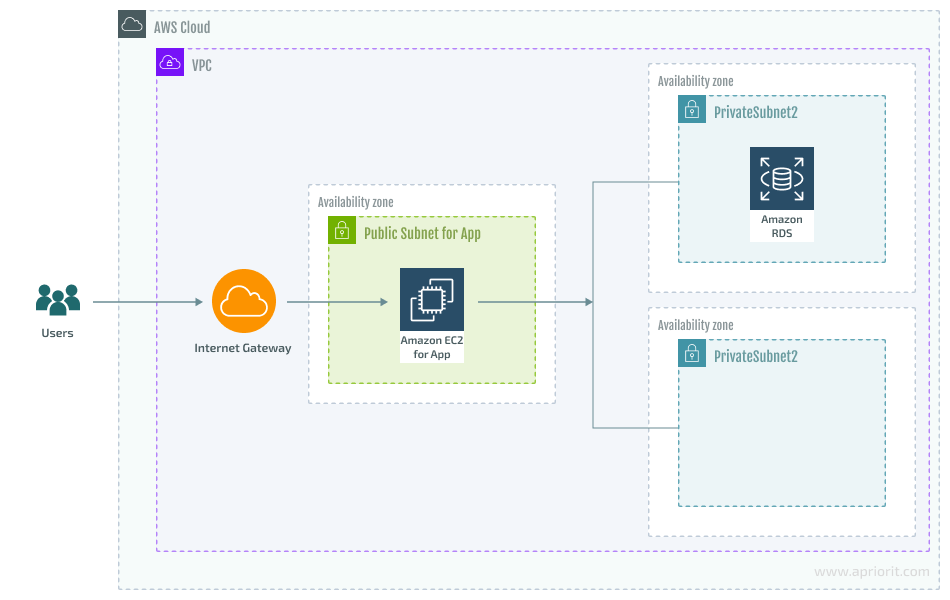
Our infrastructure diagram includes an EC2 instance to host the application, a PostgreSQL database managed by Amazon RDS, and a Virtual Private Cloud (VPC) network with associated resources. This encompasses a public subnet for storing the EC2 instance, along with two private subnets for the RDS database, ensuring secure isolation and access control.
Step 4. Fill out the product submission form
As with product registration using a single-AMI deployment, you also need to complete the product submission form when using the CloudFormation deployment type.
The form is a standard document provided by AWS Marketplace to vendors to present information about their products.
In this form, you have to provide the link to your CloudFormation template.
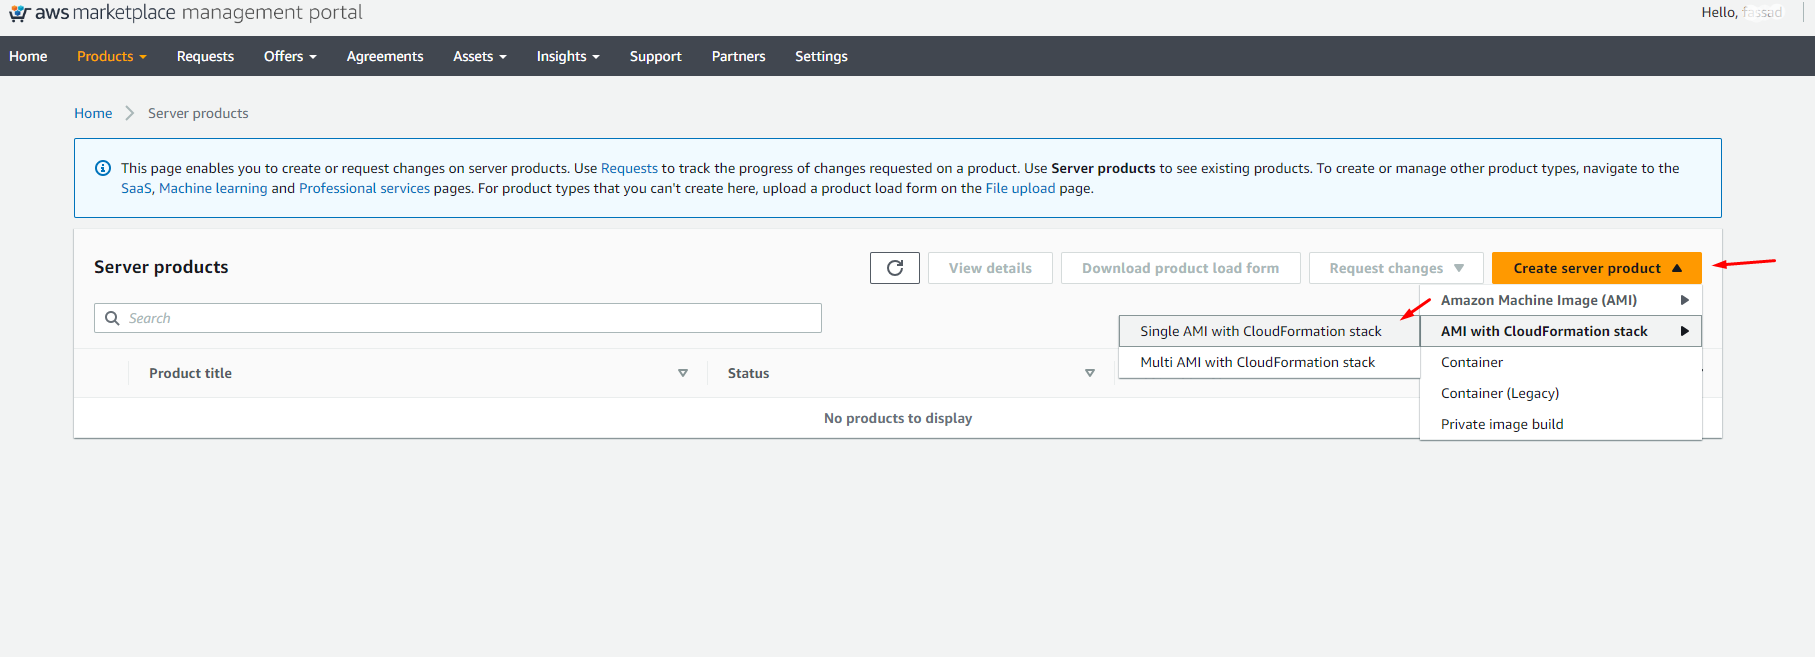
Step 5. Submit your product registration request to AWS Marketplace
The final step is to submit a product registration request. Before submitting the request, you need to ensure that your CloudFormation template launches successfully in all AWS Regions enabled for your product. You can use the TaskCat tool to check this.
To submit your product registration request, go to AWS Marketplace Management Portal, select Delivery method server, and select Go to the product page.
Next, select Create server product -> AMI with CloudFormation stack -> Single AMI with CloudFormation stack.
Upload the product form via File Uploads and wait for AWS to review it.
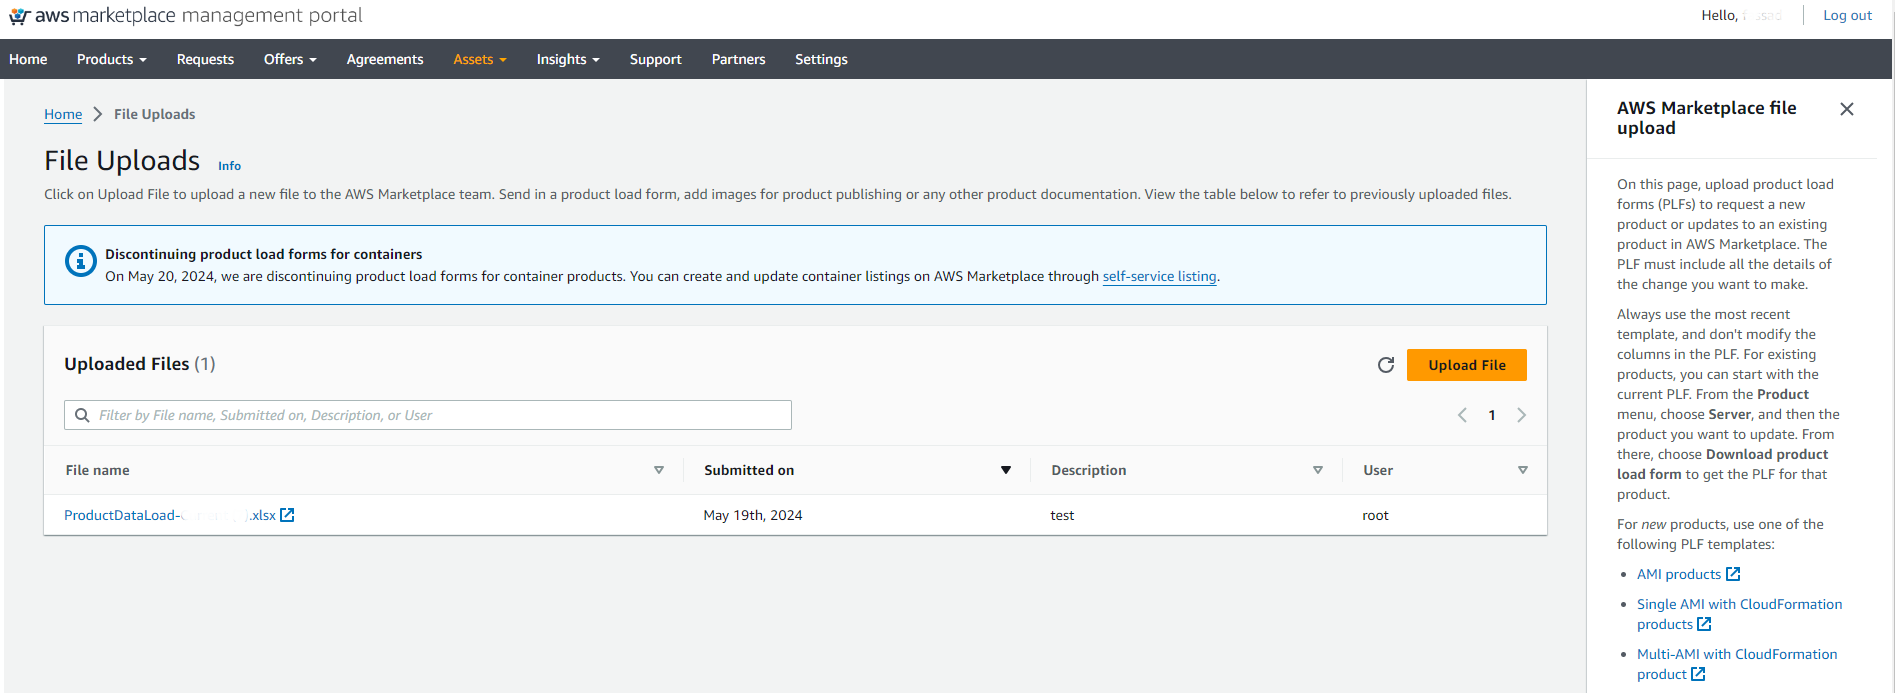
After passing the review successfully, your product will be available on the AWS Marketplace.
Read also
Introduction to DevSecOps with AWS: How to Integrate Security into DevOps
Deliver high-quality code faster. Discover how you can use AWS to implement secure and efficient DevOps practices in your project.
Software licensing for AMI-based products
AWS Marketplace has six licensing options for AMI-based solutions:
- Free. An end user can deploy any number of instances with free software and use them for any amount of time free of charge.
- Bring your own license (BYOL). An end user can purchase a license key for the product directly from the software provider and add it to AWS instead of buying the key on AWS Marketplace. This type of licensing is convenient for products that are sold on numerous platforms, including AWS Marketplace.
- Paid hourly or hourly-annual. Under this type of licensing, an AMI comes with a license key. This way, an end user purchases and deploys an already licensed product. Then, the end user gets billed per hour for using the software. The software provider can set any price. If the usage time is less than an hour, AWS Marketplace rounds the time up to an hour. Also, this type of license allows a software provider to set a monthly or yearly price for a certain amount of product usage.
- Paid monthly. This is a monthly subscription for using a product. The price is fixed and doesn’t depend on the amount of time for which an end user interacts with the software or the number of instances they run it on.
- Paid usage pricing. This licensing model is similar to the paid hourly model, as the end user pays per hour of use. But a paid usage pricing license allows a software provider to set different prices depending on the use case. For example, if multiple users across an organization need to access your product, the organization can be charged by the user. Each hour, the organization can be charged for the total number of provisioned users.
- Contract pricing. An end user has to pay up front to deploy and use software distributed under this type of license.
Paid hourly and hourly-annual are the most common types of licenses for cloud solutions as they are transparent, easy to understand, and cost-efficient for end users.
Conclusion
Cloud marketplaces help software providers find new end users, simplify product maintenance, and automate billing processes. That’s why many software providers choose to deploy their products in a hybrid environment or fully move them to the cloud.
To start selling your product in a cloud marketplace, you need to know how a particular marketplace operates and how to prepare your product to be published on it. With AWS Marketplace, you need to choose the type of EC2 instance to host your software, test the cloud deployment process, and choose a license type. The right choice will help you ensure smooth performance of cloud software while keeping cloud costs under control.
Each marketplace has its own software deployment process. Our developers specialize in cloud computing and virtualization and are experienced in preparing and deploying software to AWS, Microsoft Azure, Google Cloud, and other popular marketplaces.
Looking for a dedicated team of cloud experts?
Leverage Apriorit’s expertise to optimize performance and drive business growth with confidence!
Have a question?
Ask our expert!
Program Manager


