 Skip to main content

End users hate waiting for a response from an application. But some operations can’t be started until another task is complete. To address this problem, modern networking applications rely heavily on asynchronous execution of interdependent tasks. The aim is to optimize the performance of high-load servers and improve the reactiveness of networking applications.
In Rust and C++20, programmers use different approaches when building such applications: asynchronous programming and coroutines. In this article, we compare ways of implementing Rust async await vs C++ coroutines and provide examples based on dedicated libraries — Tokio for Rust and Boost.Asio for C++20.
This article will be useful for project managers and development teams considering different options for building a networking application that requires asynchronous task processing.
Contents:
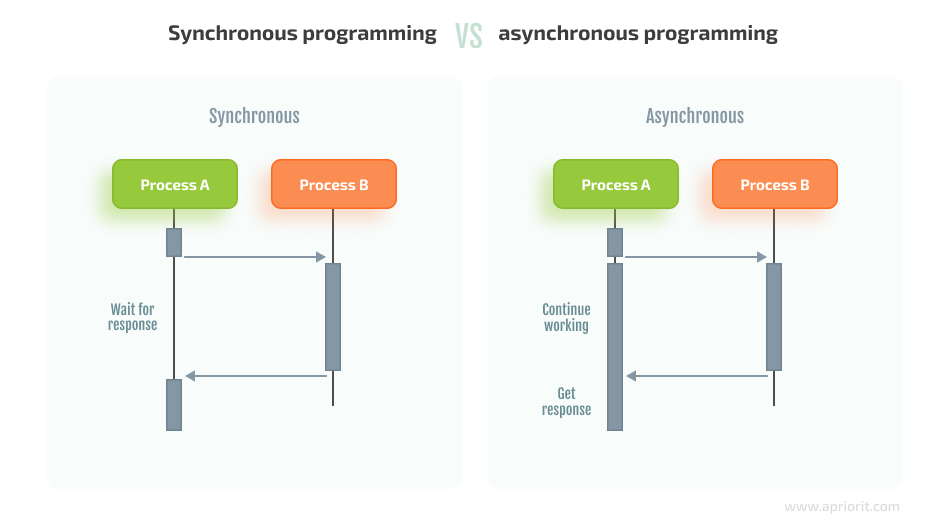
Initially, programs were written and executed synchronously, with every line of code being executed in strict order, one after another. In this approach, a task can’t be started until the previous task has finished. This can lead to significant performance issues, especially in complex solutions with multiple interdependent operations.
As an alternative to synchronous programming, we have asynchronous programming and coroutines. These mechanisms allow processes to progress without necessarily waiting for the completion of previous tasks.
Asynchronous programming and coroutines are now the de facto standard for developing reactive applications that work with networks or file systems.
They optimize high-load programs that frequently wait for tasks to be completed (e.g. waiting for a response from a client) and allow other tasks to be performed without waiting for the completion of the primary task. Additionally, they provide a solution to the 10K connections problem, which is critical for high-load servers.
Below, we analyze current approaches to asynchronous operation handling in two popular programming languages — Rust and C++20.
Looking to build an advanced solution?
Discover how Apriorit’s niche expertise can help you bring even the most ambitious idea to life!
Asynchronous programming in Rust
Since 2018, Rust programmers have had a built-in solution for asynchronous programming through the Future trait, which represents an async task and its interface. Now, asynchronous operations in Rust rely heavily on the Future trait and the types that implement it.
The Future trait represents data that is currently unavailable but can be obtained at some point in the future. This trait allows for reading from a TCP connection or any operation that takes a long time to complete.
The Future trait has a poll function, which you can call in order for the Future trait to make further progress.
Here’s the definition of the Future trait:
pub trait Future {
    type Output;

    fn poll(self: Pin<&mut Self>, cx: &mut Context<'_>) -> Poll<Self::Output>;
}Let’s look closer at the types and mechanisms that you need to implement the Future trait:
- Output — This is the type that the operation task resolves to. For a TCP reading, the Output type would be
Result<usize, io::Error>. Upon successful completion of the task, you will receiveOk(usize)with the number of read bytes. If an error occurs, you will receive theErr(io::Error)result. - Pinning — This is a mechanism for attaching data to a specific location in memory. By using Pin, you guarantee that the object won’t be moved to another location in memory. For example,
Pin<&mut Self>indicates that &mut Self will always be in the same memory location between the calls toSelf::poll. Using the same memory location is mandatory if you want to be sure that the fields of Self don’t change their memory address. - Context<‘_> — This is a wrapper type around the Waker handle. Waker informs the calling code that the task can progress, for example, when the needed file becomes available for reading.
A task can be in progress or completed. The state of a task is shown in the return value of the poll function.
pub enum Poll<T> {
    Ready(T),
    Pending,
}If after calling the poll function you receive Poll::Pending, the task is still in progress. If you receive Poll::Ready(T), the task has been completed.
Let’s take a look at a practical example of creating a simple timer with the Future trait and polling:
use std::future::Future;
use std::pin::Pin;
use std::sync::Arc;
use std::task::{Context, Poll, Wake, Waker};
use std::time::Duration;
use std::{io, time};
use time::Instant;

struct MyWaker {}

impl Wake for MyWaker {
    fn wake(self: Arc<Self>) {}
}


struct Timer {
    start: Instant,
    wait: u32,
}


impl Timer {
    fn new(wait: u32) -> Timer {
        Timer {
            start: Instant::now(),
            wait,
        }
    }
    fn wait(&mut self) {
        let waker = Waker::from(Arc::new(MyWaker {}));
        let mut context = Context::from_waker(&waker);


        loop {
            match Pin::new(&mut *self).poll(&mut context) {
                Poll::Ready(elapsed) => {
                    println!("timer finished: elapsed {elapsed:?} secs");
                    break;
                }
                Poll::Pending => {  // task is not ready for now, so sleep
                    std::thread::sleep(Duration::from_secs(1));
                }
            }
        }
    }
}


impl Future for Timer {
    type Output = u32;


    fn poll(self: Pin<&mut Self>, _: &mut Context<'_>) -> Poll<Self::Output> {
        let time_point = Instant::now();
        let elapsed = time_point.saturating_duration_since(self.start).as_secs() as u32;
        return if elapsed > self.wait {
            Poll::Ready(elapsed)
        } else {
            Poll::Pending
        };
    }
}


fn main() {
    let mut timer = Timer::new(5);
    timer.wait();
}Here, we have a Timer structure that contains the starting time and the number of seconds to wait. In the main function, we create a Timer instance that waits for five seconds and then calls Timer::wait.
In Timer::wait, we create a MyWaker handle that implements the Wake trait. MyWaker is the simplest Waker from which we create Context.
Next, we have a loop that polls our Timer structure. Pin::new(&mut *self) creates a Pin<&mut Self> to call Future::poll.
When we call Timer::poll, it can return one of the two results:
Poll::Ready— This result shows that the specified time interval has passed. After receiving Poll::Ready, we can output the result to the console and exit.Poll::Pending— This result shows that the required time interval hasn’t passed yet. In this case, we go back to polling after a one-second pause.
Thus, implementing the Future trait for the Timer structure is quite simple — if the required time interval has passed, we return Poll::Ready with the number of seconds that have passed, and if the interval hasn’t passed yet, we return Poll::Pending.

Now, let’s look closer at the specifics of the Async/Await syntax in Rust.
Read also
Rust vs C++ Comparison
Choose a suitable programming language for your software with our comprehensive comparison between Rust and C! Gain valuable insights into their features, performance, and suitability for different projects.

Async/Await syntax in Rust
The Poll mechanism we analyzed above is considered to be low-level. Therefore, while it’s useful to know the basics of this mechanism, you’re unlikely to use it or implement the Future trait manually when building a Rust solution.
To simplify the use of the Future trait, Rust developers use Async/Await syntax, which allows them to write asynchronous functions and blocks and wait for their execution.
For example, we can create a write function:
async fn write(stream: &mut TcpStream, bytes: &[u8]) -> io::Result<u32>To execute this function, we use the .await syntax:
let mut stream = TcpStream::connect(“127.0.0.1:8080”).unwrap();
async {

let count = write(&mut stream, “Hello there”.as_bytes()).await;
	println!(“wrote {count} bytes”);
}As you can see, this code is easier to write and read compared to code that uses the poll function.
The compiler rewrites async functions into functions that return the Future trait. For example, the compiler will rewrite the write function from the previous code sample to the following:
fn write(stream: &mut TcpStream, bytes: &[u8]) -> imp Future<type Output=io::Result<u32>>The .await syntax works with any function that returns impl Future. For example, with the Timer structure, instead of polling the wait function, we can do the following:
  let mut timer = Timer::new(5);
async {
     let elapsed = timer.await;
     println!("timer finished: elapsed {elapsed:?} secs");
}We can also gather several Futures and execute them:
let timers = vec![Timer::new(5), Timer::new(10), Timer::new(15)];
for timer in timers {
    async {
         let elapsed = timer.await;
         println!("timer finished: elapsed {elapsed:?} secs");
    };
}Yet this code won’t compile. Future will only start execution after the first .await. We can apply the await mechanism only when Future is in an async block or async function. However, we also must apply the await mechanism to the async block, as it also resolves to imp Future.
To address this problem, we need to apply the Runtime mechanism for the Future trait. This mechanism will execute async Futures in synchronous code.
The tricky thing is that the Runtime mechanism is unavailable in the standard library. Consequently, we have two alternatives for implementing this mechanism:
- Write a custom Runtime mechanism
- Use a library that provides async Runtime (such as Tokio or async-std)
In this article, we overview the use of the Tokio library for implementing the Runtime mechanism for Rust coroutines.
Working with the Tokio library
The Tokio library provides a Runtime for executing Futures in Rust. Using this library, we can add async variants of standard library primitives such as TcpListener, TcpStream, File, and so on.
Here’s how to add Tokio to a project:
cargo add tokio -F full And this is what the Timer structure implemented with this library looks like:
fn main() {
    let runtime = tokio::runtime::Builder::new_multi_thread().build().unwrap();
    runtime.block_on(async {
        let timer = Timer::new(5);
        let elapsed = timer.await;
        println!("timer finished: elapsed {elapsed:?} secs");
    });
}In this example, we create a Tokio Runtime that polls the Futures running on it. In particular, we create a multi-threaded runtime, which provides us with eight system threads to run our Futures on. It’s also possible to create a single-threaded runtime where our Futures will be executed on a single system thread.
Next, using the Runtime::block_on method, we launch a Future on the Runtime. This method is responsible for blocking execution of the main thread until the Future passed to it completes its work. Developers use this method to start the main Future, which will then start all the necessary sub-Futures.We also need to add a Waker waking mechanism to the Future trait implementation for the Timer structure. In this way, the Tokio executor will know that the task needs to be polled again because it hasn’t finished.
impl Future for Timer {
    type Output = u32;

    fn poll(self: Pin<&mut Self>, cx: &mut Context<'_>) -> Poll<Self::Output> {
        let time_point = Instant::now();
        let elapsed = time_point.saturating_duration_since(self.start).as_secs() as u32;
        return if elapsed > self.wait {
            Poll::Ready(elapsed)
        } else {
            let waker = cx.waker();
            waker.wake_by_ref();
            Poll::Pending
        };
    }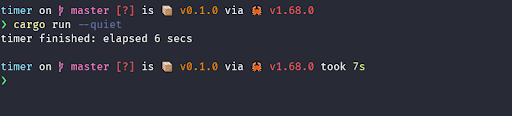
}After running this code, we receive the following results:
Note that we don’t have to always create a Tokio Runtime manually. Instead, we can use the #[tokio::main] macro.
This is what the main function from earlier would look like if we rewrite it with this macro:
#[tokio::main]
async fn main() {
    let timer = Timer::new(5);
    let elapsed = timer.await;
    println!("timer finished: elapsed {elapsed:?} secs");
}Let’s discuss Tokio Runtime in more detail.
Read also
Rust in Cybersecurity Development: Benefits, Features, and Use Cases
We examine the benefits of using Rust in cybersecurity projects, best types of projects for Rust development, and key challenges of using this languages.

Specifics of Tokio Runtime
Tokio Runtime adds an I/O event loop that starts asynchronous tasks, subscribes to them, and informs local tasks about these events. It interacts with asynchronous system tasks using the mio library, which allows for subscribing to system I/O events and passing notifications. Also, tokio Runtime contains a Scheduler that determines the order for task execution.
Using the tokio::spawn function, we launch a Task — a set of Futures defined as an execution unit — that will be executed by a Processor. A Task is a green thread managed by tokio Runtime.
Here’s an example of a Task spawned in Tokio:
use tokio::net::TcpListener;

#[tokio::main]
async fn main() {
    let listener = TcpListener::bind("127.0.0.1:8080")
        .await
        .expect("failed to bind 8080 socket");

    while let Ok((connection, _)) = listener.accept().await {
        tokio::spawn(async move {
            // doing something with the connection in a separate Task
        });
    }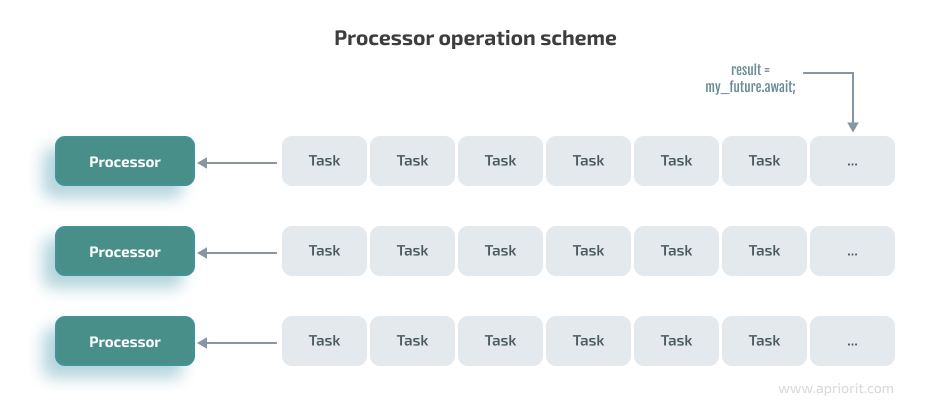
}The Processor that executes the Task represents a system thread. Each Processor has a queue of tasks: it polls a task, executes it, and then moves to the next one.
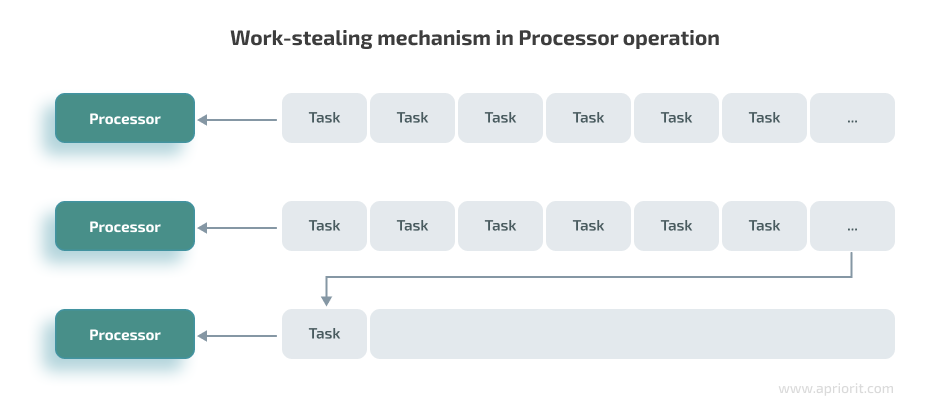
A Processor with an empty queue can also take a task from a different Processor’s queue — this mechanism is called work-stealing. Thanks to work-stealing, each Processor always has a task to execute.
Finally, let’s take a brief look at one more important element you need to know when implementing asynchronous tasks in Rust — state machines.
State machine
When working with asynchronous programming in Rust, the compiler transmits all async functions into a state machine. State machines describe relations between states — behavioral design patterns responsible for changing an object’s behavior according to changes in its internal state.
Say we have an async of the foo function that connects to some address, reads a message, and sends a response:
async fn foo() -> io::Result<()>
{                                                                                         	// State0
	let mut connection = TcpStream::connect("127.0.0.1:8080").await?;                          	//---------------------------------------------------------------
	let mut buf = Vec::new();  // State1
	let were_read = connection.read(&mut buf).await?;
	println!("client wrote:{:?}", String::from_utf8_lossy(&buf[0..were_read]));
    //---------------------------------------------------------------
	let message = "hello there"; // State2
	connection.write(message.as_bytes()).await?;
    //---------------------------------------------------------------
	// State3
	Ok(())
}For each .await, the compiler creates a separate state where the data for each stage of the foo function’s operation is stored:
struct State0Data {
	addr: &'static str,
}

struct State1Data {
	connection: TcpStream,
	buf: Vec<u8>,
}

struct State2Data<'a> {
	message: &'a str,
	connection: TcpStream,
}


enum FooStateMachine<'a> {
	State0(State0Data),
	State1(State1Data),
	State2(State2Data<'a>),
}Then the compiler implements a Future for the FooStateMachine function, where each stage contains code related to that stage as well as a transition to the next state:
impl<'a> Future for FooStateMachine<'a> {
	type Output = io::Result<()>;

	fn poll(mut self, cx: &mut Context<'_>) -> Poll<Self::Output> {
    	match self.as_mut() {
        	FooStateMachine::State0(State0Data{..}) => {
            	let mut connection = TcpStream::connect("127.0.0.1:8080").poll();
            	match connection {
                	Poll::Ready(Ok(stream)) => {
                    	*self = FooStateMachine::State1(State1Data{
                        	connection: stream,
                        	buf: vec![],
                    	});
                	}
                	Poll::Ready(Err(err)) => return Poll::Ready(Err(err)),
                	Poll::Pending => return Poll::Pending,
            	}
        	},
        	FooStateMachine::State1(State1Data{ mut buf, mut connection}) => {
            	let mut were_read = 0;
            	match connection.read(&mut buf).poll() {
                	Poll::Ready(Ok(bytes_read)) => were_read = bytes_read,
                	Poll::Ready(Err(err)) => return Poll::Ready(Err(err)),
                	Poll::Pending => return Poll::Pending,
            	}

            	println!("client wrote:{:?}", String::from_utf8_lossy(&buf[0..were_read]));
            	*self = FooStateMachine::State2(State2Data{ message: "hello there", connection });
        	},
        	FooStateMachine::State2(State2Data{message, mut connection }) => {
            	return match connection.write(message.as_bytes()).poll() {
                	Poll::Ready(Ok(_)) => Poll::Ready(Ok(())),
                	Poll::Ready(Err(err)) => Poll::Ready(Err(err)),
                	Poll::Pending => Poll::Pending,
            	}
        	}
    	}

    	Poll::Pending
	}
}Note that in the example above, we omitted pinning and lifetime to simplify the code.
Also, an asynchronous foo function gets replaced with a synchronous foo function that returns FooStateMachine:
fn foo() -> FooStateMachine
{
	return FooStateMachine::State0(State0Data{addr: "127.0.0.1:8080" });
}As you can see, the Tokio library provides multiple useful features out of the box, including executors that can immediately handle tasks in multiple threads. Tokio supports work-stealing and channels, allows for writing unit tests, and has strong community support.
For debugging asynchronous applications written in Rust, you can also go to the following libraries:
- tracing — application-level tracing for Rust
- console — diagnostics and debugging tool for asynchronous Rust programs
- async-backtrace — helps track and monitor the state of asynchronous tasks
There are also many libraries that integrate with Tokio, including:
Let’s move further with our comparison of Rust vs C++ in asynchronous programming and see what alternatives programmers have who work with C++ 20.
Read also
A Brief Tutorial on Modifying Network Traffic in Windows and Linux
Improve your project with advanced network traffic management! Explore the top network traffic modification techniques to streamline your operations, improve efficiency, and mitigate risks.

Coroutines in С++ 20
Similarly to Rust, C++ asynchronous programming initially required using complex mechanisms — callbacks and lambda expressions. After the release of C++20, they can now use coroutines — functions that can pause execution and resume it later.
The main difference between the mechanisms for asynchronous programming in Rust and C++ is that in C++, when an async task is launched, a handle of that task is returned. That handle stores the result of the task after some time. Coroutines, on the other hand, launch a green thread and are used in a fire-and-forget style.
There are two types of coroutines:
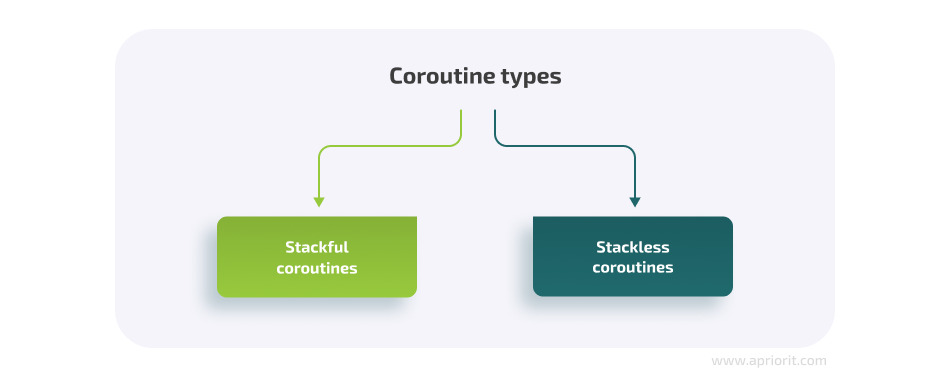
1. Stackful coroutines may be suspended within a nested stack frame. When using stackful coroutines, function execution resumes at the same point in the code where it was suspended. During function execution or suspension, local variables are stored on the stack of the corresponding point in code.
2. Stackless coroutines can only be suspended by a top-level function. Any procedure called by this top-level function can’t itself suspend execution. Local variables in such coroutines are located in the stack of the calling code, in a fixed-size buffer that belongs to a particular coroutine.
C++20 introduced different primitives for writing stackless coroutines. A function can be considered a coroutine if it has one of the following keywords (operators):
- сo_await
- co_yield
- co_return
Now, let’s look closer at the specifics of working with each of these three operators.
Working with the co_await operator
The co_await operator calls a coroutine:
co_await a; Using this operator, we can:
- Save the local variables in the current function in a heap-allocated object.
- Create a callable object (awaiter) responsible for resuming execution of the coroutine.
- Call the awaiter created in the previous step.
The compiler creates a coroutine_handle and rewrites the call to a.await_suspend(coroutine_handle) when it detects co_await. This handle is responsible for continuing coroutine execution.
Working with the co_return operator
This operator indicates that the coroutine should be terminated.
There are three ways we can show that a coroutine needs to be terminated:
- Use the co_return e expression, where e is the final value. In this case, the compiler inserts p.return_value(e), where p is the promise object.
- Use the co_return expression, which simply ends execution without returning a final value. In this case, the compiler inserts p.return_void().
- Allow the coroutine to exit the function, which is equivalent to the second option.
To determine if the coroutine has finished, you can call h.done(), where h is the coroutine handle.
Let’s take a look at the following coroutine example:
#include <concepts>
#include <coroutine>
#include <exception>
#include <iostream>

struct Awaitable
{
public:
	explicit Awaitable(std::coroutine_handle<>* coroutineHandle): coroutineHandle(coroutineHandle){}
	~Awaitable()
	{
    	if(this->coroutineHandle)
        	this->coroutineHandle->destroy();
	}

	// required
	bool await_ready() const noexcept { return false; }
	void await_suspend(std::coroutine_handle<> h) { *coroutineHandle = h; }
	void await_resume() const noexcept {}
private:
	std::coroutine_handle<>* coroutineHandle;
};

struct Task
{
	struct promise_type
	{
    	// required
    	Task get_return_object() { return {}; }
    	std::suspend_never initial_suspend() { return {}; }
    	std::suspend_never final_suspend() noexcept { return {}; }
    	void unhandled_exception() {}

    	// one return method is required
    	void return_void();
    	//void return_value(T v);
    	//void yield_value(T v);
	};
};

Task counter(std::coroutine_handle<>& handle)
{
	Awaitable awaitable(&handle);
	for (int i = 0;; ++i)
	{
    	co_await awaitable;
    	std::cout << "counter: " << i << std::endl;
	}
}

int main()
{
	std::coroutine_handle<> handle;
	counter(handle);
	for (int i = 0; i < 5; ++i)
	{
    	handle();
	}
	return 0;
}In this example, we create a Task coroutine that we can manage through a coroutine_handle. The Task must contain the promise object, which affects the behavior of the coroutine at both the beginning and the end of execution.
The promise object should contain the following methods:
- get_return_object — returns the coroutine object (Task)
- initial_suspend — returns an awaiter that defines the behavior of the coroutine during the first run (In our case, it returns
std::suspend_never, an awaiter from the standard library that forbids suspending coroutine execution during the first run.) - final_suspend — returns an awaiter that determines coroutine execution upon completion (We return
std::suspend_never, which forbids suspending coroutine execution when exiting.) - unhandled_exception — called when an exception occurs and is responsible for handling all sorts of exceptions (In our case, we suppress any exceptions we encounter.)
- One of three functions that can be called when the value is returned from the coroutine
There are three functions that can be called when the coroutine returns a value:
- The return_void function returns nothing.
- The return_value function returns a specific value.
- The yield_value function suspends the coroutine and returns a value. Note that this function is called when we use the co_yield operator.
If the promise_type misses one of those return methods, we’re faced with undefined behavior when exiting the coroutine.
The counter function represents the body of the coroutine. It creates an awaitable object that controls the behavior of the coroutine on co_await calls. Awaitable should have the following mandatory methods:
- await_ready — determines whether to make progress on coroutine execution
- await_suspend — called when coroutine execution is terminated after the await_ready method returns false
- await_resume — called when the coroutine continues its execution after the await_ready method returns true
After the coroutine has finished its work, we call std::coroutine_handle::destroy to free resources.
The body of the coroutine transforms into the following state machine:
struct CoroFrame
{
	Task::promise_type promise;
	bool initial_await_resume_called;
	int state = 0;
	int i;
	void operator()();
	std::suspend_never initial_suspend_obj;
	std::suspend_never final_suspend_obj;
	std::optional<Awaitable> awaitable;
};


void CoroFrame::operator()()
{
	auto handle = std::coroutine_handle<Task::promise_type>::from_promise(this->promise);
	try
	{
    	switch (state)
    	{
        	case 0: // initial suspend
            	if(!this->initial_suspend_obj.await_ready())
            	{
                	this->initial_suspend_obj.await_suspend(handle);
                	return;
            	}
            	this->initial_suspend_obj.await_resume();

            	this->initial_await_resume_called = true;
            	this->state = 1;
            	return;
        	case 1:
            	if(!this->awaitable->await_ready())
            	{
                	this->awaitable->await_suspend(handle);
                	return;
            	}

            	this->awaitable->await_resume();

            	while(this->i < 5)
            	{
                	std::cout << "counter: " << i << std::endl;
                	return;
            	}
            	this->state = 2;
            	return;
        	case 2:
            	this->promise.return_void();
            	goto final_suspend;
        	default:
            	// execution should never pass here
    	}
    	return;
	}
	catch(...)
	{
    	if(!initial_await_resume_called)
        	throw;
    	promise.unhandled_exception();
	}

final_suspend:
	if(!this->final_suspend_obj.await_ready())
	{
    	this->final_suspend_obj.await_suspend(handle);
    	return;
	}
	final_suspend_obj.await_resume();
	free(this);
}

Task counter(std::coroutine_handle<>* handle) {

	CoroFrame* frame = new CoroFrame;
	Task task{frame->promise.get_return_object()};
	// save local variables
	frame->i = 0;

	// initialize suspend point objects
	frame->initial_suspend_obj = frame->promise.initial_suspend();
	frame->final_suspend_obj = frame->promise.final_suspend();

   // save awaiter
	frame->awaitable.emplace(Awaitable(handle));
	(*frame)();
	return task;
}In this example, we created a so-called Coroutine Frame that stores all local variables, awaitable objects, and the state of the state machine. When we call the counter function, the only two things that happen are the initialization of the CoroFrame and the start of the StateMachine.
The initial_suspend step is executed first, after which the task is returned to the calling code. To make further progress, we need to call the coroutine_handle() function. The compiler knows the offset to the CoroFrame and will call the state machine again, thus starting the coroutine.
Before the resume step, we check if we can make any progress on the task by calling one of the two suspension functions: this->awaitable->await_ready() or this->initial_suspend_obj.await_ready(). After resuming execution of the coroutine, the state transitions to the next execution steps until it encounters an exception or is transferred to final_suspend.
If an exception is thrown, we call the promise.unhandled_exception() function and either return the exception to the calling code (if the exception appears at the initial_suspend stage) or proceed with handling the exception (in all other cases).
Read also
3 Effective DLL Injection Techniques for Setting API Hooks
Detect suspicious and malicious code! Find out how to control and manipulate system behavior and API calls to investigate and protect your software.
Working with the co_yield operator
This operator allows for using the co_yield e expression to suspend the execution of a coroutine and return a value from it. This expression is equivalent to co_await p.yield_value(e). The co_yield operator stores the current value in promise_type, from where awaitable can read it.
A typical way of using co_yield is to implement a number generator. Here’s an example of a generator providing random numbers from one to ten:
#include <coroutine>
#include <iostream>

struct Generator {
   struct promise_type {
  	using handle = std::coroutine_handle<promise_type>;
 	Generator get_return_object()
  	{
     	return Generator{handle::from_promise(*this) };
  	}
  	std::suspend_always initial_suspend() { return {}; }
  	std::suspend_always final_suspend() noexcept { return {}; }
  	std::suspend_always yield_value(int value) {
     	current_value = value;
     	return {};
  	}
  	void return_void() {}
  	void unhandled_exception() {}
  	int current_value;
   };
   explicit Generator(promise_type::handle handle) : handle(handle) {}
   ~Generator()
   {
  	if (handle)
     	handle.destroy();
   }

   int next()
   {
  	handle.resume();
  	return handle.promise().current_value;
   }
private:
   promise_type::handle handle;
};

Generator myCoroutine() {
   int x = 0;
   while (true) {
  	co_yield x++;
   }
}

int main() {
   auto c = myCoroutine();
   int x = 0;
   while ((x = c.next()) < 10) {
  	std::cout << x << "\n";
   }
}In this example, we create a generator that increments a variable. The coroutine resumes execution through the next method, which increments current_value, saves the new value in promise_type, and suspends the coroutine. Then, by reading current_value from promise_type, we can return the original value.
Coroutines in C++20 are flexible, allowing for behavioral control at the start and end of execution as well as for defining suspension and resumption logic. They also offer generators, which are a useful feature on their own.
However, it’s always important to remember to call the destroy method after the coroutine has finished its work. Also, coroutines should always have special methods to be able to complete their work. For example, if promise_type doesn’t have the return_void method, it will result in undefined behavior when the coroutine finishes.
Now, let’s see how we can use all these event-driven programming tricks in C++20 using a specific library — Boost.Asio.
Related project
Developing a Custom Secrets Management Desktop Application for Secure Password Sharing and Storage
Find out how the Apriorit team engineered a custom secrets management solution that helped our client fortify their data protection, streamline access control, and enhance operational efficiency for their business.

Working with Boost.Asio
Since C++ itself doesn’t have built-in networking mechanisms, many C++ developers implement them using Boost.Asio. This library also has a completion token mechanism that developers can use to return results to the calling code. Let’s look closer at this mechanism.
Completion token
A completion token allows us to configure the processing of an operation’s results. Using the completion handler, we can set a callback for processing the result, while the async function returns void. The completion token allows us to return the result to the calling code.
Let’s look at several examples of completion tokens, starting with use_future:
std::future<uint64_t> result = client.async_read_some(boost::asio::buffer(buf), boost::asio::use_future);
 ...
size_t read_amount = result.get();The use_future token allows us to return a value in the std::future type, which at some point in time will contain the value we’re waiting for.
Next, we have the yield_context completion token:
void foo(tcp::socket client, boost::asio::yield_context yield)
{
    try
    {
        std::vector<uint8_t> buf(1024);
        size_t read_amout = client.async_read_some(boost::asio::buffer(buf), yield);
        ...
    }
    catch (const std::exception& ex)
    {
        ...
    }
}yield_context adds support for stackful coroutines implemented on top of the Boost.Coroutine and Boost.Context libraries. This is a purely library solution for resumable functions that doesn’t require using any keywords.
yield_context represents the object of a current coroutine. By passing yield_context to an async function, we suspend the current function until the operation is completed.
Next, we have the use_awaitable completion token:
boost::asio::awaitable<void> foo(tcp::socket client)
{
    try
    {
        std::vector<uint8_t> buf(1024);
        size_t read_amout = co_await client.async_read_some(boost::asio::buffer(buf), boost::asio::use_awaitable);
        //...
    }
    catch (const std::exception& ex)
    {
        //...
    }
}This completion token returns an awaitable type that can be run with the co_await operator in C++20. When we work with the use_awaitable completion token, the async function doesn’t run the asynchronous operation directly. Instead, it only returns awaitable, which in turn runs the operation when the co_await operator is applied to it.
Task management
In Boost.Asio, there are no built-in task scheduling mechanisms. To schedule task execution, we have several options:
- Create task threads manually
- Use
boost::asio::thread_pool - Use
boost::fiberin combination with boost::asio to enable scheduling without switching contexts
Here’s an example of using boost::asio::thread_pool:
boost::asio::awaitable<void> listen(tcp::acceptor& acceptor)
{
    boost::asio::thread_pool pool;
    while (true)
    {
        try
        {

            auto client = co_await acceptor.async_accept(boost::asio::use_awaitable);

            boost::asio::co_spawn(pool.executor(), read_from_client(std::move(client)), boost::asio::detached);
        }
        catch (const std::exception& ex)
        {
            // handle an exception
        }
    }
}

int main(int argc, char* argv[])
{
    try
    {
        boost::asio::io_service ctx;

        tcp::endpoint listen_endpoint(boost::asio::ip::make_address_v4("10.100.4.68"), 8080);

        auto acceptor = tcp::acceptor(ctx.get_executor(), listen_endpoint);

        boost::asio::co_spawn(ctx, listen(acceptor), boost::asio::detached);
        ctx.run();
    }
    catch (std::exception& e)
    {
        std::cerr << "Exception: " << e.what() << "\n";
    }
}In this code, we create an io_service that represents the event-loop of asynchronous system events and calls the registered handler for a specific event.
Then we call co_spawn to launch the listen coroutine, where the io_service executor is responsible for resuming this coroutine so that we can accept new clients. co_spawn launches with a detached completion token, thus ignoring any errors or return values from the listen function, and it doesn’t block the main thread.
In the listen function, we create a thread_pool for new clients. Without blocking the execution, we wait for a new client connection and pass the read_from_client coroutine through co_spawn, where the boost thread_pool will be responsible for launching and resuming read_from_client.
Unlike Rust processors, boost::asio::thread_pool doesn’t know how to do work-stealing, although we can pass our own scheduler to it and add similar logic.
Read also
A Comprehensive Guide to Hooking Windows APIs with Python
Enhance the strength of your product with insights from our comprehensive guide! Discover how hooking Windows APIs with Python can revolutionize your business processes and unlock new opportunities for growth.
Cancellation token
In Boost.Asio, objects like sockets and timers support the cancellation of asynchronous operations with the help of member functions such as close or cancel. However, some asynchronous operations also support individual cancellation, which is enabled by setting a cancellation token:
boost::asio::cancellation_signal sig;

boost::asio::co_spawn(pool.get_executor(), read_from_client(std::move(client)), asio::bind_cancellation_slot(sig.slot(), boost::asio::detached));
...
sig.emit():First, we create a cancellation_signal sig and insert it as a cancellation slot when launching the read_from_client task. Then we can cancel the task using the sig.emit() function.
Error handling and debugging
By default, Boost.Asio throws exceptions to notify user code about an error, but this behavior can be overridden using one of the two completion tokens: redirect_error or as_tuple.
redirect_error allows for passing the error as an out parameter:
size_t read_amount = co_await client.async_read_some(boost::asio::buffer(buf), boost::asio::redirect_error(boost::asio::use_awaitable, ec));
if (ec)
{
 break;
}
...as_tuple works in a similar way, but instead of passing the error via the out parameter, the return value is std::tuple<result_t, boost::system::error_code>.
Boost.Asio allows tracking the execution of asynchronous operations and the connection between their handlers if BOOST_ASIO_ENABLE_HANDLER_TRACKING is defined. When enabled, Boost.Asio will write debug information to the standard error stream.
When comparing C++ Boost.Asio vs Rust Tokio, Boost.Asio is more flexible, offering various options for handling results and managing asynchronous tasks as well as a task cancellation function. At the same time, this library lacks a rich ecosystem around it and is poorly documented. It also doesn’t have channels, which are very convenient for communication between coroutines.
As a result, building a networking application with Boost.Asio will take a lot of time, especially when trying to improve performance, passing a customer thread scheduler or allocator, and so on. When comparing benchmarks, Tokio is slightly faster than Boost.Asio, but this isn’t critical.
Conclusion
Despite the differences between implementing asynchronous programming in Rust and C++20, both languages enable you to build efficient networking applications with asynchronous task execution. Each of these programming languages has a dedicated library for this task — Tokio and Boost.Asio, respectively.
While both of these libraries work great for writing networking applications and both can be used for writing production code, they also have their differences. Tokio comes with a rich selection of useful features, including the work-stealing mechanism. Boost.Asio, on the other hand, allows for flexible configurations which, however, can take extra time to implement due to poor feature documentation.
At Apriorit, we provide both C++ and Rust development services and will gladly assist you with building secure and reactive solutions.
Looking for expert C++ developers?
Tap into our extensive 20-year knowledge in niche development to bolster your product’s capabilities and gain a competitive edge!
Have a question?
Ask our expert!
Program Manager


