 Skip to main content

Developers apply API hooking practices to better understand how a system works, alter the behavior of an operating system or an application, detect malicious code, and build strong products.
The majority of guides and tutorials on Windows API hooking are based on using compiled languages like C or C++, which makes this practice inaccessible for developers who don’t know these languages. However, compiled languages aren’t the only option. Interpreted languages like Python can also be used for API hooking and have some advantages over compiled languages.
In this article, we explore when and why it’s best to choose Python for hooking Windows APIs and explain how to use this language for setting hooks based on easy-to-follow examples. We also show how two Python libraries — Deviare and WinAppDbg — can be used for API hooking.
Contents:
Choosing a programming language for API hooking
API hooking covers a range of techniques for altering or augmenting the behavior of an operating system (OS), application, or other software component by intercepting API function calls, messages, or events passed between software components. Code that handles such interception is called a hook. As we mentioned in the article 3 Effective DLL Injection Techniques for Setting API Hooks, API hooking for Windows can be performed using various methods such as injecting dynamic-link libraries (DLLs), injecting code, and using the Win32 Debug API toolset.
However, most API hooking examples you will encounter on the internet use C or C++. If you are lucky, you’ll find examples in C# or Visual Basic.
Since API hooking is a low-level technique, compiled languages like C and C++ may seem to be the only choice. Before we explain why this isn’t true and when you can use interpreted languages for API hooking, let’s briefly refresh your memory as to the key differences between those two groups of programming languages.
A compiled language is a programming language that is implemented using a compiler. A compiler is a program that translates statements written in a particular programming language into another language, usually machine code. C, C++, and Go are common examples of compiled languages.
An interpreted language is a programming language that is implemented using an interpreter and doesn’t compile source code directly into machine code ahead of execution. An interpreter executes a program, interpreting each statement into a sequence of one or more subroutines and then into machine code. Python and JavaScript are common examples of interpreted languages.
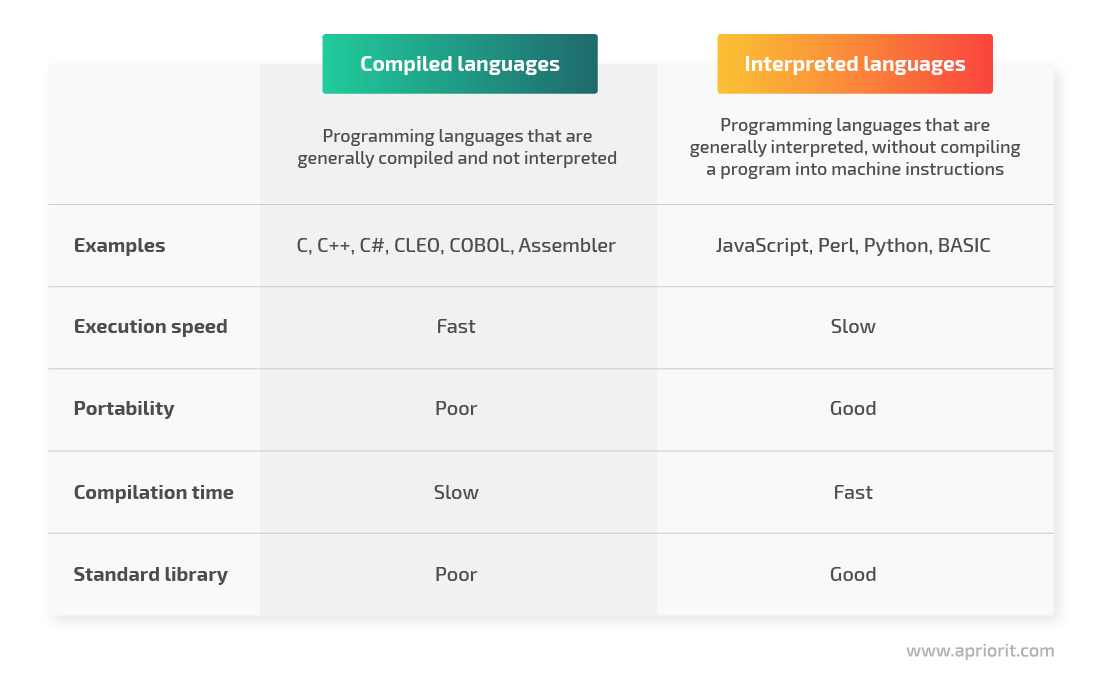
Figure 1. Comparison of compiled and interpreted programming languages
Let’s compare how working with С/С++ differs from programming with Python. Say you just want to write a small utility or a patch for some application. When using С or С++, you’ll have to spend extra time preparing the environment, which requires you to:
- Install an IDE
- Download and build a framework for API hooking
- Install and build third-party libraries, as the standard library may not provide all the utilities you need
Once you’ve installed everything, it’s still unlikely that you’ll be able to build a project on the first try. The reason is that it’s quite common for C/C++ developers to find errors like missing DLL files or inappropriate library versions.
Python, on the contrary, has convenient tools like pip and virtual environments for handling dependencies. Also, it allows for fast development, has various useful third-party libraries, and offers convenient environment configuration. So if you don’t know C or C++, you can definitely use Python as an alternative for Windows API hooking.
Before we dig into how to hook API functions with Python, let’s explore how this language works.
Want to deliver protected and efficient software?
Benefit from the thoroughly-planned development process organized by Apriorit’s cybersecurity experts and experienced Windows and Python engineers.
How Python works
Python is one of the most popular interactive programming languages. Its biggest advantage is its simple syntax that allows you to write programs with less code than other programming languages require. And since its syntax is highly readable and similar to English, all team members can easily understand it.
Python works on the following platforms:
- Windows
- Linux
- macOS
You can execute Python code right after it’s written. However, since Python is an interpreted language, it requires an executor — an interpreter called the Python virtual machine.
| Note: The Python virtual machine is an essential component to run Python code. |
This is how a program written in Python works:
- Python source code is sent to the compiler, which produces an OS-neutral intermediate file format called Python bytecode.
- The Python virtual machine interprets the Python bytecode file to produce machine-specific commands for the processor.
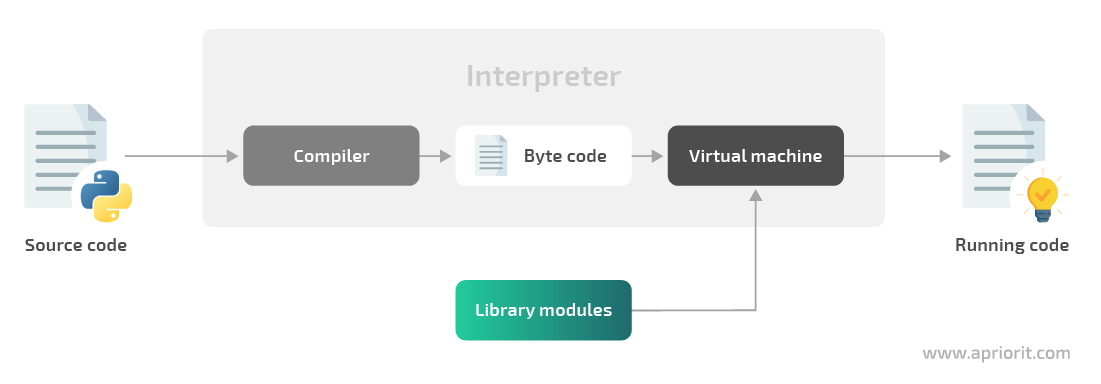
Figure 2. Python program execution flow
Now, let’s see how we can inject Python code into an application’s process.
How to inject Python code into a process
As we wrote in our previous article, to hook API functions, the hooking code should be injected inside the memory address space of the target process. If our hooking code is written in Python, the target process should be able to execute it.
But the target application may not know about Python, its virtual machine, or any interpreted language at all. To make Python code run inside the target application, you may need to inject a Python virtual machine into it.
To make the Python virtual machine run in the target process, you only need to perform a few steps:
- Make the application load a python.dll file so it can run the Python code
- Make the application call the Py_Initialize function to initialize the Python interpreter
| Note: All of the following examples (before the “Python libraries for API hooking” section) are performed on Windows 7 x32 with Python 3.8.5. |
Let’s see how these two steps can be performed in Python using the ctypes and mayhem library modules:
import ctypes.util

# Resolving python.dll path in order to inject it in the target process
python_library = 'python{}{}.dll'.format(sys.version_info.major, sys.version_info.minor)
python_library = ctypes.util.find_library(python_library)Now, we will load the phyton.dll library in the target process and make that process call the Py_InitializeEx function:
from mayhem import utilities
from mayhem.proc.windows import WindowsProcess
from mayhem.windll import kernel32

# Resolving Py_InitializeEx address in the remote process
python_library_remote = process.load_library(python_library)
python_library_local  = kernel32.GetModuleHandleW(python_library)

initializer = python_library_remote + (
        kernel32.GetProcAddress(python_library_local, b'Py_InitializeEx') - python_library_local)

# Calling Py_InitializeEx(0) in the remote process
process.join_thread(process.start_thread(initializer, 0))The target process can now execute any Python code. To make it run our code, we’ll use the PyRun_SimpleString function from the python.dll file. Let’s call this function in a separate thread with our Python code:
# PyRun_SimpleString uses utf-8 encoded strings
injected_code = source_code.encode('utf-8') + b'\x00'

# Allocate some memory in the remote process to place our Python code there
alloced_address = process.allocate(
        size=utilities.align_up(len(injected_code)), permissions='PAGE_READWRITE')

# Put utf-8 encoded Python source code into the allocated memory
process.write_memory(alloced_address, injected_code)

# Run PyRun_SimpleString in a new thread in the remote process
process.start_thread(code_runner, alloced_address)To make this code reusable, let’s put it in the Injector class to run arbitrary Python code in the target process:
class Injector:
    '''Class that allows running arbitrary Python code in any process'''

    def initialize(self):
        '''Calls Py_InitializeEx(0) in the remote process'''
        ...

    def finalize(self):
        '''Calls Py_FinalizeEx(0) in the remote process'''
        ...

    def run_code(self, source_code, should_wait=False):
        '''Runs the Python source code in the remote process in a separate thread'''
...Now we know the basics, so let’s explore a practical example of Python code injection.
Read also
3 Effective DLL Injection Techniques for Setting API Hooks
Controlling API calls can help you investigate internal processes and detect suspicious and malicious code. Find out how to make any Windows process immortal using DLL injection techniques.

An example of Python code injection
For this example, we’ll inject some Python code in the notepad.exe process, making it show a message box with some text. Here’s the code responsible for python.dll injection:
injector = Injector(pid=5815) # notepad.exe PID
injector.initialize()Python.dll is injected in the remote process. Let’s check the presence of python.dll in the list of the notepad.exe processes using the Process Explorer utility from Sysinternals tools:

Figure 3. Presence of the python.dll file in the list of notepad.exe processes
We can see that python.dll is loaded to the notepad.exe process. Now, let’s make Notepad show a message box with the text “Hello from Python”:
code = r'''
import ctypes
ctypes.windll.user32.MessageBoxA(0, b"Hello from Python", b"Hello from Python", 0)
'''

injector.run_code(code, should_wait=True)Once we inject the Python code into notepad.exe, Notepad shows us the following message box:

Figure 4. Message box that opens in Notepad after Python code injection
The Process Explorer shows that there’s a thread in the notepad.exe process running the Python code:
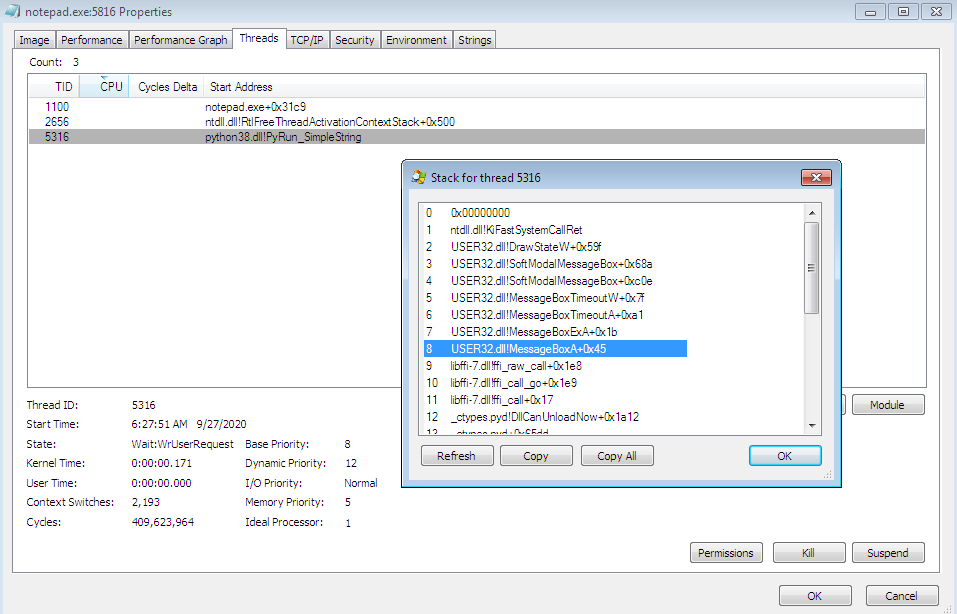
Figure 5. The stack for the python.dll thread that’s running Python code
However, the example described above isn’t the only possible option for Python code injection. Let’s look at the ways you can perform API hooking using the Import Address Table structure.
Windows API hooking with the Import Address Table
The Windows Portable Executable format contains a structure called the Import Address Table (IAT). This structure contains library names used by a certain application. For each library, the IAT also contains a list of features imported from this library. Thus, when launching an application, a loader can know what libraries to load and how to connect function addresses from these libraries.
The IAT contains pointers to information that is critical for an executable to do its job:
- A list of DLLs an executable depends on for providing the expected functionality
- A list of function names and their addresses from those DLLs that may be called by the binary at some point
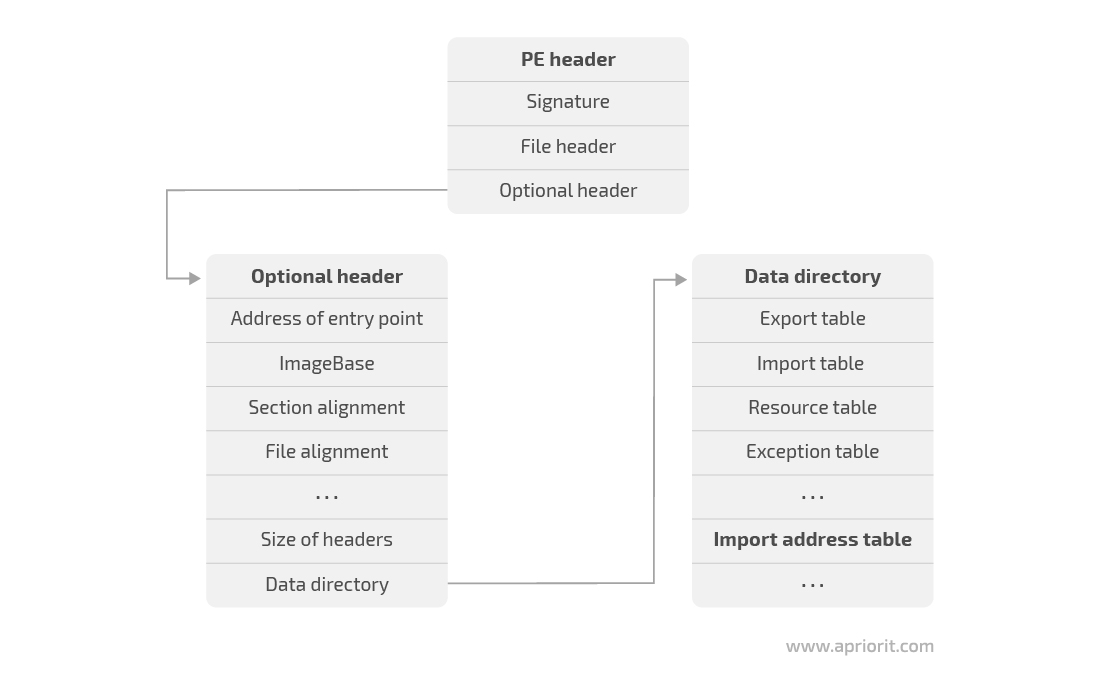
Figure 6. How to get access to the Import Address Table
It’s possible to hook function pointers specified in the IAT by overwriting the target function’s address with another function address. To access the IAT of the current module, we’ll use the ImageDirectoryEntryToData function:
import ctypes
import ctypes.wintypes

# Define helper functions to manipulate the IAT of the module

# https://docs.microsoft.com/en-us/windows/win32/api/dbghelp/nf-dbghelp-imagedirectoryentrytodata
_dbghelp                                    = ctypes.windll.dbghelp
_dbghelp.ImageDirectoryEntryToData.restype  = ctypes.wintypes.LPVOID
_dbghelp.ImageDirectoryEntryToData.argtypes = [
    ctypes.wintypes.LPVOID,
    ctypes.wintypes.BOOL  ,
    ctypes.wintypes.USHORT,
    ctypes.wintypes.PULONG
]

ImageDirectoryEntryToData = _dbghelp.ImageDirectoryEntryToData

# https://docs.microsoft.com/en-us/windows/win32/api/libloaderapi/nf-libloaderapi-getmodulehandlea
_kernel32                           = ctypes.windll.kernel32
_kernel32.GetModuleHandleA.restype  = ctypes.wintypes.HMODULE
_kernel32.GetModuleHandleA.argtypes = [
    ctypes.wintypes.LPCSTR
]

GetModuleHandleA = _kernel32.GetModuleHandleA

# https://docs.microsoft.com/en-us/windows/win32/api/libloaderapi/nf-libloaderapi-getprocaddress
_kernel32                         = ctypes.windll.kernel32
_kernel32.GetProcAddress.restype  = ctypes.wintypes.HMODULE
_kernel32.GetProcAddress.argtypes = [
    ctypes.wintypes.HMODULE,
    ctypes.wintypes.LPCSTR
]

GetProcAddress = _kernel32.GetProcAddress

# https://docs.microsoft.com/en-us/windows/win32/api/processthreadsapi/nf-processthreadsapi-getcurrentprocess
_kernel32                            = ctypes.windll.kernel32
_kernel32.GetCurrentProcess.restype  = ctypes.wintypes.HANDLE
_kernel32.GetCurrentProcess.argtypes = []

GetCurrentProcess = _kernel32.GetCurrentProcess

# https://docs.microsoft.com/en-us/windows/win32/api/memoryapi/nf-memoryapi-writeprocessmemory
_kernel32                             = ctypes.windll.kernel32
_kernel32.WriteProcessMemory.restype  = ctypes.wintypes.BOOL
_kernel32.WriteProcessMemory.argtypes = [
    ctypes.wintypes.HANDLE       ,
    ctypes.wintypes.LPVOID       ,
    ctypes.wintypes.LPCVOID      ,
    ctypes.c_size_t              ,
    ctypes.POINTER(ctypes.c_size_t)
]

# Define helper structures to manipulate the IAT of the module
class IMAGE_IMPORT_DESCRIPTOR_START(ctypes.Union):
    fields = [
        ('Characteristics'   , ctypes.wintypes.DWORD),
        ('OriginalFirstThunk', ctypes.wintypes.DWORD),
    ]

class IMAGE_IMPORT_DESCRIPTOR(ctypes.Structure):
    anonymous = ['DUMMY']

    fields = [
        ('DUMMY'         , IMAGE_IMPORT_DESCRIPTOR_START),
        ('TimeDateStamp' , ctypes.wintypes.DWORD)      ,
        ('ForwarderChain', ctypes.wintypes.DWORD)      ,
        ('Name'          , ctypes.wintypes.DWORD)      ,
        ('FirstThunk'    , ctypes.wintypes.DWORD)      ,
    ]

PIMAGE_IMPORT_DESCRIPTOR = ctypes.POINTER(IMAGE_IMPORT_DESCRIPTOR)

# Get Image import descriptor for the current module
current_module = GetModuleHandleA(None)

size              = ctypes.wintypes.ULONG()
import_descriptor = ctypes.cast(
ImageDirectoryEntryToData(current_module, True, IMAGE_DIRECTORY_ENTRY_IMPORT, ctypes.byref(size)), PIMAGE_IMPORT_DESCRIPTOR)The IMAGE_IMPORT_DESCRIPTOR structure contains information on all imported modules required for work (used by the current module). Every imported module has a list of functions imported from it by the current process. Each imported function is defined by another structure — IMAGE_THUNK_DATA — that is different for x32 and x64 systems. Let’s explore both options:
class IMAGE_THUNK_DATA32(ctypes.Union):
    fields = [
        ('ForwarderString', ctypes.wintypes.DWORD),
        ('Function'       , ctypes.wintypes.DWORD),     # Contains address of the imported function - that is to be replaced by our handler
        ('Ordinal'        , ctypes.wintypes.DWORD),
        ('AddressOfData'  , ctypes.wintypes.DWORD),
]

class IMAGE_THUNK_DATA64(ctypes.Union):
    fields = [
        ('ForwarderString', ctypes.c_ulonglong),
        ('Function'       , ctypes.c_ulonglong),        # Contains address of the imported function - that is to be replaced by our handler
        ('Ordinal'        , ctypes.c_ulonglong),
        ('AddressOfData'  , ctypes.c_ulonglong),
]

IMAGE_THUNK_DATA = IMAGE_THUNK_DATA32 \
    if ctypes.sizeof(ctypes.c_voidp) == 4 else IMAGE_THUNK_DATA64

PIMAGE_THUNK_DATA = ctypes.POINTER(IMAGE_THUNK_DATA)To hook a function, we have to take the following steps:
- Find the import descriptor of the target module
- Find the import descriptor of the module that exports the target function
- Replace the address of the target function in the IAT with the address of the function we want to call instead (set a hook)
For example, let’s see how we can hook the CreateFileW function:
...


# Real address of CreateFileW - address to be searched for in the IAT
real_CreateFileW = GetProcAddress(GetModuleHandleA(b'kernel32'), b'CreateFileW')


# Our handler of CreateFileW
@ctypes.WINFUNCTYPE(ctypes.c_void_p, ctypes.c_void_p, ctypes.wintypes.DWORD, ctypes.wintypes.DWORD, ctypes.c_void_p, ctypes.wintypes.DWORD, ctypes.wintypes.DWORD, ctypes.c_void_p)
def CreateFileW_handler(*args):
    ctypes.windll.user32.MessageBoxW(0, "Hook!!!!", "Hook!!!!", 0)
    real_CreateFileW(*args)


while import_descriptor.contents.Name:
    module_name_offset = current_module + import_descriptor.contents.Name

    # CreateFileW is in kernel32.dll
    if ctypes.cast(module_name_offset, ctypes.wintypes.LPSTR).value.lower() == b'kernel32.dll':
            replace_function_address(import_descriptor, real_CreateFileW, ctypes.addressof(CreateFileW_handler))

    # Move to the next imported module
    import_descriptor = ctypes.cast(ctypes.cast(
import_descriptor, ctypes.wintypes.LPVOID).value + ctypes.sizeof(IMAGE_IMPORT_DESCRIPTOR), PIMAGE_IMPORT_DESCRIPTOR)As you can see, we switch addresses in the replace_function_address function. It’s quite straightforward — we just need to look through all the imported functions from the kernel32.dll file, and when we find the address of the needed function, we replace it with the WriteProcessMemory function:
def replace_function_address(import_descriptor, function_address_to_replace, function_address_new_handler):
    import_thunk = ctypes.cast(
        current_module + import_descriptor.contents.FirstThunk, PIMAGE_THUNK_DATA)

    while import_thunk.contents.Function:
        # If we found the function to be hooked
        if ctypes.cast(import_thunk.contents.Function, ctypes.wintypes.LPVOID).value == ctypes.cast(function_address_to_replace, ctypes.wintypes.LPVOID).value:
            # Where to write new function address
            imported_function_location = ctypes.pointer(ctypes.wintypes.DWORD.from_buffer(import_thunk.contents, IMAGE_THUNK_DATA.Function.offset))

            # Replace the entry with the new address
            bytes_written = ctypes.wintypes.DWORD()
            WriteProcessMemory(GetCurrentProcess(),
                    imported_function_location, function_address_new_handler, ctypes.sizeof(ctypes.c_void_p), ctypes.byref(bytes_written))

            return

        # Move to the next imported function
        import_thunk = ctypes.cast(
ctypes.cast(import_thunk, ctypes.wintypes.LPVOID).value + ctypes.sizeof(IMAGE_THUNK_DATA), PIMAGE_THUNK_DATA)This is how you can hook API functions with the help of the IAT structure. However, hooking API functions in Python also requires using various libraries. In the next section, we talk about two Python libraries that can help you in setting API hooks: Deviare and WinAppDbg.
If you’re also interested in Linux driver development, check out out article on how to design a Linux WiFi driver prototype.
Related project
Building an AI-based Healthcare Solution
Discover how we leveraged Python to create an AI-based system for processing ultrasound videos. With 90% precision and a 97% recall rate, the delivered solution helped our client efficiently detect and measure follicles, saving doctors’ time and allowing them to pay more attention to patients.
Python libraries for API hooking
In the previous section, we discussed that dynamic languages may not be the best choice for such low-level development tasks as injecting code and modifying import tables because all internal structures should be defined almost from scratch. However, Python has lots of useful third-party libraries that can significantly simplify various development tasks.
In this section, we explore two Python libraries that can ease the process of WinAPI function hooking.
| Note: All of the following examples are performed on Windows 7 x32 with Python 2.7.16 because the WinAppDbg library only works with Python 2. |

Deviare
Deviare is a professional open-source hooking library for instrumenting arbitrary Win32 functions, COM objects, and functions whose symbols are located in program databases (PDBs).
The main advantage of this library is that it’s implemented as a Component Object Model (COM) component, so it can be integrated with all programming languages that support COM, such as C/C++, VB, C#, Delphi, and Python.
All hooking is performed through a special Spy Manager class contained in the Deviare COM DLL file. We can use this class to set hooks and set up callbacks for different system events like creating and terminating processes or loading dynamic libraries:
import win32com.client

class SpyManagerEvents:
    '''
    This is the event handler class
    '''

    def OnLoadLibraryCall(self, process, library_name, module):
        '''
        This function is called when a new DLL is loaded
        '''

    def OnProcessStarted(self, process):
        '''
        This function is called when starting a new process
        '''

    def OnThreadStarted(self):
        '''
        This function is called when the process creates a new thread
        '''
    ...

# Inside main
spyManager = win32com.client.DispatchWithEvents('DeviareCOM.NktSpyMgr', SpyManagerEvents)
spyManager.Initialize()

hook = spyManager.CreateHook(SOME_FUNCTION_NAME, 0)
hook.Attach(PID, True)
hook.Hook(True)To hook a function, we need to perform only three steps:
1. Create a hook instance, providing the name of the function to be hooked and some optional hook flags. Make sure all function names have the format “[dll]![function name]”. Example: “kernel32.dll!CreateFileW”.
# HRESULT INktSpyMgr::CreateHook(VARIANT func, LONG hookFlags, INktHook** ppHook);

spyManager.CreateHook(SOME_FUNCTION_NAME, HOOK_FLAG)2. Attach the hook to the target process:
# HRESULT INktHook::Attach(VARIANT procOrId, VARIANT_BOOL sync);

hook.Attach(PID, True)3. Activate the hook in all attached processes:
# HRESULT INktHook::Hook(VARIANT_BOOL sync);

hook.Hook(True)An example of API hooking using the Deviare library
Let’s write a simple hook for Internet Explorer and try to redirect all requests destined for www.google.com to www.bing.com.
Internet Explorer uses the InternetConnectW function to open an HTTP session:
HINTERNET InternetConnectW(
    __in HINTERNET hInternet,
    __in LPCWSTR lpszServerName,
    __in INTERNET_PORT nServerPort,
    __in_opt LPCWSTR lpszUserName,
    __in_opt LPCWSTR lpszPassword,
    __in DWORD dwService,
    __in DWORD dwFlags,
    __in_opt DWORD_PTR dwContext
);Let’s use the Deviare library to hook the InternetConnectW function and replace its second parameter with www.bing.com:
import ctypes
import psutil
import win32com.client

class SpyManagerEvents:

    def OnFunctionCalled(self, nktHookAsPyIDispatch, nktProcessAsPyIDispatch, nktHookCallInfoAsPyIDispatch):

        nktHookCallInfo = win32com.client.Dispatch(nktHookCallInfoAsPyIDispatch)
        nktParamsEnum   = nktHookCallInfo.Params()

        if nktHookCallInfo.IsPreCall:
            # Parameter indexes start with 0
            url = nktParamsEnum.GetAt(1)

            if url.Value.lower() == 'www.google.com':
                url.Value = 'www.bing.com'

def main():

    spyManager = win32com.client.DispatchWithEvents('DeviareCOM.NktSpyMgr', SpyManagerEvents)
    spyManager.Initialize()

    for process in psutil.process_iter(['pid', 'name']):
        if process.info['name'].lower() == 'iexplore.exe':
            # To auto hook child processes
            hook = spyManager.CreateHook('Wininet.dll!InternetConnectW',
                            flgAutoHookChildProcess | flgRestrictAutoHookToSameExecutable | flgAutoHookActive)
            hook.Attach(process.info['pid'], True)
            hook.Hook(True)

    MessageBox = ctypes.windll.user32.MessageBoxA
MessageBox(None, 'Press OK to end the demo.', 'Deviare Python Demo', 0)Now, let’s launch the script and try to access Google. You’ll see that even though the address field contains the address of the Google search engine, the browser redirects us to Bing:
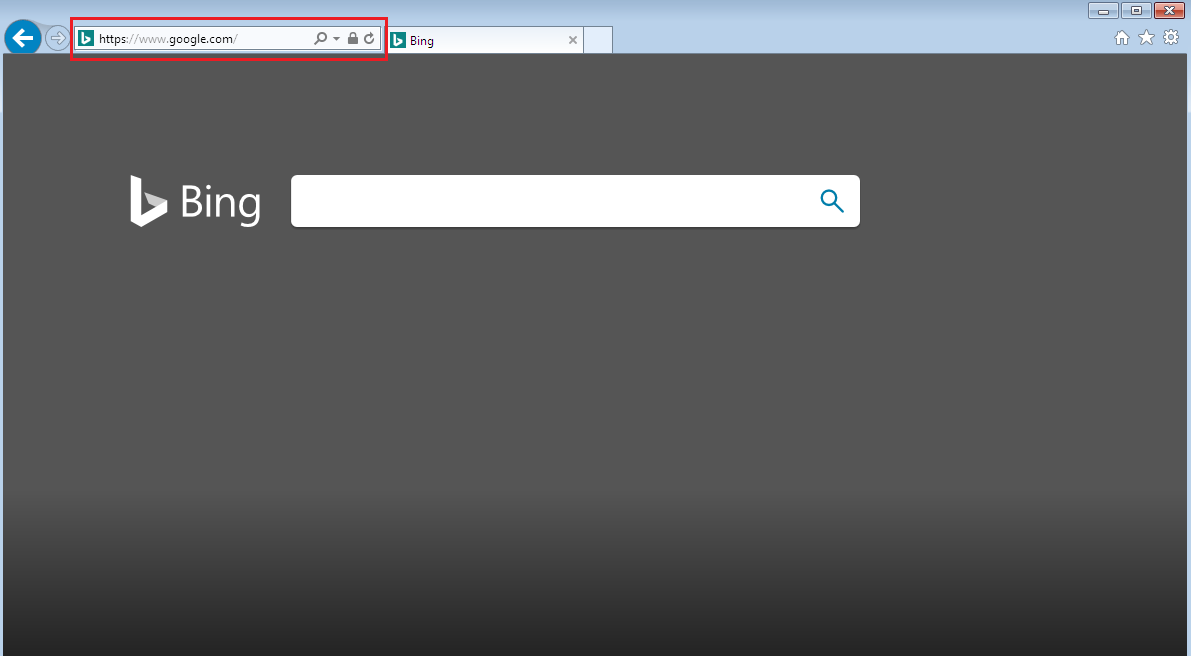
Figure 7. Redirection from Google to Bing
We can also enable some kind of warning when access to Google is requested. Let’s change the script a little to show a message box saying that access to google.com is forbidden:
...

class SpyManagerEvents:

    def OnFunctionCalled(self, nktHookAsPyIDispatch, nktProcessAsPyIDispatch, nktHookCallInfoAsPyIDispatch):

        nktHookCallInfo = win32com.client.Dispatch(nktHookCallInfoAsPyIDispatch)
        nktProcess      = win32com.client.Dispatch(nktProcessAsPyIDispatch)
        nktParamsEnum   = nktHookCallInfo.Params()

        if nktHookCallInfo.IsPreCall:
            # Parameter indexes start with 0
            url = nktParamsEnum.GetAt(1)

            if 'www.google.com' in url.Value.lower():
                # Skip the call to the original InternetConnectW
                nktHookCallInfo.SkipCall()

                # Return an error to the caller
                if nktProcess.PlatformBits == 64:
                    nktHookCallInfo.Result().LongLongVal = 0
                else:
                    nktHookCallInfo.Result().LongVal = 0

                nktHookCallInfo.LastError = 5

                # Show a message box saying that the operation is not allowed
                MessageBox = ctypes.windll.user32.MessageBoxA
                MessageBox(None, 'Access to google.com is forbidden', 'Warning', 0)

...Now, when we try to access google.com, we’ll see the following message:

Figure 8. A message saying that access to google.com is forbidden
We can use the Deviare library in various scenarios that involve API hooking. It’s easy to use with various programming languages, since its interface is almost the same in C++, C#, and Python.
Read also
How to Use Pywinauto for Windows GUI Testing Automation: Complete Tutorial
Accelerate your QA activities to improve software efficiency and use experience. Discover how to automate Windows GUI testing using Python and Pywinauto.
WinAppDbg
Let’s look at another library that can be used for Windows API hooking with Python — WinAppDbg.
To start using it, download the WinAppDbg library directly from its official website and run the .msi file to install it.
| Note: Currently, the WinAppDbg library is only available for Python 2.7. |
WinAppDbg exposes some types that can be used to monitor the entire operating system as well as specific processes: System, Process, Thread, Module, and Window. Each one acts as a snapshot of processes, threads, and DLL modules in the system.
All hooking is performed through the Debug class. You can receive notifications of debugging events by passing a custom event handler to the Debug object. When a certain event occurs during execution, a relevant method in the EventHandler class is automatically called.
Inside that method, we can write code that handles that event:
import winappdbg

class DebugEvents(winappdbg.EventHandler):
    '''
    This is the event handler class
    '''

    def load_dll(self, event):
        '''
        This function is called when a new DLL is loaded
        '''

    def create_process(self, event):
        '''
        This function is called when starting a new process
        '''

    def create_thread(self, event):
        '''
        This function is called when the process creates a new thread
        '''
    ...

# Inside main
debug = winappdbg.Debug(DebugEvents())
debug.loop()The hook_function method of the Debug object sets a code breakpoint at the beginning of the target function and allows you to set two callbacks: one when entering the function and another when returning from it.
Let’s see how the hook_function method works for the CreateFile function:
from winappdbg.win32 import PVOID, DWORD, HANDLE

class DebugEvents(winappdbg.EventHandler):
    '''
    This is the event handler class
    '''

    def load_dll(self, event):

        module = event.get_module()

        if module.match_name('kernel32.dll'):

            # Resolve function addresses
            address_CreateFileA = module.resolve('CreateFileA')
            address_CreateFileW = module.resolve('CreateFileW')


            signature_CreateFileA = (PVOID, DWORD, DWORD, PVOID, DWORD, DWORD, HANDLE)
            signature_CreateFileW = (PVOID, DWORD, DWORD, PVOID, DWORD, DWORD, HANDLE)

            # Hook function(pid, address, preCB, postCB, paramCount, signature)
            event.debug.hook_function(event.get_pid(), address_CreateFileA, preCB=pre_CreateFileA, signature=signature_CreateFileA)
            event.debug.hook_function(event.get_pid(), address_CreateFileW, preCB=pre_CreateFileW, signature=signature_CreateFileW)

            # Another way of setting up hooks without a signature

            # event.debug.hook_function(event.get_pid(), address_CreateFileA, preCB=pre_CreateFileA, paramCount=7)
            # event.debug.hook_function(event.get_pid(), address_CreateFileW, preCB=pre_CreateFileW, paramCount=7)

...Let’s explain in detail what happens in the code above:
- Inside the load_dll function, we check if we’re loading the kernel32.dll file. If we are, we call the module.resolve() method for the CreateFileA and CreateFileW functions, which return the addresses for exported functions in the target process.
- Then, we create signatures for each hooked function. Our signature for both CreateFile functions is PVOID, DWORD, DWORD, PVOID, DWORD, DWORD, HANDLE. It’s important to use the PVOID signature for all pointers. Otherwise, according to the WinAppDbg documentation, the ctypes function library can crash a process.
- Next, we hook each function using event.debug.hook_function. The most important parameters are preCB and postCB. They define callback functions that will be called before the actual WinAPI call and just after it, respectively. These functions have the following prototypes:
def pre_CreateFileA(event, return_address, lpFileName, dwDesiredAccess, dwShareMode, lpSecurityAttributes, dwCreationDisposition, dwFlagsAndAttributes, hTemplateFile):
    ...

def pre_CreateFileW(event, return_address, lpFileName, dwDesiredAccess, dwShareMode, lpSecurityAttributes, dwCreationDisposition, dwFlagsAndAttributes, hTemplateFile):
    ...

def post_CreateFileA(event, return_value):
    ...

def post_CreateFileW(event, return_value):
...It took a lot of code to make this simple hook. But fortunately, the WinAppDbg library provides an easier way of setting hooks through the apiHooks class:
from winappdbg.win32 import PVOID, DWORD, HANDLE

class DebugEvents(winappdbg.EventHandler):
    '''
    This is the event handler class
    '''

    apiHooks = {

        # Hooks for the kernel32 library
        'kernel32.dll': [

            # Function     Signature
            ('CreateFileA', (PVOID, DWORD, DWORD, PVOID, DWORD, DWORD, HANDLE)),
            ('CreateFileW', (PVOID, DWORD, DWORD, PVOID, DWORD, DWORD, HANDLE)),

            # Can also pass parameter count
            # ('CreateFileA', 7),
            # ('CreateFileW', 7),
        ],
    }

    # Now we can simply define a method for each hooked API
    # 'pre_'  methods are called when entering the hooked function
    # 'post_' methods are called when returning from the hooked function

...An example of API hooking using the WinAppDbg library
To see how this works in practice, let’s write an example of a simple hook using the WinAppDbg library.
This example is quite artificial, but it’s sufficient to show how to use the library. We’ll try to change Skype’s destination folder for downloading attached files. First, let’s see how Skype downloads and saves files using the Process Monitor from Sysinternals tools:
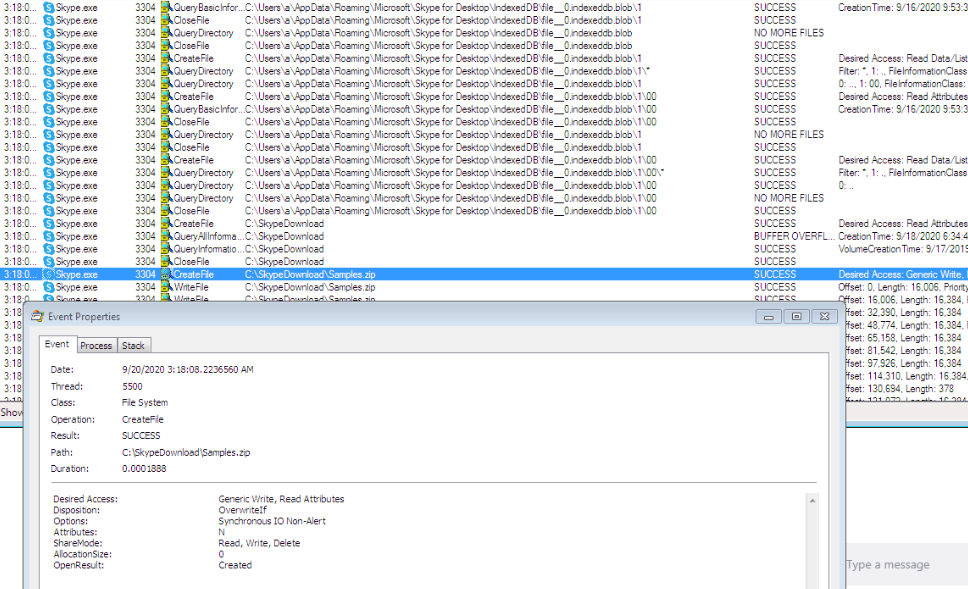
Figure 9. How Skype saves files
We can see that Skype uses the CreateFileW function with the CREATE_ALWAYS disposition to save downloaded files. So to change the destination folder, we just need to hook the CreateFileW function in the skype.exe process:
import winappdbg
import os

SKYPE_RECEIVED_FILES_FOLDER                = r'C:\SkypeDownload'
SKYPE_REDIRECTED_FOLDER_FOR_RECEIVED_FILES = r'C:\SomeNewFolder'
SKYPE_PROCESS_NAME                         = 'skype.exe'

class DebugEvents(winappdbg.EventHandler):
    ...

def main():

    # Create a Debug object. We don't want the process to be terminated when the debugger has stopped.
    debug = winappdbg.Debug(DebugEvents(), bKillOnExit=False)

    try:

        # Look up currently running processes
        debug.system.scan_processes()

        # For all processes that match the requested filename...
        for process, name in debug.system.find_processes_by_filename(SKYPE_PROCESS_NAME):
            print 'Attaching to PID: {} Name: {}'.format(process.get_pid(), name)

            # Attach to the process
            debug.attach(process.get_pid())

        # Wait for all debuggees to finish
        debug.loop()

    finally:
        debug.stop()

if __name__ == '__main__':
main()In the code above, we enumerated all processes to find all the running skype.exe instances. Now, let’s hook the CreateFileW function:
class DebugEvents(winappdbg.EventHandler):

    apiHooks = {

        # Hooks for the kernel32 library
        'kernel32.dll': [

            #  Function    Parameters
            ('CreateFileA', [PVOID, DWORD, DWORD, PVOID, DWORD, DWORD, HANDLE]),
            ('CreateFileW', [PVOID, DWORD, DWORD, PVOID, DWORD, DWORD, HANDLE]),
        ]
    }

    # Methods beginning with 'pre_' are called when entering the API and methods beginning with 'post_' are called when returning from the API

    def pre_CreateFileW(self, event, return_address, lpFileName, dwDesiredAccess, dwShareMode, lpSecurityAttributes, dwCreationDisposition, dwFlagsAndAttributes, hTemplateFile):

        filepath = event.get_process().peek_string(lpFileName, fUnicode=True)

        if self._is_skype_save_file(filepath, dwCreationDisposition == CREATE_ALWAYS):
            _, filename = winappdbg.PathOperations.split_filename(filepath)

            new_filepath       = winappdbg.PathOperations.join_path(SKYPE_REDIRECTED_FOLDER_FOR_RECEIVED_FILES, filename)
            new_filepath_bytes = new_filepath.encode('utf-16le')

            # Allocate memory in the target process and get a pointer
            new_filepath_address = event.get_process().malloc(len(new_filepath_bytes))

            # Write the new payload to that pointer
            event.get_process().write(new_filepath_address, new_filepath_bytes)

            top_of_stack = event.get_thread().get_sp()

            # Windows 32-bit uses stdcall convention for WinAPI calls: Parameters are pushed to the stack from right to left
            if event.get_thread().get_bits() == 32 or event.get_thread().is_wow64():
                event.get_process().write_dword(top_of_stack + 4, new_filepath_address)

            # Windows 64-bit uses fast call: First four parameters are stored in rcx, rdx, r8 and r9
            elif event.get_thread().get_bits() == 64:
                event.get_thread().set_register('Rdx', new_filepath_address)

            print '\n\n'
            print 'Redirecting saving file...'
            print 'Original file path: {}; New file path: {}; Thread: {};'.format(filepath, new_filepath, event.get_tid())

    def _is_skype_save_file(self, filepath, is_created):

        directory, _ = winappdbg.PathOperations.split_filename(filepath)

        return is_created and \
SKYPE_RECEIVED_FILES_FOLDER.lower() in winappdbg.PathOperations.native_to_win32_pathname(directory).lower()Now, we can try to run the application and see if the save operation is redirected to another folder:
Attaching to PID: 3592 Name: Skype.exe
Attaching to PID: 3504 Name: Skype.exe
Attaching to PID: 3760 Name: Skype.exe
Attaching to PID: 2600 Name: Skype.exe
Attaching to PID: 3784 Name: Skype.exe
Attaching to PID: 3360 Name: Skype.exe

Redirecting saving file...
Original file path: \\?\C:\SkypeDownload\Samples.zip; New file path: C:\SomeNewFolder\Samples.zip; Thread: 3408;As you can see from the results, files are now successfully redirected to be saved in the SomeNewFolder folder instead of the original destination folder.
It’s noteworthy that the WinAppDbg library wasn’t specifically designed for API hooking. It provides some other utilities to manipulate processes, threads, and windows and can even launch a command line debugger for an application. Therefore, this library will be more useful when hooking is not the main purpose of your application.
To learn more about different types of APIs, check out our article where we explore the Places API implementation options.
Conclusion
Knowing compiled languages like C and C++ isn’t necessary if you want to perform Windows API hooking. Dynamic languages like Python can be a great alternative and have their own advantages. Python shows good development speed, offers convenient environment configuration, and has lots of helpful third-party libraries.
In this article, we showed how to set hooks in different processes using Python and the Deviare and WinAppDbg libraries. With this knowledge, you can better understand how an operating system or a certain application works, manipulate various processes, and improve your products.
At Apriorit, we have professional teams of expert Python developers who are ready to help you create high-quality IT products.
Have a vision for a new project?
Create a high-quality IT product tailored to your business needs by leveraging our dedicated Windows and Python developers.
Have a question?
Ask our expert!
Program Manager


