 Skip to main content

The frameworks you choose to build your application define its development speed, scalability, performance, and other key characteristics. That’s why your team should wisely analyze each tool before making the final choice.
From our experience at Apriorit, we can say that Django is one of the best frameworks to include in your technology stack when building a Python web solution. It helps you create highly performant and feature-rich web applications while crafting an exceptional user experience.
In this article, we explore Django’s key offerings and explain how to leverage them for your web application, showing code examples. We also provide brief instructions for essential web development steps such as creating a project in Django, ensuring real-time communication in your application, and deploying a finalized product in the production environment.
This article will be helpful for tech leaders who want to build Python web apps with Django and need an overview of the framework.
Contents:
What is Django and how can you create a project in it?
Django is a high-level Python web framework that offers developers a powerful toolkit for building robust and scalable web applications. For example, you can create a blog with Django, a landing website, a web service, and more. At the heart of Django’s capabilities lies the Django server, an integral component that drives the framework’s functionality and facilitates seamless communication between the application and the end user.
Let’s start creating a new Django project using PyCharm.
If you’re using the Professional Edition of PyCharm, you can just follow the official instructions to create a Django project.
Here are instructions for doing so with PyCharm Community Edition:
1. Create a virtual environment. PyCharm will do this automatically when you create a new project. Make sure your virtual environment is named differently than the one we show in our example.
2. When you open the Terminal window in PyCharm, the project’s venv module will be active. We recommend using the opened window instead of the system terminal window. But you can also activate an environment in the system terminal window and enter your virtual environment using the following path:
source /home/user/path/to/.your project/bin/activate3. Install the Django library from the PyCharm Plugins settings, or use the following command in the terminal:
pip install Django4. Enter your Python environment directory, go to the bin folder, and find an application called django-admin. To create a new project, run the following command in the terminal while in your virtual environment:
django-admin startproject <Name Of My Application>For our example, we’ll name the project myProject.
When you create a project, Django automatically creates a directory structure for your application. Note that this is just a project, and a project can include a collection of apps.
Next, you’ll see a default project structure that looks like this:
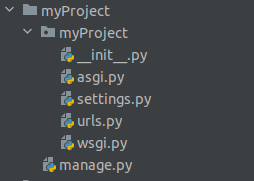
Let’s explain what each directory and file in Screenshot 1 is used for:
myProject/— a directory that contains project-level application settings__init__.py— a file that tells Python that themyProject/directory should be treated as a Python packagesettings.py— a file that contains project-level settings such as database configuration, middleware, and installed appsurls.py— a file that contains the project-level URL routing configurationwsgi.py— a file for deploying the Django web app on web servers like Apache or Nginxmanage.py— a wrapper around the django-admin script that allows you to manage your application
5. Create your first web application by running the following command in the project directory using the manage.py file:
python manage.py startapp <application name>For our example, we will name the application myApp. Once you create your app, you’ll see a default application structure that looks like this:
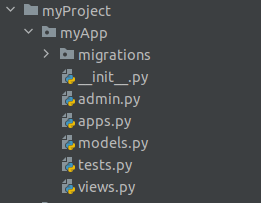
Let’s explain what each directory and file in Screenshot 2 is used for:
myApp/— a directory that contains application-specific files within the projectmigrations/— a directory that contains database migration files__init__.py— a file telling Python that themyApp/directory should be treated as a Python package- admin.py — a file that contains code for registering models to the admin site and specifying how the admin panel should look
apps.py— a file that contains app configurationsmodels.py— a file that contains the database models for your apptests.py— a file that contains test cases for your appviews.py— a file that contains code for handling HTTP requests and rendering HTML templates for your app
The name of the last file could be misleading for your developers, as traditionally, the views file is used to keep HTML code for displaying data. However, in Django, this file contains the project-level URL routing configuration. Views is essentially a URL handler. And the views your developers might be thinking of are called templates in Django.
6. Configure your application by adding models, views, templates, and URLs.
Once you’ve defined your models, you need to create database tables. Run the following command to create your database schema:
python manage.py makemigrationsThis command generates migration files by comparing the current state of your models to their previous state recorded in migration files. Then, it creates a new migration file that describes the changes needed to update the database schema.
Once you have generated migration files, apply them to the database using the following command:
python manage.py migrateThis command applies the changes to an existing database or creates a new one.
Note: You have to make migrations before running the application to avoid an error like this:
You have 13 unapplied migration(s). Your project may not work properly until you apply the migrations for app(s): admin, auth, contenttypes, sessions.
Run ‘python manage.py migrate’ to apply them.
This error occurs if the developer hasn’t configured the project, so Django doesn’t know the configurations yet.
7. Run the development server using the following command:
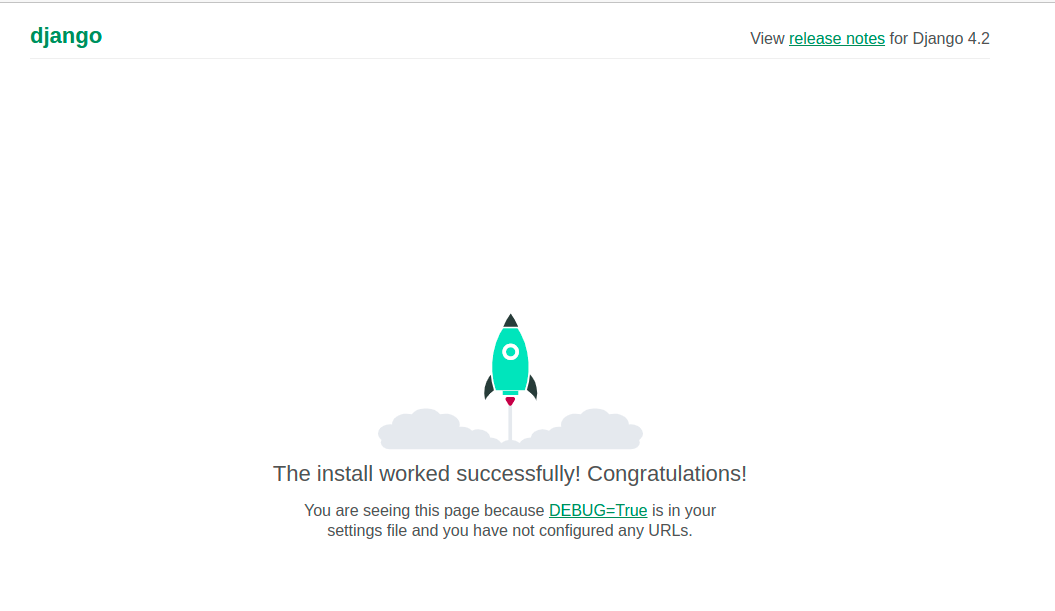
python manage.py runserverThis command will start the server and allow you to access your application by opening a web browser and going to http://127.0.0.1:8000.
If you run your project without any changes, you’ll see a default Django page that looks like this:
Now you can continue using Django to build a web app, leveraging the features provided by this framework. The next steps in developing your application significantly vary depending on your product specifics and business requirements. Therefore, in the following sections, we’ll focus on key Django opportunities and explore how to leverage them.
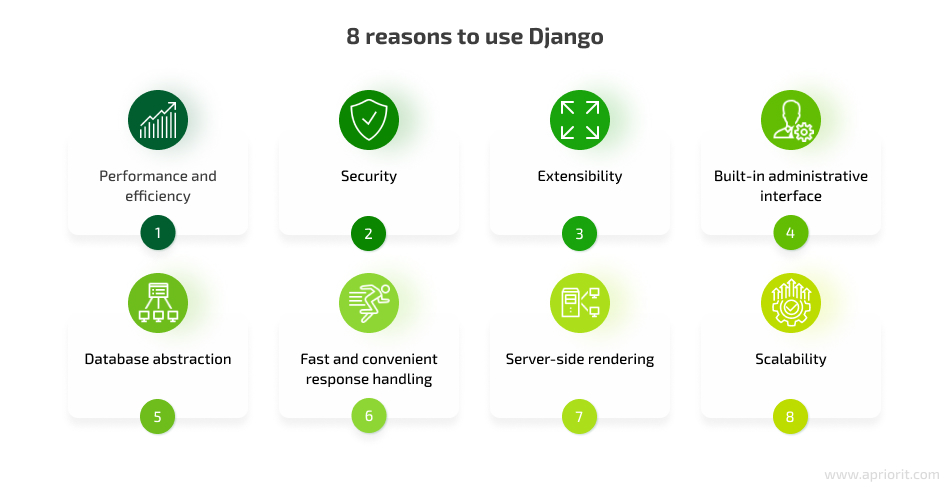
8 reasons to use Django
There are many reasons to consider using Django when building your Python application. Below, we highlight some of the most important characteristics and most useful features of this framework.
1. Performance and efficiency
Thanks to the Django server, developers can create a web application with Django that handles high traffic volumes without sacrificing performance.
The Django server is built on top of the Web Server Gateway Interface (WSGI) standard, allowing it to efficiently handle a significant number of requests. To ensure speedy and responsive web applications, the server leverages various optimization techniques including:
- Request/response caching
- Database query optimization
- Intelligent resource management
Let’s see how Django’s ability to ensure the application’s performance and efficiency works in practice.
The wsgi.py file is the entry point for running a Django application in a web server environment using the WSGI specification:
- When a request comes to the web server, the server passes it to the WSGI application object, created by the wsgi.py file.
- The WSGI application object then handles the request, generates a response, and returns it to the web server.
- The web server returns the response to the client.
Here’s an example of creating and working with the wsgi.py file:
import os
from django.core.wsgi import get_wsgi_application

os.environ.setdefault('DJANGO_SETTINGS_MODULE', 'myProject.settings')
application = get_wsgi_application()In the example above, the DJANGO_SETTING_MODULE environment variable is set to specify the settings module that an application will use. Then, you can use the get_wsgi_application() function to configure the wsgi.py file as the entry point for your application so that you can run it using a web server like Apache or Nginx.
Next, you need to install the necessary packages for running the Django web app:
- mod_wsgi for Apache
- uwsgi for Nginx
After configuring your application and creating the wsgi.py file, you can add the following configuration to your virtual host if you’re using Apache:
WSGIScriptAlias / /path/to/your/project/wsgi.py
WSGIPythonPath /path/to/your/project:/path/to/your/venv/lib/python3.8/site-packagesAnd here’s the configuration to add to your server block if you’re using Nginx:
location / {
uwsgi_pass unix:///path/to/your/project.sock;
include uwsgi_params;
}2. Security
Protecting your web application from attacks and ensuring it has few to no vulnerabilities is crucial. The Django framework offers a lot of tools and configuration options for developers to ensure proper application security. In this section, we outline and briefly describe seven important security measures you can use when building web applications with Django.

1. Cross-site scripting (XSS) protection. Cybercriminals can use XSS attacks to inject malicious client-side scripts into browsers by storing those scripts in databases or data sources like cookies and web services.
Django has built-in templates to protect end users against XSS attacks. These templates escape specific characters, preventing malicious scripts from being executed on the client side. Django’s templating engine applies context-specific escaping to ensure that user-supplied data is rendered safely.
2. Cross-site request forgery (CSRF) protection. When conducting CSRF attacks, malicious actors use legitimate user credentials without the user’s knowledge or consent.
Django provides robust protection against CSRF attacks, including middleware that generates and validates unique tokens for each user session. This prevents unauthorized requests from malicious web applications that attempt to perform actions on behalf of a compromised user. Django’s CSRF protection adds an additional layer of security to ensure that only legitimate requests from your application can modify data or perform sensitive actions.
3. Authentication and authorization. Django offers a comprehensive authentication and authorization system, which simplifies the process of handling user authentication and access controls. It provides ready-to-use user authentication views, form templates, and password hashing mechanisms.
Additionally, Django’s authentication system supports various authentication methods, such as username/password, email/password, and third-party authentication services like OAuth. The Django framework also provides fine-grained control over user permissions, as well as decorators and mixins to protect views and APIs.
4. Secure password handling. Django emphasizes secure password management to protect user accounts. It provides a flexible password storage system and uses PBKDF2 by default. Django also supports checking passwords stored with robust password hashing algorithms like PBKDF2/SHA1, argon2, bcrypt, and scrypt, which ensure proper protection and help to slow down brute-force attacks.
Apart from hashing algorithms, Apart from hashing algorithms, Django keeps passwords secure by means of numerous algorithm iterations, the resulting password hashes, and random salt. Most password hashes include salt to protect against rainbow table attacks. Django also encourages the use of strong password validation policies and provides configurable settings to enforce password complexity requirements.
5. SQL injection protection. During SQL injection, an attacker exploits a vulnerability in a web application to interfere with queries that the application makes to its database.
Django’s Object-Relational Mapping (ORM) provides protection against SQL attacks by using parameterized queries and preparing statements to automatically escape user-supplied input when constructing SQL queries. This prevents malicious SQL code from being injected into queries and helps safeguard against one of the most common web application vulnerabilities.
6. Security middleware. Django offers a range of security middleware that you can enable to enhance application security. For example, you can use the following options:
- HTTP Strict-Transport Security to instruct browsers to refuse to connect to your domain name via an insecure connection
- Referrer-Policy to control how much referrer information is included with requests
- Cross-Origin-Opener-Policy to isolate top-level windows from other documents
- X-Content-Type-Options: nosniff to prevent the browser from guessing the content type
- SSL Redirect to redirect all HTTP connections to HTTPS
By using these middleware components, you can enforce secure communication, prevent some types of attacks, and improve overall application security.
7. Secure session management. Django’s session management system ensures the secure handling of session data by:
- Providing a secure default session engine
- Supporting multiple storage options, including in-memory, cookie-based, and external cache-based sessions
- Offering settings to encrypt session data, preventing tampering and unauthorized access
- Storing session data on the server side by default and providing an opportunity to encrypt it using a secret key that is unique to each Django installation
- Using a secure random number generator to generate unique and long session IDs
- Providing developers with the possibility to customize the security of their session management system
Overall, Django provides a range of helpful tools you can leverage to secure your web application. From our experience, when you start working on a web app’s security, it’s essential to focus on Django Authentication (to ensure secure authentication and protect your app from SQL injections) and CSRF tokens (for user session identification). Then, as you keep enhancing your product’s protection, you can use various security libraries for Django depending on your project needs.
Read also
Best Python Framework for Backend Development: Django vs. Flask vs. Tornado
Examine example backend code we write using Flask, Django, and Tornado. Discover how they compare in terms of security, maintainability, and development speed.

3. Extensibility
Django’s server is designed to be highly extensible, allowing developers to customize and extend its functionality to meet specific project requirements. The server seamlessly integrates with Django’s modular architecture, enabling developers to include additional middleware, implement custom URL routing, or integrate third-party components. This extensibility empowers you to tailor the server to your unique needs, ensuring maximum flexibility and adaptability.
You can improve your application’s extensibility with a variety of Django modules. Here are step-by-step instructions on where and how you can integrate Django modules in your solution:
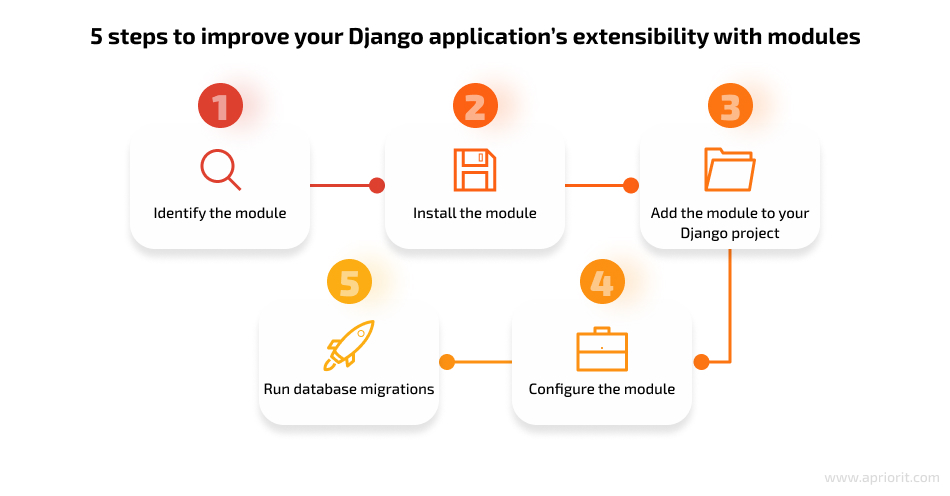
1. Identify the module. Decide which module you want to integrate in your Django project. This could be a custom module or a third-party library or toolkit such as:
- Django REST framework to build web APIs
- Celery to work with task queues
- Django Debug Toolbar to have better visibility into debug information
- Django Baton to have a convenient and responsive Django admin application
2. Install the module. Once you’ve identified the module, you need to install it into your Django project’s environment. For most modules, you can use Python’s package manager, called pip. Open a terminal or command prompt and run the following command with pip from the project’s virtual environment:
pip install <module_name>3. Add the module to your Django project. After installing the module, you’ll need to add it to your Django project so that it becomes a part of your application’s codebase. There are a few ways to achieve this:
If the module you installed is a Django app, you can:
- Add the module to your project’s
INSTALLED_APPSsettings in the settings.py file - Open the settings.py file and locate the
INSTALLED_APPSlist - Add the name of the module’s app to the list
INSTALLED_APPS = [
# other apps...
'module_name',
]If the module you installed isn’t a Django app but rather is a standalone library or module, import the module to your Django project’s code files where you intend to use it. Typically, you would import the module at the top of the relevant Python file using an import statement like this:
import module_name4. Configure the module. Some modules have specific configuration requirements, so it’s crucial to consult a module’s documentation or guidelines to understand how to configure and use it effectively.
5. Run database migrations. If the module you’ve integrated introduces new database models or changes existing ones, you need to run Django’s database migrations to synchronize the changes. In your terminal or command prompt, select your project’s directory and run the following commands:
python manage.py makemigrations
python manage.py migrate4. Built-in administrative interface
One of Django’s standout features is its built-in, intuitive, and customizable administrative interface called Django admin, which allows developers to:
- Manage and maintain their application’s data models
- Perform Create, Read, Update, Delete (CRUD) operations
- Handle user authentication and permissions
- Eliminate the need to build an administrative interface from scratch, saving significant development time and effort
The admin.py file defines the configuration of the Django admin interface and provides a convenient way for site administrators to view and edit the data stored in your app’s models.
Let’s overview how it works.
To use the admin interface, you need to register your models on the admin site. To do that:
- Create a new class that inherits from the admin.ModelAdmin class
- Register your class on the admin site into an existing model from the models.py file using the admin.site.register() method
Here is an example of how to register a model on the admin site:
from django.contrib import admin
from .models import MyModel
class MyModelAdmin(admin.ModelAdmin):
list_display = ('name', 'created', 'modified')
admin.site.register(MyModel, MyModelAdmin)The ModelAdmin class offers many possibilities to change the view of the administration model, such as:
- Displaying information on table presentation
- Defining fields that can be edited or have read-only status
- Ordering fields in the table
- Setting a number of objects displayed per page
You can also modify methods for saving models, getting a list of objects, configuring filters, and more. Such opportunities will help your developers present information on the administration panel and work with this information in the database conveniently and efficiently.
5. Database abstraction
Django’s server provides a powerful Object-Relational Mapping (ORM) layer that abstracts database operations and simplifies data management. This abstraction layer supports multiple databases, including popular ones like PostgreSQL, MySQL, and SQLite, allowing developers to switch between databases seamlessly.
Django’s server handles database connections, query optimization, and transaction management, reducing the complexity of interacting with databases and providing a consistent and unified interface for data manipulation.
Let’s explore how database abstraction works in Django.
The models.py file defines the structure of your database tables and their relationships. It’s a key component of Django’s Model–View–Controller (MVC) architecture. You can define one or more classes that inherit from django.db.models.Model. Each class represents a database table, and the attributes of the class represent the table’s columns.
Here’s an example of how to create a simple database table for storing information about a book:
from django.db import models
class Book(models.Model):
title = models.CharField(max_length=200)
author = models.CharField(max_length=200)
pub_date = models.DateTimeField('date published')By default, Django will create a primary key field named id for each table you define in the models.py file. However, you can customize the primary key by defining a field named id in your class.
You can also define relationships between tables using the following fields:
ForeignKeyto make reference to another modelOneToOneFieldto create a one-to-one relationship between two modelsManyToManyFieldto create a many-to-many relationship between two models
from django.db import models
class Author(models.Model):
name = models.CharField(max_length=200)
# other fields here
class Book(models.Model):
title = models.CharField(max_length=200)
author = models.ForeignKey(Author, on_delete=models.CASCADE)
pub_date = models.DateTimeField('date published')Once you create models, you can use them to initialize your database. Use the DATABASE parameter in the settings.py file to specify what type of database you want to create:
DATABASES = {
'default': {
'ENGINE': 'django.db.backends.postgresql',
'NAME': 'mydatabase',
'USER': 'mydatabaseuser',
'PASSWORD': 'mypassword',
'HOST': 'localhost',
'PORT': '5432',
},
'users': {
# ...
}
}Then, migrate your database to your server:
python manage.py makemigrations
python manage.py migrate6. Fast and convenient response handling
Django’s server seamlessly integrates with other components of the Django ecosystem, amplifying its power and versatility. It works harmoniously with Django’s templating engine, form handling, and caching mechanisms. And the views file is what helps connect different Django components.
The views.py file helps your application define the views and handlers that process incoming requests from clients as well as generate responses to send back. Views are Python functions that handle requests and return responses. These view functions are the glue that connect a URL to a template and perform the necessary business logic for the application.
Once your Django web app receives a request, it routes this request to a view function that is responsible for processing the request and generating a response. The view function receives the request as its first argument and generates a response. Then, your application sends the response to the client.
Here’s an example of a simple view function:
from django.http import HttpResponse

def hello_world(request):
return HttpResponse('<html><body>Hello, world!</body></html>')In addition, class-based views provide a more object-oriented way to handle requests. Class-based views can be subclassed to add additional functionality and provide more powerful request handling capabilities.
Here’s an example of a simple class-based view that renders a template with contextual data:
from django.views.generic import TemplateView

class HomePageView(TemplateView):
template_name = 'home.html'

def get_context_data(self, **kwargs):
context = super().get_context_data(**kwargs)
context['message'] = 'Welcome to my website!'
return contextYou should also pay attention to the urls.py file that defines the URL patterns for your application and maps URLs to views. This file is typically located in the root directory of your application and can contain one or more URL patterns. Also, you can specify project-level URLs that will be used for all applications.
Here’s an example of a simple urls.py file:
from django.urls import path
from . import views


urlpatterns = [
path('', views.index, name='index'),
path('about/', views.about, name='about'),
path('contact/', views.contact, name='contact'),
]You can also use regular expressions to define more complex URL patterns using the re_path() function:
from django.urls import re_path
from . import views


urlpatterns = [
re_path(r'^articles/(?P<year>[0-9]{4})/(?P<month>[0-9]{2})/$', views.article_archive),
]To use a class-based view, apply the as_view() method to create a callable that can be used as the view function:
from django.urls import path
from myApp.views import HomePageView


urlpatterns = [
path('', HomePageView.as_view(), name='home'),
]7. Server-side rendering
Server-side rendering is the process of generating and rendering HTML templates on the server before sending them to the client. This approach ensures that the client receives fully rendered HTML pages that can be displayed immediately, providing a faster initial page load time and improving the user experience.
Django supports server-side rendering, and here are a few of the benefits it brings:
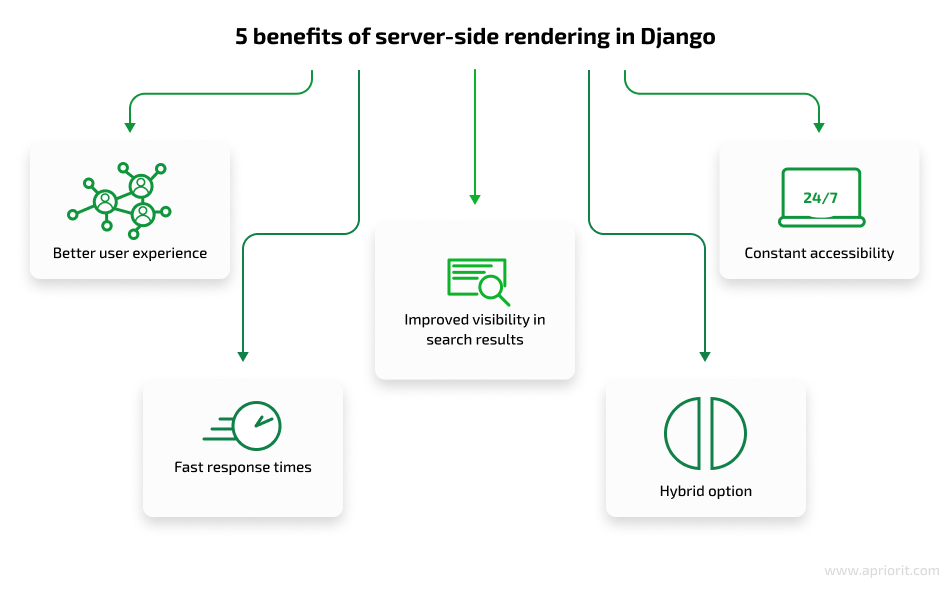
- Better user experience. Thanks to sending fully rendered HTML pages to the client, a user can see and interact with content immediately, even before JavaScript or CSS files are downloaded and executed.
- Improved visibility in search results. Search engines can index and rank content faster as fully rendered HTML pages than as heavy single-page JavaScript applications.
- Constant accessibility. Server-side rendering in Django ensures that your web application remains accessible and usable even in scenarios where JavaScript is disabled or not supported by the client’s browser.
- Fast response times. Django also offers caching mechanisms to use alongside server-side rendering. By caching rendered HTML pages, subsequent requests for the same page can be served from the cache without re-rendering the templates and fetching data. This leads to faster response times and reduced server load.
- Hybrid option. Django offers the possibility to combine server-side rendering with client-side JavaScript frameworks, such as React or Vue.js. In this hybrid approach, Django handles the initial rendering of the page on the server, and then the client-side framework takes over for managing dynamic behavior and interactivity.
Let’s briefly overview how server-side rendering works in Django.
Once your Django application receives a request, the server:
- Processes the request
- Executes the appropriate view functions
- Retrieves data from databases or external APIs
- Renders HTML templates using the retrieved data
- Sends the rendered HTML pages back to the client, where they can be displayed directly without the need for additional processing on the client side
As you can see, this process differs from client-side rendering, where the server sends raw data (often in JSON format), and the client-side JavaScript framework is responsible for rendering the HTML and populating it with data.
8. Scalability
Establishing proper scalability for your web application is essential, as with time, user traffic will grow. To help you deliver an app that can handle growing demands and maintain optimal performance, Django offers the following features:
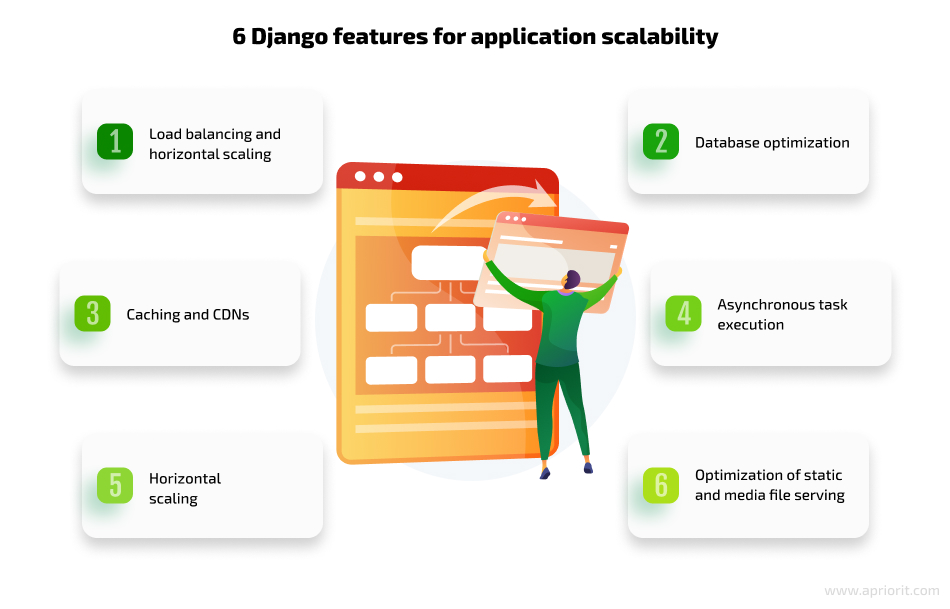
- The load balancing technique can help you distribute incoming requests across multiple server instances. By employing load balancing in a Django server setup, you can evenly distribute the workload and prevent any single server from becoming a bottleneck. With horizontal scaling, you can add more server instances to the pool as demand rises, increasing the application’s capacity to handle concurrent requests.
- You can ensure efficient database optimization and simplify database interactions by leveraging Django’s database access optimization offerings. Consider using techniques like database indexing, query optimization, and denormalization. Django also supports various database back ends, enabling you to choose the most suitable option based on your scalability requirements.
- By caching frequently accessed data or rendered HTML fragments, you can reduce the load on the server and minimize the response time. Django provides a built-in caching framework that offers different levels of cache granularity. For example, you can cache the output of specific views, pieces that are difficult to produce, or your entire site. You should also leverage content delivery networks (CDNs) that can offload static file serving and improve delivery of static assets, reducing the strain on your Django server.
- Django supports asynchronous task execution, which allows you to use slow streaming, long-polling, and other response types. In scenarios where certain operations are time-consuming or resource-intensive, offloading them to asynchronous tasks can enhance scalability. This approach helps you free up server resources to handle more requests concurrently, prevents the server from getting overwhelmed, and ensures a proper user experience.
- Horizontal scaling involves distributing the database load across multiple servers. You can use techniques like database replication, partitioning, or sharded databases to achieve horizontal scalability. Django’s database abstraction layer simplifies the process of connecting to different database back ends and incorporating horizontal scaling strategies.
- Another essential detail for ensuring proper scalability is optimization of static and media file serving. Django provides the collectstatic management command, which gathers static files from various sources into a single location, making them easier to serve. To further optimize static file delivery, configure web servers like Nginx or Apache to handle static file requests directly, offloading the task from the Django server. Additionally, you can offload media file storage to specialized services like AWS S3 or a CDN to improve scalability and reduce server load.
How to ensure real-time communication in Django
In web applications, real-time communication is crucial for enabling interactive features, collaborative experiences, and live updates. Let’s explore how Django can facilitate real-time communication and enhance your app’s interactivity.
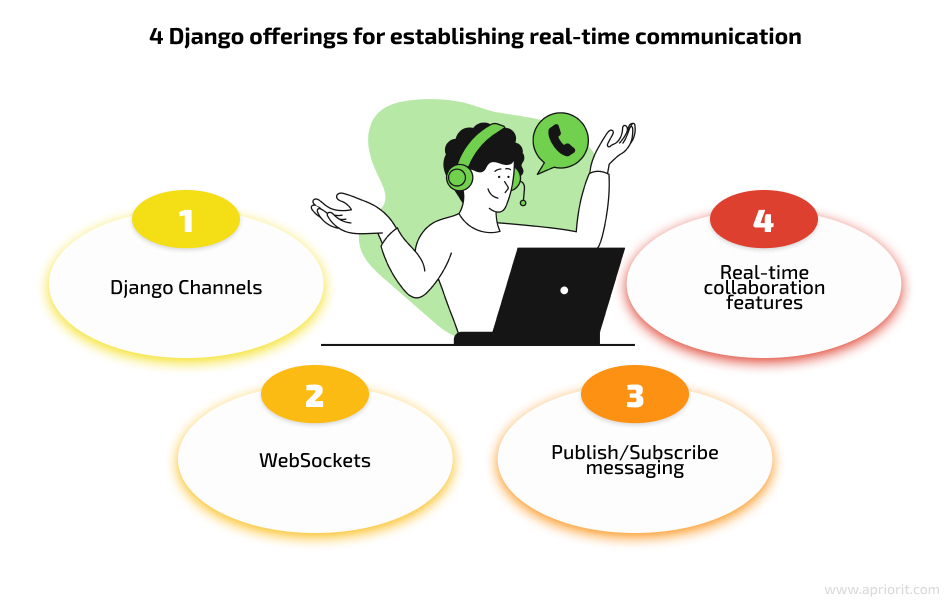
- Django Channels is a powerful extension that enables real-time capabilities and asynchronous communication in Django applications. It provides a layer on top of Django’s traditional request–response model, allowing you to handle WebSockets, HTTP/2, and other protocols. Django Channels integrates seamlessly with Django’s server, enabling bidirectional communication between the server and clients.
- WebSockets is a key technology for real-time communication. Unlike traditional HTTP requests, WebSockets establish a persistent connection between the client and the server, allowing for a bidirectional data flow. Using Django Channels, you can implement WebSockets in your application to ensure real-time updates, live chats, collaborative editing, notifications, and more. Also, WebSockets offers libraries and protocols based on the WebSocket API (such as Socket.IO) to help you enhance your application’s capabilities.
- Publish/Subscribe (pub/sub) messaging is a powerful pattern for real-time communication and event-driven architectures. Django integrates with message brokers like Redis, RabbitMQ, and Apache Kafka, allowing you to implement pub/sub messaging in your application. With pub/sub, you can broadcast messages to multiple clients or specific channels, enabling real-time updates across various clients connected to your Django server.
- Real-time collaboration features include shared whiteboards, real-time document editing, collaborative task management, synchronized media playback, and more. You can use these Django opportunities to make your application more dynamic and user-friendly, as well as to create engaging and interactive experiences for your users.
Now, let’s explore how to use Django Channels and WebSockets in your Django web app:
1. Install Django Channels
Start by installing Django Channels using pip:
pip install channelsYou also need to install a relevant Asynchronous Server Gateway Interface (ASGI). Let’s use Daphne for our example:
pip install daphne2. Configure Django Channels
Now you should add Channels to your Django project’s settings. In your project’s settings.py file, add ‘channels’ to the INSTALLED_APPS list:
INSTALLED_APPS = [
	...
	'channels',
]3. Create an ASGI application
Create a new file named asgi.py in your Django project’s root directory. Inside this file, import the get_asgi_application function from django.core.asgi and the ProtocolTypeRouter class from channels.routing.
Then, define the routing configuration for your application:
import os
from django.core.asgi import get_asgi_application
from channels.routing import ProtocolTypeRouter, URLRouter

os.environ.setdefault('DJANGO_SETTINGS_MODULE', 'your_project_name.settings')

application = ProtocolTypeRouter({
	'http': get_asgi_application(),
	'websocket': URLRouter([
		# Add your WebSocket URL routing here
	]),
})Also, configure a path to the ASGI application in the same settings.py file:
ASGI_APPLICATION = 'your_project_name.asgi.application'4. Create a WebSocket consumer
Now, you need to create a consumer class that handles WebSocket connections and manages communication with clients. In a new or existing Python module, define a class that inherits from channels.generic.websocket.AsyncWebsocketConsumer.
Create the consumers.py file in the directory next to views.py and models.py. Then, use the following code:
from channels.generic.websocket import AsyncWebsocketConsumer

class MyConsumer(AsyncWebsocketConsumer):
	async def connect(self):
	# Called when the WebSocket is handshaking as part of the connection process.
	# Implement any connection-related logic here.
	await self.accept()

async def disconnect(self, close_code):
	# Called when the WebSocket closes for any reason.
	# Implement any cleanup logic here.
	pass

async def receive(self, text_data):
	# Called when the server receives a message from the WebSocket.
	# Implement logic to handle the received message here.
	pass

async def send_message(self, message):
	# Custom method to send a message to the WebSocket client.
await self.send(message)Implement the necessary methods to handle:
- establishing a connection
(connect()) - disconnecting
(disconnect()) - receiving messages
(receive())
You can also define custom methods within the consumer class to handle specific actions or send messages to the WebSocket client.
5. Define WebSocket URL routing
In the asgi.py file, define the URL routing for WebSocket connections. This is where you specify which consumers handle WebSocket connections and their corresponding routes. A consumer is a Python class that handles incoming WebSocket connections and manages communication with clients.
To define URL routing, import the necessary consumer classes and create a list of URL patterns. Each URL pattern maps a WebSocket route to a consumer class.
Add this code to your urls.py file:
from your_app.consumers import MyConsumer
from django.urls import path

websocket_urlpatterns = [
	path('ws/your_route/', MyConsumer.as_asgi()),
]Make sure to replace your_app.consumers with the actual path to your consumer class, and replace your_route/ with the desired route for your WebSocket connections.
6. Run the ASGI server
To start the ASGI server and run your Django application with Django Channels, use the daphne command followed by the name of your ASGI application defined in the asgi.py file:
daphne <your_project_name>.asgi:application7. Connect to the WebSocket endpoint
When the server is running, clients can connect to the WebSocket endpoint you defined in the URLRouter nesting in the asgi.py file.
For example, if your WebSocket route is ws/your_route/, clients can connect to ws://your_domain/ws/your_route/.
8. Handle WebSocket events
Once a WebSocket connection is established, methods defined in the consumer class will be called accordingly. You can implement logic to handle incoming messages, send messages to clients, and perform any other necessary actions.
For example, in the receive() method, you can process the received message and take appropriate actions based on its content. You can use the send_message() method or any other custom method you defined to send messages to the connected WebSocket client.
How to deploy your Django application to production
Deploying your Django app to a production environment involves several steps. Here are brief instructions on how to successfully do it:
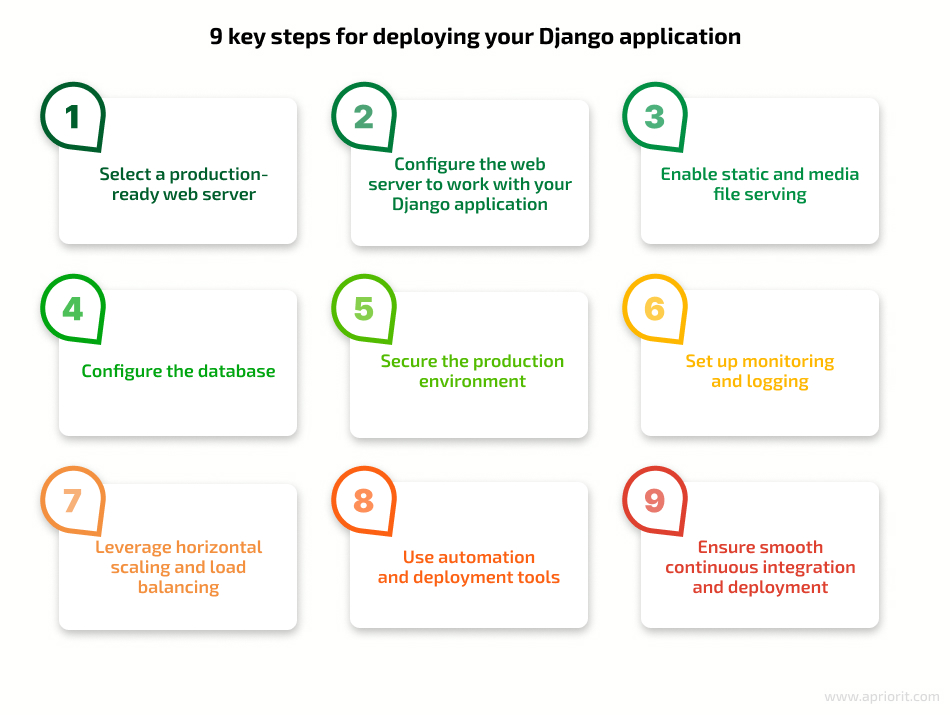
- Select a production-ready web server. By using servers like Gunicorn, uWSGI, or Apache with the mod_wsgi package, you can efficiently handle HTTP requests. Install the chosen web server on your production server.
- Configure the web server to work with your Django application. Consult the documentation of the selected web server for detailed instructions on its configuration. Ensure you specify the host, port, and other necessary parameters to connect the web server with Django.
- Enable static and media file serving. Configure the web server to serve static files and media files directly to clients. This offloads static and media file serving from Django, enhancing your app’s performance. Refer to Django’s documentation for guidance on configuring static and media file serving based on your chosen web server.
- Configure the database. Update your Django application’s database settings in the settings.py file to connect to a production-grade database system like PostgreSQL, MySQL, or Oracle. Adjust the database connection settings to match the database server used in the production environment.
- Secure the production environment. Implement robust security measures to protect your Django application and server. Enable HTTPS/SSL for secure communication, implement proper authentication and authorization mechanisms, keep software components up to date, and guard against common web application security risks like XSS and SQL injection.
- Set up monitoring and logging. Establish monitoring and logging mechanisms to track your Django server’s health, performance, and errors. Utilize server monitoring tools to keep an eye on resource use, response time, and other performance metrics. Configure logging to record relevant events, errors, and exceptions for debugging purposes and issue identification.
- Leverage horizontal scaling and load balancing. Consider horizontal scaling as your application grows. Run multiple Django server instances and distribute incoming requests among them using load balancing techniques. Set up load balancers, reverse proxies, or cloud infrastructure services to achieve load balancing and improve performance and availability.
- Use automation and deployment tools. Streamline the deployment process using automation and deployment tools like Ansible, Fabric, or Docker. Automate the provisioning and deployment of your Django application to ensure consistency, reduce human errors, and facilitate easy replication of the production environment.
- Ensure smooth continuous integration and deployment. Implement a continuous integration and continuous deployment (CI/CD) pipeline to automate build, testing, and deployment processes. Use tools such as Jenkins, GitLab CI/CD, or CircleCI to automate the deployment of your Django application, ensuring efficient and reliable updates.
Apart from following these brief instructions, ensure you thoroughly test your deployment before making it available to users. It’s also important to regularly maintain and update your production setup to guarantee optimal performance, security, and scalability.
Conclusion
Developing a robust and competitive web solution can be a hard journey. But when leveraging top-notch technologies like Python and Django, you can simplify and accelerate the entire development process. And you can still deliver an application with a rich feature set, a smooth user experience, decent scalability, and sufficient performance.
Django’s documentation provides extensive instructions and descriptions. However, working with this framework on a real-life project hides some pitfalls and nuances that developers learn with experience. So to build a web app with Python and Django, you should assemble an experienced team.
At Apriorit, we have skilled web development teams ready to help you deliver successful web applications written in Python, with all required functionality and within established deadlines.
Contact us to start discussing your next web project!
Have a question?
Ask our expert!
VP of Engineering


