 Skip to main content

Deploying an application on several cloud servers seems an ideal solution for any business. It helps you increase the solution’s availability, transfer hardware- and software-related tasks to the cloud, and centralize the management and auditing of assets. But managing such multi-cloud applications is no easy task, and a single mistake can come at a great cost.
In this article, we share Apriorit’s approach to establishing efficient multi-cloud management using Python and Terraform. We rely on the multi-cloud Infrastructure as Code approach, as it helps us to automate many activities and reduce the risk of human errors. We also briefly overview alternative cloud-native and third-party tools you can use.
This article will be useful to development leaders who plan to launch a multi-cloud project and are looking for deep expertise on this topic.
Contents:
Leverage the IaC approach for multi-cloud applications
Multi-cloud applications consist of numerous resources deployed in several cloud environments. While such an approach brings your company benefits like access to the best computing services and cost savings, managing a multi-cloud application can be extremely challenging.
One way to control the ever-growing assets of a multi-cloud application is Infrastructure as Code (IaC). This approach allows you to define, deploy, and manage cloud infrastructure, store it in a file, and keep this file versioned similarly to the codebase. Input data can come in the form of:
- Сonfiguration files
- Templates like JSON and YAML
- A set of tools
- Client libraries
- Manual invocations
- Integration with command-prompt scripts
- Linking with the application
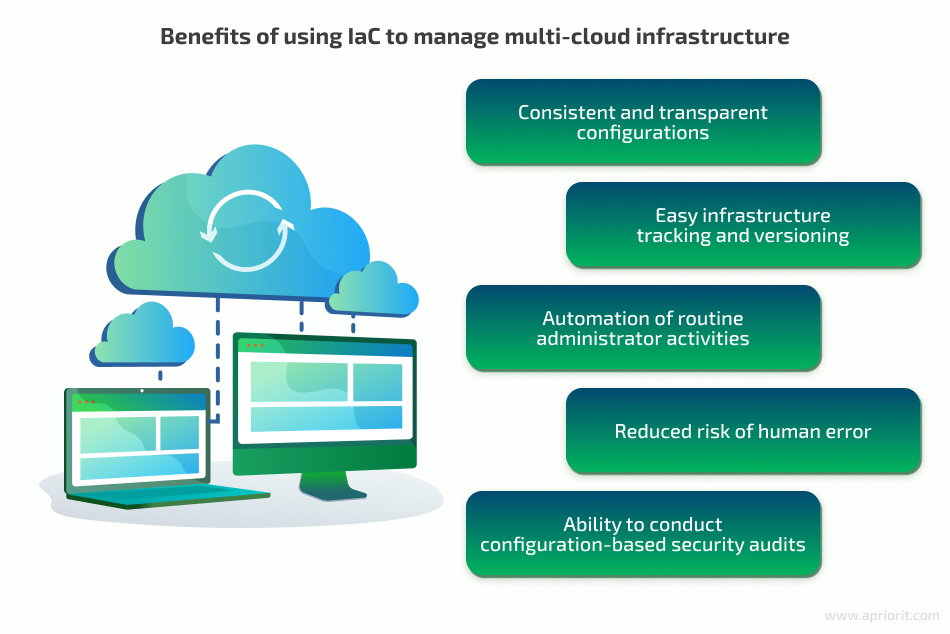
At Apriorit, we often use multi-cloud IaC because it provides the following benefits:
- Consistent and transparent configurations
- Easy infrastructure tracking and versioning
- Automation of routine administrator activities
- Reduced risk of human error
- Ability to conduct configuration-based security audits
To describe infrastructure as code, you can use declarative or procedural approaches:
- The declarative approach allows you to define the final desired state of your infrastructure in the form of names and properties of required resources. Then, IaC tools will figure out ways to create and maintain these resources. You don’t have control over this process, but you can easily introduce infrastructure changes and save time on coding.
- The procedural approach to IaC focuses on describing steps an IaC tool should follow to get your infrastructure to the desired state. This approach requires a higher level of programming skills compared to declarative IaC, but you can granularly control anything happening inside your infrastructure.
In the example we provide in this article, we use the declarative approach, as it allows us to define a lot of resources at once. Let’s take a look at the IaC tools that can help you deploy and manage multi-cloud infrastructure.
Choose IaC tools for a multi-cloud infrastructure
The choice of IaC tools for multi-cloud greatly influences your application’s deployment options and manageability. Before choosing a toolset, define:
- Which cloud environments you want to target
- Which IaC approach you will use
- The tools and cloud service providers (CSPs) your team has experience with
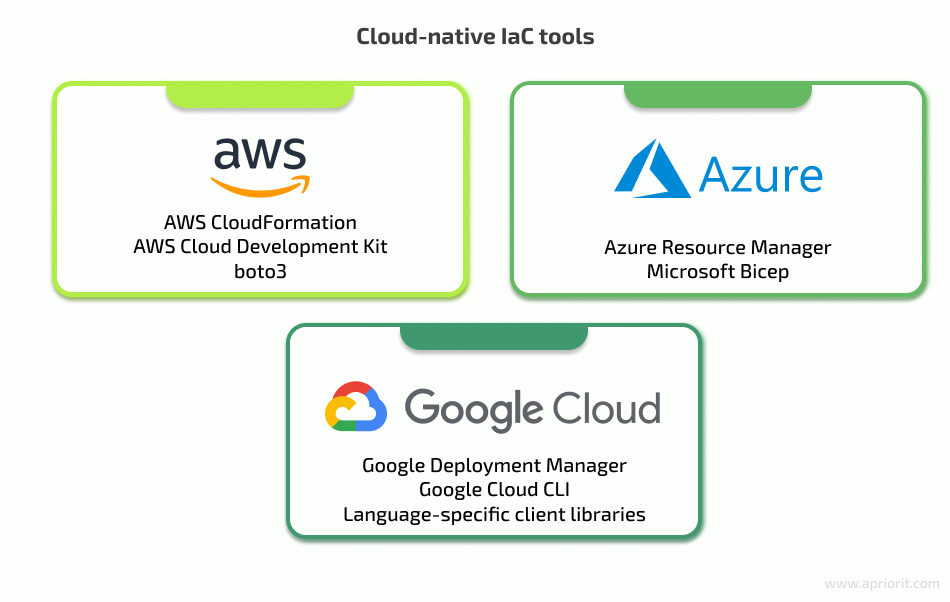
First, you can choose between using cloud-native and cloud-agnostic tools. The majority of CSPs offer native tools to manage infrastructure inside their clouds:
Using native tools to manage specific cloud infrastructure provides a few advantages:
- Continuous support and automated tool updates
- Seamless integration with cloud services of a particular CSP
- Unique internal features
However, it can take a lot of time to learn each dedicated tool, including cloud-specific object naming, types, relations, authentication differences, public API lists, and call sequences. When working on a multi-cloud project, it may be counter-productive learning to work with several such tools.
Alternatively, you can use cloud-agnostic tools like HashiCorp’s Terraform or RedHat’s Ansible. They usually can work with cloud services of all major providers as well as with more niche cloud services from Alibaba, Oracle, IBM, Tencent, OVH, Digital Ocean, and other companies. The advantages of using cloud-agnostic tools are:
- The ability to use one tool to manage all cloud resources
- A single deployment workflow
- Simple addition of new resources from supported CSPs
The key disadvantages of cloud-agnostic tools are:
- The need to keep both the tool and cloud services manually updated
- Possible breaking and non-breaking changes in language syntax as a tool develops
- Possible lack of unique features only available in native tools
On our projects, we apply Infrastructure as Code with Terraform or Ansible:
- Terraform is especially useful for infrastructure orchestration and provides rich provisioning options. It requires you to define your infrastructure using the HashiCorp configuration language and a declarative approach. You can also perform cloud automation using Terraform.
- Ansible is focused on deployment configuration with limited orchestration capabilities. To make this tool work, you can procedurally describe steps to deploy your infrastructure in a YAML file.
Besides, both of these tools are easy to work with using Python. Let’s examine a practical example of multi-cloud deployment using Terraform and Python.
Designing a multi-cloud infrastructure?
Apriorit experts can help you design and implement the infrastructure that fits the needs of your project. Reach out to leverage our DevOps experience for your benefit!
Draft the cloud-deploy service
Since our example is only a prototype, let’s focus on the architecture design and deployment process. We’ll use Python as our main language, since it provides lots of convenient frameworks for implementing a web back end. It also has dedicated client libraries for working with major CSPs:
- Azure Resource Manager for Microsoft Azure
- AWS-CDK and Boto3 for AWS
- Google-cloud for Google Cloud Platform
Some of these tools allow both management and creation operations, while others provide only access functions.
Our example solution can be uniformly deployed with Terraform thanks to the bindings wrapper for Python, which allows us to query resources with a cloud-specific library. As always, Python will serve as a glue between web APIs, querying resource states from the cloud and deployment module.
Here’s a draft architecture for our solution:
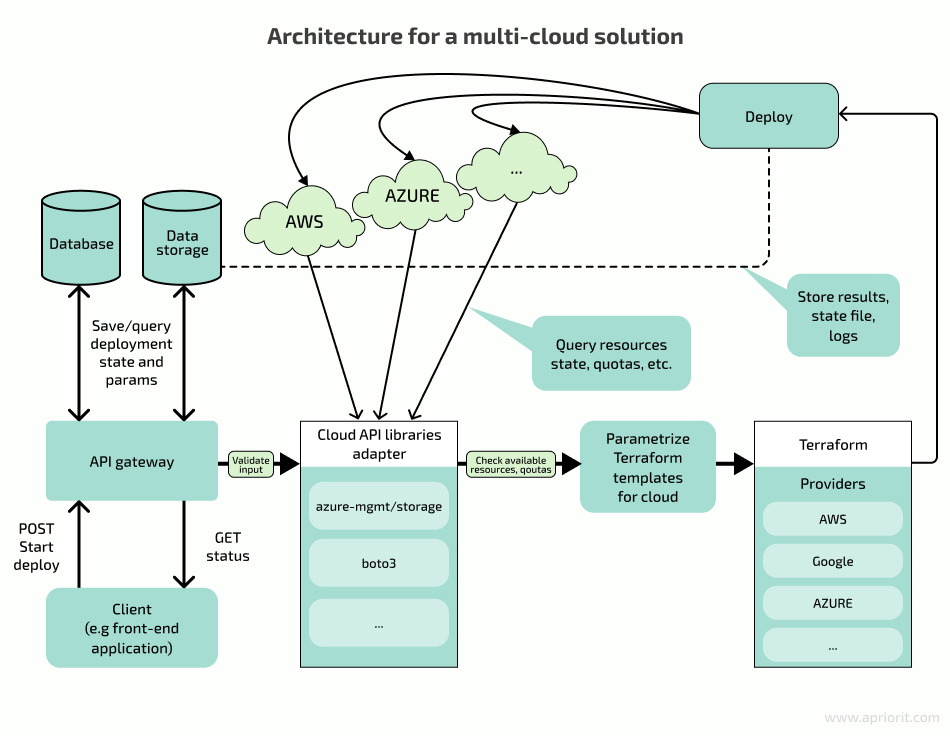
The API gateway processes CRUD actions and uses the database as persistent storage. Upon receiving a request, we need to validate that the input data:
- Includes credentials
- Contains valid instance type, disk size, etc.
After validating the sanity of initial input, we can pass the creation task to the actual Validation layer, where we can use client libraries to check if all required resources are available and can continue provisioning with one of Terraform’s providers. We need to prepare templates for each target cloud and store them as static resources.
Here’s an example of such a template:
tf_resources
- aws
| | - template_1
| | | - main.tf
| | | - variables.tf
| | …
| | - template_2
- azure
  | - template_1
...Implementing the API server, validation, and database is outside the scope of this article. Let’s try to obtain the current state of our cloud assets to check if we can continue with deployment or if there are any obstacles. In the next section, we describe this process for AWS, but it will be nearly identical for other cloud environments.
1. Query the state of cloud resources with Python client libraries
Let’s say we need to check the state of some resources on Amazon Elastic Compute Cloud (EC2). We can start with initializing our library and perform API calls to find out if we can deploy more virtual machines (VMs) before actual provisioning. For demonstration purposes, we’ll skip error handling.
Here’s what this operation looks like:
#!/usr/bin/env python3
import boto3

AWS_REGION = "us-east-2"

ec2_client = boto3.client('ec2', region_name=AWS_REGION)
quota_client = boto3.client('service-quotas', region_name=AWS_REGION)


deployed_vpcs_response = client.describe_vpcs(
	Filters=[
   	{
     	'Name': 'tag:Name',
     	'Values': ['*',]
   	},
	]
)

deployed_vpc_count = len(deployed_vpcs_response['Vpcs'])

service_quota_response = quota_client.get_service_quota(
	ServiceCode='My_ServiceCode',
	QuotaCode='My_QuotaCode'
)

service_vpc_quota = int(service_quota_response['Quota']['Value'])

if deployed_vpc_count >= service_vpc_quota:
# Error, No more room available for new vpcWe can get information on other assets with similar commands. You can learn more about the APIs, request parameters, and response schemes in AWS documentation for the EC2 client and Service Quota client.
2. Prepare Terraform input files
It’s best to keep configurations for various resources in different files to make your infrastructure more manageable, transparent, and resilient. Here’s an example of such grouping:
- TF-Working-dir

  | - main.tf # Define primary resources

  | - variables.tf # Define deployment parameters

  | - output.tf # Configure provisioning output scheme that can be obtained by terraform output command after provisioning

  | - modules.tf # Define group of resources used together

  | - requirements.tf # Required providers with versions

...The skeleton for our parametrized deployment can look like this:
FILE: main.tf

provider "aws" {
  region = var.aws_region
  access_key = var.aws_access_key_id
  secret_key = var.aws_secret_access_key
}Next, let’s add definitions for our parameters:
FILE: variables.tf

variable "aws_region"{
  description = "AWS region"
  type = string
  default = "us-west-2"
}
# ...Configuring output can be tricky depending on what information you need to get back after deployment. That’s why we need to define resources this way:
resource "aws_instance" "my_deployment" {
  ami = …
  instance_type = …
}Then, let’s use the template module for AWS-VPC and return, for example, its ID by adding this code:
FILE: output.tf

output.tf output "my_deployment_id" {
  value = aws_instance.my_deployment.vpc_id
}You can check the modules registry documentation to find specific data descriptions.
3. Configure the Terraform wrapper for Python
Now we have two packages of files: Terraform binaries and a Python library for dispatching data and actions from Python code to binary. We need a Python layer to call Terraform actions from the Python side.
We can create such a layer with the following input:
#!/usr/bin/env python3
import logging
import os

from python_terraform import Terraform


# Path to directory with terraform input files
working_dir = "./tf_work_dir"

state_file_name = "terraform.state"

# Save state in working dir for now

state_file_path = os.path.join(working_dir, state_file_name)

# Initialize terraform
py_terraform = Terraform(working_dir=working_dir, state=state_file_name)
_init_ret_code, _init_stdout, _init_stderr = py_terraform.init()

# Parametrize the deployment with variables:
variables = {
   'aws_region': os.getenv("AWS_REGION"),
   'aws_access_key_id': os.getenv("AWS_ACCESS_KEY_ID"),
   'aws_secret_access_key': os.getenv("AWS_SECRET_ACCESS_KEY"),
   # Add more parameters here to parametrize 'variable' values defined in .tf files
}

kwargs = {
   'raise_on_error': True, # Throw exception instead of error-code handling         'var': variables,
}

target = None # Pass in case of specific target
if target:
	kwargs['target'] = target # Run command

_cmd_return_code, _stdout_content, _stderr_content = py_terraform.apply(skip_plan=True, **kwargs)

# Get output configured with 'output' in .tf file
terraform_output = py_terraform.output(state=state_file_path)

logging.debug(terraform_output)Upon executing the snippet, a well-known Terraform output will appear. It’s quite long, so here’s a clipped and cleaned version of the system information:
Terraform used the selected providers to generate the following execution plan. Resource actions are indicated with the following symbols:
  + create

Terraform will perform the following actions:

  # aws_instance.NAME will be created
  + resource "aws_instance" "NAME" {
  	+ ami                      	= "ami-abcdefabcdef"
  	...
  	+ id                       	= (known after apply)
  	+ instance_type            	= "..."
  	...
  	+ security_groups          	= (known after apply)
  	+ subnet_id                	= (known after apply)
  	...
   	+ network_interface {
    	...
    	}
  	...
	}

  # aws_security_group.NAME will be created
  + resource "aws_security_group" "" {
  	+ arn                	= (known after apply)
   	…
  	+ vpc_id             	= (known after apply)
	}
  ...
  # module.vpc.aws_vpc.this[0] will be created
  + resource "aws_vpc" "this" {
  	+ arn                          	= (known after apply)
  	...
  	+ id                           	= (known after apply)
  	...
	}

Plan: 15 to add, 0 to change, 0 to destroy.

Changes to Outputs:
  + {
 	...
	}
   ...
module.vpc.aws_vpc.this[0]: Creating...
module.vpc.aws_eip.nat[0]: Creating...
module.vpc.aws_eip.nat[0]: Creation complete after 3s [id=eipalloc-abcdef1234567890]
module.vpc.aws_vpc.this[0]: Still creating... [10s elapsed]
module.vpc.aws_vpc.this[0]: Creation complete after 11s [id=vpc-01234567890abcdef]
...

Apply complete! Resources: 15 added, 0 changed, 0 destroyed.

Outputs:

output "my_deployment_id" {
  description = "…"
value = vpc-01234567890abcdefAnd with that, our resources are deployed in AWS and ready to use. From now on, Terraform will maintain the infrastructure according to the configurations we’ve described. You can also use this workflow and these tools to deploy your application in other cloud environments.
Conclusion
Deploying your application in a multi-cloud environment comes with many business benefits and DevOps challenges. Using Python and Terraform for multi-cloud, you can apply the Infrastructure as Code in a multi-cloud environment to simplify deployment, automate routine tasks, and be on top of your solution’s health at all times.
At Apriorit, we have a lot of experience building multi-cloud environments with various components and tools, while ensuring proper multi-cloud security. Our DevOps team carefully analyzes the requirements and goals to design the most fitting architecture and choose a relevant toolset. We automate and simplify as many processes as possible to make your cloud infrastructure management pain-free.
Bring your next product to the cloud!
Apriorit experts have experience working with multiple cloud environments and infrastructure management tools. Let’s discuss how you can use our experience for your benefit!
Have a question?
Ask our expert!
VP of Innovation and Technology, Canada Branch Director


