 Skip to main content

When repetitive tasks take too much time and effort, automation comes to the rescue. Robotic process automation (RPA) technology allows for creating bot programs that can take over all kinds of tasks: filtering emails, processing financial transactions, and more.
In one of our previous articles, we showed you an example of using UIPath for preparing performance testing data. This time, we continue exploring the capabilities of RPA technology and discuss a practical example of its implementation with another popular tool — Automation Anywhere. We overview the key capabilities of this platform and show you step by step how to make a task bot in Automation Anywhere.
Contents:
What you need to know about Automation Anywhere
Automation 360, more commonly known as Automation Anywhere, is a platform for creating, configuring, integrating, and executing bots. The platform comes in two editions:
- Community Edition is a free web-based version of Automation 360. This version has somewhat limited functionality and is aimed at individual users and small businesses.
- Enterprise Edition is the full version of the Automation 360 platform, with support for both on-premises and cloud-enabled deployments.
Note: At the time of writing, Automation Anywhere continues to support the latest editions of the Automation Anywhere Enterprise platform while enabling migration from Enterprise 10 and Enterprise 11 to Automation 360.
The platform’s architecture is based on three main components:
- Control Room — A centralized service providing management capabilities for all bots
- Bot Creator — A client that creates new bots with minimal human intervention
- Bot Runner — The software machine responsible for running your bots
Below, we outline the key differences between the Community and Enterprise editions of Automation 360:
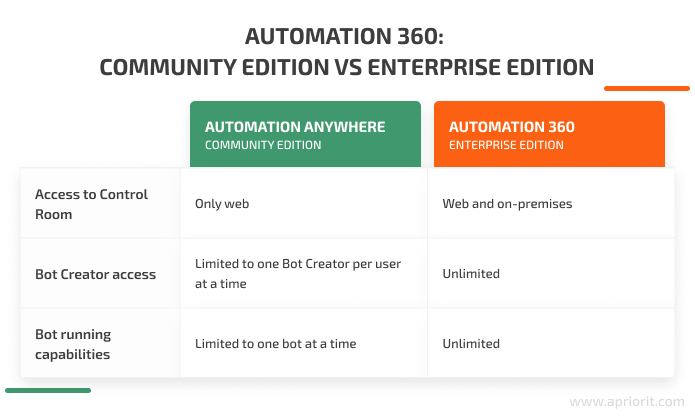
As you can see, while some capabilities in the Community Edition are limited, it is sufficient for automating small processes. In this article, we’ll showcase a practical example of bot implementation using the Community Edition of the Automation 360 platform.
How to automate tasks with Automation Anywhere bots
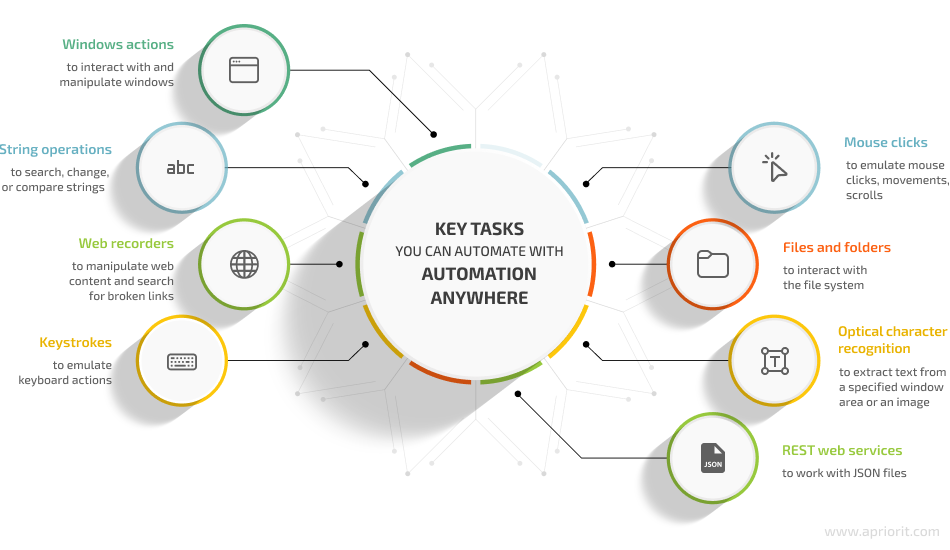
RPA enables the automation of routine tasks through bots — special programs that execute a set of predefined actions according to a chosen algorithm. You can create bots in Automation Anywhere for automating different tasks:
Configuring bots in Automation Anywhere can be tricky, as it requires a precise understanding of component dependencies, connections, and configuration peculiarities. Let’s go over some of the basics of creating and configuring bots with this platform.
First, you need to register in the Automation 360 system and install a Bot agent — an application that connects your device to the Control Room and enables you to run bots on this device. For instance, before building and deploying a bot, the Bot agent checks variables and uploads missing ones if needed. Automation Anywhere provides a detailed description of the installation process in their documentation.
To create and manage a bot, you’ll need a machine with the Bot agent installed and a web browser with the Automation Anywhere extension. To run the bot on different clients, add all those clients to your Control Room.
Note: While the platform supports all popular web browsers, Automation Anywhere advises using Google Chrome. Some operations, like registering a new device, can only be done in the Google Chrome browser.
Creating a bot in Automation Anywhere is a drag and drop process that consists of four steps:
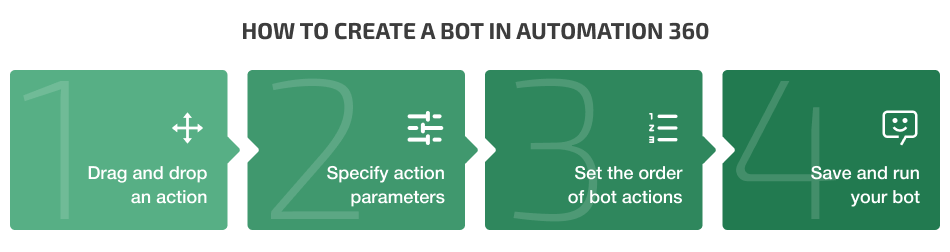
1. Drag an action from one of eight tasks and drop it into the list of bot actions.
2. Specify the parameters for this action: variables, addresses, etc.
3. Repeat Step 1 and Step 2 for every action you want your bot to execute.
4. Set the order of all bot actions.
5. Click Save and Run to execute your bot.
If a bot fails, the platform will automatically send you an email notification containing all error details.
Note: When Automation Anywhere runs a bot, all interactions programmed in this bot go through the Windows GUI. Therefore, a user of the machine where you execute this bot might accidentally interfere with the process, especially if the bot is programmed to perform actions like mouse clicks and movements.
Now, let’s see how to build a bot in Automation Anywhere in practice based on the example of creating a report collecting bot.
A practical example of creating a report collecting bot
To automate tasks with Automation Anywhere bots, you first need to decide what kinds of actions you want these bots to perform. Let’s start with defining a core scenario for our practical example.
Say there’s a team where each member sends a weekly report via email at the end of the week. The task for a bot is to gather all these reports and send them together to the final recipient. This is how you can do it with Automation Anywhere:

Step 1. Create a credential variable
A credential variable stores the credentials of different users separately from the bot structure. This allows you to use the same bot for different users.
But before you create a credential variable, you need to create a locker, as it’s necessary for working with credentials.
Note: A locker is used to group related sensitive information that’s included in automation tasks in the form of credentials and can be shared with other users. If you don’t want to use the same credential variable for different bots, you can just hardcode the credentials inside the bot structure (in this case, go straight to Step 2).
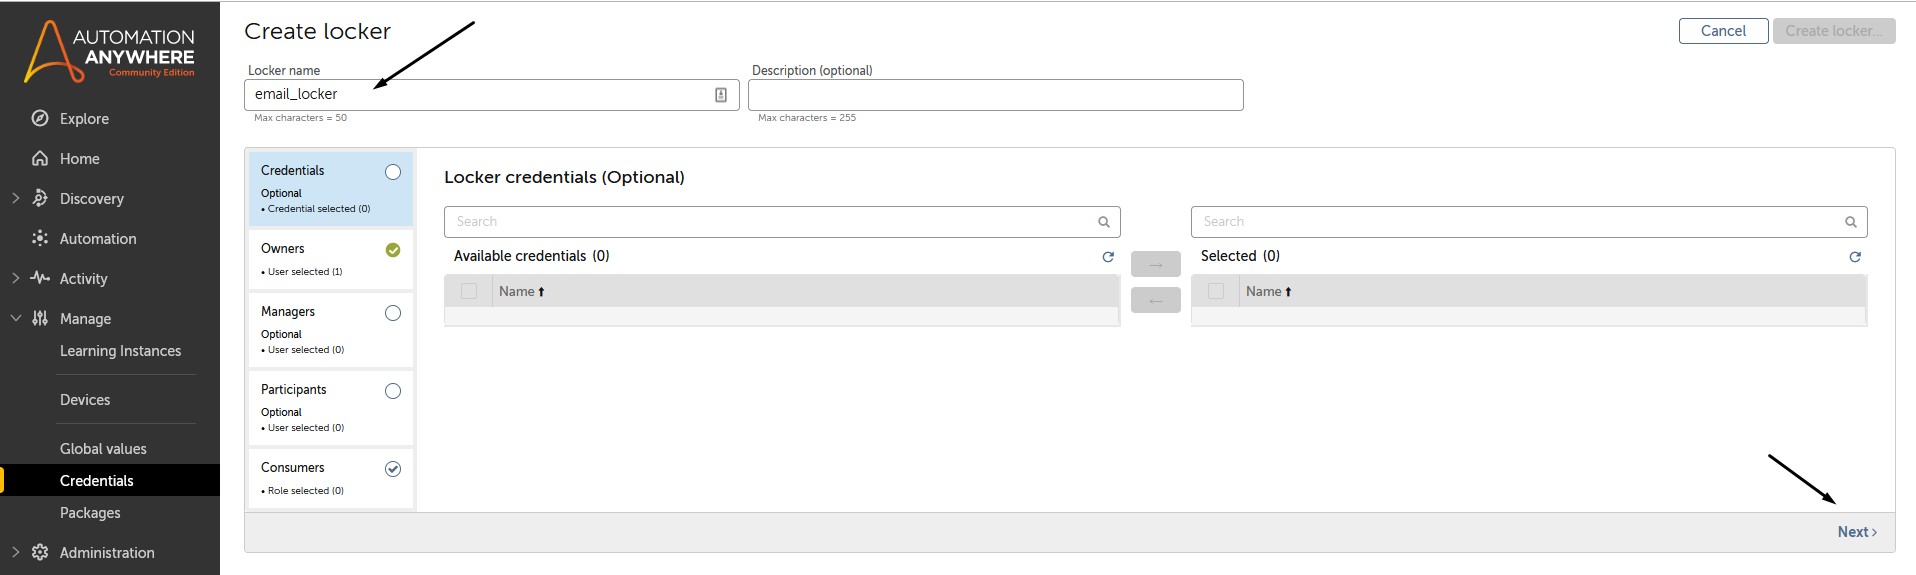
1. Open the Credentials menu, go to the Lockers tab, and click the Create locker… icon.
Screenshot 1. Creating a locker
2. Enter the locker’s name and click Next.
Note: If you have already created a credential variable without an assigned locker, you can assign it to your newly created locker in this tab.
Screenshot 2. Setting a locker’s name
3. Select the owner who can access this locker. By default, Automation Anywhere sets the current user as a locker’s owner.
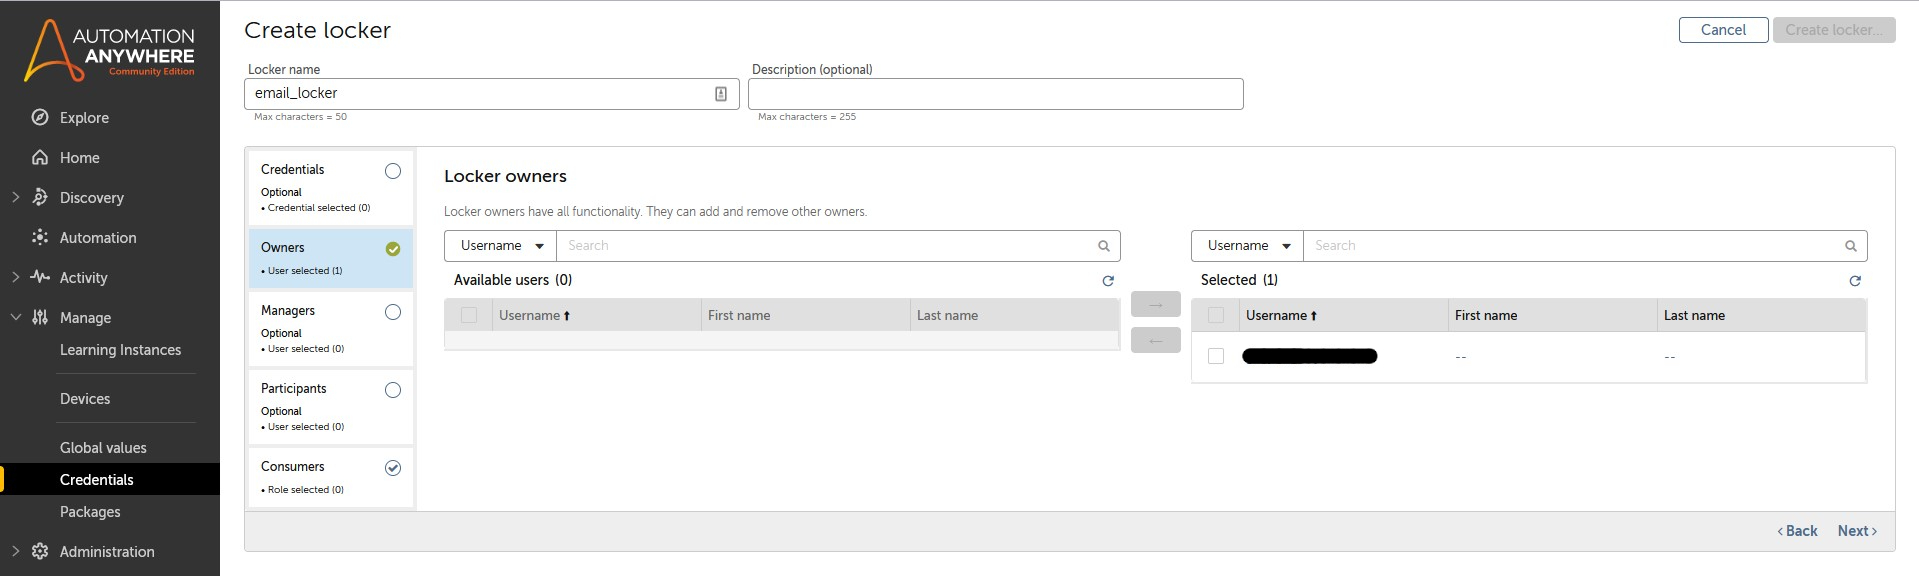
Screenshot 3. Selecting a locker’s owner
4. Filling in the information on the Managers and Participants tabs is optional. Since in this example we’ll be using a single account for creating and using the bot, we can skip these steps.
In the Consumers tab, select the available role and save the locker by clicking the Create locker… button.
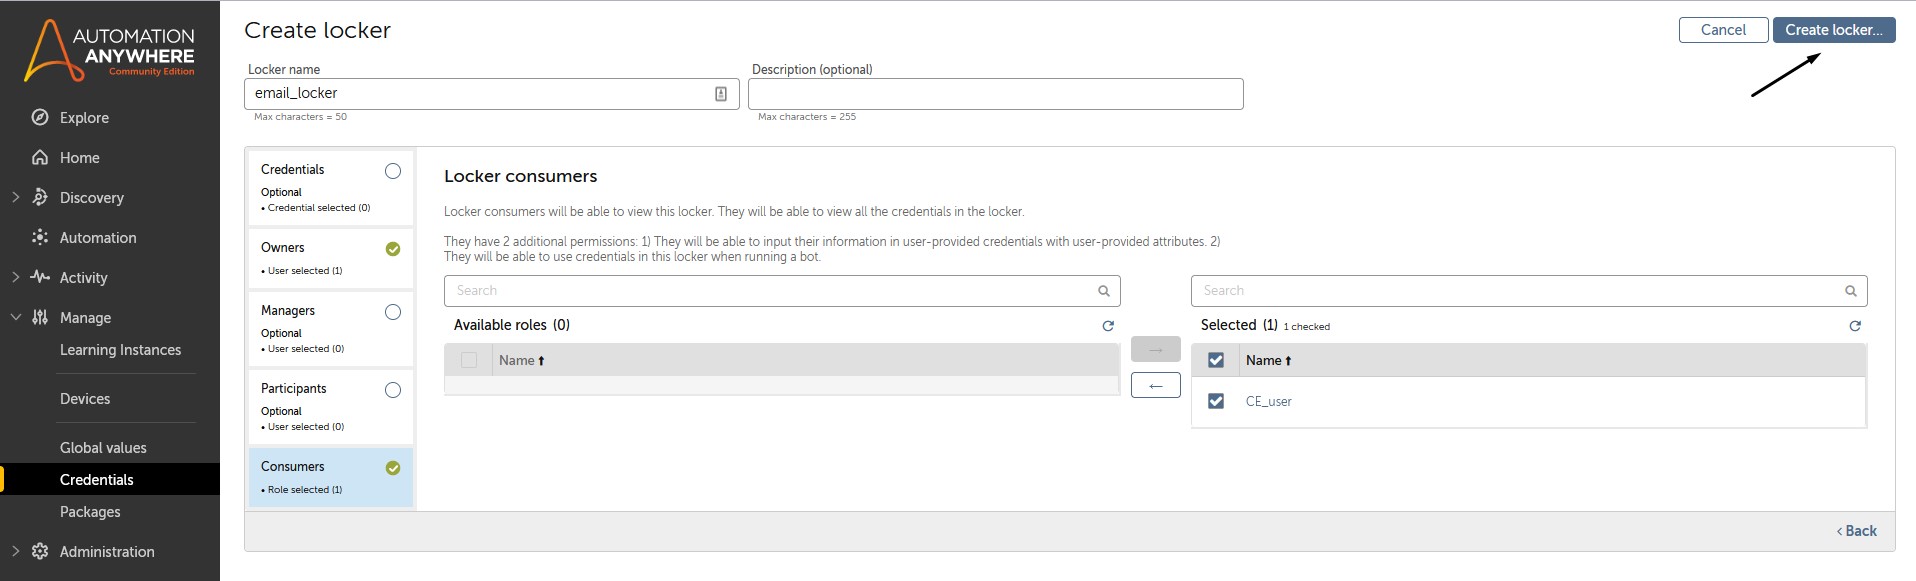
Screenshot 4. Specifying locker consumers
5. Next, go to the Credentials tab and click the key icon to create a new credential variable.
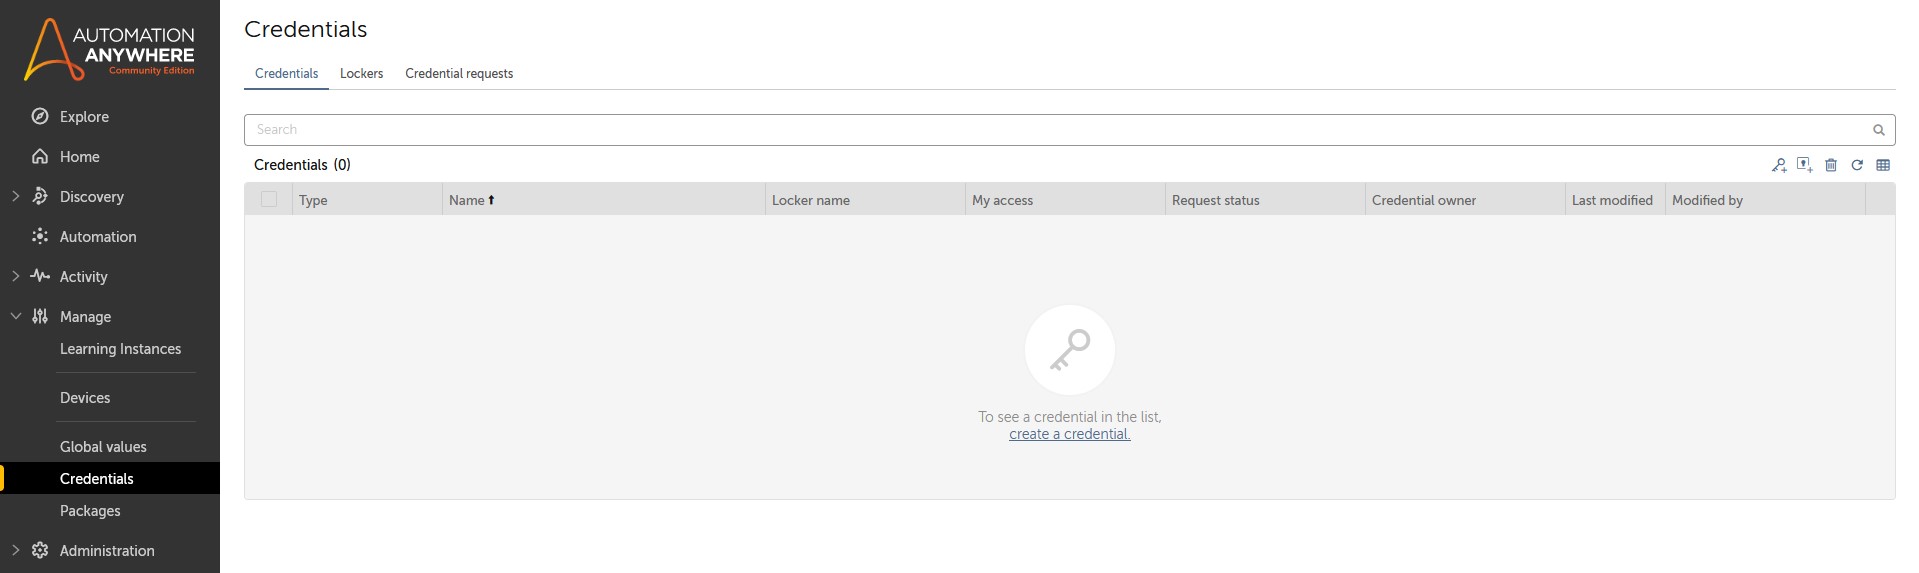
Screenshot 5. Creating a credential variable
6. Enter the name of the credential variable and select the locker that can use it.
7. Enter the required values and click the Create credential… button.
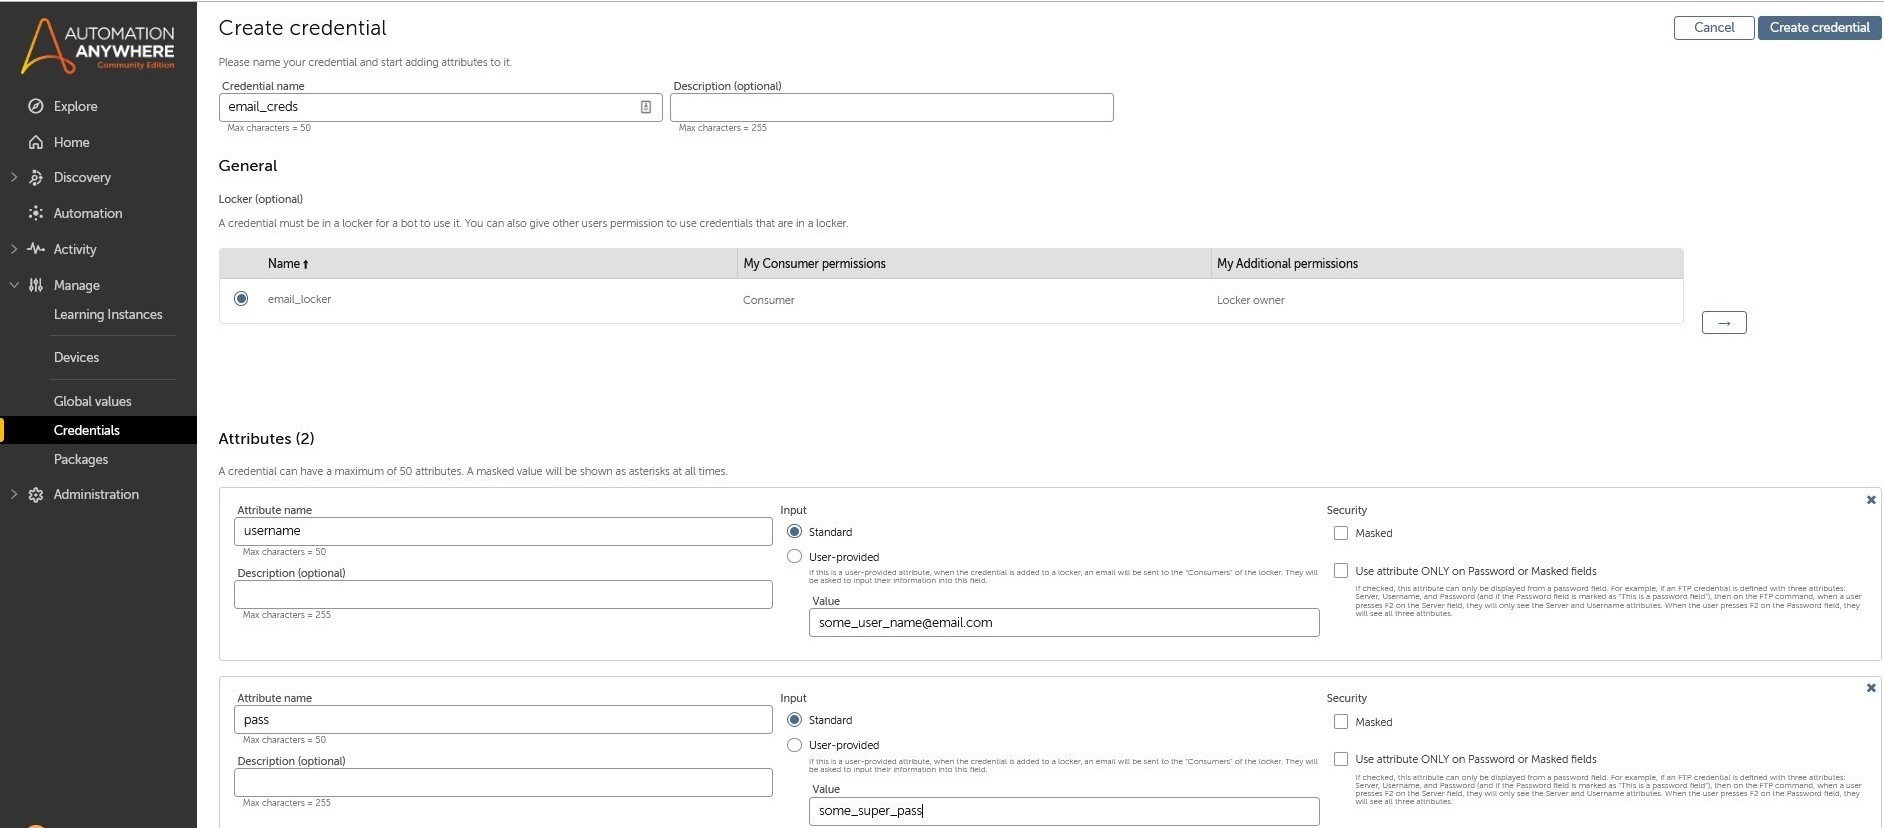
Screenshot 6. Configuring a credential variable
Read also:
Infrastructure Automation: 7 DevOps Tools for Orchestration, Secrets Management, and Monitoring
Step 2. Create a bot
To create a bot, go to the Automation menu and click Create a bot.

Screenshot 7. Creating a new bot
In the opened window, enter a name for the bot and click Create & edit.
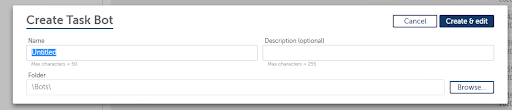
Screenshot 8. Creating a new bot
After that, you’ll see the flow of the created bot.
Step 3. Create a file to store reports
Once you’re done building an Automation 360 bot, your next step is to create a new file where gathered reports will be stored.
1. Add a new element to the flow by dragging and dropping it to the required position.
2. Enter the directory where the file containing gathered reports will be saved.
3. Since the Enter text in the log field can’t be empty, add a space in it.
4. Select the Overwrite existing log file option to create a new file each time the bot executes.
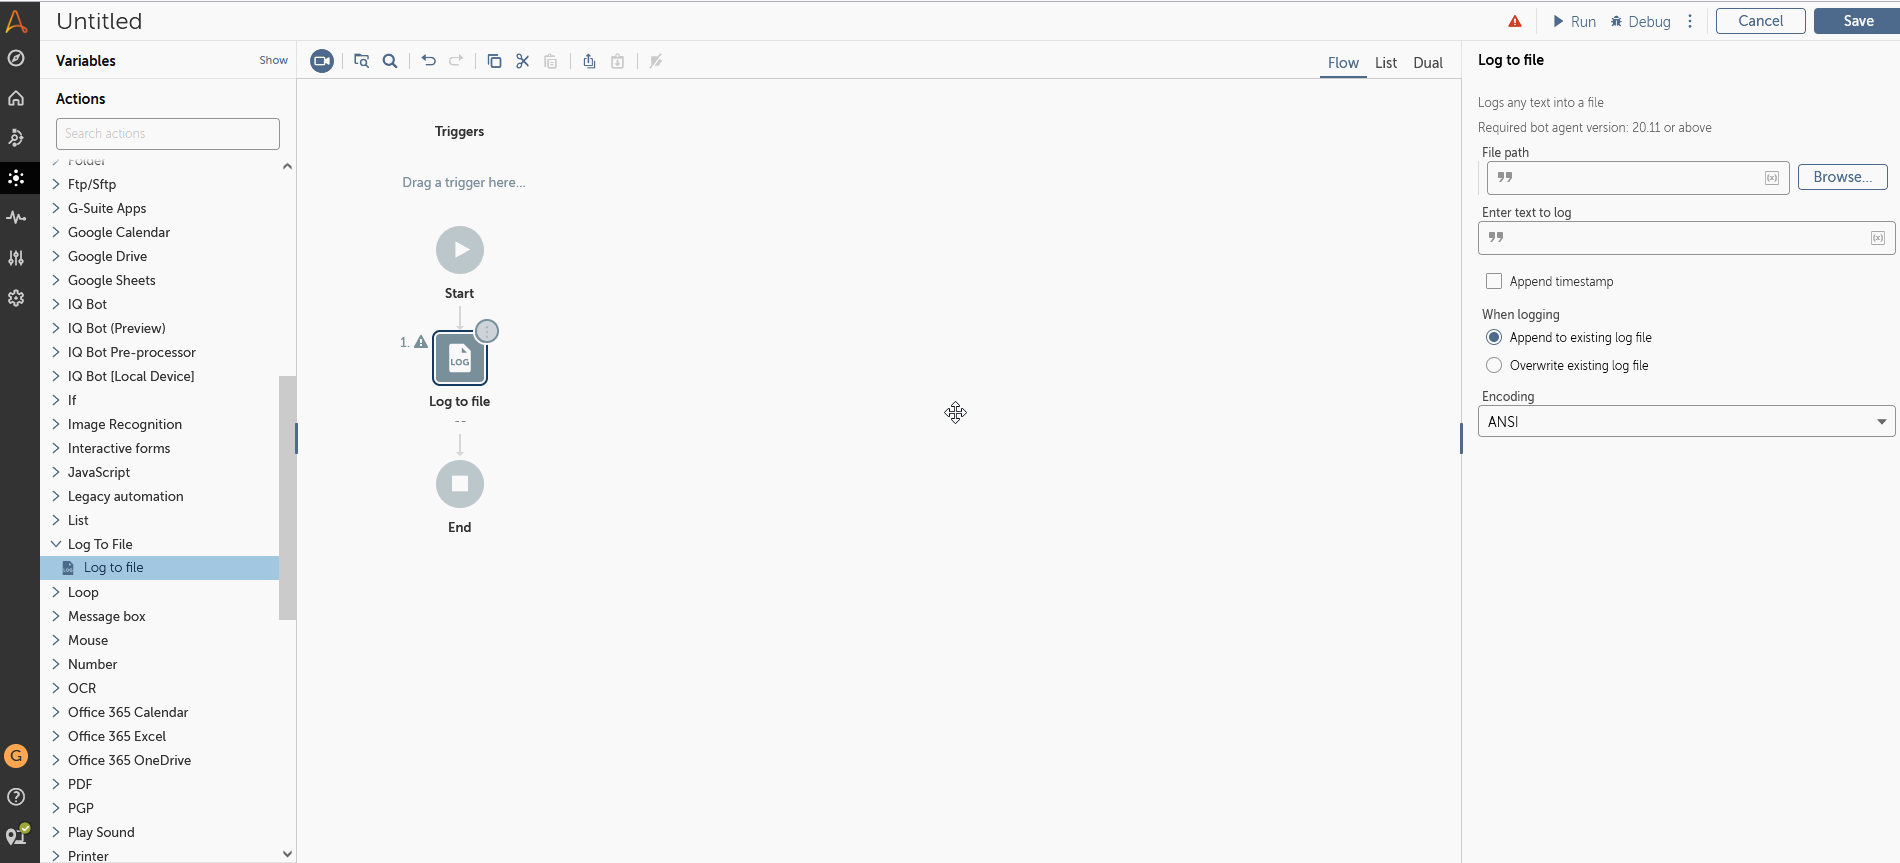
Screenshot 9. Configuring the Log into file action
Step 4. Connect to the email server
Once you’ve specified the path to the file storage, you need to connect to the email server and find the emails with reports.
1. Add the Email: Connect action to the flow.
2. Set the host and port for the email server.
3. Click the Pick button and select the variables in the Locker, Credential, and Attribute fields.
4. Save the parameters of this action.
Note: You can also create and use special variables for setting the address and the port of the email server in case you need your bot to use different servers with different parameters.
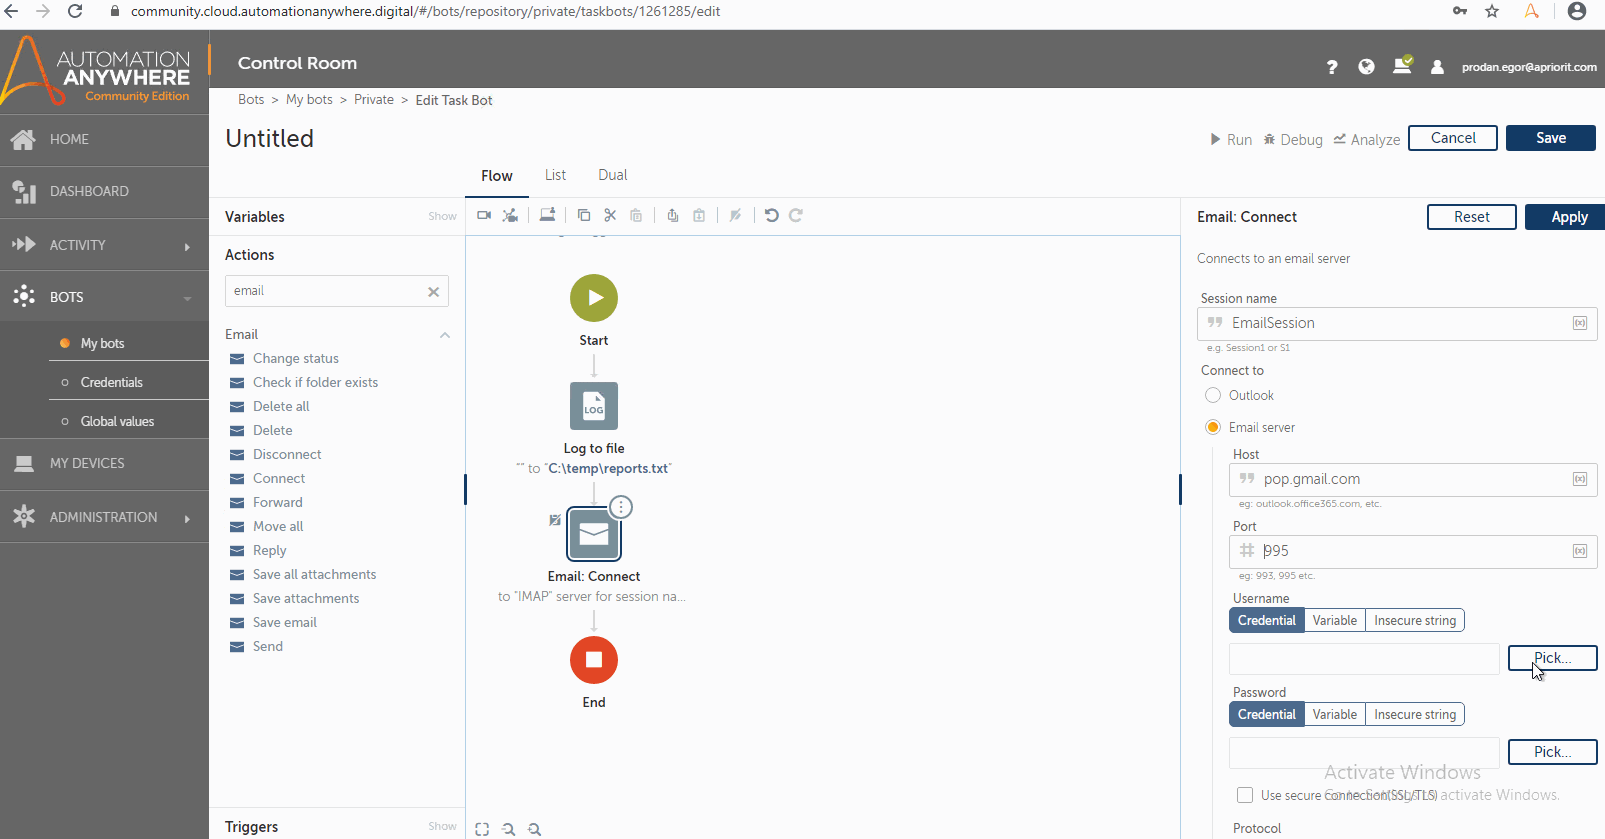
Screenshot 10. Picking credentials
Step 5. Set a loop
To make the bot check all emails from the server and select only messages with weekly reports, we need to set a loop.
1. Drag the Loop action into the flow.
2. Specify the parameters that the bot will use to filter messages. You can specify the folder, date, subject, and other parameters.
Note: The Subject parameter is case-sensitive.
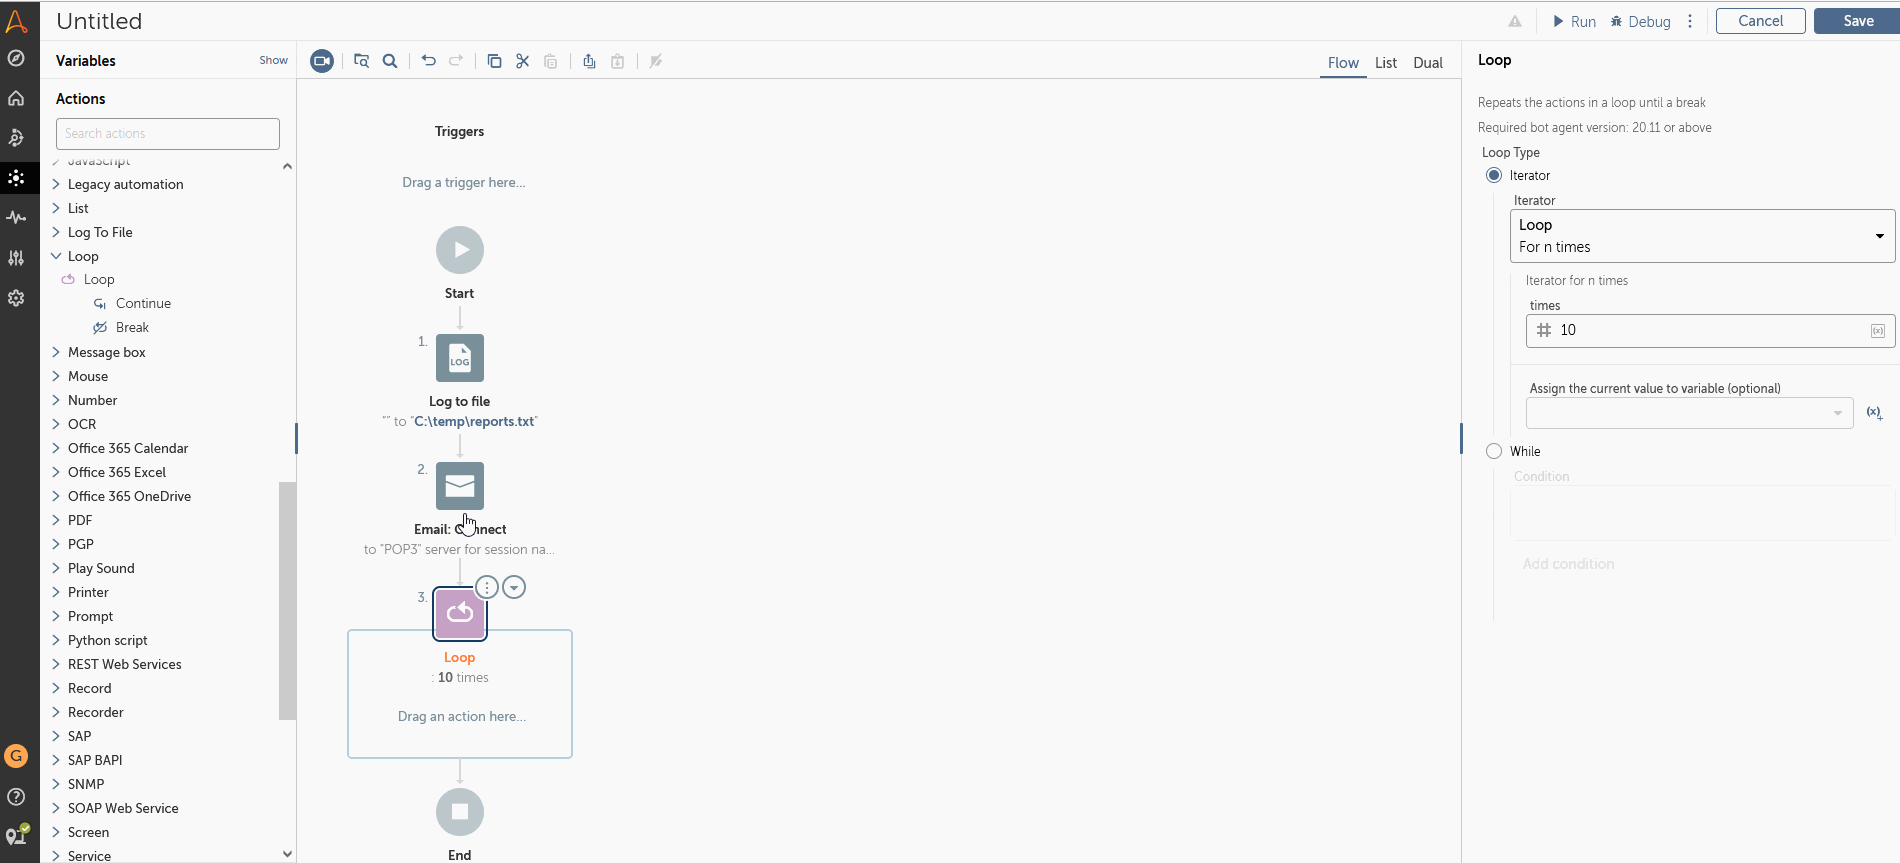
Screenshot 11. Creating a loop
Step 6. Gather data from emails
Now that your bot can select the required messages, you need to get information from them. Each email will be stored in the Dictionary emails value.
Note: For an action to be applied to all emails, it should be placed inside the loop. If you place an action outside the loop, it will be applied only once to the latest email processed by the bot.
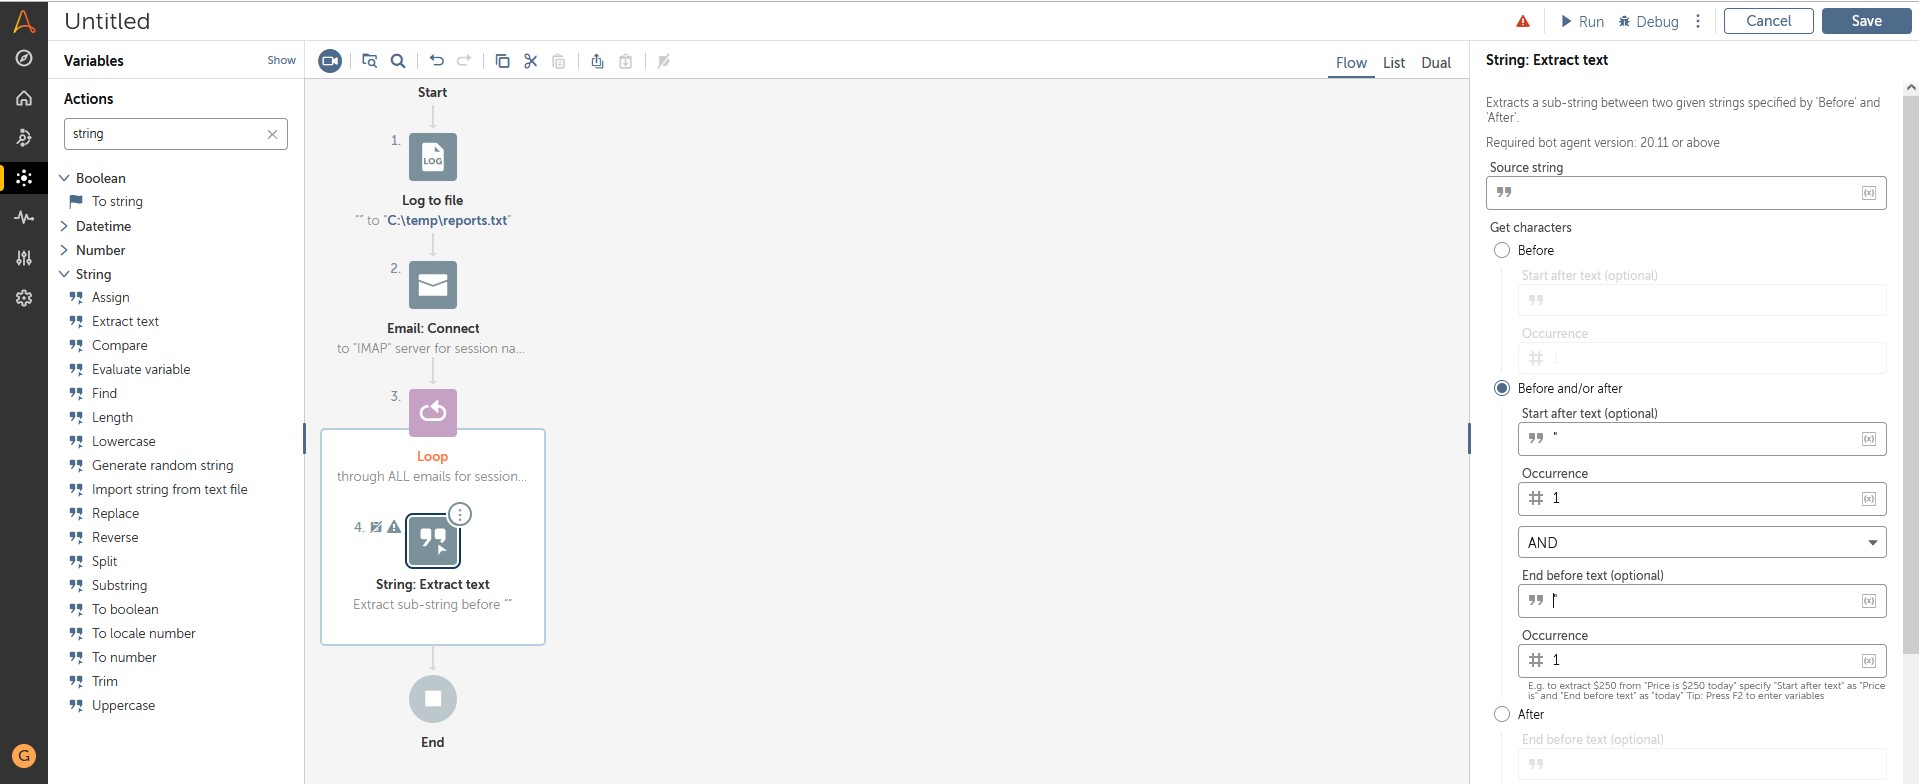
Let’s start with getting the email from value and trimming only the name of the sender.
1. Add the String: Extract text action to the loop
2. Select the Source string value.
3. Set the Start from and End before values.
Screenshot 12. Creating the String: Extract text action
4. Specify a variable to which the bot will save the results.
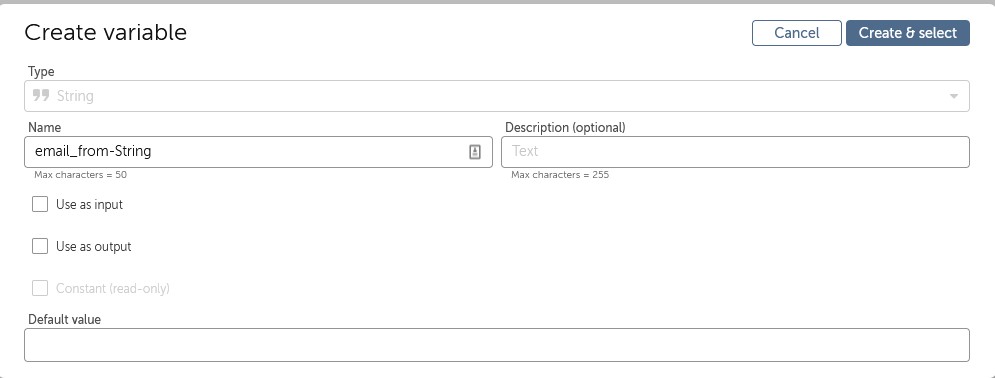
Screenshot 13. Creating a variable to store reports
Step 7. Extract text
Next, you need to extract the body text from the selected email messages.
1. Extract all text content before the signature using the End before text parameter.
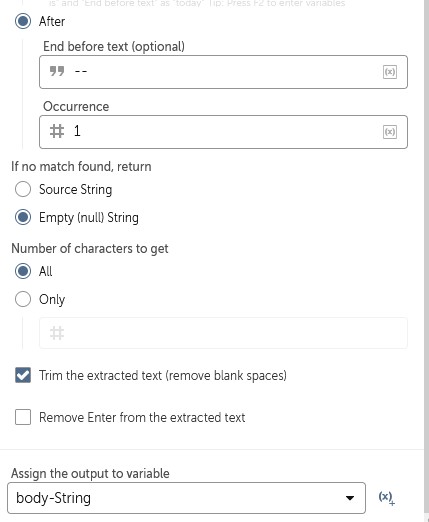
Screenshot 14. Configuring the String: Extract text action
2. Save the body text to a selected variable.
Read also:
The Evolution of Reverse Engineering: From Manual Reconstruction to Automated Disassembling
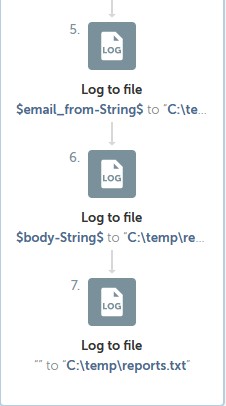
Step 8. Save gathered data
Now that you have the data from all emails, you can save it to a file. Also, you can add an additional empty string between email data to separate reports from each other.
Screenshot 15. Configuring email saving options
After that, your report gathering bot is ready. You can now execute it and get a file containing all the data gathered by the bot.
To automate the process of sending emails with gathered reports, you can add necessary actions to this bot or create an additional bot specifically for this task.
If you receive any errors during bot execution, such as the bot failing to connect to the email server or the output strings having unexpected data, you can run the bot in debug mode and check the values at each step of the flow.
If you need to stop bot execution at a certain step of the flow, you need to add a breakpoint at this step (see Screenshot 16).
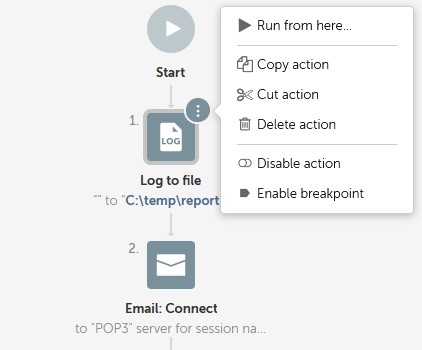
Screenshot 16. Adding a breakpoint to the bot’s flow
And that’s it. Now you know how to create a custom bot for automating tasks using Automation 360.
Conclusion
Bots can significantly speed up repetitive tasks while reducing the risk of human error and ensuring that all activities will be performed in time. With Automation 360, you can create a custom bot for automating eight types of tasks. But to succeed, you need to have a deep understanding of the tool’s workflow and know exactly which actions, variables, and parameters to use and in what order.
At Apriorit, we have vast experience applying top-notch automation tools and approaches to automate simple tasks and complex processes when building and testing software solutions. Get in touch with us to discuss RPA implementation options for your next project.
Have a question?
Ask our expert!
VP of Engineering


