 Skip to main content

Android applications collect all sorts of sensitive data about their users: financial records, personal preferences, geolocation, and even health metrics. Storing such data provides convenience for the user. However, it also subjects sensitive data to security risks if, for example, the device is rooted.
To enhance data protection, Google suggests encrypting confidential data within internal storage. But doing so with the tools provided by Google can be quite a challenge, since developers have to define the encryption parameters for each file they want to protect. In one of our Android development projects, we decided to create a library that encrypts files conveniently and transparently.
In this article, we walk you through the process of developing a framework to implement a transparent encryption that secures data even if the device is rooted. The article will be useful for Android app development teams that want to make the data encryption process reliable and convenient.
Contents:
- Planning the framework
- Discovering the details of the libjavacore library
- Implementing the interception of read and write functions
- Adding an encryption framework to our test application
- Adding data encryption functions
- Building the framework
- Framework limitations and further improvements
- Conclusion
By default, Google provides Android developers with native tools for data encryption such as the JetPack Security library. Android also encrypts all files in the user’s data partition on the device.
However, to ensure data encryption for a particular application, the app developer has to define which files should be encrypted as well as encryption parameters for each of them. Doing so takes developers a lot of time. It also leaves room for human error in case developers forget to specify a certain file or make a mistake in encryption parameters.
In one of our Android development projects, we decided to create a custom library that we only need to call once to encrypt data. It establishes a framework for automated data encryption, makes the ciphering process clear, and allows us to focus on application development.
As with any project, the first thing for building a transparent encryption framework we needed was a solid plan.
Planning the framework
The encryption process in Android applications is usually hidden from developers. Say an Android developer uses the following code to save the value of SharedPreferences:
SharedPreferences prefs = PreferenceManager.getDefaultSharedPreferences(this);
Editor editor = prefs.edit();
editor.put("key", value);
editor.commit();In this case, this value is already encrypted when written to the file with SharedPreferences. When reading this file, we get back the decrypted value. For the developer, this is an opaque process that they can’t change.
The only way to change the encryption and decryption processes is to gain complete control over them. Somewhere inside the Android app, Java functions call write and read C functions so we can add and return a new value. If we can redirect the execution of these functions to our own functions when write and read are called, we can add encryption and decryption to the process.
But how can we redirect functions?
We have already covered how to redirect functions in shared Linux libraries in our Redirecting Functions in Shared ELF Libraries article. Since Android is a UNIX-like system, we can use the approach we described in that article for this project as well.
Our transparent encryption framework should intercept the execution of the read and write functions and redirect the execution to wrapper functions. Intercepting the read function will initiate the reading and decrypting of file data, and intercepting the write function will initiate preliminary encryption and recording of encrypted data to the file.
Here’s what we need for Android transparent encryption framework development:
- Define the location of the library that calls read and write
- Open the library file.
- Find the symbol that corresponds to read and write functions in the .dynsym section of the library file and save the index of this symbol.
- Find the relocation value in the rel.plt or rel.dyn sections of the library file using the saved index.
- Find the location of the original function address, which is the sum of the library address and relocation address.
- Rewrite the original address with the address of the wrapper function.
To implement an encryption framework into android app, we need to know the following:
- Names of the functions we need to intercept
- Addresses of wrapper functions to which we’ll redirect the original functions
- The name of the library and its path in the file system
- The address of the library
We already know that the functions we need to intercept are read and write, and we know the corresponding addresses of the wrapper function. After some research, we discovered that we could get the rest of the needed information from the libjavacore library. Let’s see how to implement an encryption framework to Android application, starting from discovering the address of this library and the path to the library file.
Discovering details of the libjavacore library
After some research, we found that we needed to modify the libjavacore library to intercept read and write functions. This library loads to the application’s process memory when the application starts up.
We can work with objects loaded to application memory using the dl_iterate_phdr function:
int dl_iterate_phdr(
                 int (*callback) (struct dl_phdr_info *info,
                                  size_t size, void *data),
void *data);This function calls the callback function for each object in the application’s memory and passes the pointer to the dl_phdr_info structure that stores data on the loaded object. Here’s what this structure looks like:
struct dl_phdr_info {
               ElfW(Addr)        dlpi_addr; /* Base address of object */
               const char       *dlpi_name; /* (Null-terminated) name
                                               of object */
               const ElfW(Phdr) *dlpi_phdr; /* Pointer to array of
                                               ELF program headers
                                               for this object */
               ElfW(Half)        dlpi_phnum;/* # of items in dlpi_phdr
                                               */
               unsigned long long dlpi_adds;
                               /* Incremented when a new object may
                                  have been added */
               unsigned long long dlpi_subs;
                               /* Incremented when an object may
                                  have been removed */
               size_t dlpi_tls_modid;
                               /* If there is a PT_TLS segment, its module
                                  ID is as used in TLS relocations, else zero */
               void  *dlpi_tls_data;
                               /* Address of the calling thread's instance
                                  of this module's PT_TLS segment if it has
                                  one and it has been allocated in the calling
                                  thread, otherwise a null pointer */
};We are particularly interested in the two fields in this structure: dlpi_addr that contains the address of the loaded library and dlpi_name, with the path to the library file in the file system.
Using this data, we can start intercepting functions.
Intercepting read and write functions
Let’s start by creating the Android library called ldelib. We’ll add it to various applications to encrypt their local data.
To do this, we’ll start a new project in Android Studio without the Activity class. This class helps end users interact with applications, but it has no use in our library. Therefore, let’s delete the following line in the build.gradle file at the application level:
plugins {
    id 'com.android.application'
}We need to substitute it with the following line:
plugins {
    id 'com.android.library
}Now, let’s add the Lde class from Java. Its public functions will become available after we add the ldelib library to the application.
The Lde class loads the native library that will intercept the required functions. It has only one public method, called EnableEncryption. This method accepts the entry with the route to the files directory as a parameter. We’ll use this route to filter files that require encryption as well as to work with the Tink library. EnableEncryption will also call the native Enable function.
To implement the native part of the library, let’s add a C++ module by clicking on the app directory in the Project window and choosing the Add C++ to Module option from the context menu.
In this module, we can define our wrapper functions. At this point, they will only log events and call the original function:
ssize_t ReadHook(int fd, void *buf, size_t count)
{
   LOGI("Hooked read function!");
   ssize_t res = read(fd, buf, count);
   return res;
}
ssize_t WriteHook(int fd, const void *buf, size_t count)
{
   LOGI("Hooked write function!");
   ssize_t res = write(fd, buf, count);
   return res;
}The dl_iterate_phdr function also helps us get the address of the library loaded into memory. The callback function will check if the object’s name corresponds to the library’s name. If it does, the function will add the route to the library and the load address to the libInfo structure. Here’s how the dl_iterate_phdr function works with libraries:
namespace
{
   struct LoadLibInfo
   {
       std::string libPath;
       size_t baseAddress;
   };
   struct DataToCallback
   {
       std::string libName;
       LoadLibInfo info;
   };
}
static int Callback(struct dl_phdr_info *info, size_t /*size*/, void *data)
{
   auto libInfo = static_cast<DataToCallback*>(data);
   if (info->dlpi_name != nullptr)
   {
       std::string libName = info->dlpi_name;
       if (libName.find(libInfo->libName) != std::string::npos)
       {
           libInfo->info.libPath = libName;
           libInfo->info.baseAddress = info->dlpi_addr;
       }
   }
   return 0;
}
LoadLibInfo GetLibInfo(const std::string& libName)
{
   DataToCallback data = {libName, {"", 0}};
   data.libName = libName;
   dl_iterate_phdr(Callback, &data);
   return data.info;
}Now, let’s get back to the Enable function that gets information about the libjavacore library and reroutes the read and write functions to wrapper functions using the elf_hook() function. We covered this function in detail in Redirecting Functions in Shared ELF Libraries. In our case, the elf_hook() function can perform all the steps of our interception plan. Here’s how we can implement it:
extern "C" JNIEXPORT jboolean JNICALL
Java_com_example_ldelib_Lde_Enable(JNIEnv *env, jclass clazz, jstring pathToAppFiles)
{
   auto info = GetLibInfo("libjavacore");

  if (info.libPath.empty())
  {
       LOGE("Failed to set hooks. libjavacore is not loaded into process");
       return JNI_FALSE;
   }
   LOGI("libjavacore is loaded into the process. Path: "%s". Address: 0x%llx", info.libPath.c_str(), info.baseAddress);

   void* originalWriteAddress = elf_hook(info.libPath.c_str(), reinterpret_cast<void*>(info.baseAddress), "write", reinterpret_cast<void*>(WriteHook));
   if (originalWriteAddress == nullptr){
       LOGE("Failed to find "write" function in plt");
       return JNI_FALSE;
   }
   LOGI("Set hook for "write" function. Original address: 0x%llx", reinterpret_cast<size_t>(originalWriteAddress));

   void* originalReadAddress = elf_hook(info.libPath.c_str(), reinterpret_cast<void*>(info.baseAddress), "read", reinterpret_cast<void*>(ReadHook));
   if (originalReadAddress == nullptr){
       LOGE("Failed to find "read" function in plt");
       return JNI_FALSE;
   }
   LOGI("Set hook for "read" function. Original address: 0x%llx", reinterpret_cast<size_t>(originalReadAddress));
   return JNI_TRUE;
}Now we can check how our wrapper functions work by adding our library to our Android application. First, we need to create new application projects. Then, we add the Android Archive (AAR) ldelib dependency by clicking File -> Project Structure, choosing JAR/AAR Dependency, and adding the route to the AAR archive. After that, the build.gradle file will have an implementation files line in the dependencies section that points to the ldelib library.
Next, we add the import package named com.example.ldelib and the Lde class in the MainActivity file. This makes public functions of the Lde class available to the application and allows us to call the EnableEncryption function in the onCreate method.
To check if the interception works, we need to try reading from and writing to SharedPreferences. Since SharedPreferences doesn’t read out of the file when we request a freshly written value, we read the value with key, then write a new pair ”key_1”=”value_1”:
import com.example.ldelib.Lde;

public class MainActivity extends AppCompatActivity {
   @Override
   protected void onCreate(Bundle savedInstanceState) {
       super.onCreate(savedInstanceState);
       setContentView(R.layout.activity_main);
       Lde.EnableEncryption(getFilesDir().getPath());
       SharedPreferences prefs = PreferenceManager.getDefaultSharedPreferences(this);
       String value = prefs.getString("key", "");
       SharedPreferences.Editor editor = prefs.edit();
       editor.putString("key_1", "value_1");
       editor.apply();
   }
}If the hooking works correctly, the logs will contain messages about the new wrapper functions: Hooked read function! and Hooked write function!:
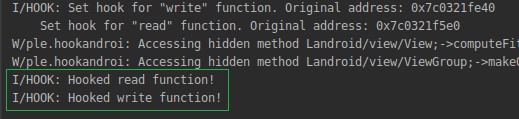
Now, our library can intercept the read and write functions. Our next step is to add this custom transparent encryption framework to Android app and see how it works.
Adding an encryption framework to our test application
Our next step is adding new capabilities to the test Android application that will apply transparent encryption to the data in the sandbox. The application will allow users to:
- Review contacts previously saved in the application
- Add a new contact
- Choose between the app’s light and dark themes
The application stores contact information in the contacts.json file that contains a list of dictionaries. Each dictionary has three fields: name, phone number, and email address. Here’s how records in the contacts.json file look:
# cat files/contacts.json
[{"name":"Test","phone":"+1234567890","email":"<span id="cloak4ee6811626091bce2fc3a957009a3275"><a href="mailto:[email protected]">[email protected]</a></span><script type="text/javascript">
        document.getElementById('cloak4ee6811626091bce2fc3a957009a3275').innerHTML = '';
        var prefix = 'ma' + 'il' + 'to';
        var path = 'hr' + 'ef' + '=';
        var addy4ee6811626091bce2fc3a957009a3275 = 'test' + '@';
        addy4ee6811626091bce2fc3a957009a3275 = addy4ee6811626091bce2fc3a957009a3275 + 'test' + '.' + 'com';
        var addy_text4ee6811626091bce2fc3a957009a3275 = 'test' + '@' + 'test' + '.' + 'com';document.getElementById('cloak4ee6811626091bce2fc3a957009a3275').innerHTML += '<a ' + path + '\'' + prefix + ':' + addy4ee6811626091bce2fc3a957009a3275 + '\'>'+addy_text4ee6811626091bce2fc3a957009a3275+'<\/a>';
    </script>"},
 {"name":"Test1","phone":"+10987654321","email":"<span id="cloak3c2a7ab979d09c330fdae0e68a222264"><a href="mailto:test1@test.com">[email protected]</a></span><script type="text/javascript">
        document.getElementById('cloak3c2a7ab979d09c330fdae0e68a222264').innerHTML = '';
        var prefix = 'ma' + 'il' + 'to';
        var path = 'hr' + 'ef' + '=';
        var addy3c2a7ab979d09c330fdae0e68a222264 = 'test1' + '@';
        addy3c2a7ab979d09c330fdae0e68a222264 = addy3c2a7ab979d09c330fdae0e68a222264 + 'test' + '.' + 'com';
        var addy_text3c2a7ab979d09c330fdae0e68a222264 = 'test1' + '@' + 'test' + '.' + 'com';document.getElementById('cloak3c2a7ab979d09c330fdae0e68a222264').innerHTML += '<a ' + path + '\'' + prefix + ':' + addy3c2a7ab979d09c330fdae0e68a222264 + '\'>'+addy_text3c2a7ab979d09c330fdae0e68a222264+'<\/a>';
    </script>"}]
Information on app settings is stored in SharedPreferences. Since the test application has only one setting — the color theme — this file simply uses 0 for light and 1 for dark.
Here are the contents of our shared_preferences file:
# cat shared_prefs/com.example.lde_test_app_preferences.xml
<?xml version='1.0' encoding='utf-8' standalone='yes' ?>
<map>
    <int name="theme" value="1" />
</map>Adding data encryption functions
We’ll encrypt data in the application sandbox using the Advanced Encryption Standard (AES), which is a symmetric block encryption algorithm. We selected Galois/Counter Mode (GCM) encryption and a 256-bit key length. All files associated with one specific application are encrypted with the same key, and the key is encrypted with the master key created in Android Keystore.
Creating a cryptographic library
We can implement encryption operations with the Tink library, which provides cryptographic APIs to cipher data. Tink currently supports Java, Android, C++, Objective-C, Go, and Python and is available under the Apache License 2.0.
Although Tink supports C++, we’ll use Java to work with encryption primitives because it supports Android Keystore. C++ can only work with key management systems from AWS and Google Cloud Platform.
To start working with Tink, we need to create a separate Java Android library. The native library that describes wrapper functions will communicate with this Java library and call for encryption and decryption methods.
Let’s use Gradle to link Tink to our Android project:
dependencies {
   ...
   implementation 'com.google.crypto.tink:tink-android:1.5.0'
   ...
}To start using Tink, we need to initialize it first. Initialization allows the library user to choose how cryptographic primitives are implemented. For our task, we need only the Authenticated Encryption with Associated Data (AEAD) primitive that supports AES GCM 256 encryption. Here’s how we register it in the encrypt and decrypt methods of the CryptoHelper class:
import com.google.crypto.tink.aead.AeadConfig;
...
AeadConfig.register();
...Now, we can create the encryption key, encrypt the key, and save it to the application sandbox. Tink stores keys in keyset-ах, which contains the key and and associated metadata. We can store the keyset in the JSON file format. It’s best to encrypt this file to ensure the keys are well-protected.
Here’s how we can save and load the keyset:
import com.google.crypto.tink.JsonKeysetReader;
import com.google.crypto.tink.JsonKeysetWriter;
import com.google.crypto.tink.aead.AeadConfig;
import com.google.crypto.tink.KeysetHandle;
import com.google.crypto.tink.aead.AesGcmKeyManager;
import com.google.crypto.tink.integration.android.AndroidKeystoreKmsClient;

public class CryptoHelper {
   private static final String KEYSET_FILE_NAME = "/lde_keyset.json";
   private static final String MASTER_KEY_URI = "android-keystore://LDE_MASTER_KEY";
  ...
   private void storeKeyset(KeysetHandle keyset) throws IOException, GeneralSecurityException {
       String filePath = pathToFiles + KEYSET_FILE_NAME;
       keyset.write(JsonKeysetWriter.withFile(new File(filePath)), AndroidKeystoreKmsClient.getOrGenerateNewAeadKey(MASTER_KEY_URI));
   }
   private KeysetHandle loadKeyset() throws IOException, GeneralSecurityException {
       String filePath = pathToFiles + KEYSET_FILE_NAME;
       File file = new File(filePath);
       if (file.exists()) {
           return KeysetHandle.read(JsonKeysetReader.withFile(file), AndroidKeystoreKmsClient.getOrGenerateNewAeadKey(MASTER_KEY_URI));
       }
       return null;
   }
  ...
}While the read method of the KeysetHandle class is static, the write method isn’t, and it requires us to pass KeysetHandle via parameters to the storeKeyset method, which writes the keyset to the keyset-ах file.
The getOrGenerateNewAeadKey method from the AndroidKeystoreKmsClient class helps us to get the encryption key from the Android Keystore using its pseudonym. This method can also create such a key.
To work with the keyset, we need to know the path to the files of the pathToFiles application. This path is one of the parameters for the EnableEncryption function to work. The keyset is created when we call for the encryption method. First, let’s find the file with the key in the application sandbox. If it isn’t there, we assume the key hasn’t been created yet. So we need to generate the new key and save it to the application filesystem:
KeysetHandle keyset = loadKeyset();
if (keyset == null) {
   keyset = KeysetHandle.generateNew(AesGcmKeyManager.aes256GcmTemplate());
   storeKeyset(keyset);
}The AesGcmKeyManager.aes256GcmTemplate() function returns the key template that determines how to generate a 32-byte key for the AES GCM algorithm. We also call the storeKeyset function, which creates the lde_keyset.json file in the files directory of the sandbox. This file contains the encrypted key. Here’s how our keyset looks:
# cat files/lde_keyset.json
{
"encryptedKeyset": "Cct7zebLSCF42m5llL6WijgAvC9ObLsB7TVjDkIvnWZ4d2xWUdhttcQUrT+BJVhiDoxsTKrNcHuf+gbDlqvDb/c7TqeeLwR0sTQqyYiOhAryZhnl8tSE3vXvn2uaXBsO5U8AxUdzNHmIlaumPrvUPLKoZK/tVHcIHqajweH9OZ2+HfJnxgs1jw==",
"keysetInfo": {
"primaryKeyId": 686385746,
"keyInfo": [
{
"typeUrl": "type.googleapis.com/google.crypto.tink.AesGcmKey",
"status": "ENABLED",
"keyId": 686385746,
"outputPrefixType": "TINK"
}
]
}
}Functions for encryption and decryption first have to initialize the object from the KeysetHandle class and load an existing keyset or generate a new one. After that, we have to get the AEAD primitive by calling the getPrimitive method from the KeysetHandle class and use it to encrypt and decrypt data.
In our example, we don’t have any attached data, so we can pass null to the encrypt and decrypt methods of the AEAD class.
Here’s the last piece of our encryption mechanism:
import com.google.crypto.tink.Aead;
import com.google.crypto.tink.KeysetHandle;
import com.google.crypto.tink.aead.AesGcmKeyManager;
...
public class CryptoHelper {
...
public byte[] encrypt(byte[] plaintext)
{
try {
KeysetHandle keyset = loadKeyset();
if (keyset == null) {
   keyset = KeysetHandle.generateNew(AesGcmKeyManager.aes256GcmTemplate());
   storeKeyset(keyset);
}
Aead aead = keyset.getPrimitive(Aead.class);
byte [] result = aead.encrypt(plaintext, null);
return result;
}
catch (IOException | GeneralSecurityException e) {
Log.e(TAG, "Failed to encrypt data. Error: " + e.getMessage());
return null;
}
}
public byte[] decrypt(byte[] encrypted)
{
try {
KeysetHandle keyset = loadKeyset();
if (keyset == null) {
return null;
}
Aead aead = keyset.getPrimitive(Aead.class);
byte [] result = aead.decrypt(encrypted, null);
return result;
}
catch (IOException | GeneralSecurityException e) {
e.printStackTrace();
Log.e(TAG, "Failed to decrypt data. Error: " + e.getMessage());
return null;
}
}
}Building the framework
Now, we can combine the previous two stages and configure the call for encryption and decryption in wrapper functions. So let’s start adding an encryption framework to android app. To work with both ReadHook and WriteHook methods, we need the CryptoHelper Java class. We can call this Java class using Java Native Interface (JNI).
This mechanism is needed to perform the following steps:
- Find the Java class in the list of directories provided when the Java virtual machine was initialized
- Get the identifier of the constructor method
- Create a new Java object
- Get the identifier of the targeted method
- Call the targeted method for the object
Each of these steps requires us to use JNIEnv — a pointer to the structure that stores pointers to all JNI functions. The JNIEnv pointer is one of two additional parameters we can find in the signatures of native methods called from the Java code. However, this pointer is a local reference, which means we can use it only in the thread it was sent to; it stops working when it gets out of the native method.
Our ReadHook and WriteHook methods aren’t called from the Java code directly, and they still need JNIEnv. But we can store the pointer to JavaVM, from which we can get JNIEnv any time we need it. We can get the pointer to JavaVM using the GetJavaVM function:
JavaVM* g_vm;
env->GetJavaVM(&g_vm);Then, we can get the pointer to the JNIEnv from JavaVM with the GetEnv function:
JNIEnv* JvmWrapper::GetEnv()
{
    JNIEnv *env;
    int status = m_jvm->GetEnv(reinterpret_cast<void**>(&env), JNI_VERSION_1_6);
    if (status != JNI_OK) {
        return nullptr;
    }
    return env;
}This code may be executed in a thread that isn’t attached to the Java VM. In this case, the GetEnv function will set the JNIEnv value as null and return the JNI_EDETACHED status. In theory, we can handle this situation using the AttachCurrentThread function that adds the required thread to the Java VM and returns the JNIEnv pointer. But since our application doesn’t support multithreading, there’s no need to do that.
Both the ReadHook and WriteHook methods need a reference to the CryptoHelper class. By default, this is a local reference, but we can turn it into a global reference using the NewGlobalRef function:
auto randomClass = env->FindClass("com/example/cryptohelper/CryptoHelper");
m_cryptoHelperHandler = reinterpret_cast<jclass>(env->NewGlobalRef(randomClass));When the application stops working, we need to delete this reference with the DeleteGlobalRef function. Otherwise, the reference may cause a resource leak.
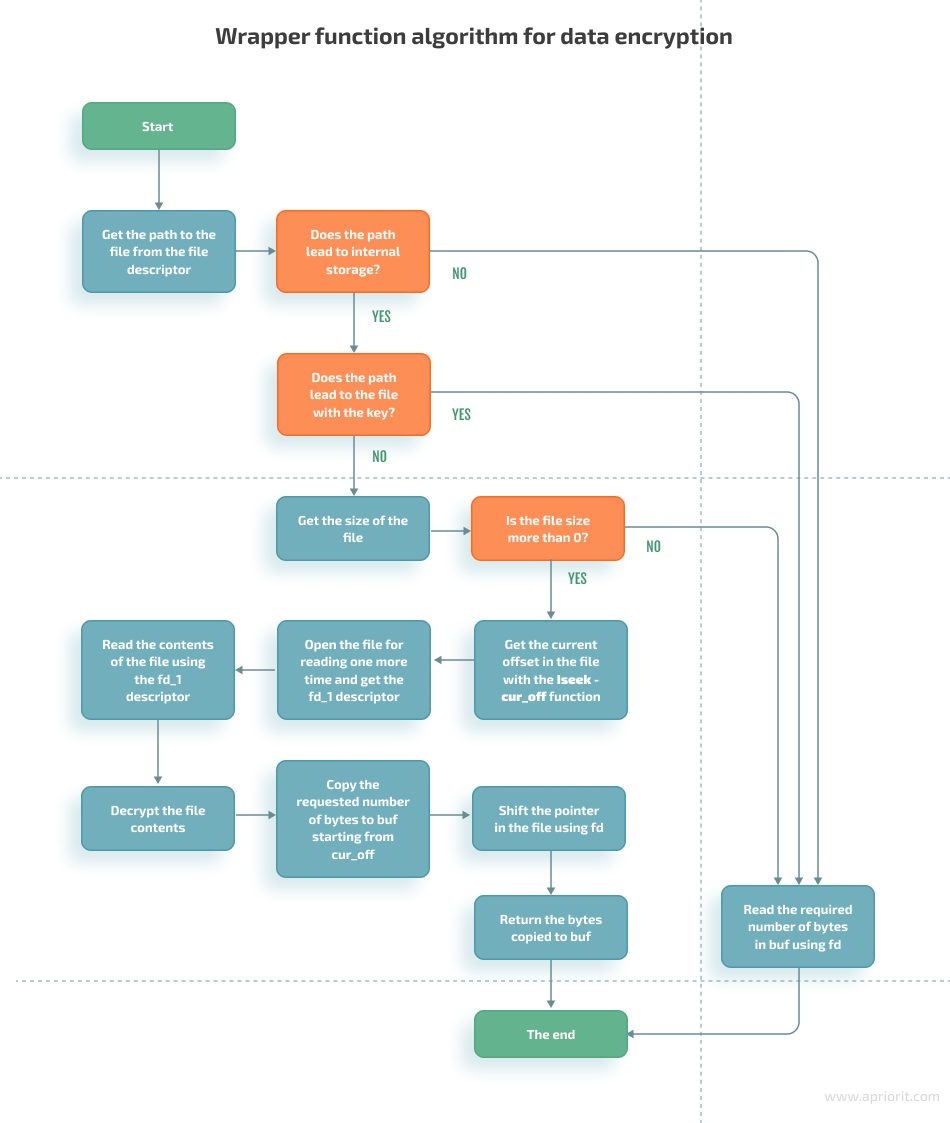
Algorithms of wrapper functions
Let’s examine how our wrapper functions work. To read data, they:
- Get encrypted contents of the necessary file
- Decrypt the contents
- Return the requested decrypted data if possible
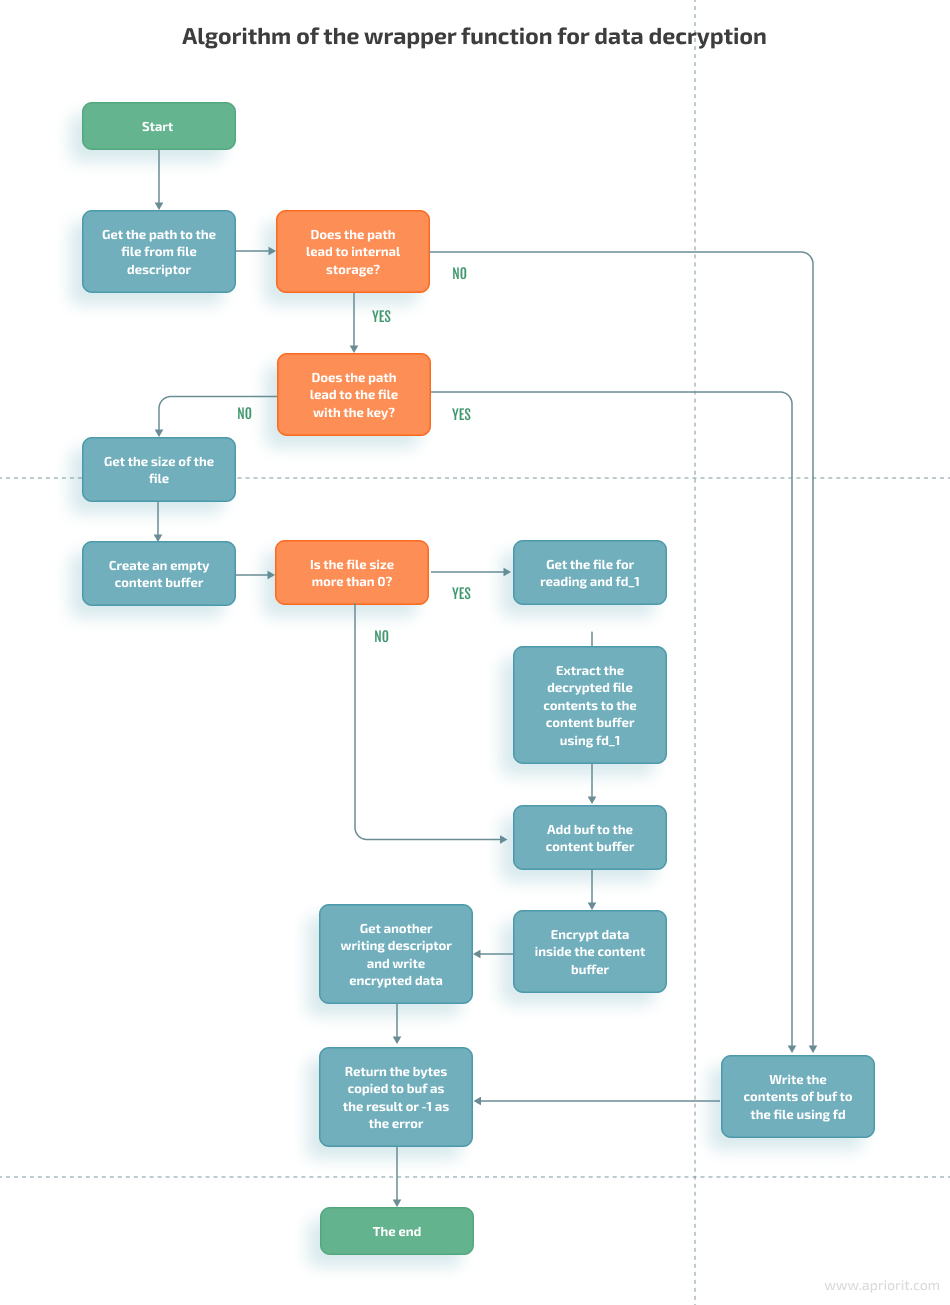
When writing, our function rewrites the whole contents of the file with two simple steps:
- Encrypt the data we want to add to the file
- Rewrite the file with the new encrypted data
However, this algorithm works only if we can write all necessary data in one iteration. If we need to write a lot of data, we have to add options for portioned reading and writing. The framework also shouldn’t encrypt anything but files in the application’s sandbox, excluding the keyset file necessary for Tink. The wrapper functions have to be able to check the location of the file they work with and its name, which should be different from lde_keyset.
We can discover the name of the file if we know the descriptor and use the readLink function:
std::string GetPathByFd(int fd)
{
    char filePath[PATH_MAX];
    std::string processDescriptors = "/proc/self/fd/" + std::to_string(fd);

    if (readlink(processDescriptors.c_str(), filePath, PATH_MAX) == -1)
    {
        LOGE("Failed to get file path via fd. Error: %s", strerror(errno));
        return std::string();
    }
    return filePath;
}With these details in mind, let’s take a look at the algorithms of our wrapper functions. The read function has the following initial data:
- fd — descriptor of the file that contains encryption data
- buf — pointer to the buffer that should contain read data
- count — size of data that the wrapper function has to read
Here’s how the wrapper function works:
The write function has the following initial data:
- fd — descriptor of the file to which the function writes data
- buf — pointer to the buffer that contains data for writing
- count — size of the data for writing
The algorithm for this function is somewhat similar to the read function:
Framework limitations and further improvements
We created a framework for transparent data encryption for Android sandbox. Our wrapper functions are designed to work in the test application with shared_preferences and JSON files.
In its current state, our solution covers only the basic use of read and write functions. It can’t work with multithreaded applications or open files with O_APPEND, O_ASYNC, O_CLOEXEC, O_DIRECT, O_DIRECTORY, O_DSYNC, O_EXCL, O_NOATIME, O_NOCTTY, O_NOFOLLOW, O_NONBLOCK, O_PATH, or O_SYNC flags.
Our framework also may experience performance limitations because we used a block encryption algorithm. Compared to stream encryption algorithms, AES requires more computing power to cipher large files. We used AES in our sample framework since it’s generally recommended to encrypt local data.
We can further improve our framework by:
- Transferring encryption processes from Java to native code. This would allow us to get rid of resource-demanding calls for JNI. To do it, we would also have to substitute Tink with another library such as LibTomCrypt — a simple library in the public domain that doesn’t require a lot of resources.
- Implementing stream encryption. A new encryption algorithm will improve the framework’s performance and be able to write data without decrypting all file contents.
Conclusion
The sample framework we created allows for encrypting and decrypting files in the app sandbox without slowing down the application itself. With it, we can protect our app’s sensitive data even on a rooted Android device.
Our mobile app development and cybersecurity experts are working on building an encryption framework to secure Android app ways to make it even more useful for real-life projects.
Reach out to learn how we can help you ensure data protection for your Android application!


