 Skip to main content

When developing Angular applications, data management can quickly become complex and chaotic. Application state management is the process of managing user session data and synchronizing it between an application UI and databases. When the application state is properly managed, users can enjoy a seamless experience, which in turn leads to increased user satisfaction. For businesses, effective state management can streamline development and reduce maintenance costs.
To streamline the process of state management, you need a dedicated tool that can manage and track data for the entire application in one place. One way to create reliable and fast data storage for your Angular application is by using the NgRx Store library.
In this article, we discuss the specifics and importance of state management with NgRx and Angular as well as ways to efficiently manage your application’s state with the NgRx Store library. We also share Apriorit’s own experience deploying reliable and fast storage with the NgRx Store library. This article will be useful for business owners and developers who want to improve the performance of their Angular applications and prevent scalability issues related to their growth.
Contents:
State management in Angular applications
Data management is one of the main challenges of any large project. When working with a large amount of data asynchronously, an application becomes entangled with dozens or even hundreds of connections between components. This leads to tracking data changes, coupled with an ever-increasing amount of code. As a result, you end up with multiple bugs, and fixing them can be time-consuming and inefficient. You also need to update the state in a predictable and efficient manner, which becomes more and more challenging as your app grows.
Web application state management is the process of synchronizing data between different parts of the application to make sure all parts are working with the same data and state. The application state includes components and data structures that are stored and maintained by the application, including:
- User preferences
- Application settings
- Data retrieved from an external API
When you build an Angular application, ensuring proper state management is a must in order to provide your end users with a satisfying and efficient experience from any device or platform.
From Apriorit’s experience, we know that when establishing proper state management for your Angular application, you can face various challenges. For example, you can have issues making sure that state changes are synchronized across all related application components. This is especially true for large applications with lots of components and complex data dependencies. To address this issue in advance, developers need to carefully plan the application architecture and consider state management and data flow from the outset. One of the tools that can help you manage this issue is a well-designed state management architecture.
Create a reliable, secure, and fast storage for your web app.
Reach out to learn how our custom development services can deliver a solution that sets you apart from the competition.
Data flow in different architectures: from MVC to NgRx
Every web application has a certain architecture at its core. The architecture consists of the underlying structure and design of the web application, including how its components and data are organized and interact with each other.
Model–View–Controller (MVC) was one of the first widely used architectures. The primary purpose of MVC was to improve the organization and maintainability of the application by separating concerns and reducing coupling between components.
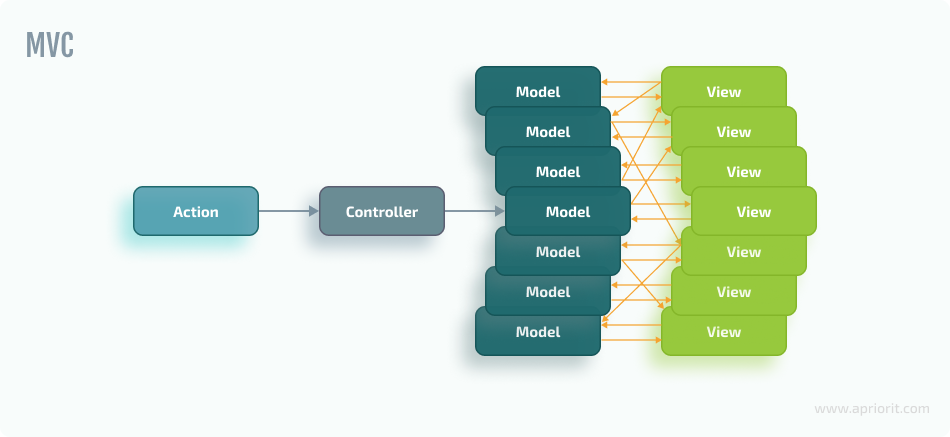
However, this architectural pattern quickly proved too complex and had unpredictable data flows. Every change in the code broke another part of the application, and the whole system became fragile, critically increasing the development time as a result. It became clear that the use of MVC in the future was impractical. It was necessary to increase code predictability, so the development community, including Facebook developers, started looking for more effective alternatives. The answer to their problems was Flux.
Flux is an architecture that relies on the Unidirectional Data Flow model and imposes restrictions on data flows, making the flows themselves predictable and errors easy to track. Flux has a distinctive feature of a one-way data flow between application components, making components unable to update their own state. This approach helps to increase code predictability, allowing developers to create stable and maintainable systems, which was exactly what MVC couldn’t accomplish. Let’s see how this is achieved.
As we mentioned, the Flux architecture features a unidirectional data flow. This eliminates the confusion that can be caused by two-way arrows, or bidirectional data flow, that makes it difficult to understand the system and the code. Here are four main elements of the Flux architecture:

Each element in the Flux architecture has its own responsibility:
- The action is the event trigger
- The dispatcher is the event handler
- The store is the data layer that updates itself when it receives an action from the dispatcher
- The view is the interface that displays the data and can request changes to that data
Note that the data flow never goes in the opposite direction, even though the view can pass the next action to the dispatcher.
Unlike in MVC, where the same data was passed between views and models, the Flux architecture is structured. Let’s take a look at a Flux use case when we need to inject the store into an Angular component:
- Using the store object and its select function, we can retrieve the data variable from Observable and display it in the view using AsyncPipe. We have now subscribed the variable to changes.
- After requesting a data change, we dispatch the necessary action using the dispatch function of the store object through the eventHandler callback.
- There is no reducer function in Flux, but the logic for handling the dispatched action is written in the store itself, specifically in the function responsible for the specific action.
- Our previously subscribed variable in the component sees these changes and updates the data through AsyncPipe.
In this scheme, the dispatcher plays a vital role, as it forbids cascading actions. We won’t be able to change the store directly from the view. While an action is being executed, the dispatcher doesn’t allow another action to pass. As a result, using the Flux architecture, you can effectively resolve the problem of unpredictable data changes.
One of the implementations of this architecture is Redux, an open-source JavaScript library designed to manage application state. Flux and Redux share some similarities, such as using a unidirectional data flow. There are also some important differences between these architectures. For example, Redux uses a single store to manage the application state, while Flux uses multiple stores. Redux also introduces additional concepts, such as reducers that manage state updates. Some sources, however, don’t differentiate between Flux and Redux when talking about state management architectures.
To design an efficient architecture and data flow, web application developers often rely on dedicated frameworks and libraries. In this article, we take a look at NgRx, a Redux-inspired framework created specifically for Angular.
Now, we explore NgRx Store — a helpful package from the NgRx framework — and the benefits of using Angular state management with NgRx.
Read also
How to Generate Client Code for Angular Services Using Swagger
Discover how to streamline your API development process with automated code generation using Swagger. Our step-by-step guide will show you how to leverage tools like NSwag and Swagger Codegen to accelerate the creation of client-side code, saving time for both developers and project leaders.

Understanding the NgRx Store, its elements, and its benefits
NgRx, or simply State Management, is a framework providing a set of libraries for Redux-based state management using RxJs. NgRx in Angular state management is heavily influenced by the Flux and Redux architectural patterns, borrowing some components from them. NgRx can help you address some challenges of Angular state management, as it does the following:
- Provides a centralized store for the application state
- Enforces a unidirectional data flow
- Simplifies the process of managing and sharing the state between components
NgRx Store is a core library of the NgRx framework. This library allows you to create a stable and predictable container for the application state and also provides a simple interface for reading and updating the application state. NgRx Store follows a unidirectional data flow pattern with a strict separation of concerns. Let’s see how NgRx state management works.
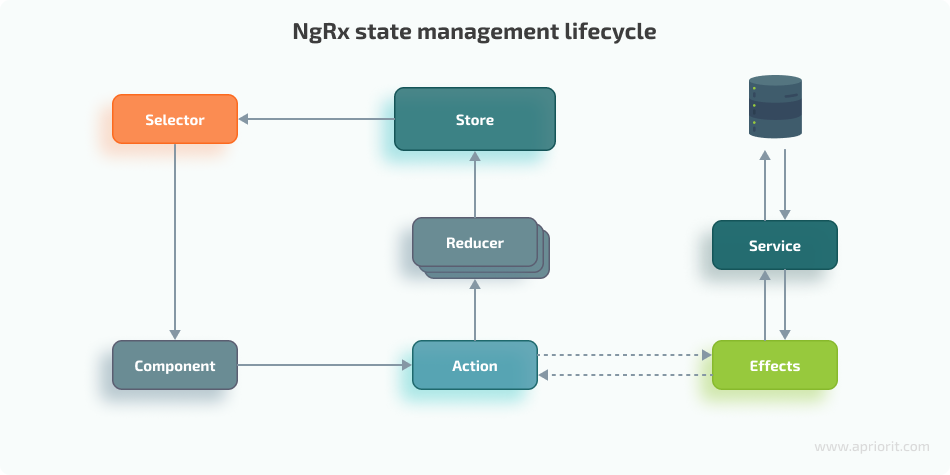
- Components store HTML markup and state tracking tools. Components in an Angular application also subscribe to the state changes in the store, receiving updated state data and re-rendering themselves if needed.
- Services, which are used for data storage in Angular, only work with APIs in NgRx. Components and services are separated and don’t communicate with each other directly, thus creating an application structure different from a traditional Angular app.
- The Store is a JavaScript object that describes the application state at any given moment. It’s injected into the component through the constructor and used to dispatch actions and select data through selectors.
- Selectors are functions that retrieve specific pieces of the overall state object from the Store. They allow components to subscribe to only the parts of the store’s state that are relevant to them instead of receiving and filtering the whole state object.
- Actions are plain JavaScript objects that are strictly defined and describe what needs to be done with data from the store. Actions ensure that all parts of store state management have a common understanding of what is being done with the data and why. Actions can be default or have additional payload parameters. Also, all actions go through the reducer.
- Reducer is a pure function that overwrites the old read-only application state based on the actions described above.
- Effects is a feature that handles tasks such as data retrieval, long tasks that create multiple events, and other external interactions. Effects isolate these actions from components to adhere to SOLID principles, specifically Single Responsibility. Following SOLID principles can help you write cleaner, more modular, and more testable code.
Now that you know the basic structure of the NgRx framework, let’s see how Store can actually help you with managing the state of your Angular application.
Boosting Angular app performance with NgRx Store
While creating Angular applications using NgRx Store, you can manage the application state in a structured manner. With the help of this library, you can have a simple and intuitive architecture, as it allows several components to use the same data independently of each other. Here are some other benefits of state management in Angular using NgRx Store:
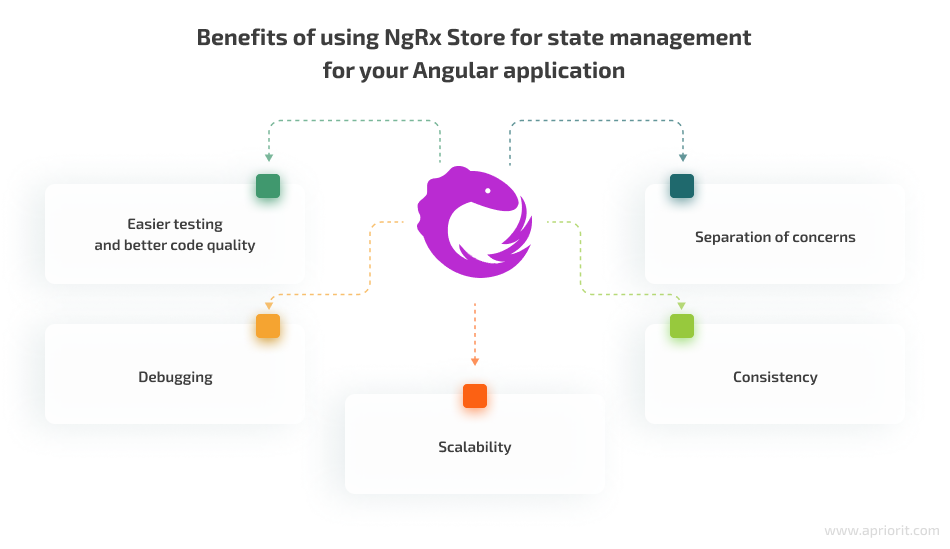
- Improved testing and better code quality. NgRx Store uses reducers, which are basic functions that exist within a well-structured system. With reducers, even though your app has a lot of code, it’s testable, templated, and straightforward enough to learn.
- Debugging. NgRx Store has a convenient debugging tool that greatly simplifies the implementation of new functionality and the detection of errors.
- Scalability. This library is great when you have a medium or large project with a lot of user interactions and many sources of the same data used across different parts of your app.
- Separation of concerns. NgRx Store follows a strict separation of concerns principle, allowing you to separate business logic from presentation components. This makes your code modular and easy to maintain.
- Consistency. This library offers a consistent approach to managing the state throughout your application, enabling developers to understand and work on the codebase.
However, it’s important to note that when you learn how to use NgRx Store with Angular, you need to prepare for certain compromises as well:
- This library was not intended for writing code quickly.
- It requires the creation of a large number of files.
- NgRx Store might not be suitable for beginners. You need a good understanding of RxJS and Redux before building an Angular app using NgRx Store and other state management libraries.
Now that you have a general understanding of pros and cons of using NgRx Store, let’s see how to use it to work with state in Angular and how this library helps improve state management of an Angular web app in practice.
Related project
Building a Microservices SaaS Solution for Property Management
Gain insights into the benefits of adopting microservices architecture! Explore our success story of transforming a monolithic SaaS platform into a flexible microservices-based solution that allowed our client, a leading US-based property management software provider, to optimize their maintenance cost and simplify product updates.

NgRx Store for Angular state management: a practical example
On one of Apriorit’s projects, we worked with an Angular application that needed to be migrated from Vue to Angular 2+. For this project, we used NgRx Store. Let’s take a closer look at this NgRx Store example and what we accomplished:
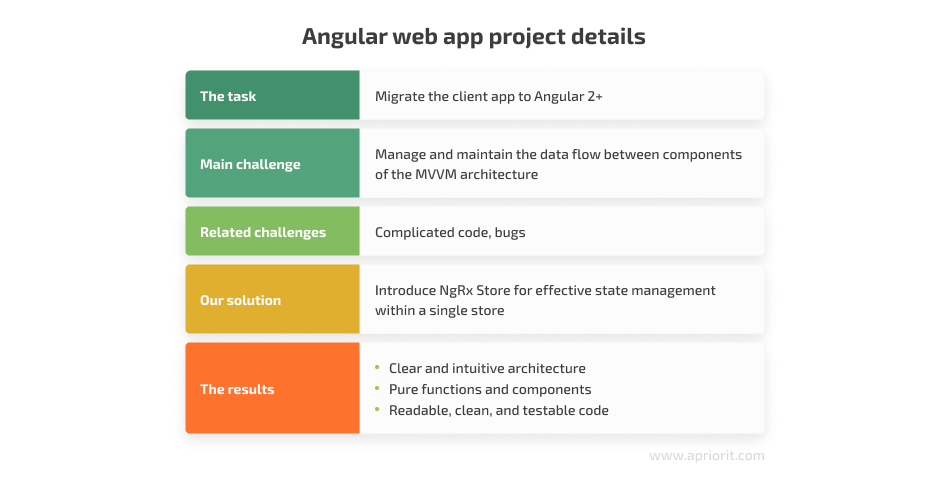
The client side of the initial application was written in Vue. Our task was to migrate the existing client part to Angular 2+ and continue the development of this framework.
The main issue with this project was a large amount of data interconnected through the Model–View–ViewModel (MVVM) architectural pattern. This created a lot of issues, including code complexity, multiple bugs, and the application functioning poorly in general. Also, asynchronous interaction with a global data source greatly affects the speed of the web application as a whole.
We had to spend a lot of time looking through custom code and all Angular components that were filled with logic. After some considerations, we decided to incorporate NgRx Store to optimize performance of the client part of the application.
Thanks to such components as reducers, actions, and selectors, we could work with this relatively large project in a convenient and understandable way. To show how this library works in practice, we will take a look at its six main elements and demonstrate them on a small counter project.
State
The State library is simply a description of our storage, specifying the types of data to be stored and their initial values.
To start using the library in our application, we first need to register the state and declare the data types that will be stored in our store. We can do this by defining an interface that describes the structure of our state:
export interface CounterState {
    count: number; // counter state in storage
}Now we need to declare the initial state of the counter as a constant:
export const initialState: CounterState = {
    count: 0
}After configuring the initial values and data types of the counter, we can move on to exploring the main functions used in NgRx Store.
Reducers
As we mentioned above, a reducer is a pure function that takes the old state as a parameter and returns a new state, derived from either the old or the new state. The state itself is a single object that lives with the application lifecycle, and we can’t directly modify it. Instead, we use reducers to change it. This approach has a number of advantages:

- Code structuring. The logic of state changes is located in one place. This makes it easy to understand where, how, and when state changes occur.
- Testing optimization. Reducer functions are pure functions that are easy to test and manage.
- Application performance optimization. Reducers can be cached, eliminating the need for additional calculations and optimizing application performance.
- No changes in state. The old instance is deleted, and a new instance is returned, which helps eliminate data errors in the app and makes it easier for developers to find errors that do exist.
Here is an example of a regular reducer:
function stateReducer(oldState, newState) {
return {... oldState, newState}
}The stateReducer function takes in oldState and newState parameters, returning a new state by using the spread operator to merge the old state with the new state.
In our project, using a regular reducer allowed us to structure data on the client side and significantly reduce the amount of duplicated code. Let’s see what this might look like for our counter component. We need a reducer function that will determine the initial state and modify it if necessary.
export const counterReducer = createReducer(
    initialState,
    on(increase, state => ({
        ... state,
        count: state.count + 1
    })),
    on(decrease, state => ({
        ... state,
        count: state.count - 1
    })),
    on(clear, state => ({
        ... state,
        count: 0
    }))
);Let’s break down what is happening in this piece of code. The createReducer helper function is used to create reducers, with the initialState passed as a parameter and used on the first reducer call. NgRx’s on() function takes in an action (for example, increase) and a callback function that modifies the current state and returns a new state.
The curly braces inside the parentheses indicate that the arrow function will return a new object. For instance, when increase is triggered, the state will change. This action copies the old state (…state) and modifies the count property (count: state.count +1).
It’s worth noting that the callback function is a reducer. Since it’s a pure function, we can’t write count: state.count++, as this would lead to modifying the read-only state and violating the purity of the function, thus eliminating the key benefit of this pattern.
We used the spread operator (…) to automatically copy any new properties added to the state so that we won’t need to modify the reducers. As a result, we have separated the state from the component. However, we still need a way to update our state and trigger the corresponding reducer. That’s when actions come into play.
Read also
How to Speed Up and Improve Web Form Implementation Using Angular Formly
Discover how you can streamline web form development and enhance user experience with Angular Formly. We share our practical insights and examples to help you save time and resources while ensuring flawless functionality.

Actions
In this library, an action is a way to notify the framework about calling a reducer and updating the state. This is important because now we only have a single source of truth for the entire application, only in Redux. An action is a simple object that we attach to the current reducer. After the action is called, it triggers the corresponding reducer. In our example, we have three actions:
export const increase = createAction('[COUNTER] Increase');
export const decrease = createAction('[COUNTER] Decrease');
export const clear = createAction('[COUNTER] Clear');We create these actions using the createAction helper function, with the action name passed as a parameter. The square brackets indicate the namespace where the action will be located, following an unwritten NgRx rule to avoid action conflicts across namespaces.
Selectors
Selectors act as a link between the store and components. They allow us to select specific data from the store and create a structured data hierarchy for the entire application.
export const selectFeature = createFeatureSelector('counter');For instance, selectFeature is the root selector of an entire feature, one of the storage nodes that retrieves the state of the node. To create a selector, we use the createFeatureSelector helper function, which requires us to pass the key as a string under which we expect to find our feature. However, we need another selector that will reuse the root selector to create a structured data hierarchy. This will allow us to create selectors structurally, from the highest to the lowest level.
To achieve this, we begin by creating a general selector that selects the state of the entire feature. From there, we can create selectors for specific fields of that state. This helps us to avoid confusion in the data and create a structured data hierarchy for the entire application. For example, if we have multiple counts in a project, we can use countSelector to understand that the count belongs to CounterState.
export const countSelector = createSelector(
    featureSelector,
    state => state.count
)The countSelector function is created using the createSelector function. By passing featureSelector as the first parameter and state.count as the second parameter, we can create countSelector.
The createSelector function allows us to create a selector of the next level. A a selector of the next level is a more specialized selector that builds on the functionality of a previously defined selector. To do this, we need to pass the selector that we want to use as the primary source as the first parameter. We can specify as many original selectors as we want next to the first parameter, separated by a comma. The second parameter is a callback function that accepts the output of all selectors.
export const countSelector = createSelector(
    a,
    b,
    c,
    (a, b, c) => // ...
);Why couldn’t we do everything in the first selector? Apriorits’ best practices say that splitting the selectors into tree-like nesting helps to avoid affecting other potential selectors that may be present. By using this approach, changes to count will only affect the current selector and the main selector.
Effects
Effects provide a useful mechanism for making third-party changes to data without affecting the state of the store. These changes might be necessary after performing certain operations with the data, for example, working with databases or external APIs.
As an example, let’s consider a scenario where we want to add information about when the counter was last updated. We start with creating a storage location for this data.
We can start by adding an action using the createAction function.
export const changeUpdatedAt = createAction(
    '[COUNTER] Change updated at',
    props<{ updatedAt: number }>()
);Here, we define the updated at value in the CounterState interface.
export interface CounterState {
    count: number;
    updatedAt?: number; // here it is
}Now, we create a reducer that handles the changeUpdatedAt action.
on(changeUpdatedAt, (state, action) => ({
        ... state,
        updatedAt: action.updatedAt
}))We create a selector using the createSelector function to retrieve the updated at value from the CounterState.
export const updatedAtSelector = createSelector(
    featureSelector,
    state => state.updatedAt
)Finally, we add the effect itself using the createEffect function.
updateAt$ = createEffect(() => this.actions$.pipe(
    ofType(increase, decrease, clear), // choose exactly those actions that we need for the effect
    map(() => changeUpdatedAt({ updatedAt: Date.now()})) // return an action that takes the current time
));In this case, we listen to the increase, decrease, and clear actions. When one of these actions is called, we execute the changeUpdatedAt action, which updates the updated at value with the current time.
With these steps, we can choose the effect of our application without impacting the state of the store.
Component
Now let’s think a little bit about what we have achieved so far. We have an application with three basic separate parts that communicate with each other:
- Reducer
- Action
- Selector
In addition, there is an effect that is not a core part and can be easily removed from the application. Right now, the application doesn’t yet know how and what to render, where the store is located, and how to work with it.
To move on to rendering the application, we need to create count$ Observable, which we get through the store using the select function and the selector name passed to it. This gives us a subscriber to the store’s state. Every time the store changes, this Observable will produce a new event.
To make sure that the counter’s value is never negative, we can reuse count$ Observable and use the pipe() and RxJs map() operators. This way, we can get the count and check that it is less than or equal to zero.
The store has a special dispatch method that reports actions to the storage. With this approach, we pass the previously created action that we need. This is what the component code looks like:
export class AppComponent {
  title = "counter";

  count$ = this.store.select(countSelector); // subscribe to a counter selector
  isDecreasable $ = this.count$.pipe(
    map(count => count <= 0)
  );
  updatedAt$ = this.store.select(updatedAtSelector); // subscribe to a selector

  constructor(private store: Store) {} // inject the storage

  increase(): void {
    this.store.dispatch(increase()); // call the reducer
  };

  decrease(): void {
    this.store.dispatch(decrease()); // call the reducer
  };

  clear(): void {
    this.store.dispatch(clear()); // call the reducer
  }

  getCurrentDate(): number {
    return Date.now();
  }
}And here is what the markup code looks like:
<button class="counter_button" (click)="increase()"> +</button>
<button class="counter_button" (click)="decrease()" [disabled]=" isDecreasable $ | async">-</button>
<button class="counter_button" (click)="clear()" [disabled]=" isDecreasable $ | async">0</button>

<p class="counter_number">Counter = {{count$ | async}}</p>
<p class="counter_updated_at" *ngIf="updatedAt$ | async">
  Updated {{updatedAt$ | async | date:"HH:mm:ss:SSS dd/MM/yyyy"}} <! -- use async -->
</p>We use async here so that Angular automatically subscribes to the observables and unsubscribes when the component is destroyed.
As a result, we get only pure functions and pure components. They are easy to work with, and we have created readable, clean, and testable code. We have also solved the challenges of project growth using the NgRx Store for state management for the Angular application, which by default involves hundreds of components and dozens of modules. Assuming that we adhere to a common scheme in the future, we can easily add more components and the code will maintain its clear structure and great readability.
Read also
Building a Cross-Platform Mobile Web Application with Ionic and Angular
Leverage the Ionic framework for creating cross-platform applications and for building efficient and seamless web and mobile solutions.
Conclusion
Without proper state management, it can be challenging to track data changes in your Angular application as it grows. While libraries like NgRx may not be universal, they are highly adaptable and suitable for solving many problems, including managing complex states or sharing states between components.
At Apriorit, our web application development specialists have extensive experience in working with Angular applications. They will gladly assist you with managing your growing project.
Ready to deliver a web app perfectly tailored to your business needs?
Leverage our web development expertise to bring your dream app to life.
Have a question?
Ask our expert!
VP of Engineering


